When you have to create presentations using PowerPoint, knowing how to format text in PowerPoint the correct way can actually save you a ton of time! It is one of the most important tasks that we invariably need to perform on any presentation i.e. formatting text in PowerPoint!
To format the text in PowerPoint, select the text first. Then, on the home tab, you can use the various formatting options such as Font Type, Font Size, Font Styles, Line Spacing, Font Color, Text Highlight, etc.
Formatting text correctly in PowerPoint can add emphasis and grab the attention of the audience where needed. This can not only make your presentation look good, but also help you deliver it effectively!
So, in this article, we shall take a deep dive and understand all the nuances of formatting the text correctly in PowerPoint. I shall try my best to provide information about everything you need to know when it comes to editing and formatting the text!
So, let’s get started!
A Quick Note Before We Begin – if you want to make jaw-dropping presentations, I would recommend using one of these Presentation Designs. The best part is – it is only $16.5 a month, but you get to download and use as many presentation designs as you like! I personally use it from time-to-time, and it makes my task of making beautiful presentations really quick and easy!
1. How to Add Text to a Slide in PowerPoint?
You probably may already know this, but let’s just start with the basics to make sure we are all on the same page!
You can add text to the slide in PowerPoint using a text box. Click on the “Insert” tab. Then, select the “Text Box” option. Next, click and drag on any part of your slide to add the text box. Finally, start typing to add text as soon as you have created the text box in PowerPoint.
Here’s a step by step process described in detail:
Step 1: Click on the “Insert” tab
The first step to adding text to a slide in PowerPoint is to click on the “Insert” tab which is the third tab in the ribbon and located at the top left of the PowerPoint window.
Step 2: Select the “Text Box” option
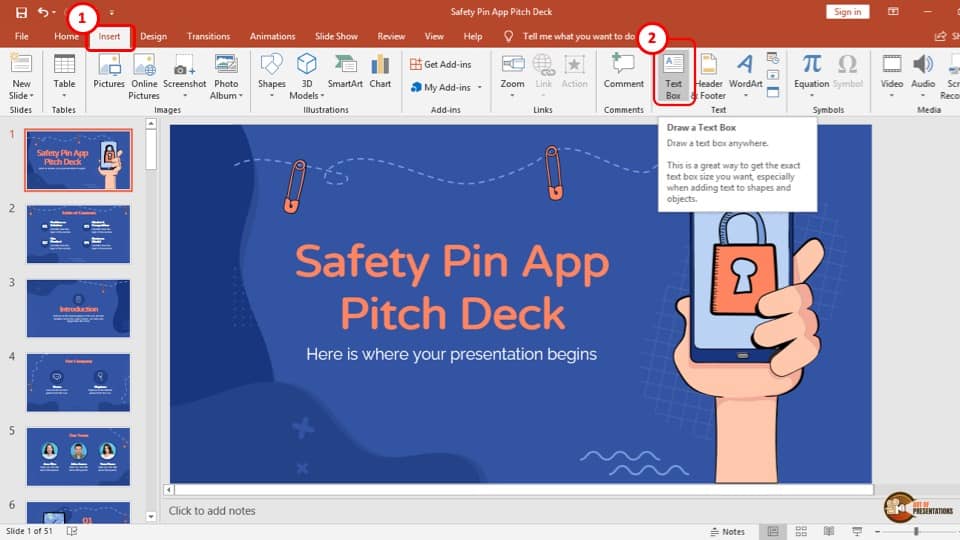
Click on the “Text Box” option which in on the right side of the “Insert” tab in the “Text” section. After clicking on the “Text Box” option, your cursor will change on the slide.
Now to add the text box to the slide, simply click and drag your cursor to draw the text box with your preferred size.
Step 3: Add text to your presentation
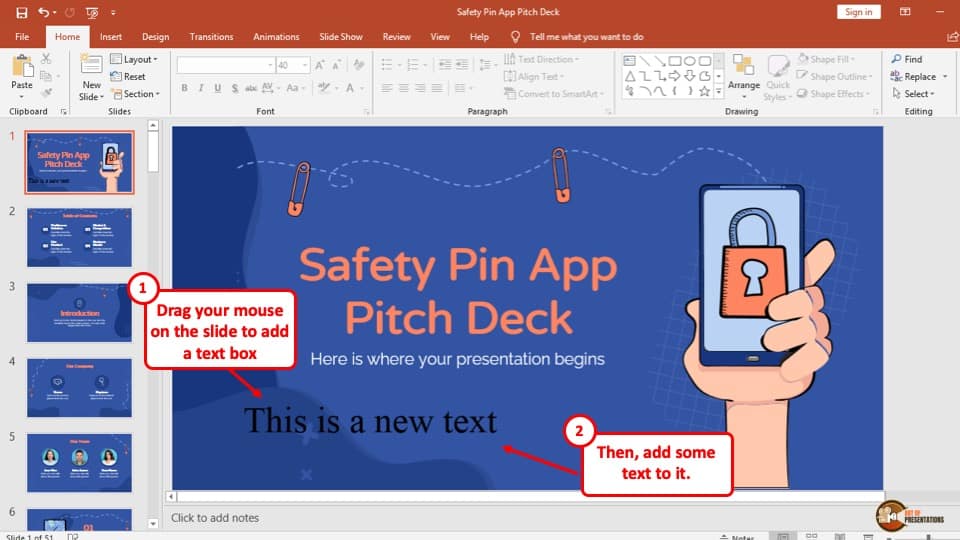
To add text, you can directly start typing as soon as you create the text box. Click outside the box when you are done, and your text will be added to the slide.
If you want to edit the text again, then click inside the text box anywhere on the text. Alternatively, you can select the text box and right-click on it, and from the menu, click on “Edit Text”.
In case you are new to PowerPoint and want to know more about the nuances of adding text such as adding text over an image, shape, or even a video, check my other article on how to add text in PowerPoint that goes in-depth on this topic.
2. How to Change the Font of the Text?
There are at least two methods you should know on how to change the font of your text in PowerPoint. However, make sure to check out our detailed guide on how to change fonts in PowerPoint where I’ve added even more relevant information explained in a step-by-step manner.
Nevertheless, the two methods are described below –
Method 1 – Using the “Home” Ribbon
The first method is by using the “Home” tab in PowerPoint. Here’s the detailed process explained –
Step 1: Select the Text
The first step is to select the text inside the text box for which you want to change the font. If you want to change the font of all the text inside the text box, you can also click on the text box itself!
Step 2: Change the Font
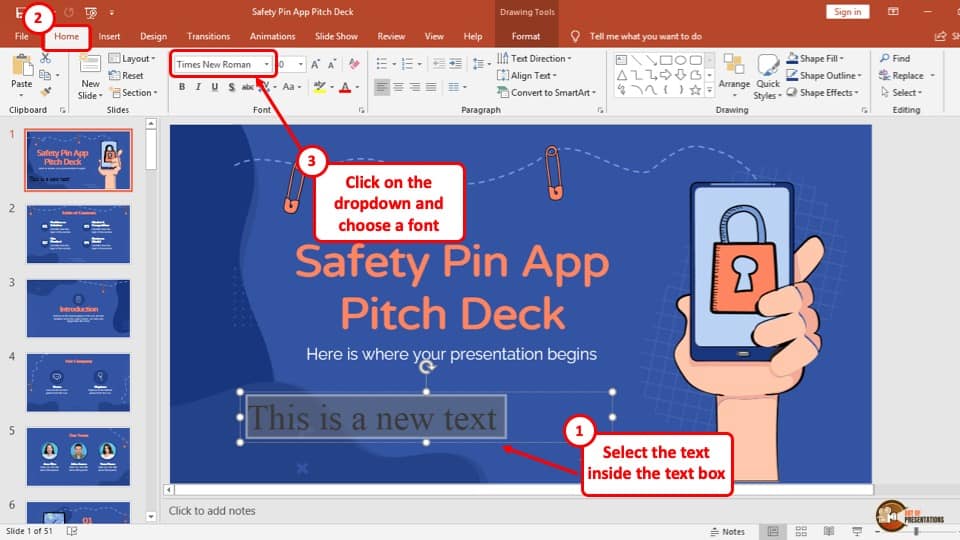
The next step is simply to change the font! To do that, make sure the “Home” ribbon is selected. (as shown in the image above). Then, under the “Fonts” section, click on the “Font” dropdown and choose the font as per your desire.
Method 2 – Using the Right-Click Option
The whole process is described through three simple steps below:
Step 1: Select the text
The first step is to select the text located in text boxes. You can do that by double-clicking on a word in the “Text box” or dragging your cursor over the texts while holding the “left mouse button”
Step 2: “Right-click” on your selected text.
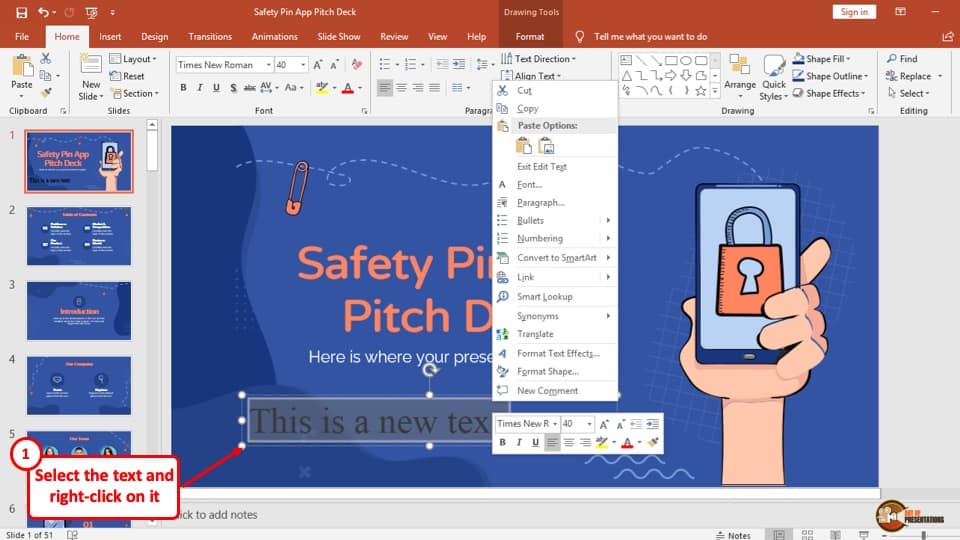
“Right-click” on the text which you have selected. This will open a drop-down menu. The drop-down menu has the “Font” section of the “Home” tab which you can use to edit the font style, color, and size.
Step 3: Click on the “Font” drop-down menu.
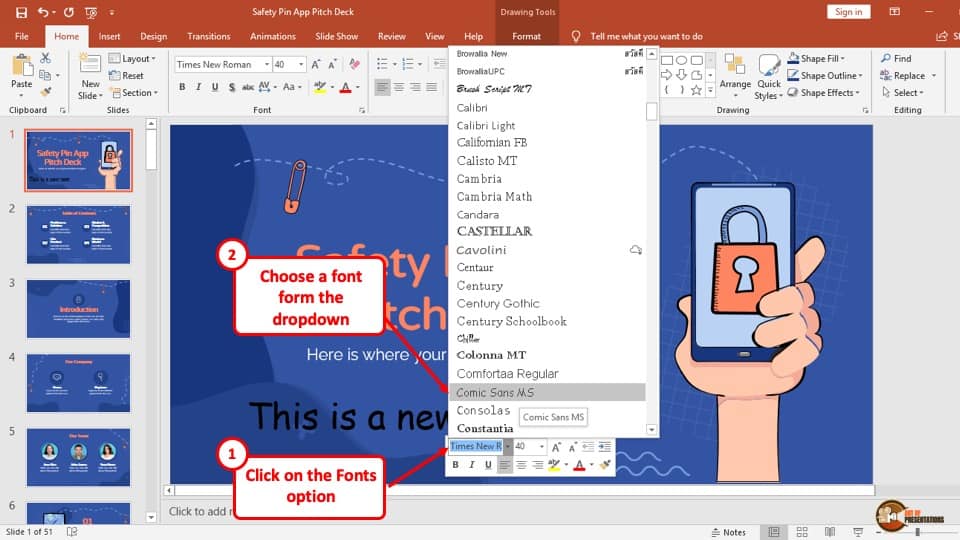
Click on the “Font” option to open its drop-down menu. The drop-down menu has a variety of fonts that will appear in the middle of the screen.
Click on your preferred font style and it will change accordingly.
3. How to Change Font Size of Text in PowerPoint?
The steps of changing the font size are very similar to that of changing the font of the text. The process is described in simple steps below:
Step 1: Select the text.
Select the text in which you want to increase or decrease the size of the font and then “Right-click” on it. A drop-down menu with the “Font” section of the “Home” tab will appear.
Step 2: Click on the “Font size” option.
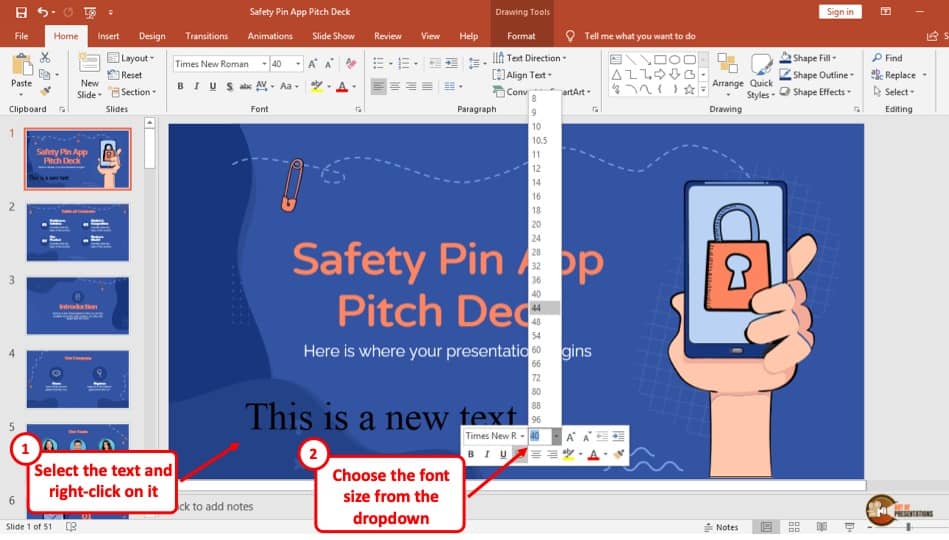
Right beside the current font style, a number is showing the size of the font, that is the “Font size” option.
To change the size of the text, click on the “Font size” dropdown menu and different numbers will show up. Click on the size you want, and the font size will be changed immediately.
You can also type in the exact font size that you want if it is not present in the dropdown list.
4. How to Add Styles to Text in PowerPoint?
You can also take advantage of the Font Styles in PowerPoint to emphasize the text! There are primarily 4 text styles available in PowerPoint. These are –
- Bold
- Italics
- Underline
- Strikethrough
There are also superscript and subscript text options, which we shall cover in detail later in this article.
To change the font style to bold, italics, underline, or strikethrough in your slide, first you have to select the texts you want to change the style of and then follow the instructions below:
How to Bold the Text in PowerPoint?
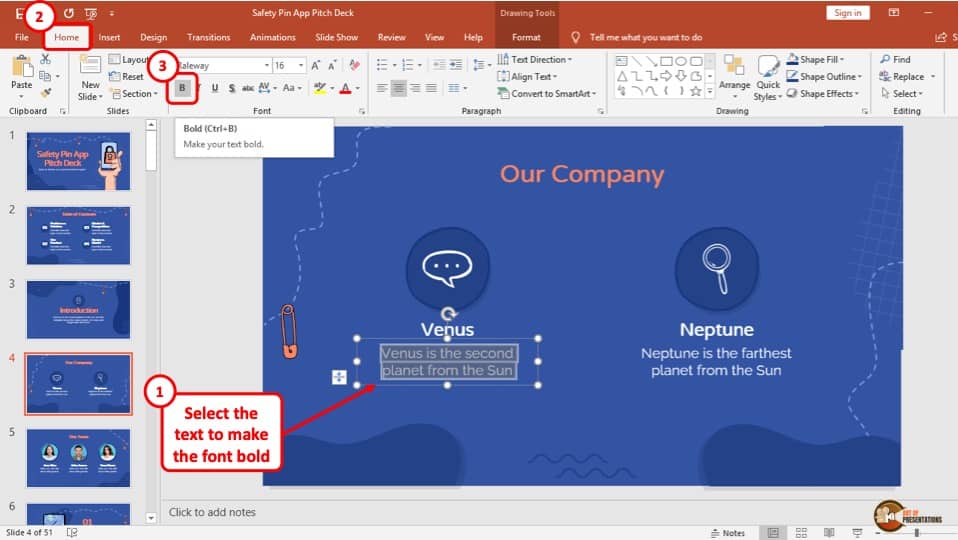
At first, select the text you want to bold. The “Home” tab has a “Font” section. On the bottom left of the “Font” section, there is a “B” button which will turn your text to a “Bold” style text. Click on the “B” button and your text will turn bold.
Alternatively, you can also use the shortcut i.e. “Ctrl + B” buttons on your keyboard after selecting the text to get the job done faster.
How to Make the Text Italics in PowerPoint?
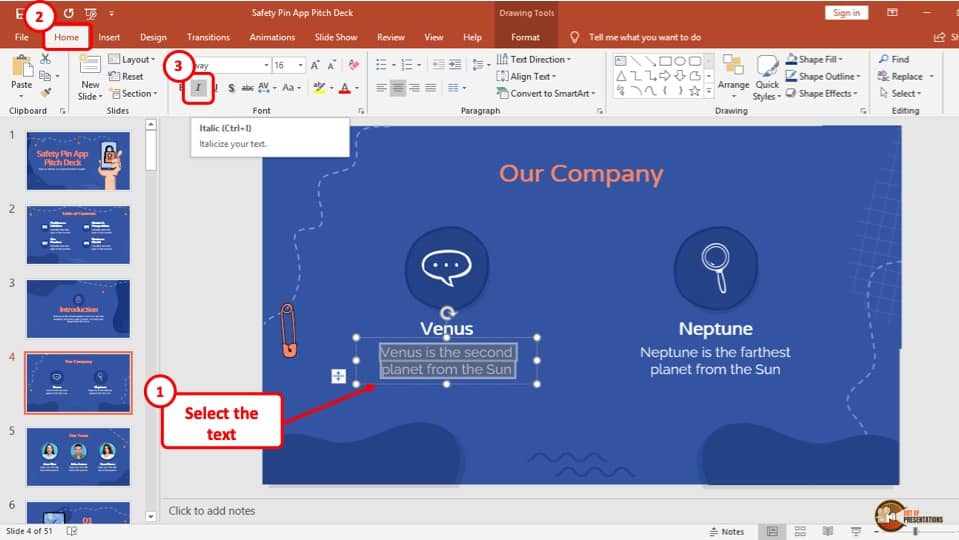
Click on the button that looks like an “I” which is the “Italic” style font option after selecting the text. It is located on the right side of “Bold” option. The selected text will be changed to an “Italic” style font immediately.
Alternatively, you can also use the keyboard shortcut for italicizing the text in PowerPoint. Just press the “Ctrl + I” buttons on your keyboard after selecting the text to get the job done.
How to Underline Text in PowerPoint?
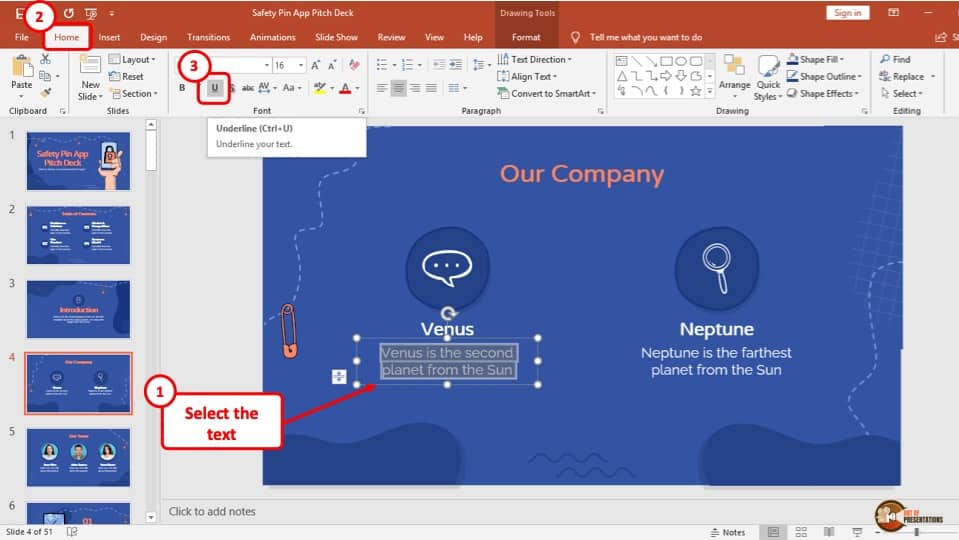
Underlining texts can be done by selecting the text and clicking on the button that looks like a “U”. This is the “underline” option in the “Font” section. The “U” button is right beside the “I” button in the Home tab.
Alternatively, you can also use the keyboard shortcut to underline text by pressing the “Ctrl + U” buttons on your keyboard after selecting the text.
How to Strikethrough Text in PowerPoint?
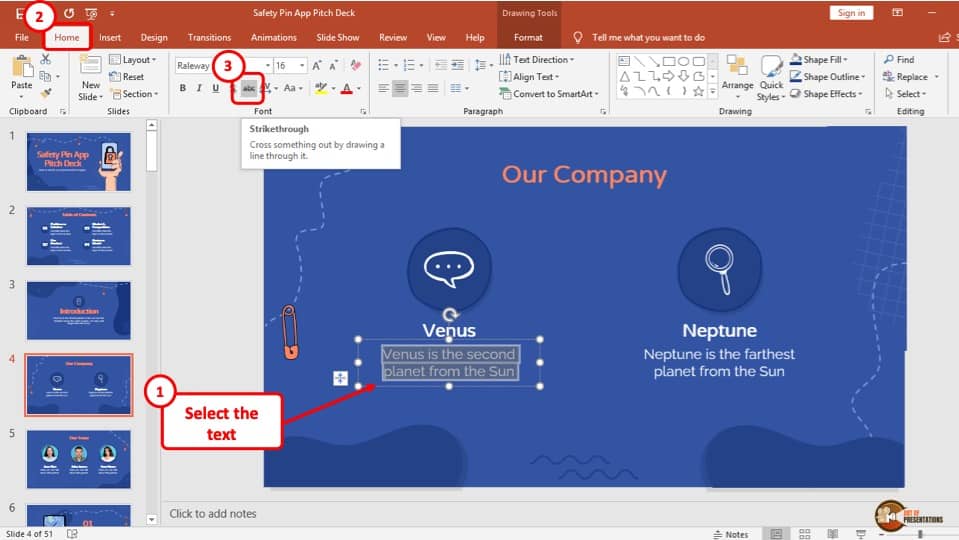
The strikethrough text is used when you want to cross out the text.
The “Strikethrough” button is beside the “Underline” button in the “Font” section and the icon has a line going through lower case “ab”.
After selecting the text, click on the “Strikethrough” option and it will cross out the text.
5. How to Highlight the Text in PowerPoint?
You can use the “Text Highlight Color” button to highlight the text in PowerPoint. However, this button is only available for the Office 365 version of PowerPoint.
If you are using an older version of PowerPoint, check out my other article on how to highlight text in PowerPoint. It provides you with multiple other ways to make your text stand out on a slide in PowerPoint.
That said, here’s a step-by-step process on how to highlight text in PowerPoint using the text highlight color option!
Step 1: Select the Text and Click the “Text Highlight Color” button
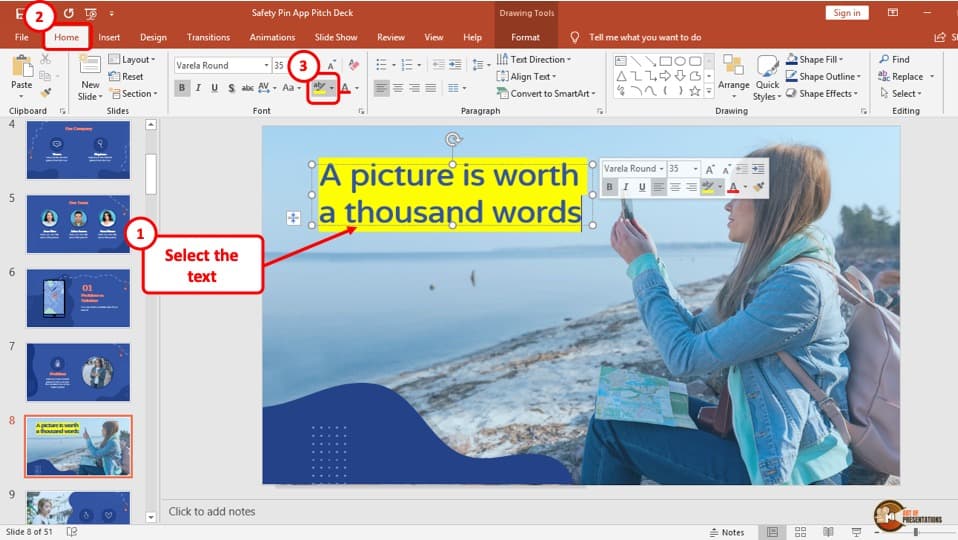
At first, you have to click on the text you want to highlight and select it. Then, you have to click the “Text Highlight Colour” button.
This button has a pen in the icon with a yellow line underneath it and it is located at the “Font” section of the “Home” tab. Doing so will instantly highlight your text.
If you want to highlight text across multiple text boxes, you can also first click on the “Text Highlight Colour” button on the “Home” tab. This will turn the cursor into a pen from the “Arrow” icon.
Now, simply click on the text box for the text you want to highlight. The text will be highlighted instantly.
6. How to Change Font Color in PowerPoint?
There are multiple ways in which you can change the color of your font in PowerPoint. I’ve listed the easiest method to change the font color below.
If you want to know ninja tips on how to change the font color for all text in PowerPoint, check out my other article. (by clicking on the link)
Follow the step-by-step guide to change your font color in PowerPoint:
Step 1: Click on the “Font Color” drop-down menu button
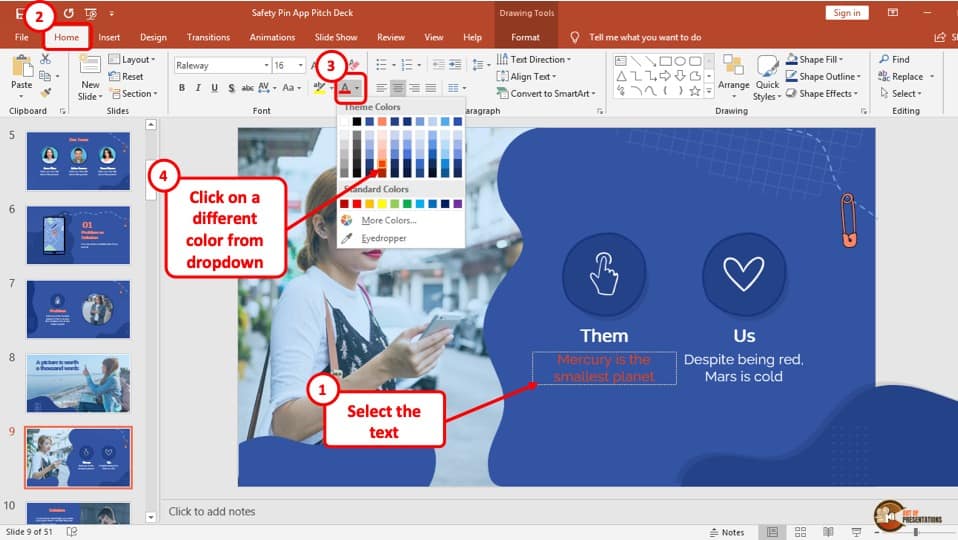
To change the color of your text, the first step is to select the text using your cursor. Then click on the “dropdown” button beside the “Font Color” button.
This button is located at the right of the “Font” section in your “Home” tab. It is an icon with a capitalized “A” and a red underline.
Step 2: Choose new font color
When you click on the dropdown menu, a color palette appears. Hover your cursor to the color you want, and you will see the text changing its color. Now, click to alter the text font color.
7. How to Clear Text Formatting in PowerPoint?
Sometimes, you don’t particularly like the changes that you’ve made to the text and perhaps you want to start over from scratch. This is when the clear text formatting option in PowerPoint comes in handy!
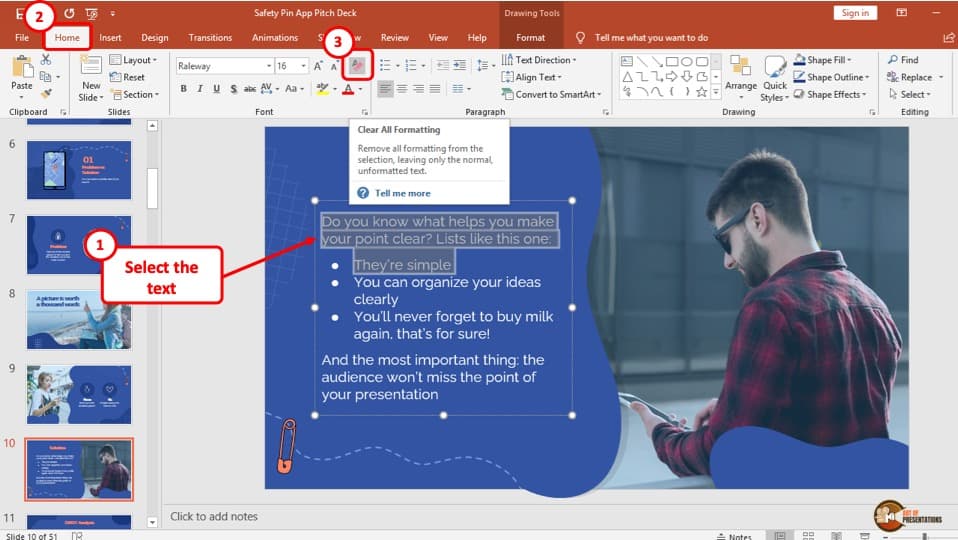
To clear the text formatting in your PowerPoint presentation, select the text you want to remove the formatting from and click on the icon with the red eraser called the “Clear All Formatting” button.
This icon is located in the “Font” section of the “Home” tab and clicking it will erase all formats such as bold, italics, underline, highlight, etc. from the text. The text will then revert to the default text of the theme.
If you want to learn how to clear formatting in PowerPoint on all slides, make sure you click on the link and check out the other article where I have gone into detail on this topic and provided tips on how to do so quickly!
8. How to Add Text Outline in PowerPoint?
You can outline text in PowerPoint to create emphasis on certain text that you want the audience to look at.
Here’s how you can outline text in PowerPoint –
Step 1: “Right-click” on the text and select “Format Text Effects”
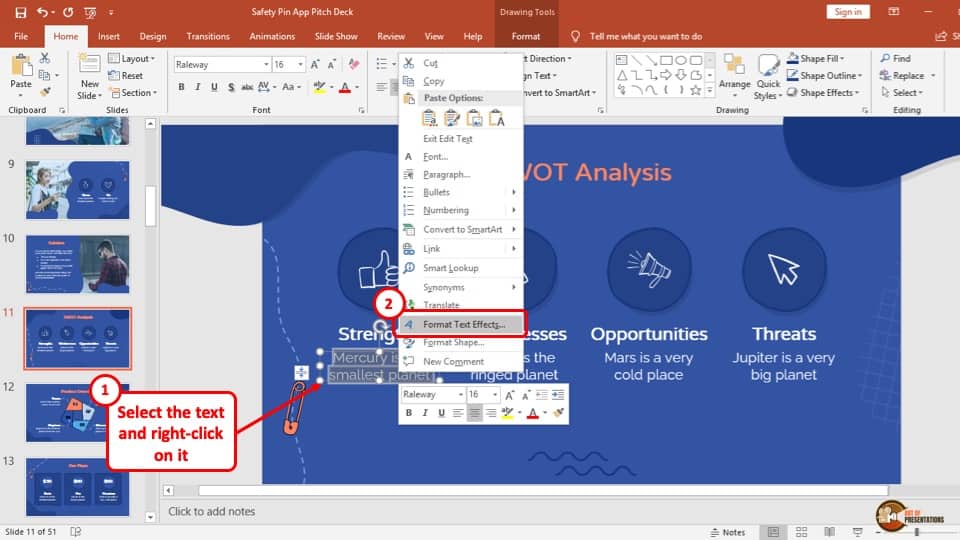
Select the text you want to outline and “Right-click” on it. A drop-down menu will appear with different options. Click on the “Format Text Effects” option from the menu.
Step 2: Click on the “Text Fill & Outline” button
After you click on the “Format Text Effects” option, the “Format Shape” sidebar will pop up on the right of the slide.
It usually automatically displays the “Texts Effects” option which is the icon in the middle that looks like an “A”. In case it doesn’t, click on “Text Options” first.
Click on the “A” icon beside it and then click on the “Text Outline” option. A menu will appear with the options like, “No line”, “Solid line”, and “Gradient line”.
Step 3: Select your desired Text Outline
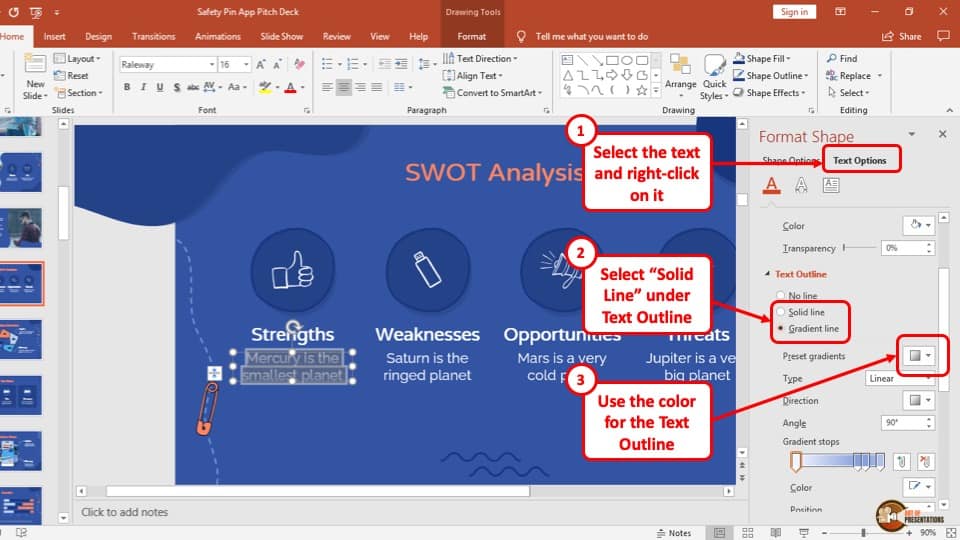
Choose the text outline you want to apply to the slide text. Gradient line will create a transparent border around your text, and a solid line will fill up your text border.
Choose a color as per preference to add the outline to text in PowerPoint.
9. Using WordArt in PowerPoint
I’ve written a detailed article on how to use WordArt in PowerPoint along with steps to customize your WordArt. So, make sure you click on the link and check out that article to learn more about WordArt. But, here’s a quick highlight on using WordArt –
To use WordArt in your PowerPoint presentation, you have to go to the “WordArt” option in the “Insert” tab. The whole process is described in easy steps below:
Step 1: Go to the “Insert” tab
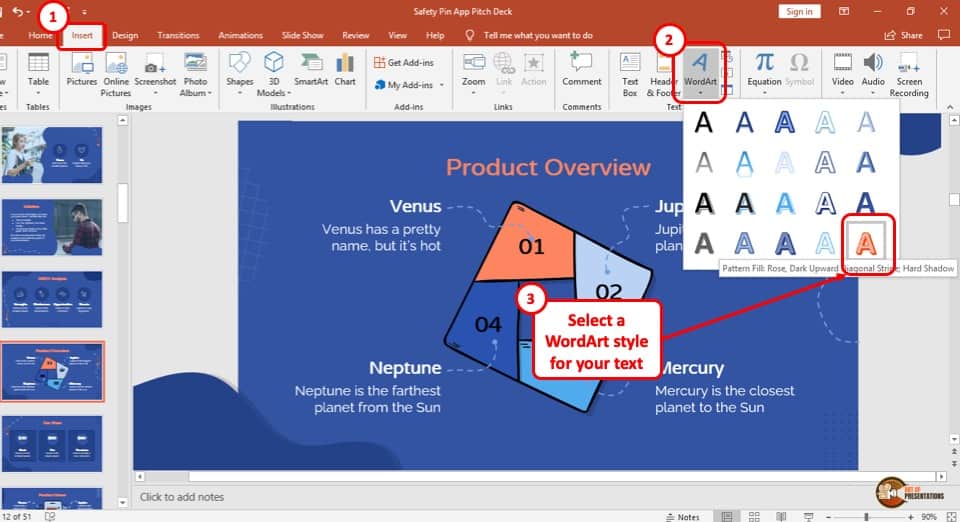
The third tab from the right in the ribbon is the “Insert” tab. Click on the “Insert” tab to access the “WordArt” option.
Step 2: Click on the “WordArt” button
Now, on the “Text” section of the “Insert” tab is a leaning “A” icon which is the “WordArt” button. Click on that button to access WordArt.
Step 3: Choose your WordArt style
Different styles of WordArt appear in a drop-down menu after you click on the “WordArt” button. Now select your preferred WordArt style to place it on the slide.
Step 4: Insert the WordArt into your presentation.
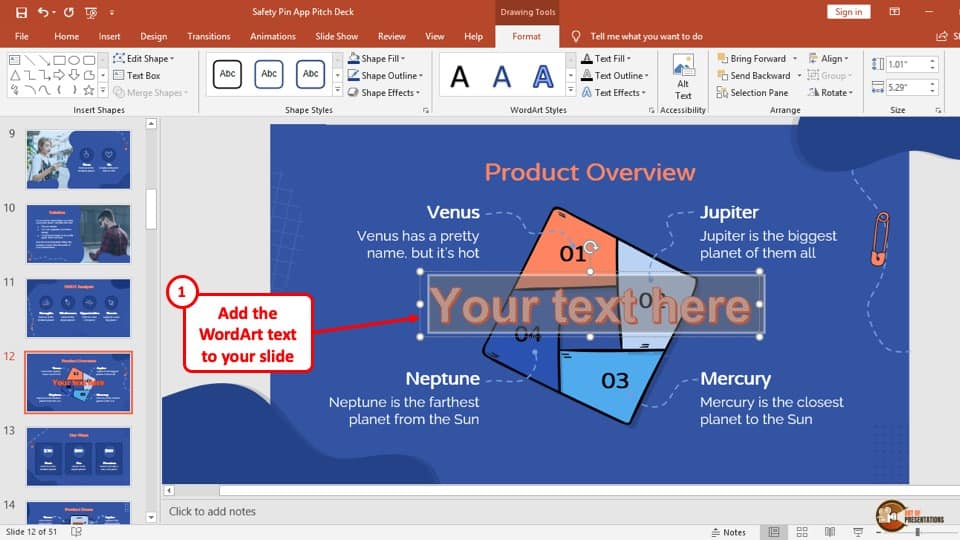
A “Text box” with the chosen style will be displayed in the middle of the slide. Select the “Your text here” texts and erase it.
Now, you can write any text with WordArt you want and then place it in your preferred location.
10. How to Change Text Direction in PowerPoint?
The method to change the text direction in PowerPoint is similar to that of changing the text outline in that it needs the user to open the format settings.
Follow the steps mentioned below to change the direction of the text in PowerPoint –
Step 1: Click on the “Format Shape” button
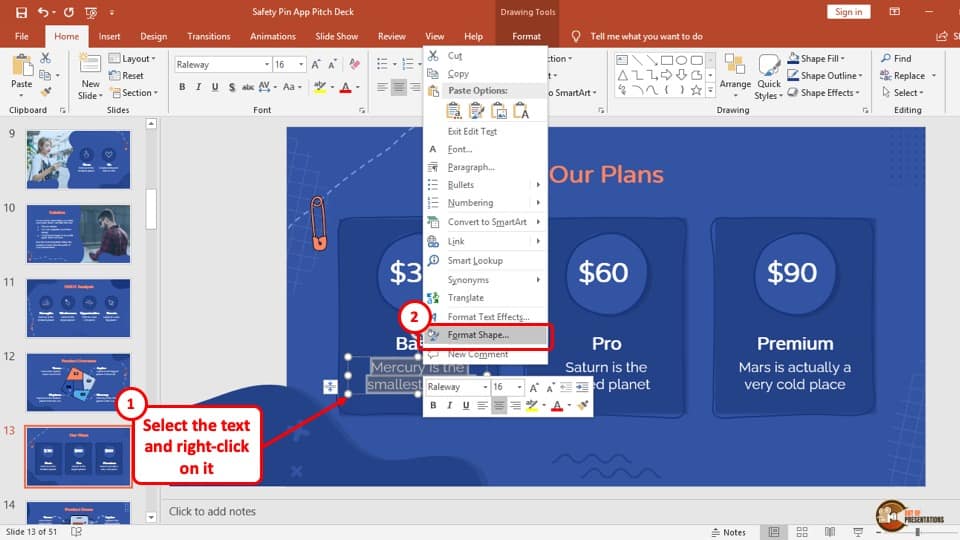
The first step to changing text direction is to select the text you want to change and “Right-clicking” on it. A drop-down menu with many options will be displayed on the screen. Click on the “Format Shape” option which is located right below the “Formatting Text Effects” button.
Step 2: Click on the “Size and Properties” option
A sidebar with the title “Format Shape” will appear on the right of the screen. Click the square icon on the right side called the “Size & Properties” option.
Step 3: Click on the “Text Direction” dropdown menu
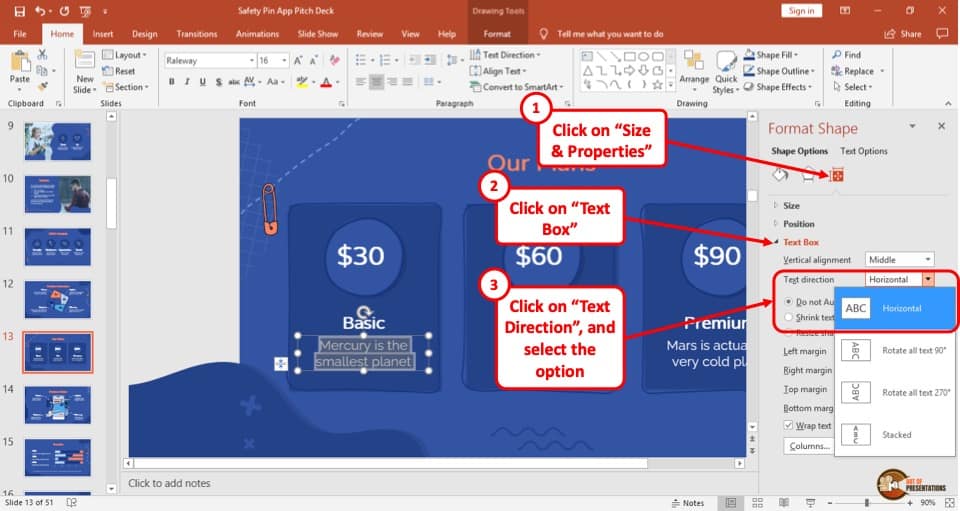
Below the “Text Box” button is the “Text Direction” option.
Every text is horizontal by default so if you want to change it, you will have to click on the arrow-mark besides the “Horizontal” option to open a dropdown menu. This will show you different text direction options. Click on the direction you want your text to move in.
You can also rotate text in PowerPoint. There are actually multiple different ways in which you can rotate the text Check out our detailed guide on how to rotate text in PowerPoint!
11. How to Cut, Copy, Paste and Duplicate Text in PowerPoint?
Copy and paste in PowerPoint are perhaps one of the most important functions in PowerPoint! Furthermore, knowing how to cut and duplicate can also help you move your text around quickly.
I’ve written a detailed guide on how to copy and paste in PowerPoint with visual references. So, make sure you check that article out for the details. For brevity, I’m just sharing the basics here –
- How to Copy Text in PowerPoint – Copying text allows you to create a photocopy of the selected text.
To copy the text in PowerPoint, select the text. Then, use the keyboard shortcut by pressing the “Ctrl + C” keys simultaneously. Alternatively, “Right-click” on the text that you want to copy and press the “Copy” button from the dropdown menu. - How to Cut Text in PowerPoint – The “Cut” function allows you to remove a text and then place it again in a different location. It is almost the same as the copy function but copying creates a photocopy while the cut function deletes the object from its original location and places it on the location where you paste it.
The keyboard shortcut to cut text in PowerPoint is “Ctrl + X”. Or alternatively, “Right-click” on the object that you want to cut and hit the “Cut” button from the drop-down menu. - Paste Text in PowerPoint – The “Paste” function allows you to place the text to a preferred location that has been copied or cut. Hence, it is done after the cut or copy function. You need to paste the text after copying or cutting it to finish the process.
The keyboard shortcut of pasting text is “Ctrl + V”. Or alternatively, “Right-click” on the location that you want to paste the object and hit the “Paste” button from the dropdown menu. - Duplicate Text in PowerPoint – Duplicating texts is a combination of the copy and paste function. After selecting your texts, if you press “Ctrl + D” then it creates a duplicate of the original.
It is, however, not an alternative to the cut function. But, it can be used instead of copy and paste. One drawback, though, of this function is that it can’t duplicate elements across slides. For that, you will need to use copy and paste functions.
12. Using Format Painter to Apply Text Formatting
Format painter is a tool that allows the user to easily copy the font style, size, and color of a certain text and apply it to another text.
Actually, the format painter has the capability to do much more than just copying the formatting of the text! It can be used to apply the formatting of shapes, text boxes, images, etc. It is a super helpful tool!
In fact, I covered the use of format painter in PowerPoint in a detailed manner in another article. Make sure you check out that article too as it will save you a ton of time while editing your presentation!
Meanwhile, I’ve covered the basics of using the format painter below –
Step 1: Select the text and go to the “Format Painter” option
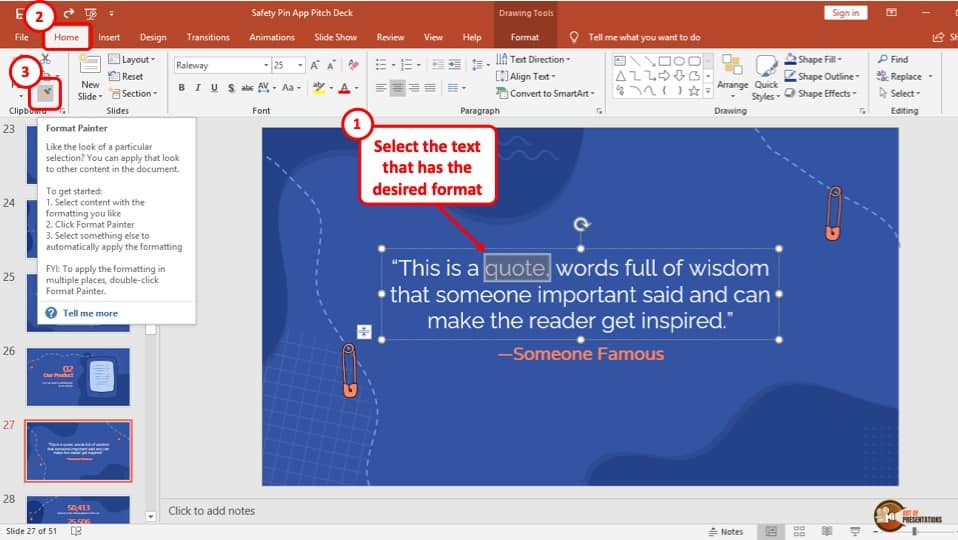
At first, you have to select the text you like the font of. This should not be the text you want to paint over. Now below the “Home” tab, and in the “Clipboard” section, there is a paintbrush icon called the “Format Painter” button. Click on it.
Step 2: Format paint the text.
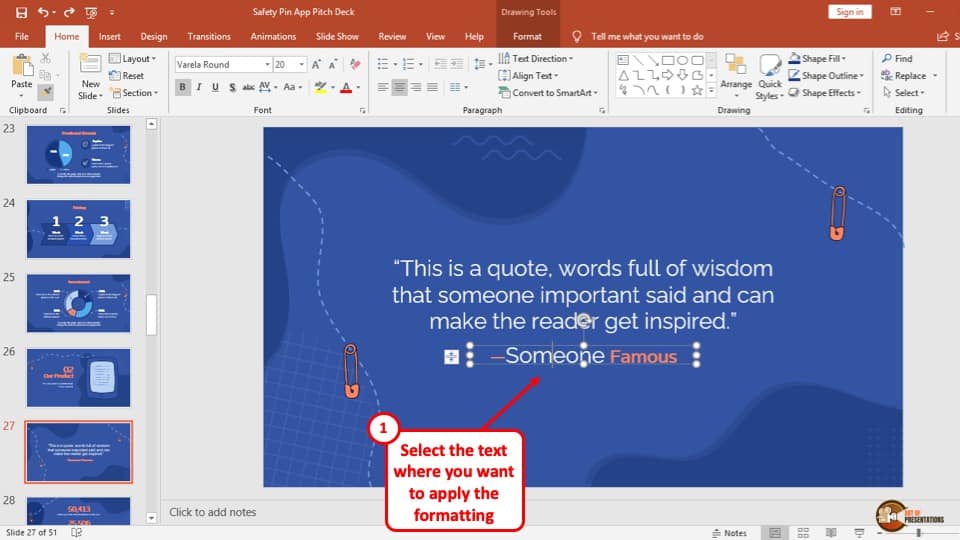
Your cursor will change into a paintbrush after you click on the “Format painter” button. Now, move the cursor to the text you want to apply the formatting on and click it. It will change to the font of your choice.
This is a single-use format painting because your cursor will change back to normal after one use.
Step 3: Format painting multiple words at a time (optional)
If you want to change the font of multiple texts using the “Format Painter” option, then instead of clicking the icon once, “Double click” on the “Format painter” button.
This time, the cursor will not change back and allow you to format the font of several texts.
Once you are done using the format painter, simply click on the icon again or press the “Esc” key on the keyboard.
13. How to Align Text in PowerPoint?
In this section, I will be describing the different alignments options for text in PowerPoint. I’ve written a detailed article on how to align in PowerPoint where I also talk about aligning objects and shapes with respect to each other and provide tips to save time! So, make sure you check out that article for further details.
Meanwhile, below are step-by-step guides to align text in PowerPoint horizontally or vertically.
Horizontal Align – left, right, centre, justify
The horizontal alignment allows the text to be aligned in the text box on a horizontal axis.
The process of aligning texts in different horizontal styles is described in the simple steps given below:
Step 1: Select the text
To change the alignment of text, the first step is to select all the texts inside a “Text box” using your cursor.
Step 2: Choose your desired horizontal alignment
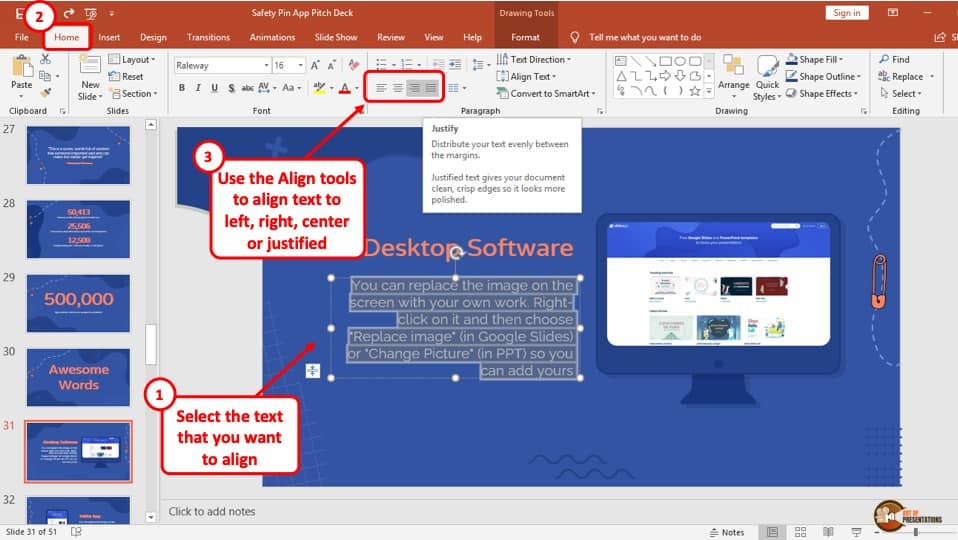
There are four icons made up of lines in the “Paragraph” section of the “Home” tab. From the left, they are “Align Left”, “Centre”, “Align Right”, and “Justify”.
Click on your preferred horizontal alignment to change the text position inside the text box.
Vertical align – Top, bottom, middle
The vertical text alignment will allow you to align the text in the box in a vertical axis with respect to the text box.
The process of aligning texts in different vertical styles is described in the following steps:
Step 1: Select the text
The first step is to simply select the text that you want to change the vertical alignment of.
Step 2: Change the Vertical Alignment
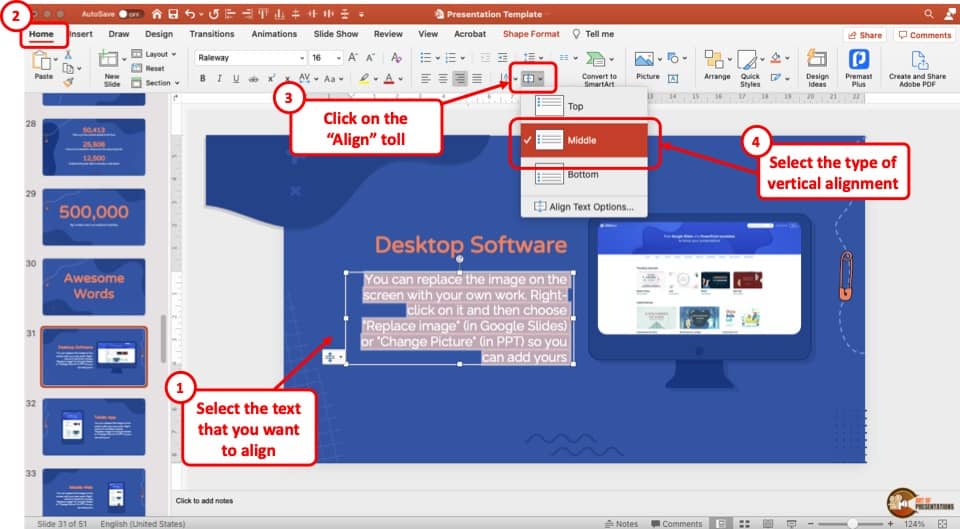
Next, simply go to the “Home” ribbon. Then, click on the “Align” Tool as indicated in the image above. From the dropdown, choose the vertical alignment options from “Top“, “Middle“, or “Bottom“.
14. How to Add Superscript and Subscript to Text in PowerPoint?
Using superscript or subscript text style can be especially helpful when creating a presentation for students or when adding an equation.
I wrote a detailed post explaining the steps to superscript or subscript text in PowerPoint (with images). Make sure you check out that article for full details. I’ll share the brief steps below –
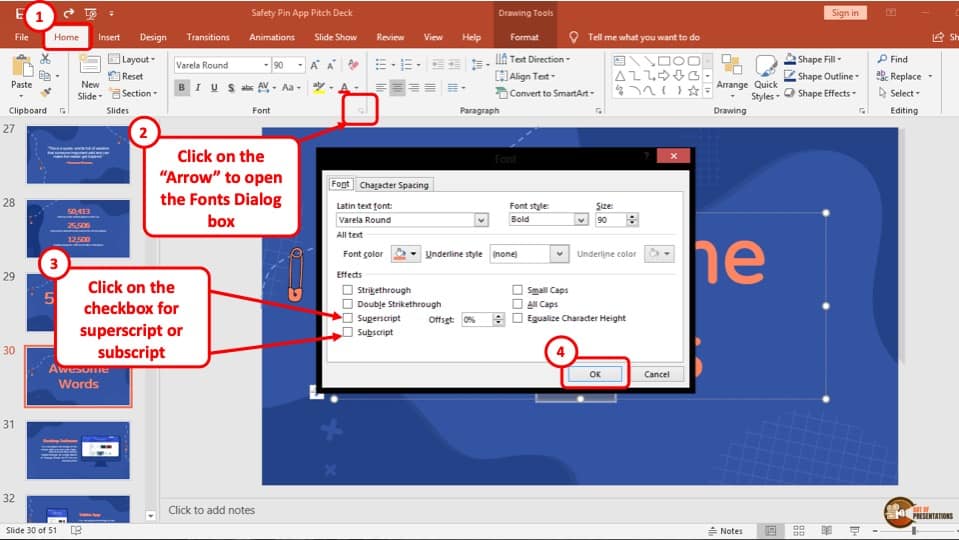
- To subscript text in PowerPoint, first, select the text. Then, click on the “home” tab, and click on the “arrow” button at the bottom right corner under the “Fonts” section of the Home ribbon.
- This will open a “Fonts” window dialog box. In the window select the “Subscript” text option. Make sure that the box is checked.
- You can also add the “Superscript” using the same process. Just make sure that the box before the superscript text is checked.
15. How to Add Bullet Points or Numbering to Text in PowerPoint?
Here’s how you can add bullet points or numbered list to your text in PowerPoint –
Step 1 – Select the Text
To add bullet points or numbering to text in your PowerPoint presentation, first, you have to select the text or navigate the blinking cursor in the place where you want the bullet point or numbering to be
Step 2 – Add Bullets from the “Home” Ribbon
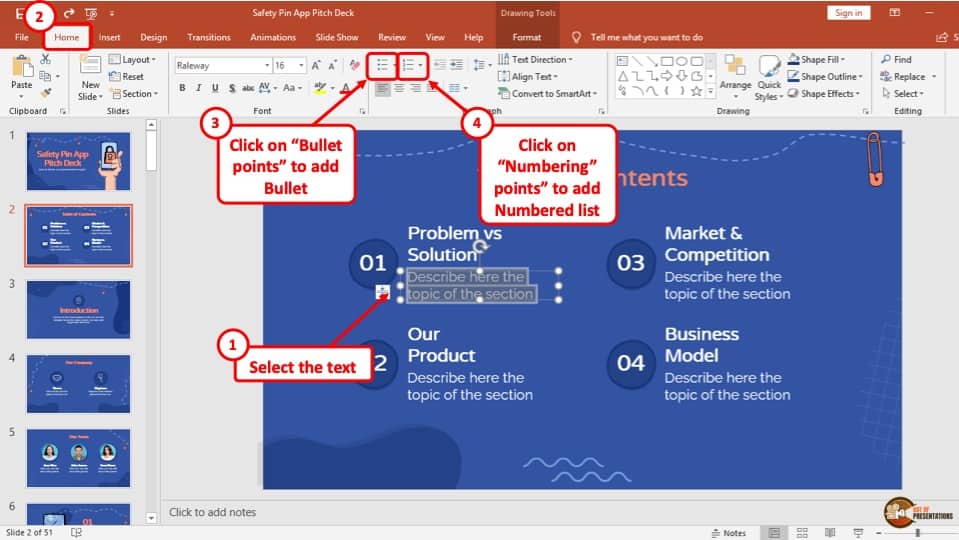
Next, click on the “Home” tab. From the “Paragraph” section on the home tab, you can choose to add either bullets or numbering in PowerPoint.
You can choose to customize the bullet points if you don’t like the default design. Alternatively, you can also change the bullet style in PowerPoint to create your own design style.
16. How to Add Indent to Text in PowerPoint?
You can also indent text in PowerPoint – meaning you can add some space before the text starts in a new paragraph or a new line. (And no, you don’t need to keep pressing the space bar for that!)
Add or Increase Indent in PowerPoint
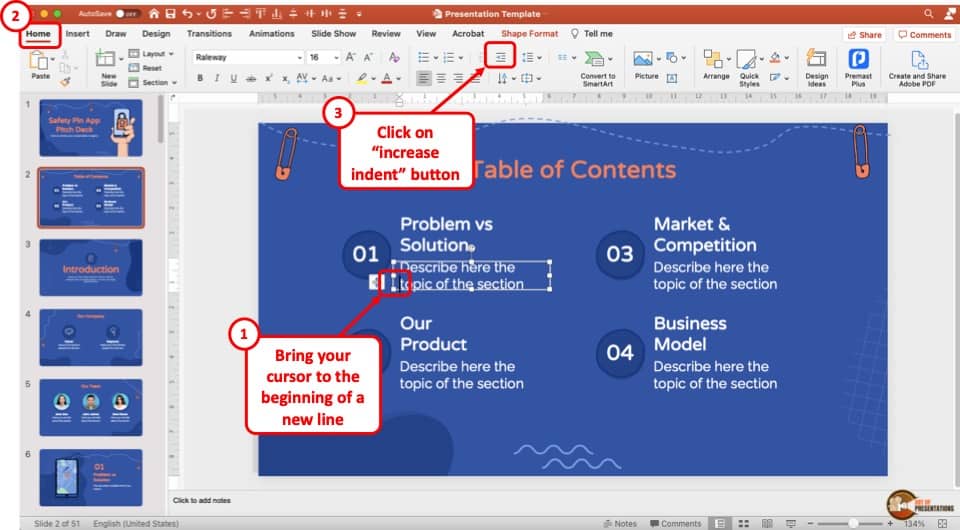
The first step is to move your cursor to the beginning of the paragraph you want to add indent to. It is important to note that the sentence that you want to indent should not be in the middle of the paragraph. Alternatively, you can bring the cursor to the start of a sentence and press “Enter”.
Now, click the icon with lines and an arrow pointing towards the right. This is called the “Increase Indent” button and is used to add or increase an indent level. You can find it in the “Paragraph” section of the “Home” tab. (check the image above for reference)
How to Decrease Indent in PowerPoint?
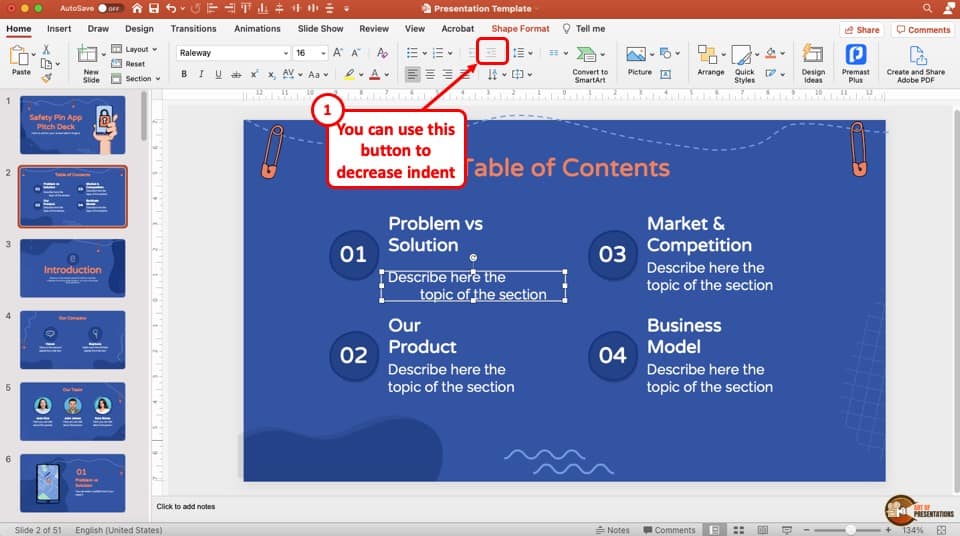
To decrease indent in a paragraph text, click on the button called “Decrease List Level.” The icon will have lines and a left-pointing arrow. It is to the left of the “Increase List Level” icon. Clicking it once will decrease one indent level.
17. Choosing Line Spacing of Text in PowerPoint
Line spacing can help increase or decrease the space between the line of text. You can add a line spacing between lines or between paragraphs. This explanation perhaps requires a detailed article.
[Edit – I’ve written a detailed article on Line Spacing in PowerPoint that highlights the nuances and explains everything in a beginner-friendly manner. Make sure you check it out by click on the hyperlink]
Nevertheless, the basic steps to choosing the line spacing in PowerPoint is described below:
Step 1: Select the text
If you want to modify the line space in a single paragraph, at first you have to select the paragraph you want to change the line spacing of using your cursor.
Step 2: Click on the “Line Spacing” button.
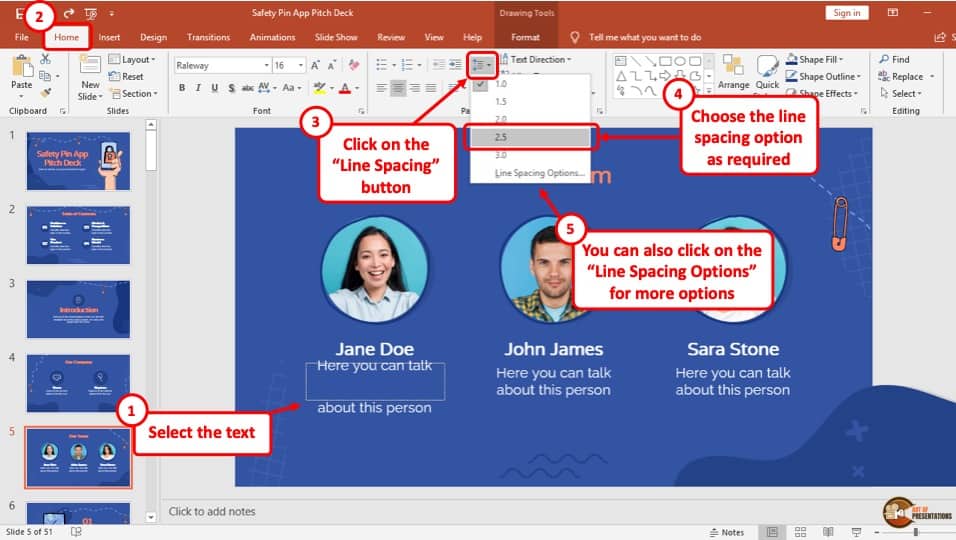
You can find the “Line Spacing” button in the “Paragraph” section of the “Home” tab (as showcased in the image above).
After selecting the text, click on the “Line spacing” button to display a drop-down menu. Choose your preferred line spacing and the paragraph will change accordingly.
Step 3: Click on the “Line Spacing Options” button for Advanced Options
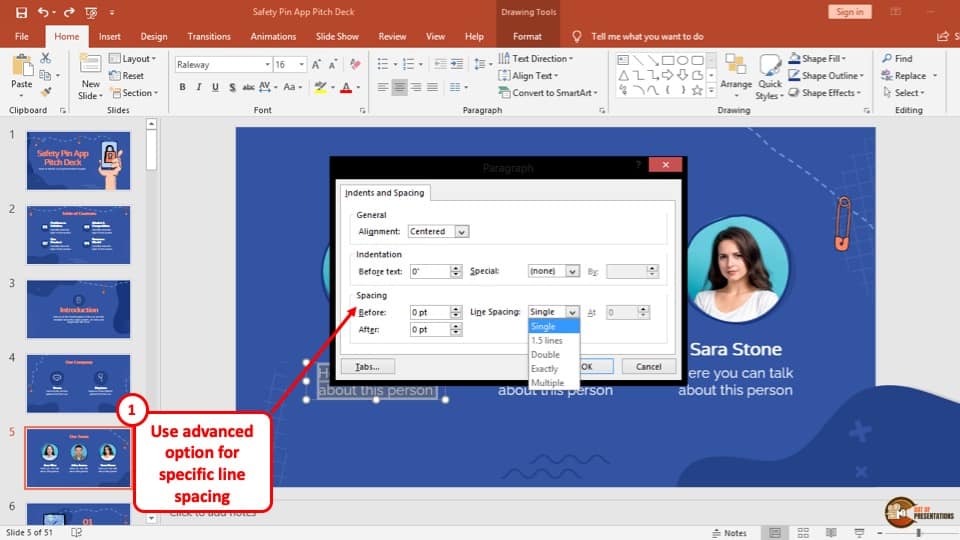
If you want more options to choose from, click on the “Line Spacing Options” button from the drop-down menu. It will open a dialogue box in the middle of the slide. Here, if you want to increase the space above your paragraph, you have to increase the “Before” option.
Or, if you want space after a paragraph, increase the “After” option. These work vice-versa. To change the space between lines, click on the dropdown menu button next to the “Line Spacing” option.
18. How to Add Text in Columns in PowerPoint?
The process of adding text in columns in your PowerPoint presentation is described in 2 easy steps below:
Step 1: Select the text or the text box
At first, select the text where you want to add the columns.
Step 2: Click on the “Add Column” button
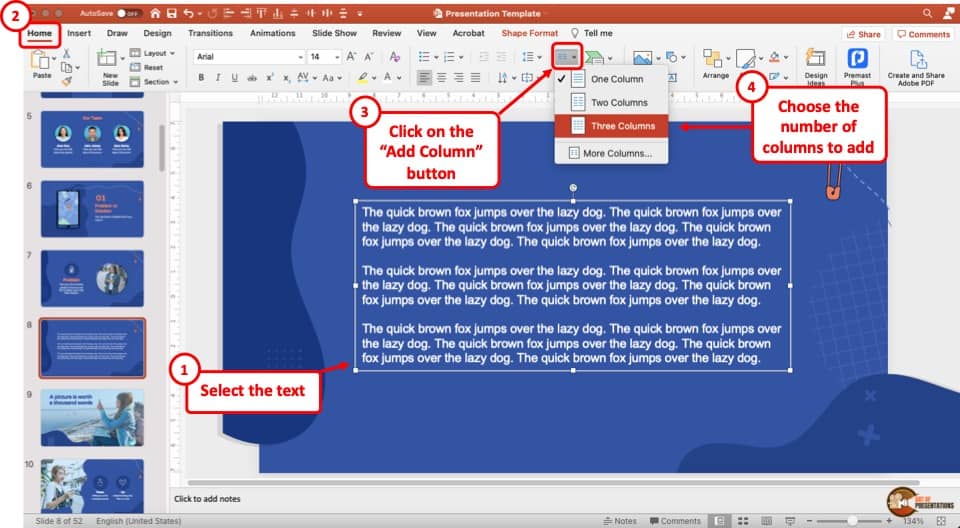
Click on the “Home Tab“. Then, under the “Paragraph” section, click on the “Add or Remove Column” button (check out the image above for references). You can usually locate it next to the indent or line spacing buttons. You can also hover over the button and wait for the name of the function to pop-up if you are unsure.
Once the button is clicked, a dropdown menu will appear. From the dropdown, choose the number of columns you would like to add.
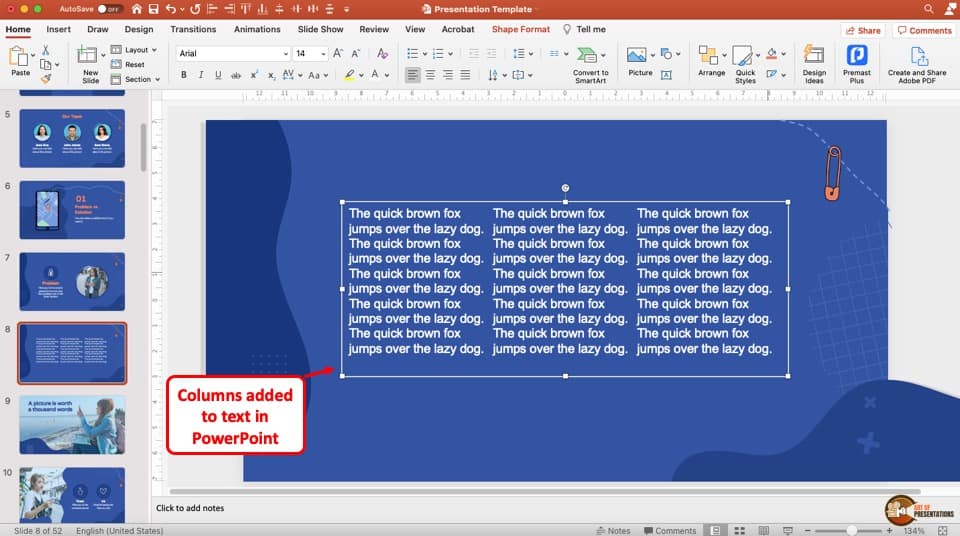
You will notice that the columns have been added to the text immediately!
More PowerPoint Related Topics
- How to Use a Presentation Clicker to Deliver Presentations Effectively!
- How to Crop a Picture in PowerPoint? [Complete Step-by-Step Tutorial!]
- How to Give a Presentation on Zoom? A Helpful Resource!
- How to Convert a PowerPoint to PDF? [A Simple Guide!]
- PowerPoint vs Google Slides: Which is Better? [ULTIMATE Test!]
- How to Change Bullet Style in PowerPoint? A Complete Guide
Credit to Nakaridore (on Freepik) for the Featured Image (further edited) of this Article

![How to Format Text in PowerPoint? [A Complete Tutorial!]](https://artofpresentations.com/wp-content/uploads/2021/06/Featured-Image-How-to-Format-Text-in-PowerPoint.jpg)