![How to Copy and Paste in PowerPoint? [With Shortcuts & Tips!]](https://artofpresentations.com/wp-content/uploads/2021/05/Featured-Image-How-to-Copy-and-Paste-in-PowerPoint.jpg)
Using Copy and Paste in PowerPoint is really one of the basic features. That said, it is also one of the most powerful and commonly used options in PowerPoint. So, how exactly does copy and paste work in PowerPoint?
Select the text or an object that you want to copy by clicking on it. Then, press Ctrl+C on your keyboard (Cmd+C on Mac) or right-click and select “Copy”. Go to the destination slide and press Ctrl+V (Cmd+V on Mac) or right-click and select “Paste” to paste the text or the object that you had copied.
As easy as the answer may seem, the copy and paste command can actually be used for more than just duplicating a line of text or creating another shape.
So, in this article, we will learn how to use the copy and paste command in PowerPoint for more than just a few basic things! Plus, you will get to know how to disable copy and paste for your audience. Additionally, I will also help you understand how to use copy and paste function correctly when working with images and charts!
That and much more! So, let’s get started!
[A Quick Note Before We Begin – for this article, I will be using one of the presentation templates from Envato Elements. With Envato Elements, you get access to thousands of presentation designs with unlimited downloads so you never run out of options again. Plus, you get free previews so you know exactly what you’re getting before buying! It is also very affordable. Check out their pricing here]
1. How to Copy and Paste in PowerPoint?
In general, copying and pasting in PowerPoint is very straight forward. Here is how you do it in 6 simple steps:
Step-1: Select the object or text you want to copy
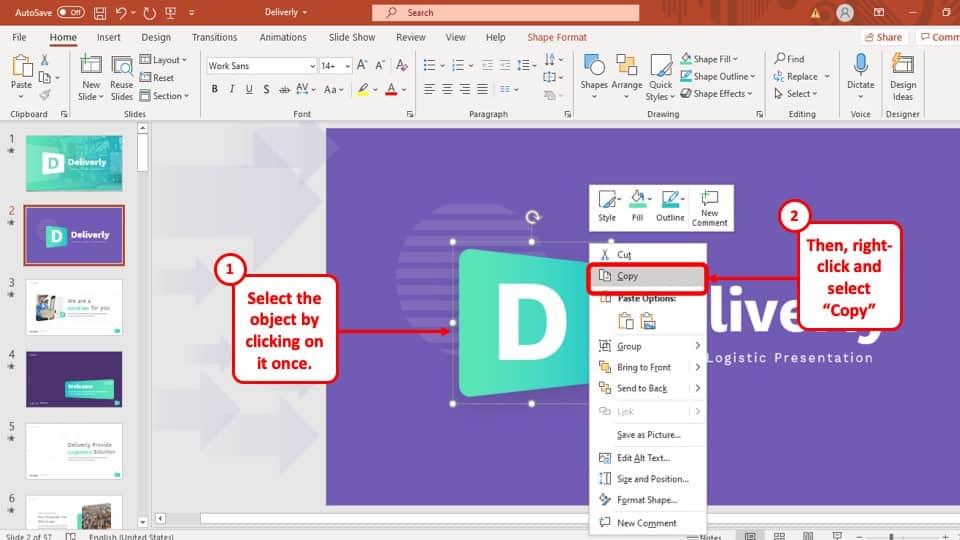
At first, you have to select the object or text you want to copy by clicking on the ‘Left’ mouse button and dragging the cursor over it.
Step-2: Click on the ‘Right’ mouse button on the selected object to open the drop-down menu
After you have selected the object that you want to copy, hit the ‘Right’ mouse button. A drop-down menu will appear with several options.
Step-3: Press the ‘Copy’ option
In the drop-down menu, select the ‘Copy’ option. This will make a copy of the object and temporarily save it in the ‘Clipboard’ menu ready to be pasted in your preferred location.
Step-4: Click on the ‘Right’ mouse button on the slide you want to paste your object or text.

After you have copied the object, go to the slide where you want to paste the object, ‘Right click’ on your mouse anywhere in the slide to access the drop-down menu.
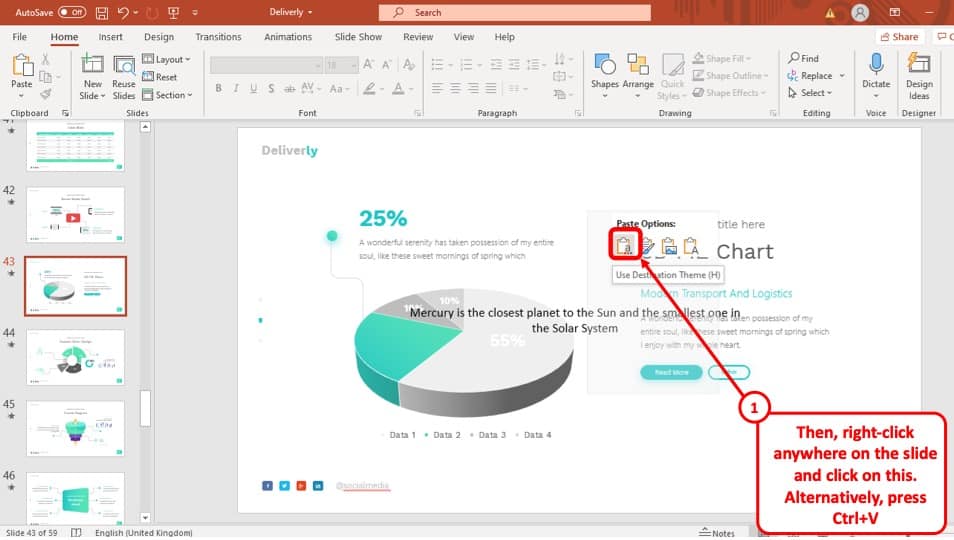
Step-5: Click on the ‘Use Destination Theme’ option.
Finally, after you have ‘Right clicked’ on the slide where you want to paste your object, select the ‘Use Destination Theme’ option located under ‘Paste Options’ with an icon of a clipboard with a lower case ‘a’ on it. You can do the same for copied texts as well.
1a. How to Copy and Paste in PowerPoint on Mac?
Copy and pasting in PowerPoint on Mac is almost the same as it is on Windows. Follow these simple steps to copy and paste objects on your Mac computer:
Step-1: Select the object and click on the ‘Right’ mouse button
At first, go to the slide where the object or text you want to copy is located. Select it by clicking on the ‘Left’ mouse button. Then, press the ‘Right’ mouse button. This will give you access to a drop-down menu.
Step-2: Click on the ‘Copy’ button
Now click on the ‘Copy’ option from the drop-down menu. Similar to Windows operating systems, this will make a copy of the object and temporarily save it on the ‘Clipboard’ of your PowerPoint presentation.
Step-3: Go to the destination slide, and right-click on the slide
After you have copied the object, go to the destination slide where you want to paste the object and hit the ‘Right’ mouse button. This will again give you access to the drop-down menu.
Step-4: Click on “Paste” option
Finally, click on the ‘Paste’ option that is located on the menu. This will paste the copied object or text onto the destination slide.
1b. Keyboard Shortcuts for Copy and Paste in PowerPoint (For PC & Mac)
Microsoft PowerPoint has keyboard shortcuts to bypass the drop-down menu that makes the process much more efficient. To use your keyboard to copy and paste objects in your PowerPoint presentation, use the following keyboard shortcuts –
- For PowerPoint on Windows PC –
- To copy – Press Ctrl+C
- To paste – Press Ctrl+V
- For PowerPoint on Mac –
- To copy – Press Cmd+C
- To paste – Press Cmd+V
2. How to Copy and Paste a PowerPoint Slide?
While making your PowerPoint presentation, you might often need to copy an entire slide from one destination to another. The process is explained in 3 easy steps below:
Step-1: ‘Right Click’ using your mouse on the Slide you want to copy.

To begin, you have to move your cursor to the slide that you want to copy and click on the ‘Right’ mouse button to open the drop-down menu.
Step-2: Select ‘Copy’ option or press ‘Ctrl + C’
From the drop-down menu, Select the ‘Copy’ option. This will make a copy of the slide to your clipboard. Alternatively, you can skip ‘Step-1’ by just selecting the slide and pressing ‘Ctrl + C’
Step-3: Right-click between the two slides and Paste the Copied Slide

Finally, position your cursor on the slide bar where you want to paste the copied slide. Hit the ‘Right’ mouse button and select the ‘Use Destination Format’ option under ‘Paste Options’. Alternatively, you can also use the keyboard shortcuts ‘Ctrl + V’ to get the job done.
This will immediately paste your slide to your preferred position in the PowerPoint presentation.
2a. How to Copy and Paste a PowerPoint Slide in Another Presentation?
Copy and pasting a PowerPoint slide from another presentation is almost identical to copy and pasting a slide from the same presentation. The whole process is described below:
Step-1: Copy the Original Slide

At first, go to the PowerPoint presentation that has the slide that you want to copy into your presentation and then copy the slide.
Step-2: Paste the Slide in the Destination presentation

Now simply paste the slide you have copied from the other slide by positioning your cursor on the slide bar and clicking on the ‘Right’ mouse button and selecting ‘Use Destination Themes’ under the ‘Paste Options.’

This will paste the slide you have copied to your preferred location while matching the theme used in your PowerPoint presentation.
2b. How to Copy and Paste a PowerPoint Slide without Losing Formatting?
PowerPoint also has the option to paste slides from other presentations while maintaining the original format of the slide. Below is a step-by-step guide on how to do that.
Step-1: Copy the slide you want to paste from the source presentation
Go to the presentation that has your preferred slide and copy it by hitting the ‘Right’ mouse button and then selecting the ‘Copy’ option from the drop-down menu.
Step-2: Go back to your PowerPoint presentation and click on the ‘Right’ mouse button in your preferred location.
In the next step, you have to go back to your PowerPoint presentation and click on the ‘Right’ mouse button on the position where you want to paste the slide that you copied. This will open the drop-down menu.
Step-3: Click the ‘Keep Source Format’ option under ‘Paste Options’
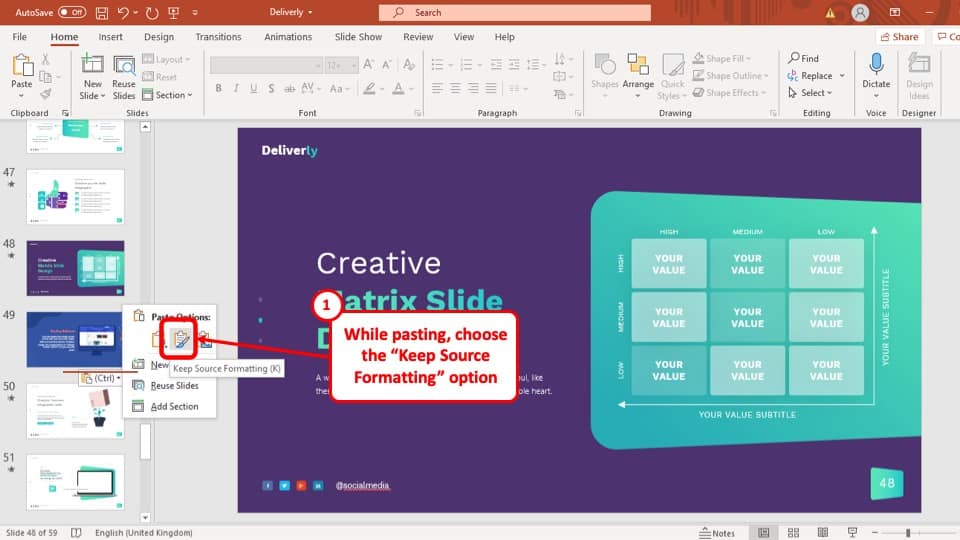
After you have accessed the drop-down menu, instead of clicking on the ‘Use Destination Format’ option, click on the ‘Keep Source Format’ option, the icon looks like a paintbrush on a clipboard as shown in the screenshot.
After selecting the ‘Keep Source Format’ option, the slide had copied will be pasted on your PowerPoint presentation, but it will match the format of the presentation it was originally in.
3. How to Copy and Paste Text in PowerPoint?
Copy and pasting text in your PowerPoint presentation is an easy 2 step process. They are explained below:
Step-1: Select the text that you want to copy in your PowerPoint presentation
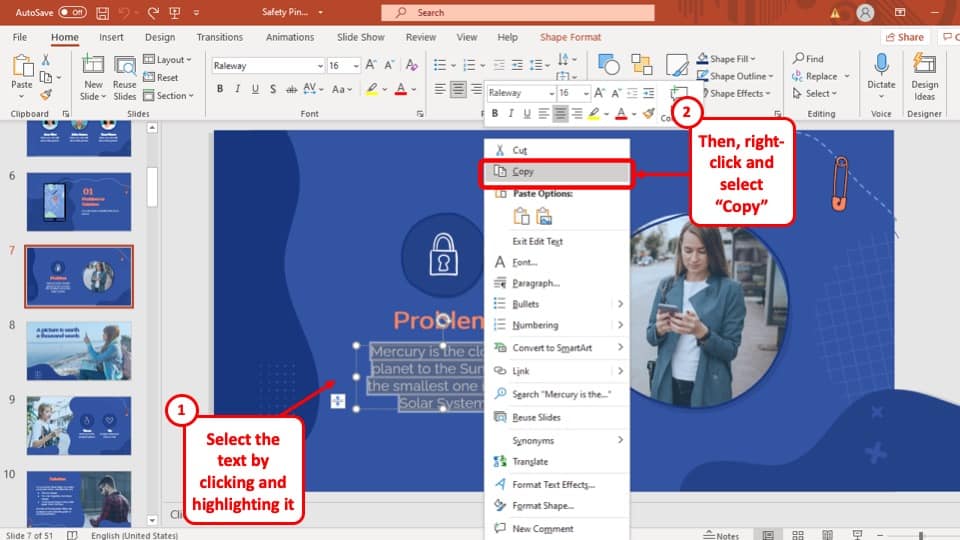
At first you have to copy the text that you want to paste in your PowerPoint presentation. Simply select the text, press the ‘Right’ mouse button and click on the ‘Copy’ option from the drop-down menu.
Step-2: Go to the slide in your PowerPoint presentation and paste the copied text
Once you have copied the text you want to paste on your presentation, go to the slide where you want to paste the text, press the ‘Right’ mouse button and click on the ‘Use Destination Format’ option.
Check out our article on How to Format Text in PowerPoint to edit the text the correct way in PowerPoint and save some time!
4. How to Copy and Paste Pictures in PowerPoint?
The process of copying and pasting pictures in PowerPoint is almost the same as copying and pasting texts in PowerPoint. Simply copy your preferred picture and paste it in your PowerPoint presentation.
It is important to note that you can also copy and paste an image from a folder into your PowerPoint presentation. You can also do it using the keyboard shortcuts ‘Ctrl + C’ to copy and ‘Ctrl + V’ to paste.
“Unable to Paste Image” Error in PowerPoint
In some cases, users are unable to paste pictures in their PowerPoint presentation if the image is copied from a folder. In such a case, you will have to insert the image into your PowerPoint slide, instead of pasting it. The process is described step-by-step below.
Step-1: Click on the “Insert” tab to add an Picture

At first, you have to go to the slide where you want to insert the image and then go to the ‘Insert’ ribbon located in the upper left area of your PowerPoint window. Now click on the ‘Pictures’ option.
Step-2: Select the ‘This Device…’ option
After clicking on the ‘Pictures’ option, select ‘This Device…’ from the drop-down menu.
Step-3: Select the image click ‘Insert’
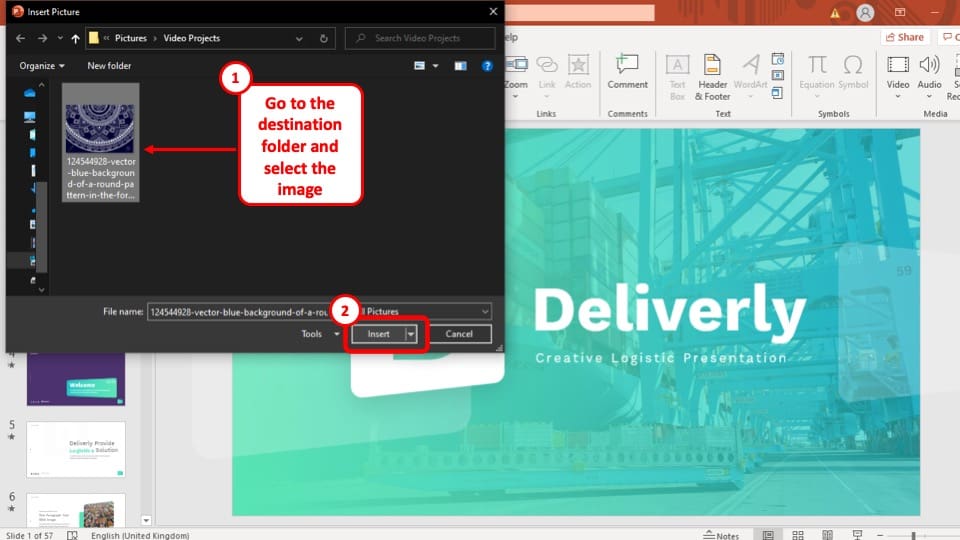
A pop-up window will appear, where you have to select the image, you want to add to your presentation. After selecting the image, click on the ‘Insert’ button at the bottom right corner of the pop-up window to successfully insert it to your presentation.
The image will be added to the slide in your PowerPoint presentation. Now all you have to do is resize it and place it in your preferred position.
5. How to Disable Copy and Paste in PowerPoint?
Although you cannot completely turn off the copy and paste option from your PowerPoint presentation file, you can, however, restrict the PowerPoint file to ‘View Only’ for permitted users.
This way only permitted users will be able to view the presentation file and they will not be able to edit or copy anything from it. A step-by-step guide to the whole process is given below.
Step-1: Go to the ‘Info’ section in the ‘File’ tab.
To restrict your PowerPoint presentation, at first you have to go to the ‘Info’ section which is located in the ‘File’ tab.
Step-2: Restrict the Access of the PowerPoint Presentation
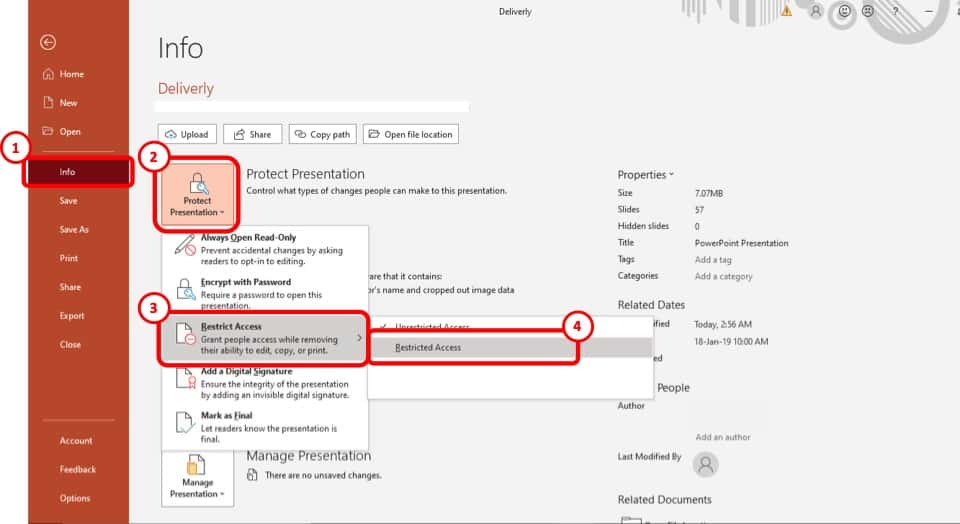
Now you have to go the ‘Restrict Action’ option under ‘Protect Presentation’ and select the ‘Restricted Action’ option.
Step-3: Tick the box that says, ‘Restrict permission to this presentation’
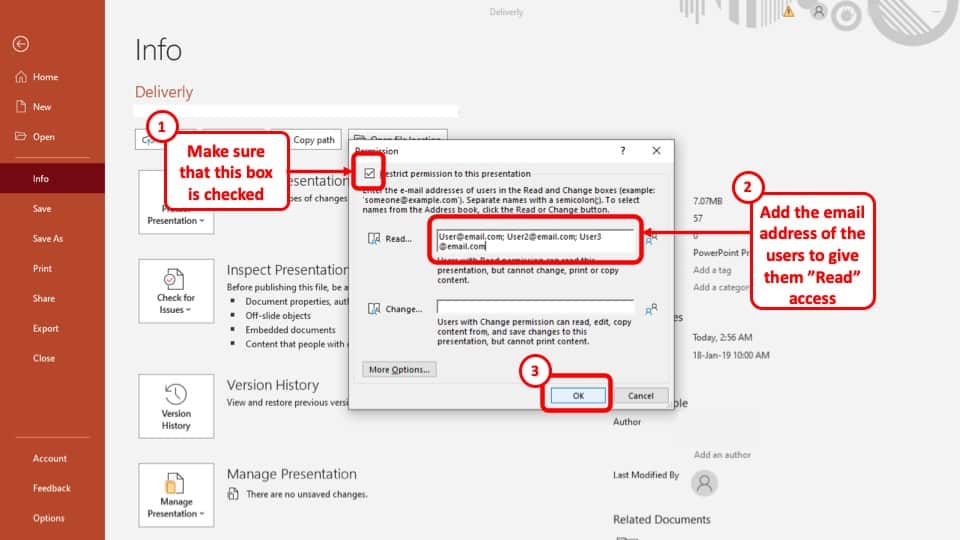
After you press the ‘Restricted Action’ option, a pop-up window will appear. Tick the box that says ‘Restrict permission to this presentation’ on the pop-up window to enable the restriction on your presentation. This will allow you to limit the viewership and use of your PowerPoint presentation file to selected users only.
Step-4: Add the email addresses of the users and press ‘Ok’
Add the email addresses of the users you want to show the presentation to in the first box that says ‘Read…’ and press the ‘Ok’ button at the bottom right corner of the pop-up window.
Now email the presentation to the users with access to your presentation. This way, only the users you added to the box will be able to see the presentation, without being able to edit or copy anything on it.
6. Troubleshooting Copy and Paste Issues in PowerPoint
There may be more than a few reasons why you cannot copy and paste in you PowerPoint presentation. In this section I will be discussing some of the reasons why that maybe and how to fix them.
6a. PowerPoint Won’t Copy and Paste? Here’s Why!
Although this is quite a rare occurrence, however, this can happen from time to time. Here’s what you can do to troubleshoot this problem –
- Restart Microsoft Office – Sometimes, the problem gets solved by simply restarting the PowerPoint or even Microsoft Office application. If it gets solved, then great! Else, move on to the next step.
- Restart your Computer – Restarting your computer will most definitely fix the problem. Perhaps your computer had an update or even the Microsoft Office application received an update and needed to restart.
However, if the problem is still not fixed, then you need to check to see if any of the other common reasons have caused an issue! (mentioned below)
The 3 most common reasons why you might be having trouble copying and pasting in your PowerPoint Presentation are:
1. The latest update in you Microsoft Office may have a bug that needs fixing
2. The Microsoft Office installed in your computer maybe broken and needs to be repaired
3. One of the installed add-ins in your Microsoft PowerPoint might be causing this problem.
If you have managed to fix the above 3 errors, it is highly unlikely that you will have a copy and paste issue. If the issue still exists, you would be better off to check if this is a system-wide issue or just an issue in PowerPoint. Based on this, 2 scenario’s can emerge –
- Copy and paste issue is still seen only in PowerPoint – then, reach out to a customer support executive from Microsoft.
- You are unable to copy and paste anywhere on your computer – perhaps check to see if the “Control” key on your keyboard is functioning fine. Other than that, there isn’t any other solution apart from resetting your computer to factory default or replacing your computer altogether.
6b. Excel Chart Won’t Paste into PowerPoint!
Sometimes, the paste function just doesn’t work when trying to paste a chart from Excel to PowerPoint. This can be really annoying especially when you are in a hurry.
Below, I’ve shared 3 methods to fix the issue of an excel chart not pasting into your PowerPoint –
Method 1 – Using “Paste Special” Option
One of the solutions to not being able to paste your Excel Chart is to use the “Paste Special” option. Here is a step-by-step explanation of the process.
Step-1: Copy the chart from your Excel Workbook
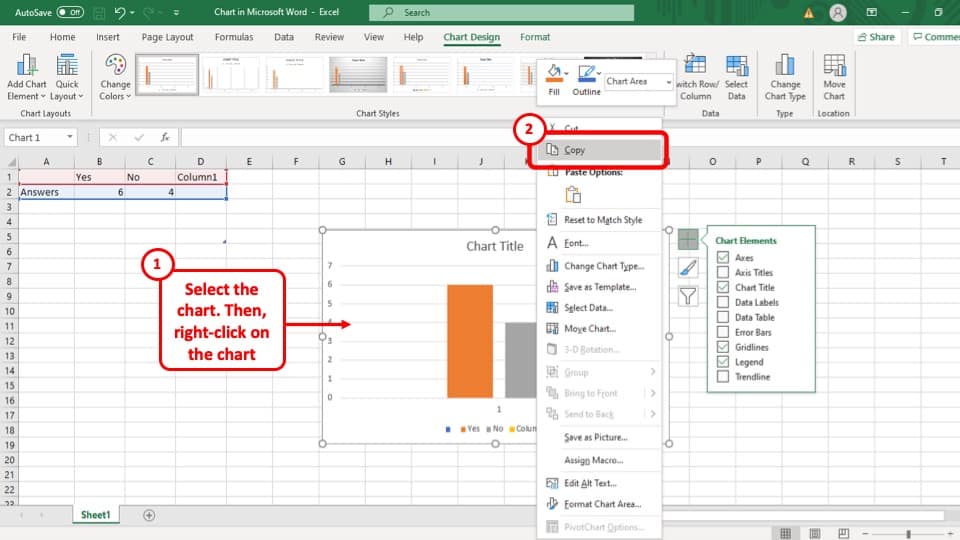
At first you have to copy the Chart by “Right clicking” on it and selecting the “Copy” option.
Step-2: Click on the arrow under the “Paste” option
After that, you have to go back to the slide you want to paste the chart. Click on the arrow under the “Paste” option in the “Clipboard” section of your “Home” tab. This will open a drop-down menu.
Step-3: Click on the “Paste Special” option

After opening the drop-down menu, click on the “Paste Special” option. This will open a pop-up window.
Step-4: Select “Microsoft Office Graphic Object” and press “Ok”
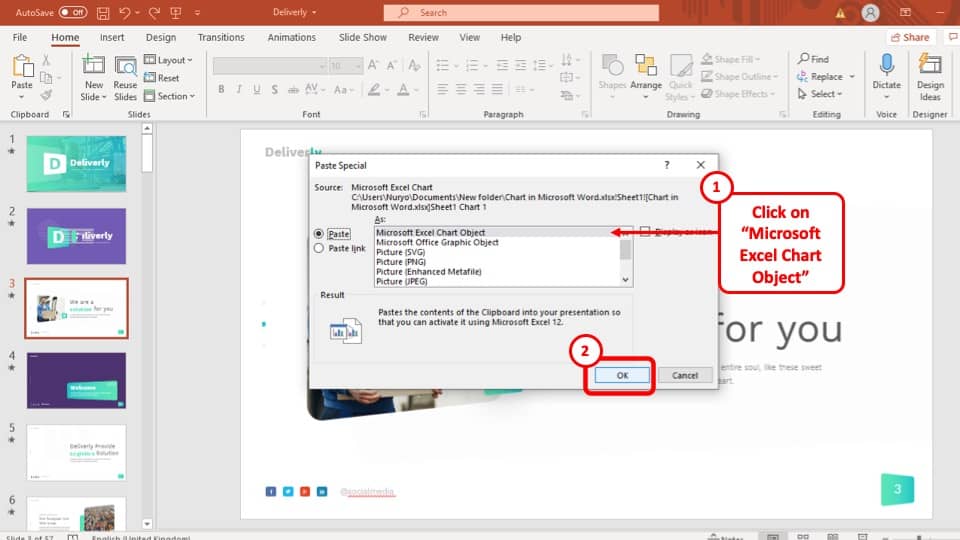
Once you have opened the “Paste Special” option, select “Microsoft Office Graphic Object” to past the chart in your PowerPoint presentation and then click on the “Ok” button.
Method 2 – Paste the Chart as an Image
Another solution to not being able to paste Excel Charts in your PowerPoint presentation can be to paste the chart as an image. That way, the chart will be saved to your presentation as an image instead of a chart.
The drawback to this method is that the edits that you make to your data in excel won’t automatically reflect in the chart in PowerPoint. That said, it is a temporary quick fix. If you don’t intend to update the source data for the chart, then this method will work just fine!
The process is described below.
Step-1: Save the chart as a picture from the Excel Workbook
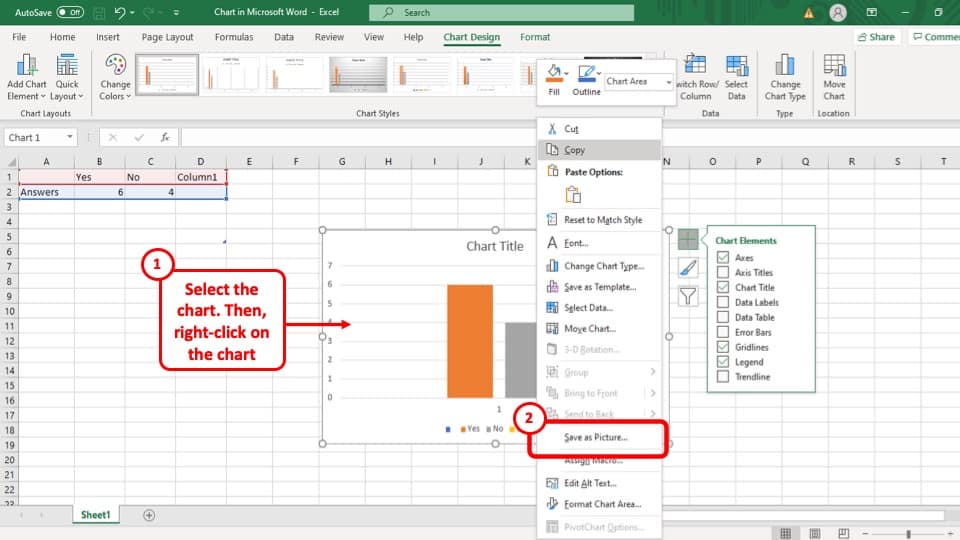
Go to the Excel Workbook with the chart that you want to add to your presentation, “Right click” on it and select the “Save as Picture…” option.
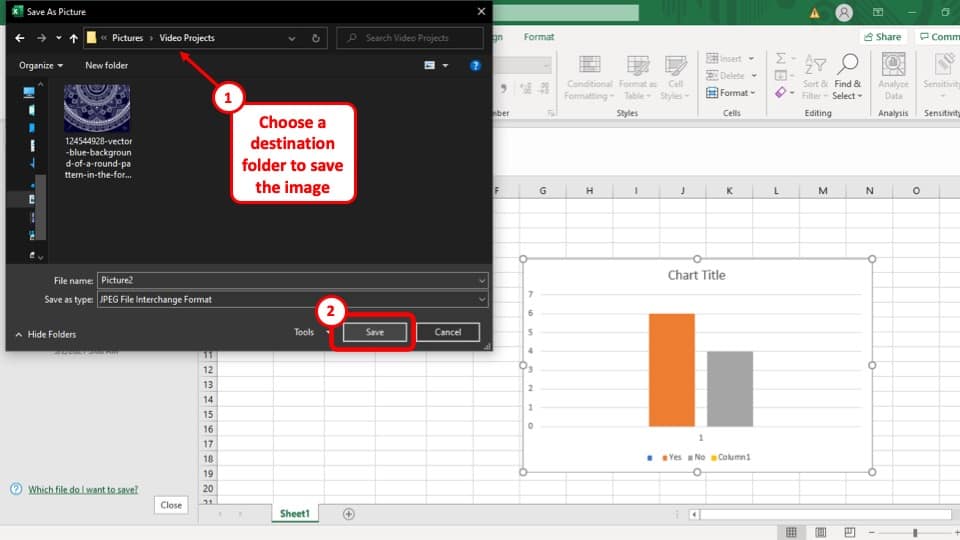
Step-2: Press “Save” on the pop-up window.
Once you have selected the “Save as Picture…” option, a pop-up window will appear on your screen. Save the image of the chart by clicking on the “Save” button at the bottom right corner of the pop-up window.
Step-3: Select the “This Device…” option
The next step is to select the “This Device…” option, under the “Pictures” drop-down menu which you can find in the “Insert” ribbon
Step-4: Select the chart and press “Insert”
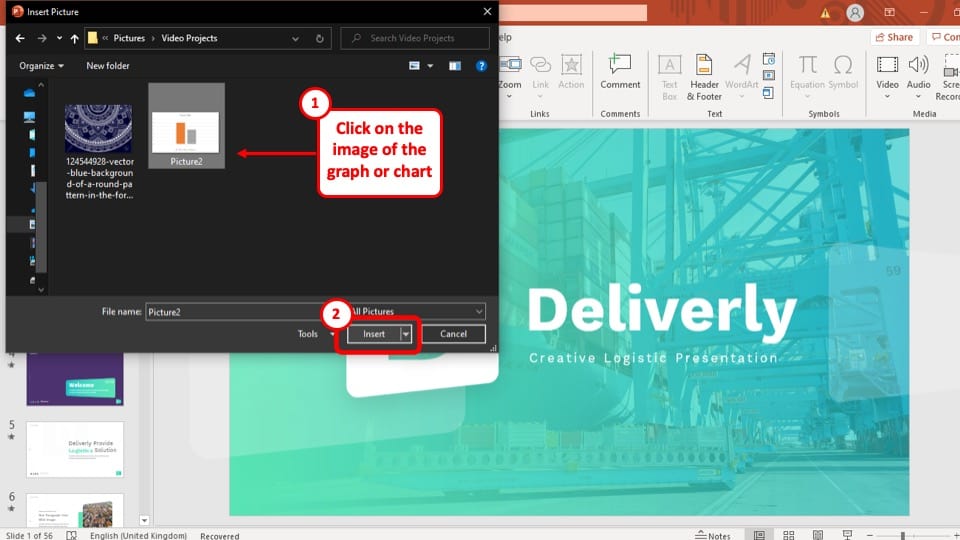
Finally, all you have to do is select the image of the chart and press the “Insert” button at the bottom right of the pop-up window.
Method 3 – Recreate the Chart in PowerPoint
If all else fails, you can still copy all the chart data from the Excel Workbook and create a new chart in your PowerPoint slide using those data. You can recreate an identical chart on your PowerPoint.
However, this may method may take time to recreate the chart exactly depending on how many customizations were done to the chart in Excel. Nevertheless, it is also an option that will work for you.
More PowerPoint Related Topics
- How to Crop a Picture in PowerPoint? [Complete Step-by-Step Tutorial!]
- How to Give a Presentation on Zoom? A Helpful Resource!
- What is a Presentation Clicker? [And How to Use it!]
- How to Convert a PowerPoint to PDF? [A Simple Guide!]
- PowerPoint vs Google Slides: Which is Better? [ULTIMATE Test!]
- How to Change Bullet Style in PowerPoint? A Complete Guide
Credit to diana.grytsku (via Freepik) for the featured image of this article