There are times when you receive a presentation that has text formatting all over the place! Meaning, there is perhaps no consistency in the way fonts look across slides. The first step to fixing this type of presentation or a slide is using the “Clear Formatting” tool in PowerPoint!
To clear formatting in PowerPoint, first, select the text on the slide. Then, click on the “Home” ribbon. Next, click on the “Clear All Formatting” button. This button is denoted with an icon that contains an eraser on top of the letter “A”.
In this article, we shall take a deeper look at how you can clear formatting of slides and presentations in a jiffy! Plus, I will also show you how you can clear formatting from all slides in your presentation at once!
So, let’s get started!
What Does Clear Formatting Mean in PowerPoint?
It is important to understand what “Clear Formatting” means in PowerPoint just so that we are all on the same level of understanding before we begin with this article.
Clear formatting in PowerPoint allows you to reset the formatting of text (and some other objects) and revert the formatting of such elements to the default settings. You can use the “Clear Formatting” option to remove multiple fonts, font color, font style, font outline, etc in PowerPoint.
There are multiple ways in which you can format text in PowerPoint. Sometimes, you may not like the way the text has been formatted. Or, perhaps you have received a presentation that has multiple different types of formatting used in the same presentation.
All this just doesn’t give a good user experience to your audience. Thus, the first place to start cleaning up the presentation is to use the “Clear Formatting” tool in PowerPoint.
So, let’s learn more about how to clear formatting in PowerPoint.
How to Clear Text Formatting in PowerPoint?
The process to clear the text formatting has been made simple and quick with the “Clear All Formatting” button present in PowerPoint.
Let’s take a look at the process with some visual references –
Step 1 – Highlight the Text
The first step is to highlight the text that contains the formatting that you want to clear. You can either select partial text with a text box or choose the text box itself (or multiple text boxes) by clicking on it.
For selecting multiple text boxes, press and hold the “Ctrl” key on your keyboard while you click on each text box.
Step 2 – Click on the “Clear All Formatting” Button
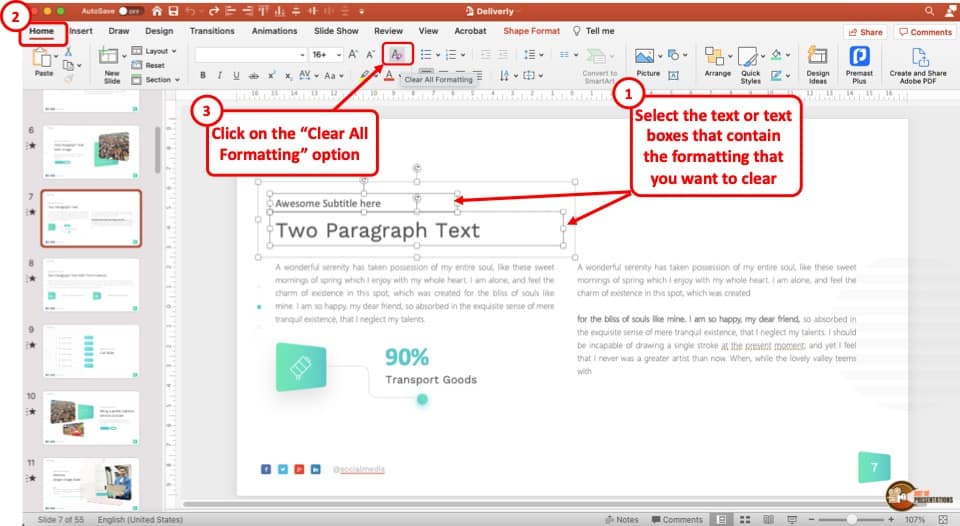
The next step really is to click on the “Clear All Formatting” button. You can locate this button on the “Home” tab under the “Paragraph” section in PowerPoint (check the image above for visual reference).
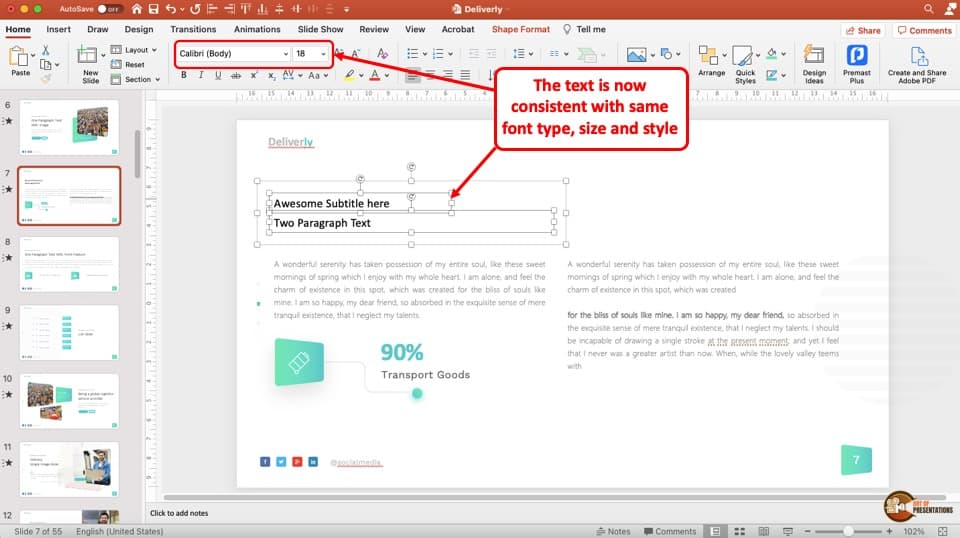
Here’s how the text shall look once you have used the “Clear All Formatting” button in PowerPoint (check the image above)
How to Clear Formatting on All Slides in PowerPoint?
The above method works great when you have text that you want to clear formatting for on just a single. But, what if your presentation actually contains tens of slides. It will be really cumbersome to go through each slide to fix the formatting of text on all the slides!
Fortunately, there are two ways you can fix this issue. Let’s take a look at both the methods –
Note – Both the methods mentioned below work only if default text placeholders have been used (or default slide layouts have been used) when creating the presentation. If text boxes have been added separately on the slide, you will need to clear the formatting of those textboxes one by one using the method described above.
Method 1 – Using the Outline View
The first method involves using the outline view. Let’s go through the steps one by one.
Step 1 – Open the Outline View

The first step involves opening the outline view in PowerPoint. To do that, click on the “View” ribbon in PowerPoint. Then, select the “Outline View” option.
Step 2 – Select all the Slides in Outline View
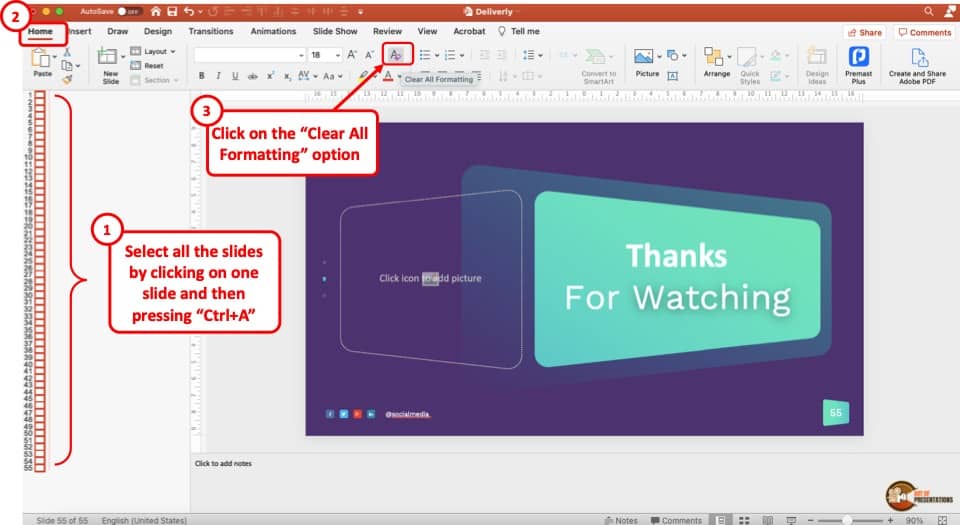
Opening the outline view will convert all the slide thumbnails on the left into a small icon.
Now, select all the slides in the outline view. To do that, you can click on any one slide and press the “Ctrl+A” keys on your keyboard (Cmd+A on Mac). Alternatively, you can also use the mouse to select all the slides by dragging the cursor over all slides (just how you would select text in a text box).
Step 3 – Clear Formatting for All Slides
The next step really is to clear the formatting on all the slides! You can do that by simply clicking on the “Home” ribbon, and then clicking on the “Clear All Formatting” button. That’s it!
Method 2 – Using the Slide Master
There are times when perhaps not too many fonts have been used on the presentation, but just the default font combination used is either incorrect or not something that you like!
This next method is perfectly suited for such a scenario in helping you make all fonts consistent on all slides with your preferred fonts.
Let’s take a look at the process –
Step 1 – Open the Slide Master View

The first step is to open the “Slide Master View” in PowerPoint. You can do that by simply clicking on the “View” tab. Then, select the “Slide Master” option from the ribbon.
Step 2 – Select the Master Slide in the Slide Master
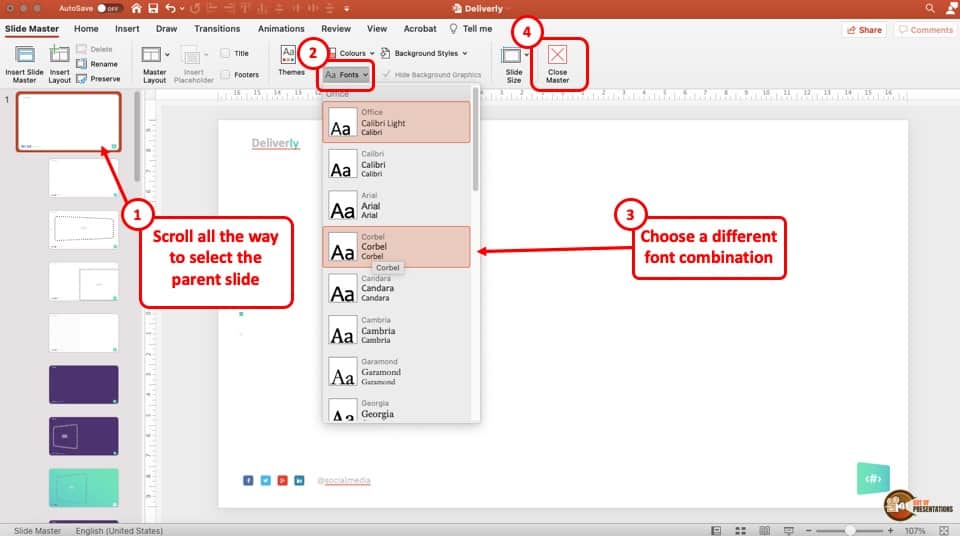
This next step is important otherwise the changes won’t take place on all slides.
Make sure that you select the first slide known as the “Master Slide“. You will notice that the first slide has a larger thumbnail than all the other slides. Select this slide by clicking on it. Making changes to this slide will impact all the layouts (other slides below this slide) in the Slide Master.
Step 3 – Change the Fonts Combination
As a next step, simply click on the “Fonts” option present on the slide master. From the dropdown, click on a different font combination as per your preference.
This will change the default font selection for all the slides.
Step 4 – Exit the Slide Master
The last step is to exit the slide mater. To do that, click on the “Close Master” button on the ribbon.
How to Clear Table Formatting in PowerPoint?
If you want to reset the way a particular table has been formatted, the process is slightly different but equally easy!
To clear the table formatting in PowerPoint, first, select the table. Then, click on the “Tab Design” tab. Next, open the table design options and click on the “Clear Table” option from the dropdown.
Let me share with you the detailed steps with visual references for ease of understanding.
Step 1 – Select the Table
The first step is really to select the table for which you want to reset the formatting. You can do so by clicking on the table.
Step 2 – Open the Table Design Options
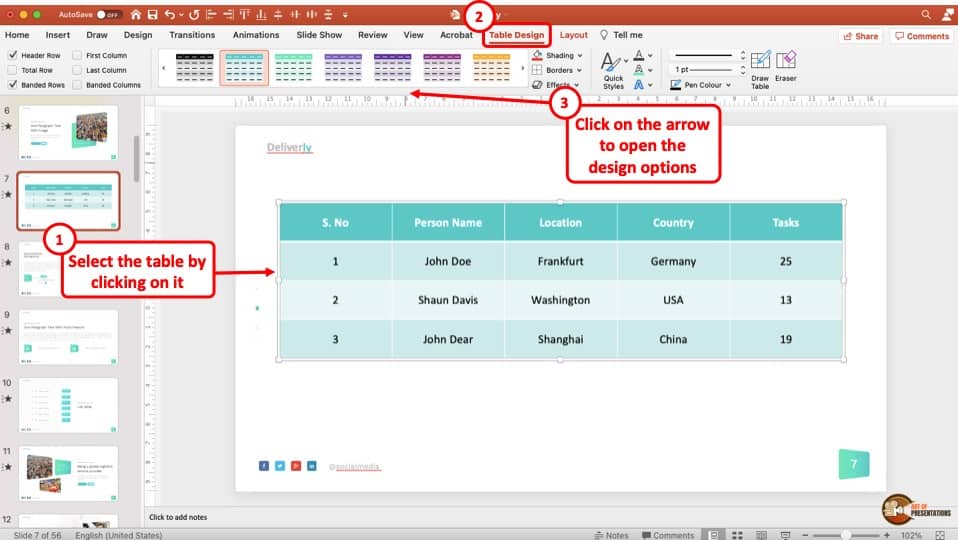
When you select the table, a new “Table Design” tab will be made available in PowerPoint. Click on it.
Next, click on the arrow to “Show More” table design options. This will open up a drawer with all the various preset table design layouts.
Step 3 – Clear the Table Formatting
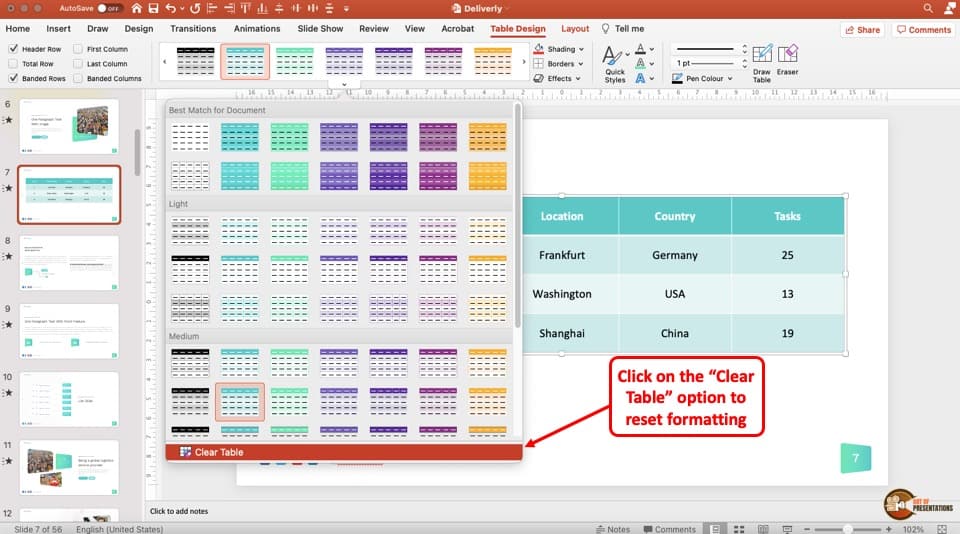
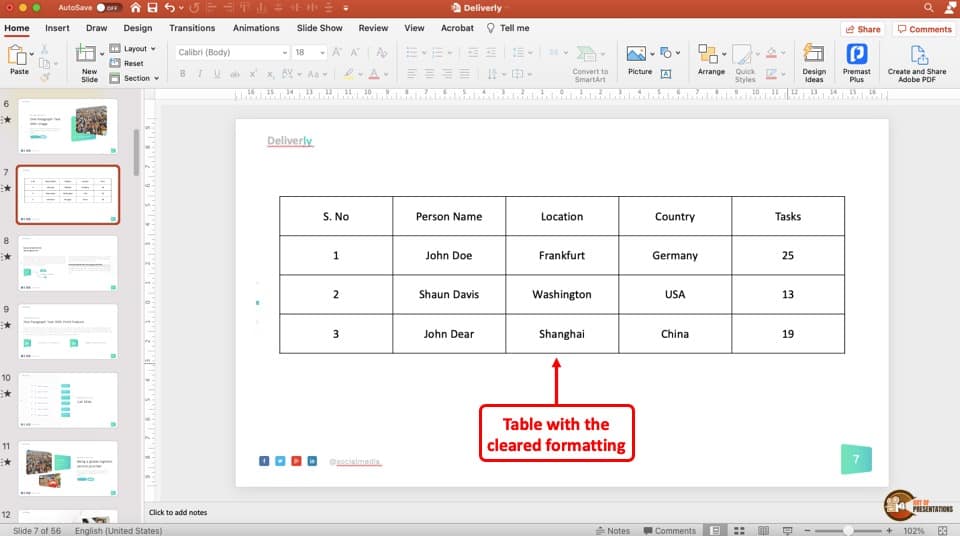
At the bottom of the dropdown menu, click on the “Clear Table” option. This will reset the formatting used for the table including any changes made to the color of the font, table fill color and the border settings!
Here’s how the table will look after clearing all the table formatting –
You May Also Want to Read –
- How to Use Format Painter in PowerPoint [And Save Time!]
- How to Change Bullet Style in PowerPoint? A Complete Guide!
- How to Highlight Text in PowerPoint? [A Helpful Tutorial!]
- How to Copy and Paste Correctly in PowerPoint!
Credit to Wayhomestudio (on Freepik) for the featured image of this article

![How to Clear Formatting in PowerPoint? [Step-by-Step Guide!]](https://artofpresentations.com/wp-content/uploads/2021/06/Featured-Image-How-to-Clear-Formatting-in-PowerPoint.jpg)