![How to Give a Presentation on Zoom? [A Step-by-Step Guide!]](https://artofpresentations.com/wp-content/uploads/2021/03/Featured-Image-How-to-Give-a-Presentation-on-Zoom.jpg)
If you’ve never used Zoom, giving a presentation on it might seem a bit challenging. But, that’s a challenge we will have to learn to overcome as the world moves digital more and more day by day. The key question really is how to give a presentation on Zoom!
To give a presentation on Zoom, first, start by joining a meeting. Now open the presentation file on your computer and share the slides on Zoom using its “Share Screen” feature. You should test your camera, mic, speaker, and internet connection before you start with your presentation.
As easy as it may seem, some of you may need further detailed instructions. So, in this article, I will provide a step-by-step guide on things that you need to do in order to deliver a presentation on Zoom successfully! Plus, I will also share some tips that can help you ace your presentation on Zoom!
So, without any further delay, let’s get started!
Understanding the Zoom Application Interface
Before we understand the steps to give a presentation using Zoom, it is perhaps a good idea to acquaint yourself with the Zoom user interface first. If you are well-versed with it, then perhaps you may want to skip this section and click here instead.
Logging into Zoom
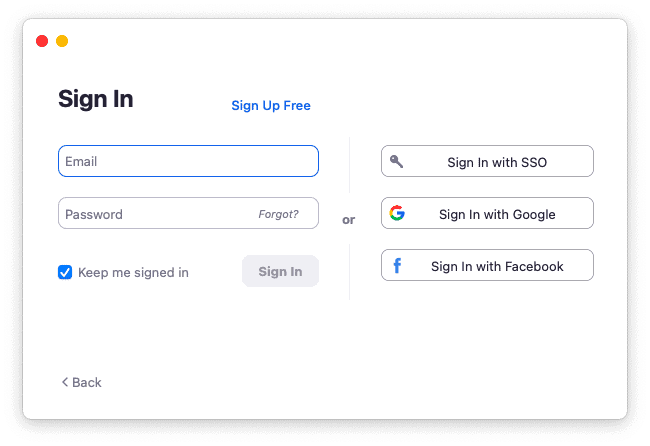
Although you can login to your account using zoom website too, but it is best to download and use the zoom app.
Once you have download the app, you will be prompted to login to your account. If you don’t have an existing account, you can either sign up or even login using your social account such as Google or Facebook. It’s actually quite simple.
If you feel that you don’t want to sign up or even use the social accounts for your meeting, you can choose to use “Sign In with SSO” option. SSO stands for single sign on and this allows you to sign in even when you don’t have an account with Zoom just once.
Zoom Home Screen
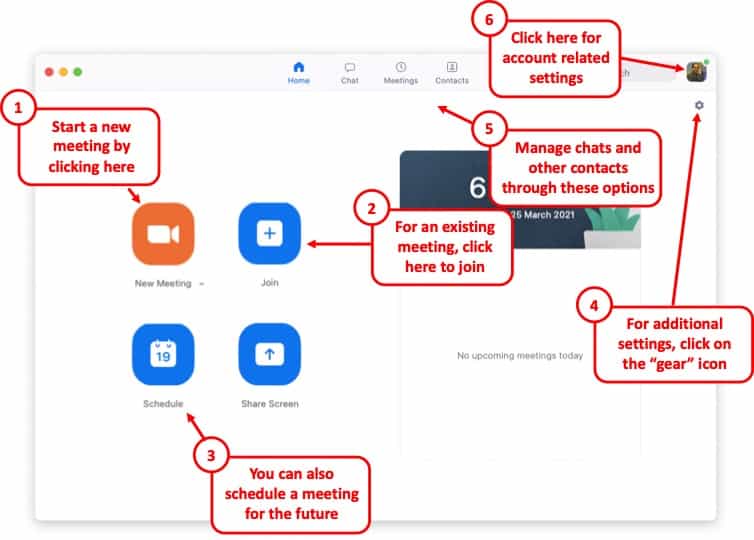
Once you’ve logged in, you will be taken to the home screen on Zoom.
There are a bunch of different things that you ca do with the home screen on Zoom. If you have been invited for a meeting, you will need to click on “Join“. However, you will also need the meeting ID and the password for the meeting. If you don’t have the details, you will perhaps need to contact the person hosting the meeting.
You can also host the meeting yourself by using the “New Meeting” button. You can set a new meeting and invite others to join using this option.
Likewise, you can also schedule a meeting in the future using the “Schedule” option.
Furthermore, for changing the account related information, just click on your profile picture in the top-right corner of your window.
Lastly, there are several other detailed settings that you can tweak for your Zoom application. Almost all the other settings can be found in the “Settings” section by clicking on the “Gear Icon“.
Zoom Virtual Meeting Window Interface
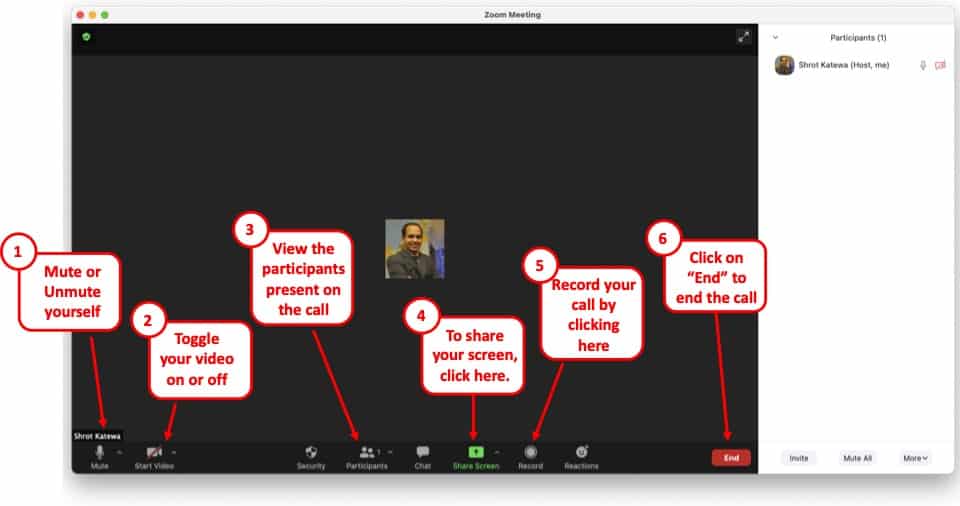
Once you are a participant in a virtual meeting, either by joining an existing meeting or by starting a new meeting, you will be greeted with an image similar to the one mentioned above.
On this screen, you will be presented with several different options. Some of the key functions that you will need to be aware of are as follows –
- Mute – Turning on the Mute or Unmute
- Video – Toggling between your Video
- Participants – Checking the names of the Participants
- Share Screen – to deliver a presentation (more on this later)
- Record – To record a meeting session
- End – Knowing how to end a meeting and exiting a call.
All the above functions will be visible on a small bar at the bottom of the window. If you are not able to see this option bar at the bottom, just hover over at the bottom part of your screen and all the options will appear.
Although there are other features that are also available for a zoom user or a participant, however, the aforementioned features should be good enough to deliver a presentation. These 6 features are at the very least something that you should be aware of.
How to Give a Presentation on Zoom (Step-by-Step)
Zoom has become a common tool for giving virtual presentations today. It is a widely used tool at conferences, meetings, and other events! If you are giving a presentation on Zoom for the first time, then perhaps you should be aware of a few things –
Here is a quick step-by-step guide on how you can give a presentation on Zoom:
Step 1: Install Zoom
Download and install the Zoom application to your desktop. To download the application, visit https://zoom.us/download and download the Zoom Client to your computer.
Step 2: Login to your Zoom Account
After installing the application, open it and log into your Zoom account. If you don’t have one, you can sign up for free using your email account.
Zoom also has options to sign in using SSO (Single Sign-On) or with your Facebook or Google account.
Step 3: Test Audio and Video Settings
Before you start or join a meeting, you will need to configure and test your audio and video settings.
To do that click on the gear icon on the Zoom application’s home screen. This will open the settings menu.
Now click on the “Audio” tab and select the microphone you are going to use. Try our different audio settings. After the microphone, select the speaker for audio output. If you can’t hear anything, try out another speaker source.
After configuring audio, click on the “Video” tab. From there, select the camera that is connected to your desktop. Tweak different video settings and find out what works best for you.
Step 4: Join or Schedule a Meeting
Now start a meeting by clicking on “New meeting”. You can also schedule a meeting on Zoom. To do that, click on “Schedule” and set up when you want to start the meeting. After completing the set-up, Zoom will give you a URL. Share it with the team members to join the meeting.
Or you can join a meeting by clicking “Join” on the Zoom client’s home screen. You can use a meeting ID or URL to join a meeting in Zoom.
Step 5: Open the Presentation
Once you have everything setup, you then need to prepare to show your presentation with your audience. To do that, open the presentation slides on your computer.
Step 6: Share Your Presentation
The last step in giving your presentation is to make sure that you share your presentation with your audience. To do that, click on “Share Screen” from the Zoom clients meeting window, select the screen where your presentation slides are open, and click “Share”. Now start presenting your slides to the audience.
Step 7: Stop Sharing to end the Presentation
One thing to know is how to end the presentation. To stop screen sharing, simply click on “Stop Share” located at the top of the screen. This option will only appear when you start sharing your screen.
How to Share a PowerPoint with Presenter View on Zoom?
To share your PowerPoint presentation slides with presenter view on Zoom, follow the steps given below:
Step 1: Open the Zoom App and Login
The first step really is to open the zoom app and login to your account.
Step 2: Join or Setup a Virtual Meeting on Zoom
Next, join the meeting. Remember, you need the meeting ID and password to join a meeting. Make sure you have requested for the details beforehand.
Step 3: Open Your PowerPoint Presentation
First step is really to open your presentation file that you want to present on the PowerPoint application.
Step 4: Put the Presentation in Presenter View
Now select the “Slide Show” tab from the top of the screen and click on either “From Beginning” or “From Current Slide” depending on your preference. This will open the slides in the “Presenter” view.
Step 5: Switch to the Zoom Application
Now, go to the Zoom application, start or join a meeting. While you are in the “Presenter” view on PowerPoint, press “Alt+Tab” to switch between applications in Microsoft Windows-powered computers. For iMac, use “Command+Tab” to move through open apps.
Step 6: Share Screen on Zoom’s Meeting Window
Once you are in Zoom’s meeting window, click on “Share Screen”, select the window where your PowerPoint slides are open in the presenter’s view, and click “Share”.
And that’s all you have to do in order to share PowerPoint with the presenter’s view in your Zoom meetings.
How to Share PowerPoint on Zoom Without Showing Notes?
There are two methods that you can use to share PowerPoint slides on Zoom without sharing your presenter notes. For the first method, you will need to have two monitors connected to your computer.
As for the second one, you can still share your PowerPoint slides on Zoom without sharing your notes (and you won’t need two monitors either). I’ve briefly explained both methods below.
Method 1 – Dual Monitor Method
In this method, you will be presenting your PowerPoint file on one monitor while looking at your presenter’s notes on the other one. Here’s how you can do that:
Step 1: First of all, open your slides on PowerPoint.
Step 2: Now join or start a Zoom meeting.
Step 3: Now click on “Share Screen” and select “Screen 1”. Then click “Share”. Here, “Screen 1” is your primary monitor.
Note: If you are not sure which one is your primary monitor, select where the PowerPoint file opened in.
Step 4: Now go to the PowerPoint application, click on the “Slide Show” tab, and from there click on “Monitor” and select “Primary Monitor”.
Step 5: Open the presentation file in the presenter’s view by clicking on the “Slide Show” tab and selecting “From Beginning” or “From Current Slide”.
If you have done everything correctly, participants will only be able to see the presentation slides while you have your presenter’s notes open on the second monitor.
In case you shared the wrong monitor on Zoom, click on “Screen Share” on Zoom’s meeting window, select “Screen 2” and click on share. This should fix your problem.
When you are sharing a screen on Zoom, you will notice a green border around that screen. This indicates which monitor you are currently sharing.
Method 2 – Sharing Portion of Your Screen
Follow the steps below if you have only a single monitor connected to your computer.
Step 1: Join or start a meeting on Zoom.
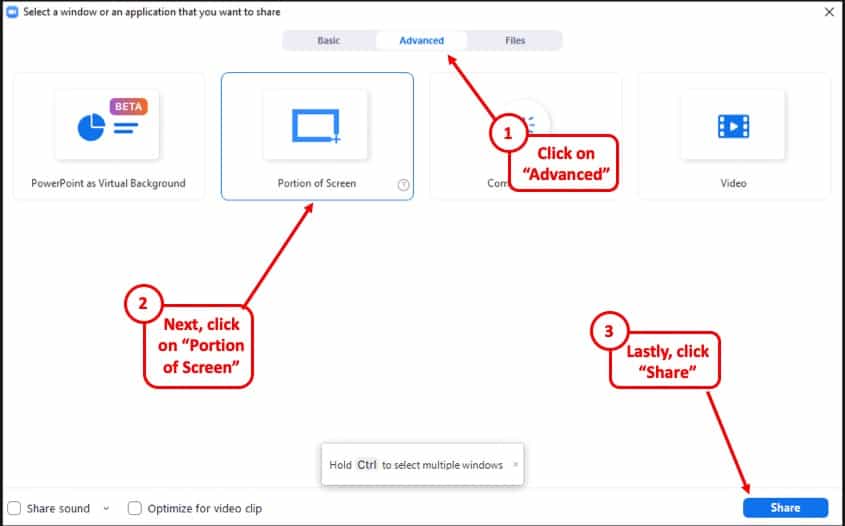
Step 2: Click on “Share Screen” and from the pop-up window select “Advanced”. From there select “Portion of Screen” and click on “Share”. This will give you a green border on your screen that you can adjust. Only the things that are inside this border will be shared on Zoom.
Step 3: Now open the presentation file in PowerPoint, and go to the presenter’s view by selecting “Slide Show> From Current Slide or From Beginning”.
Step 4: Adjust the size of the green border so that it only shows the presentation slides in the presenter’s view.
And that’s all you have to do. By doing so, your audience will only see the slides that you are presenting, but not your notes.
How to Show Yourself During a Zoom Presentation?
Ensuring that you are visible from time to time during a presentation can make it slightly more engaging and much more interactive. Here is how you can do that-
Step 1: First, start or join a Zoom meeting.
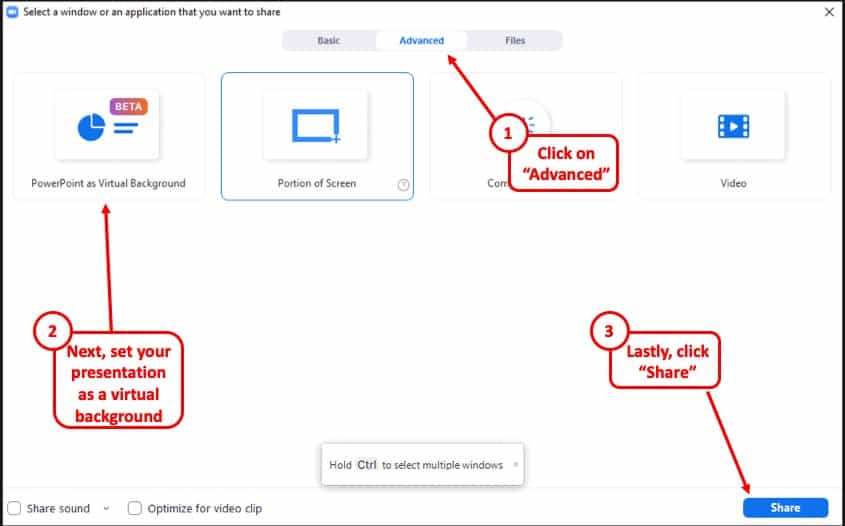
Step 2: Click on “Share Screen” and select the “Advanced” option. From there, select “PowerPoint as Virtual Background” and select the file you want for your presentation. Then click on “Share”.
Step 3: Make sure your video is switched on so that you are also visible to your audience. You can do that by clicking on “Start Video” on the Zoom Virtual Meeting Interface.
It will take some time for your slides to appear on the Zoom client. When it is done, participants will be able to see your face in front of the slides in Zoom. Make sure that your camera is connected to your computer and configured correctly.
This feature works best if you have a green screen behind you. If you have one, go to Zoom’s settings menu, select the “Background and Filter” tab and check “I have a green screen”. If you want to stop showing yourself during a zoom presentation, click on “Stop Video” on the meeting window and that will do the job.
Furthermore, you may sometimes want to show just yourself to the audience and not show the presentation at all. For that, all you need to do is simply click on “Start Video” in the Zoom Virtual Meeting Interface.
How to Record a Presentation on Zoom?
If you want to record your presentation on Zoom, you can do it easily. After joining or starting a meeting on Zoom, click on the “Record” icon located at the bottom of the meeting window. Once the recording starts, you can pause the recording or stop it whenever you like.
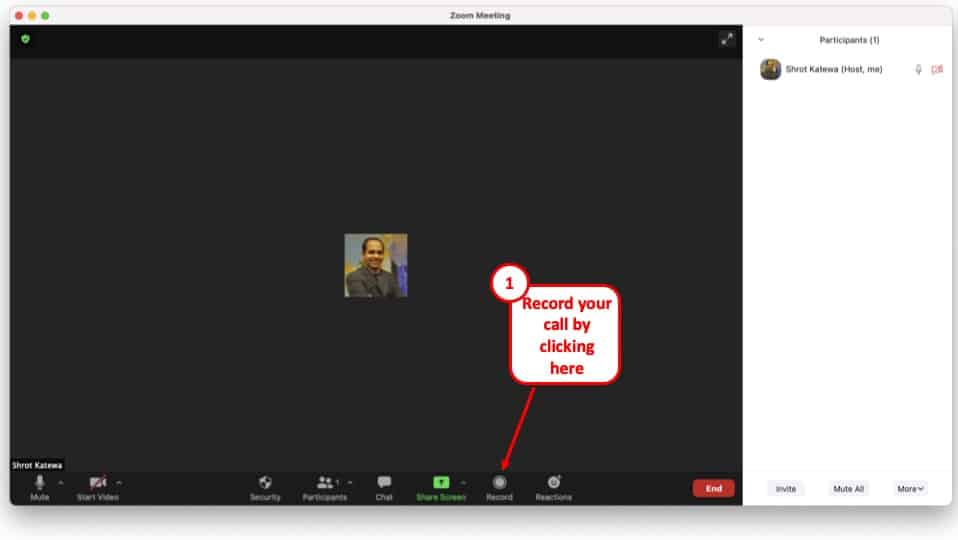
After the end of the meeting, the recorded video will be automatically converted into “.mp4” format and stored on your computer.
Tips for Giving an Awesome Presentation on Zoom
Giving a presentation in front of an audience is always a challenging task. Especially if it is online, many things can go wrong during your presentation. This is why I’m sharing some tips that can help you deliver an awesome presentation on Zoom. These are as follows –
1. Make a Professional Looking Presentation
There are several ways to make your presentation look really professional and high quality. One obvious method is to outsource your presentation to a specialised design agency! But, that can become really expensive depending on your budget.
Another (non-obvious) option is to use a PowerPoint Presentation Template! There are several high-quality and professional templates that you can get quite easily! In fact, using these Presentation Designs is quite inexpensive! You can download as many presentation templates as you want for as little as $16.5/month!
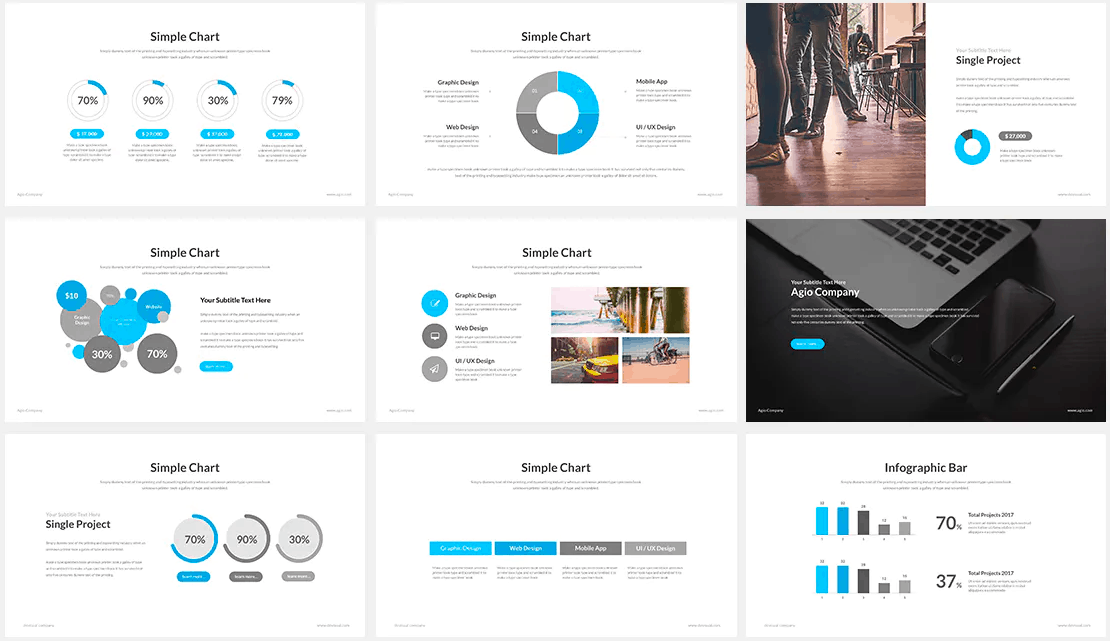
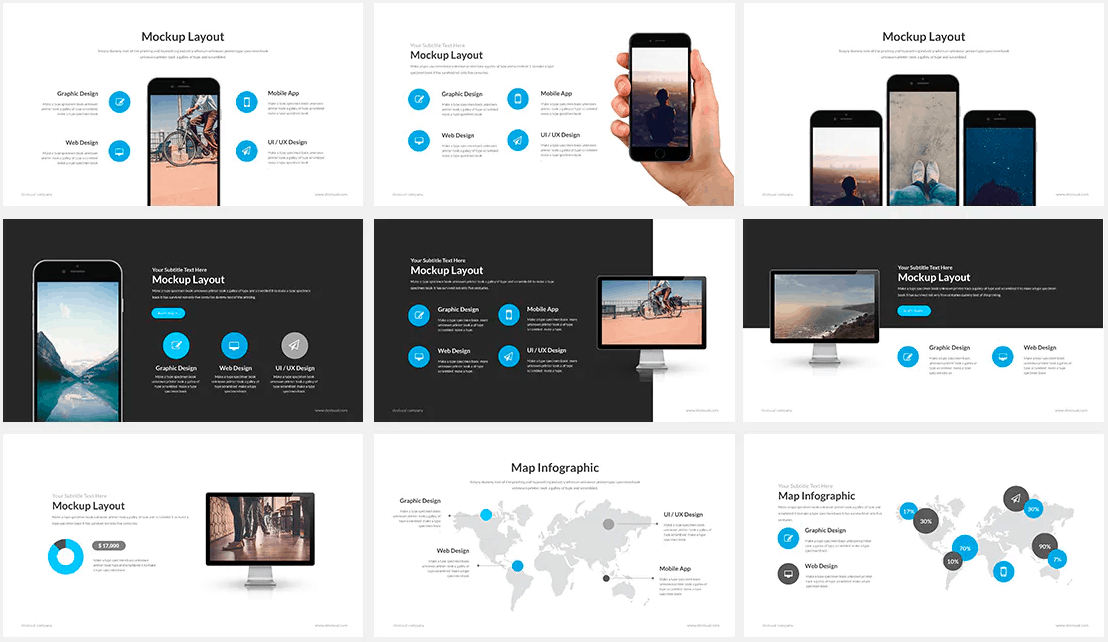
My favorite one is Agio PowerPoint Presentation template. It is perfectly suited to give a professional look to your presentation and yet it is quite quick and easy to use. Check out some of the images below –
Agio PowerPoint Presentation Template


Furthermore, make the presentation as simple and straightforward as possible. Do not confuse your audience with a network of colorful texts, graphs, or other contents.
Only use data and graphs that are relevant to your presentation. Also, the clever use of transition animations can make the slide appear much more engaging.
2. Check Your Equipment Beforehand
Whenever you are giving your presentation online, many things can go wrong. For example, your camera or mic may not function properly. Such interruptions will only make you a laughing stock in front of the participants.
Check your mic, camera, and speakers to find out whether they are working properly or not. Also, check your internet connection and your laptop’s battery level. If everything is ok, then you are good to go on with your presentation.
More Related Topics
- Change the Style of Your Bullet Points and Stand-out from the Crowd!
- 7 EASY Tips to Always Make your Presentations Attractive! (Even if You are a Beginner)
- How to Reduce the Size of Your PowerPoint File? The Perfect Method!
- Auto Create Your PowerPoint Slides using Design Ideas Feature!
- Main Features of PowerPoint! [I bet You DIDN’T Know These]
Credit to Cookie_Studio for the featured image of this article