
If you want to make great presentations, and you are not a design wizard, slide layouts can come in really handy! It is a great place to start designing your presentation. If you are beginning your journey with PowerPoint, you may wonder, what is slide layout in PowerPoint?
Slide Layouts in PowerPoint are pre-created slide designs that allow you to quickly and easily add text, headings, images, tables, etc. By default, PowerPoint provides 9 slide layouts (including a blank slide). PowerPoint also allows you to easily add, edit and delete slide layouts.
So, where can you find these slide layouts? How do you format them? Well, in this article, I will share with you all the basic details that you need to know in order to get started with using and understanding the slide layouts in PowerPoint!
So, let’s get started!
1. What is a Slide Layout in PowerPoint?
A slide on PowerPoint can contain several elements including text, shapes, tables, images, headers, footers. In fact, there may be more than one same type of element present on a single slide. When you start creating a presentation, you are basically using some of these elements to share an inspiring story or an important piece of information.
However, the aesthetics of the slide are determined by how well you lay out these elements on the slide. If you have fairly good design skills, you will easily be able to create an aesthetically pleasing slide! For the rest of us, slide layouts are the way to go!
In Microsoft PowerPoint, a “Slide Layout” refers to the way certain elements (such as text box, image, table, etc) are arranged on the slide. A slide layout is a pre-designed slide format with placeholders that allow you to add text, images, and other elements quickly to the slide.
Using slide layout and master slides, you can also control the color scheme of the presentation, type of fonts, effects, background, headers, footers, and other aspects of presentation design.
This functionality in PowerPoint that allows various pre-created designs to be added to a presentation is often leveraged by corporations. Organizations often create templates and not only control the way presentations look and feel, but also save time for their employees by providing them with various slide design options out of the box!
Pre-set slide layouts are amazing as they allow you to create or use PowerPoint presentation templates. These are pre-designed slide bundles that not only look great on a presentation even when used by a non-designer but also save time for the user of these templates.
For this article, I will be using one of the presentation templates from Envato Elements. With Envato Elements, you get access to thousands of presentation designs with unlimited downloads so you never run out of options again. Plus, you get free previews so you know exactly what you’re getting before buying! It is also very affordable.
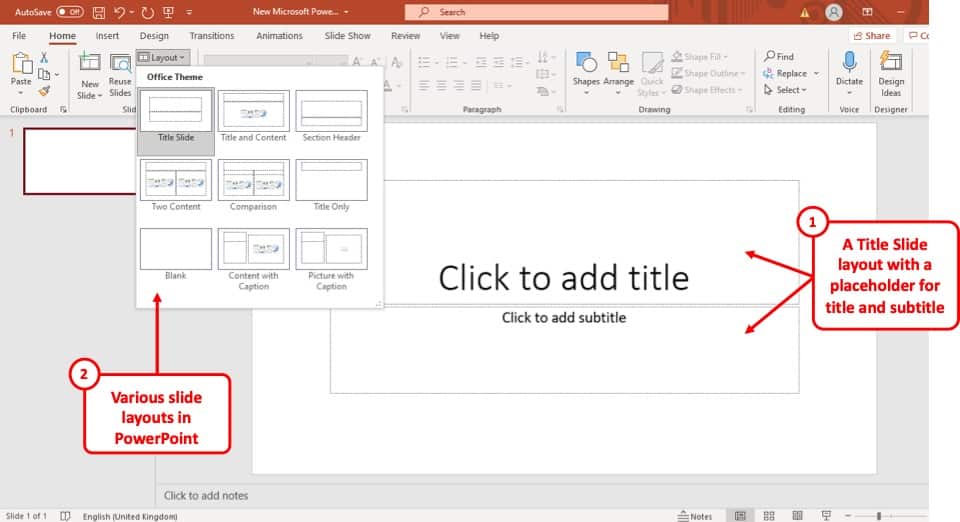
2. Where is the Slide Layout in PowerPoint?
To get quick access to the different layouts of your PowerPoint presentation, click on the ‘Layout’ button in the ‘Slides’ section of the ‘Home’ tab. By clicking on the ‘Layout’ button you will see the various slide layouts present in your presentation.
How to Access Slide Layouts in PowerPoint?
To get complete access to all the Slide Layouts in your PowerPoint so that you can edit them, you have to go to the ‘Master Views’ section under the ‘View’ tab. The whole process is described in the steps mentioned below.
Step-1: Go to the ‘View’ Tab
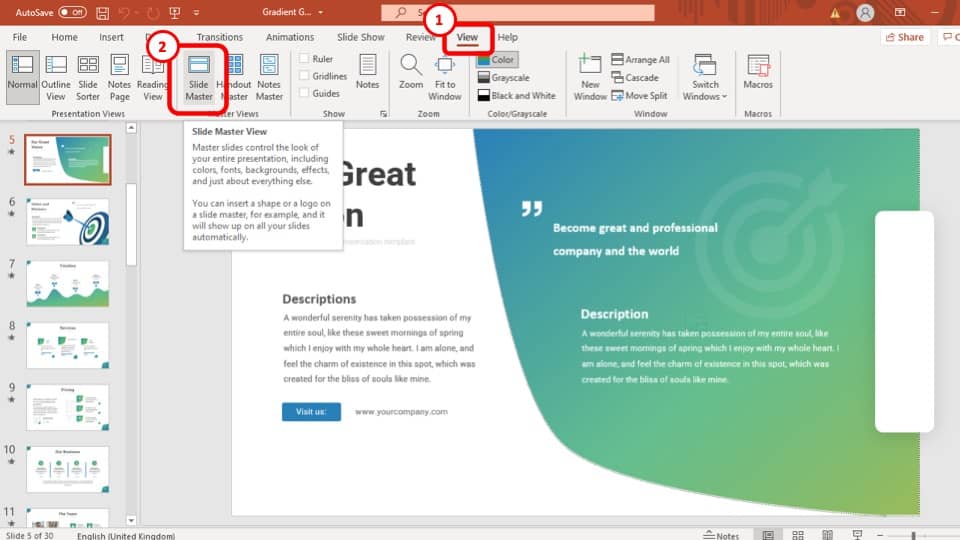
The first step is to go to the ‘View’ tab which is the second to last tab in the ribbon of your PowerPoint.
Step-2: Go to the ‘Slide Master’ view
In the next step, all you have to do is click on the ‘Slide Master’ view option in the ‘Master Views’ section which is located in the ‘Views’ tab.
By clicking on the ‘Slide Master’ viewing option, you will be taken to the Slide Layout view of the PowerPoint presentation.
Related Article – Slide View Options in PowerPoint! [A Complete Guide!]
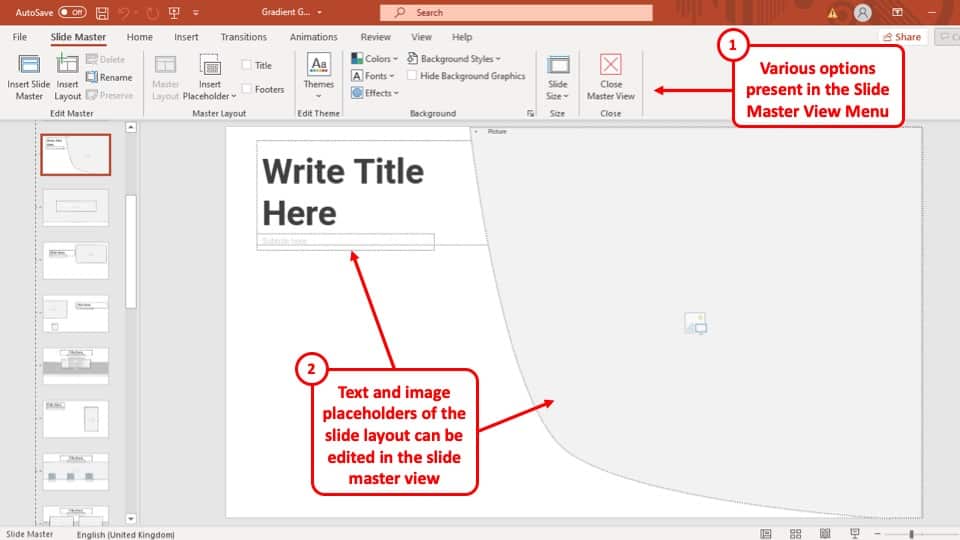
Here, you will notice that the menu options change. Furthermore, you now have access to the different shape, image and text placeholders present on the slide. You will be able to move these placeholders and get complete access to the slide layout.
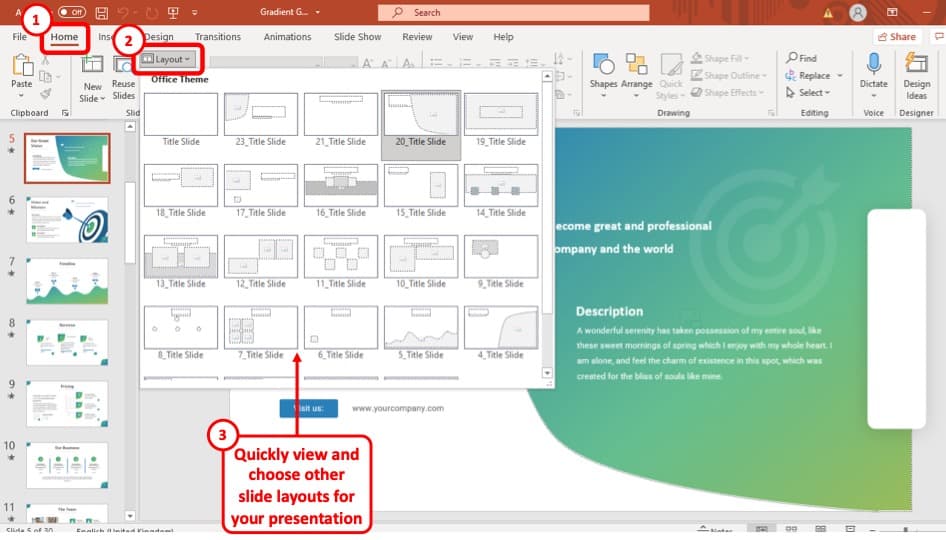
3. How to Change the Slide Layout in PowerPoint?
You can change the Slide Layout of a slide in your PowerPoint presentation by using the Quick access ‘Layout’ option in the ‘Home’ tab of the ribbon. The process is described in 2 easy steps below.
Step-1: Select the Slide first
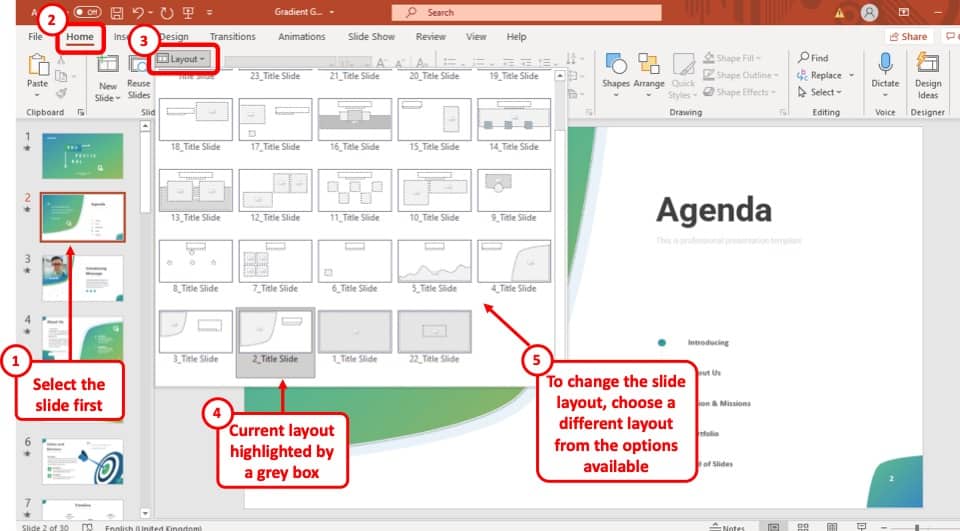
At first, you have to go to the slide you want to change the layout of and then click on the ‘Layout’ button in the ‘Slides’ section of the ‘Home’ tab. This will open a drop-down menu of all the slide layouts in your presentation.
Step-2: Click on Layout and Select a Different Layout
After clicking on the ‘Layout’ button, from the drop-down menu, simply select the layout that you want the slide to change into and the layout of that slide will be changed instantly.
4. How to Apply Slide Layout to All Slides?
Applying slide layout to all slides could mean a couple of things –
- You want to make a change that applies to all slide layouts OR
- You want a specific slide layout to be applied to all slides.
Whatever the case may be, we shall understand both in greater detail below –
4.1 How to Make a Change that Applies to All Slide Layouts
There are certain changes that you sometimes need to apply to all slides. For instance, adding a slide number, adding a company disclaimer, or a company logo.
To apply a change to all slide layout, you will have to edit the ‘Master Slide’.
You will first need to access the “Master Slides” using the “Slide Master View“. To do that, simply click on “View“, then click on “Slide Master“. (as described in the previous sections)
It is the first slide in the ‘Slide Master’ view option which you can find, as discussed earlier, in the ‘Views’ tab.
By applying a change to the ‘Master Slide’ the change will be added to all the other slides in the presentation as well. After going to the ‘Slide Master’ views, follow the simple steps described below.
In the following example, I’m going to add a “Star” (that shall act as a logo) to the top-right corner of the master slide.
Step-1: Apply the change in the ‘Master Slide’ layout.
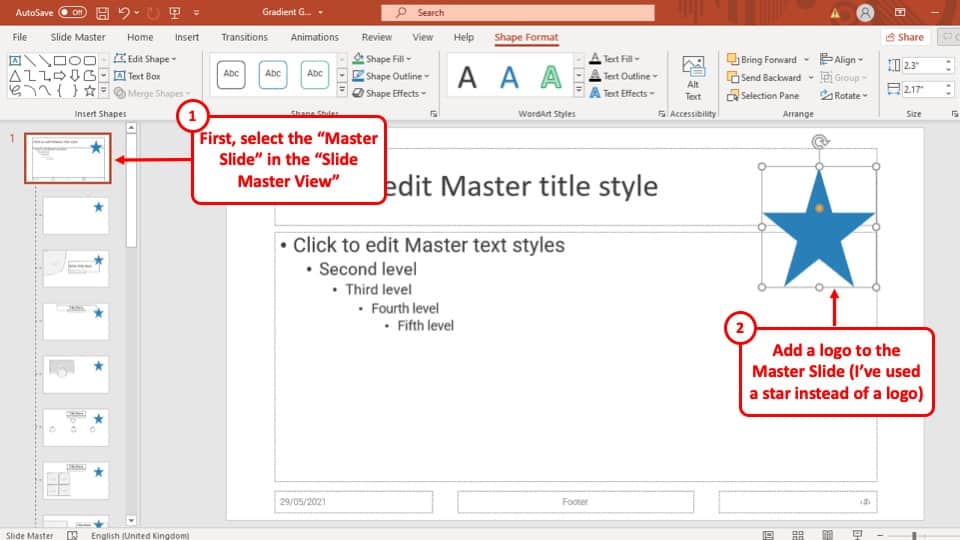
To apply slide layout to all the slides, make the change that you want to have on the ‘Master Slide’. In this case I have added a star on the top right corner of the Slide.
Step-2: Send the applied changes to the background
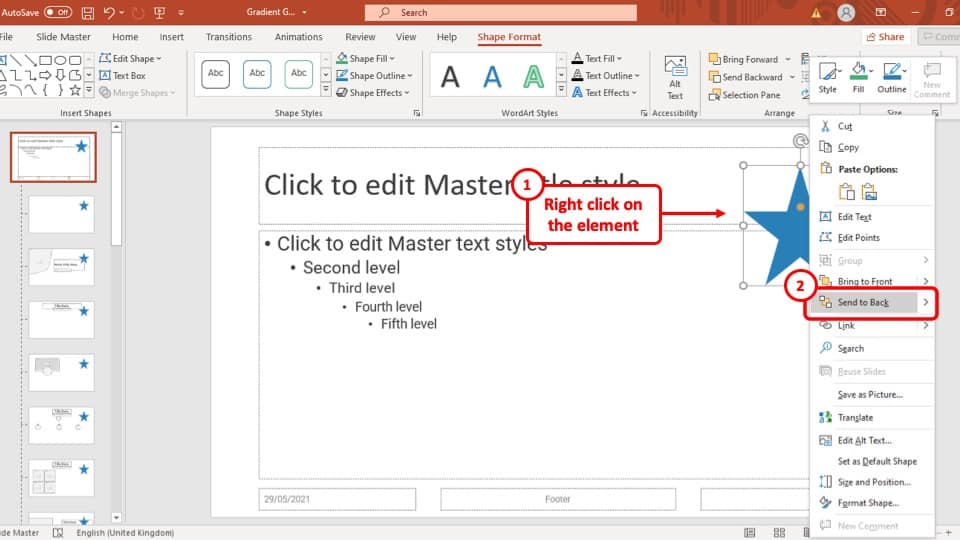
To keep the change, you have made on the background of every slide as a layout, ‘Right click’ on the objects and click on the ‘Send to back’ option from the drop-down menu.
That way, the object will be applied to the background of all the slides and the texts will be visible on top of the logo or the element added.
4.2 How to Apply Specific Slide Layout to All Slides?
If you want to apply a particular slide layout to all slides, follow the below mentioned steps –
Step 1 – Select All Slides
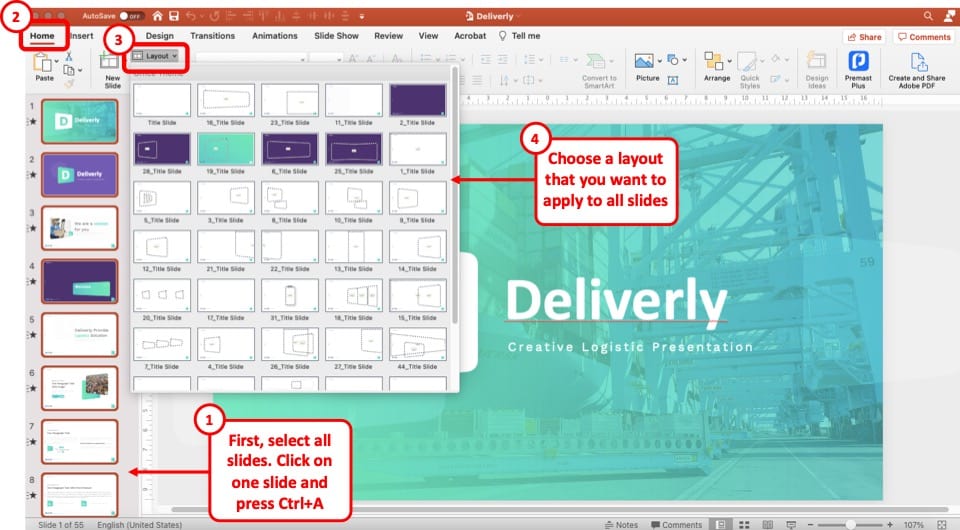
The first step is to select all the slides. To do that, first click on any one slide. Then, press the “Ctrl+A” (Cmd+A for Mac) key combination on your keyboard to select all slides.
Step 2 – Change the Slide Layout
The next step is simply choosing the layout that you want to apply to all slides. To do that, first click on “Home”. Then, click on “Layouts” and choose a layout from the array of slide layouts presented by PowerPoint.
As soon as you select a slide layout, PowerPoint will apply it to all slides.
5. What is the Default PowerPoint Slide Layout?
The default PowerPoint Slide Layout is the style of layout that the Microsoft PowerPoint software provides you out-of-the-box when you open a new PowerPoint file.
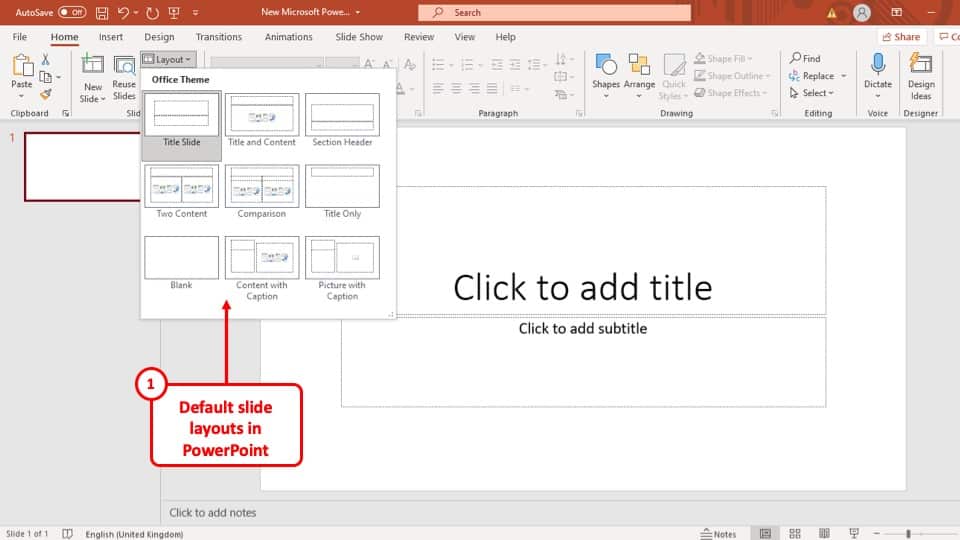
The default layout consists of 9 styles of slides which are:
- Title Slide
- Title and Content
- Section Header
- Two Content
- Comparison
- Tittle Only
- Blank
- Content with Caption
- Picture with Caption
6. How to Edit Slide Layout in PowerPoint?
To edit a slide Layout, you have to use the ‘Slide Master’ view as discussed earlier in the article and follow the simple steps given below.
Step-1: Go to the layout you want to change in the ‘Master Slides’ view
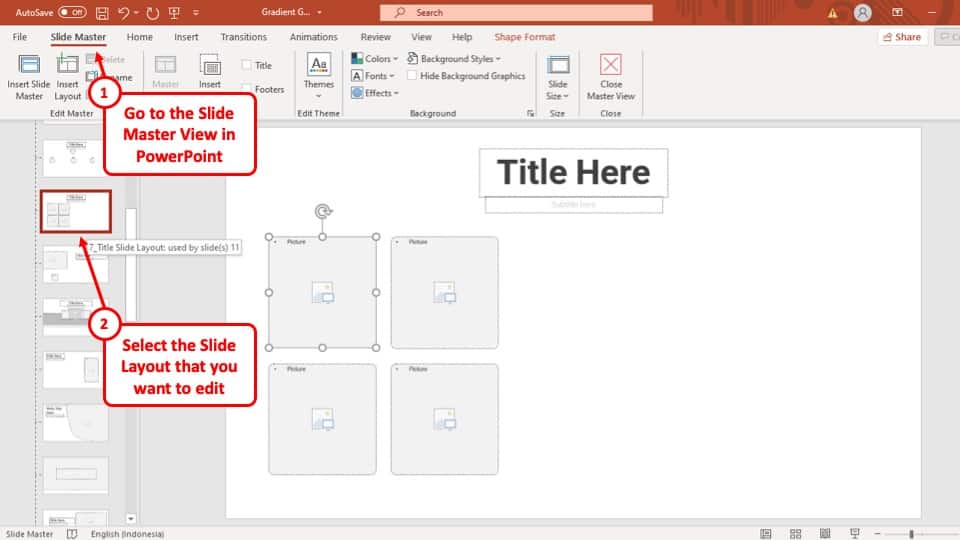
The first step is to go to the ‘Slide Master’ view in the ‘View’ tab and click on the Layout that you want to edit.
Step-2: Make the preferred edits to the layout
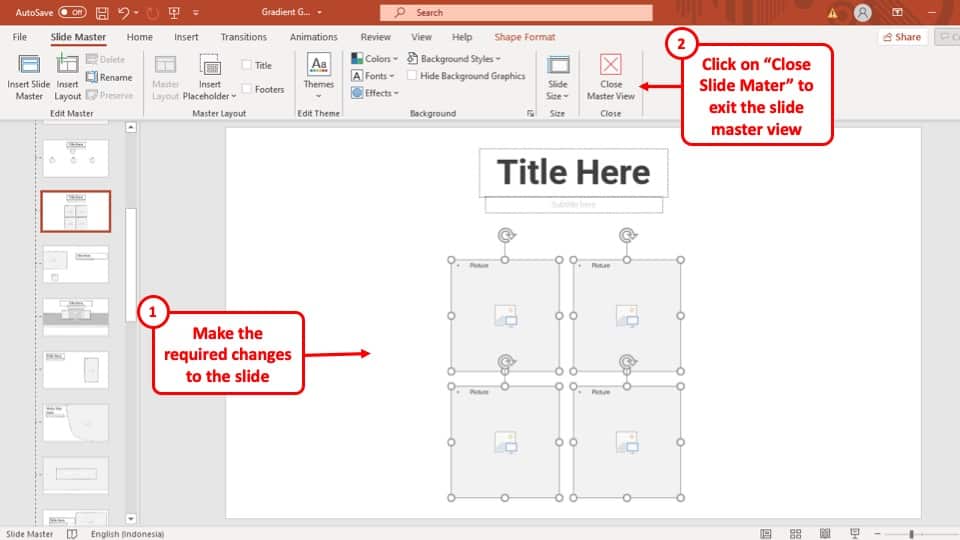
Now, all you have to do is make the preferred edits in the selected layout. After making the edits, the element of the layout will be changed accordingly in the ‘Layout’ option in the ‘Slides’ section of the ‘Home’ tab and all the slides that are using that layout.
Related Article – How to Edit Background Graphics Using Slide Master in PowerPoint!
7. How to Create a New Slide Layout in PowerPoint?
To create a new slide layout in PowerPoint, go to the ‘Slide Master’ view in the ‘Views’ tab in the ribbon and follow the 2 easy steps described below.
Step-1: Click on the position where you want to add the new slide layout
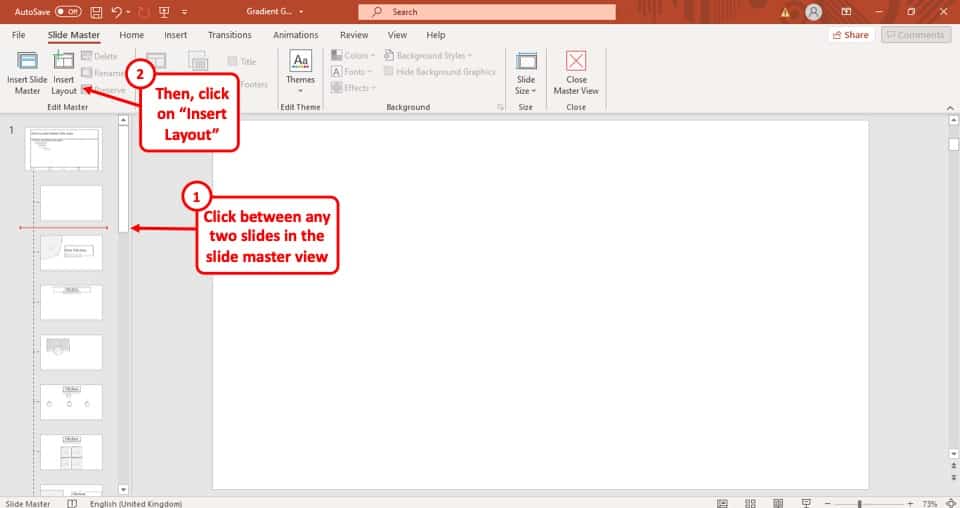
At first you have to click on the position where you want to add the new slide layout in the ‘Slide Navigation’ bar.
Step-2: ‘Insert Layout’ button at the ‘Edit Master’ section.
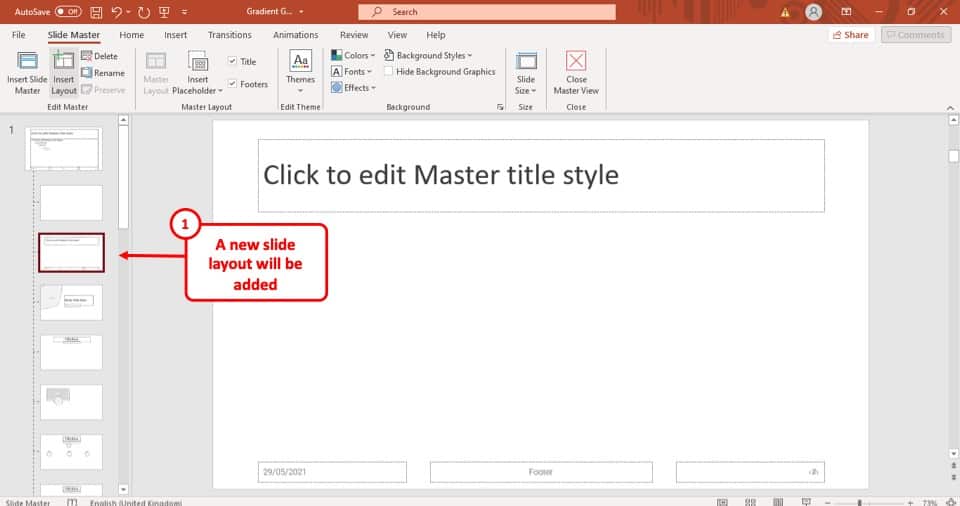
After you have clicked on the position where you want to add the new slide layout, all you have to do is click on the ‘Insert layout’ button located in the ‘Edit Master’ section of the ‘Slide Master’ view.
7b. How to Insert a Blank Slide Layout in PowerPoint?
To insert a blank slide layout in PowerPoint, add a new layout and follow the simple steps given below.
Step-1: Select all the elements in the new slide layout
After inserting a new slide layout, select all the elements that are on the slide layout. You can do that by holding the ‘Left’ mouse button at one corner of the slide and dragging the selector cursor over all the elements of the slide.
Alternatively, you can also ‘left click’ on the elements one by one while holding the ‘Ctrl’ button on your keyboard or click on one of the elements in the slide layout and press the ‘Ctrl + A’ buttons on the keyboard of your computer.
Step-2: Delete the elements or object present on the slide
Finally, delete all the elements that you have selected on the new slide layout. You can do that by clicking on the ‘Backspace’ button or the ‘Delete’ button on the keyboard of your computer while keeping all the elements of the new slide layout selected. That way, the new slide layout will be blank.
Step-3: Rename the Slide Layout and Exit Slide Master
The last step is to rename the slide master so that you can easily identify the newly created slide layout in the layout menu. Once that’s done, simply click on “Close Master View” to exit the slide master.
8. How Many Types of Slide Layouts are There in PowerPoint?
In PowerPoint, there are 16 different types of slide layouts that you can apply to your presentation. All 16 of these layouts are divided into 4 categories. The categories and types of slide layouts is listed below.
- Text Layouts
- Title Slide
- Title Only
- Title and Text
- Title and 2 Column Text
- Content Layouts
- Blank
- Content
- Title and Content
- Text and Content Layouts
- Title, Text, and Content
- Title and Text over Content
- Title and Content over Text
- Other Layouts
- Title, Text, and ClipArt
- Title, Text, and Chart
- Title, Text, and Media Clip
- Title and Table
- Title and Diagram or Organization Chart
- Title and Chart
More PowerPoint Related Topics
- How to Use a Presentation Clicker to Deliver Presentations Effectively!
- How to Crop a Picture in PowerPoint? [Complete Step-by-Step Tutorial!]
- How to Give a Presentation on Zoom? A Helpful Resource!
- How to Convert a PowerPoint to PDF? [A Simple Guide!]
- PowerPoint vs Google Slides: Which is Better? [ULTIMATE Test!]
- How to Change Bullet Style in PowerPoint? A Complete Guide
Credit to psh.vector (on Freepik) for the Featured Image of this Article