
Every once in a while, you will come across this issue where you just can’t select, resize, or even delete an element on the slide! Annoying as it is, if you are in a hurry, it can be a real pain and make matters worse! These elements remain in the background on the slide, and can often interfere with the elements that you’ve added to the slide! So, how do you edit these background graphics in PowerPoint?
To edit the background graphics in PowerPoint, first select the slide in the Normal View. Next, click on the “View” tab. Then, click on “Slide Master”. This will open the master layout of your presentation. Select the graphic on the slide, and edit or delete it as required. Lastly, exit slide master.
It may perhaps be a little difficult to understand exactly how to edit the background graphics on PowerPoint without a visual reference. So, in this article, I will help you understand the process step-by-step with pictures so that you can understand what you need to do. Plus, I will also help you understand how to add or delete placeholders, images in the background and edit the text in the footer!
So, let’s get started!
A Quick Note Before We Begin – if you want to make jaw-dropping presentations, I would recommend using one of these Presentation Designs. The best part is – it is only $16.5 a month, but you get to download and use as many presentation designs as you like! I personally use it from time-to-time, and it makes my task of making beautiful presentations really quick and easy!
How to Access Background Graphics in Slide Master View in PowerPoint?
So, the first thing you need to understand is how do you access these background graphics as PowerPoint doesn’t even allow you to select it! Well, the trick is to open the Slide Master.
Slides Master view is one of the special features of Microsoft PowerPoint. This feature allows you to quickly modify your slide layouts in your presentation file. It allows you to also add placeholders and graphics to your slide!
To access background graphics in the slides master view, here’s what you need to do:
Step 1: Open the PowerPoint Presentation
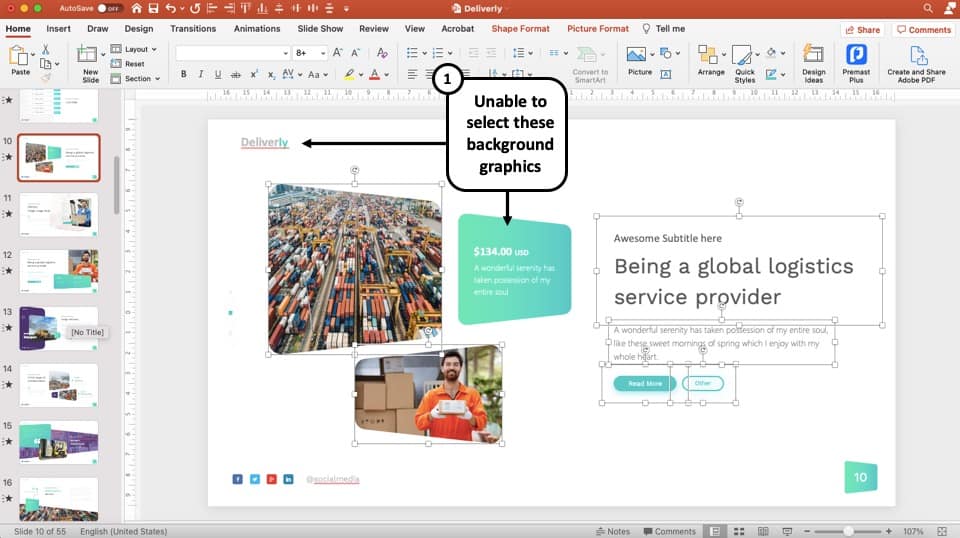
The first step is to open your presentation file in the PowerPoint application. Go to the specific slide where you are unable to select a particular element on your slide.
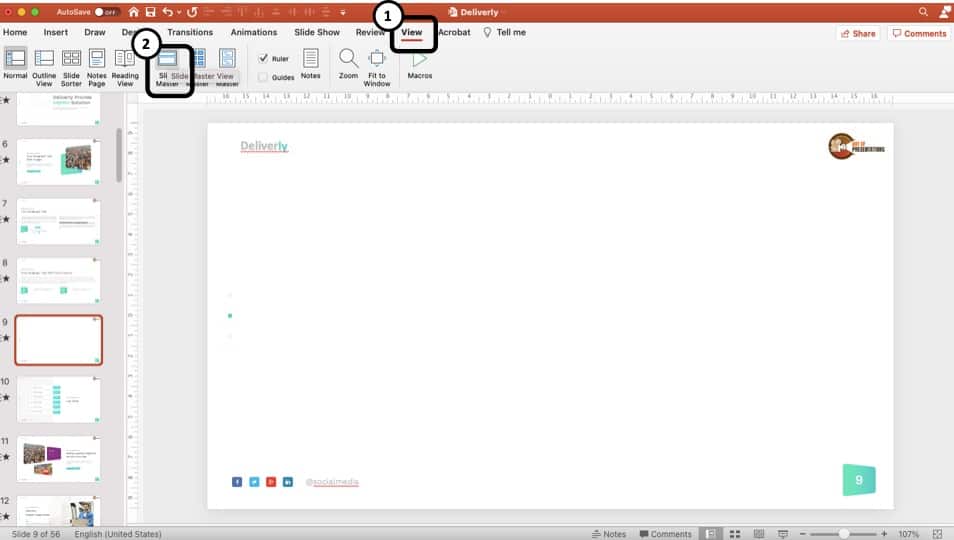
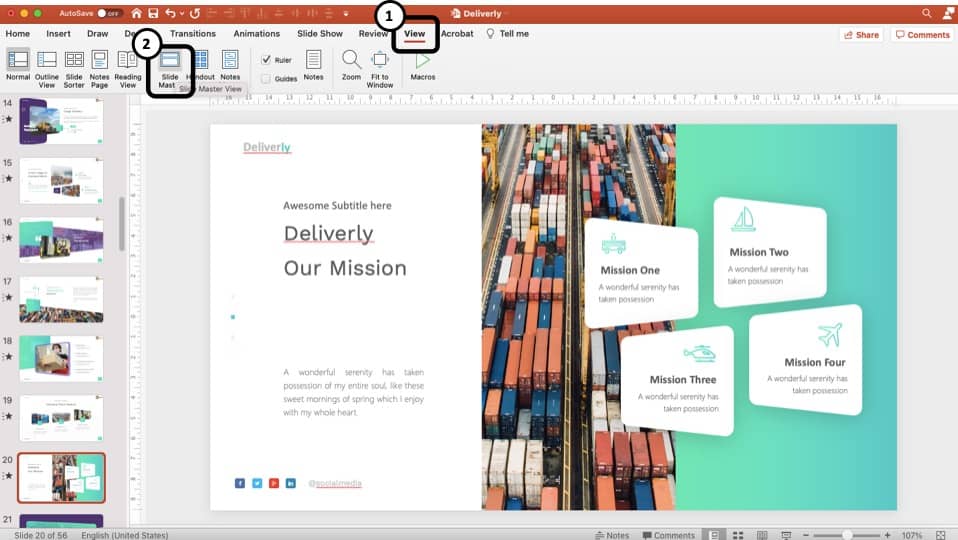
Step 2: Click on “View”, and then select “Slide Master”

Now click on the “View” tab located on the top of the screen and select “Slides Master” from the “Master View” section.
Step 3: Enable the “Hide Background Graphics” option
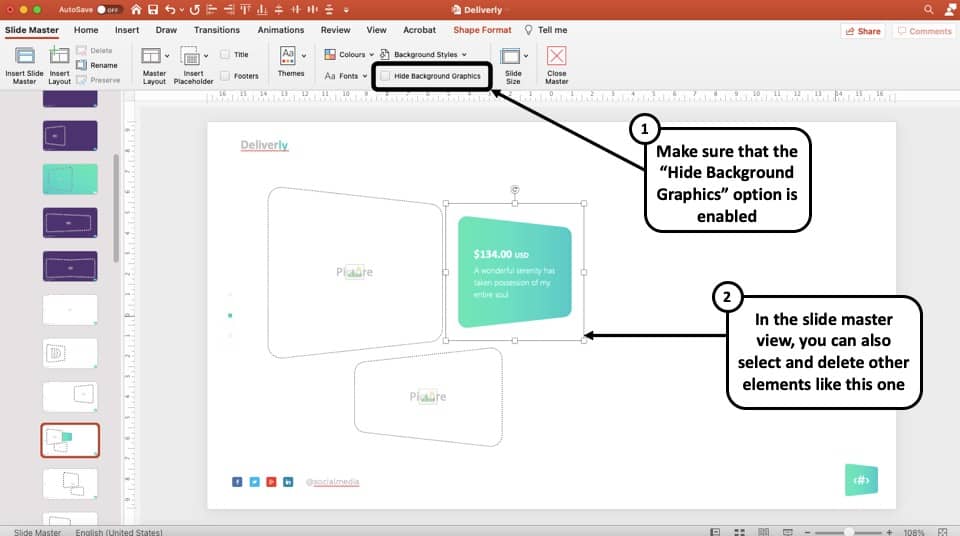
In the slide master view, find the “Hide background graphics” located in the “Background” ribbon. If the button is grey, that means you can now access the background graphics.
How to Edit Background Graphics in PowerPoint?
When editing the background graphics in PowerPoint, there are 2 things that we need to keep in mind!
- Edit background graphics for all your slides – this option is usually used when you want to add, edit or delete background graphics to all slide. For example, if you want to add or remove page number from all the slides, or add a logo to all the slides.
- Edit background graphics for a specific slide – this option is used when you want to edit placeholders on a specific slide. For instance, if you want to edit the image on a slide, or change the text placeholder, or even change the color of the shape of a graphic used on a particular slide
In this section, I’m going to discuss both methods step-by-step.
Edit Background Graphics for all the Slides in Slide Master
When you want to make a change to be visible on all your slides (such as adding a logo), you can use the Master Slide in the Slide Master View.
Let’s see how this is done –
Step 1: Enter the Slide Master View in PowerPoint
Open the presentation file in the PowerPoint application and choose “View>Slide Master” to open the file in slide master view.
Step 2: Scroll up to locate the “Master Slide”
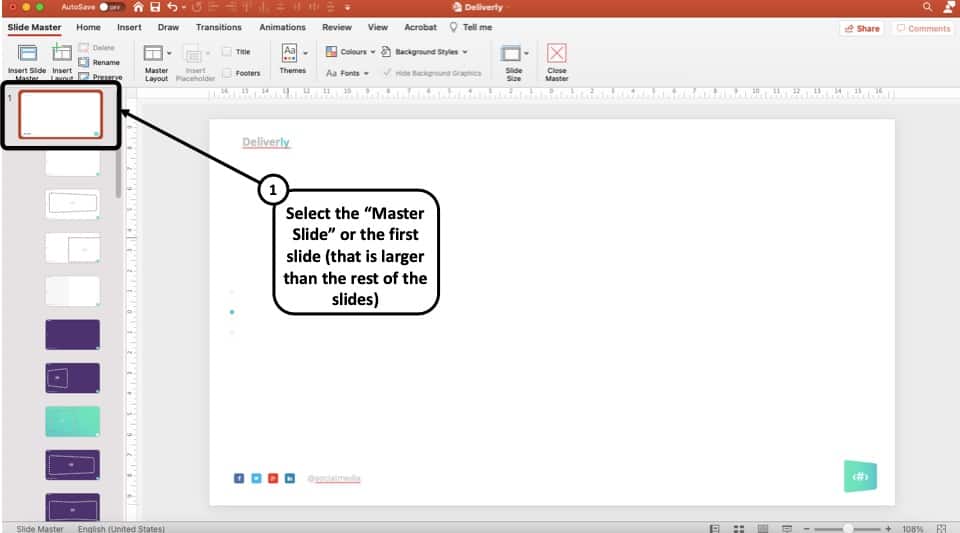
In the slide master view, scroll up in the left navigation panel and select the master slide (the first slide).
Step 3: Add a logo to the Master Slide
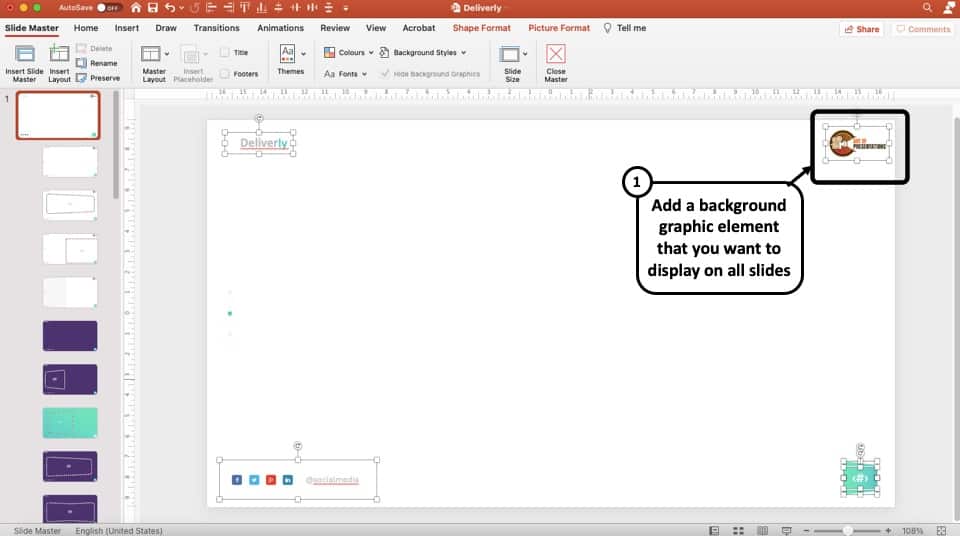
For this example, I’m going to add the logo of Art of Presentations to the “Master Slide” in the top right corner of the slide. You can add any logo or any other image file for the purpose of an example.
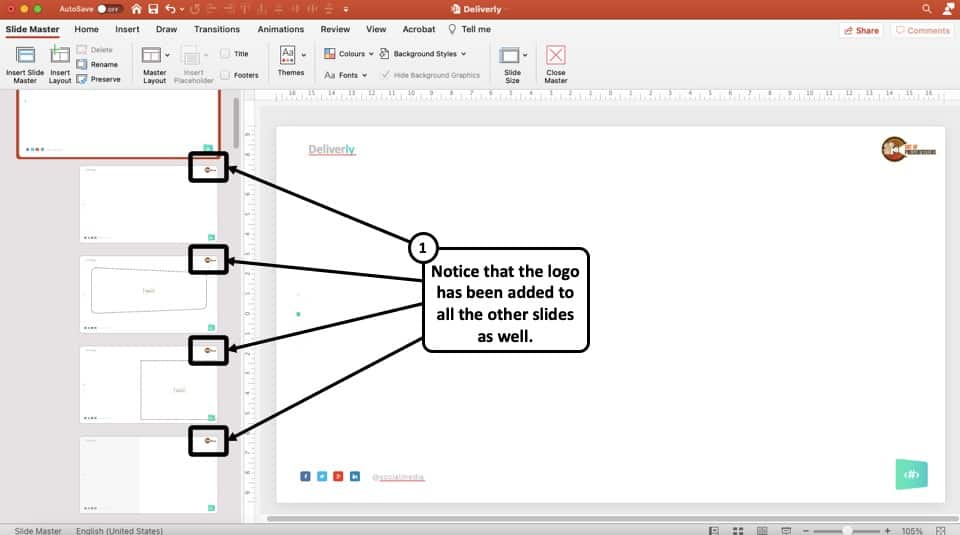
As you may have noticed, as soon as you add the logo to the master slide, the logo is visible on all the slides in the same position i.e. top right corner of the slide.
This is how you can edit or add background graphics all at once to all your slides. Now, you can also go to each slide and paste the logo on every single slide. But, that’s just very cumbersome and takes a lot of time! This is a much better way to add or edit graphics that should be visible on all slides.
Edit Background Graphics for a Specific Slide
Now, the problem with the previous method is that it is limited only to adding or editing elements that are supposed to be visible on every single slide. But, what if you want to edit an element to just one slide? How do you edit the background graphic for a specific slide?
Let’s take a look –
Step 1: Open the Slide Master View
As always, select the slide for which you want to edit the background graphic and click on “View” and then on “Slide Master” to open the slide master view in PowerPoint. You will automatically land on the slide layout of the specific slide in question.
Step 2: Select the specific background graphic on the slide
Next, all you need to do is just select the element that you want to edit on the slide. You will notice that even though you were not able to select the object in the “Normal View“, you will now be able to select the element in the “Slide Master View“!
Let’s say we want to change the color of this background element. Here’s what you need to do next.
Step 3: Change the Shape Fill Color
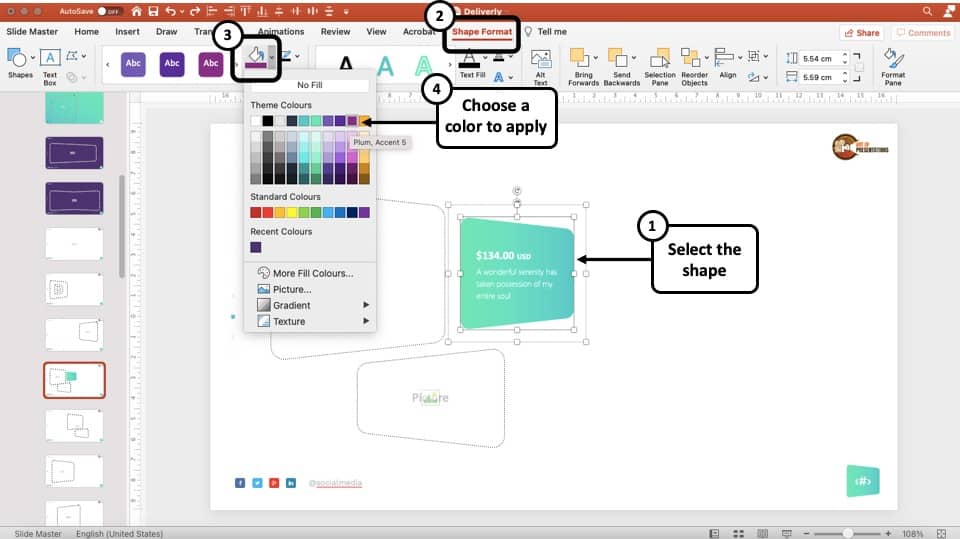
For this example, we plan to change the color of the background graphic. To do that, select the shape. Then, click on “Shape Format“. Next, select the “Shape Fill” option, and select the desired color.
Step 4: Go back to the Slide Master View
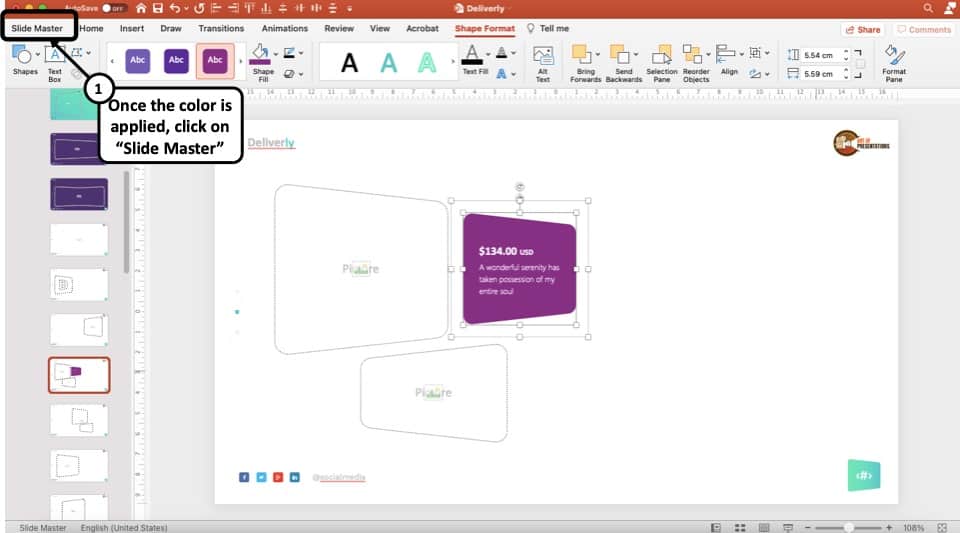
It is important to remember to go back to the slide master view. To do that, simply click on the “Slide Master” menu in the top left corner (as shown in the image above).
Step 5: Exit the Slide Master
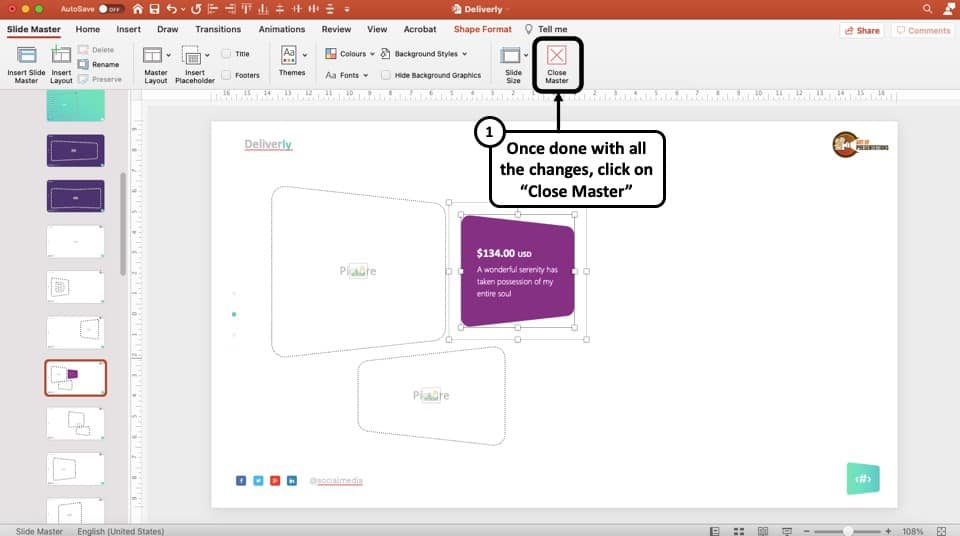
Once you are done making all the changes, the last step is really to exit the slide master view. To do that, simply click on the “Exit Slide Master” option visible (as showcased in the image).
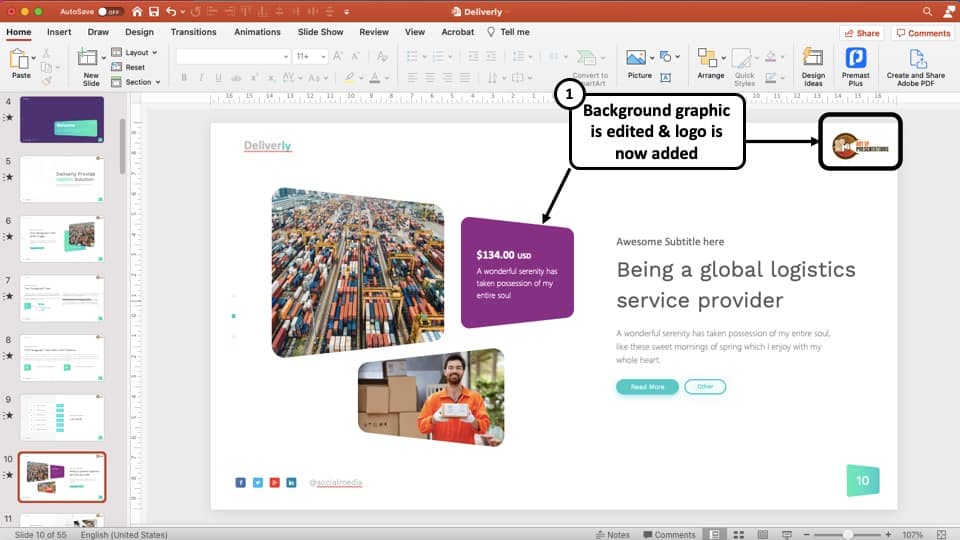
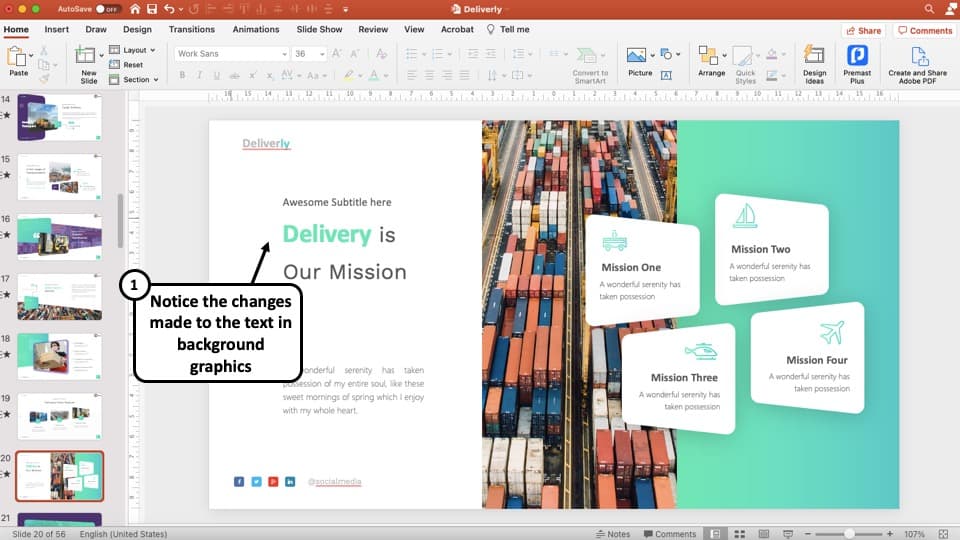
As you can see in the “Normal View”, not only have we managed to change the color of the element that we weren’t even able to select, but also we have added a logo to the slide (done through the master slide in the previous step).
How to Add Placeholders in the Slide Master View?
When learning about how to edit graphics in slide background, it is equally important to know how to add placeholders in the Slide Master View in PowerPoint!
Let’s understand this first before we move on to the other important parts of the article –
Step 1: Open “Slide Master” from “View” menu
Open the presentation slide on PowerPoint and from the “View” tab, click on “Slide Master”.
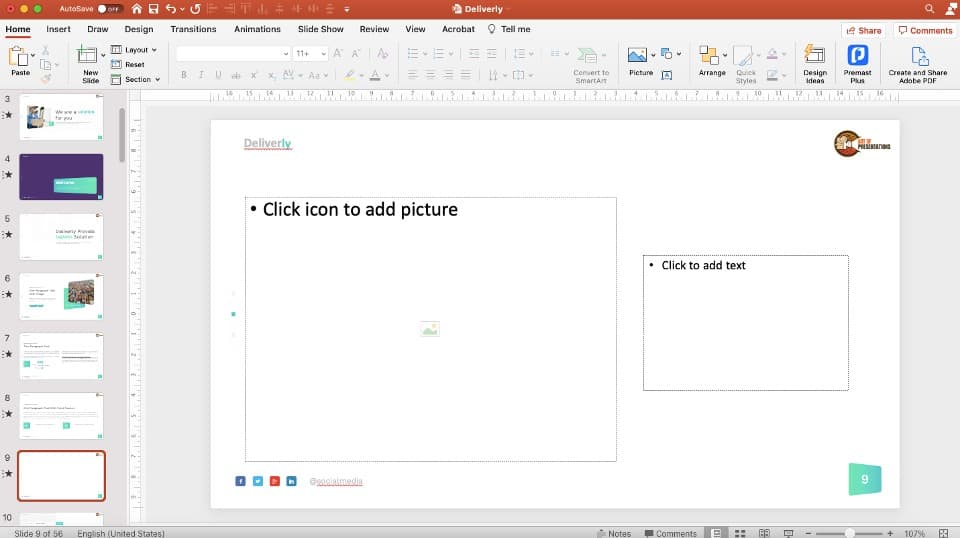
Step 2: Insert a new layout and add a placeholder

On the menu, click on the “Insert Layout” button to create a new layout.
Next, once the new layout has been added, click on “Insert Placeholder” to add a new placeholder to the slide.
Step 3: Add an Image Placeholder
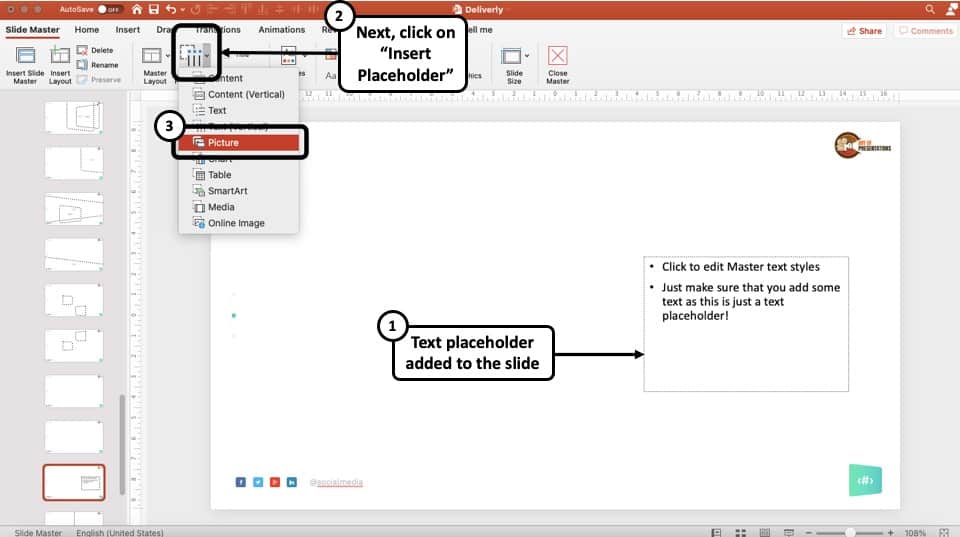
For this example, we will also add an image placeholder to the slide in addition to the text placeholder.
Step 4: Rename the Slide Layout and exit Slide Master
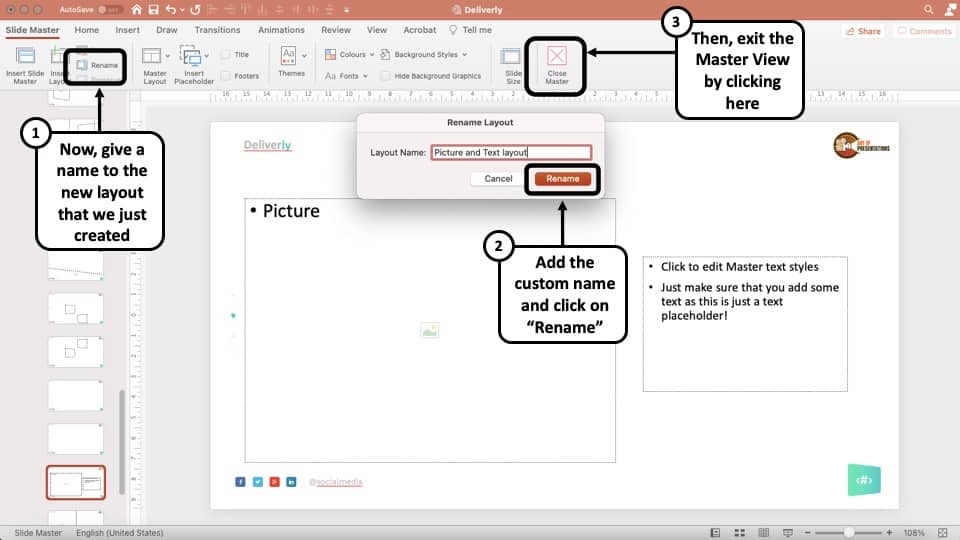
Once we are done adding the placeholders to the slide, simply rename the slide layout that we just created.
Once that’s done, simply click on “Close Master“
Step 5: Insert the newly create slide layout

Our job is not done yet. In the normal view, you first need to insert the new slide layout that you have just created.
To do that, click on “Layout” under the “Home” ribbon. A dropdown menu will open that will contain all the various layouts present. Look for the one that contains the name for the layout we created and click on it.
That’s it! Finally, we are done. As you may notice, we now have successfully added placeholders to your PowerPoint presentation!
How to Edit Text in Background Graphics in PowerPoint?
So far, we have learned how to enable and disable background graphics. We have also learned how to add placeholders. Now, let’s learn how to edit the text in the background graphics in PowerPoint.
This process is quite simple. Here are the steps involved in editing text in background graphics in PowerPoint!
Step 1: Open the Slide Master
Open the slides in PowerPoint and click on “View>Slides Master” to open the presentation file in slide master view.
Step 2: Format the text and make the changes
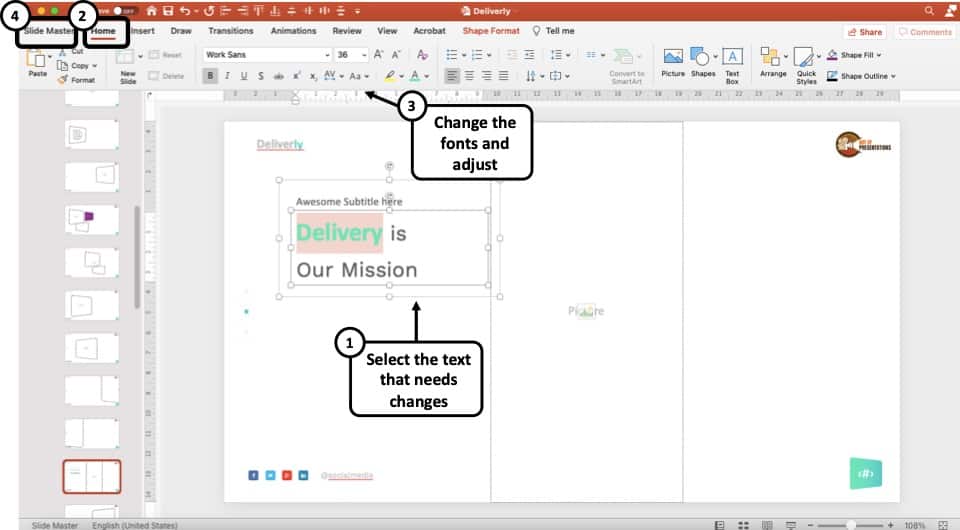
Format the text in order to edit text in the background graphics. To do that, first highlight the text. Then, click on “Home“. Format the text as per your preference. Then, click “Slide Master“
Step 3: Exit Slide Master
As a final step, simply click on “Close Master” to exit the slide master and enter the normal view. You should now be able to see the edits made to the text in background graphics in PowerPoint.
You can also make changes to master slide just the same way.
How to Edit Footer in PowerPoint Slide Master?
We’ve now learned the basics of how to access, edit and format background graphics. Thus, changing the footer from the slide background in PowerPoint shall not be difficult. Here’s what you need to do –
Step 1: Open the Slide Master View
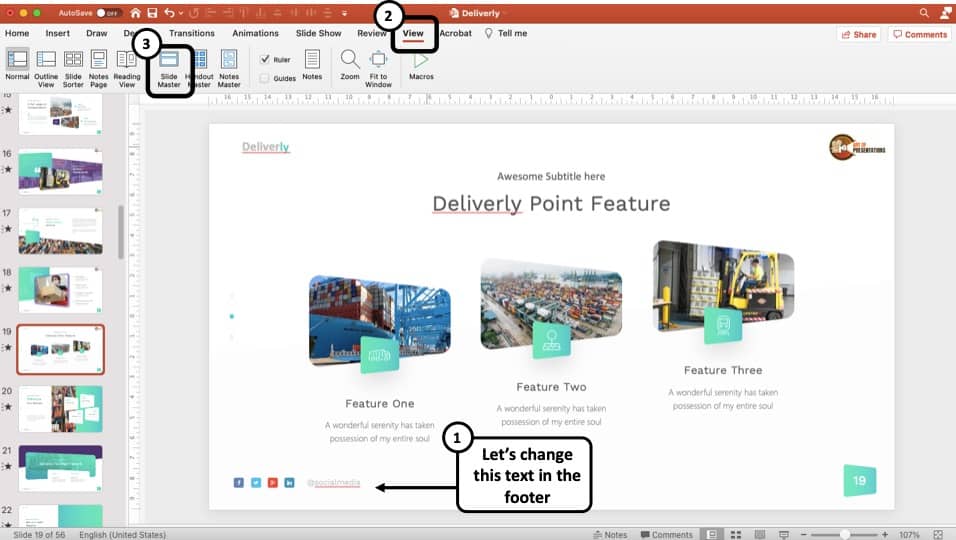
As usual, go to slide master view by clicking on the “View” tab and then the “Slide Master” tab.
Step 2: Scroll up to the Master Slide

In the slide master view, scroll up in the left slide navigation pane and select the first slide.
Step 3: Edit the Footer and Exit Slide Master
Now edit the footer as per your requirement. Here, I’ve changed the text for the social handles to represent my brand i.e. “Art of Presentations”. (as shown in the image above)
Step 4: Switch to Normal View to Validate Changes
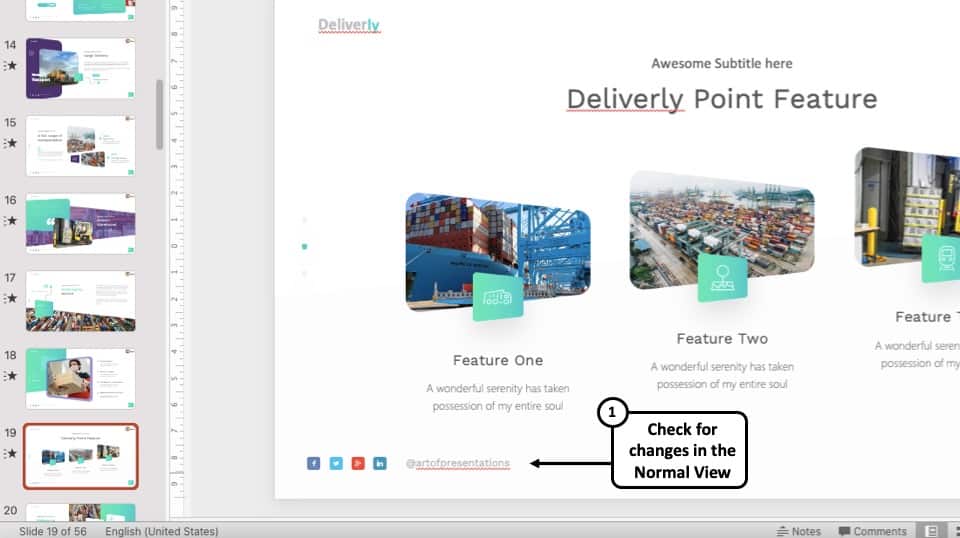
After finishing editing, switch to normal view. You will notice that your changes have been applied to all the slides that are using this slide master layout.
How to Unlock and Edit Images in Slide Master in PowerPoint?
When it comes to background graphics, it feels like images are the most annoying especially when we are unable to select or change the image. This can happen when the images are used as background graphics in the slide master view.
Nevertheless, here’s what you need to do –
Step 1: Open the Slide Master View
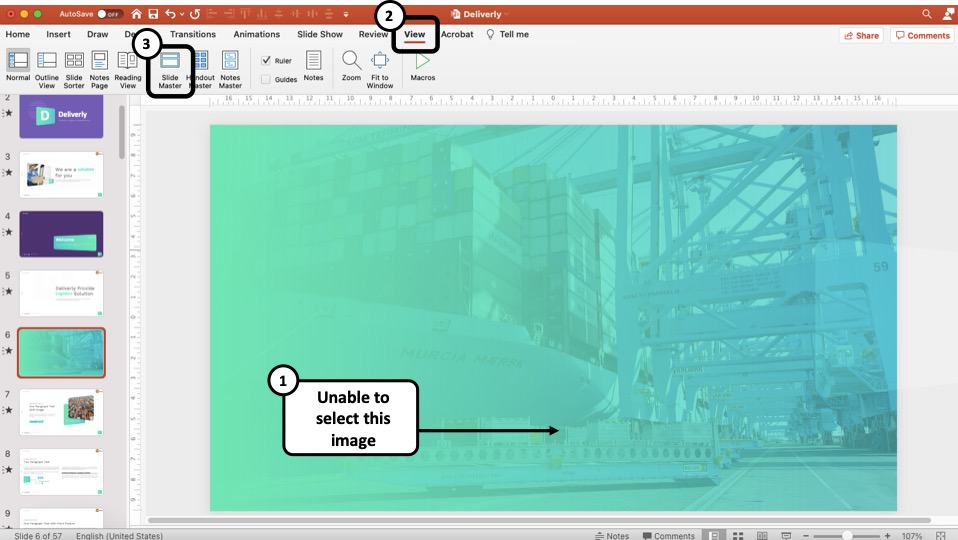
First, open the slide in PowerPoint that contains the image that you are unable to select in the Normal View. Then, you can click on “View“. Click on “Slide Master”
Step 2: Locate and select the image

Sometimes, there can be shape layers added on top of the image. Remove the layers and access the image. You can now right-click on the image and format it the way you normally would format an image!
Furthermore, you can also choose to delete the image from the slide background or the slide master view. Alternatively, you can also cut the image and paste it on the slide in the normal view to make the image more accessible.
Step 3: Ensure that the slide has a solid white fill
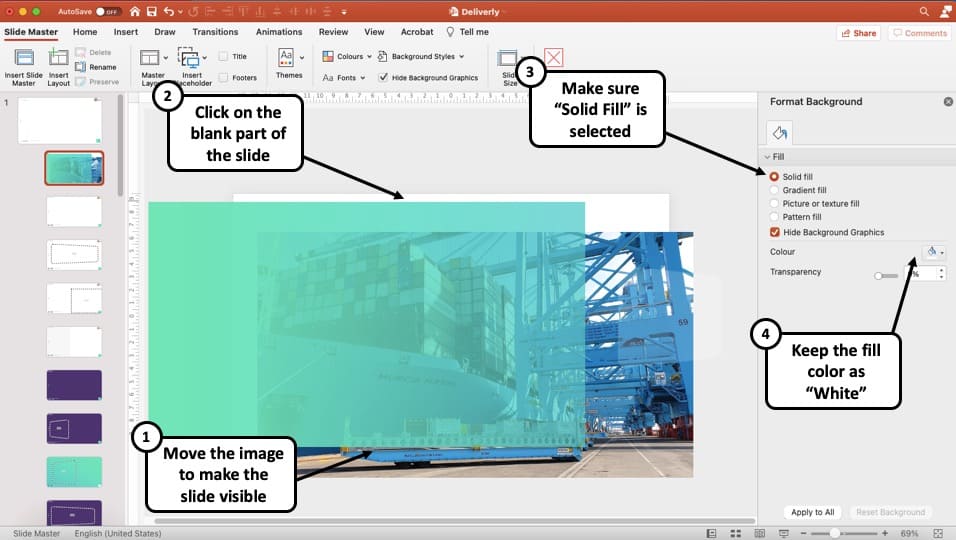
One last thing that you need to check is that the slide doesn’t have a picture fill. Sometimes, you may not be able to grab the image even in the slide master. This can happen when the background of the slide has a picture fill. Meaning, an image has been used to fill a slide!
To counter this issue, right-click anywhere on the slide, and then click on “Format Options”. In the format pane on the right, make sure that the fill selected is “Solid Fill“. Also, choose the color of the solid fill as “White“. This will ensure there is no picture fill done for the slide!
More PowerPoint Related Topics
- How to Crop a Picture in PowerPoint? [Complete Step-by-Step Tutorial!]
- How to Give a Presentation on Zoom? A Helpful Resource!
- How to Convert a PowerPoint to PDF? [A Simple Guide!]
- PowerPoint vs Google Slides: Which is Better? [ULTIMATE Test!]
- How to Change Bullet Style in PowerPoint? A Complete Guide
Credit to Wayhomestudio (provided by Freepik) for the featured image of this article