
Microsoft PowerPoint boasts a ton of features to allow the users the highest level of customizability. Some commands are indispensable while some are aimed toward ensuring a better experience. For greater access to these commands, PowerPoint has a feature called the quick access toolbar. For a beginner, it can be troublesome to locate and make use of this feature.
The quick access toolbar in PowerPoint is located at the top of the application window. It allows users to quickly access features like undo, redo and save. PowerPoint also allows you to customize the quick access toolbar and add commands that are used frequently or need multiple clicks to access.
If you use PowerPoint often, you can actually save a lot of time if you know how to use the quick access toolbar correctly!
So, in the rest of the article, I’m going to help you understand the key things that you need to know on how to customize the quick access toolbar, add and remove commands, and other important points to keep in mind.
So, let’s get started!
[A Quick Note Before We Begin – for this article, I will be using one of the presentation templates from Envato Elements. With Envato Elements, you get access to thousands of presentation designs with unlimited downloads so you never run out of options again. Plus, you get free previews so you know exactly what you’re getting before buying! Check out their pricing here]
What is the Quick Access Toolbar in PowerPoint?
Quick access toolbar in Microsoft PowerPoint is a toolbar for fast access to necessary and frequently used commands. Commands are placed on the ribbon under various tabs. Like the ‘table’ or ‘screenshot’ command is under the ‘insert’ tab, or the font selection or font size selection is located under the ‘home’ tab.
For instance – if you were to choose the “Distribute Horizontally” command, first you need to go to “Shape Format”, then click on “Align”, and finally from the dropdown click on “Distribute Horizontally”.
If you have to do that multiple times while creating a presentation (trust me, you have to do that multiple times, and it is annoying!), then it will take a lot of time and a bit of frustration!
Using the quick access toolbar really makes it easier to access the commands and makes them available in just 1 click to the user.
It is important to remember that the quick access toolbar is independent of the tabs. Meaning – any command from any tab can be added to the toolbar. The quick access toolbar is always present and provides one-click access to your desired commands.
What is the Advantage of the Quick Access Toolbar in PowerPoint?
There are quite a few benefits of using the quick access toolbar in Microsoft PowerPoint. Besides quick access and increase work efficiency, there are few more benefits that you can avail yourself by using the quick access toolbar such as:
- Access to difficult-to-find Commands: Some commands seem quite difficult to find in time of need. They are hidden deep under the tabs in the labyrinth of the ribbon. Those commands can be added to the quick access toolbar for seamless access.
- Auto Shortcut to the Commands: A little-known feature of the quick access toolbar is the keyboard shortcuts. The first 9 commands automatically correspond to Alt+1, Alt+2, Alt+3, and so on.
- Adding Macro Commands: Macro is a series of commands that can be executed with a single button press. Macro commands are a huge time saver and they can be added to the quick access toolbar.
Where is the Quick Access Toolbar Located in PowerPoint?
The quick access toolbar is located on the top left corner of the PowerPoint interface above the ribbon.
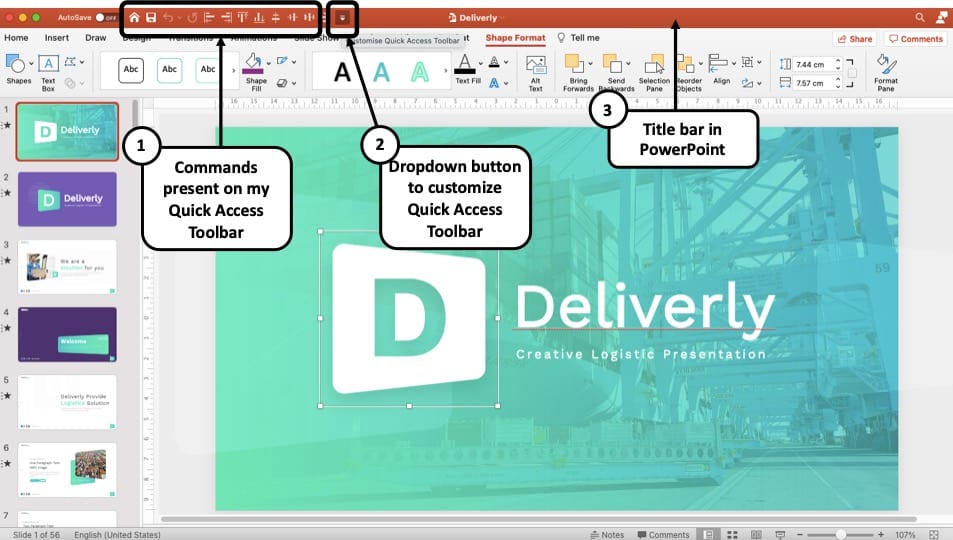
The commands you add to the toolbar are added next to each other on the right side and can go all the way to the right side to the top right corner. You can access the ‘customize the quick access toolbar’ menu by clicking the drop-down icon.
One important thing to know that the more commands you add, the drop-down icon will be pushed to the right. After enough commands are added, the drop-down icon can be found in the far right at the top right corner of the screen.
How Many Commands can be Added to the Quick Access Toolbar in PowerPoint?
The older version of PowerPoint allowed you to add up to 20 commands in the Quick Access Toolbar in PowerPoint. However, in PowerPoint 2016 and later versions, there is seemingly no limit in the number of commands that can be added to the quick access toolbar.
The commands are added next to each other to the right. Once the quick access toolbar is filled with commands, an icon named ‘More controls’ shall appear at the right end of the toolbar.

After you click it, the second line of commands shall appear below. If more commands can appear in a single line, there will be a ‘right’ icon on the far right. Click on it and you will have access to the rest.
How to Customize the Quick Access Toolbar in PowerPoint?
Customizing the quick access toolbar in PowerPoint is easy. You can directly add a command from the ribbon or go to the quick access toolbar customization option and add commands from the commands list. Let’s take a look at how you can customize the quick access toolbar in PowerPoint 2016, 2010, and on Mac:
Customize Quick Access Toolbar in PowerPoint 2016
Follow the steps below for customizing the quick access toolbar in PowerPoint 2016:
Step 1 – Open the PowerPoint Presentation
The first step really is to open the PowerPoint application. You can do that by opening any presentation file.
Step 2 – Click on the “Customize Quick Access Toolbar” icon
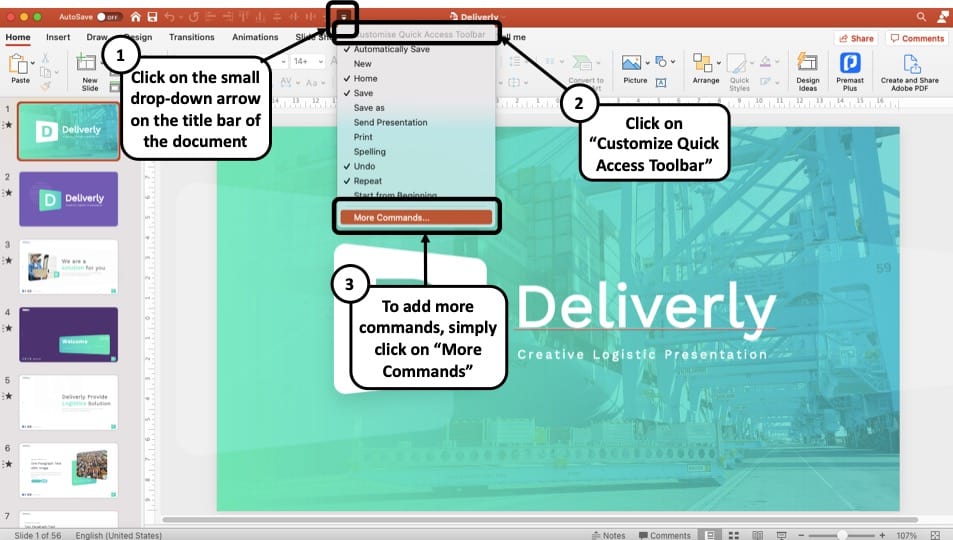
Next, take your cursor to the title bar, and click on the little dropdown button that will allow you to customize the quick access toolbar in PowerPoint.
Step 3 – Add More Commands
Be default, there will be some commands like Save, New, Undo, Redo, etc that will be visible on quick access toolbar.
To add more commands to your toolbar, simply click on the “More Commands” option. (as indicated in the above image)
Step 4 – Choose the Command Category
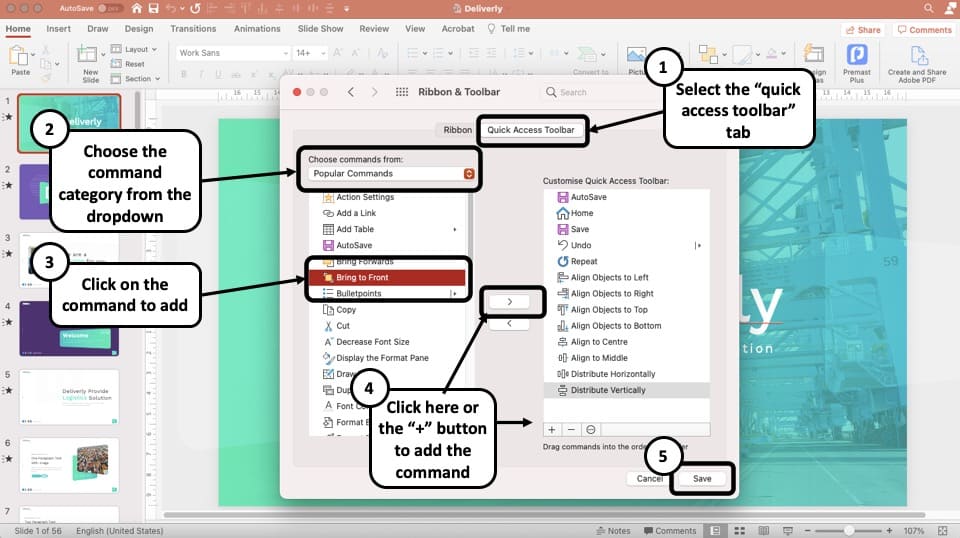
The commands are divided into multiple categories such as “Popular Commands”, “All Commands”, “Commands not on the Ribbon”, etc. Select your desired category from the drop-down menu under “Choose commands from“.
Step 5 – Add the Command to the Quick Access Toolbar and Click Save
Click on your desired command from the box on the left and click ‘Add’. Finally, click “Save” once you are done adding all the commands to your quick access toolbar.
You can also access the quick access toolbar option by clicking on File>Options and selecting ‘Quick Access Toolbar’ from the sidebar of the PowerPoint options dialogue box.
If you want to reset the quick access toolbar, click on File>Options>Reset > Reset only Quick Access Toolbar.
You can directly add commands from the ribbon to the quick access toolbar. Right-click on the command and select ‘Add to Quick Access Toolbar.’ For removing, right-click on the command on the quick access toolbar and select ‘Remove from Quick Access Toolbar.’
Customize Quick Access Toolbar in PowerPoint 2010
You can customize the quick access toolbar in PowerPoint 2010 the same way as PowerPoint 2016.
You can either right-click anywhere on the ribbon or the quick access toolbar to access the quick access toolbar customization option. Or you can go to File>Options and select ‘Quick Access Toolbar’ and follow the same procedure as PowerPoint 2016.
Customize Quick Access Toolbar in PowerPoint on Mac
Following are the steps to customize the quick access toolbar on mac:
- Open or create a PowerPoint document.
- Go to the app Preferences>Quick Access Toolbar.
- Select the commands from the left box On the Quick Access Toolbar tab window, and select the arrows to add or remove a specific command
- Click ‘Save’
- The selected command will appear at the end of the Quick Access toolbar.
Quick Access Toolbar Missing? Here’s How to Fix it!
The quick access toolbar is a built-in feature in Microsoft PowerPoint. Some reasons can make it difficult to find the quick access toolbar. In case the quick access toolbar goes missing, here are possible scenarios:
- The quick access toolbar may have moved – Its default location is on the top left corner above the ribbon. If you select ‘Show Below the Ribbon’ from the customization menu, it will move from its default location to the top left corner beneath the ribbon.
- Quick access toolbar got removed or disappeared – This can happen especially when you are updating your PowerPoint software. But, that’s okay! It is easy to bring the quick access toolbar back.
Simply click on the small dropdown arrow on your title bar, and then select “Customize Quick Access Toolbar”. This will open up the options to add the desired commands, and the quick access toolbar will be added back to where it belongs!
More PowerPoint Related Topics
- How to Crop a Picture in PowerPoint? [Complete Step-by-Step Tutorial!]
- How to Give a Presentation on Zoom? A Helpful Resource!
- How to Convert a PowerPoint to PDF? [A Simple Guide!]
- PowerPoint vs Google Slides: Which is Better? [ULTIMATE Test!]
- How to Change Bullet Style in PowerPoint? A Complete Guide
Credit to Cookie_studio (designed by Freepik) for the Featured Image of this article