
Shapes, in PowerPoint, are a great way to make your presentation more visually engaging and interesting. But, not knowing how to format shapes in PowerPoint can be really frustrating and annoying especially when you are starting out! However, it is really not that hard to format shapes in PowerPoint.
To format shapes in PowerPoint, select the shapes that you want to format by holding the “Ctrl” key on your keyboard and clicking on each shape. Then, right-click using your mouse, and choose the “Format Shape” option. This will open a new window that will allow you to make changes to the shapes.
In this article, we will cover all the basics of formatting shapes in PowerPoint. We’ll go over how to add shapes, change their color and outline, and even add an image or text inside a shape! That and much more in a step-by-step manner so that it is easy for you to understand even as a beginner.
So, let’s get started!
[A Quick Note Before We Begin – for this article, I will be using one of the presentation templates from Envato Elements. With Envato Elements, you get access to thousands of presentation designs with unlimited downloads so you never run out of options again. Plus, you get free previews so you know exactly what you’re getting before buying! Check out their pricing here]
1. How to Add Shapes in PowerPoint?
The first thing that we should know is how to add shapes in PowerPoint. If you are already aware of this process, you can skip to the next sub-section (i.e. How to Insert a Perfect Circle in PowerPoint)
Adding shapes in PowerPoint is quite easy. Let’s learn the process with the help of some visuals –
Step 1 – Click on the Insert Tab

The first step is to click on the “Insert” tab on the PowerPoint.
Step 2 – Click on Shapes and choose the shape to add
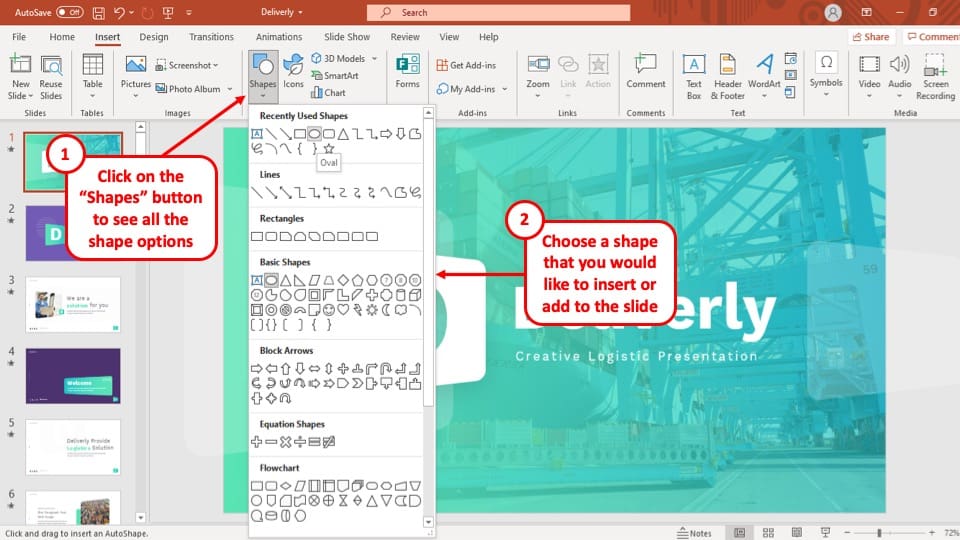
The next step is to identify the “Shapes” option located on the ribbon, and then click on it.
Once you click on the “Shapes” option, you will be presented with several different options of shapes to choose from. Simply browse through and click on the shape that you would like to insert
Step 3 – Add the shape to the slide
The last step in the process is to add the shape to the slide. To do that, simply click and drag the cursor in one direction and you will notice that the shape has been added to the slide!
It is as simple as that!
One thing that you may have noticed is that there is no option to insert a perfect circle as a shape in PowerPoint. It may seem annoying at first, but there is an easy way to solve this problem! Let’s understand how this can be done.
1a. How to Insert a Perfect Circle in PowerPoint
Inserting a perfect circle requires you to follow three easy steps. These are as follows –
Step-1: Go to ‘Shapes’ option from the ‘Insert’ tab
To start, click on the ‘Insert’ tab and find the ‘Shapes’ option located in the ‘Illustrations’ section on the ‘Insert’ ribbon of your PowerPoint window.
Step-2: Open the ‘Shapes’ option to choose the Oval Shape
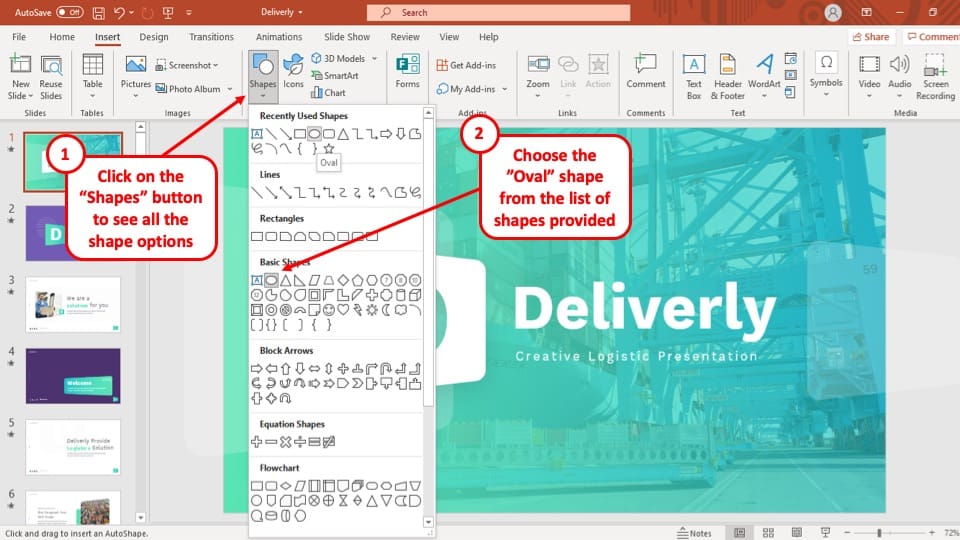
After opening the ‘Shapes’ Tab, select your desired shape from a range of shapes available in the option. To make the perfect circle, select the ‘Oval’ shape from the options.
Step-3: Use the ‘Shift’ key to create a circle
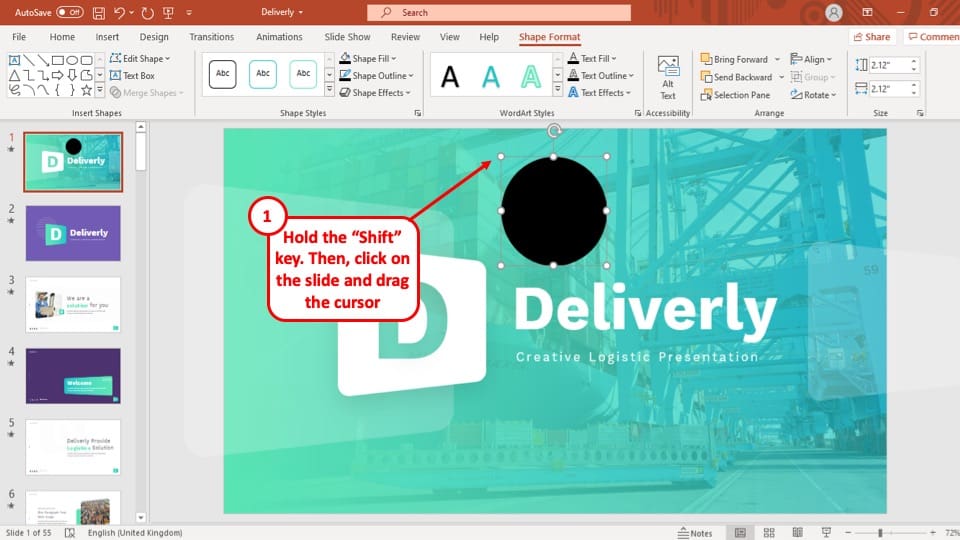
Once you have selected the oval shape, your cursor will change into a plus sign to indicate that a shape is ready to be inserted. Take your cursor to your preferred location for the circle. Press the ‘Shift’ key on your keyboard, and ‘left click’ on your mouse to drag the circle into shape.
2. How to Access Shape Format Tab in PowerPoint?
Once you’ve added a shape to the slide, you will perhaps need to format it as well. This can be achieved by accessing the “Shape Format” ribbon in PowerPoint.
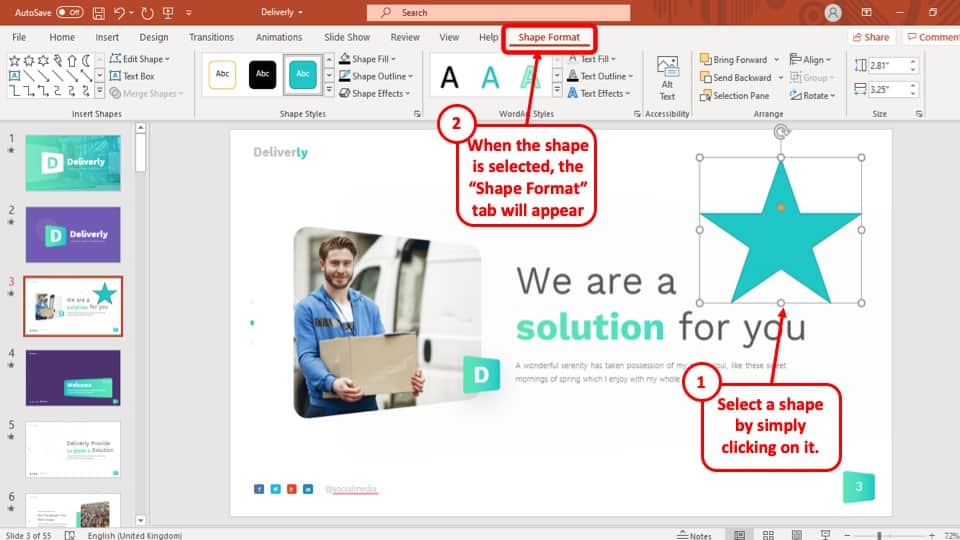
To access the shape format tab in PowerPoint, first, select a shape by clicking on it. This will make the ‘Shape Format’ tab appear at the upper middle part of your PowerPoint presentation window.
You can then access the options to format a shape.
3. How to Format Shapes in PowerPoint?
Shapes in PowerPoint can be formatted through the ‘Format Shape’ bar. To make the ‘Format Shapes’ bar appear, ‘right-click’ on the shape in your presentation and select the ‘Format Shape’ option from the drop-down menu. You will see a pictorial representation in the below section.
In the following section, I will show you some of the basics of formatting a shape in PowerPoint so that you can also incorporate these in your presentation design routine.
3a. How to Change Shape Fill Color in PowerPoint?
Changing the shape color in PowerPoint is very easy. Here is a step-by-step guide on how to do it.
Step-1: Select the shape and open the ‘Format shapes’ window
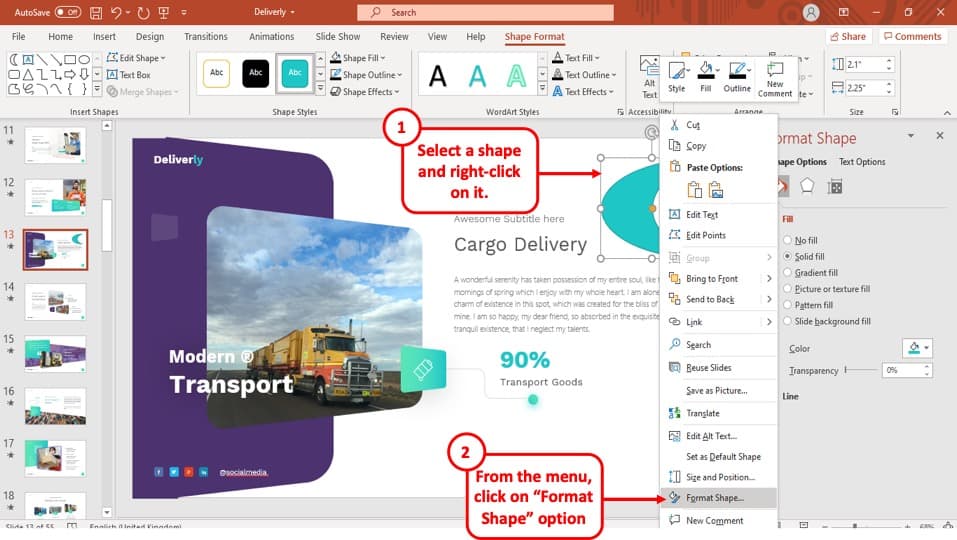
At first, select the shape that you want to change fill color, right-click on it and open the ‘Format shapes…’ bar to access the different formats.
Step-2: Choose “Solid Fill” and click on the ‘Color Bucket’ icon.
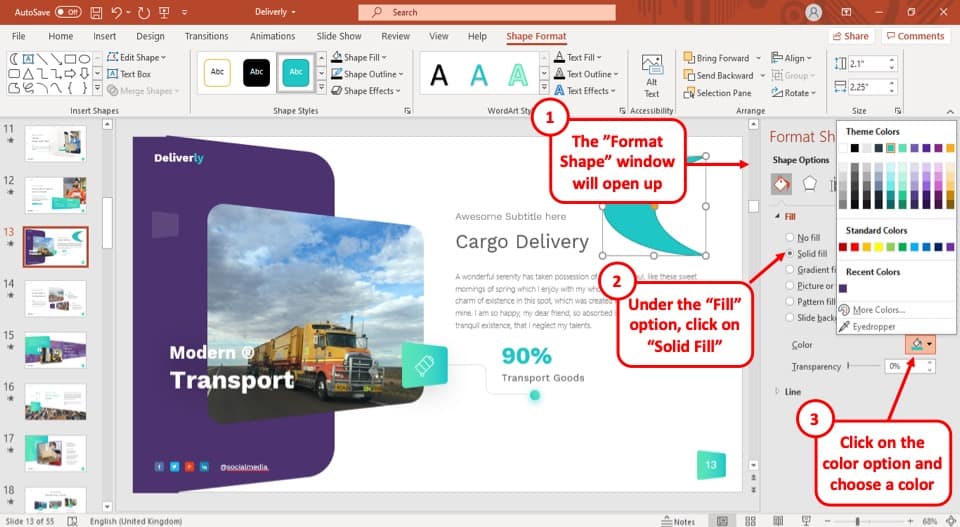
While keeping the shape selected (which means a square outline is covering the shape from its outer part) go to the Format Shapes bar and find the ‘Color’ option by clicking on the ‘Paint Bucket’ icon .
Step-3: Select the color for the shape
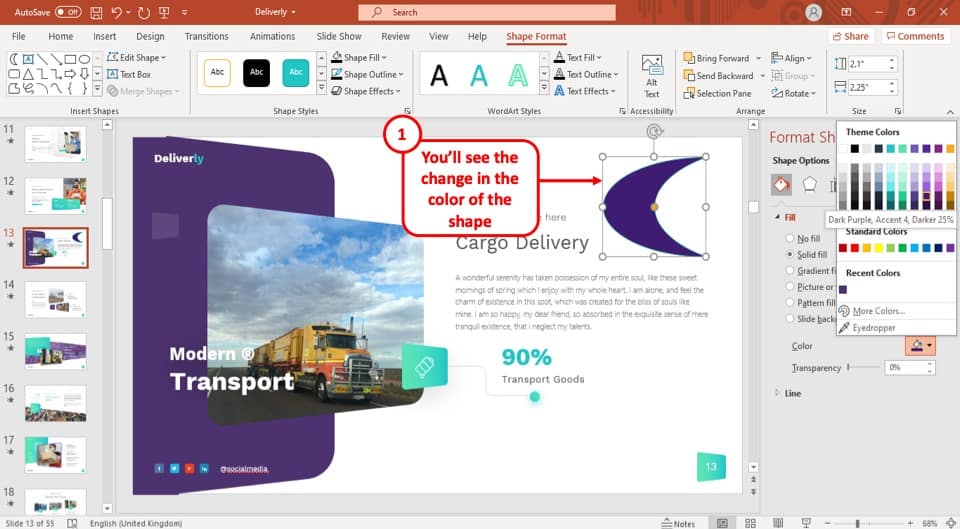
After you have selected the ‘Color’ option, simply select the different color that you want your shape to change into and you are done!
Adding Transparency to Shape Fill Color
If you think that the color is too bright or perhaps you want to just make it transparent, you can achieve this by adding transparency to the shape fill in PowerPoint.
Adding transparency to the shape fill color is very simple in PowerPoint. It can be done in 2 simple steps. They are described below.
Step-1: Open the ‘Format shape’ bar and go to the ‘Fill’ section.
First you will need to access the ‘Fill’ section in the ‘Format shape’ bar to find the ‘Transparency’ slider.
Step-2: Move the slider to increase the transparency of the color in your shape
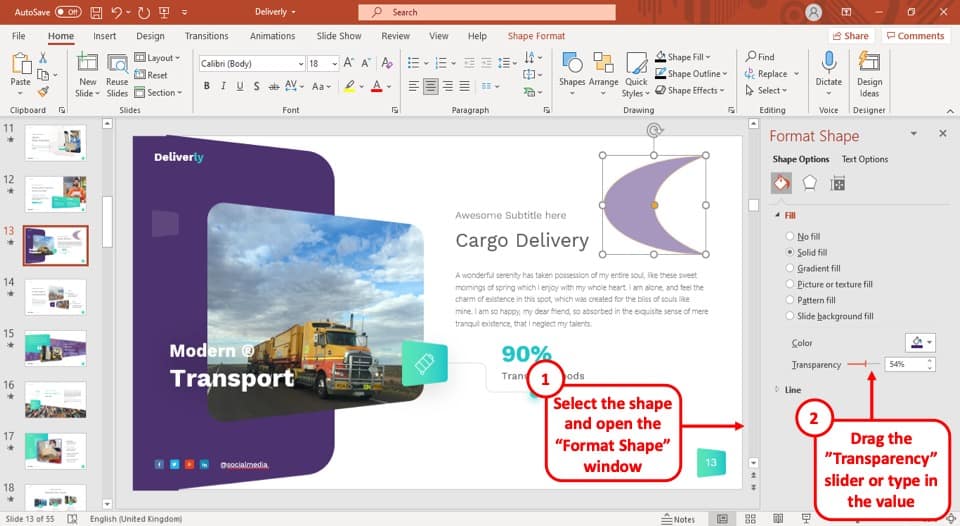
The ‘Transparency’ slider allows you to increase or decrease the level of transparency to the color of the shapes in your PowerPoint presentation.
Simply glide the slider until you are satisfied with the amount of transparency in the color of the shape or alternatively, type in the percentage of transparency you want the color to have in the box.
How to Add Gradient Shape Fill Color in PowerPoint?
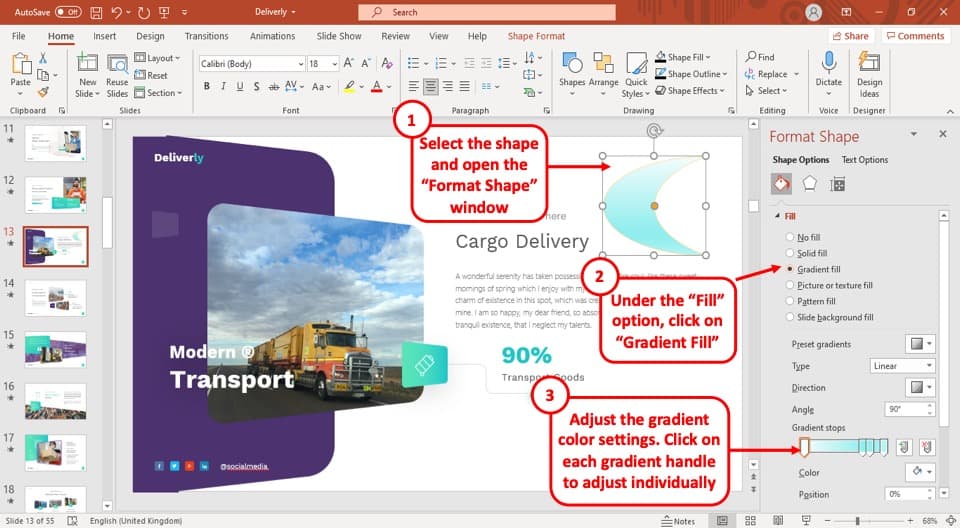
To add a gradient shape fill color to your shapes in PowerPoint, all you have to do is go to the ‘Fill’ section in the ‘Format shapes’ tab and select the ‘Gradient fill’ option.
This will change the color of your shape to a gradient fill. You can play around with the gradient handles, change the color of the handles and even increase or decrease the transparency of each gradient handle independently.
It will take some time to master the gradient fill and perhaps I will cover this topic in a future article.
3b. How to Add an Outline to a Shape in PowerPoint?
You can add an outline to a shape in your PowerPoint presentation very easily from the ‘Format shapes’ option. The step-by-step process is given below.
Step-1: Expand the ‘Line’ section in the ‘Format shapes’ bar

The first step is to go to the lower part of the ‘Format shapes’ bar and expand the ‘Line’ section located at the lower part of the ‘Format shapes’ bar.
Step-2: Adjust the Settings for the Shape Outline.
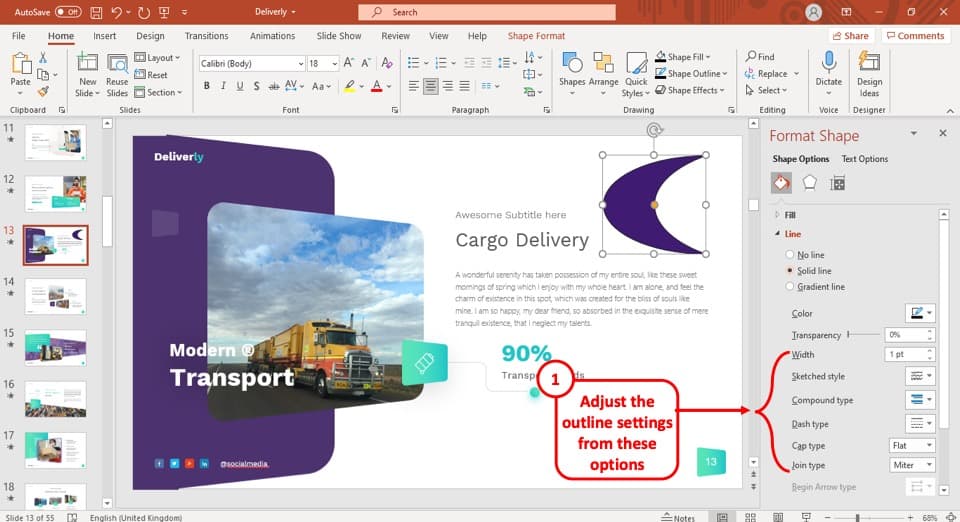
To add an outline to your shape, at first select the shape. After accessing the ‘Line’ section, click on the ‘Solid line’ option and an outline will be automatically added to your shape.
You can then adjust the various settings provided by PowerPoint to make changes to your shape outline.
How to Change Shape Outline Color?
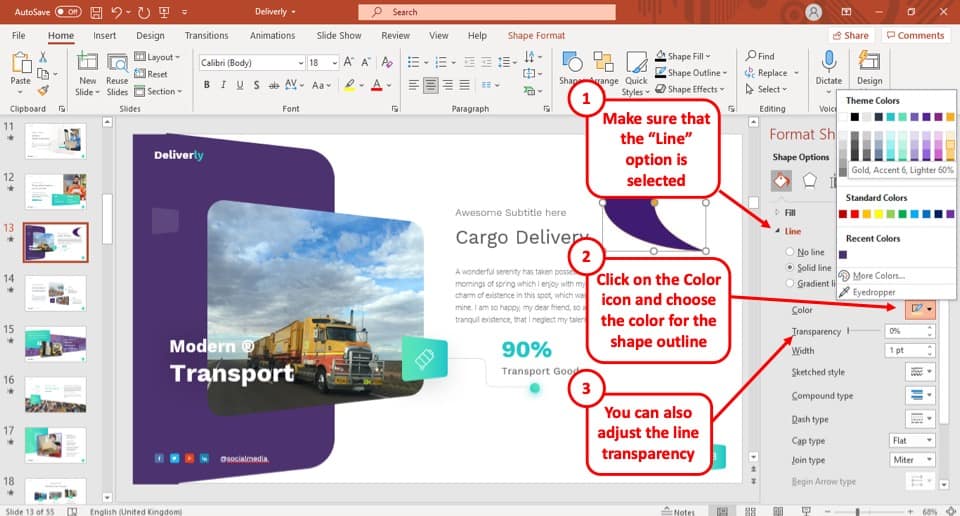
Changing the shape outline color is quite easy as well. All you have to do is, select the ‘Color’ option in the ‘Format Shapes’ tab while keeping the shape selected. After that, simply click on the color you want your shape outline to change to and the outline will change color.
3c. How to Fill a Shape with Picture?
To fill a shape with picture, follow these simple steps:
Step-1: Select the ‘picture or texture fill’
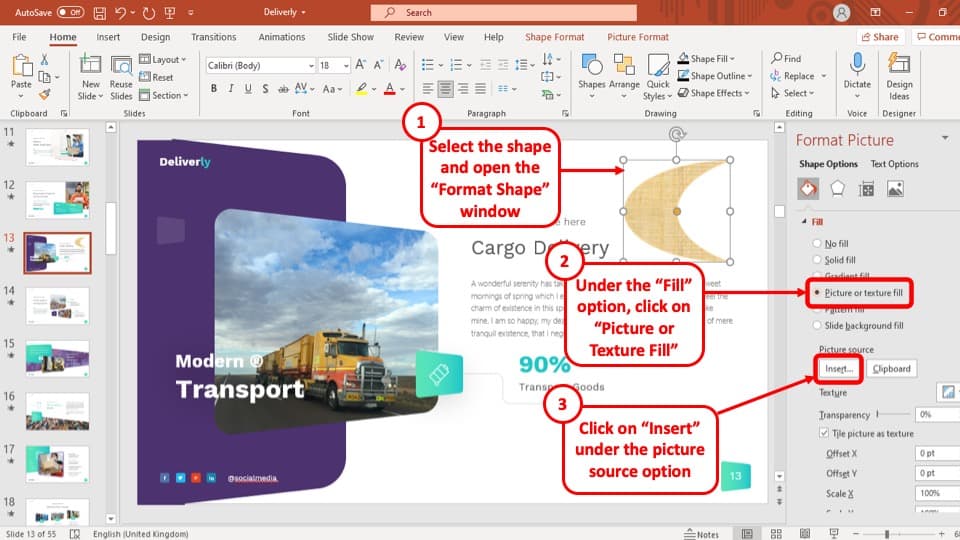
While having your shape selected, click on the ‘Picture or texture fill’ which is located right below ‘Gradient fill’.
Step-2: Click on the ‘Insert’ button and select the ‘From a file’ option.
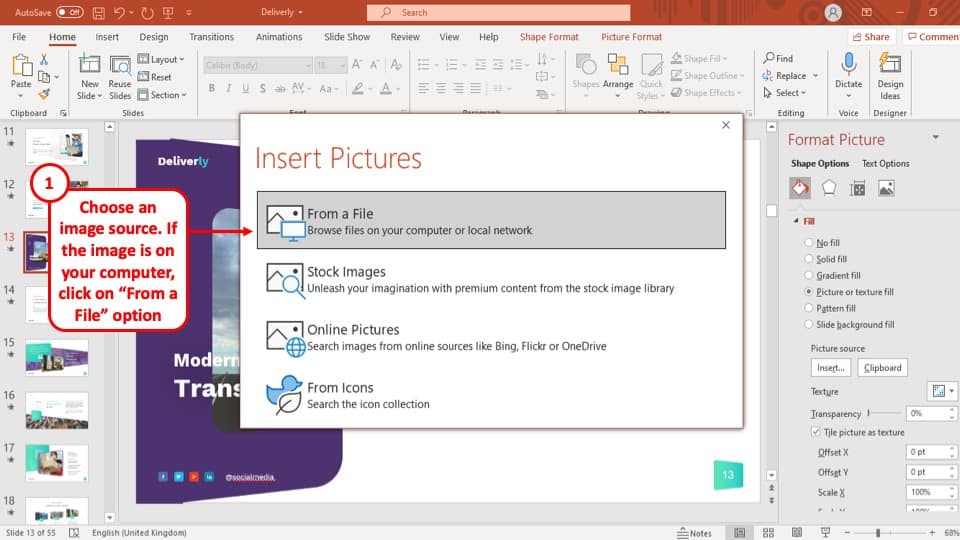
To insert an image to your shape, click on the ‘Insert’ button in the ‘Picture source’ section. This will open a pop-up. Select the ‘From a File’ option from the pop-up
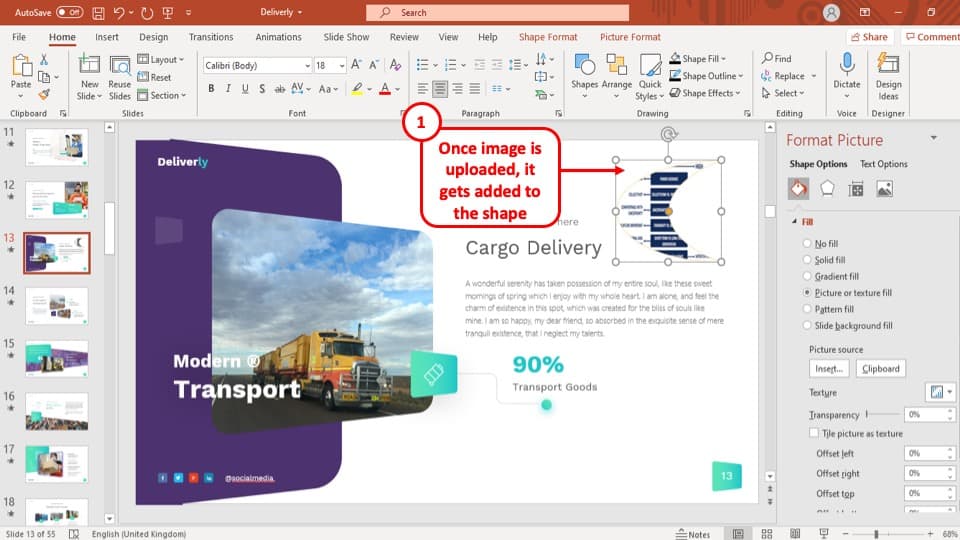
Step-3: Select the image you want to insert in your shape and press ‘Insert’
Now from the window, select the image that you want to add in your shape and press the ‘Insert’ button. This will add the image inside your shape.
3d. Other Types of Shape Fill
Besides solid fill, gradient fill, and filling your shape with a picture, you can also add texture and patterns to your shape in PowerPoint. Let’s take a quick look at how to do that.
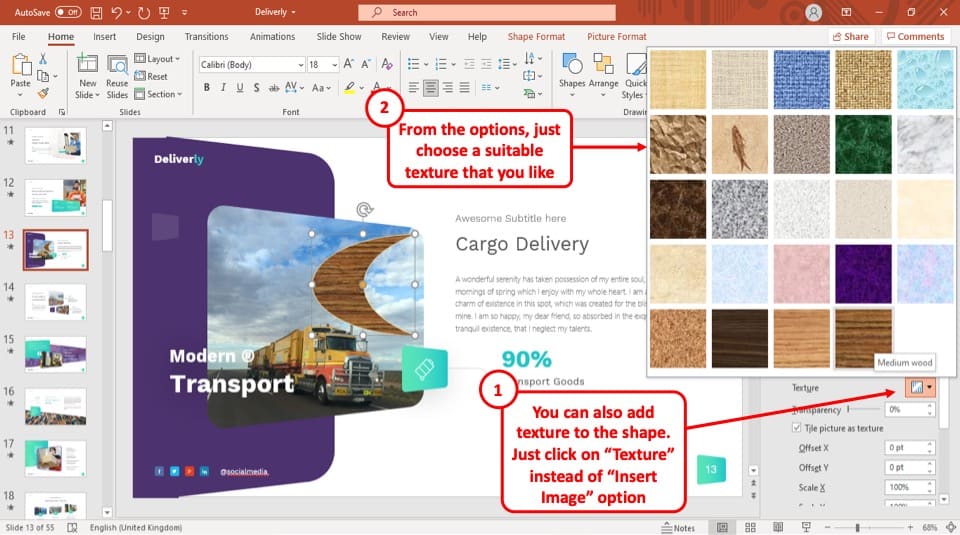
Adding a Texture Fill to a Shape
To add texture, select the ‘Picture or texture fill’ option then click on the ‘texture’ button and select the texture you want to add to your shape.
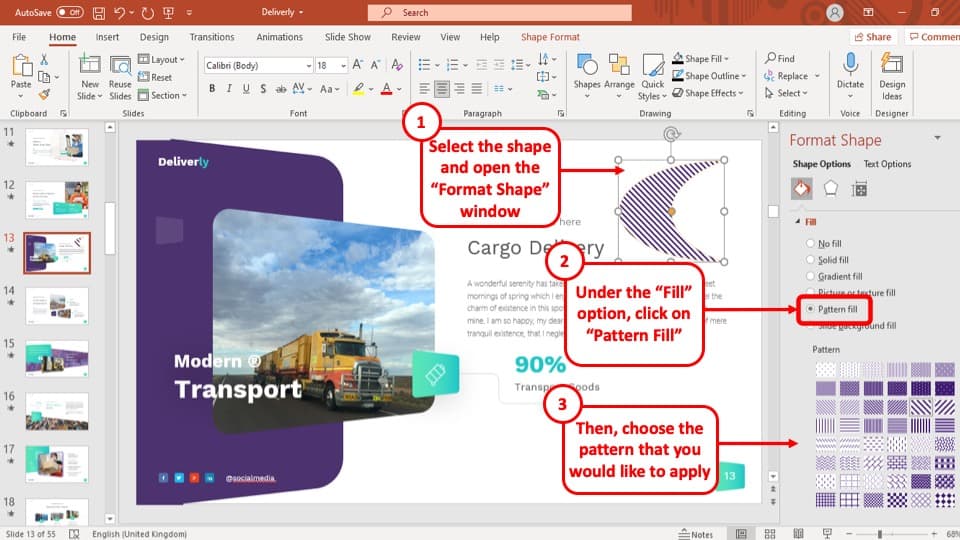
Adding a Pattern Fill to the Shape
To add a pattern to your shape, simply select the ‘Pattern fill’ option and then choose the pattern you want to add to your shape.
Adding these shape fill options are really quite simple. Just that you need to know how to use it.
3e. How to Add Shadow to a Shape in PowerPoint?
To add shadow to a shape in PowerPoint you will need to go to the ‘Effects’ section of the ‘Shape options’ under the ‘Format Shape’ tab. A step-by-step explanation of how to add shadows to a shape in PowerPoint is described below.
Step-1: Go to the ‘Effects’ section.
At first, you will need to select the pentagon shaped icon in the middle of the sections area called ‘Effects’. This will allow you to access the ‘Shadows’ option.
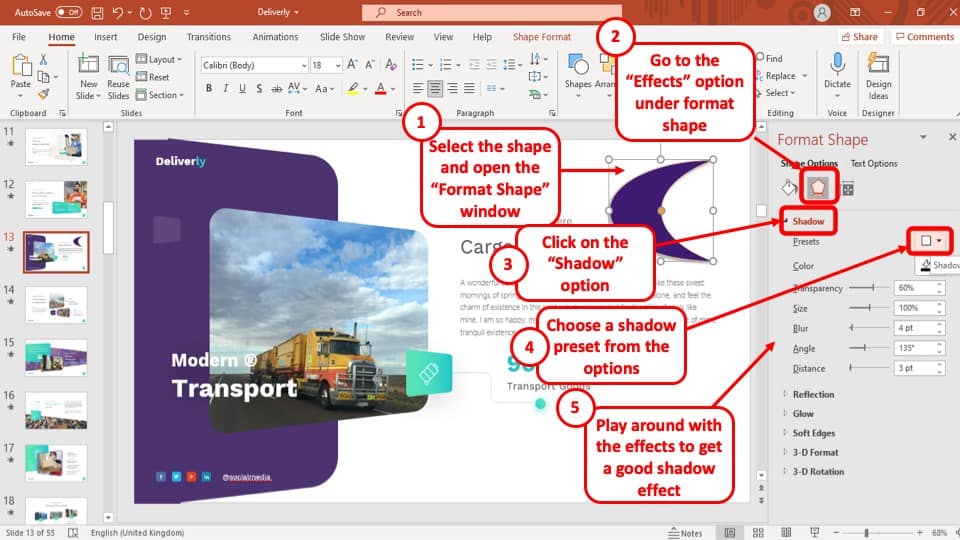
Step-2: Expand the ‘Shadows’ option to find the ‘Presets’ box.
Once you are in the ‘Effects’ section, expand the option that says ‘Shadow’. This will allow you to access the ‘Presets’ box.
Step-3: Select your preferred style of shadows from the ‘Presets’ box.
The ‘Presets’ box contains various styles of shadows that you can add to your shape. Click on the ‘Presets’ box and select your preferred style of shadow to add to the shape in your PowerPoint presentation.
Step-4: Adjust the settings
As a final step, play around with the settings like transparency, blur, size, distance, etc to get the right shadow effect that you like. Don’t just settle with the default shadow option that PowerPoint provides even with the preset.
3f. How to Format Multiple Shapes in PowerPoint?
One of the ways you can format multiple shapes in PowerPoint is to select all the shapes and add the format you want them to be in. The two simple steps are described below.
Step-1: Select all the shapes that you prefer to be in the same format
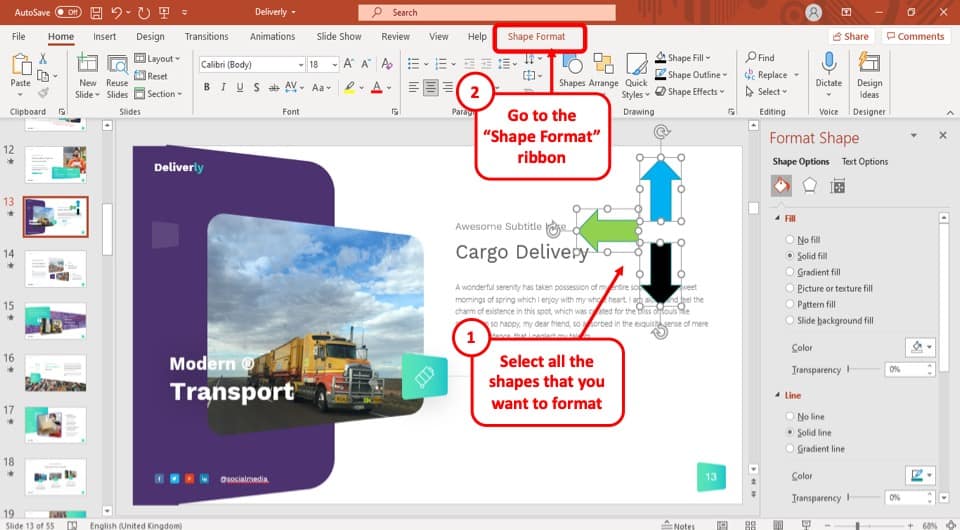
To select the multiple shapes in your PowerPoint presentation, first you have to hold the ‘Shift’ key on your keyboard and ‘left click’ with your mouse on the shapes.
Step-2: Select the format you want your multiple shapes to be in
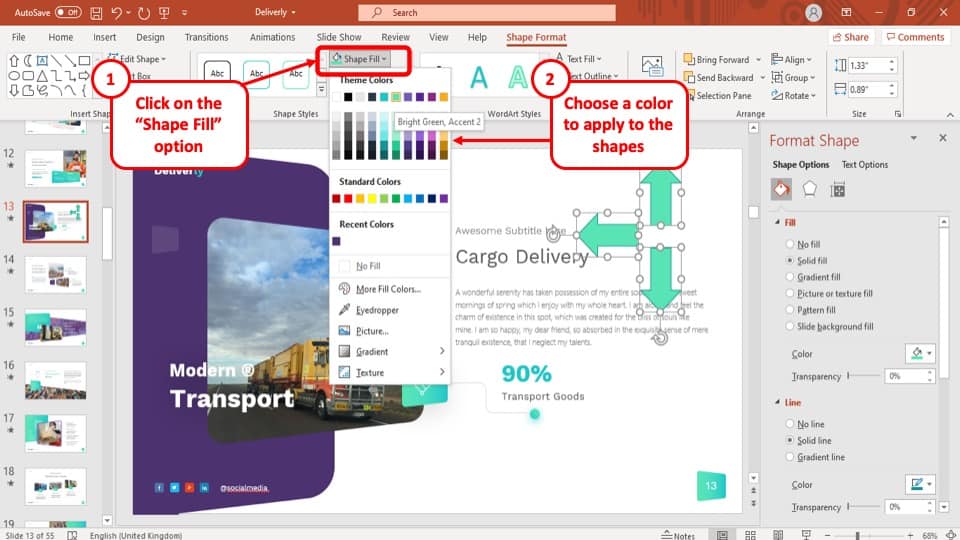
After you have selected all the shapes you want to format in your PowerPoint presentation, simply apply the format you want them to be in.
4. How to Apply a Shape Style in PowerPoint?
There are several ways to apply a shape style in PowerPoint. The most efficient way is to use the ‘Format Painter’ tool. Here is a step-by-step explanation of using the ‘Format Painter’ to format multiple shapes.
Step-1: Select the shape that contains the desired format
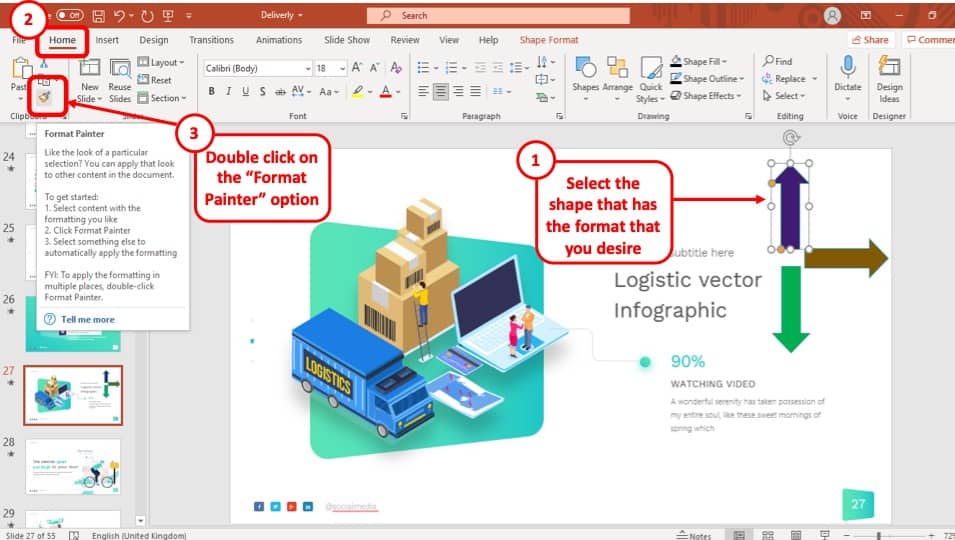
To bring consistency to all the shapes you have added to your PowerPoint presentation, first you have to select the shape which is already in the style that you want all your other shapes to be in.
Step-2: Double click on the ‘Format Painter’
The next step is to double-click on the ‘Format Painter’ tool. This will allow you to select multiple shapes and change their style to the originally selected shape. The ‘Format Painter’ tools is in the top left corner of your PowerPoint window under the ‘Clipboard’ section of your ‘Home’ ribbon.
Step-3: Paste the shape format to other shapes
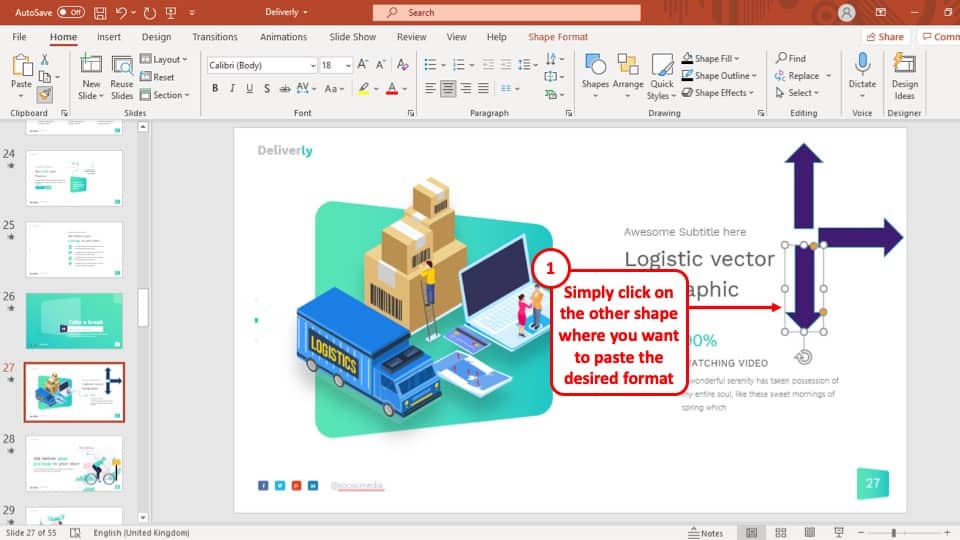
In this step, simply ‘left click’ once on the shapes that you want to have the same style of the original shape that you had selected in the beginning of the process. This will change their shapes and match the style of the original shape.
Once you are done applying the style to your shapes, click on the ‘Format Painter’ icon again to stop using the tool or you can press “Esc” on your keyboard
4b. What is the Quickest Way to Format Shapes in PowerPoint?
As we can see from the two ways you can apply the same format to multiple shapes, the quickest way to do it is the ‘Format Painter’ tool.
Although selecting all the shapes and then applying the format may seem like the easier way to do it because it has fewer steps as explained earlier in this article, it is the Format Painter tool that gets the job done the fastest.
Selecting the shapes one by one can be a tedious and boring job if you have tens of shapes in your presentation. However, with the ‘Format Painter’ you can do it more efficiently with just a click on the shapes.
5. How to Merge Shapes in PowerPoint?
The ‘Merge Shapes’ option in PowerPoint allows you to combine more than one shape together into different combinations. While using shapes in your presentation, the ‘Merge Shapes’ option can prove to be really helpful to create interesting shapes and designs.
To merge shapes, first, you need to add some shapes to your PowerPoint presentation, and then select them. You need at least 2 shapes, to begin with.
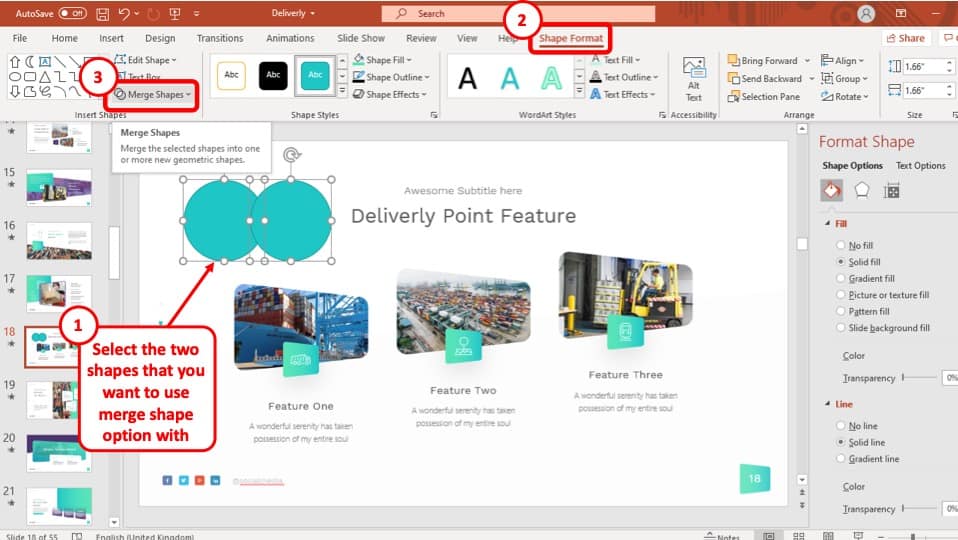
After selecting them, the ‘Shape Format’ ribbon will appear in the ribbon section in the upper middle part of your PowerPoint window. In the ‘Shape Format’ ribbon, you will find the ‘Merge Shapes’ button on the ‘Insert Shapes’ section.
So, let’s learn more about some of the merge shape options that will be provided by PowerPoint.
5a. More about Fragment, Intersect, Union, Combine, or Subtract Shapes
The ‘Merge Shapes’ dropdown menu will give you 5 styles to choose from. The use of these styles is explained below.
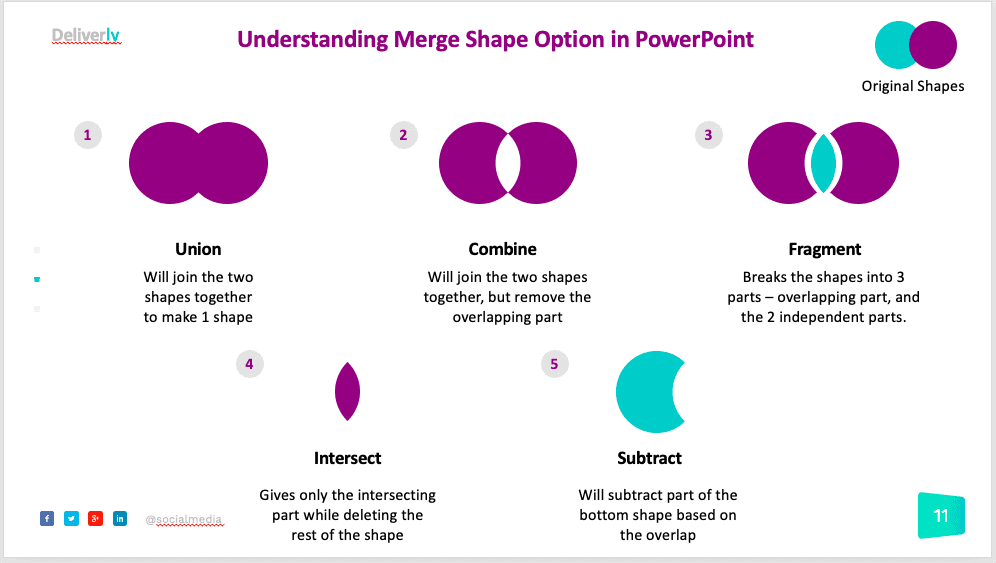
- Union: The Union style simply combines the selected shapes into one shape.
- Combine: This style of merging shapes will merge the shapes together but exclude the intersecting area of the shapes.
- Fragment: In this style, the shapes will merge together and while also showing all the outlines of both shapes.
- Intersect: This style is the opposite of the union style of merging shapes. This style merges the intersecting area of both shapes while excluding all the other parts of the shapes.
- Subtract: This style of merging shapes takes the shape that has been selected second away from the shape that has been selected first.
5b. How to Crop Shapes in PowerPoint?
To crop or cut shapes in PowerPoint, you can use the “Subtract” option under the merge shapes in PowerPoint. To do that, follow the 2 steps described below.
Step-1: Add 2 shapes to your PowerPoint slide
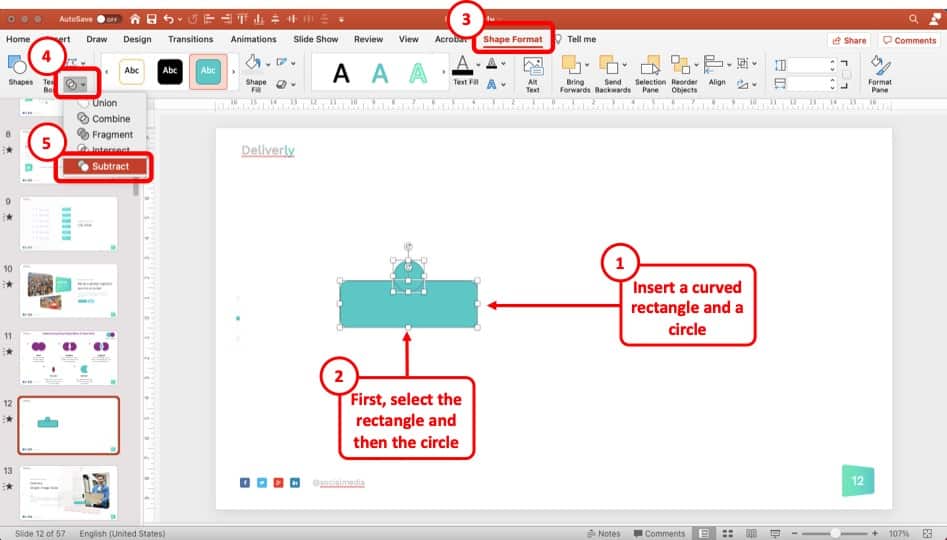
The first step is to add the two shapes that you want to use on your slide. You can insert it based on the methods described previously in the article.
Then, select the two shapes and head over to the “Shape Format” ribbon. Under the merge shapes option, choose the “Subtract” option.
The “Subtract” style crops away from the shape that has been selected second, from the shape that has been selected at first. Simply place a shape on top of the shape that you want to crop and make sure the intersecting area is in the part where you want to crop.
Step-2: Crop the shape
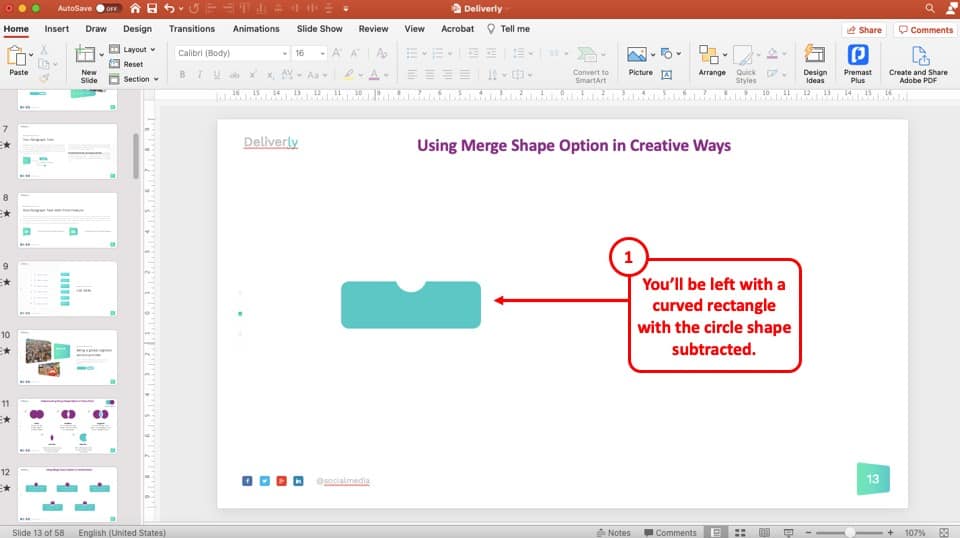
Once you have used the “Subtract” option from the “Merge Shapes” menu under the “Shape Format” tab, you will be left with the subtracted shape.
5c. How to Create Custom Shapes in PowerPoint?
With “Merge Shapes” option under the “Shape Format” ribbon, you can make almost any shape you can imagine using a combination of the ready-made shapes and the 5 styles of merging shapes as described earlier. Here is how to do it in 2 simple steps.
Step-1: Insert 2 or more shapes to create a custom shape

Simply insert the shapes that can be combined, intersected, subtracted, or merged in union to make the shape that you need.
Step-2: Merge the combination of shapes with your preferred style.
After that, you have to combine the different shapes you have just inserted in order to create your custom shape. Merge the shapes together in the style that best fits your preference.
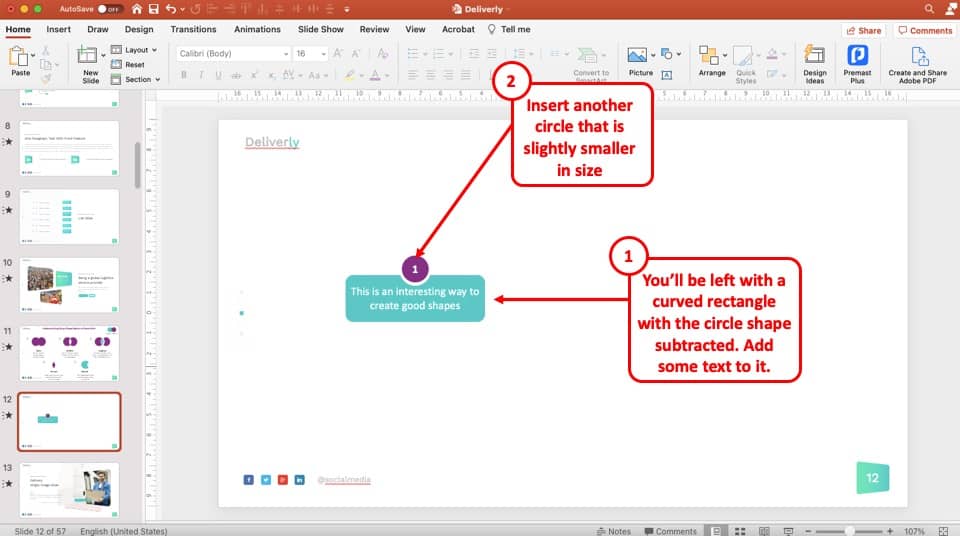
In some cases, you can also add another shape like a circle in the above example, and create an even more interesting design.
Step-3: Replicate the design to create a unique slide
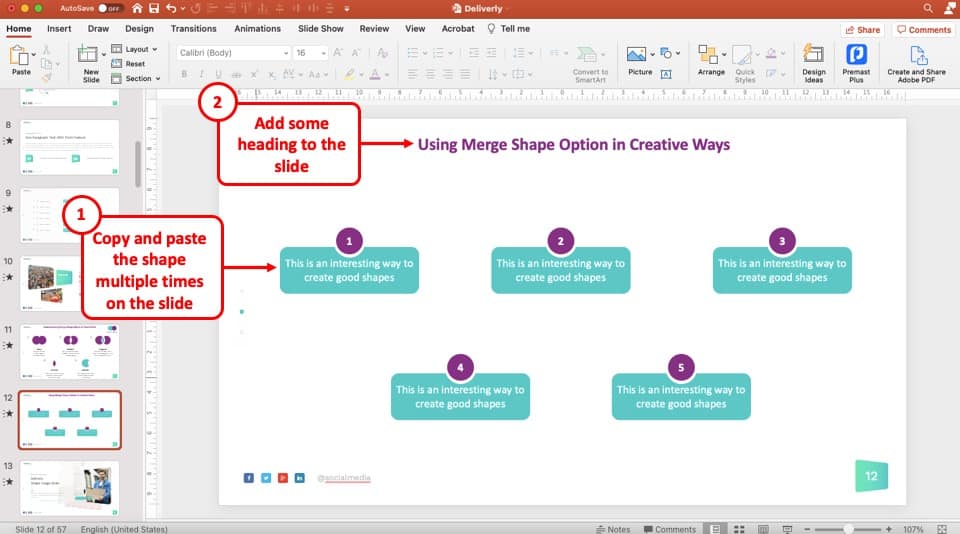
You can then replicate the design to create a unique slide. The sky is the limit once you understand the amazing merge shape feature of PowerPoint!
6. How to Align and Distribute Shapes in PowerPoint?
The align and distribute tool in PowerPoint helps to organize unorganized shapes that is spread throughout a slide in the presentation.
The alignment tool is used to align the randomly placed shapes in the slide to be aligned uniformly and the distribution tool helps to distribute the shapes evenly across the slide.
The process of using the alignment and distribution tool is described step-by-step below.
Step-1: Select all the unevenly placed shapes in the presentation
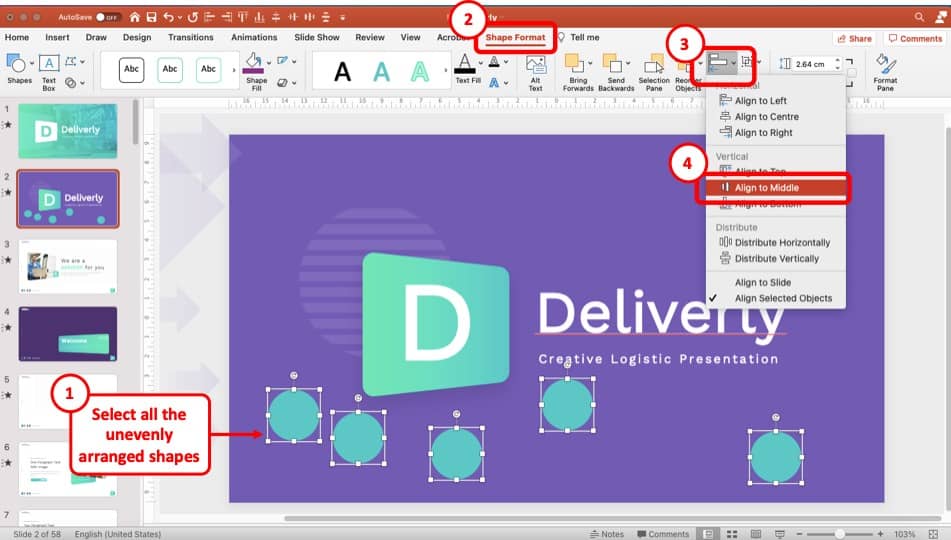
At first you have to select the shapes that you want to align uniformly in the slide of your PowerPoint presentation.
Step-2: Click on Align Under the Shape Format option
After selecting the shapes, the ‘Shape Format’ ribbon will appear. Go to the ‘Shape Format’ ribbon where you will find the ‘Align’ option under the ‘Arrange’ section.
Click on the ‘Arrange’ tool and you will find 6 option to choose your alignment. For this example, we will choose the “Align to Middle” option.
Step-3: Distribute the shapes that have been aligned
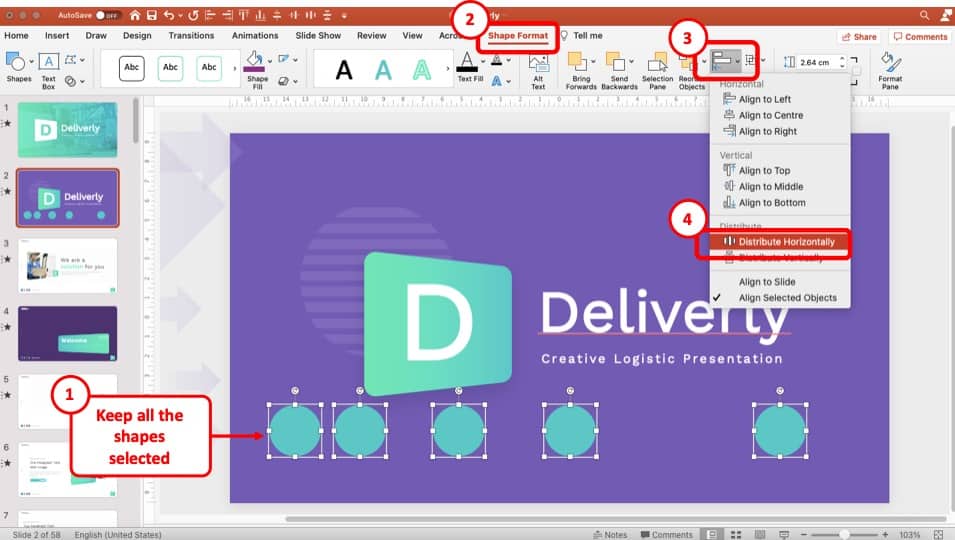
After aligning the randomly placed shapes, they can be distributed evenly either vertically or horizontally. While the shapes are selected, click on the ‘Distribute Horizontally’ style or ‘Distribute Vertically’ style to distribute them accordingly.
For this example, we shall distribute it vertically. So, we shall choose that option from the menu.

Here’s what we will be left with after using the “Disbtribute Horizontally” option. See how easy it is to format, and align the shapes in PowerPoint once you know how to do it!
7. How to Edit Shapes in PowerPoint?
Editing shapes in PowerPoint is done using the ‘Edit Shapes’ option located in the ‘Shape Format’ tab, under the ‘Insert Shape’ section. A step-by-step explanation of how to edit shape point and how to add or remove shape points is given below.
7a. Edit Shape Points
To edit shape points you must first add a shape to your presentation, select it and follow the simple steps below.
Step-1: Go to ‘Edit Shape’ located under the ‘Insert Shapes’ section of the ‘Shape Format’ tab.
At first select the shape and go to the ‘Edit Shape’ option which is located at the upper left part of the ‘Shape Format tab’ under the ‘Insert Shape’ section.
Step-2: Go to the ‘Edit Points’ option
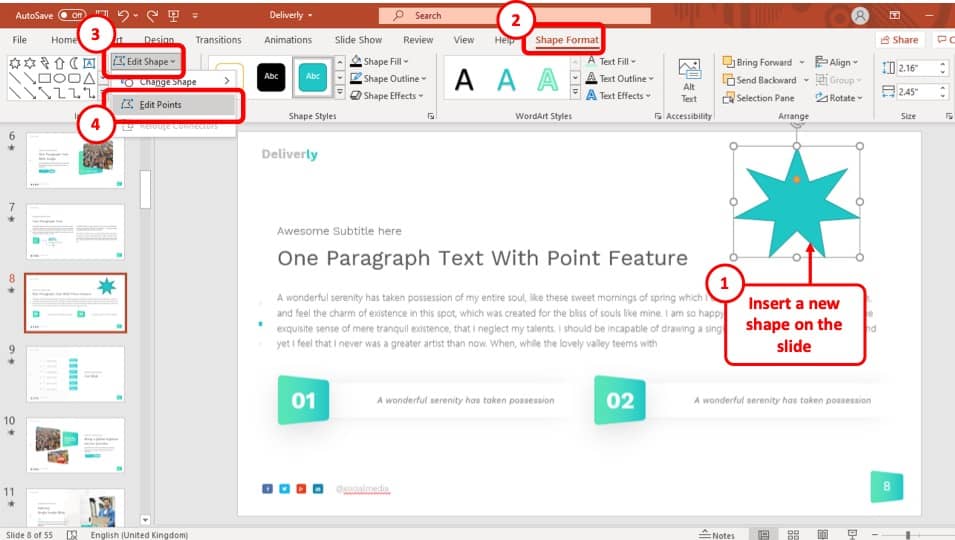
Once you have selected the ‘Edit Shape’ option a drop-down menu will give you two other options. Select the ‘Edit Points’ option from that drop-down menu. This will make all the edit points in your shape instantly appear.
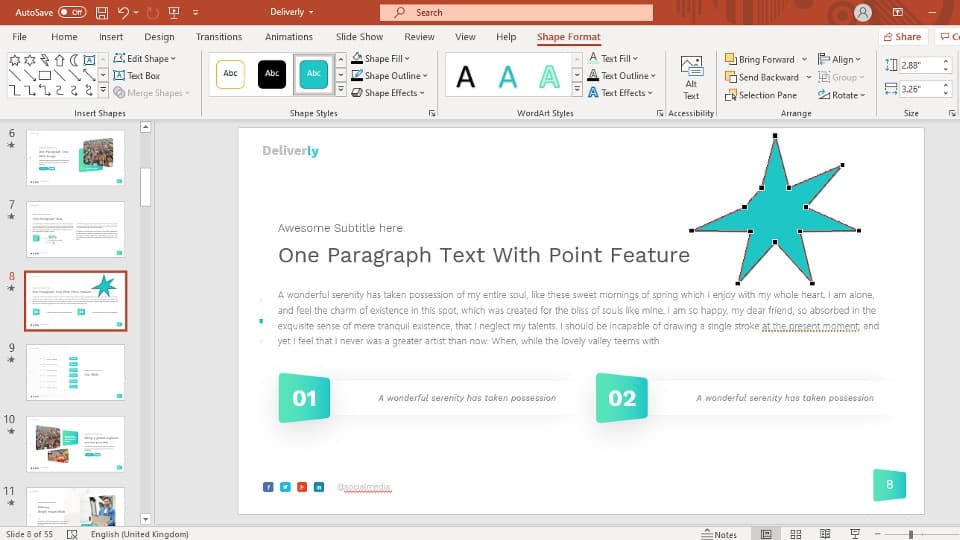
Step-3: Hold one of the shape points and drag them
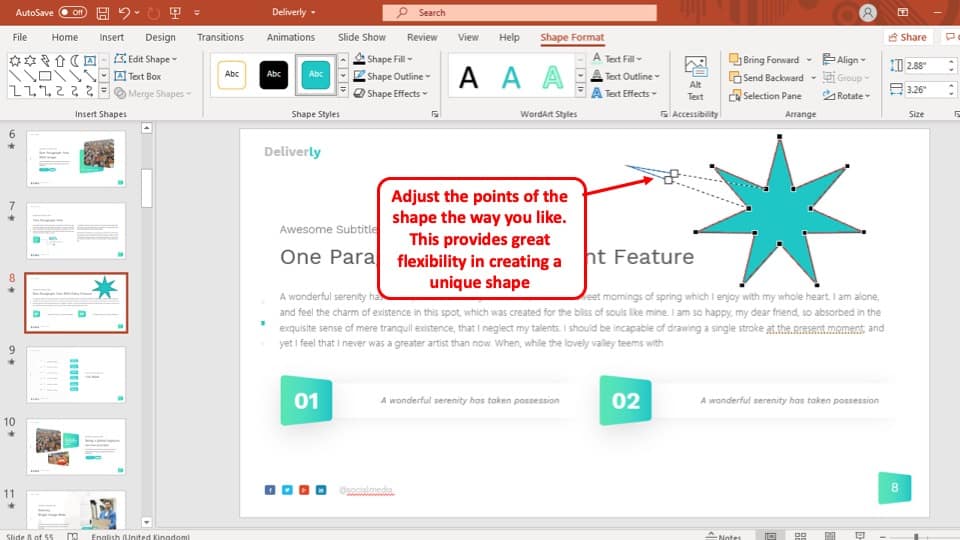
Once you have selected the ‘Edit Points’ option, the edit points in your shape will appear. Now simply select an edit point and drag them to edit it into your preferred shape.
Removing Shape Points
Adding and removing edit points is very simple in PowerPoint. The process of removing edit points is described in 2 simple steps below.
Step-1: ‘Right click’ on the point that you want to remove

To remove an edit point, at first you have to ‘right click’ on the edit point to make the drop-down bar appear. This will give you a selection of edits that you can make.
Step-2: Click on the ‘Delete Point’ option
In this step, all you have to do to remove the edit point is to click on the ‘Delete Points’ option and the edit point will be deleted instantly.
The process of adding an edit point to your shape is the same as removing it. Here is how you add an edit point to a shape in your PowerPoint presentation.
Adding Shape Points
If you want to add shape points, here’s what you need to do.
Step-1: ‘Right click’ on the area where you want to add the edit point
At first you must move your cursor to the area where you want to add the edit point and ‘right click’ on the mouse of your computer. This will open a drop-down menu with several options.
Step-2: Select the ‘Add Point’ option
After you open the drop-down menu, simply select the add points button to add an edit point to the selected area. Then you can drag the edit point to your preferred position.
8. How to Add Text to a Shape in PowerPoint?
Adding text to a shape in your PowerPoint presentation may sound tough, but it is actually quite the opposite.
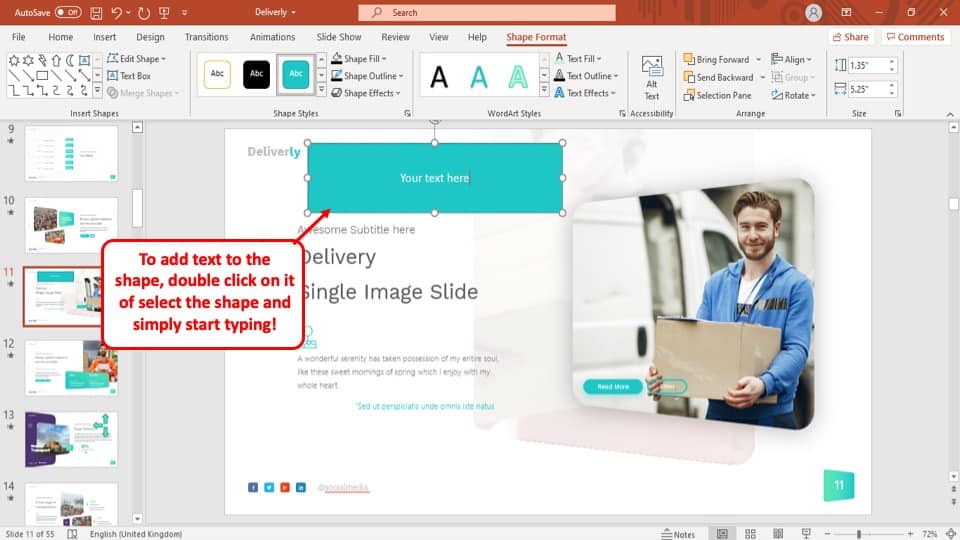
All you have to do is insert a shape in the slide and ‘Double Click’ anywhere on the inner part of the shape. A blinking vertical line will appear which is the keyboard cursor. This indicates that you can now start typing in the shape.
Alternatively, you can also directly start typing once you have selected the shape by clicking on it.
More PowerPoint Related Topics
- How to Crop a Picture in PowerPoint? [Complete Step-by-Step Tutorial!]
- How to Give a Presentation on Zoom? A Helpful Resource!
- How to Convert a PowerPoint to PDF? [A Simple Guide!]
- PowerPoint vs Google Slides: Which is Better? [ULTIMATE Test!]
- How to Change Bullet Style in PowerPoint? A Complete Guide
Credit to diana.grytsku (designed by Freepik) for the featured image of this article