When you start using Microsoft PowerPoint, most of your effort will be spent trying to learn the various features and in creating slides for your presentation. But, what happens when you don’t like a slide design and you want to delete it? How do you delete slides in PowerPoint?
To delete a slide in PowerPoint, simply select the slide from slide preview on the left part of your screen. Then, from the options, click “Delete Slide”. You can also press the “Delete” key on your keyboard after selecting the slide from the slide navigation pane.
In this article, I will share with you not just how to delete your slides, but also how to recover slides that you may have accidentally deleted! Plus, you’ll also get to understand everything in a step-by-step manner so that you can implement this in your presentation.
So, let’s get started!
[Please note – in this article, I will be using one of the presentation templates from Envato Elements. With Envato Elements, you get access to thousands of presentation designs with unlimited downloads so you never run out of options again. Plus, you get free previews so you know exactly what you’re getting before buying! Check out their pricing here]
1. How to Delete a Slide in PowerPoint?
Let’s understand how to delete a in your PowerPoint presentation. This can be achieved in the following 2 easy steps mentioned below –
Step-1: “Right-click” and Select the Slide
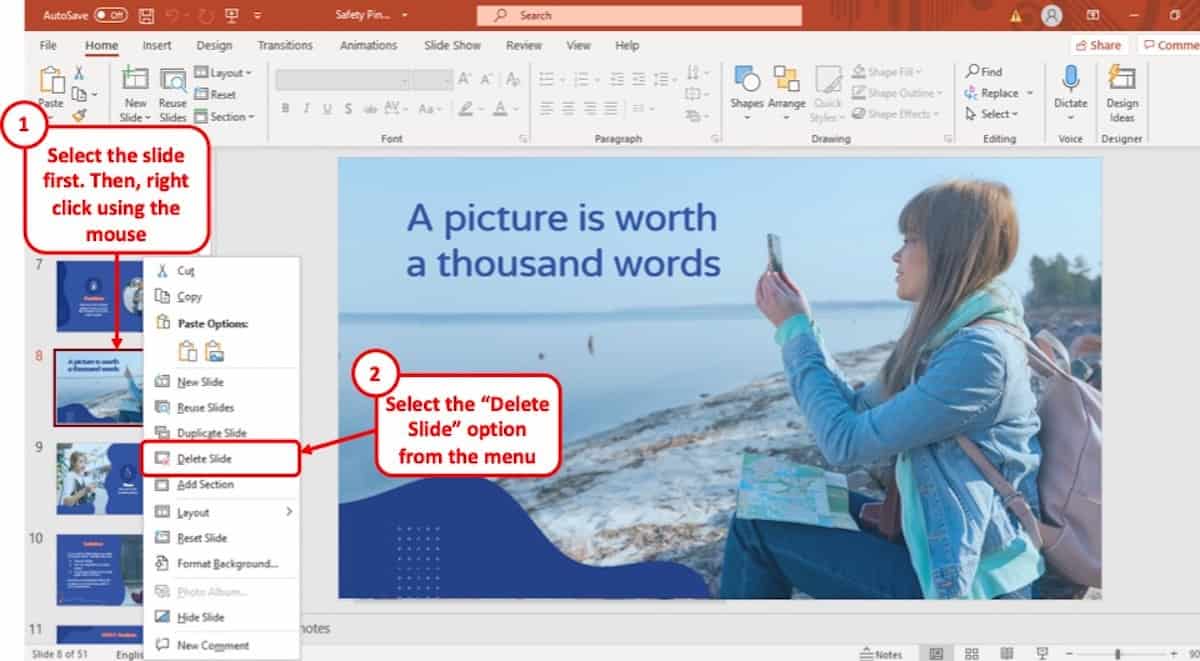
The first step to deleting a slide on your PowerPoint presentation is to move your cursor on the slide which you want to remove and “Right-click” on it using the mouse of your computer.
Step-2: Click the “Delete Slide” Option
After “Right clicking” on the slide, click on the “Delete Slide” option from the drop-down menu. It is located in the middle of the menu with an icon of a square with a red ‘x’ mark on it.
1a. How to Delete Slides in PowerPoint on Mac?
Deleting a slide from a PowerPoint presentation is the same on Mac as it is on Windows. Simply follow the two steps described above from your Mac device and you will be able to delete any slide in your PowerPoint presentation.
1b. How to Delete a Slide in PowerPoint without Right-click?
Sometimes, when you have too many slides to delete from time to time, you don’t want to end up using the right-click option as this does take a bit of time. So, to delete a slide in PowerPoint without “Right-clicking” the mouse on your computer, you have to use the keyboard instead.
Below is a step-by-step guide of the whole process.
Step-1: Select the slide you want to delete
At first, you have to select the slide you want to delete from the “Slide Navigation” bar at the left of your screen. (just the way it is shown in the previous section above)
Step-2: Press the “Delete” button on your keyboard.
Keeping the slide selected in the “Slide Navigation” bar, hit the “Delete” button on the keyboard of your computer. It is located at the upper right corner of the keyboard right above the “Backspace” key.
Alternatively, you can press the “Backspace” key on your keyboard which will also delete the slide from your presentation. Furthermore, for Mac users, simply press the “Delete” key since there is no backspace key on Mac.
2. How to Delete Multiple Slides in PowerPoint?
To delete multiple slides in your PowerPoint presentation, you have to use the ‘Ctrl” key on your keyboard to select multiple slides at the same time.
Here’s the detailed process to delete multiple slides in PowerPoint –
Step-1: Hold the “Ctrl” key and select all the slides you want to delete.
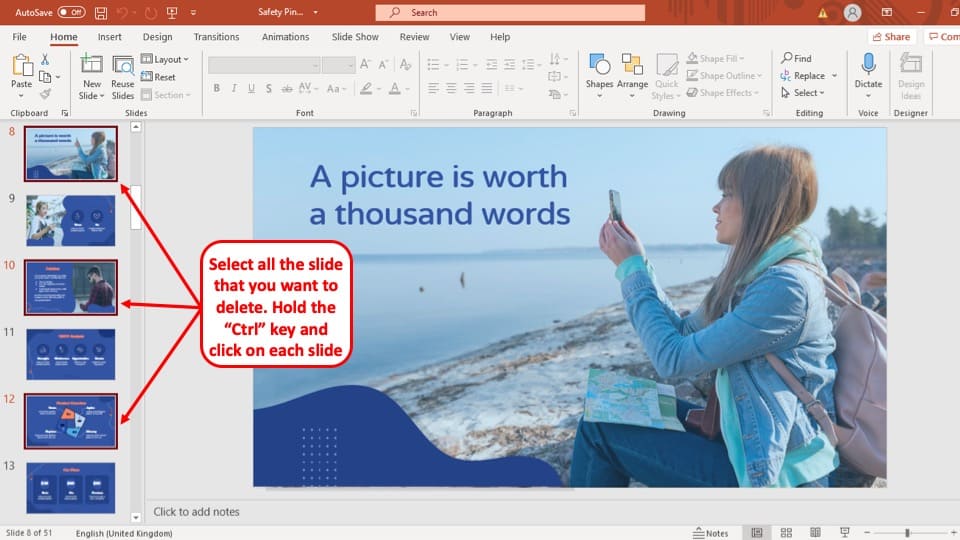
To delete multiple slides on your PowerPoint presentation, first, hold the “Ctrl” key on your keyboard and simply “Left-click” on the slides you want to delete to select them together.
Step-2: “Right-click” on one of the slides and press the “Delete Slides” option.
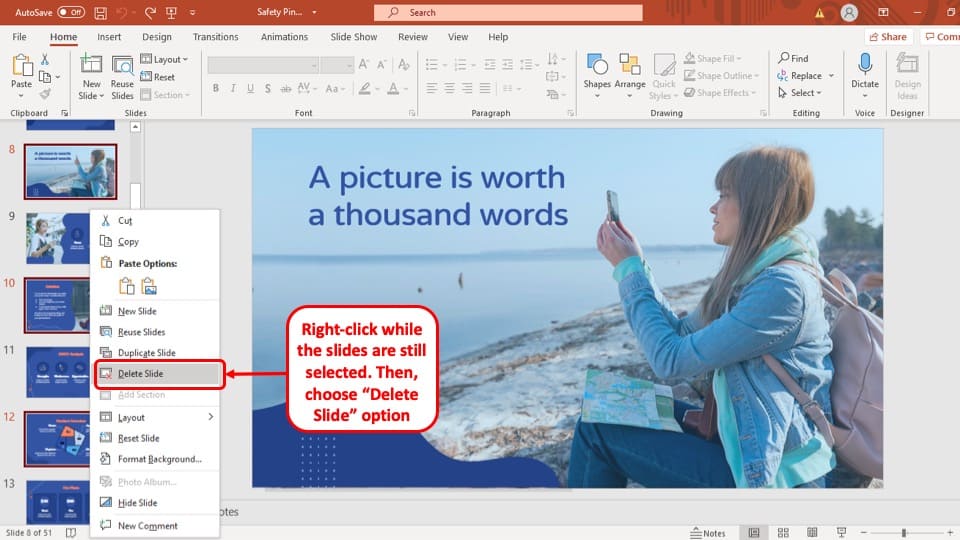
Once you have selected the slides that you want to remove from your PowerPoint presentation, “Right-click” on it using the mouse of your computer to open the drop-down menu and click on the “Delete Slides” option. However, make sure that the slides remain selected when you right-click (you will see a red border around the selected slides in the slide navigation pane)
Alternatively, you can also press the “Delete” button on your keyboard while. All the selected slides will be deleted instantly.
3. How to Delete Hidden Slides in PowerPoint?
The easiest way delete hidden slides in your PowerPoint presentation is to use the “Slide Sorter”. A step-by-step description of the process is given below.
Step-1: Go to the “View” tab on the ribbon.
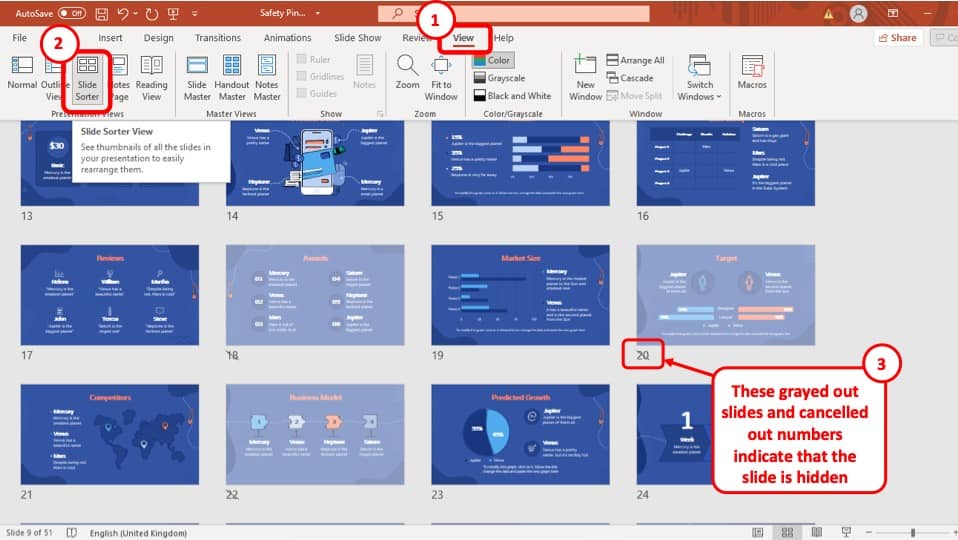
To access the “Slide Sorter” you have to first go to the “View” tab on the ribbon of your PowerPoint window. It is the second to last tab on the ribbon.
Step-2: Click on the “Slide Sorter” button
The next step to deleting hidden slides is to click on the “Slide Sorter” button which is the third button from the left at the “Presentation View” section.
Step-3: Select the hidden slides using the control key
After opening the “Slide Sorter” view, select the slide or multiple hidden slides that you want to delete and
Step-4: Right-click and Press the “Delete Slide” option
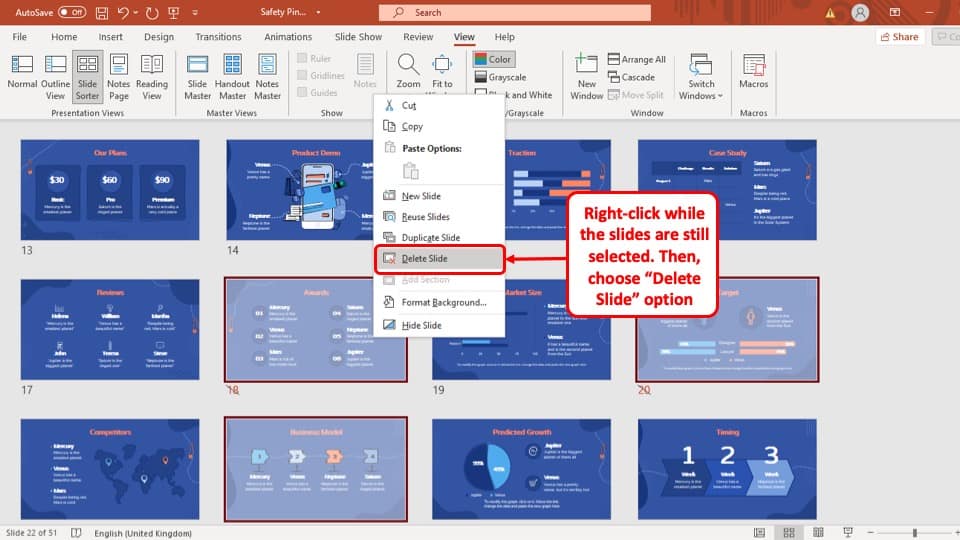
After you have selected all the hidden slides, simply “Right-click” on one of them using the mouse. Then, from the drop-down menu, simply press the “Delete Slides” option and all the hidden slides will be deleted from your PowerPoint presentation.
4. How to Delete Unused Master Slides in PowerPoint?
Deleting an unused master slide is quite helpful to reduce the size of you PowerPoint file if it becomes too large. Below is a step-by-step guide on how to delete unused master slides in your PowerPoint presentation:
Step-1: Go to the “View” tab in the ribbon
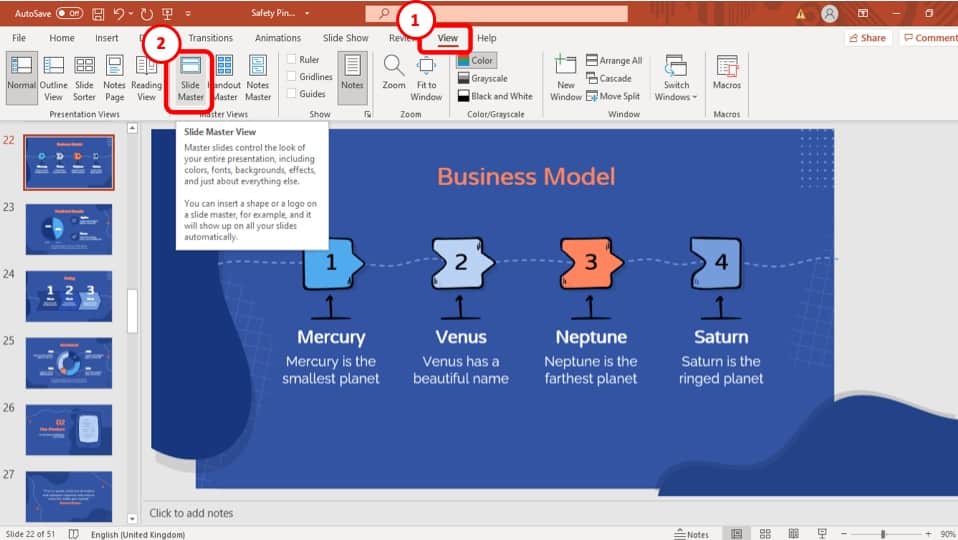
To access the “Slide Master Navigation” bar, at first you have to click on the “Slide Master” option located at the “Master Views” section in the “View” tab of the ribbon.
Step-2: Hover over the slides to see which ones are unused
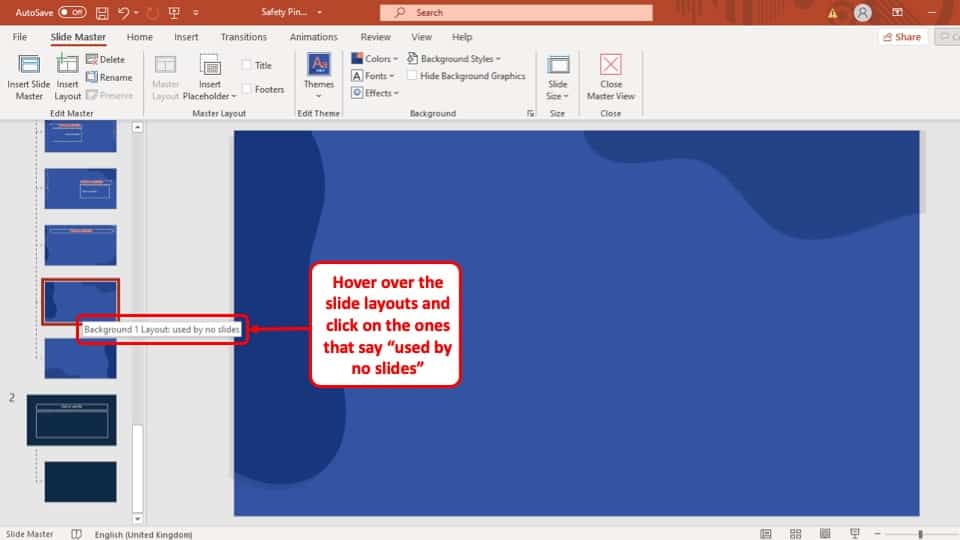
To see which master slides are unused, hover your cursor over the slides to see which ones have not been used.
Step-3: Select the slide and delete it
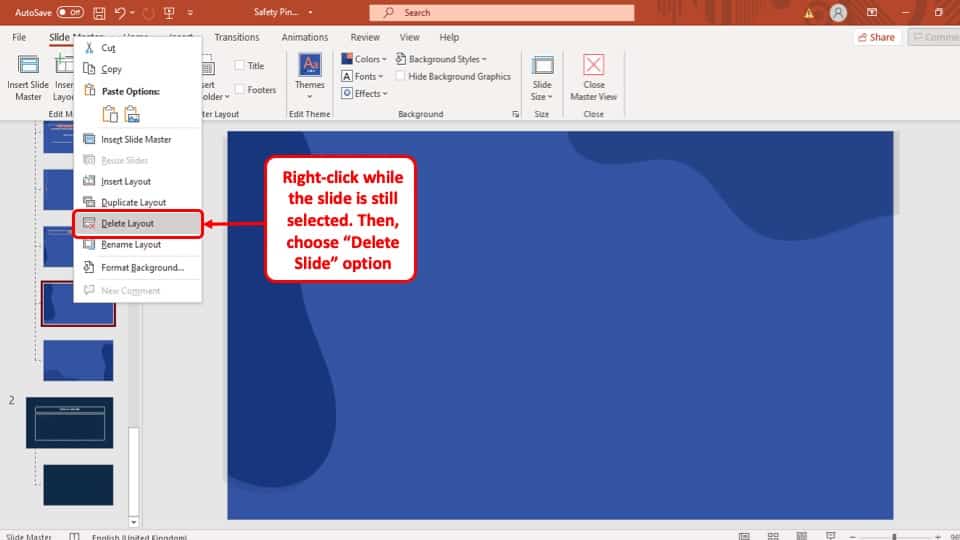
Once you have found the master slides that you want to delete, simply “Right-click” on one of them and press the “Delete” button.
5. How to Recover Deleted Slides in PowerPoint?
To recover deleted slides in PowerPoint, you have to use the “Undo” button. Once you have mistakenly deleted a slide in your presentation., click on the icon that looks like a curved arrow directing to the left, which is the “Undo” button.
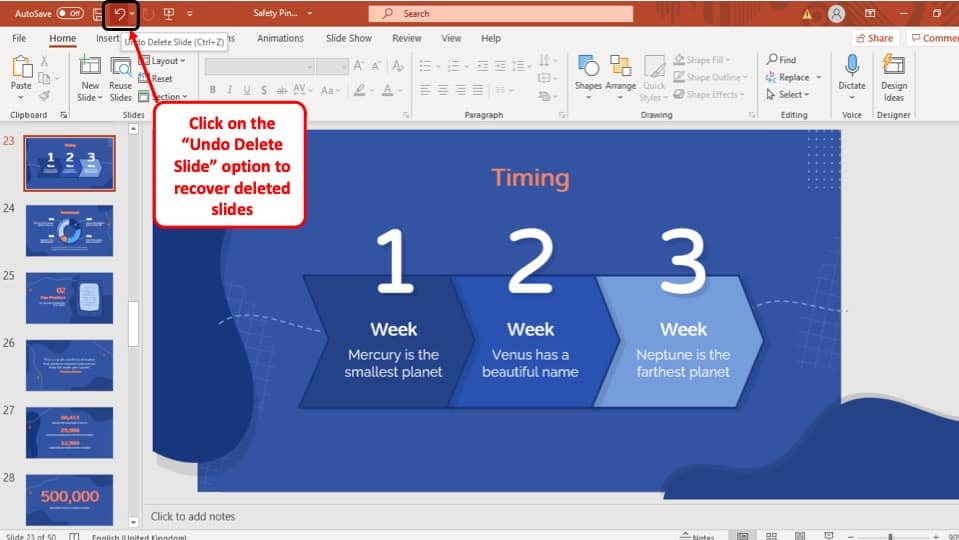
It is located at the top left corner of your PowerPoint software window. By clicking on it, your deleted PowerPoint slide will be recovered. Alternatively, you can press “Ctrl + Z” on your keyboard.
Another way of recovering deleted slides is to close the Microsoft PowerPoint application without saving the changes. You can do that by clicking on the ‘x’ icon at the top right corner of your screen and selecting the ‘Don’t Save’ option.
Now when you open your PowerPoint file again, you will find that the deleted slide is back to its place!
6. How to Delete a Slide Layout in PowerPoint?
Deleting a slide layout in PowerPoint is just the same as deleting unused master slides. So, you can follow the exact steps mentioned in the section 4 of this article.
However, one thing that you do need to remember is that a slide layout that is being used in one of your PowerPoint presentation slides cannot be deleted.
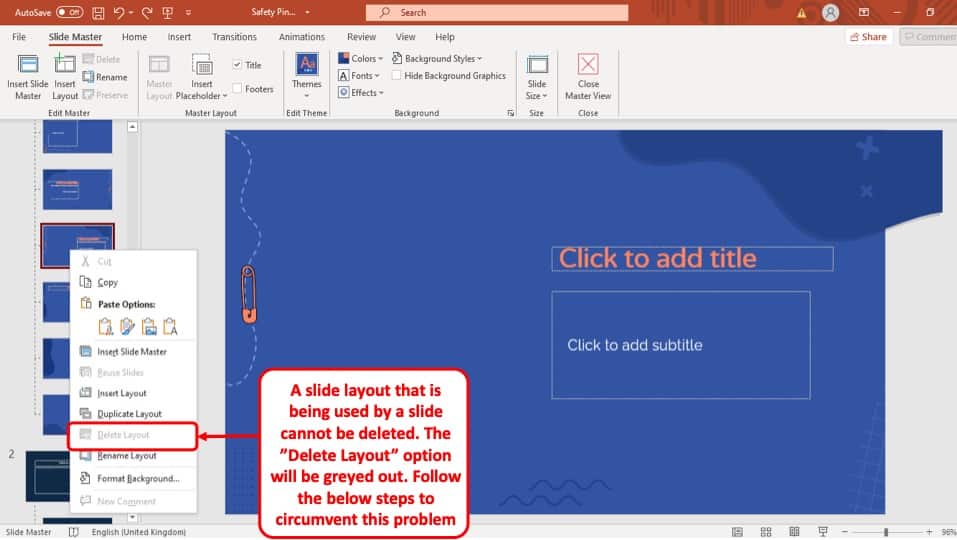
If you try to delete a layout that is being used the “Delete Layout” option will be greyed out indicating that it cannot be deleted (as shown in the image above).
To get around this issue, follow the 5 easy steps given below.
Step-1: Identify the slide using the layout
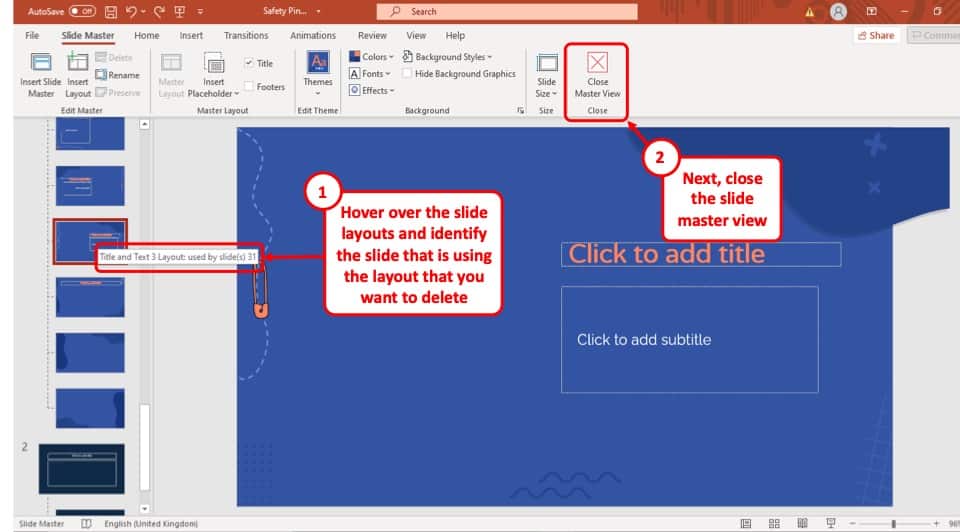
At first go to the “Slide Master” and hover your cursor over the layout that you want to delete. This will show you which of the slides in your PowerPoint presentation are using that layout.
Step-2: Exit Slide Master and go to the specific slide
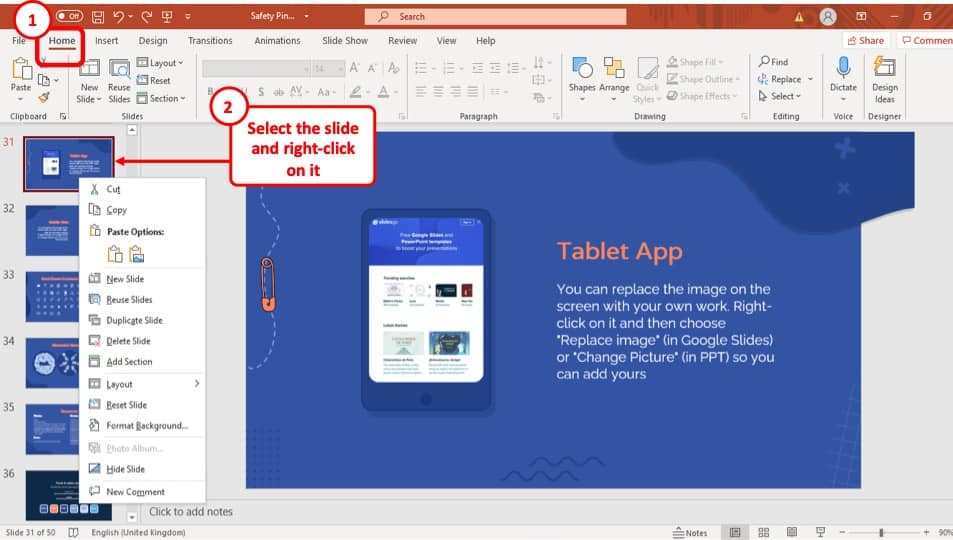
After finding out which slide is using the layout you want to delete, you have to go back to the “Slide Navigation” bar and “Right-click” on the slide to open the drop-down menu.
Step-3: Change the layout of the slide
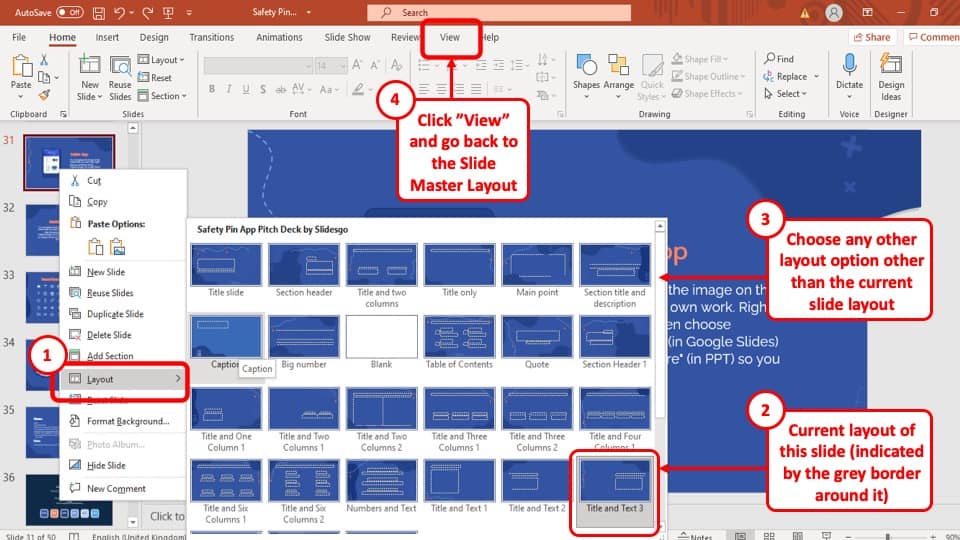
Once you have opened the drop-down menu, go to the “Layout” option, and change the layout of the slide to a different style. This will allow you to delete the layout that this slide was previously using.
Step-4: Go back to “Slide Master”
Once you have changed the layout of the slide that was using the layout you want to delete, go back to the “Slide Master” option, and “Right-click” on the layout. Now you will see that the “Delete Layout” button is no longer greyed out.
Step-5: Delete the layout
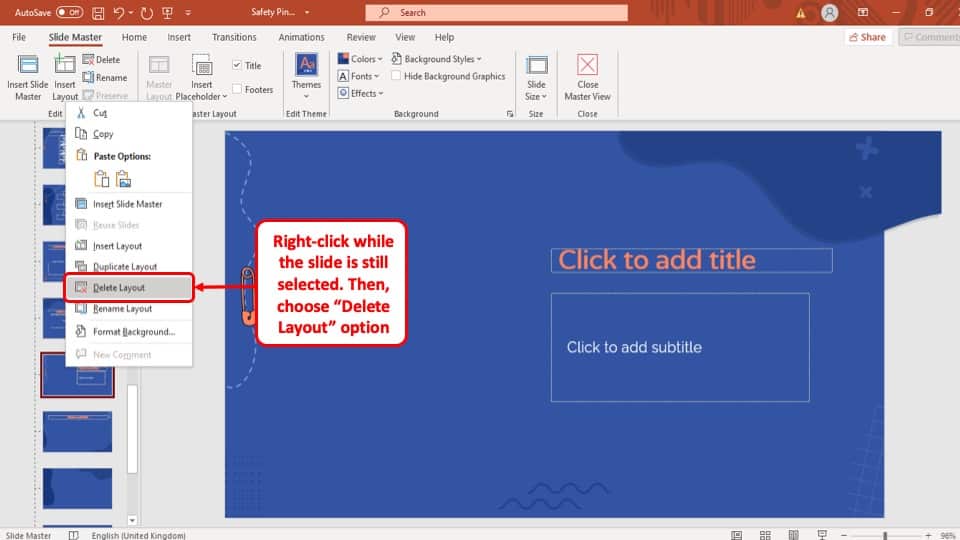
Finally, select the “Delete Layout” option and the layout will be removed from your PowerPoint Presentation.
7. Why Can’t I Delete Slides in PowerPoint?
On some occasions, you may not be able to delete slides. This is an extremely rare occurrence, but it can happen!
The main reason why you may not be able to delete a slide in PowerPoint is that your PowerPoint may have faulty macros in it. Perhaps you may have added a macro command that has bugs. This may create such an issue or prevent you from deleting slides even when the slide is blank with no data in it.
If you have indeed added a macro in your PowerPoint Presentation, it will be saved with a “.pptm” extension instead of a “.pptx” extension.
To solve this issue, all you have to do is save the presentation back as a ‘.pptx’ file, which will essentially kill all the macro commands. Once it is saved as a ‘.pptx’, opening it will allow you to delete any slide you want!
Another culprit could perhaps be an add-on that you may have recently added to your PowerPoint application. If so, try disabling or deleting the add-on, restart PowerPoint and try once again to see if you are able to delete the slide.
More PowerPoint Related Topics
- How to Crop a Picture in PowerPoint? [Complete Step-by-Step Tutorial!]
- How to Give a Presentation on Zoom? A Helpful Resource!
- How to Convert a PowerPoint to PDF? [A Simple Guide!]
- PowerPoint vs Google Slides: Which is Better? [ULTIMATE Test!]
- How to Change Bullet Style in PowerPoint? A Complete Guide
Credit to Lookstudio for the featured image (designed by Freepik) of this article

