![How to Format a Table in PowerPoint? [The ULTIMATE Guide!]](https://artofpresentations.com/wp-content/uploads/2022/05/Featured-Image-Edited-How-to-Format-a-Table-in-PowerPoint.webp)
While reading, presenting, or working with tables it is always more pleasing to see when everything is in place, is formatted, and follows a set style. This is why it is important to know how to format a table.
To format a table in PowerPoint, first, select the table by clicking on it. Then, under the Table Design tab, go to the Table Styles group, and choose your preferred table format option in this gallery.
While this step seems easy, there are many other methods in which you can further customize your tables in PowerPoint to suit your requirements. Let’s dive further into the article to learn more about Formatting Tables in PowerPoint.
1. Using Table Style in PowerPoint
The table style in Microsoft PowerPoint is an automatically generated gallery of table designs. You can apply the designs to a table in the presentation. However, before you apply the table styles, you first need to add a table in PowerPoint. So, make sure you do that first.
Also, make sure you check out my other article on table styles in PowerPoint to get an in-depth understanding. However, here are the brief steps that you need to follow in order to add table styles to a table.
To use the table style, follow these 2 steps.
Step-1: Click on the “Table Design” tab

The first step is to select the table where you want to apply the table style. Then click on the “Table Design” tab in the menu ribbon located at the top of the screen.
Step-2: Click on the “Table Styles” gallery
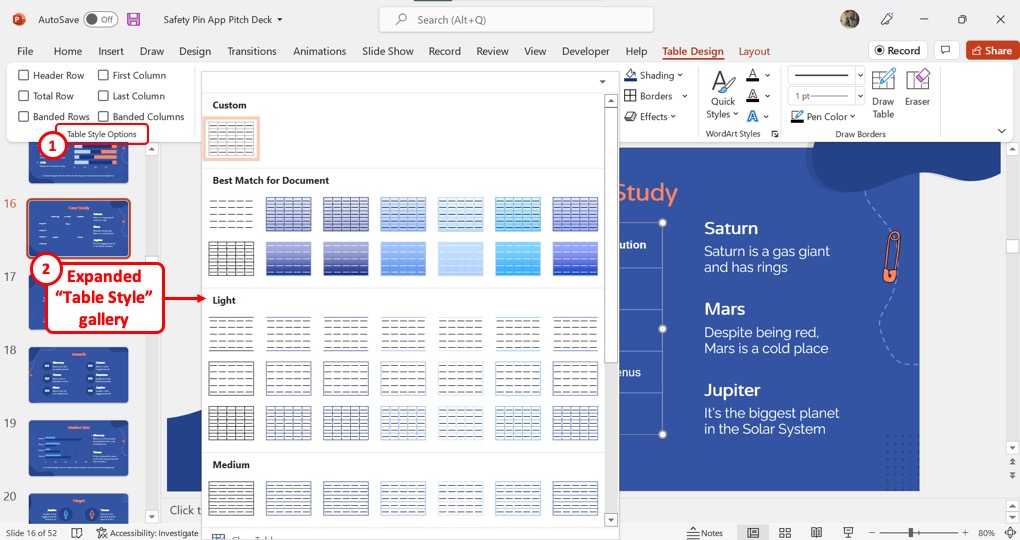
In the “Table Design” tab, click on the downward arrow in the “Table Styles” group. This will expand the “Table Styles” gallery. Now click on your preferred table style from the gallery to apply it to the selected table.
2. How to Add Border to a Table in PowerPoint?
In Microsoft PowerPoint, you can add or remove borders of a table using the “Borders” feature. I’ve covered this topic in further detail in another article. Make sure you check out my other article on table borders in PowerPoint and read more about it.
Meanwhile, here are the brief steps that you need to take to add a border to a table.
Step-1: Click on the “Table Design” tab
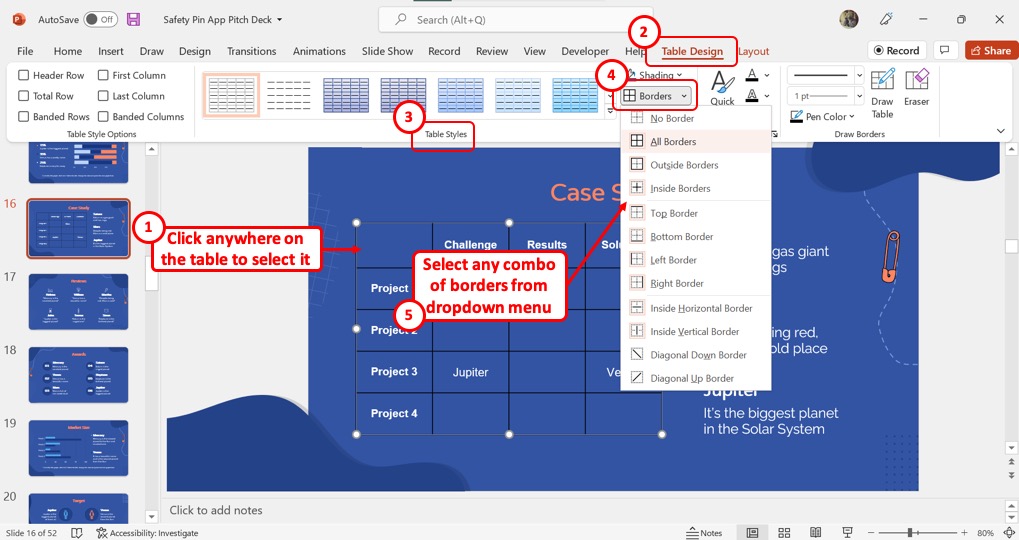
In the open slide, click on the table to select it first. Then click on the “Table Design” contextual tab to access options for customizing the table.
Step-2: Click on the “Borders” option
The next step is to click on the “Borders” option in the “Table Styles” group of the “Table Design” tab. In the dropdown menu under the “Borders” option, you can select any combination of border options for the selected table (shown above).
3. Change Border Color of Table in PowerPoint
The “Table Design” tab in Microsoft PowerPoint allows you to customize the appearance of the presentation table. You can read my article here to learn more about using the “Table Design” tab to change the border color of the table.
To change the color of the table border, follow these 3 steps.
Step-1: Click on the “Table Design” tab
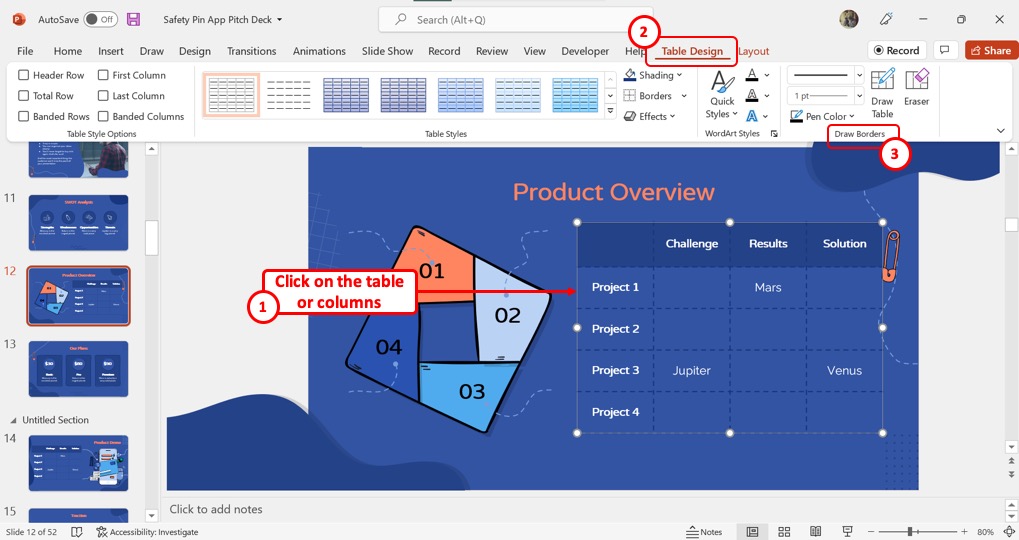
The first step is to click on the table or selected columns where you want to change the border color. Then click on the “Table Design” tab in the menu ribbon.
Step-2: Click on the “Pen Color” option
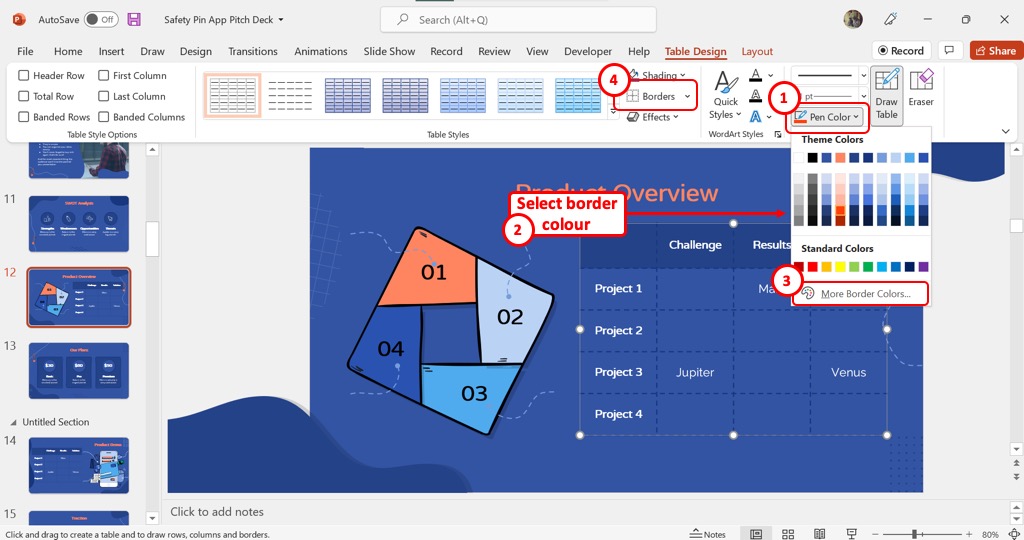
In the “Draw Borders” group of the “Table Design” tab, click on the “Pen Color” option. You can now select a border color from the dropdown list under the “Pen Color” option. For more colors, click on the “More Border Colors” option at the bottom of the dropdown menu.
Step-3: Click on the “Borders” option
The final step is to apply the new border color. To do so, click on the “Borders” option in the “Table Styles” group (shown above).
4. How to Format Text in a Table in PowerPoint?
Microsoft PowerPoint allows you to format text within a shape or a table using the “Format Shape” sidebar. To format text in a PowerPoint table, follow these steps.
Step-1: Click on the “Format Shape” option
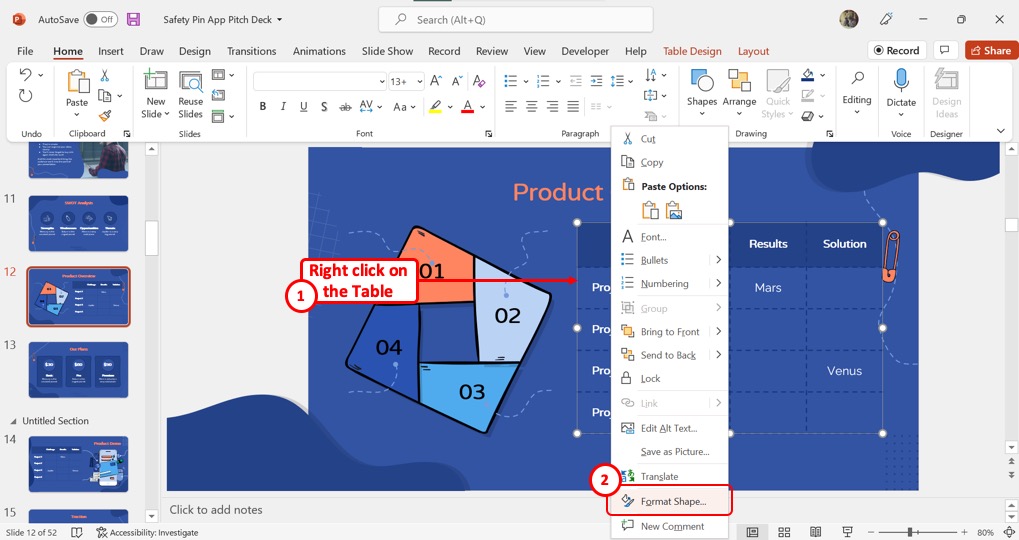
The first step is to “Right Click” on the table. In the right-click menu, click on the “Format Shape” option at the bottom. This will open the “Format Shape” sidebar on the right side of the screen.
Related Article – How to Align Text in a Table in PowerPoint? [Complete Guide!]
Step-2: Click on the “Text Options” tab
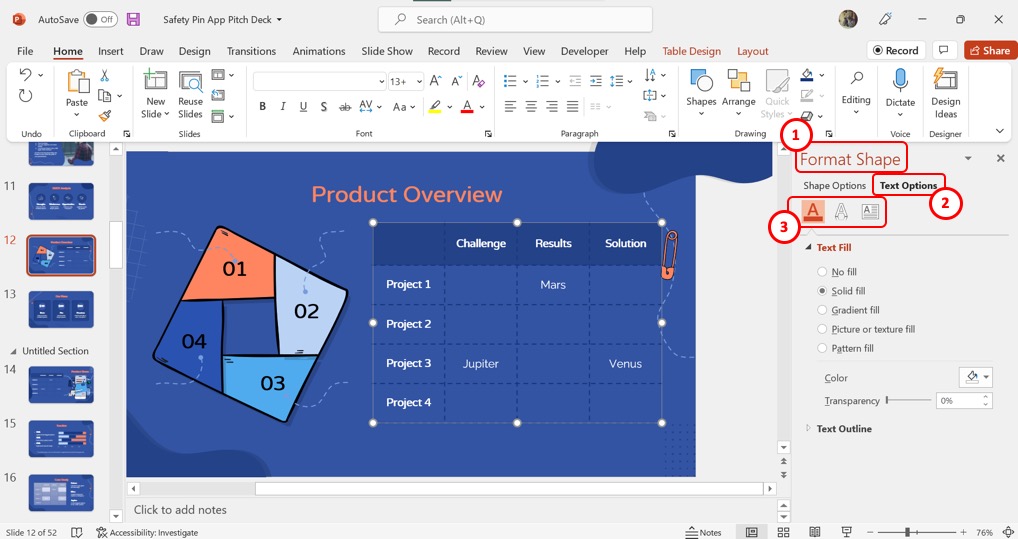
In the “Format Shape” sidebar, click on the “Text Options” tab located at the top. There are three groups under the tab: “Text Fill & Outline”, “Text Effects”, and “Textbox”. You can use the options available under each group to format the text inside the table.
5. How to Add Color Shading to a Table in PowerPoint?
In Microsoft PowerPoint, you can use the “Shading” option to add background color, gradient, texture, or picture to a table. To add color shading to a table, follow these 3 steps.
Step-1: Click on the “Table Design” tab
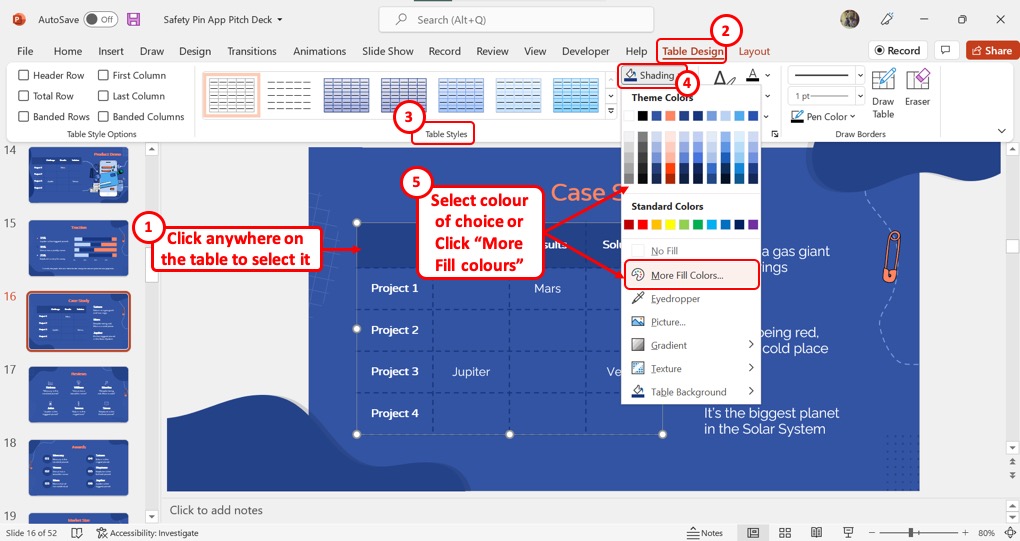
The first step is to access the table contextual tab. To do so, click anywhere on the table inside the slide. Then click on the “Table Design” contextual tab from the menu ribbon.
Step-2: Click on the “Shading” option
In the “Table Styles” group of the “Table Design” tab, click on the “Shading” option. You can now select a shading color from the “Theme Colors” or the “Standard Colors” section of the dropdown list under the “Shading” option. You can also click on the “More Fill Colors” option.
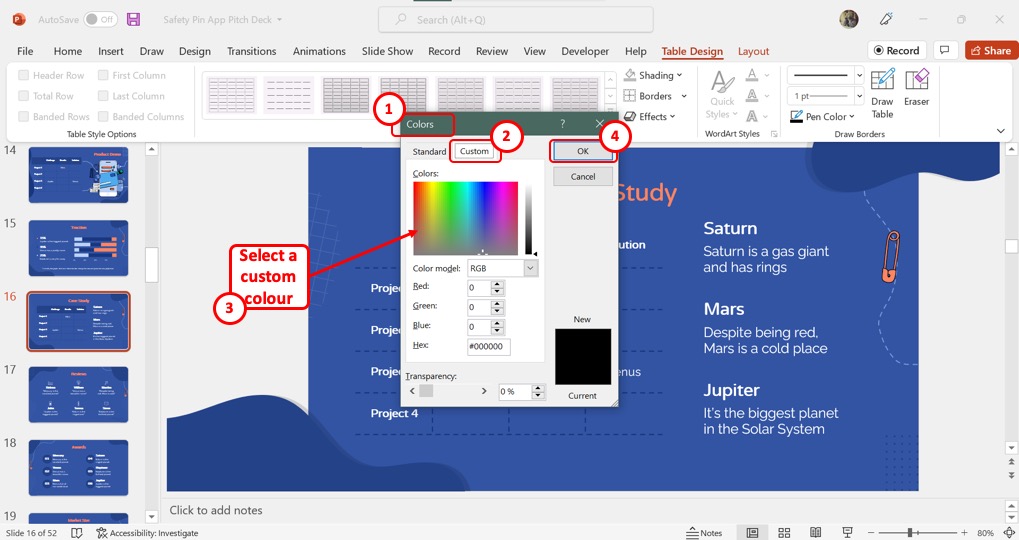
Step-3: Click on the “OK” button
In the “Colors” dialog box, click on the “Custom” tab for more color options. Now you can select a custom color. Click on the “OK” button to apply the selected color as table shading (shown above).
5.1 Adding a Color Shading to the Complete Table in PowerPoint
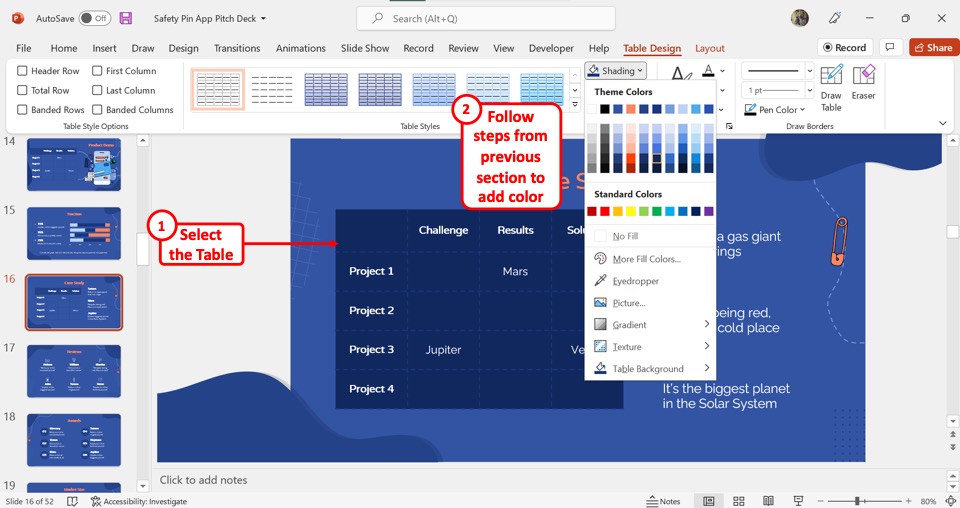
To add color to the complete table in PowerPoint, you have to first select the entire table. Then all you have to do is follow the steps mentioned in the previous section to add your preferred shading color to the selected table in the slide.
5.2 Adding a Color Shading to a Specific Cell of a Table in PowerPoint
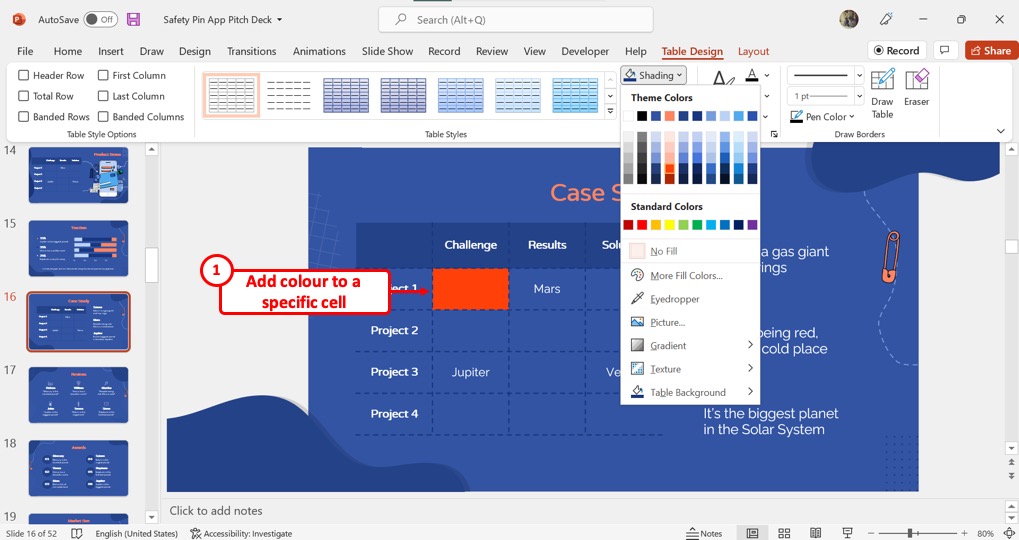
To add color shading to a specific cell in a PowerPoint table, you have to first select only that cell in the table. Then follow the 3-step process detailed in this section previously to add color shading to the selected table cell.
5.3 Adding a Banded Color Row or Column in PowerPoint
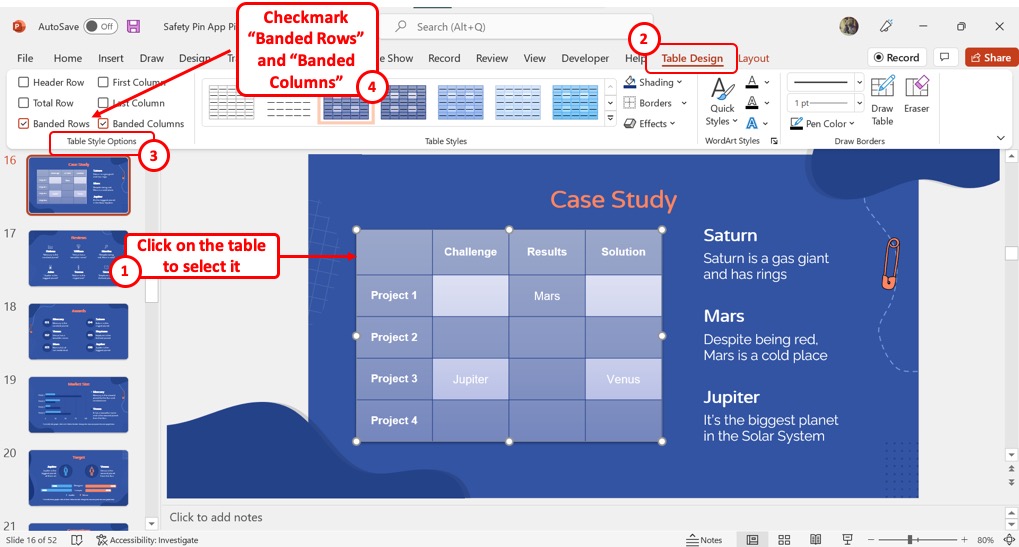
In PowerPoint, you can also add a banded color row or column to a table.
To do so, you have to first select the table and click on the “Table Design” tab in the menu ribbon. In the “Table Style Options” group of the “Table Design” tab, you can now click on the “Banded Rows” option or the “Banded Columns” option or even both.
6. How to Add a Gradient Color to a Table in PowerPoint?
In Microsoft PowerPoint, you can add solid or gradient color to any object using the “Format Shape” option. To add a gradient color to a table, follow the 3 quick steps.
Step-1: Click on the “Format Shape” option

The first step is to “Right Click” on the table where you want to add the gradient color. In the right-click menu, click on the “Format Shape” option to open the “Format Shape” sidebar.
Step-2: Click on the “Gradient Fill” option
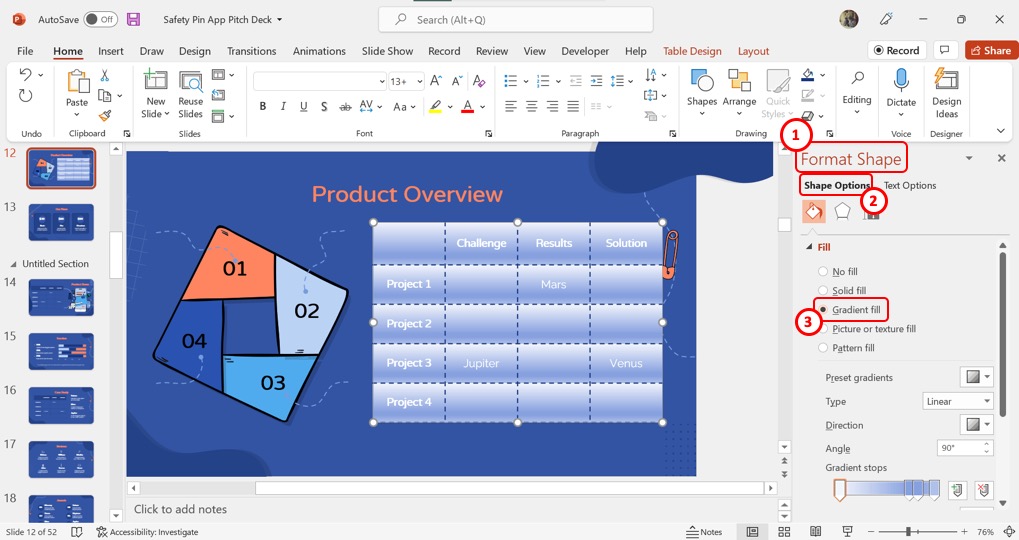
In the “Format Shape” sidebar on the right side of the screen, click on the “Gradient fill” option. This will expand the options to customize the gradient background of the table.
Step-3: Select the gradient color
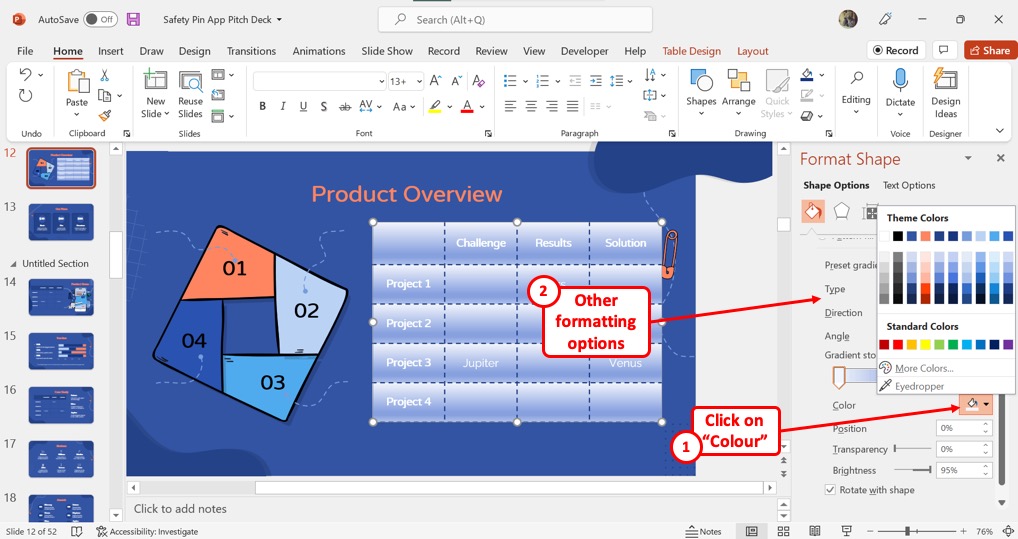
Click on the “Color” option in the “Format Shape” sidebar to select the gradient color. You can also customize the type, direction, angle, transparency, etc. of the gradient fill.
7. How to Add a Texture Fill to a Table in PowerPoint?
Microsoft PowerPoint offers predesigned textures that you can use as a background for a slide or an object inside a slide. To add a texture fill to a table in PowerPoint, follow the 3 steps below.
Step-1: Click on the “Format Shape” option
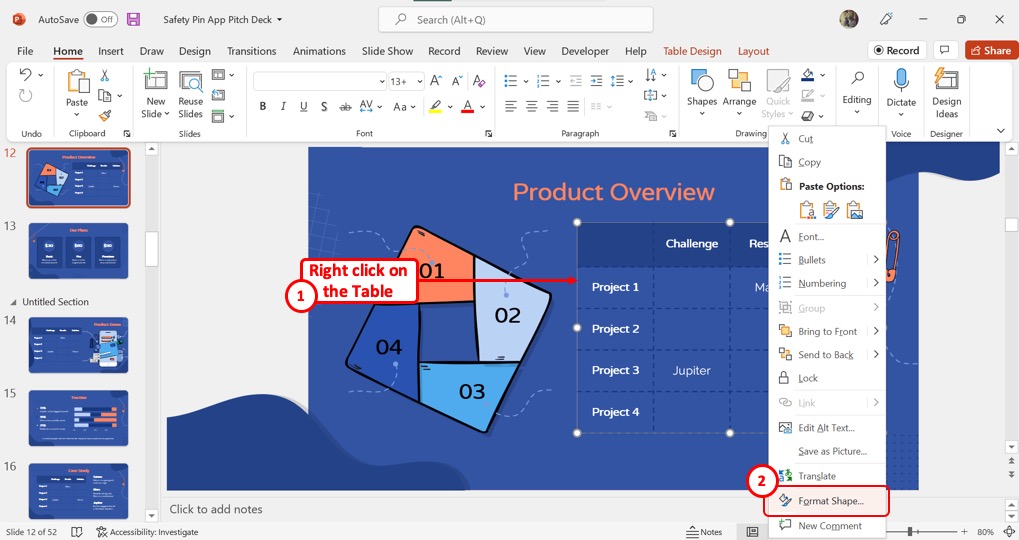
The first step is to open the “Format Shape” sidebar. To do so, “Right Click” on the table and click on the “Format Shape” option from the right-click menu.
Step-2: Click on the “Picture or texture fill” option
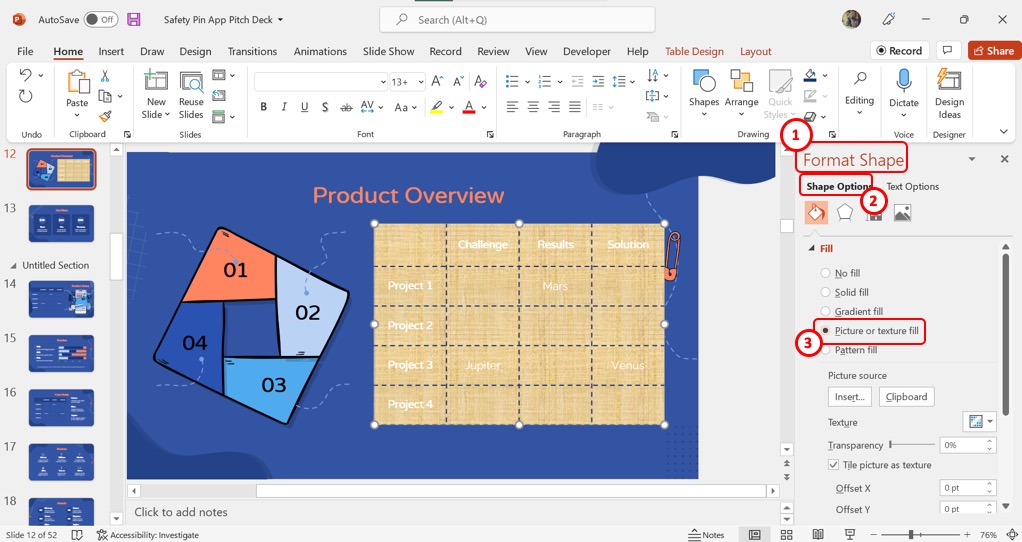
In the “Format Shape” sidebar on the right side of the screen, click on the “Pattern or texture fill” option. This will expand the options to customize the table background.
Step-3: Click on the “Texture” box
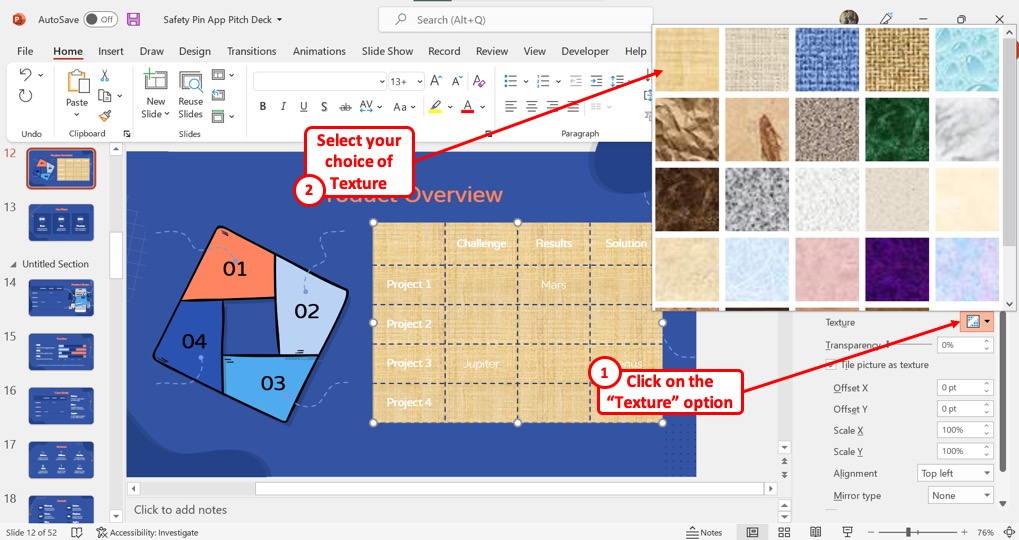
Finally, all you have to do is click on the “Texture” box in the “Format Shape” sidebar. In the pop-up menu over the “Texture” option, you can now click on your preferred texture to apply as a background fill to the selected table.
8. How to Add a Table Background in PowerPoint?
Using the “Shading” option in Microsoft PowerPoint, you can add backgrounds to a selected table. You can add color, gradient, texture, pattern, or picture as a table background. To add the table background, follow the 3 steps mentioned below.
Step-1: Click on the “Table Design” tab
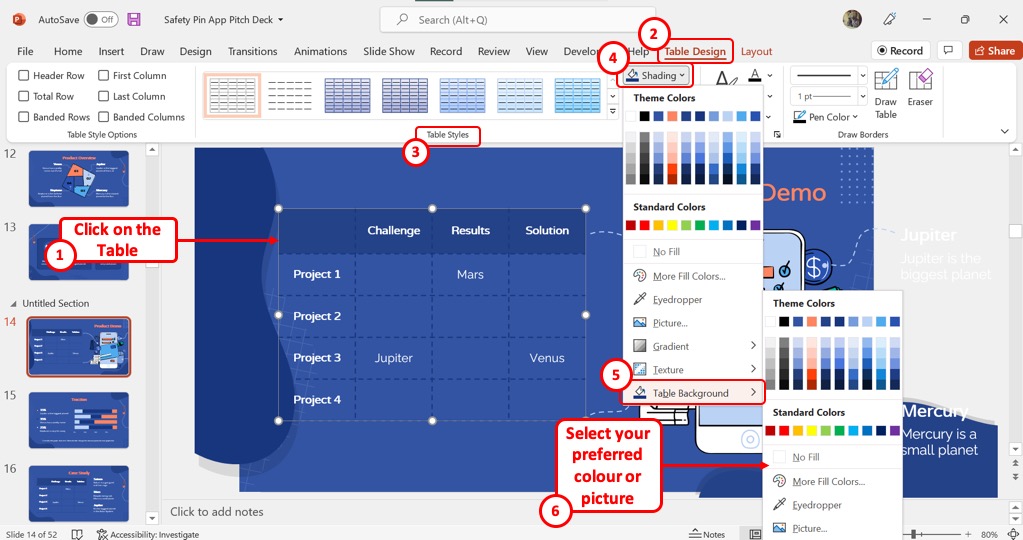
The first step is to select the table where you want to add a background. Then click on the “Table Design” tab in the menu ribbon located at the top of the screen.
Step-2: Click on the “Table Background” option
In the “Table Styles” group of the “Table Design” tab, click on the “Shading” option. Then click on the “Table Background” option in the dropdown menu under the “Shading” option (shown above).
Step-3: Select your preferred color or picture
In the dropdown menu under the “Table Background” option, you can now select a preferred color or add a picture for the table background (shown above).
9. How to Add Reflection to a Table in PowerPoint?
The “Reflection” option in Microsoft PowerPoint allows you to add the visual effect on any object inside a slide. To add reflection to a table, follow the 3 simple steps.
Step-1: Click on the “Effects” option
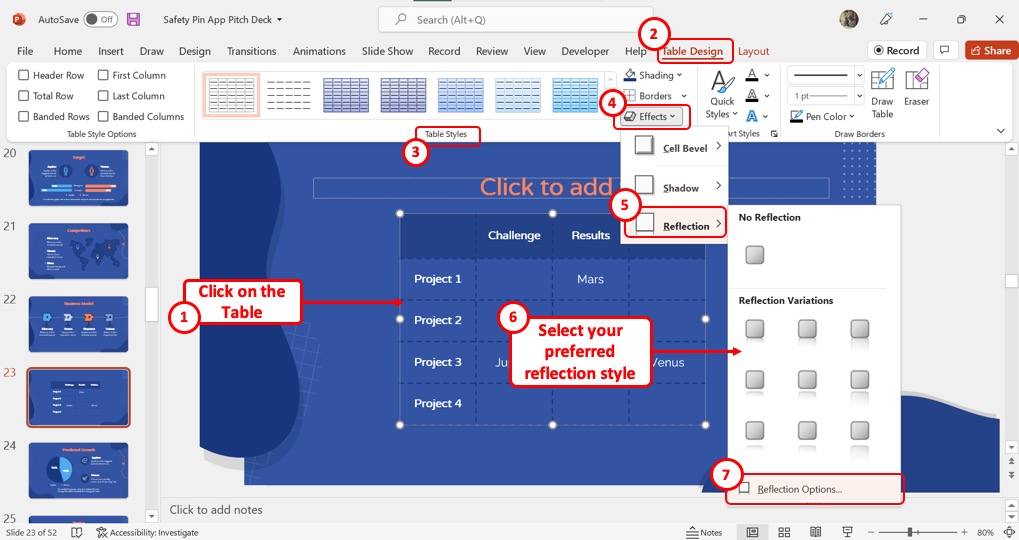
The first step is to click on the “Table Design” tab in the menu ribbon located at the top of the screen. Then click on the “Effects” option which is the last option in the right column of the “Table Styles” group of the “Table Design” tab.
Step-2: Click on the “Reflection Options”
In the dropdown menu under the “Effects” option, click on the “Reflection” option to open another dropdown menu. Click on your preferred reflection style from the dropdown menu. To customize the reflection, click on “Reflection Options” (shown above).
Step-3: Add preferred reflection style
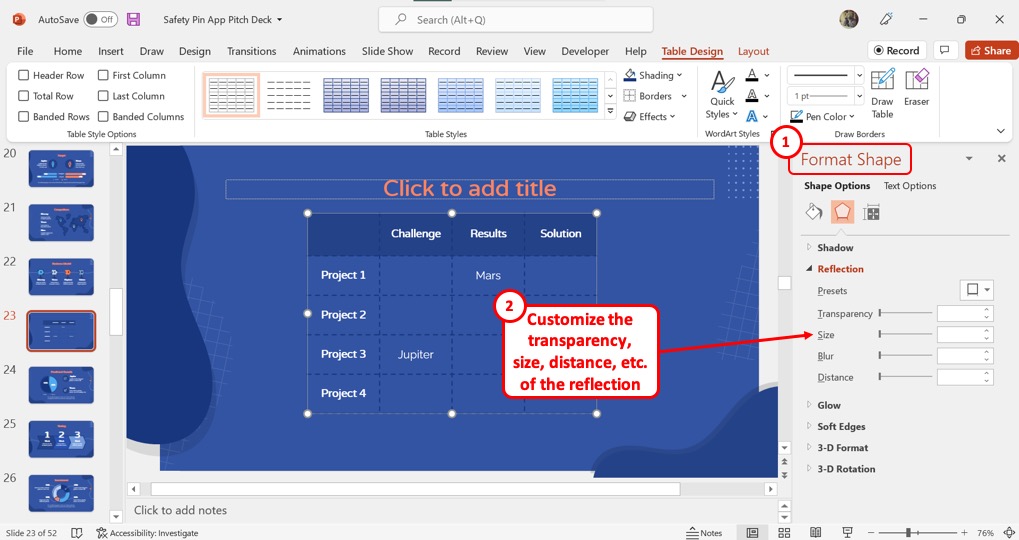
Clicking on “Reflection Options” will open the “Format Shape” sidebar on the right side of the screen. You can now customize the transparency, size, distance, etc. of the reflection for the selected table.
10. How to Add Shadow to Table in PowerPoint?
In Microsoft PowerPoint, you can add shadows to tables to give them visual emphasis. To add a shadow, follow the 2 steps.
Step-1: Click on the “Table Design” tab
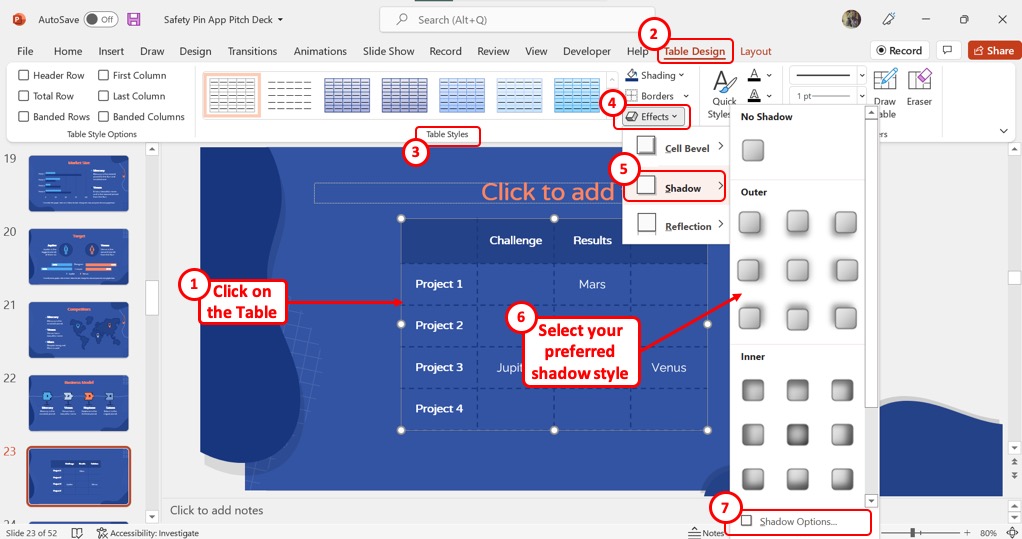
The first step is to click on the “Table Design” tab in the menu ribbon located at the top of the screen. In the “Table Styles” group of the “Table Design” tab, click on the “Effects” option.
Step-2: Click on the “Shadow” option
In the dropdown menu under the “Effects” option, click on the “Shadow” option. This will open another secondary menu where you can select your preferred shadow style for the selected table. You can also click on “Shadow Options” to customize the shadow (shown above).
11. How to Draw a Table in PowerPoint?
The “Draw Table” option in PowerPoint allows you to draw or erase cells within a table inside a slide. To draw a table in PowerPoint, follow these 2 steps.
Step-1: Click on the “Table Design” tab
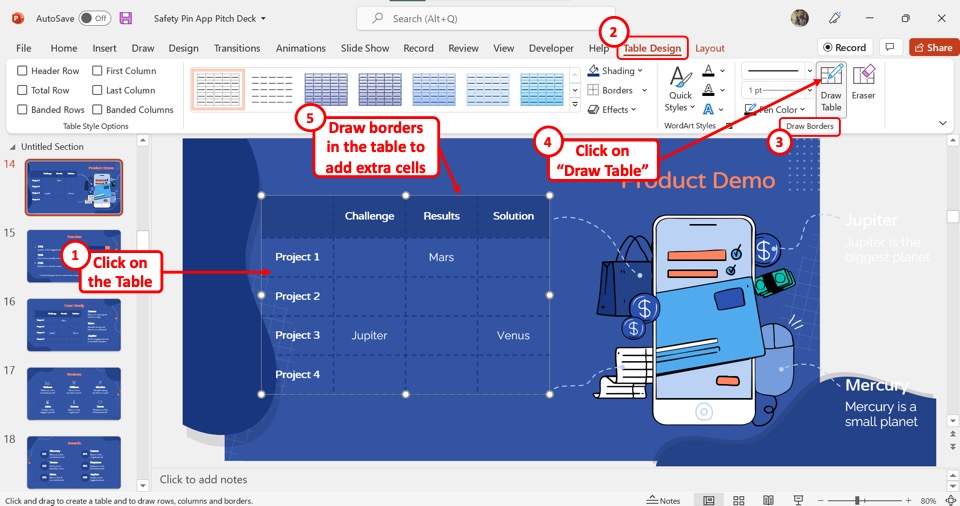
The first step is to click on a table to access the contextual tabs. Then click on the “Table Design” contextual tab in the menu ribbon.
Step-2: Click on the “Draw Table” option
In the “Draw Borders” group of the “Table Design” tab, click on the “Draw Table” option. Now all you have to do is draw borders inside the table to add extra cells anywhere in the table (shown above).
12. How to Merge Cells of a Table in PowerPoint?
Using the “Merge Cells” option in PowerPoint, you can merge selected table cells into a single cell. All you have to do is follow the 2 quick steps.
Step-1: Click on the “Layout” tab
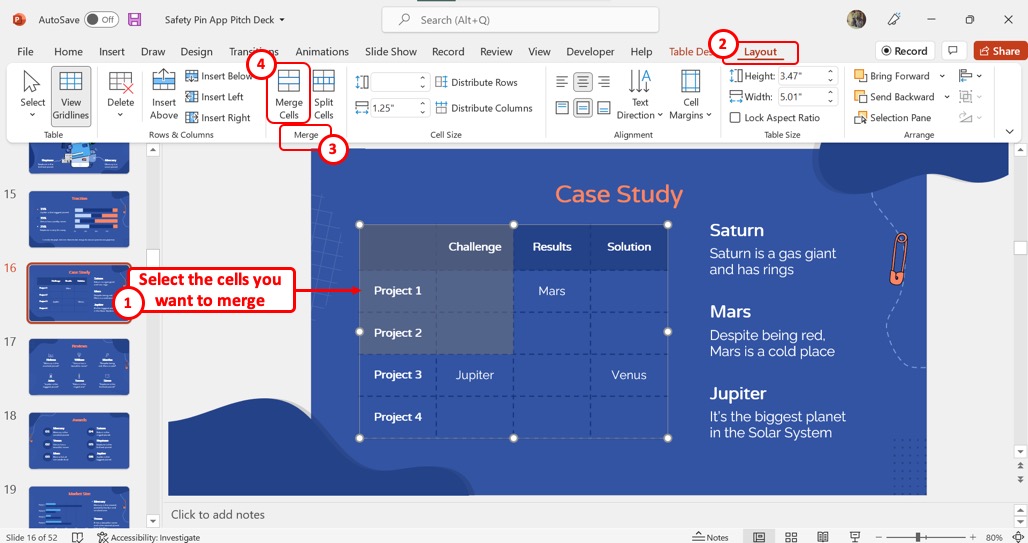
The first step is to select the cells that you want to merge together into one cell. Then click on the “Layout” tab in the menu ribbon located at the top of the screen.
Step-2: Click on the “Merge Cells” option
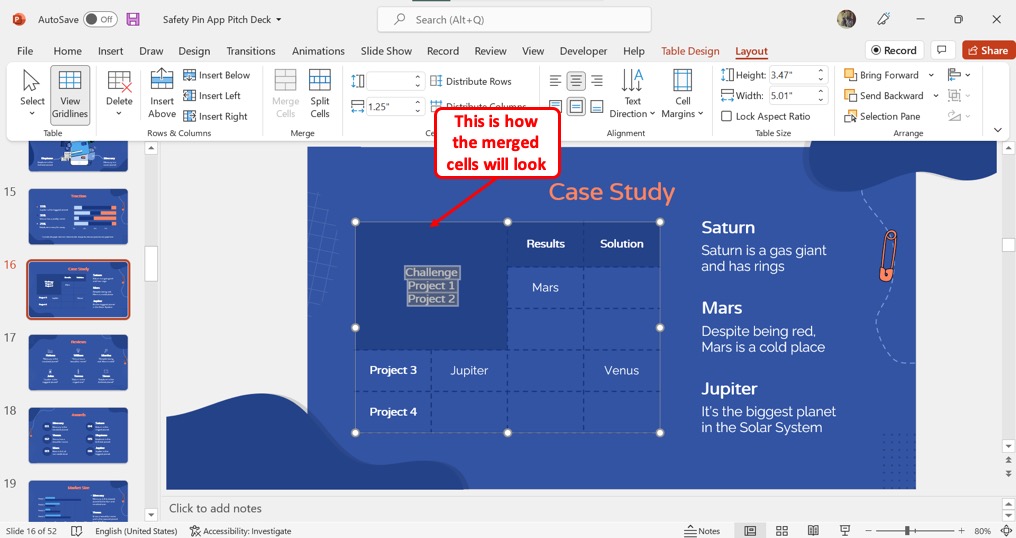
Now all you have to do is click on the “Merge Cells” option in the “Merge” group of the “Layout” tab to merge the selected cells (shown above).
13. How to Split a Table in PowerPoint?
In Microsoft PowerPoint, you can split a selected cell into multiple cells in a table. To do so, follow the 3 easy steps.
Step-1: Click on the “Layout” tab
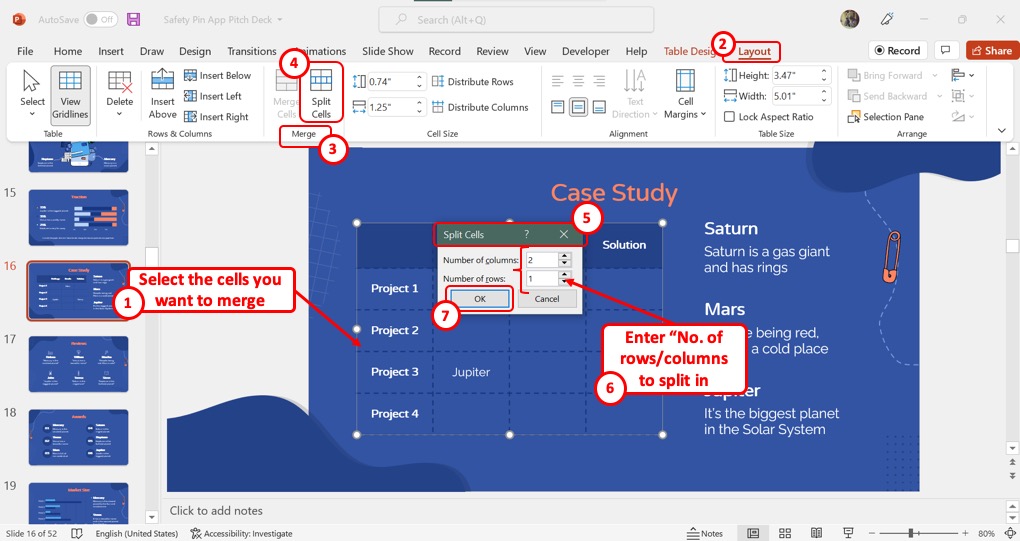
You have to first select the cell that you want to split. Then click on the “Layout” tab in the menu ribbon located at the top of the screen.
Step-2: Click on the “Split Cells” option
In the “Merge” group of the “Layout” tab, click on the “Split Cells” option. This will prompt the “Split Cells” dialog box.
Step-3: Enter the number of rows and columns
In the “Split Cells” dialog box, click on the “Number of columns” box to enter the number of columns you want to split the cell into. Similarly, type in the preferred number of rows in the “Number of rows” box. Finally, you have to click on the “OK” button at the bottom of the dialog box to split the selected cell.
14. How to Clear Formatting of Table in PowerPoint?
Microsoft PowerPoint allows you to clear all formatting applied to a table at once to return to the default look. All you have to do is follow the 2 simple steps.
Step-1: Click on the “Table Design” tab
The first step is to select the table for which you want to clear the formatting. Then click on the “Table Design” tab in the menu ribbon.
Step-2: Click on the “Clear Table” option
In the “Table Styles” group of the “Table Design” tab, click on the downward arrow to expand the “Table Styles” gallery. Then click on the “Clear Table” option at the bottom of the “Table Styles” gallery to clear the formatting of the selected table.