![Change Border Color of Table in PowerPoint? [An EASY Way!]](https://artofpresentations.com/wp-content/uploads/2021/12/Featured-Image-Change-Border-Color-in-PowerPoint.webp)
Using tables in a PowerPoint is quintessential for any presentation where you need to represent data and share numbers! But, one of the biggest challenges that you may face when using a table in PowerPoint is how to change the border color of the table!
To change the border color of table in PowerPoint, first, select the table. Click on the “Table Design” tab. Next, click on the “Pen Color” option and choose a color from the dropdown. Then, click on the “Borders” button to apply the border color to the entire table.
While the short answer above may be helpful, but it may not be enough to explain all the details.
So, in this article, we shall cover this topic in great detail. I’ll not only share with you how to change the color of the border of the complete table, but I’ll also show you how to change the border color of just one cell or multiple cells in a table in PowerPoint.
More than that, you’ll get to understand the process in a complete step-by-step manner with visual references. So, by the end of this article, you will surely have mastered the process to change the border color of a table in PowerPoint!
So, let’s get started!
1. How to Add Border to Table in PowerPoint?
Using tables designs that match represent your brand and match the colors of your brand is important from a design standpoint. This also makes the presentation look visually appealing and consistent!
In Microsoft PowerPoint, you can change the table design and layout to make the table stand out. To add borders to your table, all you have to do is follow the 2 easy steps.
Step-1: Click on the “Table Design” menu
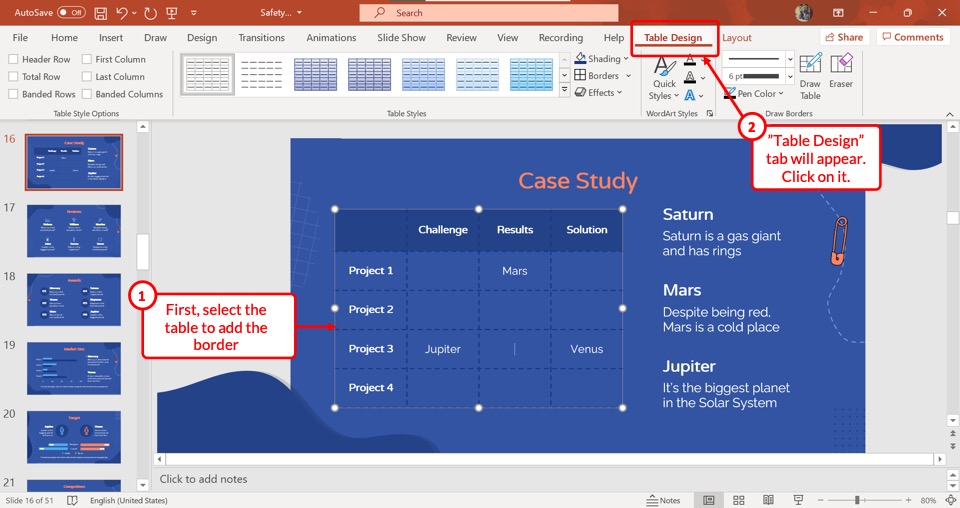
Click on the table in the slide to which you want to add borders to. Then click on the “Table Design” option in the menu bar located at the top of the screen.
Step-2: Click on “Borders”
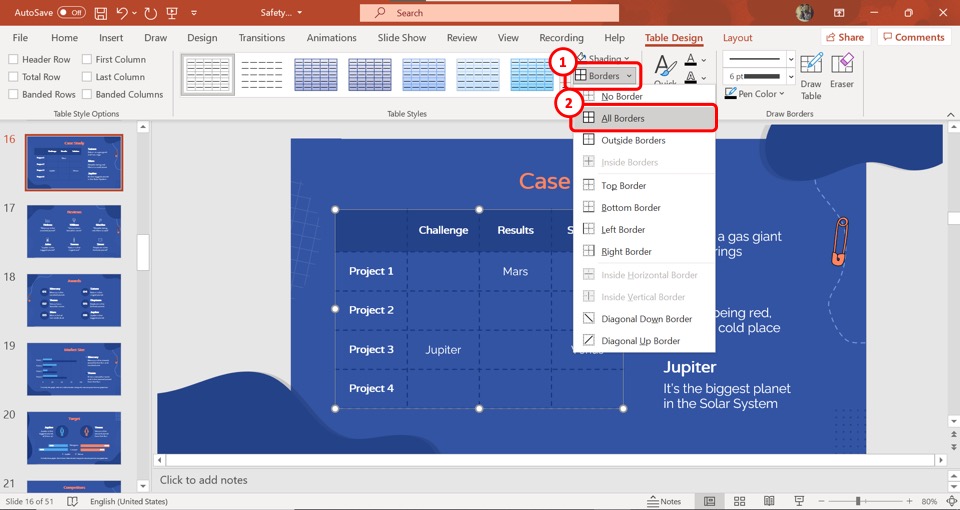
In the “Table Design” menu, click on the downward-facing arrow by the “Borders” option to access a dropdown menu. In the dropdown menu, you can select your preferred border type from the numerous border styles available.
2. How to Change Border Color of One Cell in PowerPoint Table?
Microsoft PowerPoint allows you to add, remove or change the border of individual cells of a table in a slide. This can help you to highlight a specific cell in the presentation table.
Here’s what you need to do –
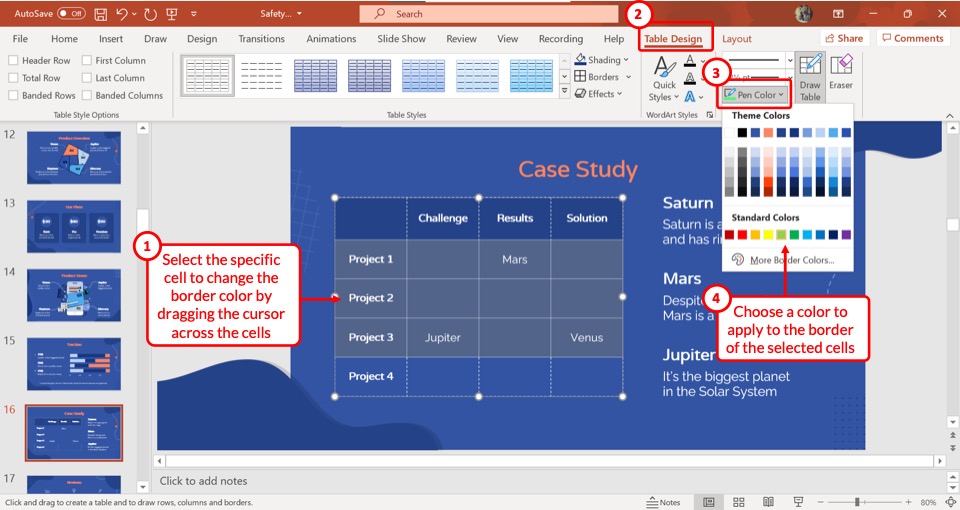
Step-1: Select the preferred cell

The first step is to select the table cell you want to change the border color of. To do so, click on the preferred cell.
Then, click on the “Table Design” option which is the second option from the right in the menu bar. This will open more options for editing the table.
Step-2: Click on the “Pen Color” option
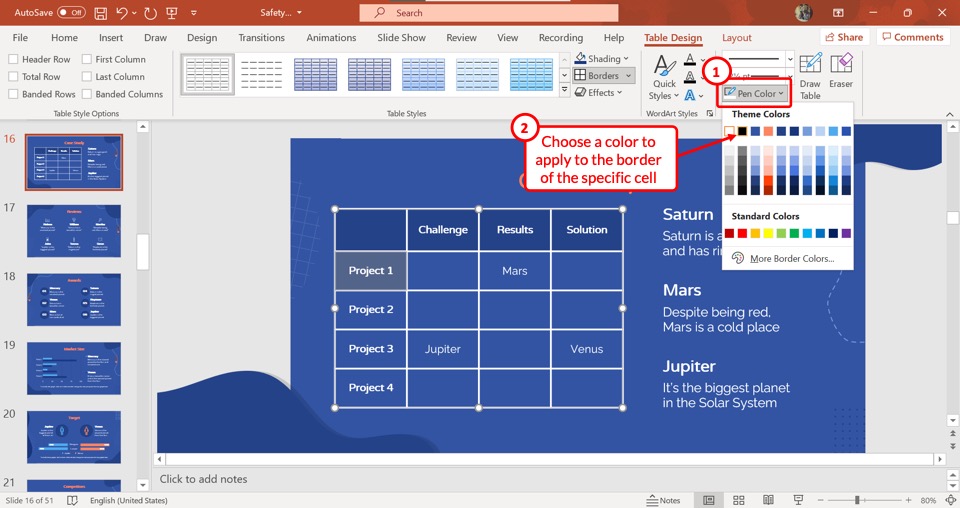
The next step is to click on the “Pen Color” option in the “Table Design” menu. After that, you have to click on the preferred color from the dropdown menu.
You can also click on the “More Border Colors” option to search and select your preferred color.
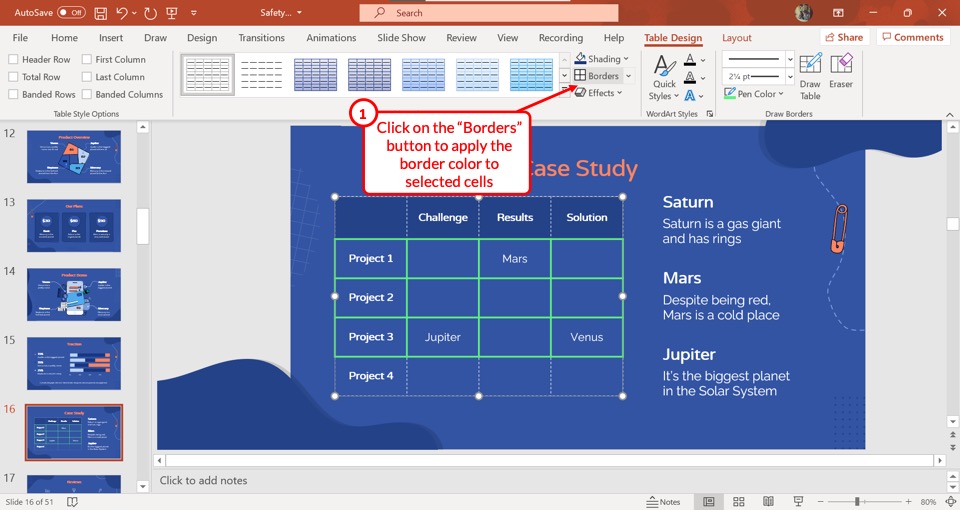
Step-3: Click on “Borders”
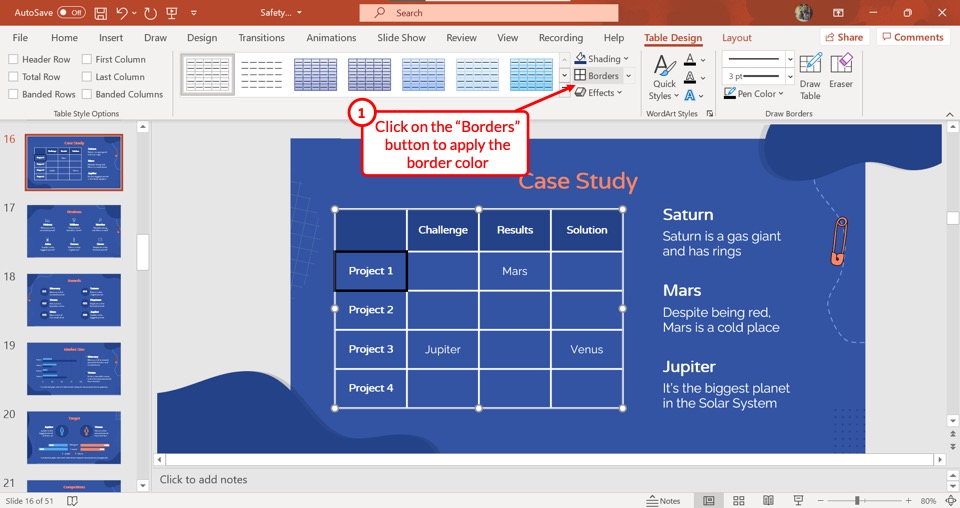
Now all you have to do is click on the “Borders” option to change the border color of the previously selected cell.
You have to be sure not to click on the downward pointing arrow beside the “Borders” option.
3. How to Change Border Color of Multiple Cells in PowerPoint Table?
The steps for changing the border color of a single cell and multiple cells are similar.
The only key difference for changing the border color of multiple cells of a table in PowerPoint is that you have to select multiple cells rather than just a single cell.
Here’s the process that you need to follow –
Step-1: Click on “Pen Color”
In the “Table Design” menu, click on the “Pen Color” option to access a dropdown menu. You can click on your preferred color from the “Theme Colors” or “Standard Colors” options.
If you cannot find your preferred color, you can also click on the “More Border Colors” option to select a new color for the border.
Step-2: Click on the “Borders” option
Now all you have to do is click on the “Borders” option in the “Table Design” menu. This will change the border color of the selected cells into the newly selected color.
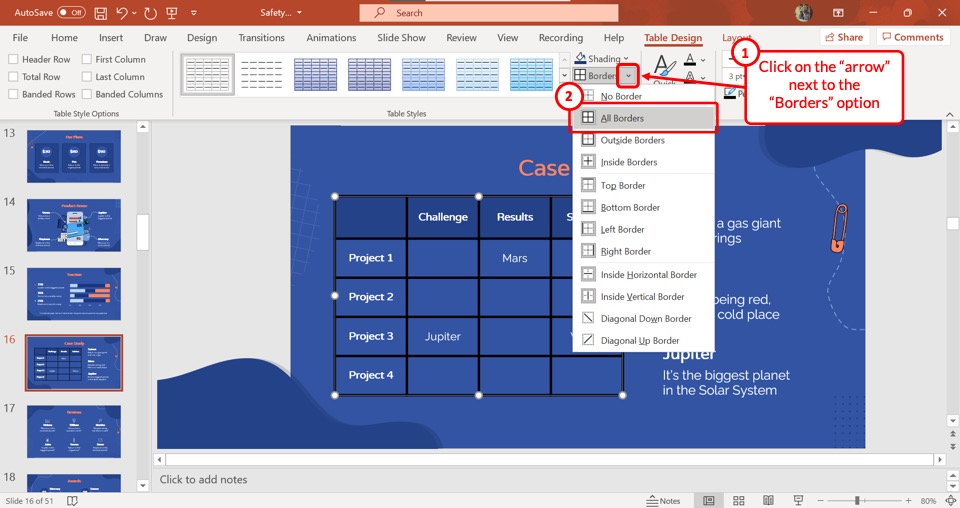
4. How to Change Border Color of Complete Table in PowerPoint?
To change the border color of the complete table in Microsoft PowerPoint, at first, you have to select the entire table rather than an individual cell. Then all you have to do is follow the 3 quick steps.
Step-1: Click on the “Table Design” menu
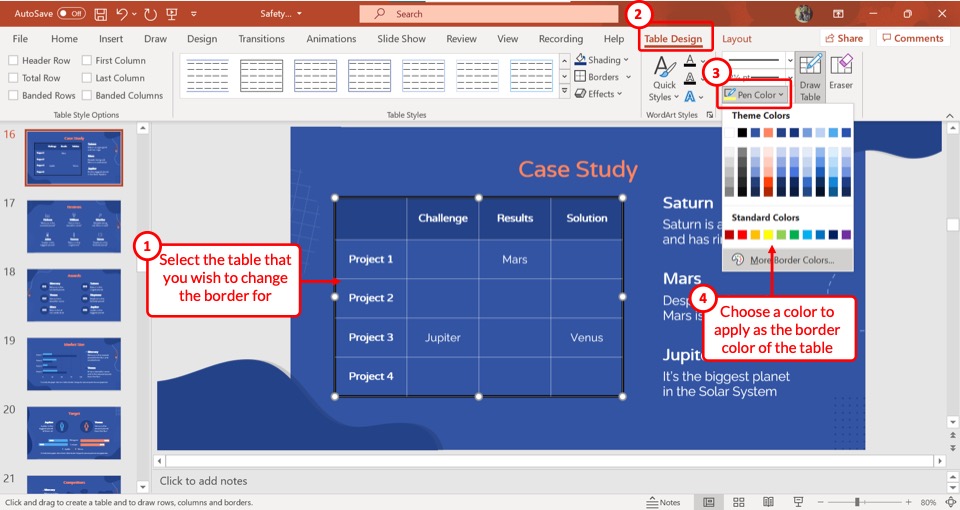
In the menu bar located at the top of the screen, click on the “Table Design” option. This will open a toolbar under the menu ribbon containing various options to edit the table.
Step-2: Click on “Pen Color”
The next step is to click on the “Pen Color” option. In the “Pen Color” option, click on your preferred border color (as shown in the image in step 1).
You can also click on the “More Border Colors” option to access more colors.
Step-3: Click on the “All Borders” option
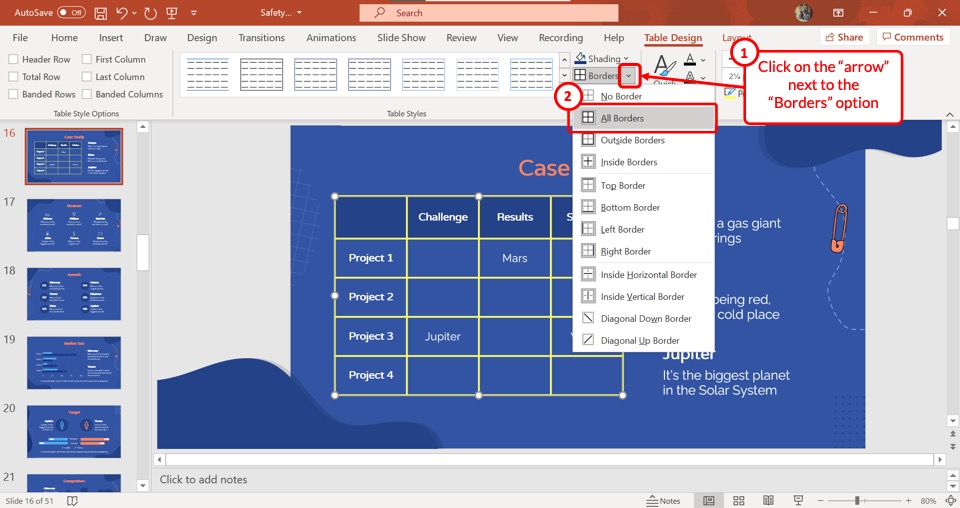
Click on the downward pointing arrow beside the “Borders” option to open a dropdown menu. Then all you have to do is click on the “All Borders” option in the dropdown menu.
This will change the border color of all the borders in the entire table.
5. How to Add a Dark Border Around a Table?
Microsoft PowerPoint allows you to add borders around a table without placing borders around individual cells. To add a dark border around the table, follow the 4 easy steps.
Step-1: Click on “Table Design”
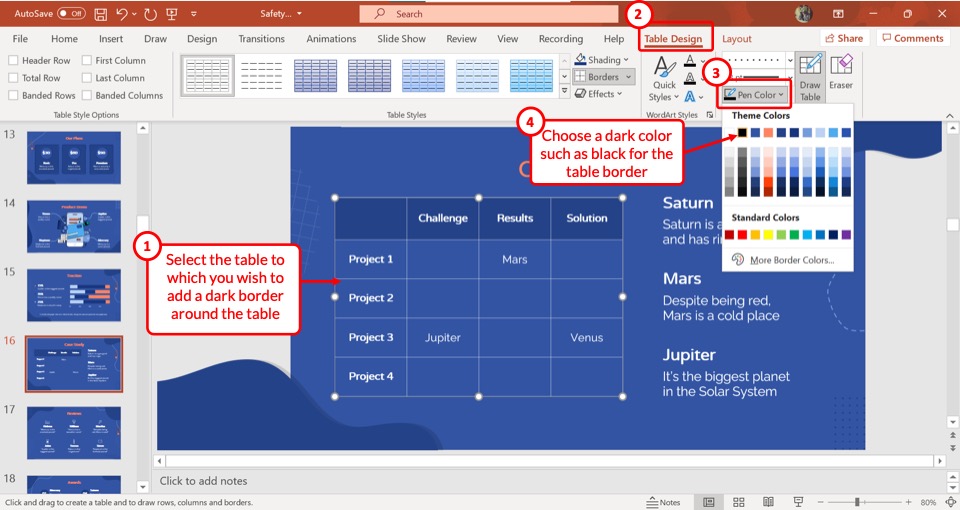
The first step is to select the table to access the table menus. Then click on the “Table Design” option in the menu ribbon located at the top of the screen.
Step-2: Click on “Pen Color”
In the “Table Design” menu, click on the “Pen Color” option to open a dropdown menu. From the dropdown menu, select your preferred dark color.
Step-3: Click on the “Pen Style” box
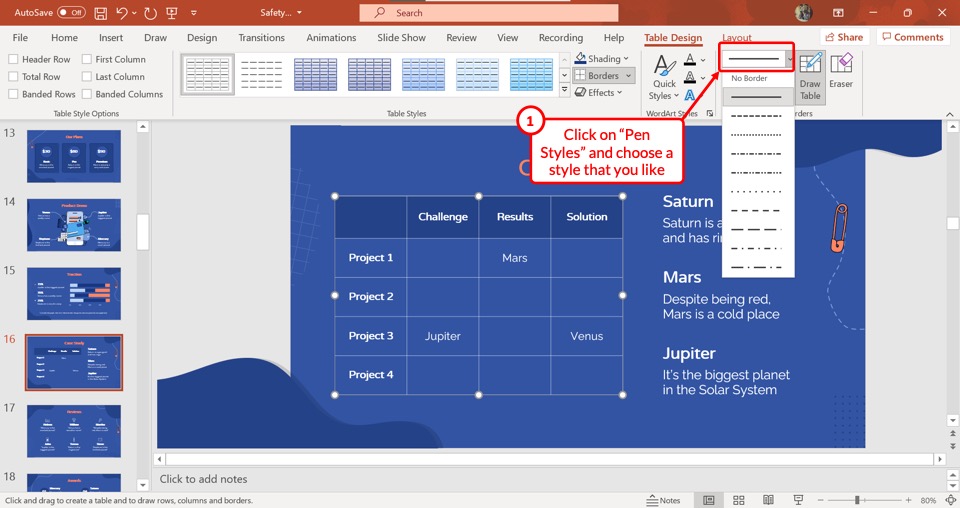
The next step is to click on the “Pen Style” box in the “Table Design” menu. In the dropdown menu under the “Pen Style” option, click on the straight line which is the first option.
Be sure not to select a dotted or dashed line since it will not result in a dark border.
Step-4: Click on the “Outside Borders” option
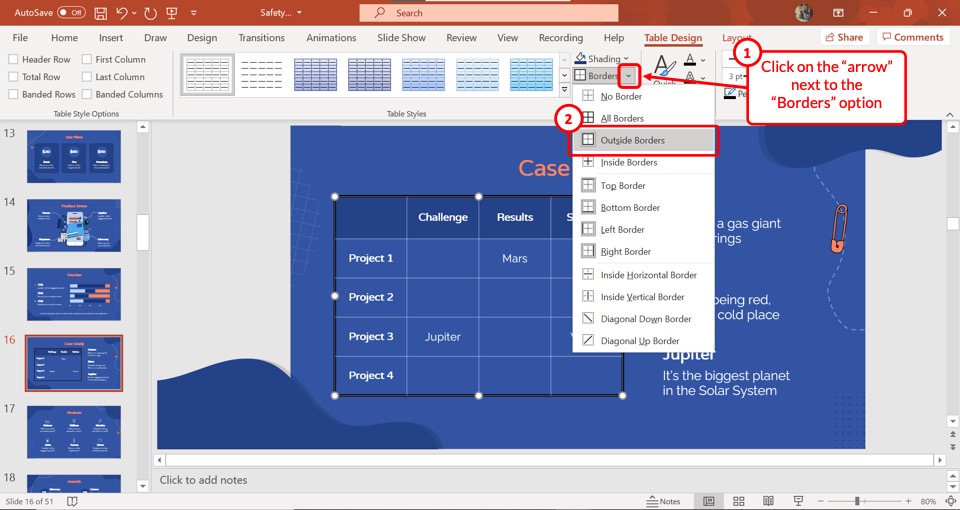
Now all you have to do is click on the downward pointing arrow beside the “Borders” option to open a dropdown menu.
In the dropdown menu, click on the “Outside Borders” option to add a dark border around the table.
6. How to Change Table Border Thickness in PowerPoint?
In Microsoft PowerPoint, you can also change the border thickness of a table. Changing the thickness of the table border can make the table more noticeable in a slide. All you have to do is follow 3 simple steps.
Step-1: Click on the “Table Design” menu
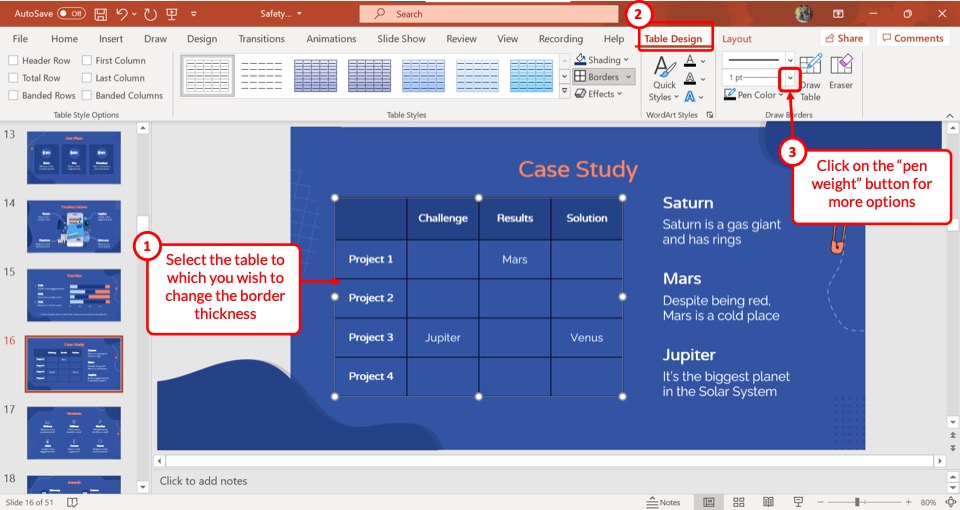
To access the “Table Design”, you have to first click on the table and select it. Make sure to select the entire table rather than selecting a single cell in the table. Then click on the “Table Design” menu from the menu ribbon located at the top of the screen.
Step-2: Click on the “Pen Weight” option
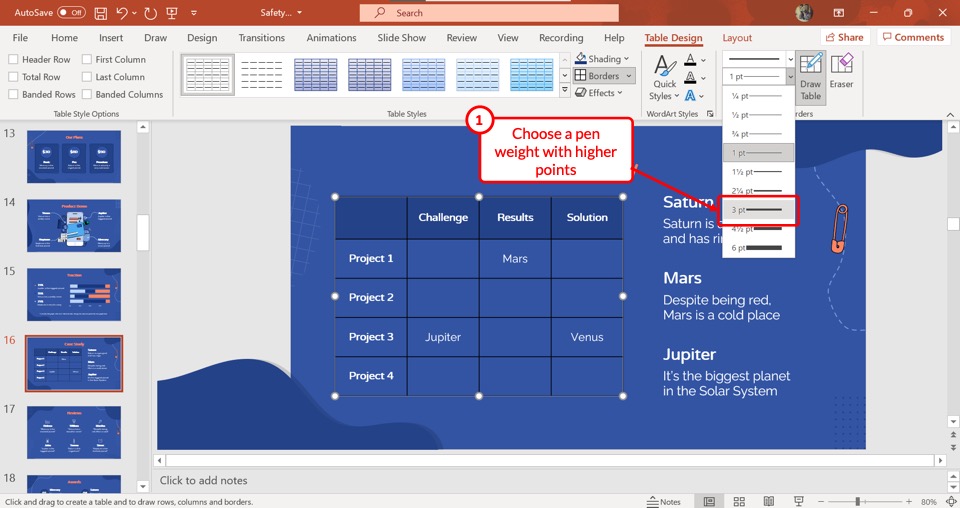
The next step is to click on the “Pen Weight” box located right above the “Pen Color” option in the “Table Design” menu.
This will open a dropdown menu containing nine border thickness options ranging from “¼ pt” to “6 pt”. Click on your preferred border thickness.
Step-3: Click on “All Borders”
Now all you have to do is click on the “Borders” option to change the thickness of all the borders of the table.
To change the thickness of some specific borders, click on the downward-facing arrow beside the “Borders” option and select your preferred option from the dropdown menu.
Credit to wayhomestudio (on Freepik) for the featured image of this article (further edited)