Creating bulleted or numbered lists on your slides in PowerPoint is a great way to make your slides less cluttered and make the text more readable. Lists can help highlight facts and figures, steps, methods, or even key points in a project! So, the question really is how to create a numbered list in PowerPoint?
To create a numbered list in PowerPoint, first, select the text. Then, click on the “Home” tab and from the ribbon, click on the “Numbering” icon in the “Paragraph” group. This will add a numbered list to your text.
Although it may seem oversimplified above, I have enumerated different ways in which you can use the Numbering function in PowerPoint in this article.
So, let’s get started.
1. How to Create a Numbered List in PowerPoint?
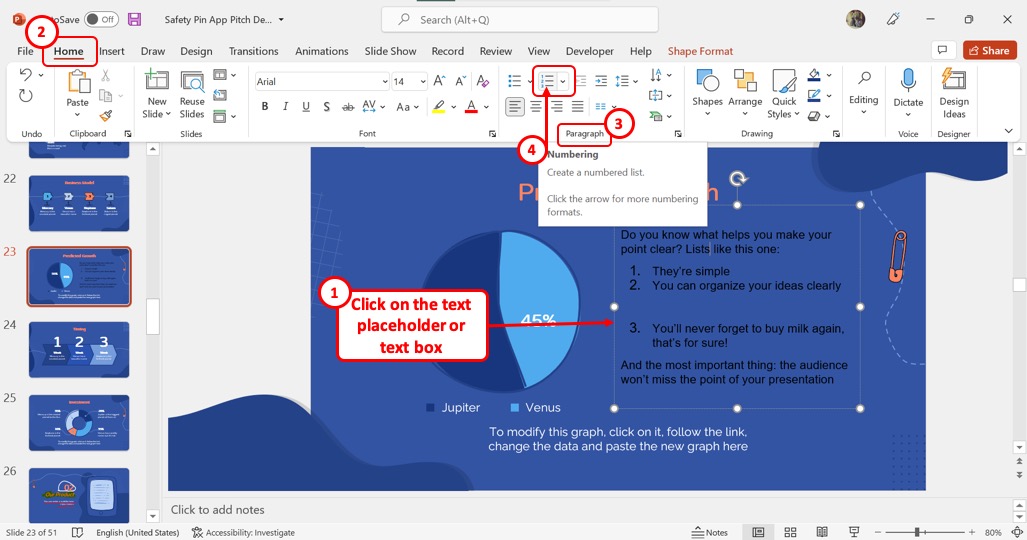
In Microsoft PowerPoint, a numbered list is a list of items that are numbered serially. To create a numbered list in PowerPoint, you have to first click on a text placeholder or a text box. Then click on the “Numbering” icon in the “Paragraph” group of the “Home” tab to create a numbered list.
2. How to Add New Numbers to the Numbered List?
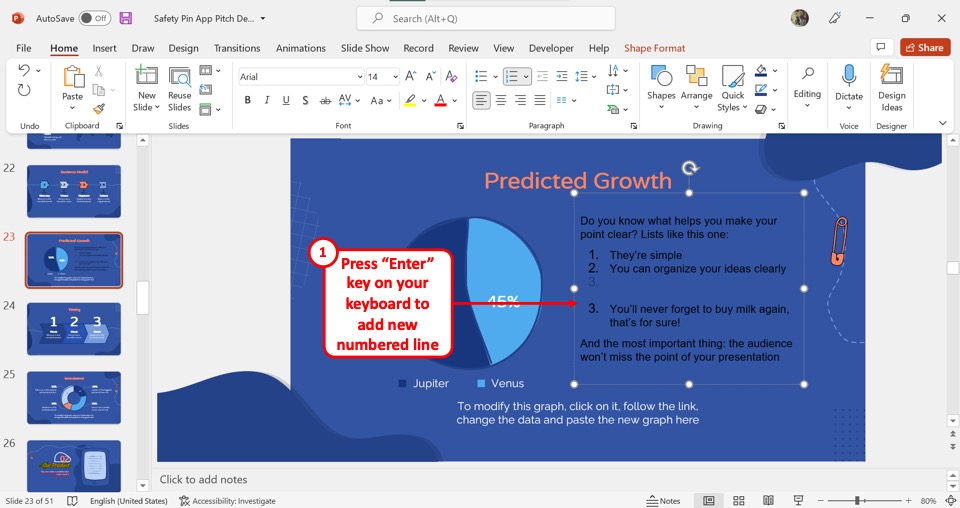
In Microsoft PowerPoint, the numbered list feature continues automatically. Once you create a numbered list, each new line will be automatically numbered. All you have to do is press the “Enter” key on your keyboard to add a new line with a new number in the list.
3. Creating a Multi-level Numbered List in PowerPoint
A multi-level numbered list is a list that contains more than a single level. That is, there are secondary lists present under the items of the primary numbered list. Unlike Microsoft Word, PowerPoint does not have any nested list feature. You have to manually create a multilevel list.
3.1 How to Increase Level of the Numbered List in PowerPoint?
When you increase the list level of an item in a numbered list, it becomes a part of a new secondary list. To increase the list level of the numbered list, follow the below steps.
Step-1: Click on the “Increase List Level” option
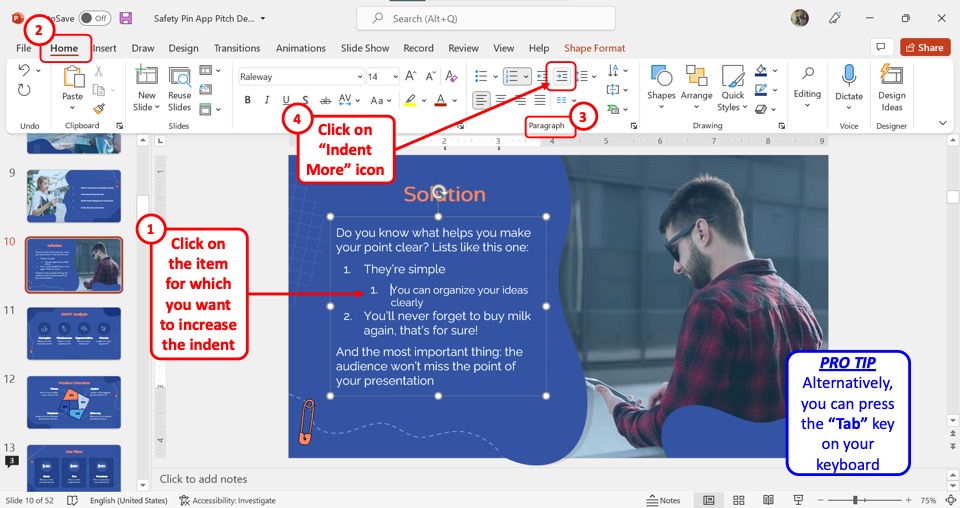
The first step is to click on the item in the numbered list for which you want to increase the indentation. Then click on the “Indent More” icon in the “Paragraph” section of the “Home” menu. Alternatively, you can press the “Tab” key on your keyboard.
Step-2: Click on the “Numbering” downward arrow
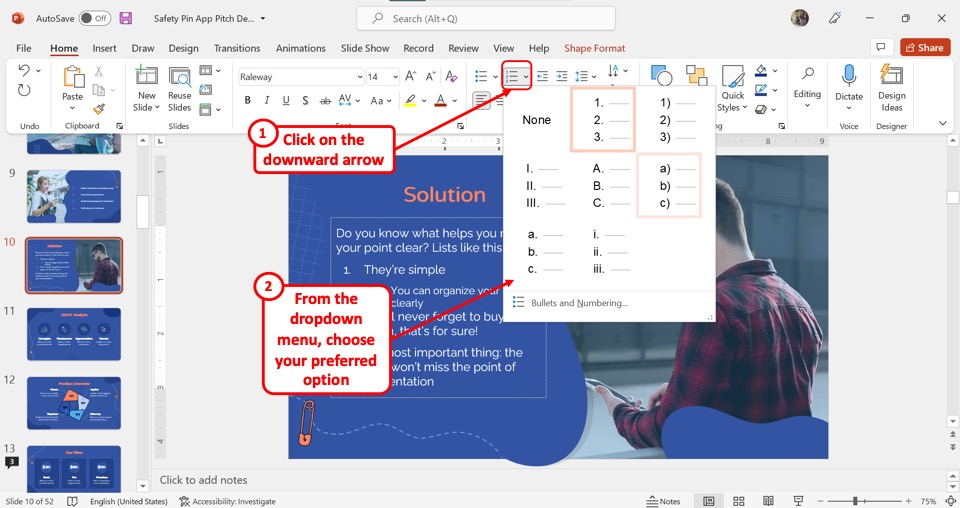
Since there is no automatic feature to change the list level, you have to now add a different numbering style for the new list level. Click on the downward arrow next to the “Numbering” icon in the “Home” tab. From the “Numbering” dropdown list, click on your preferred numbering style.
3.2 How to Decrease Level of Numbered List in PowerPoint?
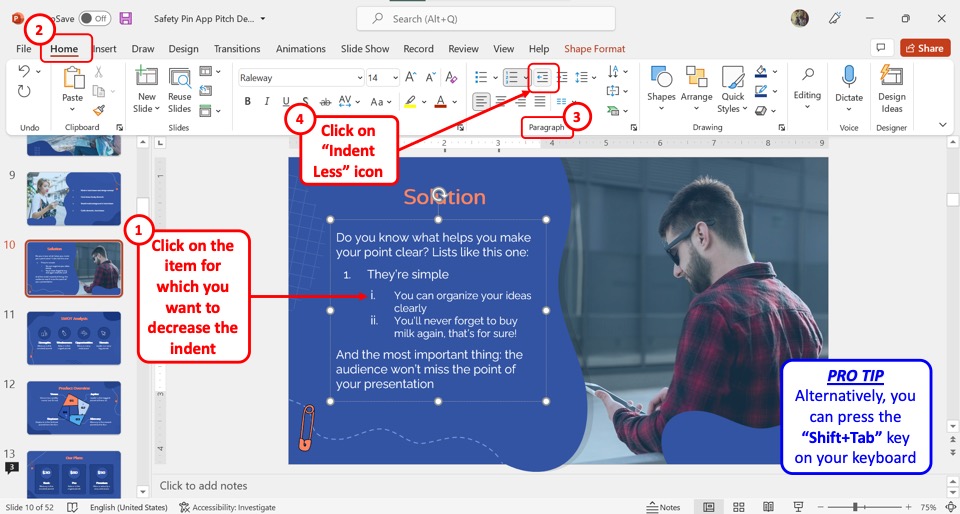
To decrease the level of the numbered list, you have to first click on the numbered item in the slide. Then click on the “Indent Less” icon in the “Paragraph” group of the “Home” menu. Alternatively, you can press the “Shift+Tab” keys on your keyboard to decrease the list level.
4. How to Format the Numbered List in PowerPoint?
The numbered list in Microsoft PowerPoint is available in any text box and text placeholder. There are some default settings for numbered lists that you can customize. To access the formatting options for numbered lists, follow the steps below.
Step-1: Click on the “Numbering” icon
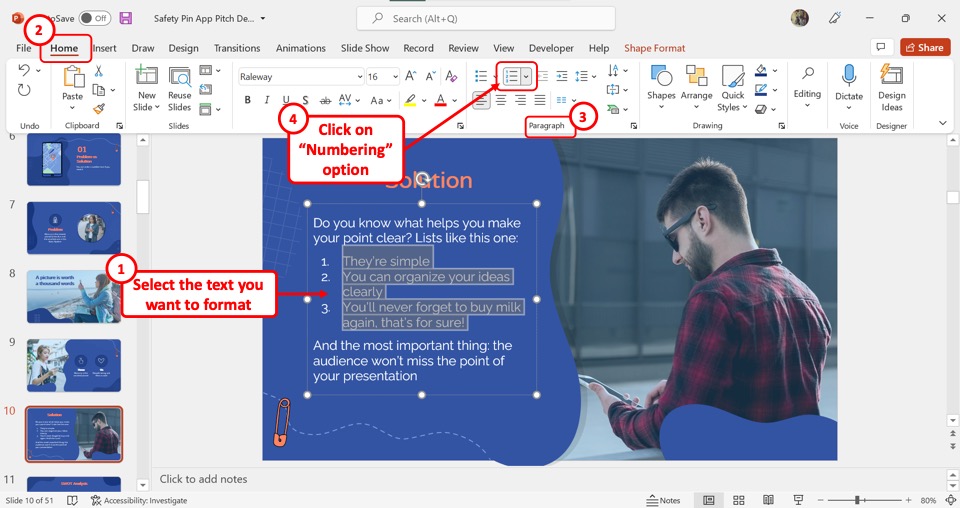
In the text box in the PowerPoint slide, select the numbered list that you want to format. Then click on the “Numbering” option in the “Paragraph” group of the “Home” menu.
Step-2: Click on the “Bullets and Numbering” option
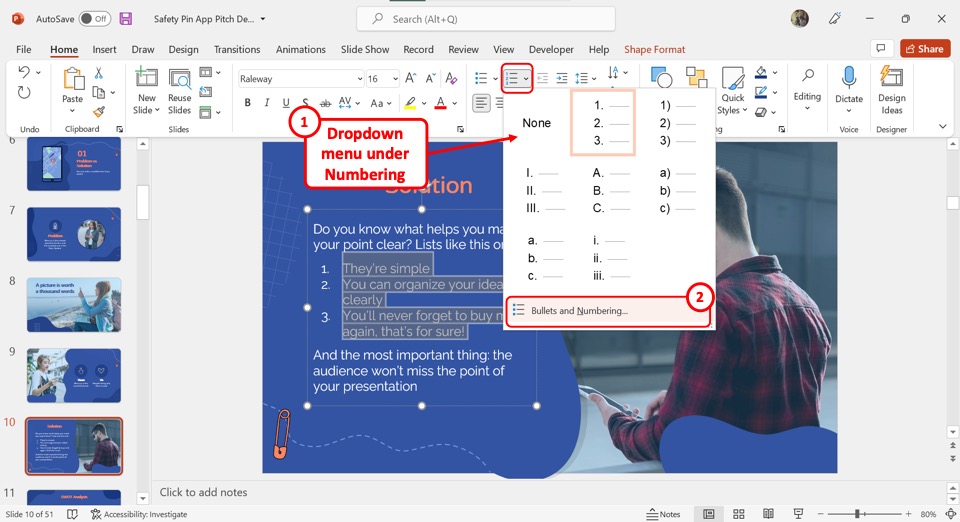
In the dropdown menu under the “Numbering” option, click on the “Bullets and Numbering” option. This will launch the “Bullets and Numbering” dialog box with the “Numbered” tab open. Now you can customize the numbered list.
4.1 How to Change the Type of Numbered List in PowerPoint?
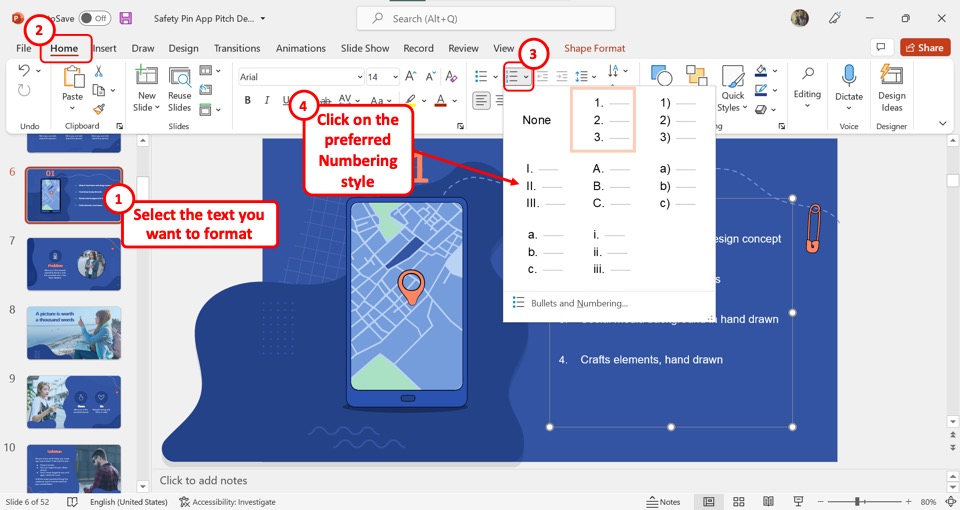
You can change the numbering style in the numbered list in PowerPoint. There are seven numbering styles to choose from.
To change the type of numbered list, you have to first select the numbered list in the text box on the presentation slide.
Click on the downward arrow next to the “Numbering” icon in the “Paragraph” group of the “Home” tab. Then click on your preferred numbering style from the dropdown list under the “Numbering” option.
4.2 Change the Color of the Numbers in PowerPoint?
In Microsoft PowerPoint, you can customize the numbered list in various ways to fit your presentation’s visuals. To change the color of the numbers in a numbered list, follow the 4 simple steps.
Step-1: Click on the “Bullets and Numbering” option
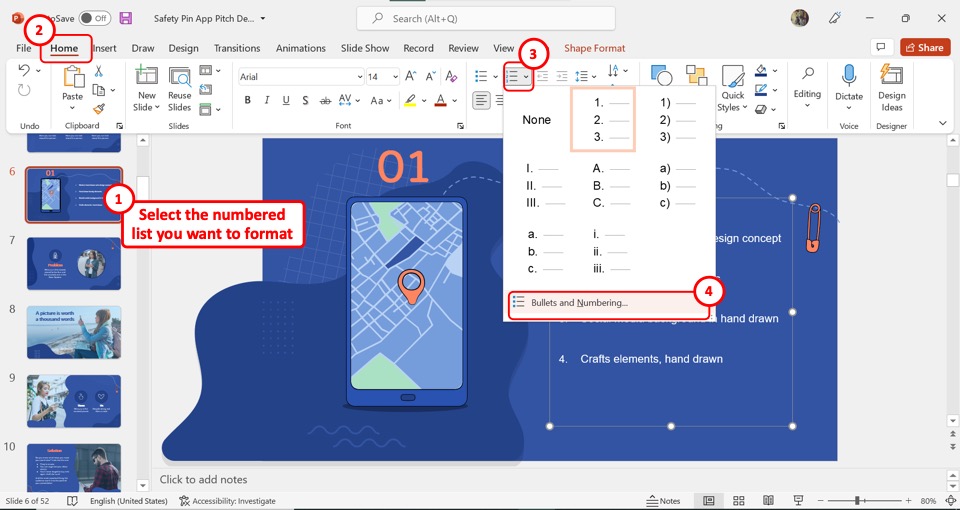
The first step is to select the numbered list inside the text box in the slide. Then click on the “Numbering” option in the “Paragraph” section of the “Home” menu. From the dropdown menu, click on the “Bullets and Numbering” option to open the dialog box.
Step-2: Click on the “Color” button
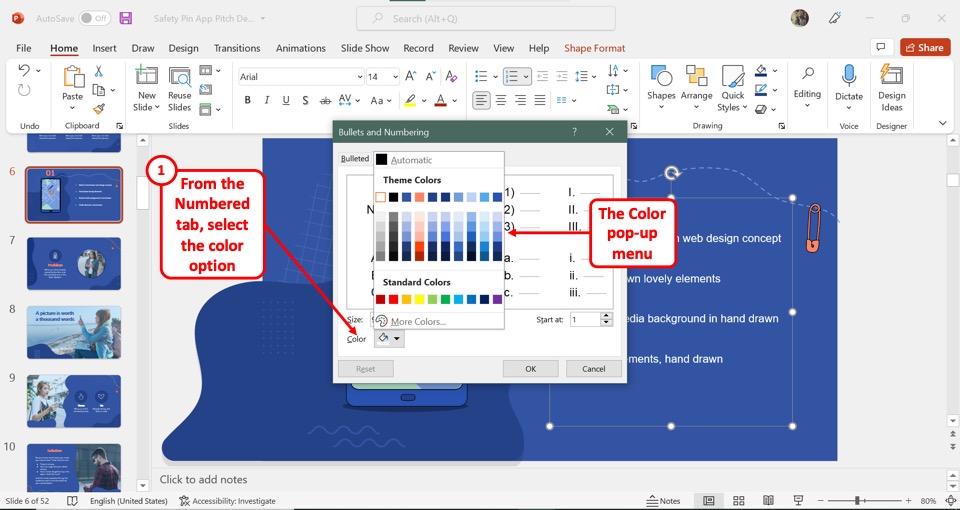
In the “Numbered” tab opened in the “Bullets and Numbering” dialog box, click on the “Color” option. This will open a pop-up menu with some standard color options.
Step-3: Select your preferred color
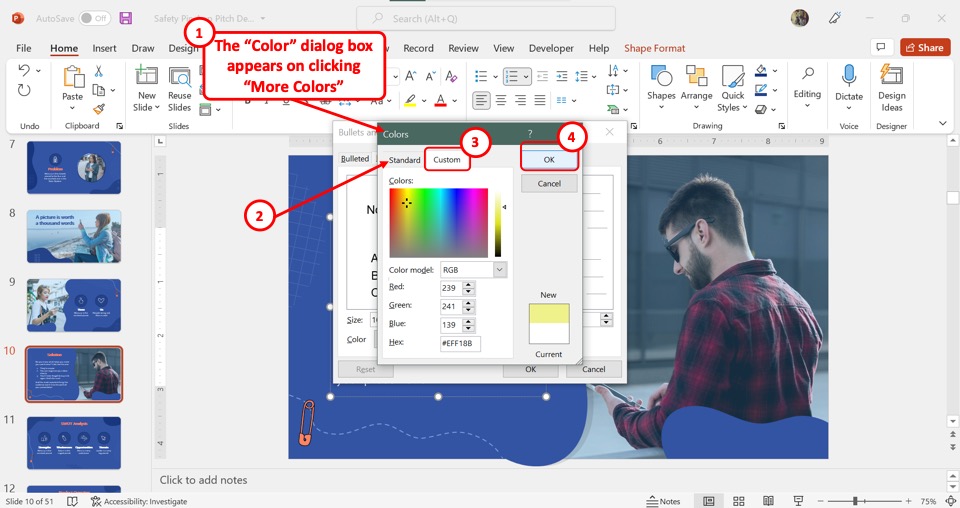
In the pop-up menu, you can click on the “More Colors” option to open the “Colors” dialog box. Click on the “Standard” tab in the dialog box for more standard colors. Click on the “Custom” tab to create a custom color for the numbers.
After you’ve selected the color click on the “OK” button in the right column of the “Colors” dialog box.
Step-4: Click on the “OK” button
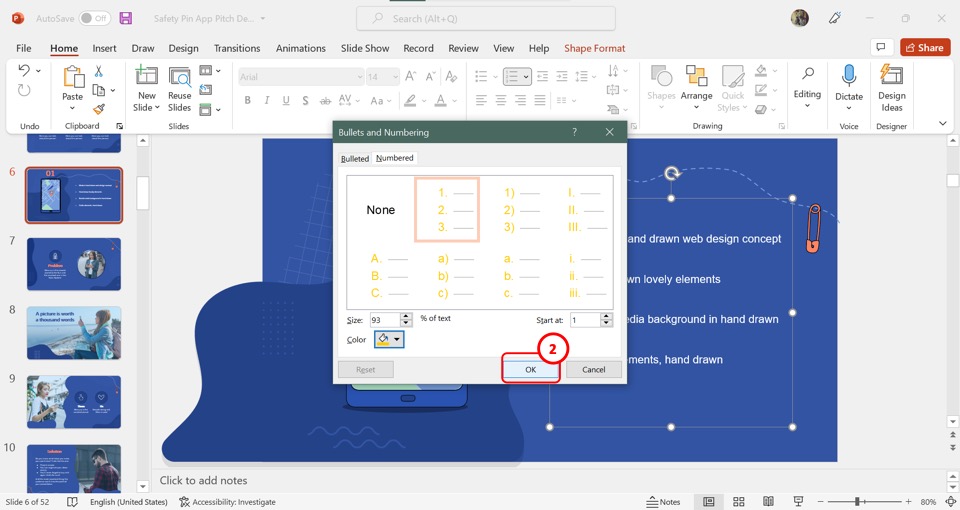
Now click on the “OK” button at the bottom of the “Bullets and Numbering” dialog box to change the color of the numbers in a numbered list.
4.3 How to Increase or Decrease the Size of Numbers in the Numbered List?
In Microsoft PowerPoint, the default size of numbers of a numbered list is slightly smaller compared to the text in the list. You can easily increase or decrease the size of numbers in the numbered list. All you have to do is follow the 2 steps below.
Step-1: Click on the “Bullets and Numbering” option
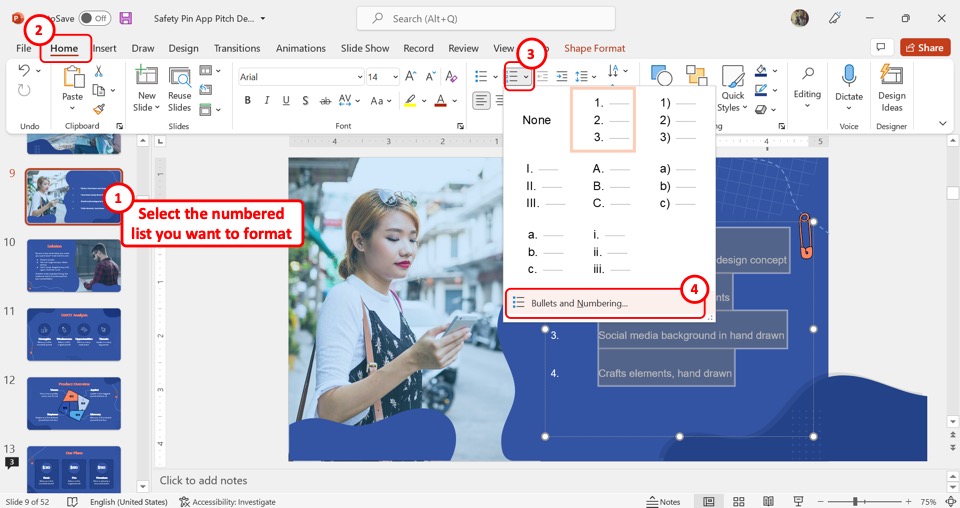
The first step is to open the “Bullets and Numbering” dialog box. Select the numbered list in the slide and then click on the “Numbering” option in the “Home” menu. From the dropdown list under the “Numbering” option, click on “Bullets and Numbering”.
Step-2: Click on the “Size” box
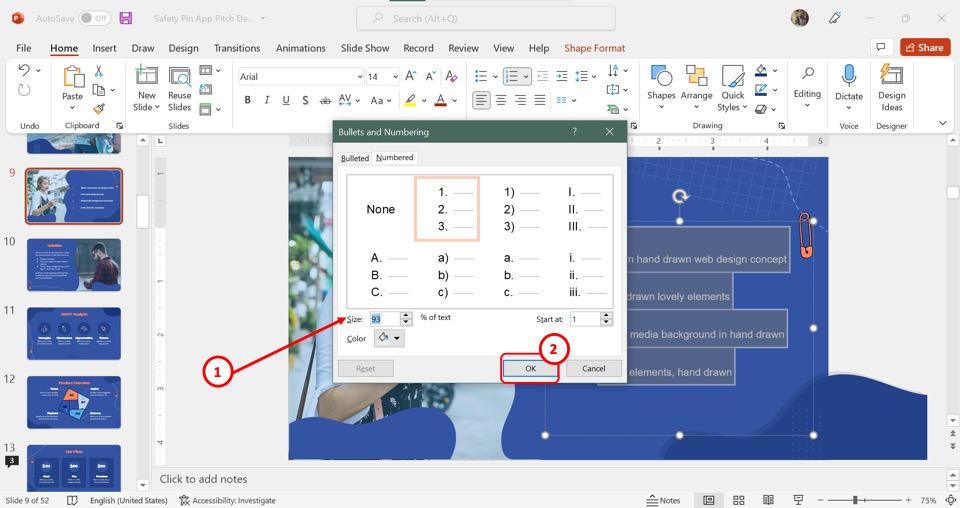
In the “Bullets and Numbering” dialog box, click on the “Size” option. In the “Size” box, you can type in your preferred size of the numbers as a percentage of the text in the list. Then all you have to do is click on the “OK” button at the bottom of the dialog box.
4.4 How to Change the Starting Number of the List
Microsoft PowerPoint allows you to change the numbering of the numbered list in a text box. While the automated settings will add numbers consecutively for each list item, you can change the starting of the number.
Click on the list item where you want to change the starting of the list. Then follow the 2 steps.
Step-1: Click on the “Bullets and Numbering” option
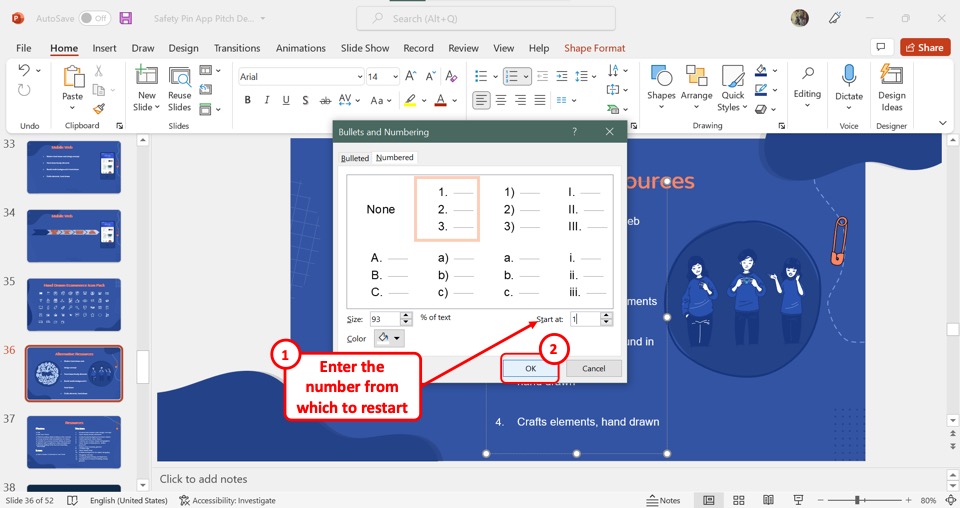
In the “Paragraph” group of the “Home” menu, click on the “Numbering” option. Then click on the “Bullets and Numbering” option from the dropdown menu under “Numbering”.
Step-2: Click on the “Start at” box
In the “Bullets and Numbering” dialog box, click on the “Start at” option. In the box, enter the number from which the list will restart numbering. Then all you have to do is click on the “OK” button at the bottom of the dialog box (as shown above).
4.5 How to Increase or Decrease the Space Between the Numbers and the Text in a Line?
In the PowerPoint numbered lists, there is a default spacing between the number and the text in a line that is equal to a standard indentation. However, you can customize this spacing.
To increase or decrease the space between the numbers and the text in a line in the numbered list, follow the 3 steps as below.
Step-1: Click on the “View” tab
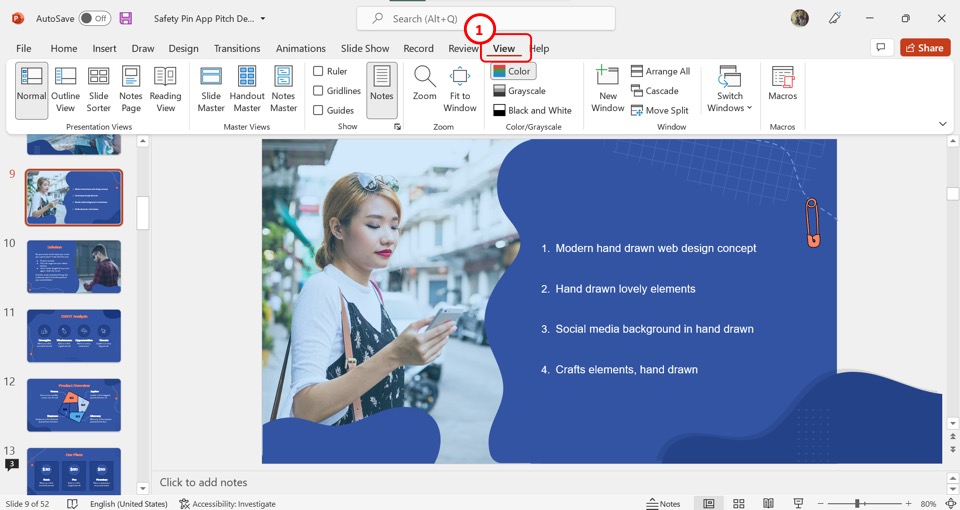
The first step is to open the “View” menu. To do so, click on the “View” tab in the menu ribbon located at the top of the screen.
Step-2: Click on the “Ruler” option
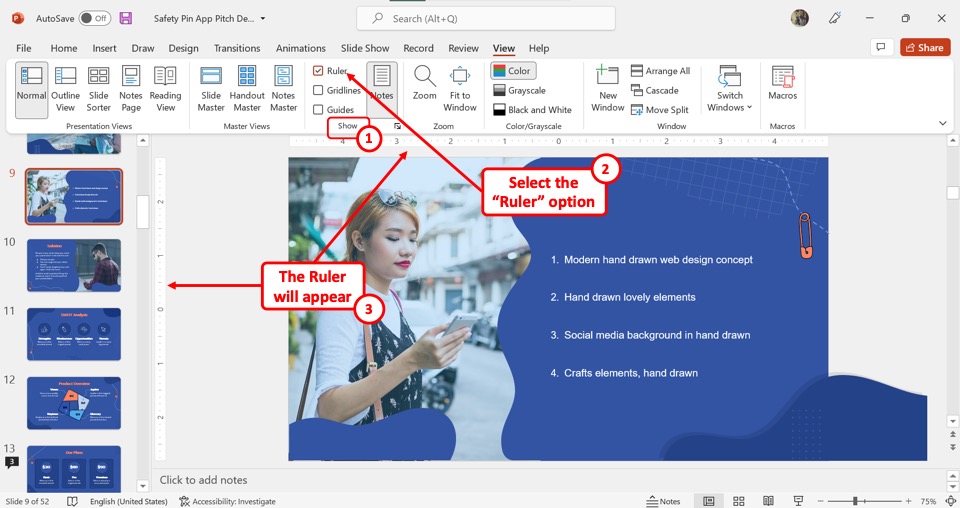
The next step is to access the ruler markings. In the “Show” group of the “View” menu, click on the “Ruler” option to open the ruler around the slide.
Step-3: Drag the bottom slider
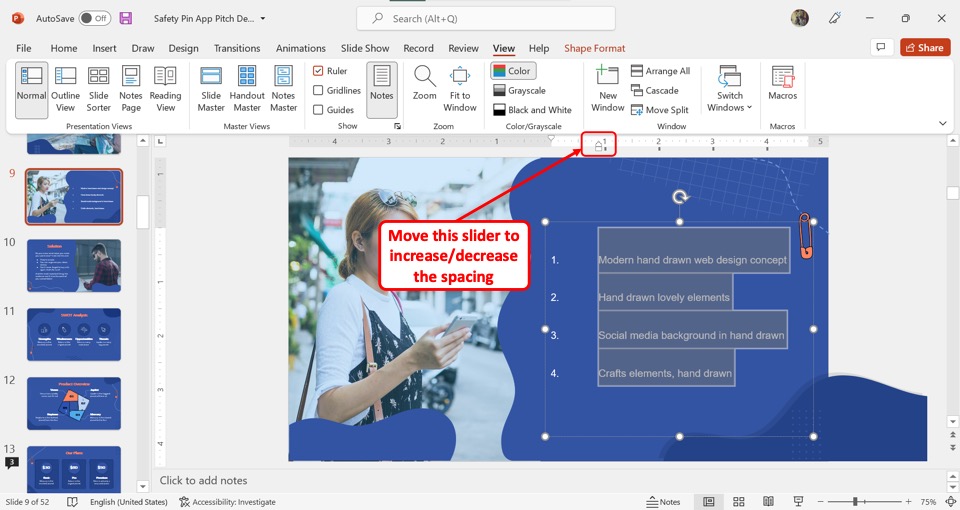
In the ruler at the top of the slide, click and drag the bottom slider. Drag it to the right to increase the spacing. You can drag it to the left to decrease the spacing.
4.6 How to Increase Line Spacing Between the Lines of a Numbered List
Using the “Line Spacing” feature in Microsoft PowerPoint, you can customize the space between each item in the numbered list. I have discussed the “Line Spacing” feature of the PowerPoint in detail in my previous article here.
To increase line spacing between the lines of a numbered list, follow the 3 quick steps.
Step-1: Click on the “Paragraph” dialog launcher
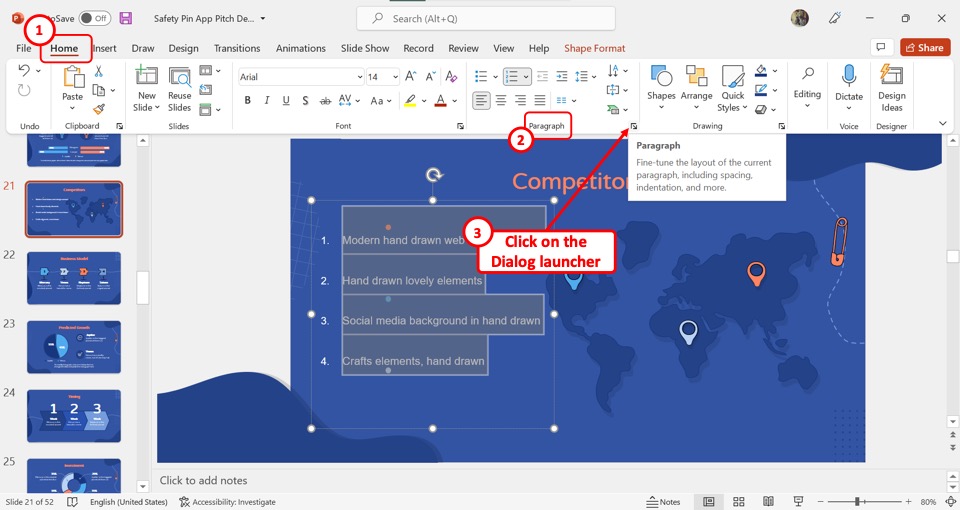
The first step is to click on the “Home” tab in the menu ribbon at the top of the screen. In the “Paragraph” group of the “Home” menu, click on the dialog launcher which is the small square icon with an arrow inside.
Step-2: Click on the “Before” and “After” boxes
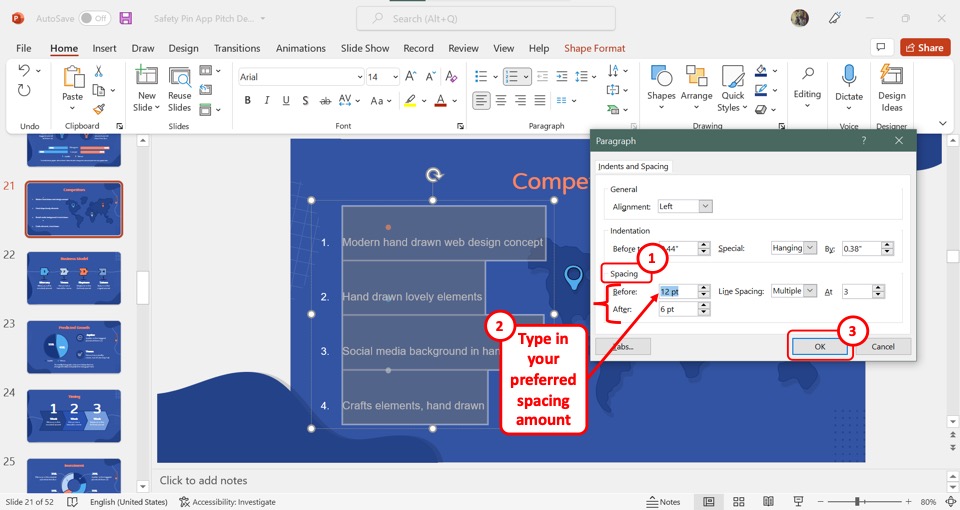
In the “Paragraph” dialog box, click on the “Before” box under the “Spacing” section. You can type in your preferred spacing option before each numbered item. You can also click on the “After” box to add spacing before the items in the numbered list.
Step-3: Click on the “OK” button
Now all you have to do is click on the “OK” button at the bottom of the “Paragraph” dialog box to save the custom spacing between the lines in a numbered list (as shown above).
5. How to Restart Numbering of a List in PowerPoint?
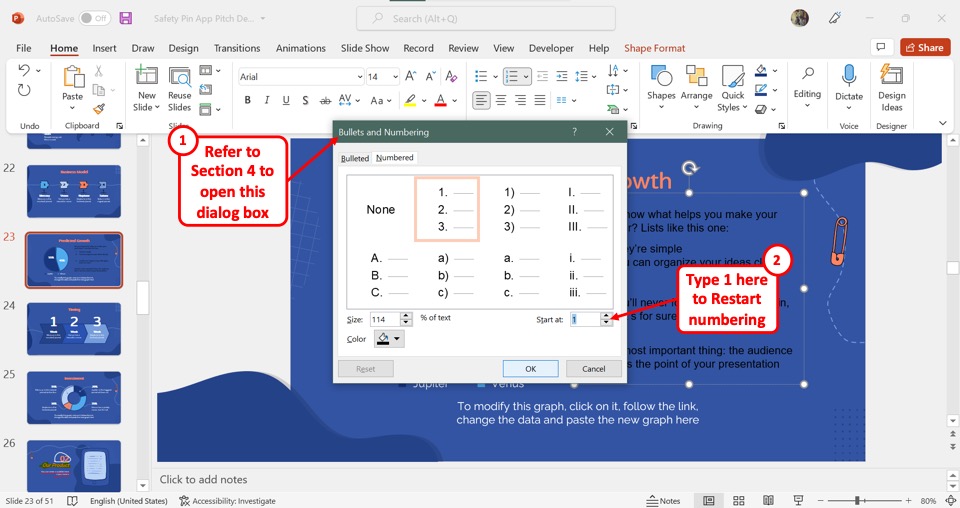
In Microsoft PowerPoint, you can restart the numbering from any item inside the list.
To restart numbering in PowerPoint, first, select the point where you want to restart the list. Then, right-click at the beginning of the sentence. From the options that appear, click on the “Restart Numbering” option.
You can also open the “Bullets and Numbering” dialog box. Refer to section 4 for the detailed steps. In the “Bullets and Numbering” dialog box, click on the “Start” box and type in “1” to restart the numbering.
6. How to Add More Lines Without Adding More Numbers to the List?
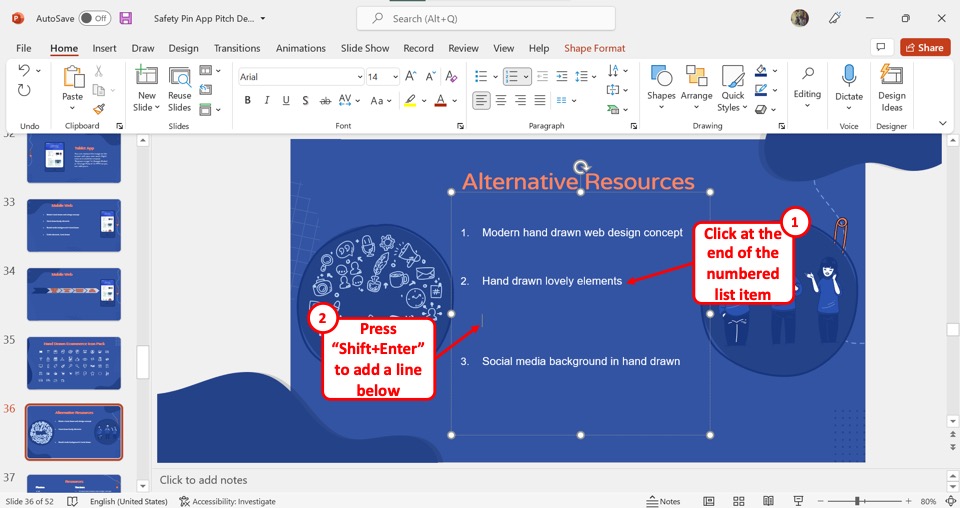
Microsoft PowerPoint does not have any feature that you can use to add a line without a number within a numbered list.
However, you can use a simple keyboard shortcut. First, click on the end of the numbered list item under which you want to add a line without a number. Then all you have to do is press the “Shift+Enter” keys on your keyboard.
Alternatively, you can also press “Enter” at the end of the previous numbered line. A new line with a number will appear next in the sequence. Simply press the “Backspace” key on your keyboard.
7. How to Bold or Unbold the Numbers on the Numbered List in PowerPoint?
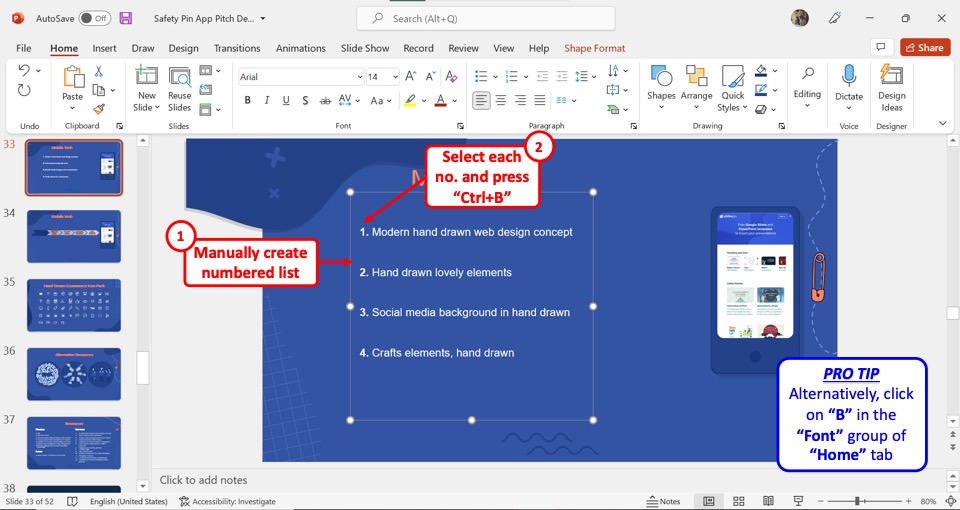
Unlike Microsoft Word, PowerPoint does not have any feature that allows you to bold only the numbers in a numbered list.
To make the numbers bold, you have to manually create a numbered list. Select each number in your manual list and press the “Ctrl+B” keys on your keyboard to make them bold. You can also press the “B” icon which is the “Bold” option in the “Font” group of the “Home” menu.
8. How to Convert Bullet Points to Numbered List in PowerPoint?
Once you create a bullet list in a PowerPoint slide, you can easily convert it to a numbered list. All you have to do is follow the 3 simple steps.
Step-1: Click on the “Bullets and Numbering” option
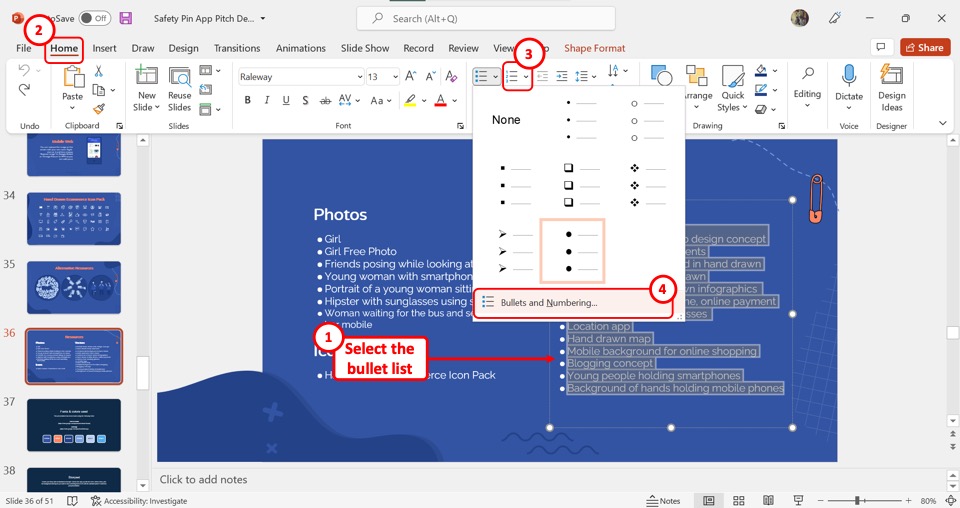
The first step is to select the bullet list inside a text box in the slide. Then click on the downward arrow beside the bullet icon in the “Paragraph” group of the “Home” tab. In the dropdown menu, click on the “Bullets and Numbering” option.
Step-2: Click on the “Numbered” tab
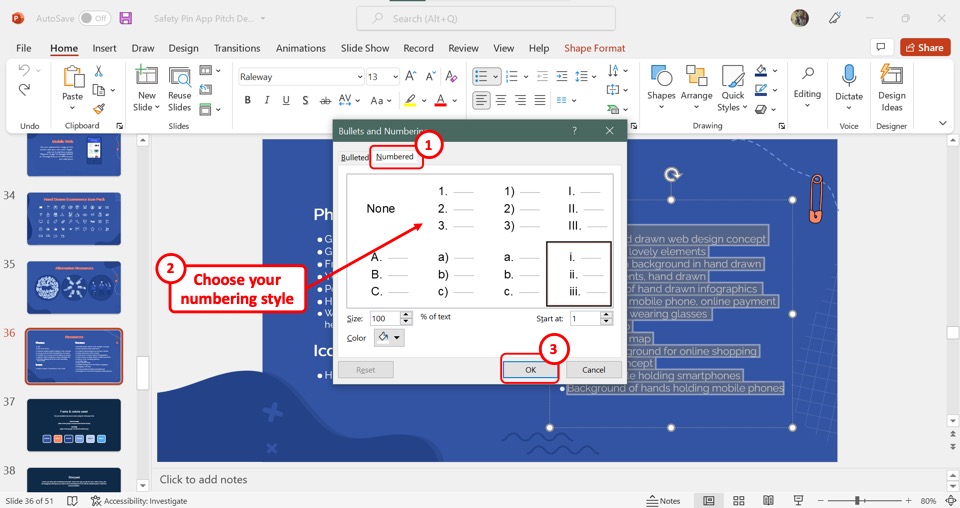
In the “Bullets and Numbering” dialog box, click on the “Numbered” tab. Then select your preferred numbering style for the numbered list.
Step-3: Click on the “OK” button
Finally, all you have to do is click on the “OK” button at the bottom of the “Bullets and Numbering” dialog box to convert the bullet list to a numbered list (as shown above).
An alternative method would be to simply select the bulleted list, and click on the “Numbering” option from the “Paragraph Group” as you normally would when adding a numbered list!
9. How to Stop Adding Numbers Everytime You Add a New Line?
In Microsoft PowerPoint, a numbered list is carried on to new lines by default. To stop automatic numbering to every line you add to a text box, follow the 4 easy steps.
Step-1: Click on “Options” in the “File” tab
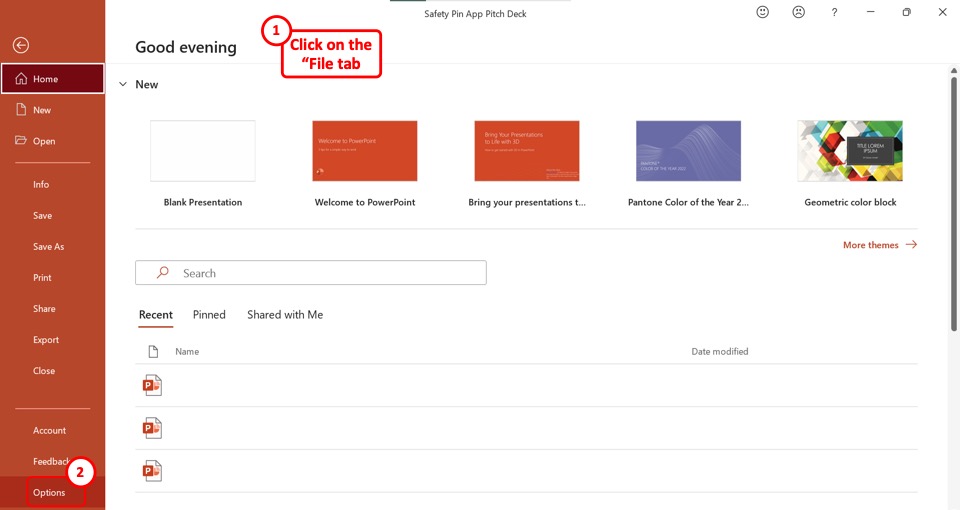
In the menu ribbon located at the top of the screen, click on the “File” tab. Then click on the “Options” option from the sidebar on the left side of the screen in the “File” menu.
Step-2: Click on the “AutoCorrect Options” button
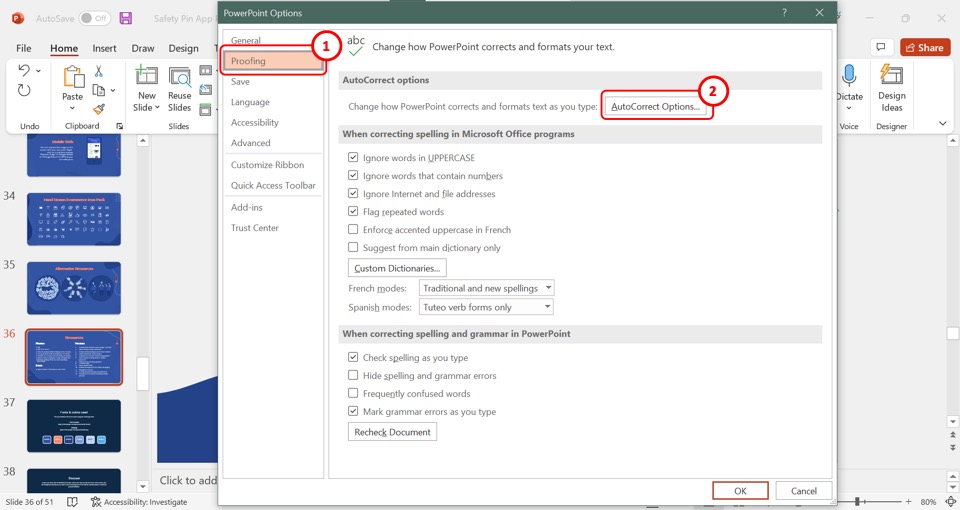
In the “PowerPoint Options” dialog box, click on the “Proofing” option from the sidebar on the left side. Then click on the “AutoCorrect Options” button to launch the “AutoCorrect” dialog box.
Step-3: Click on the “Automatic Bulleted and Numbered Lists” box
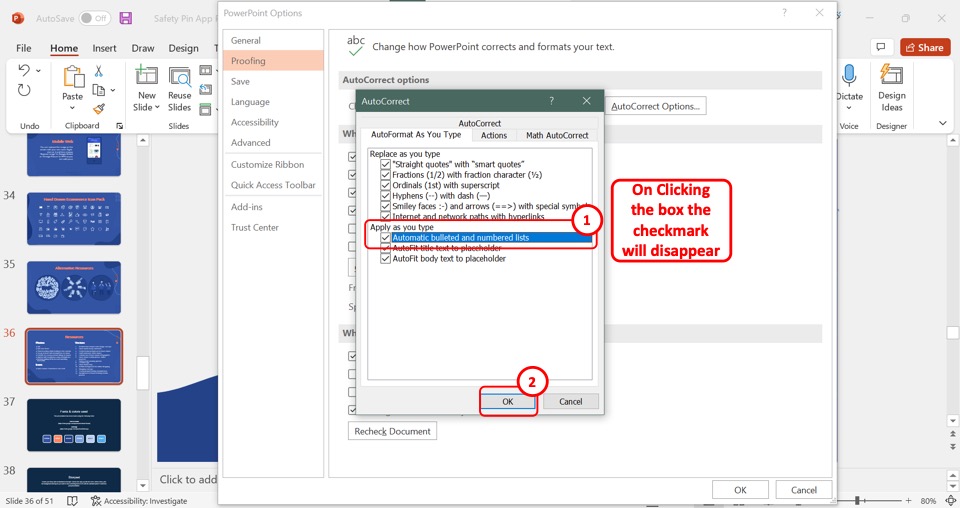
In the “AutoCorrect” dialog box, click on the “Automatic bulleted and numbered lists” option. It is the first option under the “Apply as you type” section. You will see the checkmark before the option disappears upon clicking.
Step-4: Click on the “OK” button
The final step is to click on the “OK” button at the bottom of the “AutoCorrect” dialog box. Then click on the “OK” button again under the “PowerPoint Options” dialog box (as shown above).
10. How to Convert Numbered List to SmartArt in PowerPoint?
The SmartArt graphics in Microsoft PowerPoint are predesigned lists, graphs, and charts that you can use to make the information in your slides stand out. You can learn all about the SmartArt feature in my article. To convert a numbered list to SmartArt, follow the 2 steps.
Step-1: Click on the “Convert to SmartArt Graphic” icon
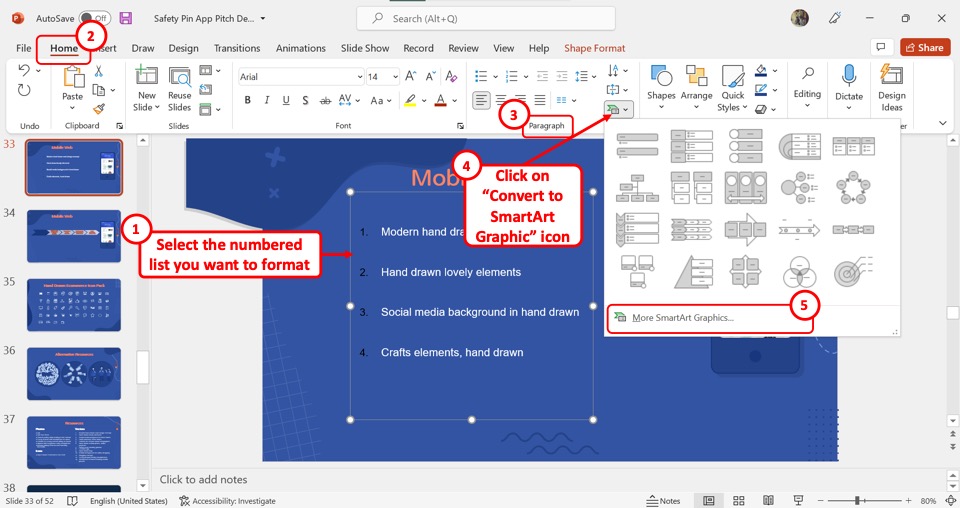
The first step is to select the numbered list inside a text box. Then click on the “Convert to SmartArt Graphic” icon on the right side of the “Paragraph” group in the “Home” menu. In the dropdown list under the icon, click on the “More SmartArt Graphics” option.
Step-2: Click on the “OK” button
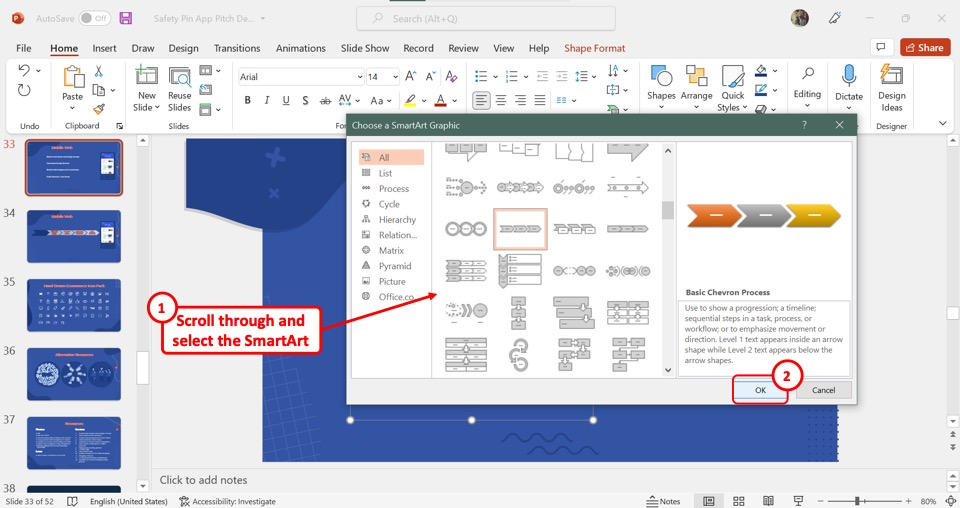
In the “Choose a SmartArt Graphic” dialog box, scroll through the available list of SmartArt options and click on your preferred one. Then click on the “OK” button at the bottom of the dialog box to convert the list into SmartArt.
The most suitable type of SmartArt for a bulleted or numbered list is the “List” SmartArt. You can click on the “List” on the left panel to apply just the “List” based SmartArt.

![Create a Numbered List in PowerPoint [Step-by-Step Guide!]](https://artofpresentations.com/wp-content/uploads/2022/06/Featured-image-Create-a-Numbered-List-in-Powerpoint.webp)