![How to Create a Table of Contents in PowerPoint? [EASY Way!]](https://artofpresentations.com/wp-content/uploads/2021/12/Featured-Image-How-to-Create-Table-of-Content-in-PowerPoint.webp)
Having a table of content in your PowerPoint presentation is a great way to indicate to your audience the overview of the topics that will be covered in the presentation. However, unlike some of the other applications, PowerPoint doesn’t provide a one-click button to add a table of contents to your slides!
That may make you wonder, how to create a table of content in PowerPoint?
To create a table of contents, first, add a blank slide. Then, you can drag the slides from your presentation to the table of contents slide, use the outlive view, use the zoom feature, or SmartArt options. You can also create the table of contents manually or use a “Macro” to do it automatically.
In this article, we will look at afive different ways in which you can add the table of content to your slides with a step-by-step explanation with visual references. Some of these methods are automated and unique. So, make sure to read the article till the end to know which one works the best for you!
5 Ways to Create a Table of Contents in PowerPoint
Unfortunately, unlike Microsoft Word, PowerPoint doesn’t provide a one-click button to add a table of contents directly to the slides (which I think they should!)
That said, there are multiple different ways to create a table of contents for your presentation in Microsoft PowerPoint. I’ll be sharing with you an exhaustive list of five different methods.
Some of these methods are automated, however, you will still need to do some work in order to make it work.
All of the five methods are explained below –
Method 1 – Dragging the Slides to the Presentation (For Windows Users Only)
To create a table of contents for your PowerPoint presentation by dragging the slides in your presentation, you have to open a new blank slide and then drag the slides one by one.
The whole process is explained in easy steps below.
Step-1: Add a new slide

The first step of the process is to add a new slide to your PowerPoint presentation which will act as the table of contents slide. To do that, you have to click on the “New Slides” button which is located in the “Slide” section of the “File” tab.
Step-2: Drag the slides into the new slide
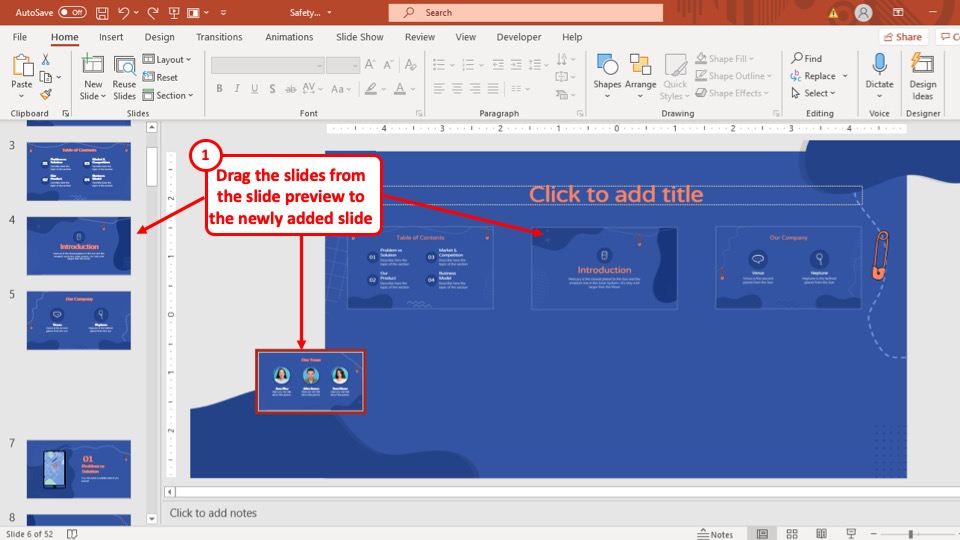
After you have added a new slide to your PowerPoint presentation which will act as the table of contents slide, simply click on the slides you want to add to the contents page and place them inside the table of contents slide, while holding the “Left mouse button”.
After you have placed all the slides on the new page, the thumbnails in your table of contents slide will be clickable and will take you to the slide of the thumbnail.
Method 2 – Using the Outline View
To create a table of contents for your PowerPoint presentation using the outline view, follow the simple steps given below.
Step-1: Go to the Outline view
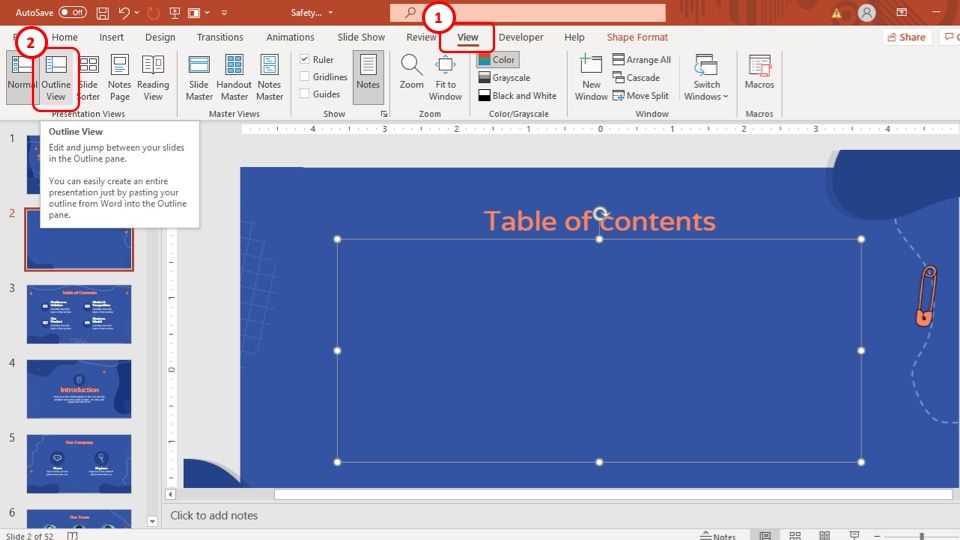
The first step of the process is to open the outline view in PowerPoint. To do that, go to the “View” tab in the ribbon of your PowerPoint presentation and then click on the “Outline View” button located in the “Presentation Views” section.
Step-2: Copy all the titles of the slides

After accessing the “Outline View”, you will be able to see all the tiles of the slides in your PowerPoint presentation. Now simply select all the titles in the slide navigation bar of the “Outline view”, right-click on one of them, and select the “Copy” option from the drop-down menu.
Step-3: Paste the titles
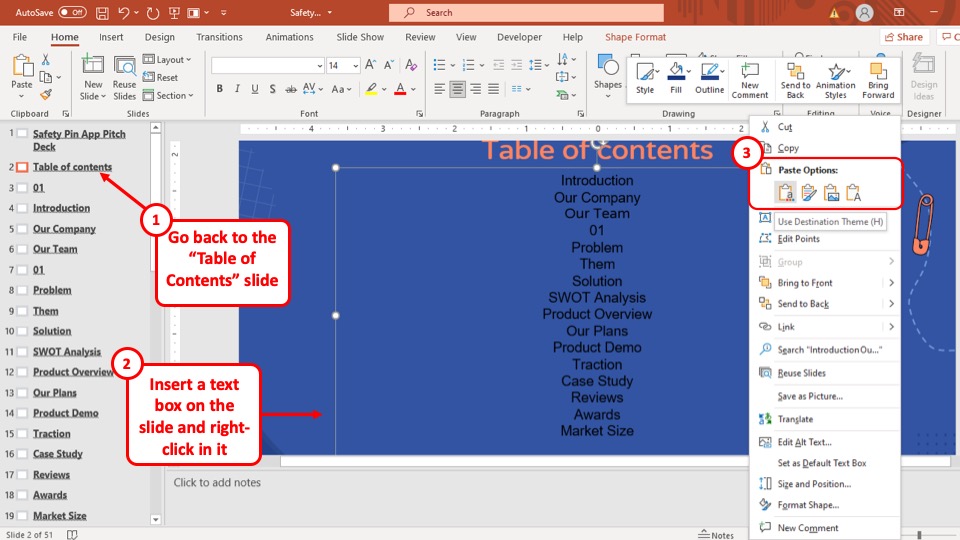
After you’ve copied all the titles of the slides in your PowerPoint presentation from the “Outline view”, go back to the table of contents slide.
First, make sure you have a text box in the slide. If not, insert a text box on the slide, and then paste the titles using the clicking “Ctrl + V” buttons simultaneously on the keyboard of your computer.
Alternatively, you can also right-click inside the text box and click on “Paste” to paste the outline of your presentation.
Once the titles are added, you can make them clickable by adding links to the text in your PowerPoint presentation.
Step-4: Format the Titles
The last step in this method is to format the text of the outline that you just pasted. First, you can left-align the text in the box. Then, I’d recommend that you add bullet points to the text. Perhaps, also split the text into columns (preferably two columns) to distribute all the agenda items appropriately.
Method 3 – Using the Slide Zoom Feature in PowerPoint
To use the Zoom feature in your presentation to create a table of contents, follow the easy steps explained below.
Step-1: Click on the “Zoom” button
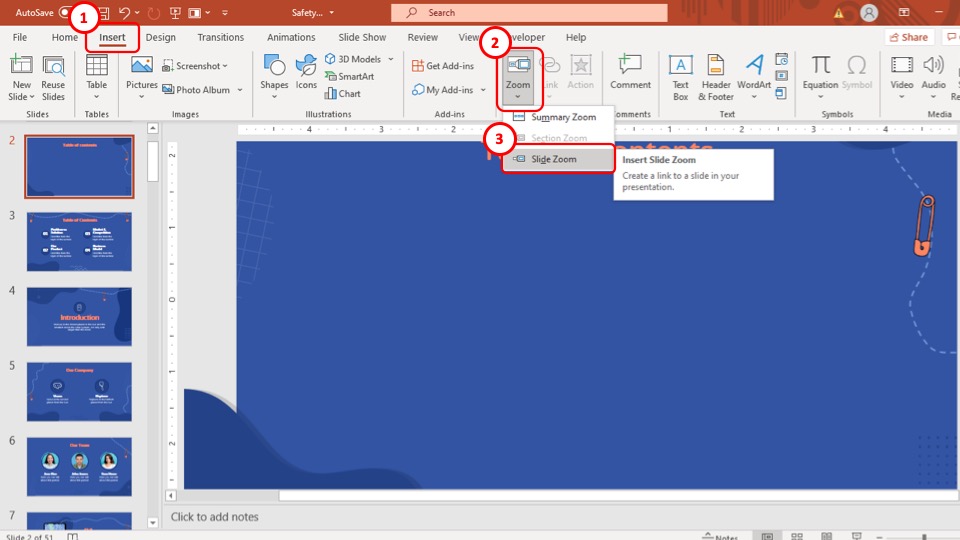
The first step of the process is to click on the “Zoom” button which is located in the “Links” section of the “Insert” tab. After you click on the “Zoom” button, a drop-down menu will appear on your screen.
Step-2: Click on the “Slide Zoom” option
After you open the drop-down menu, select the “Slide Zoom” option which is the last option in that drop-down menu. By clicking on the “Slide Zoom” option, a pop-up window will appear on your screen.
Step-3: Select the slides
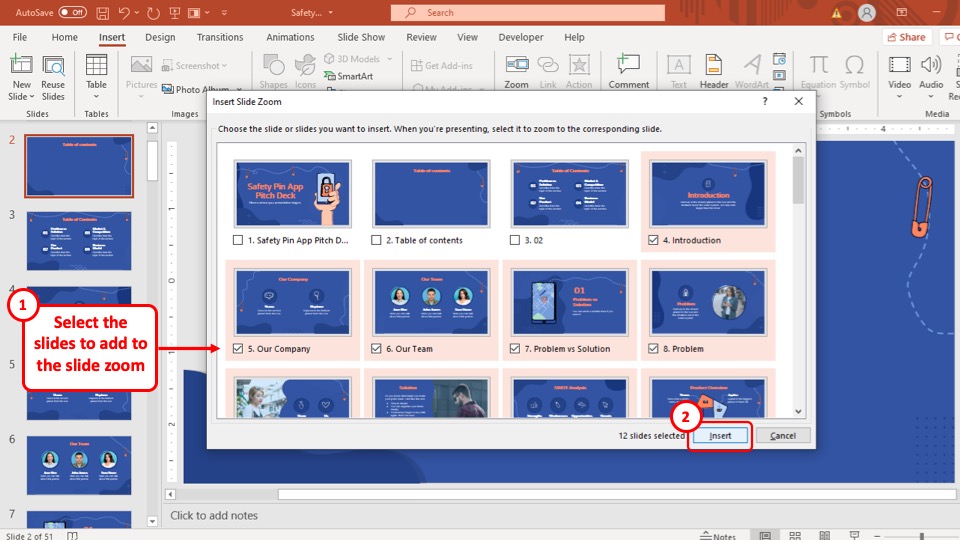
After you open the pop-up window, select the slides that you want to add to your contents slide and then hit the “Insert” button. After you click on the “Insert” option, linked thumbnails of the selected slides will be added to your contents slide.
Now, all you have to do is format them and rearrange the slide icons to fit your style.
Method 4 – Using SmartArt in PowerPoint
To use SmartArt in your PowerPoint presentation to make a table of contents, follow the easy steps explained below.
Step-1: Click on the “SmartArt” button
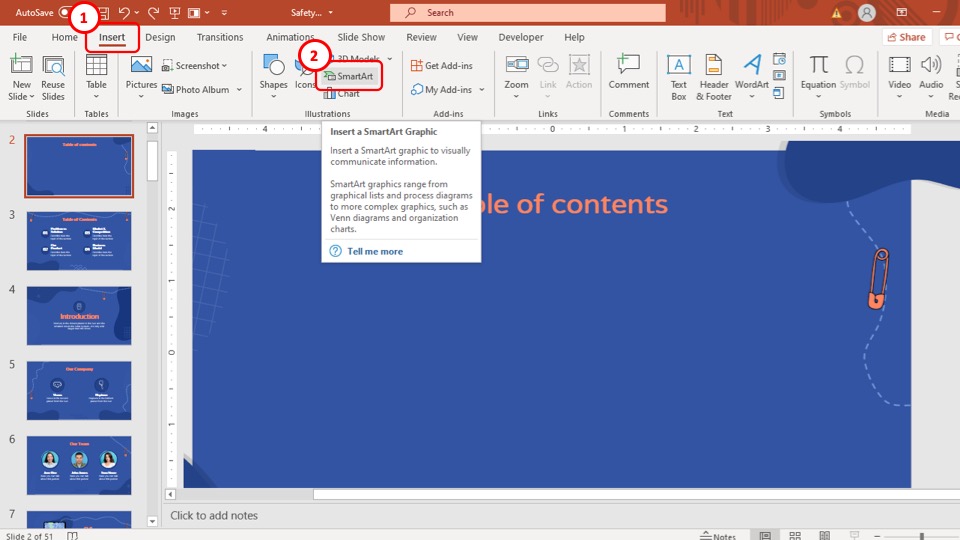
The first step of the process is to open the SmartArt option. To do that, go to the “Insert” tab which is located in the ribbon of your PowerPoint.
Then click on the “SmartArt” button, which is in the “Illustrations” section of the “Insert” tab.
Step-2: Choose your preferred SmartArt
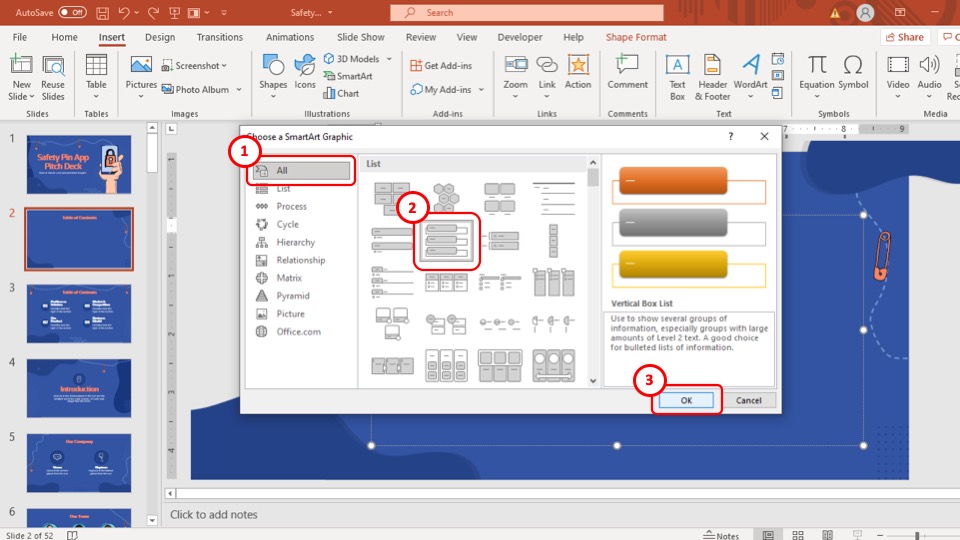
After you click on the SmartArt button, a pop-up window will appear on your screen. Now simply select the SmartArt you want to add as a table of contents and then hit the “Ok” button.
Step-3: Add a Hyperlink
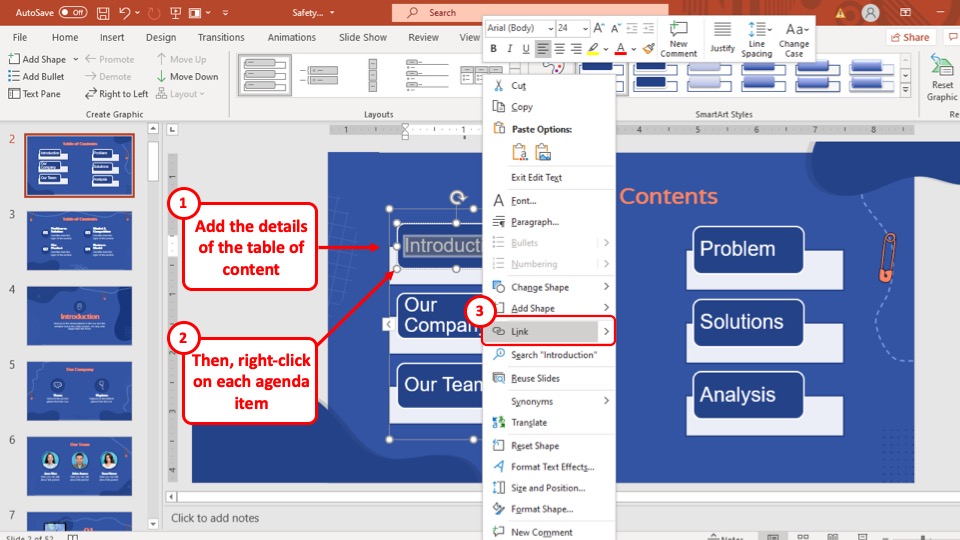
After you have added the SmartArt in your PowerPoint presentation, edit the texts in the SmartArt and type in the titles of the slides in your PowerPoint. After that select the title and “Right-click” on it. From the drop-down menu, select the “Link” option.
Step-4: Link the Text to the Relevant Slides
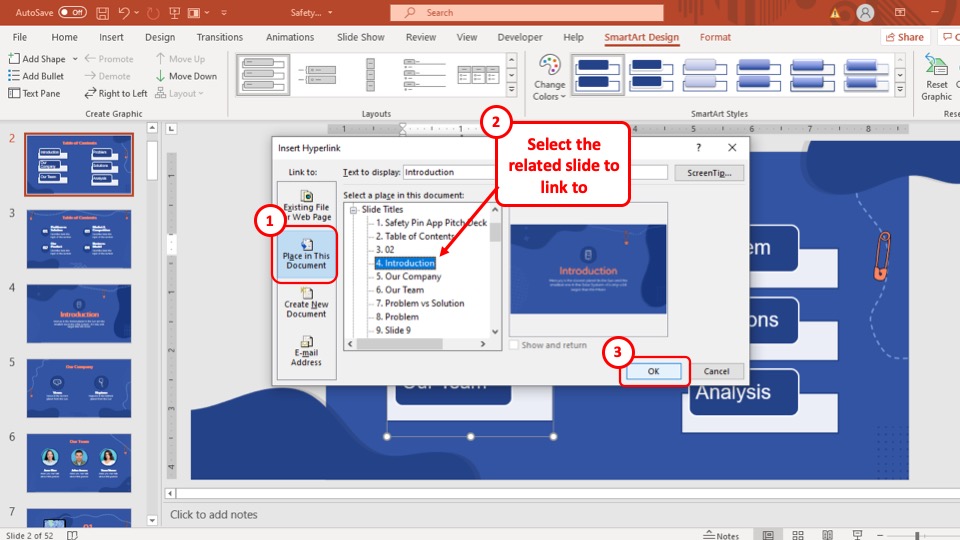
After you have clicked on the “Link” option, a pop-up window will appear on your screen.
From that pop-up window, select the “Place in this document” option from the “Link to” pane in the left part of the pop-up window. Then select the slide which corresponds to the title in your table of contents and hit the “Ok” button.
After that, the title will be linked to a corresponding slide. Repeat this process for the rest of the titles in your SmartArt table of contents and you will be able to make an entire table of contents using the SmartArt feature.
Method 5 – Manually Creating a Table of Contents Using Shapes
To manually create a table of contents in your PowerPoint presentation, you will have to insert shapes on the slide and design your table of contents.
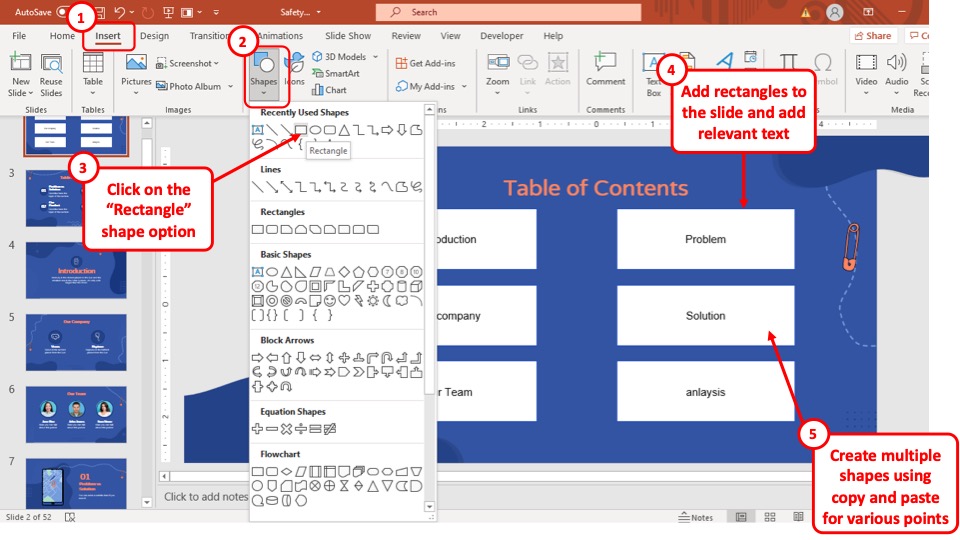
First, click on the “Insert” tab. Then, click on the “Shapes” option. From the dropdown, choose a shape. I would recommend using the “Rectangle” or “Curved Rectangle”.
Then drag the mouse cursor on the slide to create the shape. Once the shape is added, you can format the shape, and duplicate the shape using copy and paste in PowerPoint.
If you are not sure how to do all this, check out our complete guide on working with shapes in PowerPoint.
Can You Create a Linked Table of Contents in PowerPoint?
Yes, you can create a linked table of contents in PowerPoint. There is more than one way to do it. Follow any of the methods explained in the previous section of this article and you will be able to make a linked table of contents for your PowerPoint presentation.
How to Add Page Numbers to the Table of Content in PowerPoint?
Unfortunately, there is no direct or automatic way to add page numbers in your PowerPoint presentation. So, if you want to add page numbers to the table of contents in your PowerPoint, create a table with a column separate for adding page numbers and then add them manually.
How to Automatically Update Table of Contents in PowerPoint?
You can’t automatically update the table of contents in PowerPoint. But to get around this issue, you can use a macro code that will run through the entire presentation and then update your table of contents including formatting.
You can use a “Macro” to automatically update the table of contents in your PowerPoint presentation. The macro is effective only once there is content on the presentation. Thus, it is recommended to run the macro at the end once you’ve designed all your slides –
To do that, follow the steps mentioned below –
Step-1: Create a Draft Table of Content
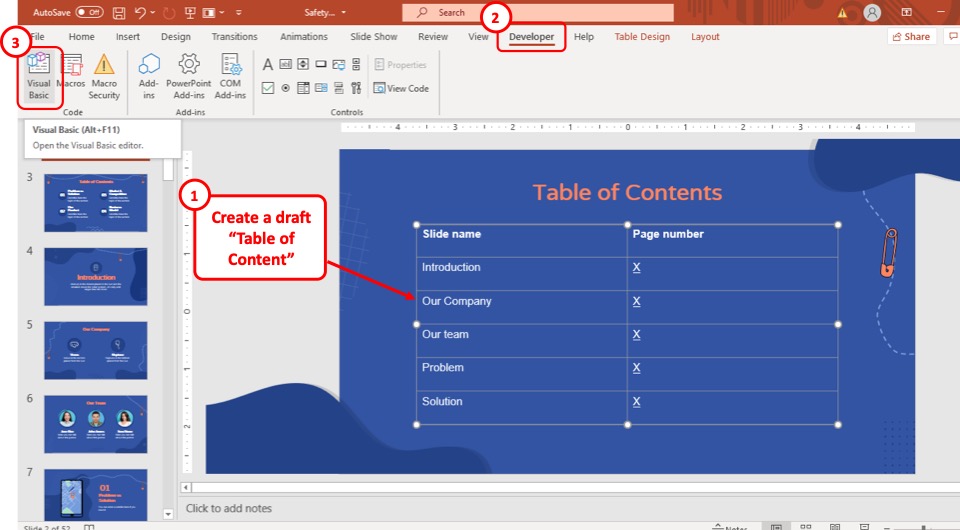
create a table of contents with page numbers and then hyperlink the page number with its corresponding slides.
On the page number column, write ‘Page no. x’ and the macro will automatically update the page numbers.
After you are done making the table of contents and linking the page numbers, follow the simple steps given below.
Step-2: Open the VBA feature
The first step of the process is to click on the “Visual Basics” option which is located in the “Code” section of the “Developer” tab (as shown in the image above).
Step-3: Click on the “Module” option

After you click on the “Visual Basics” button, a pop-up window will appear on your screen. From that pop-up window, click on the “Module” option which is located in the “Insert” tab of the pop-up window.
Step-4: Paste the code
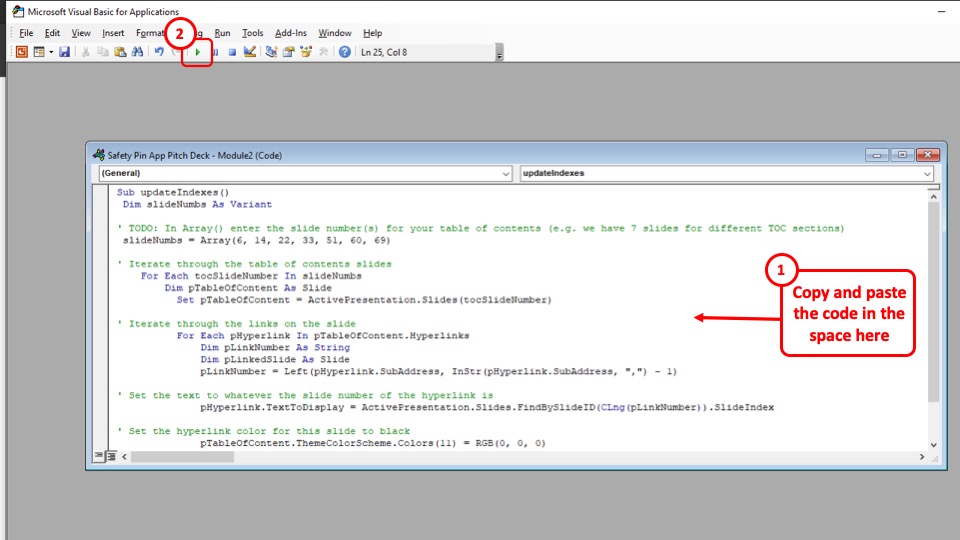
After you have clicked on the “Module” option, yet another pop-up window will appear on your screen. In that pop-up window, paste the following code and then close the window.
Sub updateIndexes()
Dim slideNumbs As Variant
‘ TODO: In Array() enter the slide number(s) for your table of contents (e.g. we have 7 slides for different TOC sections)
slideNumbs = Array(6, 14, 22, 33, 51, 60, 69)
‘ Iterate through the table of contents slides
For Each tocSlideNumber In slideNumbs
Dim pTableOfContent As Slide
Set pTableOfContent = ActivePresentation.Slides(tocSlideNumber)
‘ Iterate through the links on the slide
For Each pHyperlink In pTableOfContent.Hyperlinks
Dim pLinkNumber As String
Dim pLinkedSlide As Slide
pLinkNumber = Left(pHyperlink.SubAddress, InStr(pHyperlink.SubAddress, “,”) – 1)
‘ Set the text to whatever the slide number of the hyperlink is
pHyperlink.TextToDisplay = ActivePresentation.Slides.FindBySlideID(CLng(pLinkNumber)).SlideIndex
‘ Set the hyperlink color for this slide to black
pTableOfContent.ThemeColorScheme.Colors(11) = RGB(0, 0, 0)
Next pHyperlink
Next tocSlideNumber
End Sub
Step- 5: Click on the “Run macro” button
After you close the window, click on the “Run Macro” button which is on the taskbar right below the ribbon (as shown in the image in step 4)
Step-6: Run the Macro
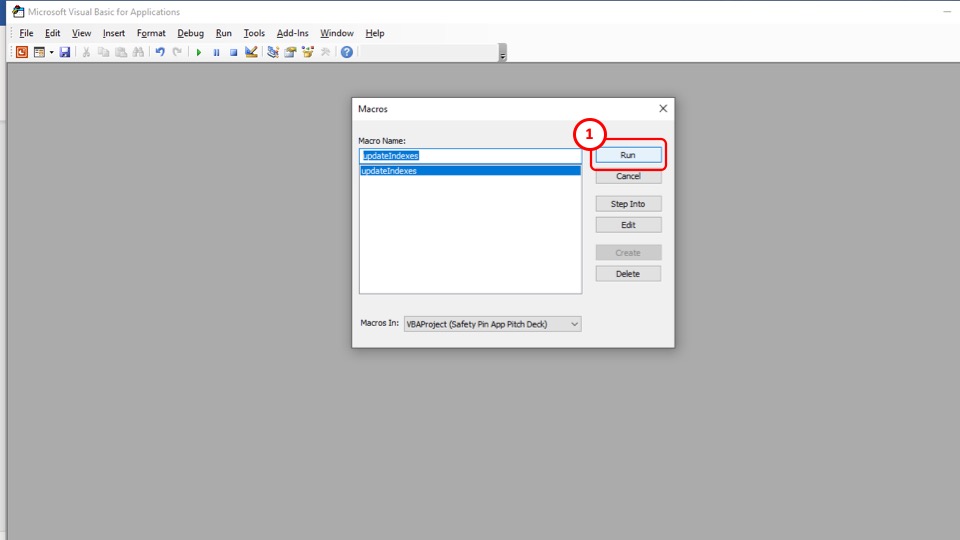
After you have clicked on the “Run Macro” button, a pop-up window will appear on your screen. Simply click on the “Run” button and then the Macro will automatically update your table of contents.
Credit to cookie_studio (on Freepik) for the featured image of this article (further edited).