Adding a company logo to your PowerPoint presentation can help your audience identify your brand at all times during the presentation. It can be a great way to subtly pitch your brand. But, merely inserting the logo file on the slide may not be the correct way to add the logo to the slide!
To add a logo in PowerPoint, click on the “View” tab and open the “Slide Master”. Go to the “Master Slide”. Click on “Insert”, and then on “Picture”. From the dropdown, click on “Picture from File”. Navigate to the folder to upload the logo. Now, resize the logo and close the slide master.
In this article, we shall take a look at two methods of adding a logo to a PowerPoint presentation. I will also help you understand the type of file that you should use to add a company logo along with a few other ninja tips!
So, without any further delay, let’s get started!
1. What File Type is Needed to Add a Logo to Your Presentation?
First, let’s understand the basics of the type of file that you need to use to add your company’s logo to your PowerPoint presentation.
Here’s a list of a logo file format that you can add in a PowerPoint presentation –
- PNG
- JPG/JPEG
- SVG
Any common image format will work for PowerPoint. The four file formats mentioned above are quite commonly used logo file formats. My recommendation would be to use the “JPG” file for a logo in your presentation as it reduces the size of your image considerably while maintaining the resolution.
One thing to note here is that logo files also often come with an open file (usually a .cdr, .ai, .PSD, or .eps files). However, such a file format is not suitable for PowerPoint and it won’t work.
Furthermore, the “SVG” file format only works in certain PowerPoint versions. I’ve written a detailed article on using SVG file format in PowerPoint. Be sure to check it out!
Pro Tip!
In addition to a normal logo file, it is recommended to ask your designer/corporate team to share the “Inverse” logo as well as the “Black & White” version of the logo in a PNG or JPEG format.
The black and white version of the logo is useful when you have to add the logo over a slide background that is black in color. Likewise, the inverse logo file is super useful when you want to add the logo on top of any colored graphic or a colored slide background!
If you are working in a large corporation, you should reach out to the “Corporate Communications” department in your organization. They are usually responsible for the branding needs of the company.
If you are a small organization or a solo entrepreneur, it is best to reach out to a graphic designer for designing a logo for your company. Be sure to ask them to share the open files, the inverse files as well as the logo in an image format with you at the time of delivery!
2. How to Add a Logo to Your PowerPoint Presentation?
Now that we have understood the basics of the file types that are required for adding a logo to a PowerPoint presentation, let’s understand how to add the logo to the presentation!
If you are more of a visual person and prefer to watch rather than read, check out this video below that shows the process in a step-by-step manner!
For those of you who prefer to learn by reading, you can continue with the steps outlined in the article below.
There are two methods of adding a logo to your presentation. Let’s take a look at both methods one by one –
Method 1 – Adding Logo Directly to the Slide
The easiest way to add a logo to your presentation is by adding it directly to your slides. All you need to do is insert the logo files just as you would add an image to the slide, and then place it to the position of your preference in your presentation.
Here’s a step-by-step process
Step 1 – Click on “Insert Picture”

The first step is to insert the logo as a picture in your PowerPoint presentation.
To do that, first, click on the “Insert” tab. Then, click on the “Picture” option, and from the dropdown, click on the “Picture from File” option.
Step 2 – Add the Logo File to the Slide
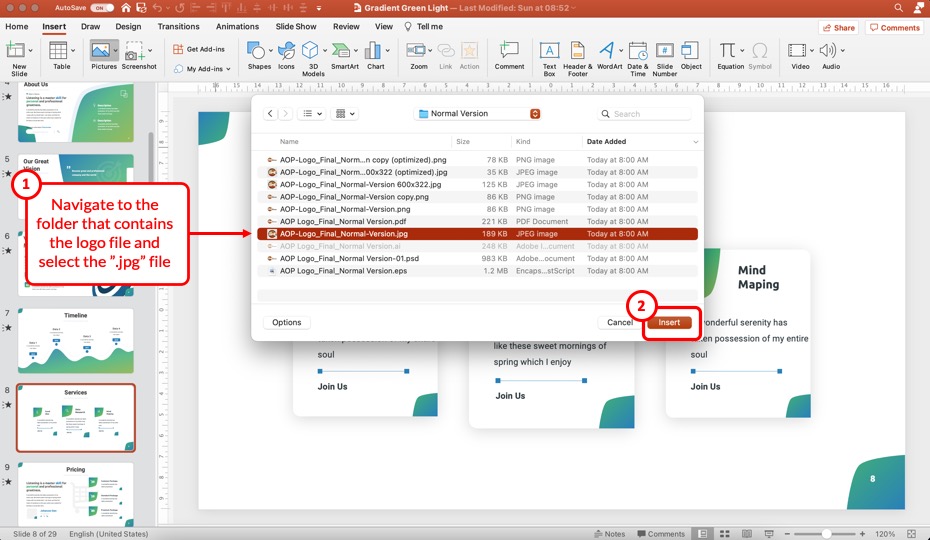
A new window will appear. Navigate to the folder that contains the logo file in an image format.
Then, select the logo file that you wish to add by clicking on it, and then click on “Insert“.
This will add the logo file to your slides in the presentation.
Step 3 – Resize the Logo on the Slide
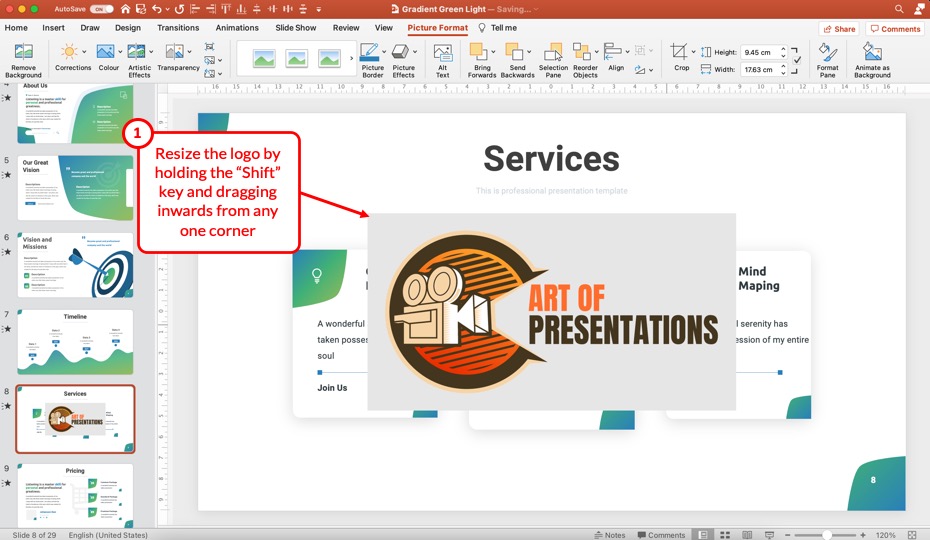
Now, sometimes, we may need to resize the logo file as it can be quite large in size.
To resize the logo image file, hold the “shift” key on your keyboard, and drag the image from any one corner inwards. Doing so will ensure that you maintain the aspect ratio of the image file of the logo.
Step 4 – Reposition the Logo on the Slide
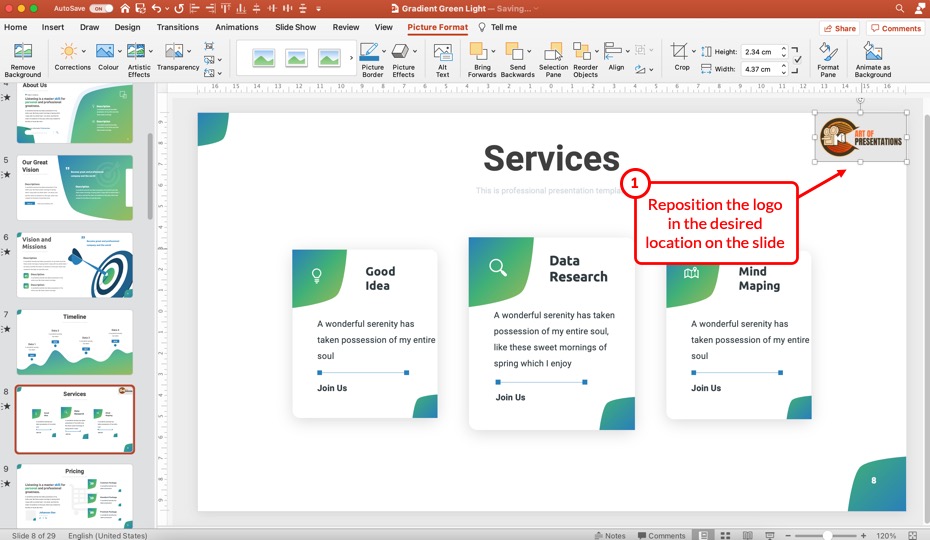
Now, reposition the logo on the slide as per your preference. You can use your mouse to drag the logo file in position.
Alternatively, you can use the align tools in PowerPoint to accurately and easily align the logo in two clicks in a corner on the slide.
Using the logo directly on the slide is quite straightforward. However, there are two drawbacks with this method –
- You can end up easily moving the logo around by mistake since it is present on the slide
- You will have to copy and paste the logo on every single slide individually
To circumvent this issue, it is better to use the next method described below –
Method 2 – Using the Slide Master to Add the Logo File
The next method involves adding the logo to the “Master Slide” or a specific slide layout. You can access the master slide using the slide master view in PowerPoint.
It can seem confusing to access the slide master if you haven’t used it previously. But, don’t worry, just follow the steps mentioned below –
Step 1 – Open the Slide Master View
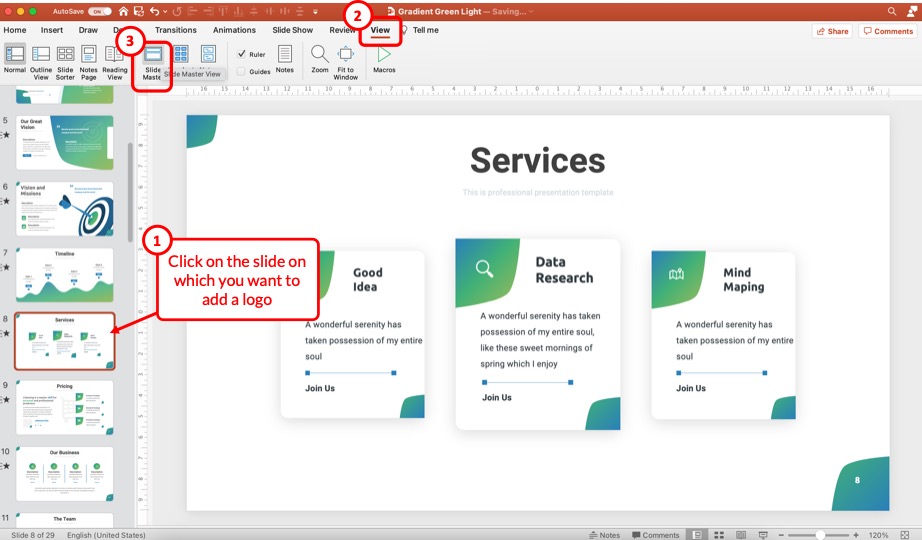
Select the slide on which you want to add the logo. Then, click on the “View” tab, and from the ribbon, click on the “Slide Master” option.
Step 2 – Click on the “Insert” Tab
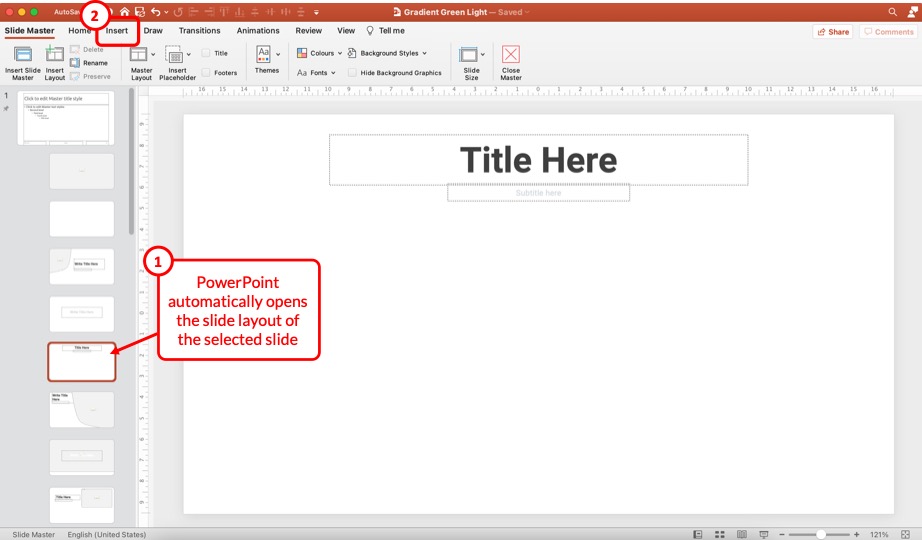
This will open the slide master view in PowerPoint. The next thing that you need to do is click on the slide layout on which you wish to add the logo.
By default, PowerPoint will automatically select the slide layout of the slide that we selected in step 1. You can know which slide is selected by seeing the red border around the slide on the left part of the screen (as shown in the image above).
Now, we need to add the logo file to the slide layout. To do that, first, click on the “Insert” tab.
Step 3 – Insert the Logo Image on the Slide
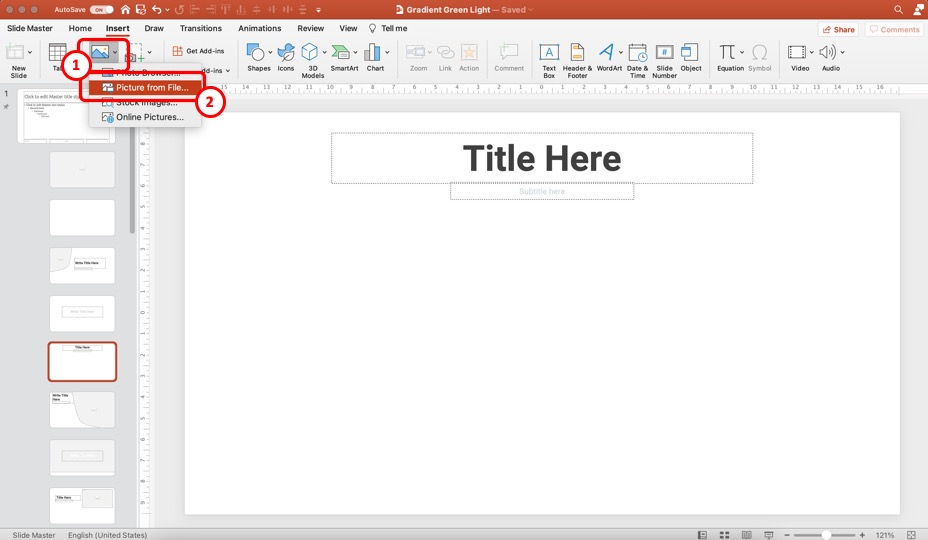
On the “Insert” ribbon, click on “Picture” option, and from the dropdown, click on the “Picture from file” option.
This will open a new window. Navigate to the respective folder that contains the logo file just as we did in the first method. Once the file is located, select the file by clicking on it. Then, click on “Insert”.
As I mentioned before, it is recommended to go with the “jpg” image format for the logo.
Step 4 – Resize and Reposition the Logo on the Slide
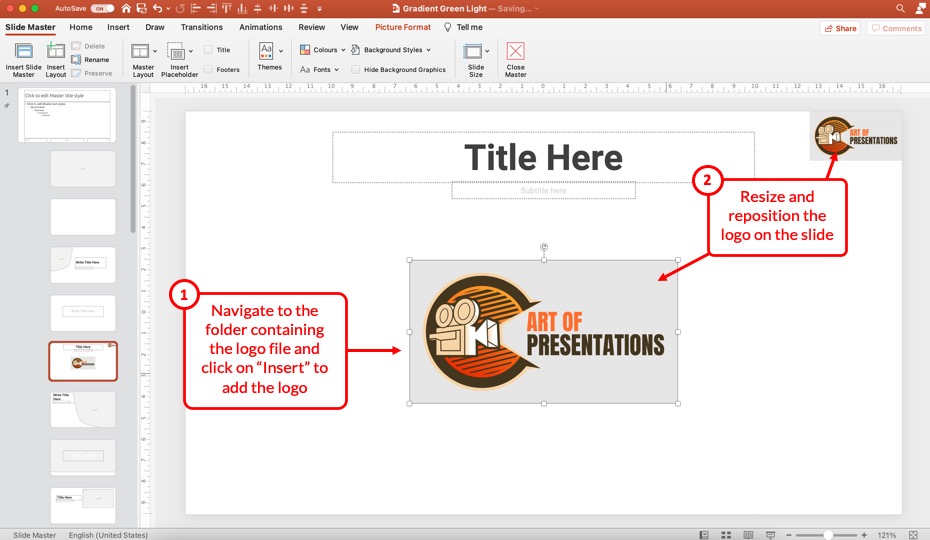
Now, the logo will be added to the slide layout. Simply resize and reposition the image to the corner of the slide like we did in the first method previously.
After that, click on the “Slide Master” tab and click on “Close Master” to exit the slide master view in PowerPoint.
Step 5 – Verify the Logo in the Normal View

Once you exit the slide master, you will get back to the normal view in PowerPoint.
Here, you’ll notice that the logo is present on the slide where we inserted it on the slide layout.
You might be tempted to think that there is no difference between the first and the second methods described above.
However, if you look closely, you will notice that the logo added to the slide can not be easily selected anymore. So, it won’t move around on the slide by mistake.
Furthermore, all the slides using the slide layout to which we added the logo, will also now have a logo in the same position (this can be benefit or a drawback depending on your situation).
Adding logo to specific slide layouts can be a cumbersome experience in some cases as you may not necessarily want the logo to appear on all slides using the same slide layout sometimes.
Perhaps, the best way to make sure that your presentation looks consistent is to add the logo to all the slides in your presentation.
3. How to Add Logo to All Slides in PowerPoint?
Well, one method is to copy and paste the logo to all the slides in PowerPoint. However, this can take a lot of time and lead to monotonous work especially when you have a few hundred slides!
Furthermore, adding logo to individual slides means that it can end up changing its position and jump around as you see the final slides.
An easier method to add logo to all the slides in PowerPoint is by adding the logo to the “Master Slide” in the slide master view.
Let’s take a look at how this is done –
Step 1 – Open the Slide Master View

To access the master slide we need to open the slide master view in PowerPoint.
To do that, click on the “View” tab, and then click on the “Slide Master“. Once you open the slide master view, click on the first slide from the slide preview section on the left part of the screen.
You can recognize the master slide as the one that is slighly larger in shape (see the image in step 2)
Step 2 – Open the Master Slide and Add the Logo
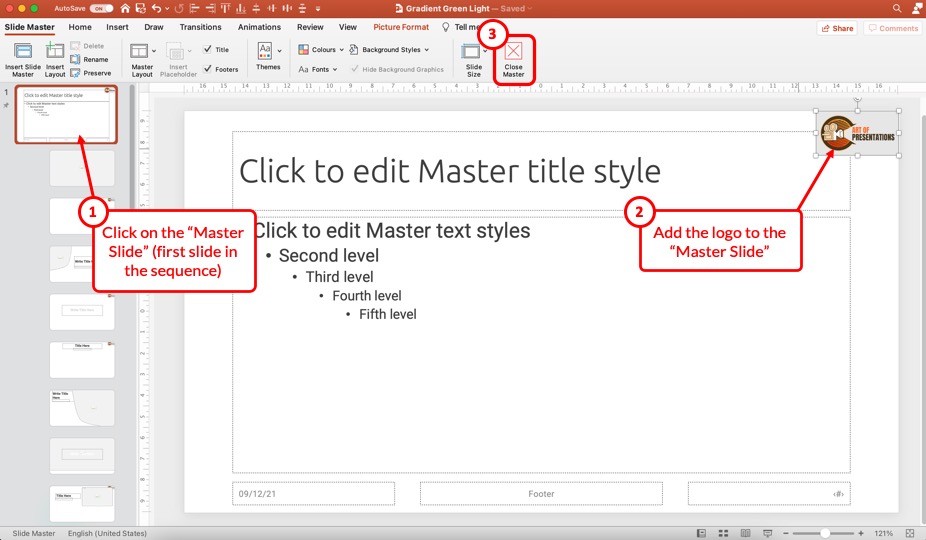
Once you locate the master slide, click on it to open it. The changes that you make on the master slide affect all the slide layouts.
So, add the logo to this slide just as we did in the previous section of this article (follow the process mentioned in section 2). Once the logo is added, resize and reposition the logo.
You will notice that the logo gets added to all the slide layouts below.
Now, exit the slide master by clicking on the “Close Master” button.
4. Where Should You Place the Logo on the Slides in PowerPoint?
One question that you may face is where do you position the logo on the slides in PowerPoint?
It is recommended to place the logo on the top-right corner of the screen as this position has the least chances of overlap with other content. You can also place the logo in the footer either in the left or the right corner. However, do not place the logo at the top left corner of the screen.
There is no one-size-fits-all approach here to position the logo on the slide. However, there are a few things to keep in mind when positioning the logo on the slide –
- Keep the logo in the same part of the slide on all slides. You don’t want the logo to jump around when changing the slides. Title slide is an exception to this rule.
- Make sure that the logo is ideally present on all the slides. This is not a necessity but indicates a good design hygiene.
- Once the position is identified, make sure that the logo is of the exact same size and occupies the exact same position on all slides. This will give a professional look to your presentation.
- Ideally, use the master slide to position the logo in your presentation.
5. How to Add the Logo to the Footer in PowerPoint?
Adding the logo to the footer works just the same ways as adding the logo to the slide. However, here’s a step by step process to add the logo to the footer in PowerPoint.
Step 1 – Open the Slide Master View in PowerPoint

First open the slide master view in PowerPoint. Just as we did before, click on the “View” tab. Then, click on the “Slide Master” option.
Step 2 – Insert the Logo in the Footer on the Master Slide

Now, click on the “Master Slide” to open it, and add the logo to the master slide (as per the process described previously in the article).
Then, resize and reposition the logo (just as we did before) to the footer of the slide.
After that, exit the slide master view by clicking on the “Close Master“.
Step 3 – Check the Logo on Footer on Your Slides

Check to see if the logo is added to the footer of the slide.
You can also directly add the logo to the footer of the slide in the normal view. However, the logo will only be added to just one slide instead of all the slides.
6. How to Make the Logo Background Transparent in PowerPoint?
Sometimes, the logo file contains a colored background in addition to the company logo file (as is the case with my website’s logo file).
But, you can make the image background transparent for the logo file. Here’s what you need to do –
Step 1 – Insert the Logo in Your PowerPoint Presentation
The first step is to insert the logo file in your PowerPoint presentation. You can easily follow the steps that I’ve mentioned in the earlier part of this article to add a logo to the slides.
Step 2 – Open the “Picture Format” Settings

To open the “Picture Format” settings, first, select the logo image by clicking on it. Then, click on the “Picture Format” tab that now appears.
From the ribbon, click on the “Color” option. A dropdown menu will appear.
Step 3 – Select the “Set Transparent Color” Option

Now, from the dropdown, simply click on the “Set Transparent Color” option. You will notice that the mouse cursor changes the shape and becomes a pionted arrow momentarily.
Step 4 – Make the Logo Transparent
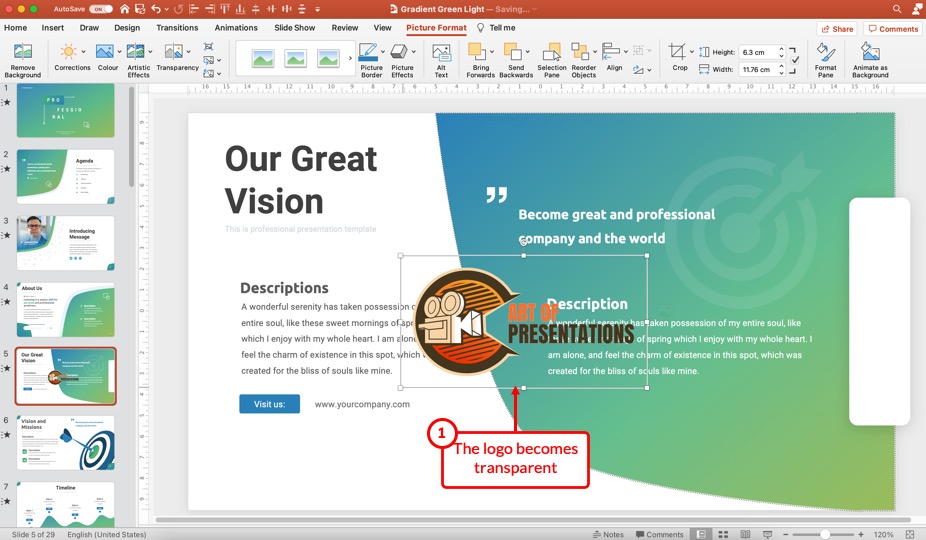
When the cursor changes temporarily, simply click on anywhere in the background of the logo image and you will notice that the logo becomes transparent.
You can now place the logo on top of colored elements on the slide and it will blend in with the overall design of your presentation!
7. How to Change the Logo in PowerPoint File?
Microsoft PowerPoint has a “Change Picture” feature that allows you to replace a picture in the slide. To change the logo from the master slide, at first, you have to click on the “Slide Master” option in the “View” menu and then follow the 4 steps below.
Step 1 – Open the Slide Master View

Assuming that your logo is present on the master slide, the first step is to open the slide master view in PowerPoint.
If you haven’t added the logo to the master slide and instead have it present on the normal view, then you can skip the first step. Rest of the steps will still be applicable.
Click on the “View” tab. Then, from the ribbon, click on the “Slide Master” option to enter the slide master view in PowerPoint.
Step 2 – Select the “Change Picture” Option
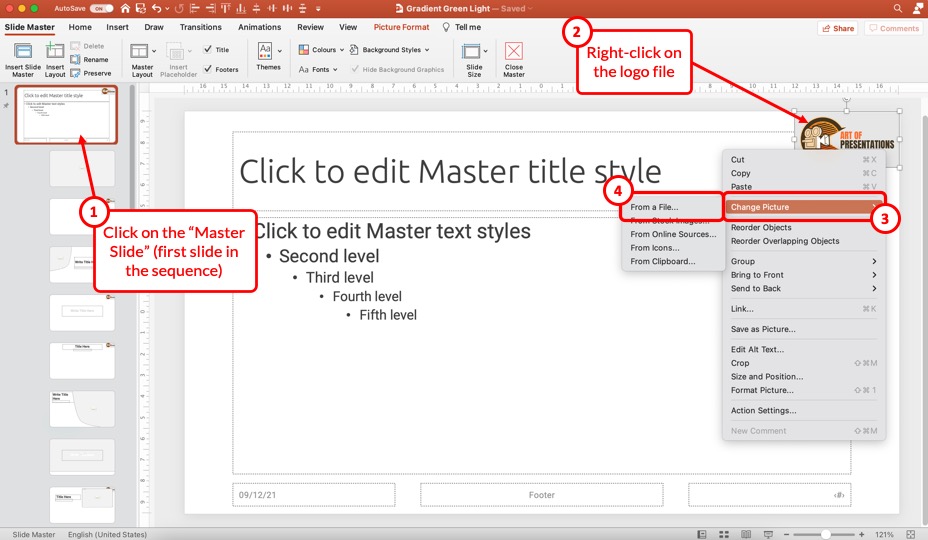
Make sure that you first open the master slide in the slide master view.
Then select the logo file and right-click on it. From the options that appear, click on the “Change Picture” option. You will see more options to replace the logo file. For this example, we will upload the other logo from from the computer.
Click on the “From a File” option.
Step 3 – Upload the Replacement Logo File
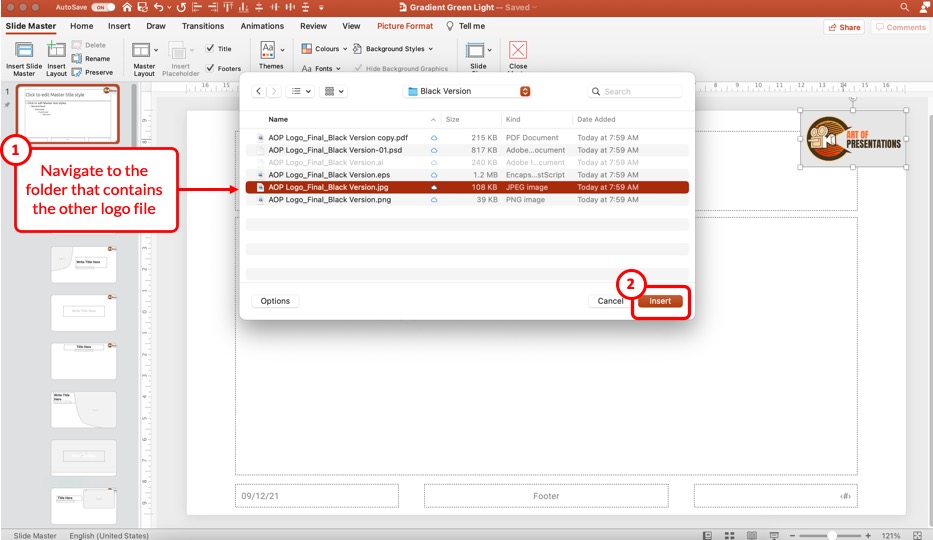
Now, you will be prompted to navigate to the folder that contains the replacement file. Open the specific folder, select the other logo file by clicking on it, and click on “Insert“.
Step 4 –
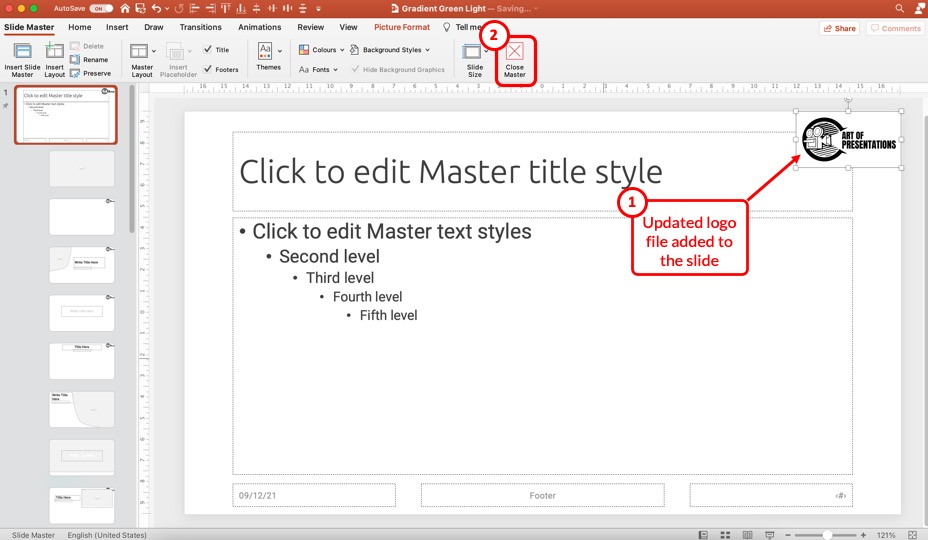
The logo gets replaced with another image to the master slide (as shown in the image above). Once that’s done, simply click on the “Close Master” to exit the slide master view in PowerPoint.
8. How to Remove Logo from Slides in PowerPoint?
Now, let’s understand what to do when you receive a presentation and you simply want to remove the logo from the PowerPoint presentation.
To remove the logo from PowerPoint, first, click on the “View” tab. From the ribbon, click on the “Slide Master” option. Then, open the “Master Slide”. Locate the logo on the slide, and press the “Delete” key on your keyboard to remove the logo from all slides in PowerPoint.
Depending on how the logo has been added, the process of removing the logo from the PowerPoint presentation can vary.
If you have added the logo directly in the normal view in the presentation, then chances are that you need to open each slide on which the logo is present and delete the logo individually.
However, if the logo has been added to a specific slide layout, then open the specific slide layout from the slide master. Then, locate and select the logo by clicking on it, and press the “Delete” key to delete the logo from the slide layout.
However, if the logo is added on the master slide, you need to open the master slide from the slide master to delete the logo.
Here are the steps that you need to follow –
Step 1 – Open the Slide Master View

As mentioned before in the article, click on the “View” tab, and then click on the “Slide Master” option to open the slide master view in PowerPoint.
Step 2 – Open the “Master Slide” and Delete the Logo
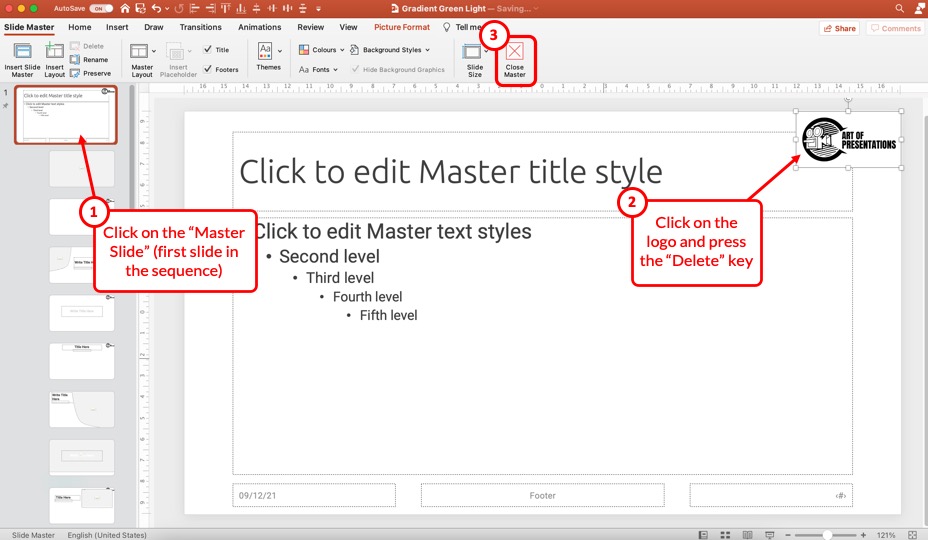
Once you open the slide master view, click on the “Master Slide“. Then, locate the logo on the slide. Select it by clicking on it. Next, press the “Delete” or the “Backspace” key on your keyboard to delete the logo file.
Lastly, close the slide master view by clicking on the “Close Master” option.
Credit to wayhomestudio (on Freepik) for the featured image of this article (further edited)

![How to Add a Company Logo in PowerPoint? [The CORRECT Way!]](https://artofpresentations.com/wp-content/uploads/2021/12/Featured-Image-How-to-Add-a-Logo-in-PowerPoint.webp)