![How to Convert Google Slides to Video [For FREE]](https://artofpresentations.com/wp-content/uploads/2021/04/Featured-Image-how-to-convert-Google-Slides-to-video.jpg)
Although Google Slides is completely free to use, it does come with its own disadvantages! For instance, if you want to convert your Google Slides presentation to a video, you will not be able to do it out-of-the-box, and you will need to other methods.
Currently, there is no direct method available to convert a Google Slides presentation into a video. However, you can convert Google Slides to a video using third-party applications such as PowerPoint, Screencastify, or even default screen recording applications.
In this article, I’m going to share with you 3 different methods (all FREE) to convert your Google Slides presentation into a video.
So, let’s get started!
Method 1 – Export Google Slides to Video using PowerPoint
Google Slides does not have the option to directly convert presentatations into videos. However, there are a few easy ways to get the job done. One of such ways is to do it using Microsoft PowerPoint. This might sound a little difficult, but once I show you how it’s done, you will have the confidence to do it on your own. All you need to do is to follow these easy steps one by one:
Step-1: Download your Google Slides Presentation on your Computer
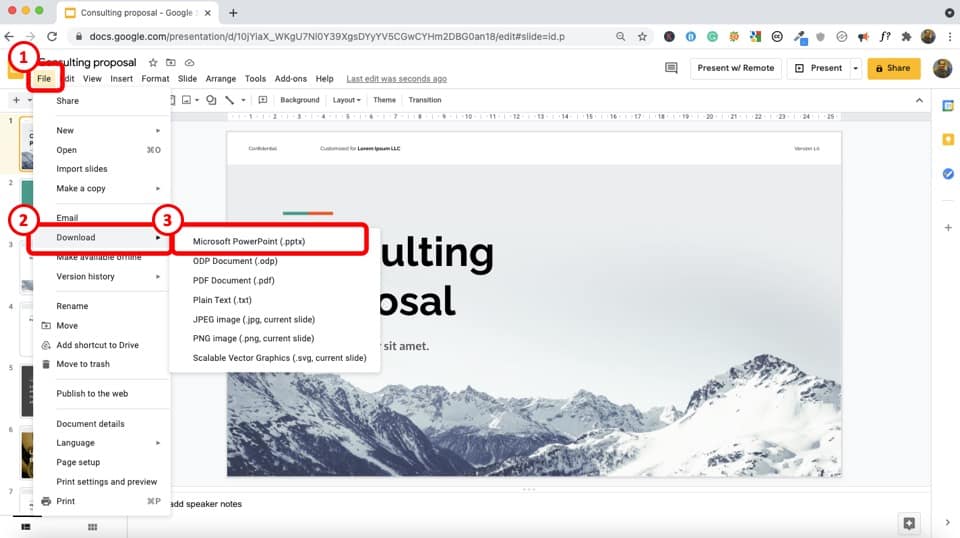
Open your Google Slides Presentation and click on ‘File’. From the dropdown menu, place your cursor on ‘Download’ and select ‘Microsoft PowerPoint (.pptx).’ The presentation will be downloaded to your computer as a Pptx file.
Step-2: Open Microsoft PowerPoint and Access the Screen Recording Option
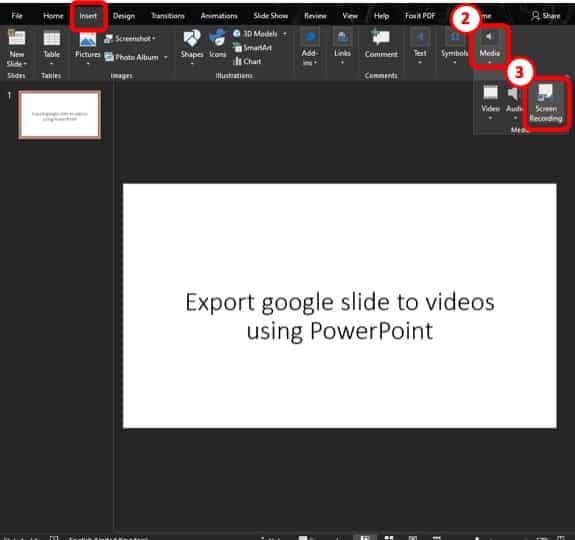
Open the file you have just downloaded with Microsoft PowerPoint and click on the ‘Insert’ tab. After that, slide towards the ‘Media’ button to add Screen Recording in your presentation.
Step-3: Record your Presentation
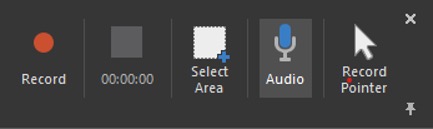
A recording panel will pop up once you click on ‘Screen Recording’. But, do not start recording yet. Select the portion of the screen you want to record.
Then, go back to the slides and initiate your Presentation. Once the presentation starts press the recording button immediately. Similarly, click on the stop button after your presentation is over.
Step-4: Export your Presentation to Video
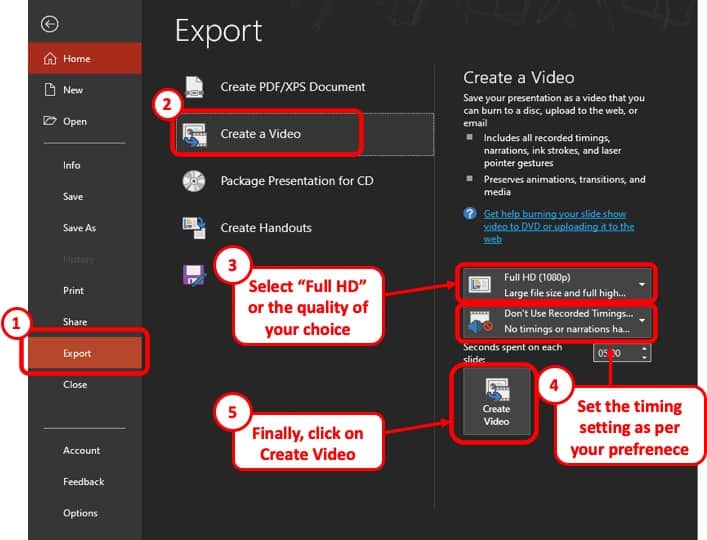
Go to the ‘file’ tab and click on ‘Export’. Upon clicking, you will be given five options where you have to choose ‘Create a video.’ On the right panel, select the quality of the video you want (Example: Full HD 1080p) and specify the timing. After that, click on the ‘Create Video’ button.
Step-5: Save the Video file to your desired directory
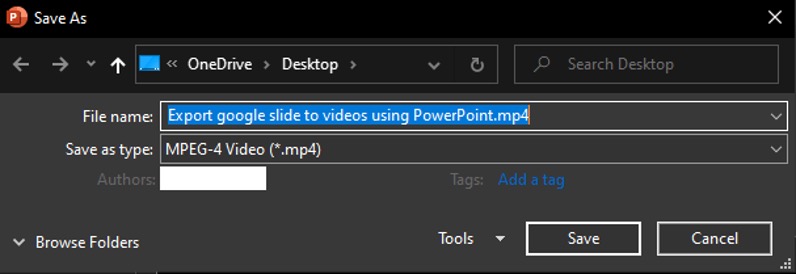
You will be asked to assign a name to your video and select where you want it to be saved. Click on ‘Save’ and its done!
Method 2 – Convert Google Slides to Video using Free Online Tools
Since Google Slides do not offer an option to export presentation slides to video, you can get the job done using any of the online tools available out there. Here, I will be highlighting two of the most popular ones: Screencastify and Slidevid. Follow the steps below to learn how to use these tools effectively:
2.1 Using Screencastify
Screencastify is a Chrome extension that allows users to screen record, edit and share videos. This is a very handy tool when it comes to converting Google slides to video. You can it by simply installing the Screencastify extension to your browser (For Google Chrome, you’ll find it on Chrome Webstore).
Step-1: Download, Install and Open Screencastify
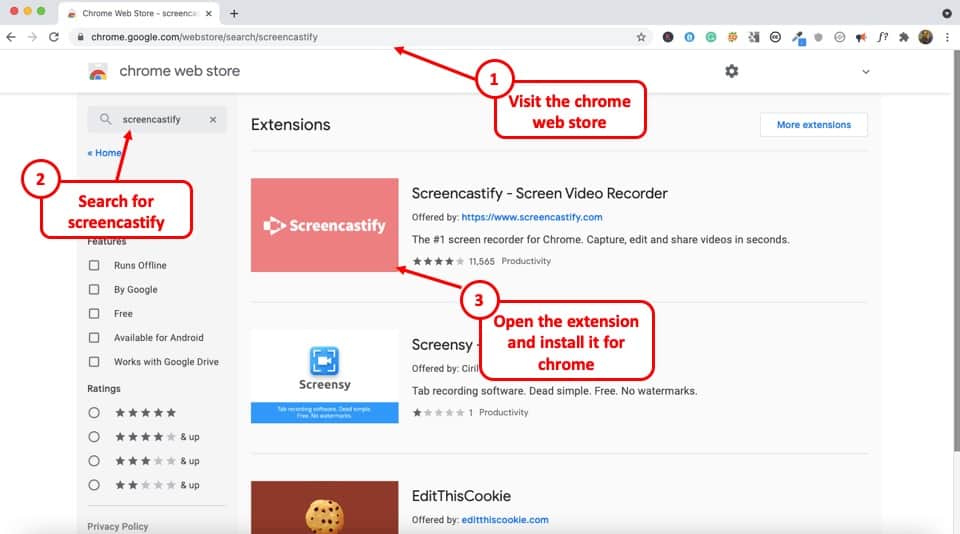
Visit the Chrome Web Store. Then, search for “Screencastify” by entering it in the search box in the top left corner of the screen. Click on Screencastify extension and install it.
Once installed, you will find the extension icon on the top right corner of your screen on the bookmark tab (or on the address bar tab depending on the setting of your browser). Go for the Screencastify icon and click on it.
Step-2: Start Recording using Screencastify
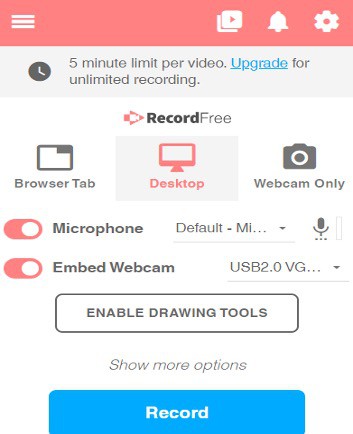
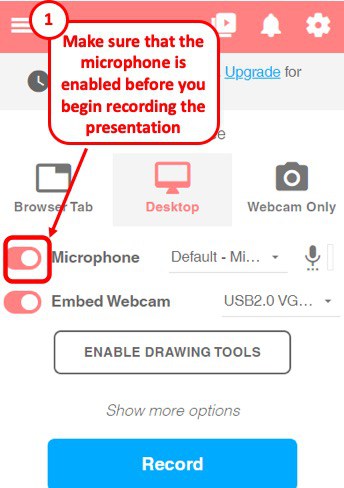
A recording panel will appear under the Screencastify icon where you will be given the option to choose from Browser tab, Desktop and Webcam.
Click on the ‘Browser Tab’ to record the Google Slides Presentation on your browser. Make sure the Microphone option is turned on if you want to add audio to your presentation. Press ‘Record’ to start recording.
Step-3: Adding a Title and Editing the Video
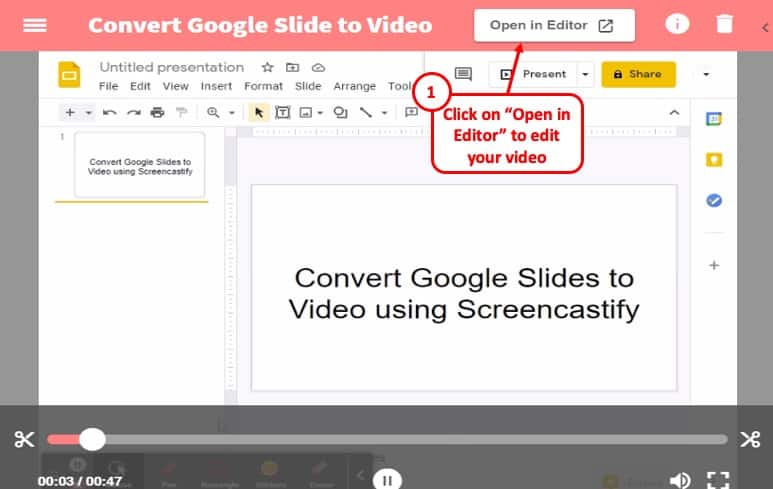
When you are done recording, Screencastify will take you to a new browser tab where you can trim your recordings and add a title on top. Next to the title, there is an ‘Open in Editor’ button. Clicking on it will take you to another tab to make the necessary changes to your video.
Step-4: Edit, Export to MP4, and download the Video
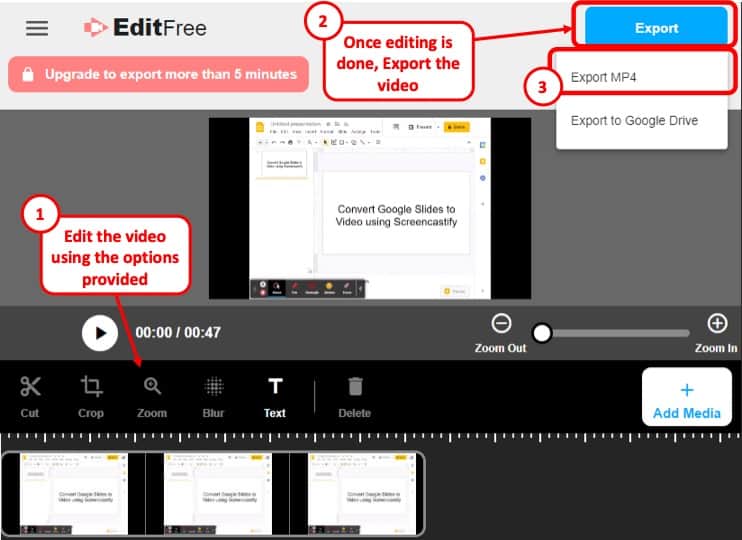
In this tab, you will have the option to add multiple recordings, texts, audio to your video. You can also crop, zoom, or blur your video if you want. When you are done, click on the ‘Export’ button and select ‘Export MP4’ to download the video on your computer.
2.2 Using SlideVid
SlideVid is a tool you can add on Google Slides and use it to make a video of your presentation. Follow the steps below to master its use:
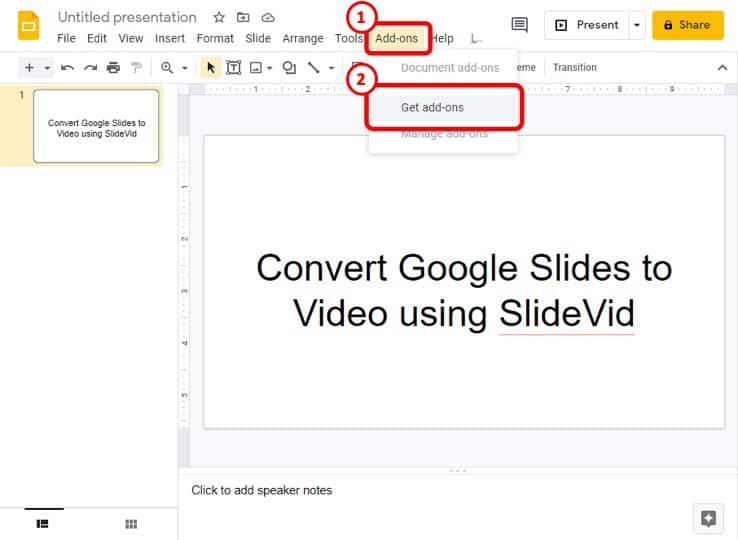
Step-1: Finding the ‘Add-on’ option in Google Slides
On your Google Slides presentation, you will find the ‘Add-ons’ tab at the top right. Click on it and from the dropdown menu, click on ‘Get add-ons’.
Step-2: Search for SlideVid and Install it
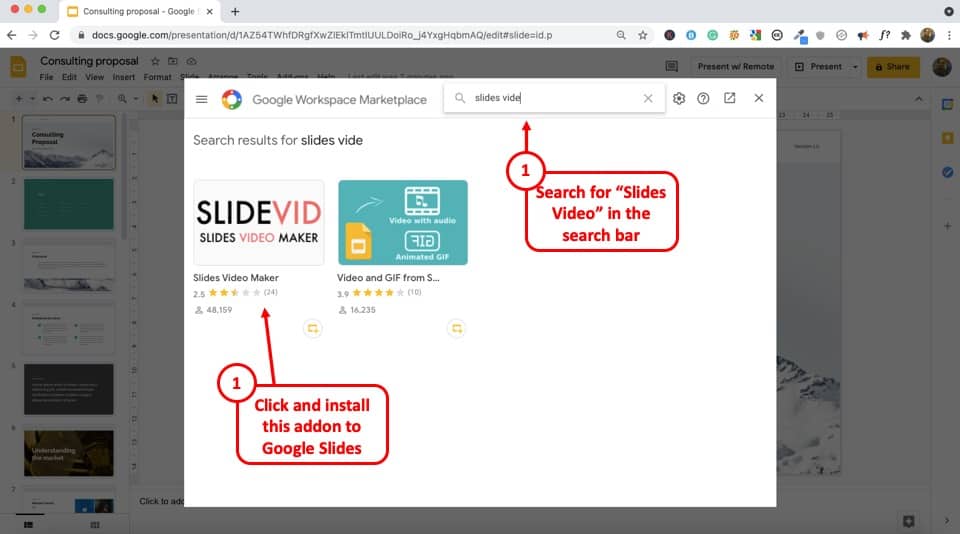
This will open a tab on your screen where you will find many add-ons to choose from. Search for ‘SlideVid’ from the list and install it.
Simply click on “Install”, then click “Continue”. Do provide the necessary credentials to sign-in to your Google account.
Step-3: Open SlideVid
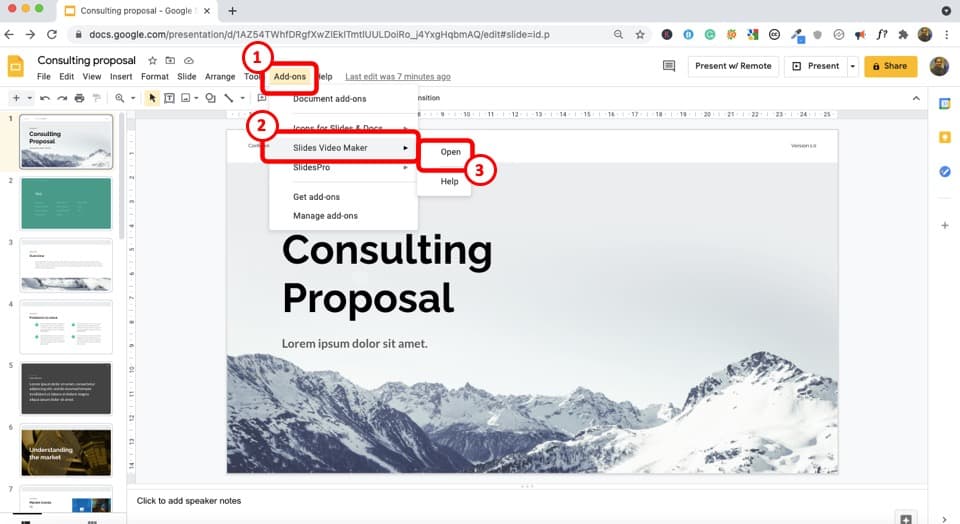
Go back to your Google Slides presenation and place your curson on the ‘Add-ons’ tab. From the dropdown menu, click on ‘Slide Video Maker’ and select ‘Open.’
Step-4: Create your video and download it.
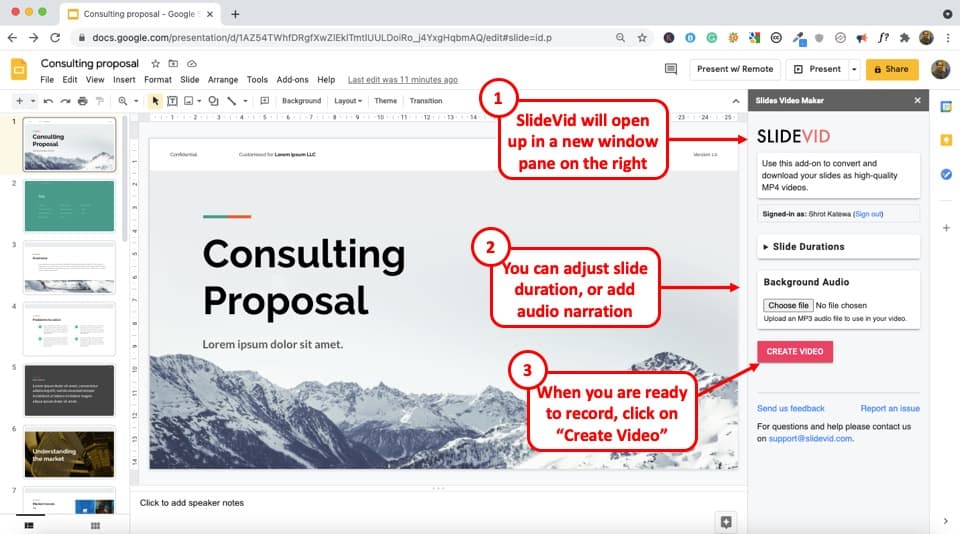
A bar will appear on the right side of your screen where you can choose the duration for every individual slide on your video. You can also upload any background audio you want. Click on the ‘Create Video’ button and your presentation slides will be processed and converted to a video.
On completion, it will be sent to your email address and you can easily download it in MP4 format.
Method 3 – Save Google Slides as Video using Screen Record Software
Screen recording applications allow users to record on-screen slides and present them through a video. Depending on the computer you are using and its operating system, the default screen recording software may vary. In this section, I’ll be giving you a step-by-step guide on how to do it with both Mac and Windows.
3.1 For Windows
Screen recording on Windows is quite easy, and you can do it using the Xbox Game Bar application. Follow the steps below:
Step-1: Open Xbox Game Bar application
From your computer’s start menu, find the Xbox Game Bar application and open it. This will open up a bar on your screen. Click on the monitor-shaped icon which allows you to take a screenshot, record screen and audio.
Step-2: Open the Google Slides Presentaion on your browser and start recording
Go to your Google slide tab to record your screen while presenting it. Your screen will start recording when you simply click on the round recording button from the ‘capture’ option. After you are done, click on the stop button to end the recording.
Step-3: Watch preview and select where you want to save the video
The ‘Show all captures’ button on the Capture tab will allow you to preview your captures and recordings. Upon clicking on the ‘Open file location’ option, you will be taken to the directory where your video is saved in MP4 format.
3.2 Quicktime Player for Mac
If you are using a Macbook or an Apple computer, I strongly recommened you to use Quicktime player. Not only is it easy to use as a screenrecorder, but it also allows you to edit your video just the way you want. Follow the steps below:
Step-1: Open Quicktime Player and Access the Recording Option
On your taskbar, look for the Quicktime Player an open it. Go to the ‘File’ tab next to the Quicktime Player title and from the dropdown menu, click on ‘New Screen Recording’ which will open a recording a panel on you screen. Don’t start recording right away.
Step-2: Open the Google Slides Presentaion on your browser and start recording
Open your Google Slides presentation and bring back the screen recording panel. Once you have the presentation open on your screen, click on ‘Present’ to go full screen. Start recording the slides by clicking on ‘Record’ button from the screen recording panel.
Step-3: Stop Recording and Check the Preview
After you are done with your presentation, you can stop recording by simply clicking on the ‘Stop’ button from the screen recording panel. Quicktime player will then automatically show you a preview of your video, where you can edit it as well.
Step-4: Save or Export video
After you are done editing the video, you have to save the video to your desired directory. To do that, click on the ‘File’ tab and scroll down to the ‘Save’ or ‘Export’ option. Please note that choosing the ‘Export’ option will give also allow you to select the video quality.
How to Export Google Slides to Video with Audio
Almost all screen recording applications has the option to record or add audio to your presenation. Below, I’ll be dicussing how to enable audio recording in the applications I’ve discussed above:
Using Microsoft Powerpoint:
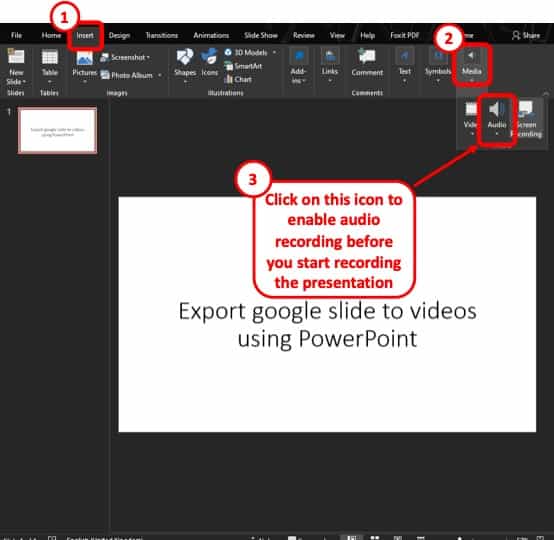
When the recording panel pops up, there is an audio icon that will allow you to record your audio alongside the video. If you want to enable audio recording, be sure to click on this icon before you start recording.
Using Screencastify:
While selecting the browser tab for recording you Google Slides Presentation, make sure that the Microphone option is turned on, which will allow you to add audio to your screen recordings.
Using SlideVid:
Adding audio to SlideVid is a little different from the other applications. You have to prepare the audio beforehand and add it seperately to the video.
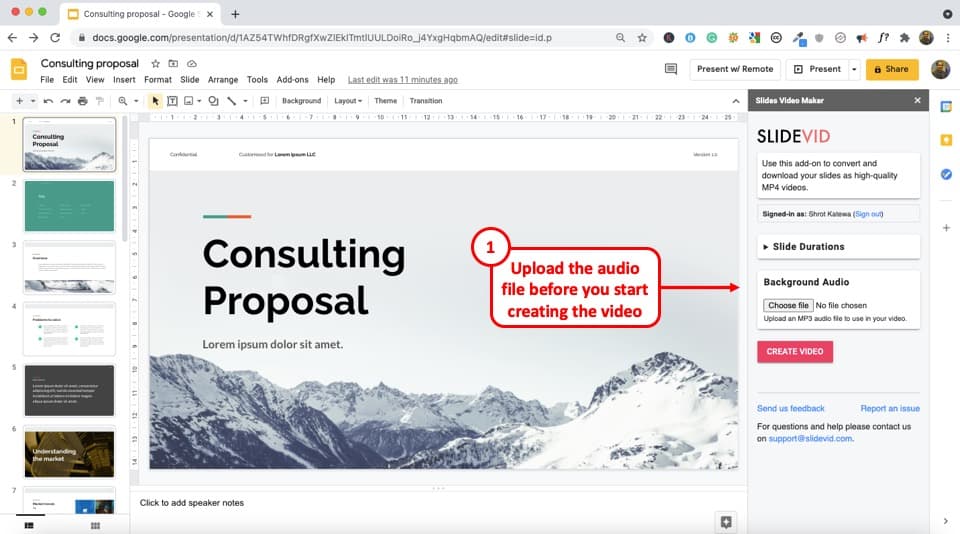
Once you have the audio prepared, you can simply add it to your presentation by clicking on ‘choose file’ from the ‘Background Audio’ section and selecting your audio file from its directory.
For Xbox Game Bar Application in Windows:
In the recording panel of the Windows Xbox Game Bar Application, you will find an audio button, right next to the screen recording button. Clicking on it will enable audio recording while recording the screen.
Quicktime Player in Mac:
In the screen recording panel of Quicktime Player, you will find a down arrow icon right next to the recording button. Click on it and select your default microphone system to enable audio recording.
How to Convert Google Slides to YouTube Videos?
As I’ve already mentioned, Google Slides does not have the option to record your presentation. Hence, if you want to convert a Google Slides presentation to a Youtube video, you’ll need to use a plug-in or an extension. I’ll show you how to do it using Screencastify.
Step-1: Open the Screencastify Application from your Browser’s Extension bar
From the extensions installed on your browser, click on the Screencastify icon to open it.
Step-2: Record your Presentation

Record your Google Slides Presentation with Screencastify following the steps I’ve shown above. After you are done recording and editing your video, click on the arrow icon on the top right corner, next to the bin icon.
Step-3: Publish to YouTube
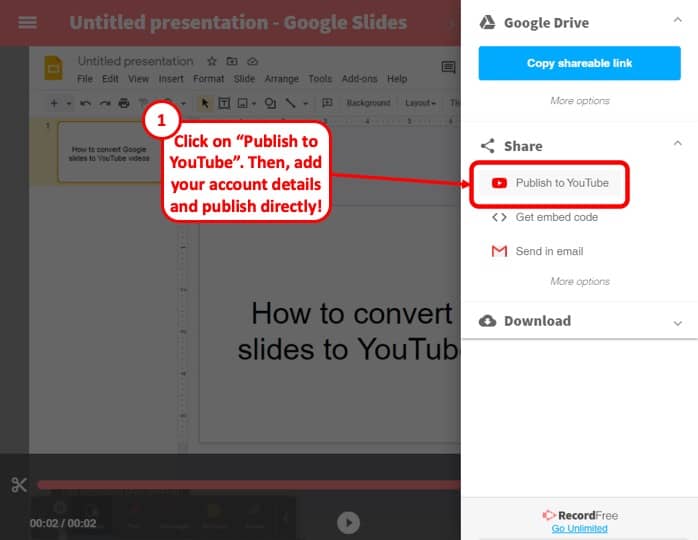
Clicking on the arrow icon will open a new panel on the right side of your screen, where you will find the ‘Share’ section. To upload your video on YouTube click on ‘Publish to Youtube’.
Step 4: Add Youtube channel to Screencastify and Upload the Video
In order to upload your video using Screencastify, you will need to add your YouTube channel. To do that, click on the ‘Add a Youtube Channel’ and sign in to your Google/Youtube account. Add a title and description to the video and select your mode of privacy. Finish off by clicking on the ‘Upload’ button.
More Related Topics
- How to Fix Almost Anything on Google Slides! [A Comprehensive Troubleshooting Guide]
- Do Presentation Clickers Work with Google Slides? [Interesting Read!]
- How to Curve Text in Google Slides? Always Use THIS Trick!
- How to Use the Eyedropper Tool in Google Slides? [Even When This Tool Doesn’t Exist!]
- 17 Pros and Cons of Google Slides! [Should You Even Use it?]
- How to Give a Presentation on Zoom? [Step-by-Step Guide!]
Credit to Wayhomestudio for the featured image of this article