Google slides offer unparalleled convenience, as it seamlessly combines all the materials you have from other Google platforms and gives you all the tools you need to make a perfect presentation. But sadly, just like any other similar service, it too has its share of faults and bugs. Lucky for you, this article is all about addressing those very issues!
Google is usually quite thorough about its services and its issues. So, If you face some problems, try reloading the page a few times. Most of the time, loading issues are related to network delays.
Sometimes there are problems that you can’t fix with a reboot. These specific issues need specific solutions. So, if you tried the initial fixes and your Google slide is still not working then take a look at some of the fixes I’ve provided in this article. Maybe one of them will fix your issue.
So, let’s begin!
A Quick Note Before We Begin – if you want to make jaw-dropping presentations, I would recommend using one of these Presentation Designs. The best part is – it is only $16.5 a month, but you get to download and use as many presentation designs as you like! I personally use it from time-to-time, and it makes my task of making beautiful presentations really quick and easy!
Why is my Google Slides Not Loading?
Google slides not loading is one of the more common issues that users face while using Google slides. Thankfully, most of the time it’s not that hard to fix.
- Internet access: If your Google slides are not loading, the first thing you should check is your internet connection. Internet access is related to a wide range of loading, syncing, and saving issues. If you have extremely slow internet, some files may fail to sync at all.
Unlike most other office utility software, Google slides stores the files on your Google drive directly. So, it requires the internet for you to be able to open them.
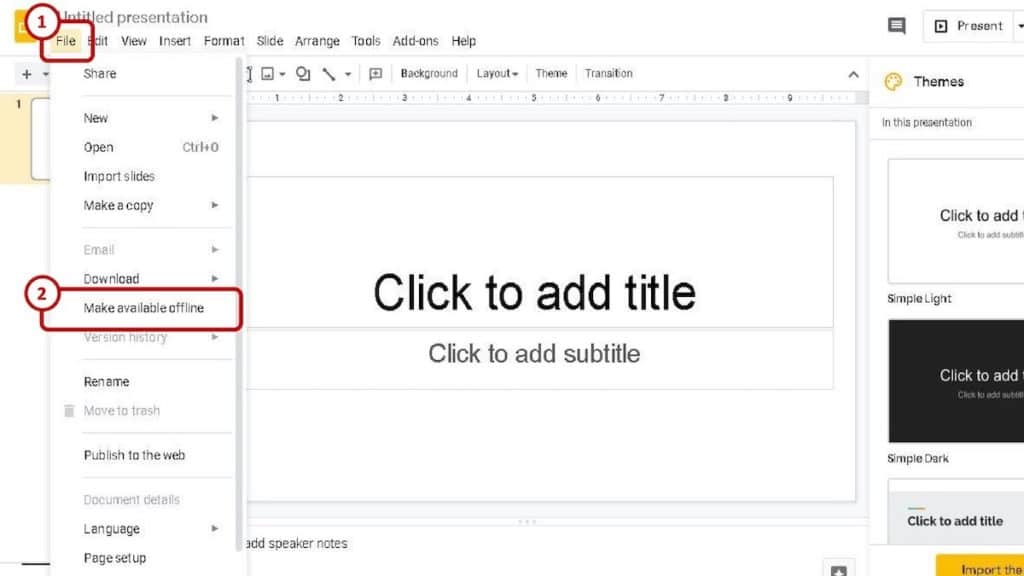
You need to manually make your files available offline if you want to access them offline. Otherwise, they won’t load without the internet. Making a file available offline essentially means downloading a hard copy of it on your hard drive.
After making a file available offline you can access it directly from your Google drive, or Google slides even when your internet is down.
- File size: There is a limit to how large your slide can be. Google limits it to 100 Mb for Google slides file. If your presentation exceeds this size cap, chances are, it won’t load properly.
- Browser: Google slide has maximum compatibility with all popular browsers. But you need to have the latest versions of the browsers for them to be able to use Google slides properly.
Another thing you should remember is to always enable cookies, as Google Slides may fail to load if cookies are turned off. The same goes for JavaScript – make sure it’s turned on in your browser.
Older versions of browsers may make it run glitchy, which is also responsible for making the slides fail to load properly.
If your browser is the latest version and you still can’t load the slide files, then try cleaning up the browser cache. Clearing up the browser cache removes any corrupted files and all the essential cookies will be back when you open the file again.
- Drive Access: If the above steps fail, then there is a high chance that the culprit is your antivirus or firewall. Firewalls and antivirus often conflict with Google drive. When this happens, you can’t access the files properly. Try editing your proxy settings, or try opening the slides with your antivirus turned off.
Why Can’t I Edit my Google Slides?
Has a colleague or a classmate sent you a Google slides file, but you can’t edit it or find the edit option anywhere? There are two reasons why that can happen –
- Account: Reason number one is when you aren’t logged in to the correct Google account. When you start a new project on Google slides it keeps the default privacy setting to “only me” for that account. Meaning, you cannot access it if you do not log in to that same account on another device.
If you click on the Share icon, you’ll notice you have options to change your permissions to editor, viewer or even remove yourself entirely from the file. If you end up doing this, then you need to ask the current owner of the file to give you editing access again.
- Permissions: Reason number two is you do not have edit access for the file. It is more common when someone sends you a Google slide. If the original owner does not manually grant you editing access, you cannot edit the file no matter what you do.
When that happens, you need to ask the person directly to give you editing access from their Google account. Alternately could use the “request edit access” button from your end of the file.
If none of the above methods worked for you, then the problem is in the drive of whoever is the current owner of the file. You need to ask that person to fix the permission related issues from their side before you can gain editing access.
“Google Slides unable to Save” Error!
Google slide saves your progress automatically every time you go online. That’s why you don’t need to save your work manually. It saves the file directly into your or the files admins drive.
The save happens in real-time, meaning every time you edit anything, even a dot, the file should update itself as shown in this picture below-
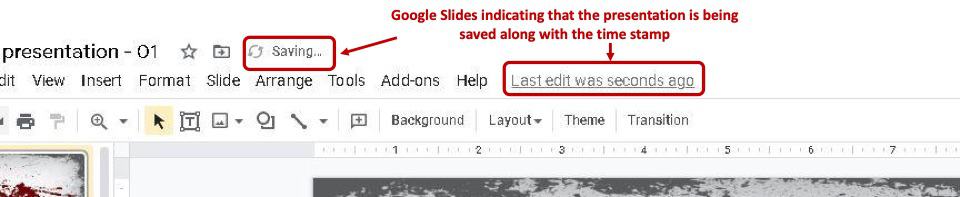
And there will be a timestamp of when the file was last edited. If your file does not do this when you change something, but your internet connection is still on, then you need to be wary.
Unfortunately, Google Slides not saving files automatically is a known issue, but there’s no way of solving it as of yet. It has something to do with the syncing system, and Google has not implemented any fixes yet.
The best way you can keep your work safe is to copy the content from the slide and paste it all into a separate new slide. You only need to do it if your file does not show the “saving…” prompt every time you edit it.
If you are working on a file as a group, make sure that the other members are not undoing your changes. You can find who touched the file last and the time of their editing in the version history.
“Error Rendering Shape” in Google Slides
You are likely to see this error when you try adding a gif or an animated image file in your Google slides.
It usually happens when you try to add gifs or animated images by dragging the file down right inside the slide. I know this is something we are familiar with but it messes with the Google slide as well as doc. It doesn’t happen all the time, but it’s more common on larger files.
When that happens, you receive the Error rendering shape error. To fix this you need to resize the image. Then, add it to your slide through the insert option. Don’t just drag and drop it in the middle of the slide. That should prevent the error from popping up any more. If it still shows the same error, close the slide and try again.
Sometimes the photos won’t render unless you are in presentation mode on Google Chrome. You can work around this by opening the file on Firefox, or you could turn off Google Docs offline extension. It fixed the problem for a lot of people.
These are relatively known issues, and you can hope for a hotfix from Google shortly. Until then, resizing and re-uploading the files is the best thing you can do.
Missing Images Error on Google Slides (Pictures not Showing Up in Google Slides!)
It’s irritating when you manually take a photo to insert on your presentation, but it does not show up. There are mainly three types of errors you can encounter regarding this on slides. Thankfully, they all have easy fixes.
- Images uploaded from the phone: This one of the most common issues with missing picture files. When you take a picture from your phone and upload it directly to your slide, you might notice that you can’t see it when you open the same slide from a laptop or pc.
It is a more common occurrence for iPhone users. All you need to do to fix this problem is upload your photo to your Google drive first, and then insert the image in your slides from there. This should fix your missing image issue.
- Invisible images: if you inserted an image to your slides and it shows that it was inserted perfectly. Yet, you can’t see the image, then you are probably using a pc and you have an extension called the “high contrast chrome extension” installed.
This extension helps reading things on websites easier by adding more contrast to the letter. But it also makes images disappear from a lot of popular websites. This also includes Google docs and Google slides.
Sadly, there’s no fix for this. You either have to remove that browser extension or keep it disabled while you work on your Google slides. If you have it turned off, your slides and images would work as intended.
If you see a big error icon where the photo should be, then you most likely have a loading problem. Try reloading the slide or follow the steps for fixing loading issues that I discussed earlier in the guide.
Unsupported Image Type Error in Google Slides
Google slides support all the major image file types which are .JPEG, .PNG, .GIF, .BMP, .TIFF, .SVG. If you are trying to upload a file that does not have these extensions then you are likely to face the unsupported image type error.
There are a couple of ways you can fix this. First, you can manually convert the image files with an image converter. You can easily find these by googling. Or you can try changing the file extension by hand from your pc.
There is an odd instance where you might get this error even with a supported format. If you are using the supported image format and still getting the error, try uploading the file into your Google drive and insert the image into your slide from there.
Google Slides not Playing Video (Unable to Play Video Error)
Embedding videos is a common feature that most of us use for our presentations, and it is extremely frustrating when a video doesn’t play or gives out that annoying “Unable to play video. Error: 5”.
Unfortunately, it is hard to pinpoint what is causing the problem because there are quite a few things that could be going wrong.
- Check the accessibility/permissions: What a lot of people neglect checking is the privacy setting. If you share a video directly from your drive to the Google slides you have to change the privacy of the source video.
By default, the privacy is set to “only me” in your drive, and if you share it directly from there, your colleague won’t be able to play it from their end of the slide. The same thing is happening when they add something and you can’t see it. Ask them to change the permission settings.
- Internet: The most common reason you would get the Unable to play video error 5 is if you have a poor internet connection. If your internet is feeling slower than usual then chances are it’s your internet that’s causing the issue. Contact your ISP if that is the case.
- Too many plugins: Another reason why you may face a video related issue is if you have too many plugins and extensions installed. What you could do is turn off all your plugins and disable the browser extensions. Restart your browser and try playing that video file again.
- Outdated browser: No matter which browser you use, you should always keep them updated to the latest version. Outdated browsers often tend to have multimedia related issues because they lack the compatibility patches for newer content.
- Dirty browser: You could face unable to play video error when you have a browser that no one cleaned for ages. Try clearing your browser cache, history, and cookies. This is relatively easy to
For Chrome:
- Click on the three dots on the top right corner,
- Find “setting” in the drop-down menu and click it,
- Select “Clear browsing data” under “Privacy and security”
If you do everything listed above then hopefully your video-related errors should be gone. If none of the methods worked, and your video is still unplayable, then try opening the video file on a different multimedia app, chances are the file won’t play there either. Unfortunately, That means the video file is corrupted and you need to get a new copy.
Google Slides not Playing Audio!
A lot of people complain that the audio files they add in their Google slides are inaccessible to the people they share them with. If you are having the same issue, then chances are you have the source file in restricted mode. If you upload a file that only you can access your Google slides, people who later open the file from their side cannot view the content.
Ideally, you would want to upload the files to your Google drive and then insert them into the slides from there to avoid any glitchy bugs. But a lot of people forget to change the permission of the file from the drive before inserting it.
To fix this,
Go into your Google drive and right-click the audio file. Select “share+” from the list of the popup menu.
When you come across this, change the permission setting from “restricted” to “anyone with the link”.
Then upload the file again in your Google slides, and it should play for everyone who has access to the file.
Now if you have trouble playing your audio file from your side of the slide, then you either have a loading issue, or the files are out of sync. To fix this you need to restart the browser and try again.
Toolbar on Google Slides Disappeared/ Google Slides is not a Showing Toolbar
If you are new to Google Slides, toolbar disappearing is not uncommon.
You were most likely tinkering with the options on the toolbar and poof! The toolbar disappeared. Thankfully it’s not a bug. You could get your toolbar back in one of two ways.
The first one is clicking CTRL+Shift+F. this would unhide the toolbar and you can start using it again just like before. You can press CTRL+Shift+F again to hide the bar again.
The second option is for those who don’t want to remember all sorts of hotkey options. Find the downward arrow on the top right corner of the slide. Click on it and the toolbar will come down and the arrow will change into an upward-facing arrow. Clicking it once more will hide the toolbar again.
Why is Google Slides Not Working on iPad / Google Slides keeps Crashing on iPad?
IPad and Google slides or docs have had issues for a decidedly long time now. Sometimes the files keep crashing, or they might not play the multimedia properly. There are no official fixes for these, but you could work around some of the issues.
The primary way of fixing this particular issue is to update your Google slides app to its latest version. If the problem persists then maybe your iOS is outdated too, so you should update that to the latest version as well. iOS 12 has a fix for this problem.
If for some reason the steps above did not fix your problem then you can try this. Most of the problems with the iPad occur because of the Wi-Fi. If you open your presentation and the screen goes black and reverts you to your home screen, then the app is crashing.
Thankfully you can fix this easily by disabling your Wi-Fi connection while you work on the slide. The downside is that you won’t have any internet access so make sure you have all the materials you need for your project beforehand.
If certain multimedia files don’t open on your Google slide from your iPad but work fine on other devices, then,
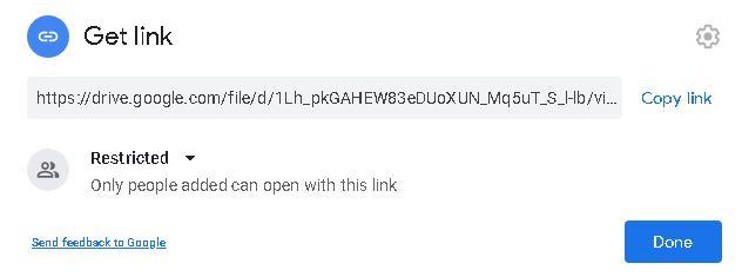
- Find the original presentation file on your drive.
- Right-click on the file and click on “get link”
- Copy the link to your presentation.
- Open the browser you use and paste the link on the search bar.
This will open the presentation again, and the multimedia should work just fine. Make sure you are logged in with the correct Google account on the browser before you do this.
I lost my Google Slides Presentation! How do I find it?
Unless you or the original owner of the file deleted it from your drives then you cannot lose the Google slides presentation.
To find your file, first, make sure you are logged in to the right Google account. If you don’t log in to the same Google account that you were on while making the slide, you cannot find it.
After logging in to the right account, open your drive, it should be one of the first things under the “quick access” tab if you have not opened any other file from your Google drive.
If for some reason the presentation file is not there, then check the folders in your drive. If you still can’t find it, then the final place you can look in is the trash folder. Even if you mistakenly deleted the file, it will stay in the trash for 30 days.
Now if your file was not deleted, but some of the edits you did are missing, then you can check the version history to see who edited the file last and what changes they made. You can press CTRL+ALT+Shift+H to open the edit history. Alternatively, you can find it under Files>version History>see version history drop-down menu.
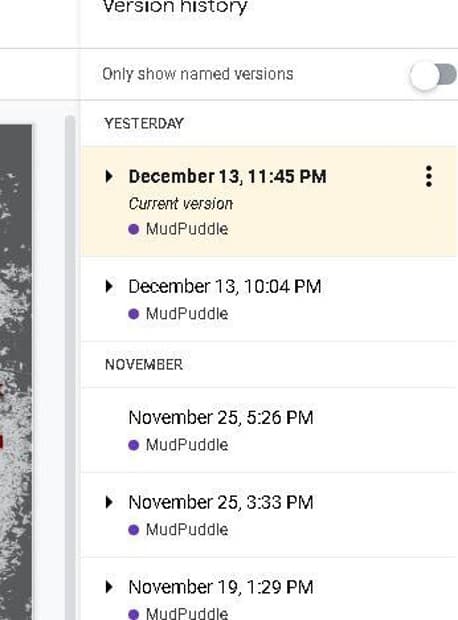
Version history is an amazing system because it saves each version of the work separately, like a backup version of your work. Even if you or one of your colleagues deletes a portion of the presentation and exits the file, you can still get it back by visiting the version history.
“Browser Extension is Preventing Slides from Opening” Error on Google Slides
Some browser extensions have incompatibility issues with multimedia on Google slides, but they should not prevent a slide from opening. First, try disabling all the plug-ins and extensions from your browser, if the problem persists then it is most likely a virus or malware.
In that case, you need to run your antivirus and root out the problem before opening the slides again. The malware is usually a Trojan in most cases I’ve seen.
“Parts of This Slide Didn’t load” Error on Google Slides
When you use the Google slides app, you may come across an error where the screen is black with an error message in the center that says “Parts if this slide didn’t load. Try reloading” with options to “show anyway” or “reload”
If this happened to you, then you are most likely using an outdated version of the app. Usually, updating to the latest version should fix this problem.
You should also try the methods I mentioned earlier about fixing loading issues on google docs.
“There was a Problem Inserting Thumbnail Image for the Video” Error
This is probably the rarest error you could come across while making your slides for a presentation, but it is still very annoying. When you insert a video file it automatically generates a thumbnail or uses the one on the original file in your drive.
The failure to insert a thumbnail happens if you try to upload a file that exceeds the maximum size allowed in the Google slides. It can also happen if the video playback resolution is too high. The maximum allowed resolution on Google slide is 1920×1080.
If your problem persists even with the right video formats, then try copying all the content to a new slide and then inserting the video there. Hopefully, that should fix the issue too.
Final Thoughts
The small number of bugs that we face from time to time is a small price to pay for all the conveniences that Google platforms provide. It is effectively giving us all the resources to make the perfect presentations at the least possible hassle.
If you keep your device updated to the latest version and use the newer versions of windows then you are much less likely to run into any problems on Google platforms. One thing you should remember is to always keep track of the Google account you are using.
You should pay careful attention to the privacy settings for the material you share. As these are the most common reasons why something might not work the way it was intended. I hope now you know what to do if your google slide is not working. Thanks for reading this article till the end. Have a great day and until next time, farewell.
Featured Image Credit