Google Slides is a great free tool provided by the Google Suite. But, using a free tool can sometimes come with a trade-off. For instance, if you have been using any other presentation software, you will find yourself searching for the color picker tool in Google Slides!
Google Slides does not have an in-built eyedropper color picker tool yet. However, you can use chrome extensions like ColorZilla or ColorPick Eyedropper and other color picker software to snip colors and use it in combination with Google Slides.
The color picker tool is perhaps one of the most helpful tools to have in your repertoire when working on presentations especially on Google Slides. Since, Google Slides doesn’t come pre-installed with the eyedropper tool, using these tools in Google Slides becomes a bit tricky.
In this article, we’ll take a look at how we can use eyedropper color picker tool in Google Slides.
A Quick Note Before We Begin – if you want to make jaw-dropping presentations, I would recommend using one of these Presentation Designs. The best part is – it is only $16.5 a month, but you get to download and use as many presentation designs as you like! I personally use it from time-to-time, and it makes my task of making beautiful presentations really quick and easy!
How do you Color Match in Google Slides?
So, we have already learned that Google Slides doesn’t come with an eyedropper that allows you to pick colors. In such a case, how does one color match in Google Slides?
Well, there are several ways you can do that. However, the two of the easiest methods of extracting or matching color for your Google Slides presentation is by using extensions or third party programs.
1. Browser Extensions to Pick a Color in Google Slides
The easiest method to match colors in the absense of an eyedropper in Google Slides is to use browser extensions.
Browser Extensions or Addons are basically set of tools that provide additional functionality to the users. Each browser will have a different set of extensions that it provides.
Since Google Slides is a Google product, using Google Chrome as a browser for accessing eyedropper color picker extensions would work best. That said, if you are using Microsoft Edge, you could use the Rainbow Color Picker extension.
If, however, you are indeed using Chrome, my personal favorite is ColorZilla. It is completely FREE and has a decent user interface that is simple and easy to use. Another well-known color picker extension for Google Chrome is ColorPick Eyedropper.
No matter which tool you choose, you need to install the extensions in order to use the tool. Here’s how you could install the extension in order to use the color picker tool in Google Slides –
How to Install and Use Eyedropper or Color Picker Extension on Google Slides?
If you don’t know how this process works, make sure you check out my other article on how to install an add-on in Google Slides.
Nevertheless, here’s a step-by-step process described below. If you are already aware of this process, you can skip this process and proceed ahead.
For explaining the process, I’m going to be installing the ColorZilla extension as an example –
Step 1 – Visit Chrome Web Store
The first step really is to visit Chrome’s web store by clicking on this link. For thereon, you can search for ColorZilla in the search bar on the top left corner of the screen.
Alternatively, you could also directly visit the ColorZilla’s page.
Step 2 – Add the extension
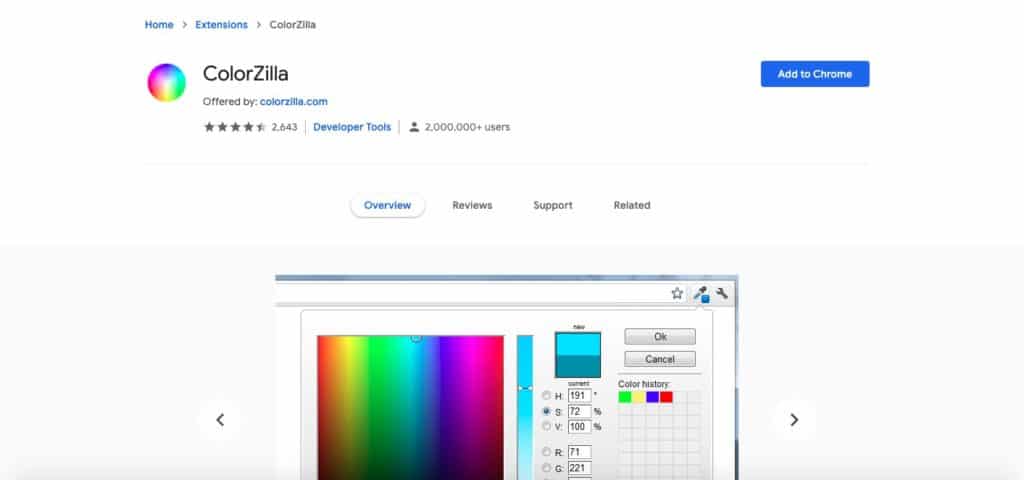
Once you are on the page of the extension that you want to add to chrome, click on “Add Extension” in the top right corner of the screen.
You will then be prompted with a pop-up message asking you to confirm whether you want to add the extension. Again, click on “Add Extension“.
Step 3 – Start Using ColorZilla and Snip the desired Color
That’s literally it! Installing an extension is really that simple.
You’ll now notice that there is an eyedropper icon as a bookmark in your browser’s tool bar.
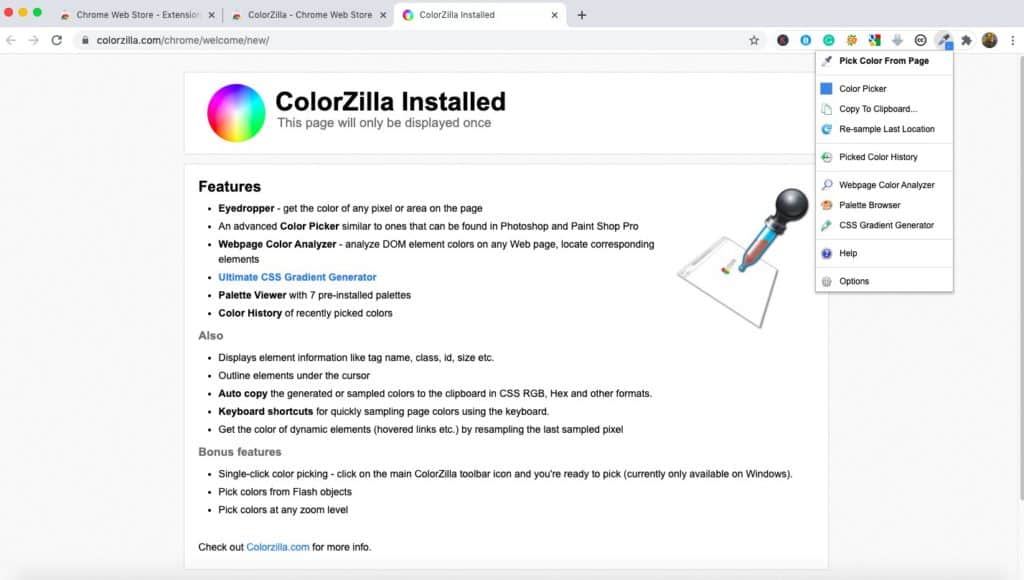
To color match, simply click on the eyedropper icon now visible in your chrome extensions area. A dropdown menu will appear. Then, click on “Pick Color From Page“.
As a next step, simply click on the color that you want to snip. Then, click on the eyedropper once again, and from the dropdown, choose “Picked Color History“
The application stores upto 66 colors that have been snipped in the past along with their RGB, HEX and HSV values.
Step 4 – Use the Snipped Color in Google Slides
The first thing that we need to do is copy the hexadecimal (or the HEX code) of the color that we snipped using the ColorZilla extension.
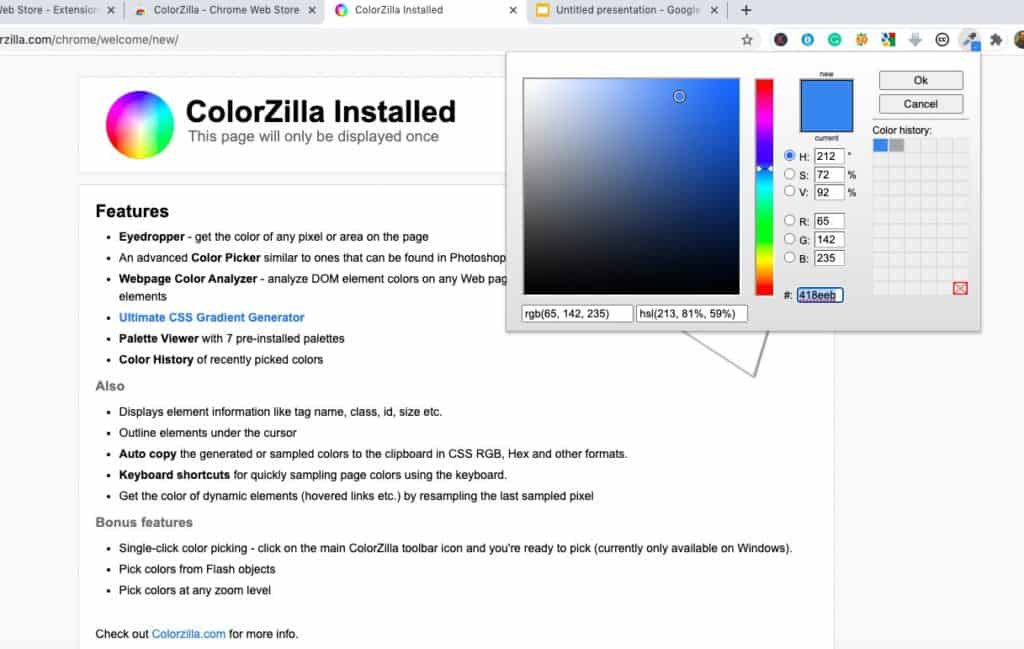
Go back to “Picked Color History”, and choose the color that you want to go with (if you have multiple color options that you have snipped).
Make sure you copy the HEX code. This will be a 6 digit code under the RGB values displayed. In this case, the HEX code of the chosen color is #418eeb.
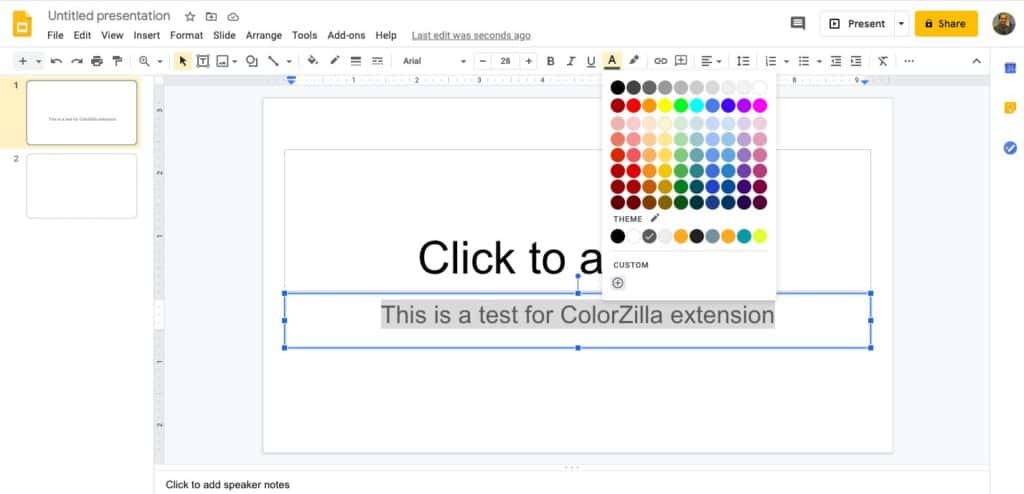
We need to copy this code and apply it on the specific elements on Google Slides.
For this example, I want to apply the selected color to the text. To do so, simply click on the “Font Color” option, and then from the dropdown with several colors, scroll all the way down and click on “Custom” by clicking on the “+” sign.
In the next window, simply click on the area to enter the 6 digit HEX code and paste the value of the color that we had copied from ColorZilla.
Likewise, you can also use this tool to add the desired color to a particular shape or any other element in Google Slides.
2. Third Party Programs to Pick Color in Google Slides
Less well-known than extensions are the several programs that add the eyedropper functions to your computer. You can use most imaging software that can edit an image to find the colors in that image for example Adobe Photoshop.
You don’t necessarily need to pay for such high-end software to use just this one functionality. For instance, Microsoft Paint on Windows also does a fantastic job of picking color with color codes from images so you can use it in Google Slides (using step 4 mentioned in the above process).
If you are a Mac user, there are a ton of different options. My personal favorite is SIP. It has a free version and a paid version. But, the free version gets most of the work done. For the most part, you won’t need to get a paid version. An equally good alternative is ColorSnapper 2.
The advantage of tools like SIP and ColorSnapper 2 is that they don’t need to be open in a separate program. You can snip colors from literally anything that is open on your screen!
Further, these programs usually have a memory function, this allows you to easily see what the colors you’ve recently selected are and what they are when you want to make something else that color.
How to Pick a Color from a Website?
Picking a color from a website is simply using the eyedropper tool of your choice and clicking on the color you are looking for.
This will give you the value of that color in either it’s hex code, CMYK values, or RGB numbers. You can then enter these numbers into the program you are using to make a presentation, even saving them as a swatch color to be used in the future.
However, it is always important to remember how colors will work with each other, and websites are depicted on bright digital mediums. It may be worth slightly changing or editing the colors that you grab from a website to be more effective on a projection or printed out.
Many websites also have built-in codes to protect their colors, as they are considered to be part of a corporate identity.
In these instances, you can simply take a screenshot of the website and use the eyedropper on the screengrab that you have now taken. This will still give you an accurate color and you can continue working on the presentation that you have.
What is an Eyedropper Tool?
The eyedropper tool is used in many creative settings to help designers, presenters, and even normal workers to copy a color with pinpoint accuracy. This tool is strong and all creative tools in the digital world should have something similar to the eyedropper tool.
Having an eyedropper tool handy will mean your projects easily stay consistent, and more importantly in line with the company rules and guides that have been set out. Eyedropper tools are simply a short piece of coding that can read the values that are being displayed on a digital platform, which is how they always give the most accurate readings.
However, they can be tricked with low resolution images, where individual pixels may have lost their color, or the values may have been changed.
Purpose of an Eyedropper Tool
In the world of design and art the eyedropper tools is easily one of the most valuable tools used in daily creativity. Ensuring that colors are all within the same family, or sometimes match exactly as required. They became popular through programs like Photoshop that uses them to match color on the fly while adding in large backgrounds or editing out small details that need to be gone.
The eyedropper tool’s purpose id to ensure that all color within documentations and designs are perfectly aligned to a set list of pre-approved colors. This is valuable in corporate settings as not everyone may know what colors are to be used when creating new presentations, or designs.
Final Thoughts
Having a good eyedropper tool installed on your browser or computer will help you to always have the most accurate colors to use. Within Google Slides your blocks, circles, or highlights can all easily be made to match the corporate guides if you are using an eyedropper tool that is both effective and useful.
Getting the best possible eyedropper tool and using it effectively will help your presentations always hit home while staying on brand.

