![How to Download Google Slides Presentation [Complete Guide!]](https://artofpresentations.com/wp-content/uploads/2021/04/Featured-Image-How-to-Download-a-Google-Slides-presentation.jpg)
If you are a Google Slides user, you probably already know that Google Slides works on cloud storage. Meaning that your presentation files are stored online and can be accessed using just a browser. You no longer need to carry the physical file on a thumb drive. But, what if you intentionally need to save a Google Slides presentation? In that case, how do you download a Google Slides presentation?
To download a Google Slides presentation, simply open the presentation file in your browser. Then, click on the “File” menu and select the “Download” option. Choose the format (such as .pptx, .pdf, etc) in which you need to download the file, and save the presentation on your computer.
While that’s just a quick explanation, if you need a detailed step-by-step pictorial description, continue reading as I will be sharing the same below in the article. Plus, I will also share with ninja tips that will allow you to download just the audio or even a protected presentation to your computer!
So, let’s get started!
A Quick Note Before We Begin – if you want to make jaw-dropping presentations, I would recommend using one of these Presentation Designs. The best part is – it is only $16.5 a month, but you get to download and use as many presentation designs as you like! I personally use it from time-to-time, and it makes my task of making beautiful presentations really quick and easy!
1. How to Download a Google Slides Presentation?
Downloading a google slide presentation is very simple and absolutely free for Windows, Mac and other operating systems. There are a few ways you can download a google slides presentation on your computer which you can choose from, according to your preference.
In this section, I will show you step-by-step, the 3 ways you can download Google Slides presentation on your device.
1a. Save Google Slides as a PowerPoint File
The fastest way to save a Google Slides file as a Power Point file is to use the “Download” option in the “File” tab that you can find on the upper left corner of the ribbon. Here is a detailed step-by-step guide of the whole process:
Step-1: Click on File Tab and Select Download
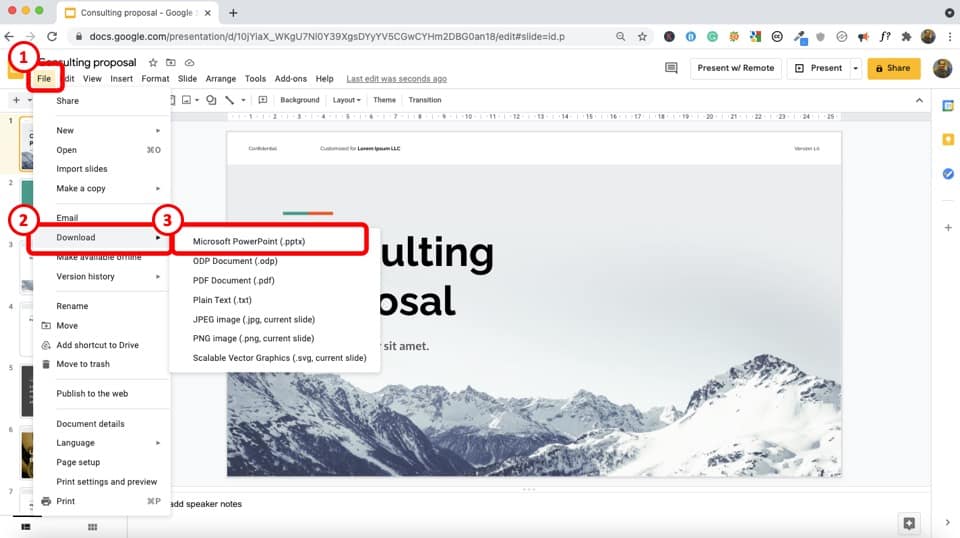
When the Google Slides document is open, you can find the “File” tab on the top left corner of your screen. Select that tab and you will find the “Download” option.
Step-2: Select the “Microsoft PowerPoint (.pptx)” Option
After selecting the “Download” option, there you will find a series of convertible formats to download to your computer. Select the “Microsoft PowerPoint (.pptx)” option.
Step-3: Open the Downloaded file.
After you select the “Microsoft PowerPoint (.pptx)” option the download will begin automatically and the preview of the downloaded file will be displayed on the bottom left corner of your screen (if you are using Google Chrome as your browser) which will lead you to the downloaded PowerPoint file.
1b. Download Google Slides as a PDF
The process of Downloading a Google Slides presentation file as a PDF file is very simple and the steps of doing it is very much similar to downloading it as a Microsoft PowerPoint file. Here is a step-by-step guide to the entire process.
Step-1: Click on the “Download” Option from the “File” tab
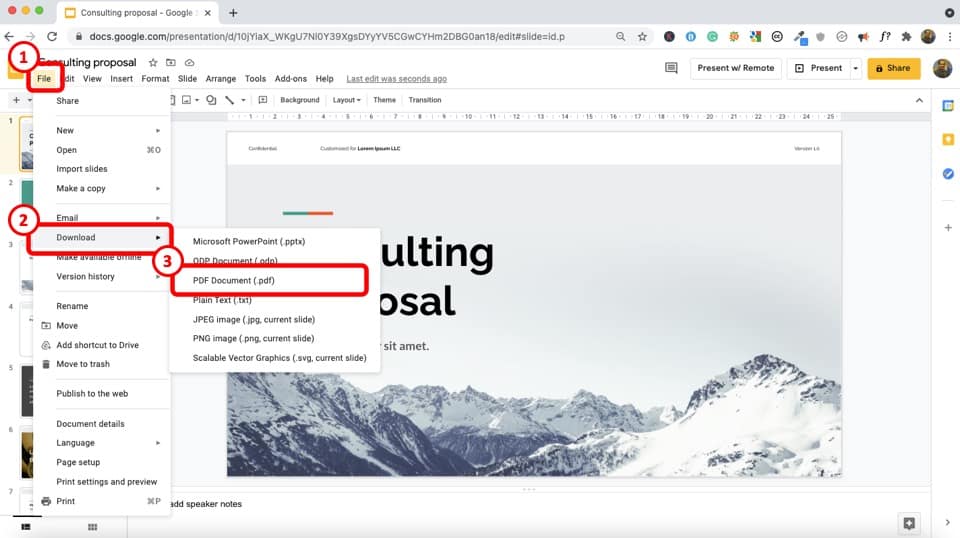
As we’ve learned from the previous section, the “Download” option in the “File” Tab is the first step to begin the process.
Step-2: Select the “PDF Document (.pdf)” option
Inside the “Download” option there is a range of convertible formats to choose from. Click on the “PDF Document (.pdf)” option.
Step-3: Open the downloaded PDF document
Right after clicking on the “PDF Document (.pdf)” option, the downloading process will being and the file will be downloaded in a few seconds.
A preview of the file will be found on the bottom left corner of the screen and the file will be found in the “Download” folder of your computer.
1c. Save Google Slides as Images
It is a bit tricky to download all the google slides into images since there is no ready option to do so. In any case, I will show you how to do it step-by-step below;
Step-1: Open the “Download” option from the “File” tab
When the Google Slides window is open on your computer screen, you can find the “File” tab in the top left corner of your screen. Open the “Download” option.
Step-2: Download the file as a Microsoft PowerPoint (.pptx)
To download the google slides as images, you have to first download it as a PowerPoint .pptx format.
Step-3: Open the Downloaded Presentation file on Microsoft PowerPoint.
After downloading the Googles slides presentation on your computer, open the file with Microsoft PowerPoint.
Step-4: Click on the “Export” option in the “File” tab
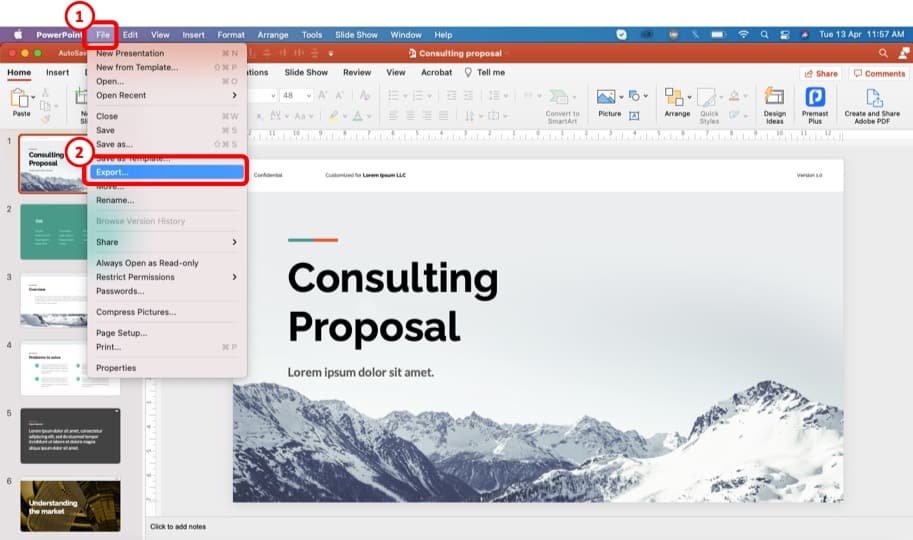
At the top left corner of the screen you can find the “File” tab which will take you to the “Export” option.
Step-5: Select the “JPEG File Interchange Format” button in the “Change File Type” option
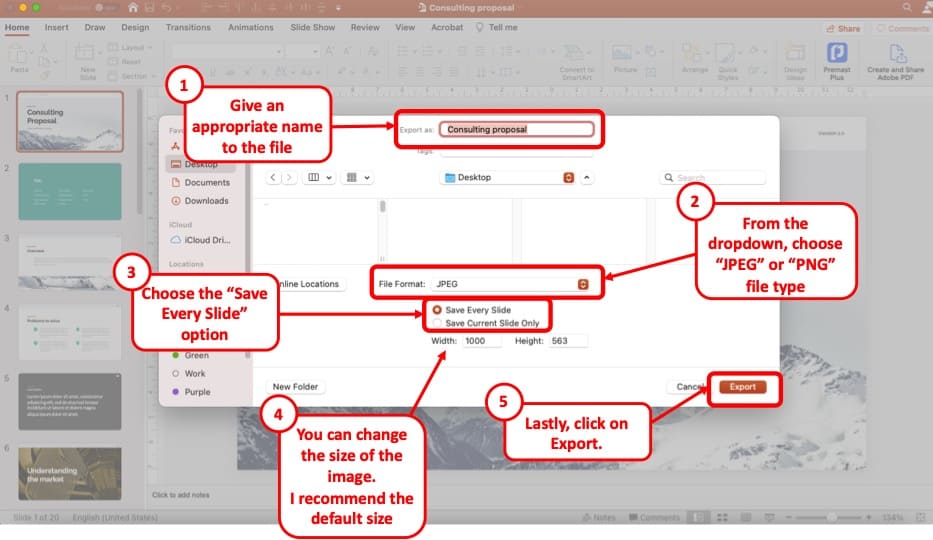
At the bottom of the “Export” option you will find the “Change File Type” option which will allow you to select “JPEG File Interchange Format”
Step-6: Select the “Save As” or “Export” button
After selecting the “Save As” button in a pop-up will show you the file name destination and file type. For Mac users, you can directly click on the “Export” button (as shown in the image above).
After selecting the “Save” button each slide will be converted into a JPEG image and saved in a folder together.
2. How to Download Google Slides Presentation with Audio?
Downloading Google Slides Presentations with audio can be a little trouble because after downloading it as a Power Point presentation, the file open in a different window instead of the presentation background. Here is a step-by-step to solve that problem.
Step-1: Download the Audio by right clicking the mouse on the audio bar
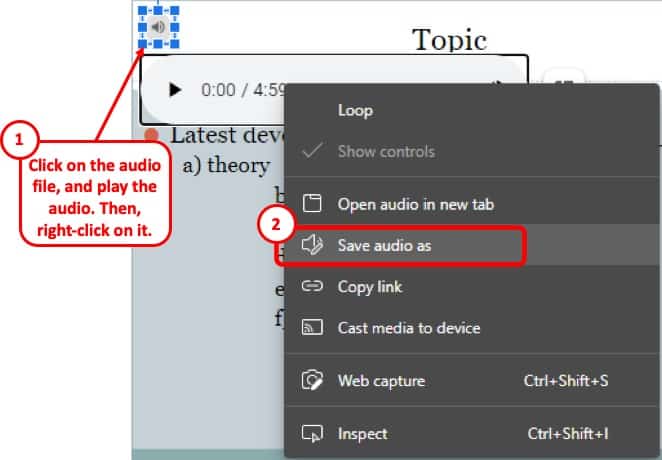
By selecting the speaker icon on the slide, you can turn on the audio in the presentation. Upon turning it on, right click on the audio bar and select “Save audio as”.
Step-2: Save the audio on your computer

By selecting the “Save audio as” option, a pop up will appear the screen. Select the “Save” button
Step-3: Download the Google Slides Presentation as a PowerPoint File
Download the presentation as a PowerPoint presentation on your computer as explained in the previous section of this article.
Step-4: Insert the Audio in Your PPT File
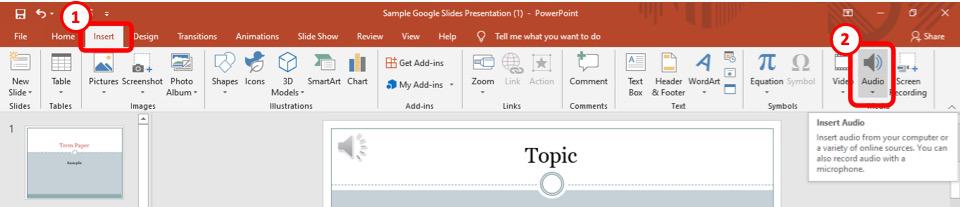
Open the slide where the audio was embedded on the google slide presentation. When the slide is open, go to the “Insert” tab on the upper part of the Power Point file.
By going to the “insert” tab, there is the “Audio” option in the top right part of the screen as shown in the figure
By clicking on the “Audio” option in your presentation, a pop-up window will appear. Select the audio downloaded for the presentation and hit “Insert”
Step-5: Re-arrange the position of the speaker icon
By inserting the audio into your presentation, an audio icon will appear at the center of the screen. Reposition the icon and you’re all set. This is just an optional step.
3. How to Download a Protected Google Slides Presentation?
There are no easy ways to download protected google slides presentations to your computer. There is no available direct links or download buttons. But there is a simple way of generating a direct download link from shared or protected files. Each step of the process is described below:
Step-1: Click on the Protected Google Slides presentation URL
https://docs.google.com/presentation/d/FILE_ID/edit?usp=sharing
There is a link in the URL box located at the upper part of your browser. The link should look something like the link above
Step-2: Select the “edit?usp=sharing” part of the URL
In the link select the part of the URL from “edit” until the end. (check the section of the link that has been written in bold formatting
Step-3: Write “export/pptx” on the selected part
Your link should look something like this – https://docs.google.com/presentation/d/FILE_ID/export/pptx
Upon selecting the colored part of the URL, write “export/pptx” in its place. The URL should look like how it has been written above.
Step-4: Press “Enter” to Open the New Link
The new link that you’ve created is a direct download link and so upon opening it, your presentation file should start downloading automatically.
4. How to Download Embedded Google Slides Presentation from a Website?
Unfortunately, there is no easy way to download an embedded google slides presentation from a website. However, there is a quick and simple way to download the presentation by simply making two bookmarks on your internet browser. The process is described below;
Step-1: Create a bookmark named “Open Google Sides”
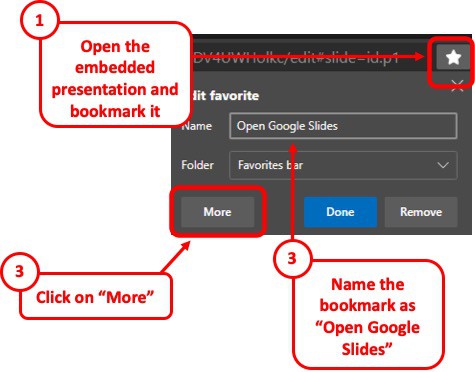
The first step is to create a bookmark named “Open Google Slides” on your preferred browser. Simply click the star mark on the right corner of your url box (for Google Chrome) and change the name of the bookmark to ‘Open Google Slides’.
Step-2: Paste the JavaScript code in the url section.
With a click on the “More” option, there will be a pop-up box for you to paste a url. Paste the following code into the url box.
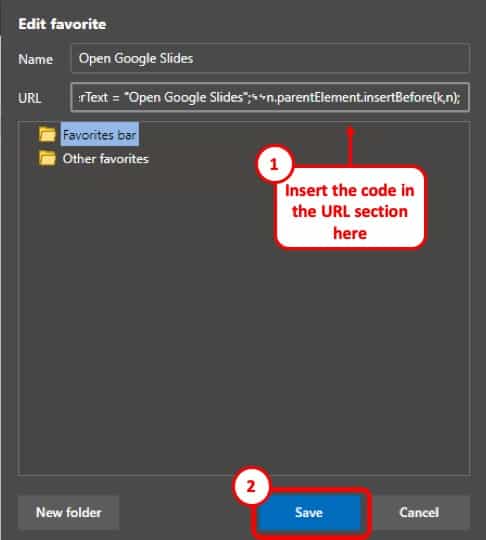
Copy and Paste the code mentioned below –
javascript:
var n = document.querySelectorAll(‘iframe[src*=docs\\.google]’)[0],
k = document.createElement(“a”);
k.setAttribute(“href”,n.getAttribute(“src”));
k.setAttribute(“target”,”_blank”);
k.setAttribute(“style”,”display:block”);
k.innerText = “Open Google Slides”;
n.parentElement.insertBefore(k,n);
Step-3: Make a similar bookmark with the name “Extract Slides”
Simillar to the last step, another bookmark make another bookmark, but name it ‘Extract Slides’ and instead of the previous code, paste the following code on the url box:

Copy and Paste the below-mentioned code –
javascript:
var atag = “punch-viewer-content”,
btag = “-caption”,
ctag = “aria-setsize”,
dtag = “aria-posinset”,
msvg = document.getElementsByTagName(“svg”),
node = document.querySelectorAll(‘[class$=”‘ + btag + ‘”]’)[0],
view = document.getElementsByClassName(atag)[0],
size = node.getAttribute(ctag),
data = “”,
func = () => {
data += msvg[0].outerHTML;
if((i = node.getAttribute(dtag))==size) document.write(data);
else view.click(), setTimeout(func,10)
};
func()
Step-4: Download the embedded file
Once the bookmarks are in place, simply go to the website with the embedded presentation and click on the “Open Google Slides” bookmark. It should open a link on top of the embedded presentation to be downloaded.
5. How to Download a Google Slides Presentation Published to the Web
When there is no direct link to downloading a google slides presentation in a website, it can be frustrating to find complex ways to download it. But I will show you a simple way of creating a direct download link. The process is described below.
Step-1: Scroll to the last character of the shared protected google slide presentation URL
There is a link in the URL box located at the upper part of your browser. The link should look something like the link below:
https://docs.google.com/presentation/d/FILE_ID/edit?usp=sharing
Step-2: Select the “edit?usp=sharing” part of the URL
In the link select the part of the URL that I intentionally made bold, to explain the process.
Step-3: Write “export/pptx” on the selected part
Your link should look something like this – https://docs.google.com/presentation/d/FILE_ID/export/pptx
Upon selecting the bold part of the URL, write “export/pptx” in its place. The URL should look like the link showcased above.
Step-4: Open the new link
The new link that you’ve created is a direct download link and so upon opening it, your presentation file should start downloading automatically.
More Related Topics
- How to Fix Almost Anything on Google Slides! [A Comprehensive Troubleshooting Guide]
- Do Presentation Clickers Work with Google Slides? [Interesting Read!]
- How to Curve Text in Google Slides? Always Use THIS Trick!
- How to Use the Eyedropper Tool in Google Slides? [Even When This Tool Doesn’t Exist!]
- 17 Pros and Cons of Google Slides! [Should You Even Use it?]
- How to Give a Presentation on Zoom? [Step-by-Step Guide!]
Credit to Benzoix for the Featured Image of this article.