![Remove Picture Background in PowerPoint! [Step-by-Step Guide]](https://artofpresentations.com/wp-content/uploads/2021/03/Featured-Image-How-to-Remove-Picture-Background.jpg)
Microsoft Powerpoint is one of the most widely used software around the world for creating presentations. Its user-friendly interface, versatile features, and useful tools are what make it unique and take it miles ahead of all of its competitors. One such unique feature in PowerPoint is the ability to remove picture background! But, knowing how to use this feature can be a bit tricky!
To remove the picture background in PowerPoint, first, select the image. Then, click on the “Format Picture” ribbon in the menu bar. Next, click on “Remove Background”. Finally, choose the areas to remove and keep on the image and click “Ok”.
While this will remove the image background of pretty much any image in PowerPoint, but you don’t always have to follow these detailed steps. In fact, if you have an image with a white background, I’m going to share with you a ninja trick that will make your life a lot easier!
So, let’s take a look at all the various options and the cool hacks!
How to Remove White Background from an Image in PowerPoint?
There are a few different ways to remove the background of an image using PowerPoint. The task becomes quite easy when it comes to backgrounds with a single solid color such as white, and can be accomplished with just a few clicks.
Here is a step by step guide to remove the white background from an image in PowerPoint:
Step-1: Insert and Select the Image
Insert the desired image on your PowerPoint. In order to do it, click on the ‘Insert’ tab, and from the multiple options that appear, click on ‘Pictures’. If you have the image on your device, click on ‘This device’, go to the folder containing the image, and double click to select it.
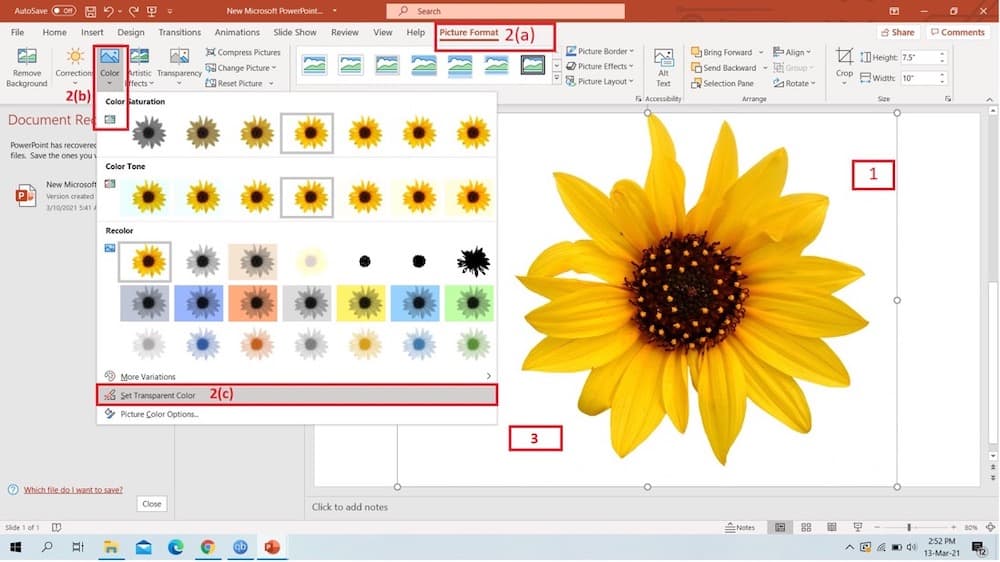
Step-2: Select “Set Transparent Color” option
Go to the ‘Picture Format’ tab and click on ‘Color’. From the dropdown menu, select ‘Set Transparent Color’.
Step-3: Click on the White Part of the Image
Click on the color you want to remove from the background and watch as the magic unfolds!
Following these three simple steps, you can remove not just white, but any solid background from an image using PowerPoint.
However, things get complicated when dealing with images with dynamic backgrounds. Most images don’t really have a single colored background and that’s okay, there are multiple ways of removing their background as well. One such way is to use certain online tools that do the job for you!
Remove Background from Image Online for FREE
If you do a quick google search on online image background-removing tools, most of the results will lead to one of the two outcomes: either the tool disappoints you by failing to properly remove the background or they ask for money.
There are a few free tools too, and I’ve used most of them. So, in this section, I’m going to recommend two online tools that are not only remarkable in removing image background but are also absolutely free to use.
With a few clicks, you can remove the background of your image and download it in decent quality!
Tool 1 – Remove.bg
Remove.bg is one of the best online background removing tools out there. Its high accuracy and pinpoint precision is what makes it so good, and what’s even better is that it’s completely free of charge.
Using remove.bg, you can not only remove the background from images with people, but also from images with products, animals, cars, and different types of graphics including logos.
Apart from removing the background, you can also add a background of your own choice, or choose one of the many preset options they have for you, including solid colors. After your done removing and editing the background, you can download the picture with a single click!
Along with the online version, you can also download remove.bg in your Windows/Mac/Linux for offline use. You can also add it to Adobe Photoshop as an extension.
Remove.bg works great when the main character in the photo is easily distinguishable from the background. In such scenarios, it is just the perfect tool for you.
However, sometimes Remove.bg may not be the best option. If the main character in the photo is similar in color to the background, or perhaps has spread-out hair, this tool can sometimes fail to do the job.
This is where the second tool that I am recommending comes in handy!
Tool 2 – Slazzer.com
Another highly effective online image background removing tool is slazzer.com, equipped with powerful A.I and capable of detecting and removing backgrounds within no time. Along with images of people, slazzer.com also works great with images having graphics, cars, products, and animals.
It not only has this powerful AI that gets the job done for you, if there is a mismatch, you can also choose to edit the photo further and fix the issues.
If you’re a noob at photo editing and looking for a quick online tool to remove or edit image backgrounds, then slazzer.com can be a great option for you.
Slazzer is also available for you to download on your desktop and mobile for offline use. You can also use its plugin on Shopify, WooCommerce, Figma and Adobe Photoshop.
How to Use the Online Tools to Remove Background for FREE
Below you will find a step by step guide on how to use these online image background tools for free:
Step-1: Open your web browser and go to ‘www.remove.bg’ or ‘www.slazzer.com’. It is ideal to use either Google Chrome or Mozilla Firefox.
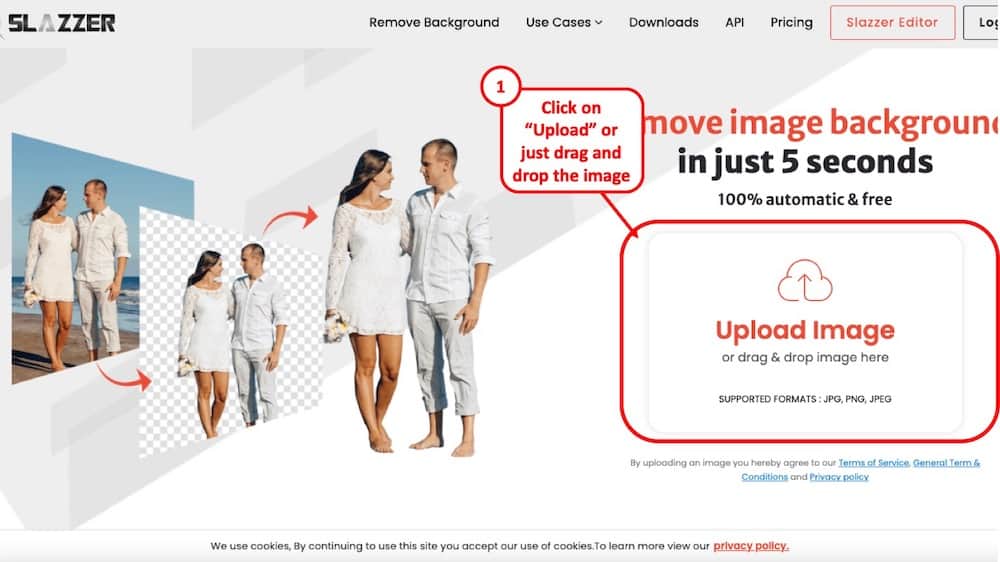
Step-2: Once the webpage loads, click on ‘Upload Image’. This will open a file explorer window. You can also drag and drop a file or paste an image URL.
Step-3: In the file explorer window, go to the folder where you’ve kept the picture whose background you want to remove. (For example Local Disk (F)/New Folder)
Step-4: From the folder, select the image in question and click on ‘Open’. Wait for the image to be uploaded
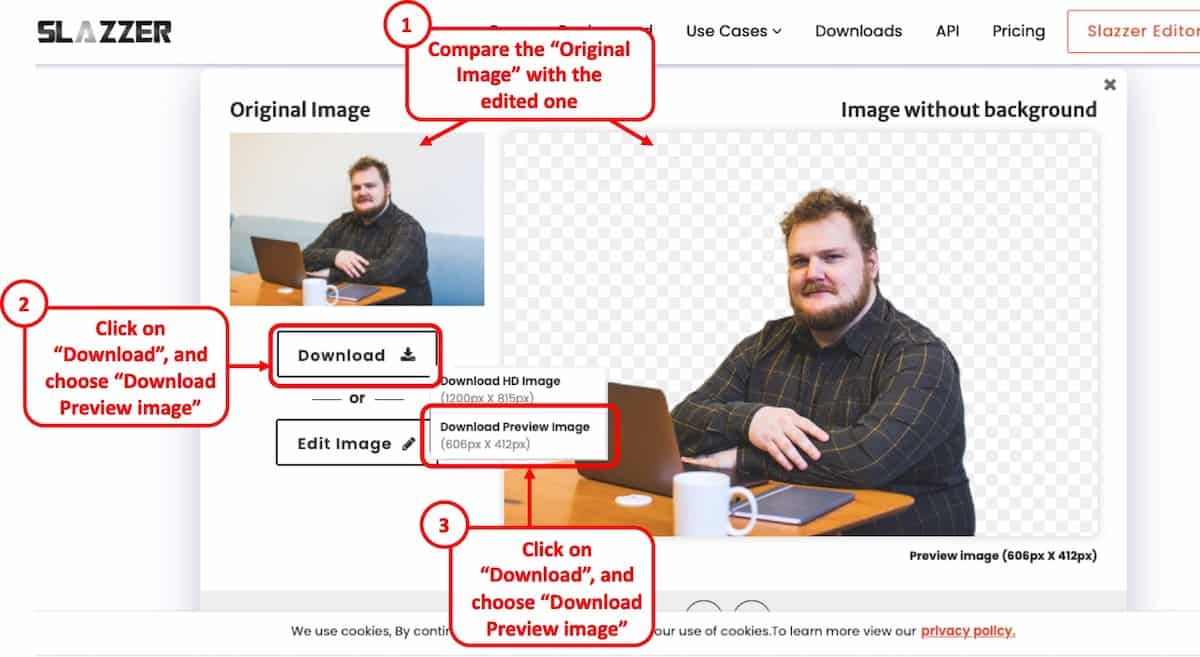
Step-5: You will be shown a preview of how the picture looks without the background. Click on ‘Download’ to download the background removed image.
Hence, using online tools like remove.bg or slazzer.com, you can easily remove the background from an image, very effectively. But can you do the same using Microsoft Powerpoint? Below, I’ll discuss how:
How to Remove Any Background from Image in PowerPoint?
To remove any background from any image using PowerPoint, simply follow the step below:
Step-1:
Insert the desired image on your PowerPoint. In order to do it, click on the ‘Insert’ tab, and from the multiple options that appear, click on ‘Pictures’. If you have the image on your device, click on ‘This device’, go to the folder containing the image, and double click to select it.
Step-2: Navigate to the ‘Picture Format’ tab.
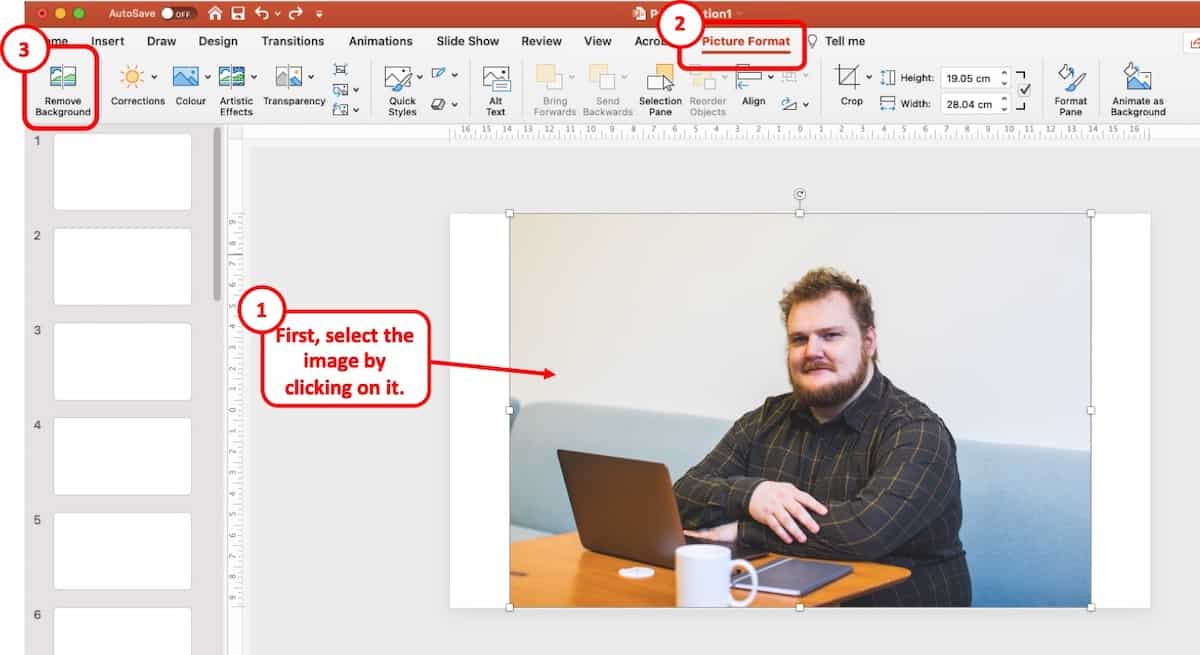
Step-3: Click on ‘remove background’. Most of the time, PowerPoint is able to accurately identify the background and remove it. However, sometimes it fails to do so. In such cases, you’ll have to do it manually. (description is given below)
Step-4: Select ‘Keep changes’ to execute the changes.
If PowerPoint is not able to accurately identify the background, then you will have to adjust the areas to remove or keep.
How to adjust image background removal settings:
In cases where Microsoft Powerpoint fails to properly remove image background, you can either:
Mark Areas to Keep:
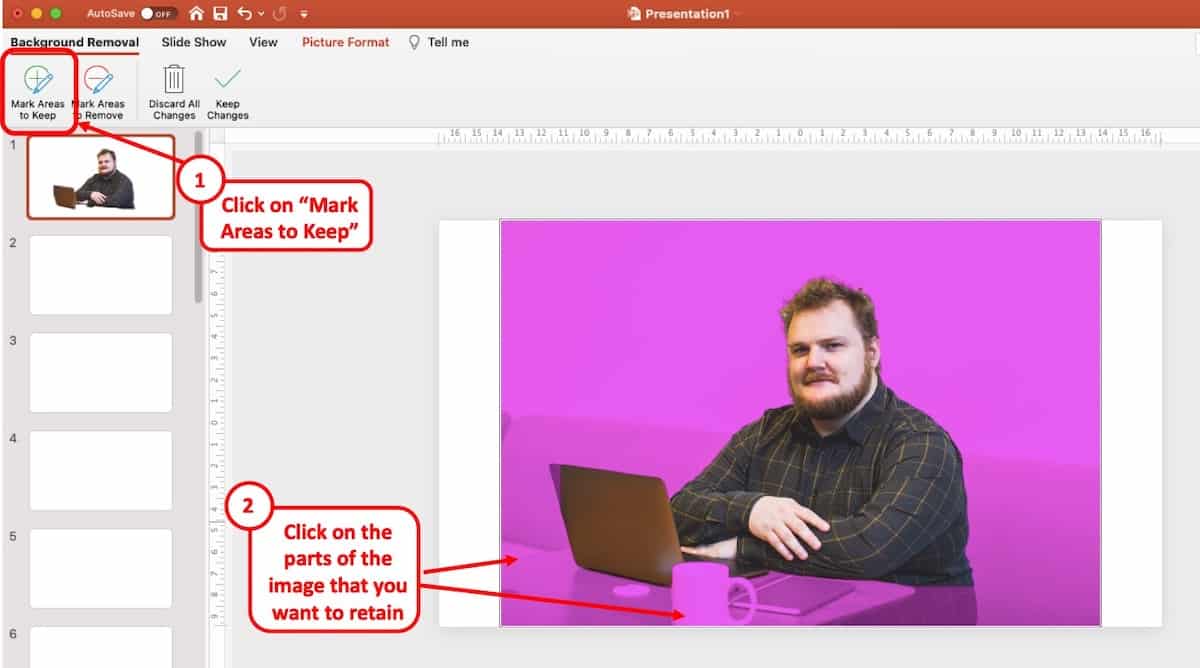
Step-1: Click on ‘Mark Areas to Keep’. This will turn your mouse cursor into a red marker.
Step-2: Using the green marker, click and draw over the parts of the image you want to keep
Step-3: Select ‘Keep changes’ to execute the changes.
Similarly, if PowerPoint has retained parts of the images that you want to remove. You can easily click on “Mark Areas to Remove”.
Mark Areas to Remove:
Step-1: Click on ‘Mark Areas to Remove’. This will turn your mouse cursor into a green marker.
Step-2: Using the red marker, click and draw over the parts of the image you want to remove.
Step-3: Select ‘Keep changes’ to execute the changes.