![Insert Excel File into PowerPoint? [Here’s How to Do It!]](https://artofpresentations.com/wp-content/uploads/2023/01/ezgif.com-gif-maker-5.webp)
There may be a time when you have data in an Excel file which you want to represent in your PowerPoint presentation. It is also good to make it dynamic so that when the data changes in the Excel file the same changes in the PowerPoint as well.
But, how do you insert data from excel in PowerPoint?
To embed an “Excel” file in PowerPoint, click on the “Insert” tab, and click on the “Objects” option in the “Text” group. Then, click on “Select from File” in the dialog box, and click on the “Browse” button. Select the excel file, and click “OK”. Enable the “Link” option and click “OK”.
In this article, I’m not only going to show you how to insert data from Excel into PowerPoint, but also show you the steps to embed an Excel sheet directly in your PowerPoint, either in part or full. Then, we shall also understand how to insert a chart from Excel into PowerPoint.
So, let’s get started!
1. How to Insert an Excel Worksheet into PowerPoint?
To insert an Excel worksheet into Microsoft PowerPoint, you can simply paste the Excel data in the presentation slide. All you have to do is follow the 3 quick steps.
Step-1: Copy the Excel Data
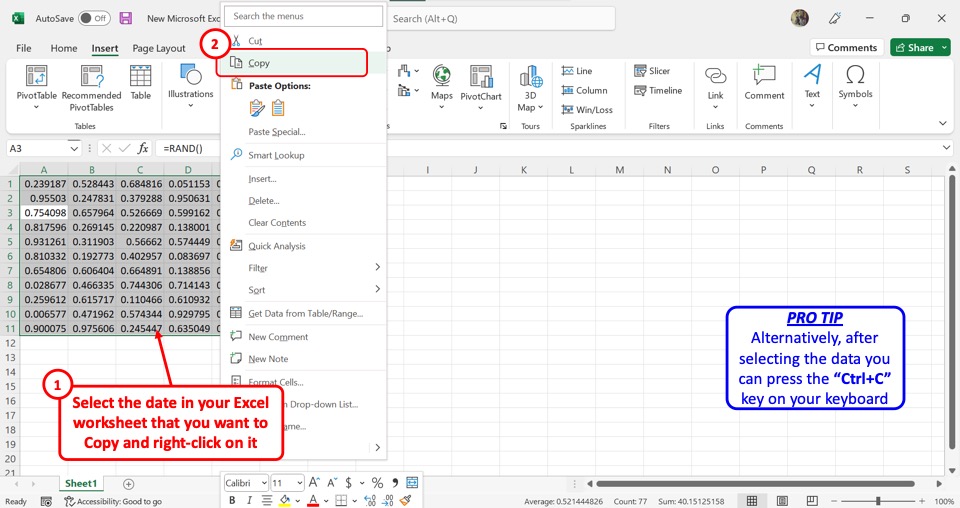
To copy Excel data, you have to first open the Excel worksheet. In the worksheet, select the cells you want to incorporate in Excel. “Right Click” on the Excel data and select the “Copy” option from the right-click menu. Alternatively, you can press the “Ctrl+C” keys on your keyboard to copy the data.
Step-2: Click on the “Copy” option
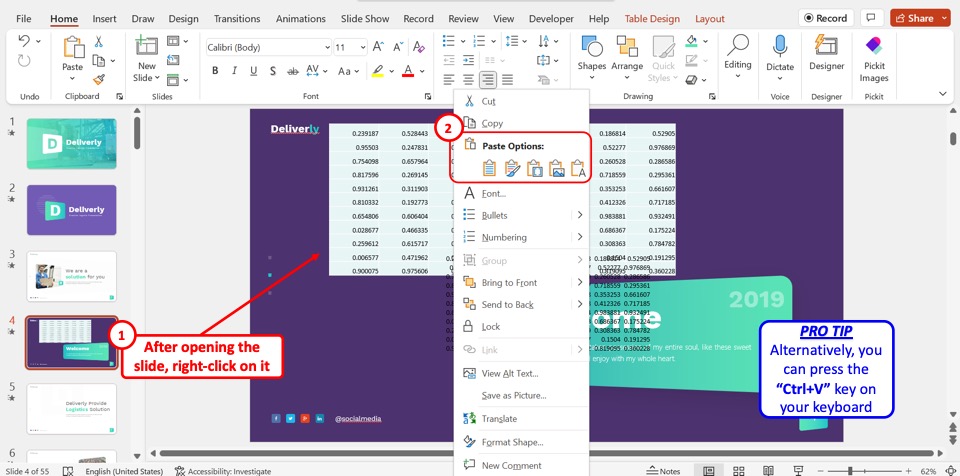
The next step is to open the PowerPoint slide where you want to insert the Excel data. “Right Click” anywhere on the slide and click on the “Paste” option in the right-click menu. Alternatively, you can press the “Ctrl+V” keys on your keyboard to paste the copied data.
Step-3: Click on the “Table Design” tab
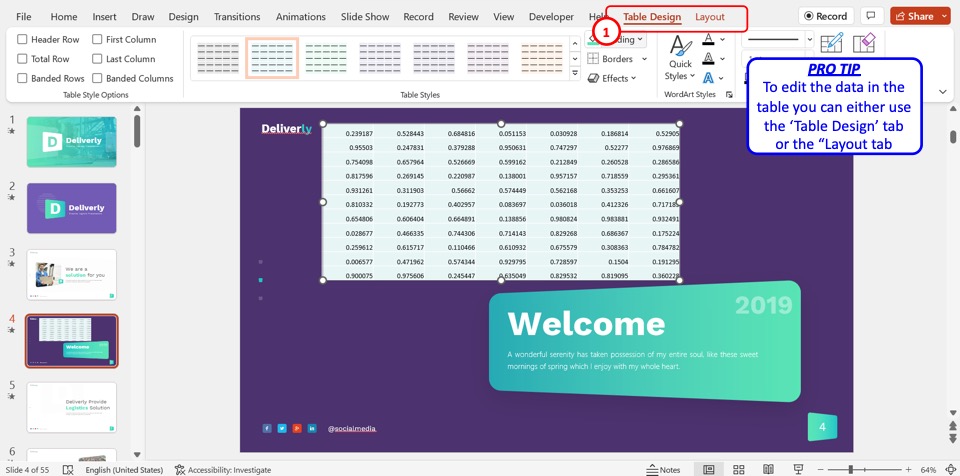
Finally, you can edit the Excel data inserted as a table in Microsoft PowerPoint. To do so, click on the “Table Design” tab in the menu bar located at the top of the screen. You can also click on the “Layout” tab by the “Table Design” tab for more editing features.
1.1 How to Embed an Excel Worksheet in PowerPoint?
By embedding an Excel worksheet in PowerPoint, you can automatically update the worksheet in a slide when editing data in Microsoft Excel. To embed an Excel worksheet, follow the 6 simple steps.
Step-1: Click on the “Insert” tab

The first step is to open the “Insert” menu. In the menu bar at the top of the screen, click on the “Insert” tab.
Step-2: Click on the “Object” button

In the “Text” group of the “Insert” menu, click on the “Object” button. The “Object” icon is at the bottom of the right column in the “Text” group. This will open the “Insert Object” dialog box.
Step-3: Click on the “Create from file” option
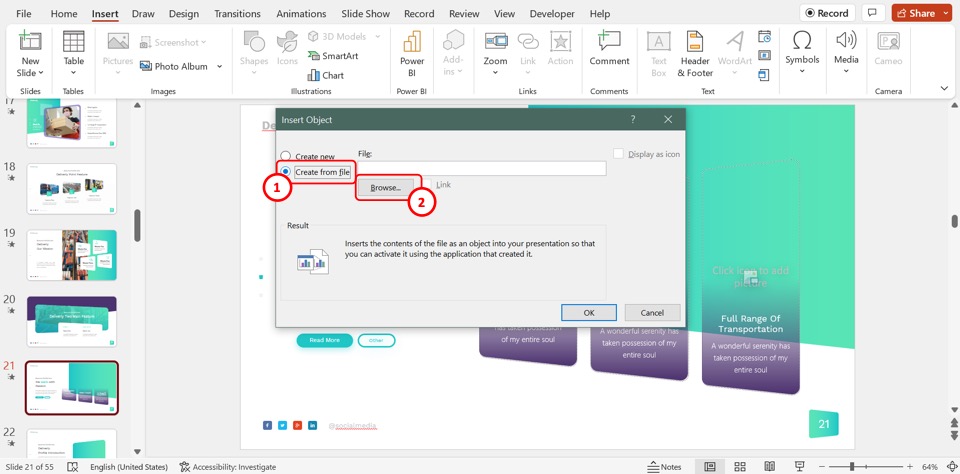
In the left column of the “Insert Object” dialog box, click on the “Create from file” option. Then click on the “Browse” button in the middle of the dialog box. It will open the file browser window.
Step-4: Select the Excel file

In the file explorer pop-up window, select the Excel file that you want to embed into the PowerPoint slide. Then click on the “OK” button at the bottom of the window to add the Excel file.
Step-5: Click on the “Link” option
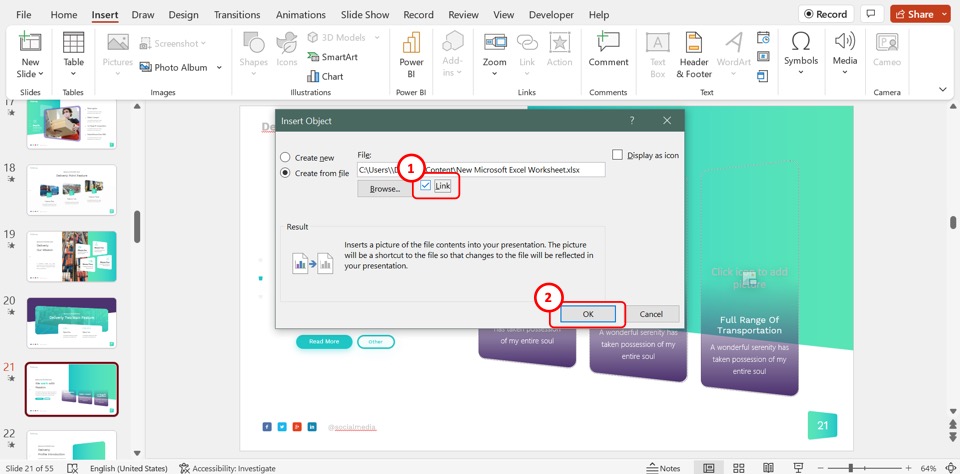
In the “Insert Object” dialog box, click on the “Link” option by the “Browse” button to embed the inserted Excel worksheet. A checkmark will appear indicating the link has been added.
Step-6: Click on the “OK” button
Now all you have to do is click on the “OK” button at the bottom of the “Insert Object” dialog box to embed the Excel worksheet into the PowerPoint slide (as shown in the image above).
1.2 How to Embed a Section of Excel Data in PowerPoint?
The “Paste Special” feature in PowerPoint allows you to embed a section of an Excel worksheet into a slide. To do so, follow the 4 simple steps.
Step 1: Copy the section of Excel worksheet
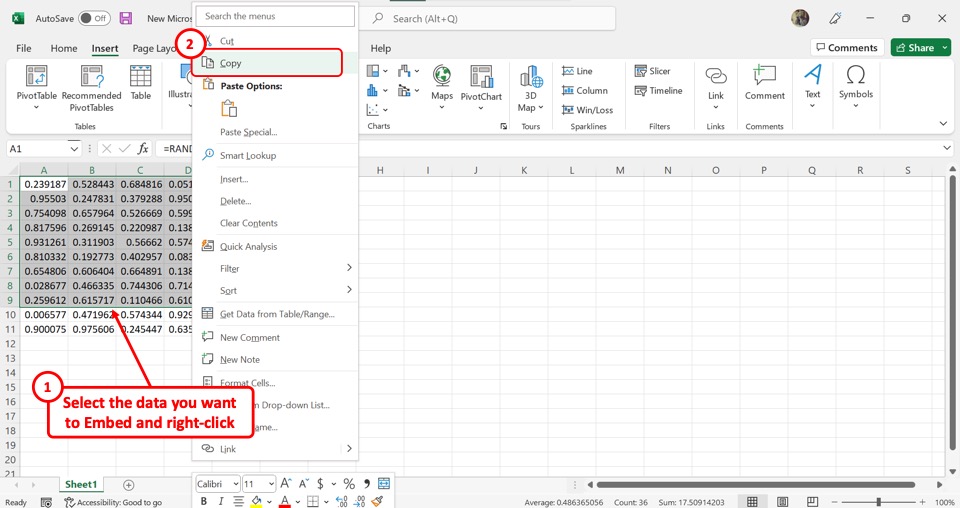
The first step is to copy the section of the Excel worksheet that you want to embed into PowerPoint. In the Excel file, select the section and “Right Click” on it. Click on the “Copy” option in the right-click menu to copy the section.
Step-2: Click on the “Paste Special” option

The next step is to open the PowerPoint slide. In the “Clipboard” group of the “Home” menu, click on the “Paste”button. Then click on the “Paste Special” option in the dropdown menu under the “Paste” option.
Step-3: Click on the “Microsoft Excel Worksheet Object” option
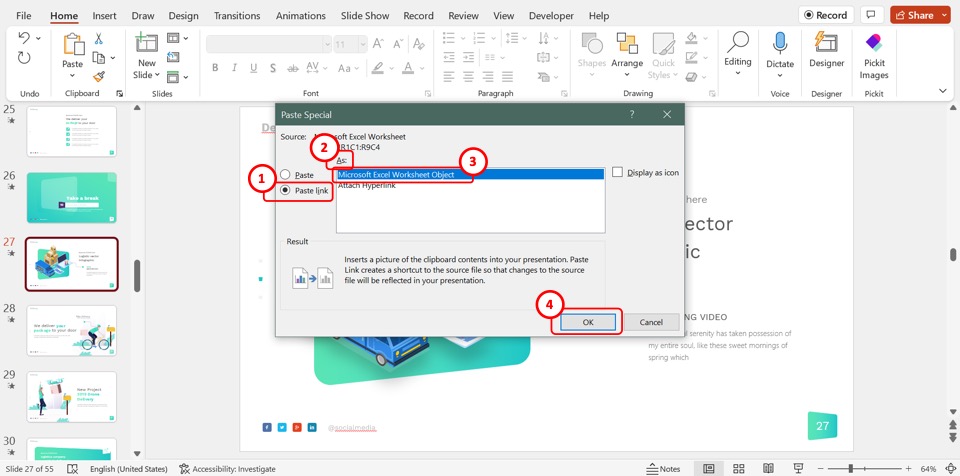
In the “Paste Special” dialog box, click on the “Paste link” option from the left column. Then click on the “Microsoft Excel Worksheet Object” option in the “As” box.
Step-4: Click on the “OK” button
Now all you have to do is click on the “OK” button at the bottom of the “Paste Special” dialog box to embed the copied section of the Excel worksheet into the slide (as shown in the above image).
2. How to Insert an Excel Chart into PowerPoint?
In Microsoft PowerPoint, you can insert an editable chart from Excel. All you have to do is follow the 2 easy steps.
Step 1: Click on the “Copy” option
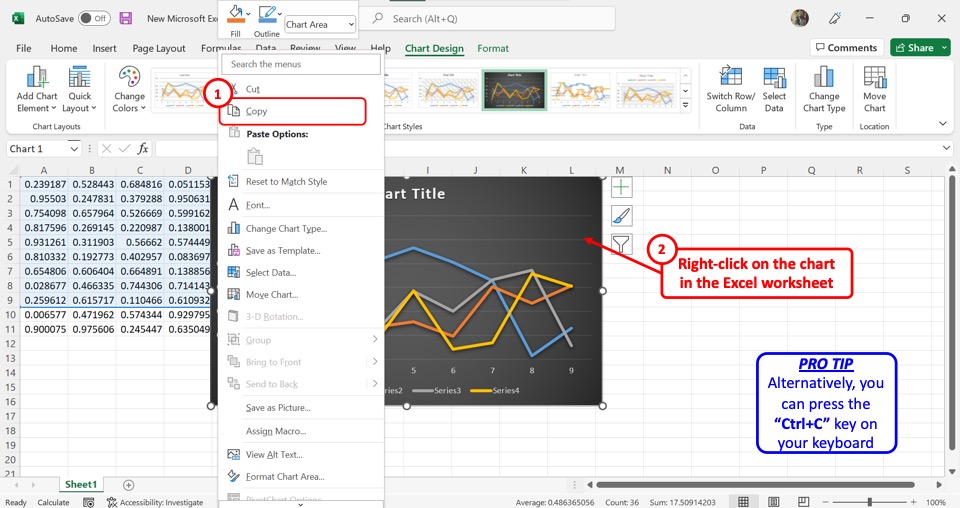
In the Microsoft Excel file, “Right Click” on the chart that you want to insert into PowerPoint. Then click on the “Copy”option from the right-click menu. You can alternatively press the “Ctrl+C” keys on your keyboard to copy the chart.
Step-2: Click on the “Keep Source Formatting & Embed Workbook” option

The next step is to open the PowerPoint slide where you want to insert the Excel chart. “Right Click” on the slide. Click on the “Keep Source Formatting & Embed Workbook” option under the “Paste Options” section in the right-click menu to paste the editable Excel chart.
3. How to Insert an Excel File as an Icon into PowerPoint?
To insert an Excel file into Microsoft PowerPoint as an icon, you can use the “Insert Object” feature. Follow the 7 quick steps.
Step-1: Click on the “Insert” tab
In the menu ribbon located at the top of the screen, click on the “Insert” tab to open the “Insert” menu.
Step-2: Click on the “Object” option
At the bottom of the right column in the “Text” group of the “Insert” menu, click on the “Object” option. This will open the “Insert Object” dialog box.
Step-3: Click on the “Browse” button
In the “Insert Object” dialog box, click on the “Create from File” option. Then click on the “Browse” button to open the “Browse” pop-up window.
Step-4: Click on the “OK” button
In the “Browse” window, select the Excel file that you want to insert. Then click on the “OK” button at the bottom of the window.
Step-5: Click on the “Display as Icon” option
Now you can click on the “Display as Icon” box on the right side of the “Insert Object” dialog box to add the Excel file as an icon.
Step-6: Click on the “Change Icon” button
If you want to change the icon for the Excel worksheet, click on the “Change Icon” button. This will open the “Change Icon” dialog box where you can select an icon to add to the presentation slide.
Step-7: Click on the “OK” button
Finally, click on the “OK” button at the bottom of the “Insert Object” dialog box to insert the Excel file as an icon.
Credit to cookie_studio (on Freepik) for the featured image of this article (further edited).