![Insert Confetti Animation in PowerPoint [EASY Tutorial]](https://artofpresentations.com/wp-content/uploads/2023/01/featured-image.webp)
Every once in a while, we want to make our PowerPoint presentation “Jazzy”; especially for some special occasions! Using confetti, albeit virtually through PowerPoint, is a great idea. However, figuring out how to do the confetti animation in PowerPoint is a bit of a task!
Unfortunately, there is no direct way to insert a confetti like effect in PowerPoint. Thus, you will have to create this effect manually.
But don’t worry, in this article, I’ll show you the complete process in the step-by-step manner so you can replicate this process for yourself! Just make sure to follow the exact steps!
1. How to Insert Confetti Animation in PowerPoint?
In Microsoft PowerPoint, there is no feature that allows you to add confetti to a presentation slide. However, you can draw confetti and add animation effects. To insert confetti animation, follow the 31 simple steps.
Step-1: Click on the “Insert” tab
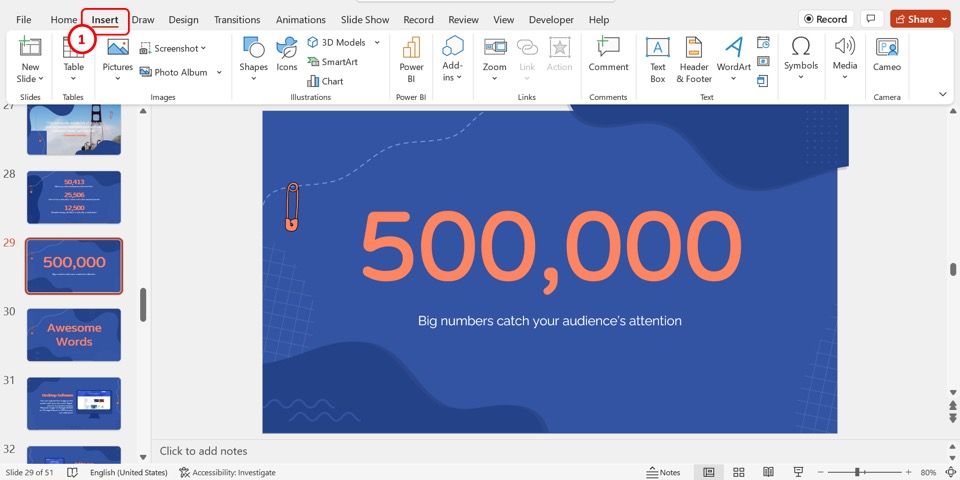
The first step is to draw the confetti. To do so, you have to open the “Insert” menu. Click on the “Insert” tab in the menu ribbon located at the top of the screen.
Step-2: Click on the “Shapes” option
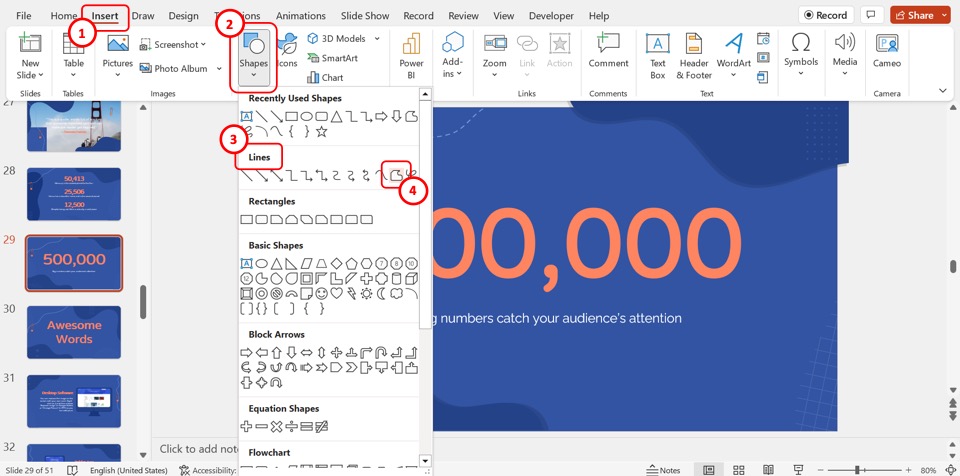
In the “Illustrations” group of the “Insert” menu, click on the “Shapes” option. Then select the “Freeform: Shape”option from the “Lines” section in the dropdown menu under the “Shapes” option.
Step-3: Draw the freeform shape

Now you can draw the confetti. All you have to do is click and drag the cursor on the screen to draw the confetti. Then “Double Click” to finish the drawing process.
Step-4: Click on the “Shape Fill” option
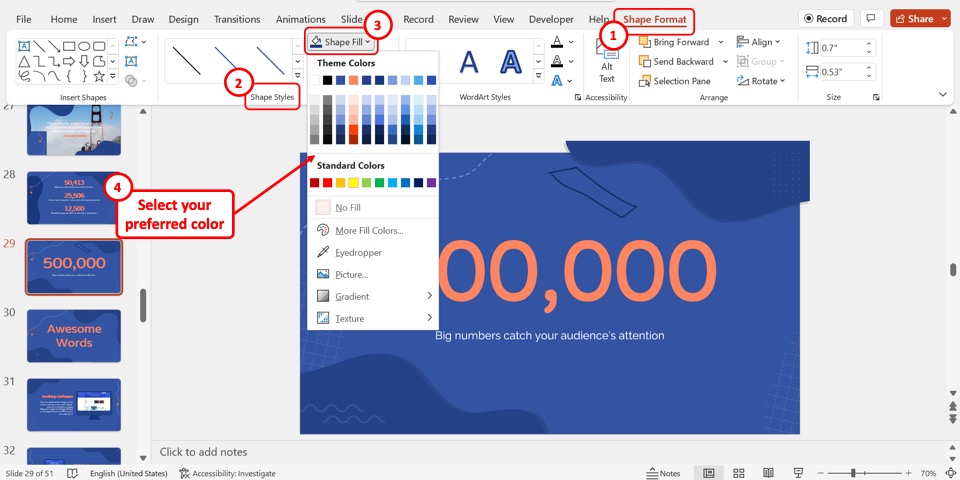
In the “Shape Styles” section of the “Shape Format” menu, click on the “Shape Fill” option. Then select your preferred confetti color from the dropdown menu under the “Shape Fill” option.
Step-5: Click on the “No Outline” option
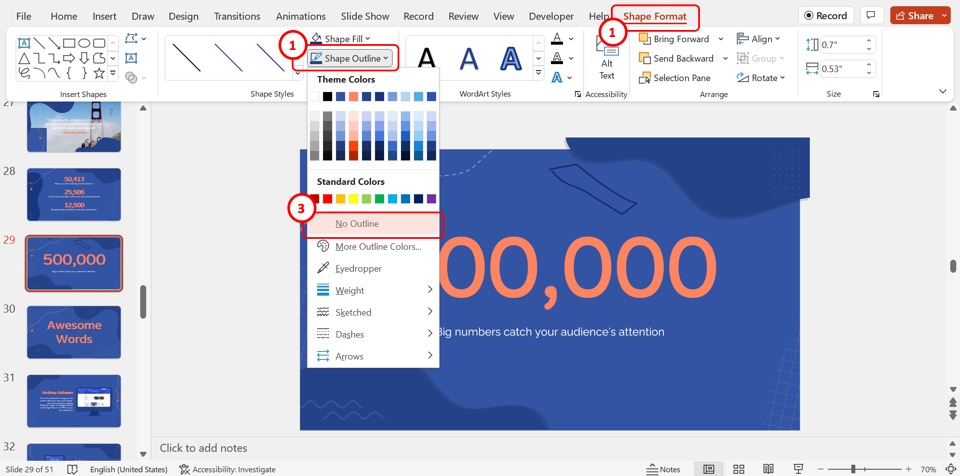
The next step is to click on the “Shape Outline” option located under the “Shape Fill” option. In the dropdown menu under the “Shape Outline” option, click on the “No Outline” option.
Step-6: Click on the “Animations” tab
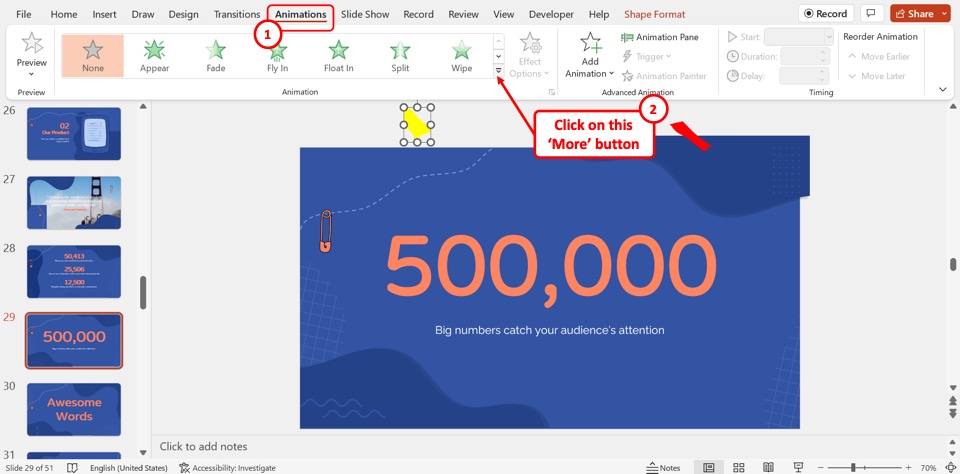
In the menu ribbon, click on the “Animations” tab. In the “Animations” menu, click on the “More” option which is the downward arrow in the “Animations” gallery to expand the gallery.
Step-7: Click on the “Spin” option
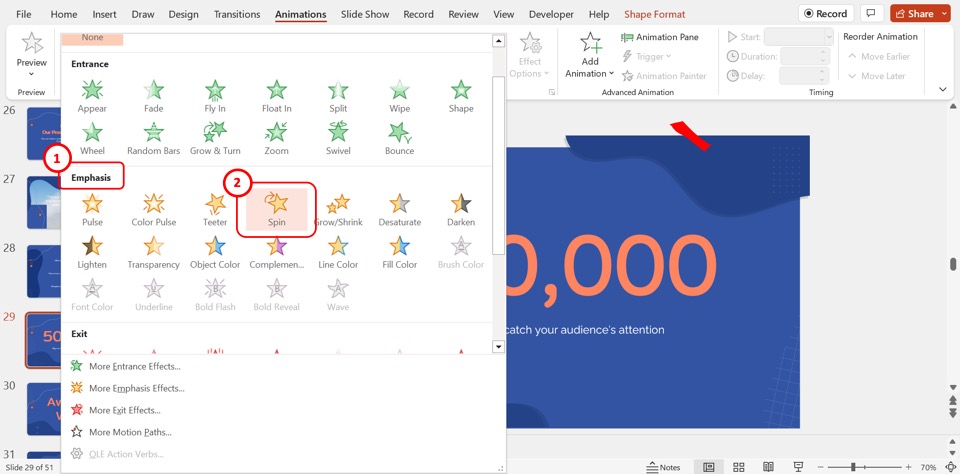
In the expanded “Animations” gallery, click on the “Spin” option under the “Emphasis” section.
Step-8: Click on the “Animation Pane” option
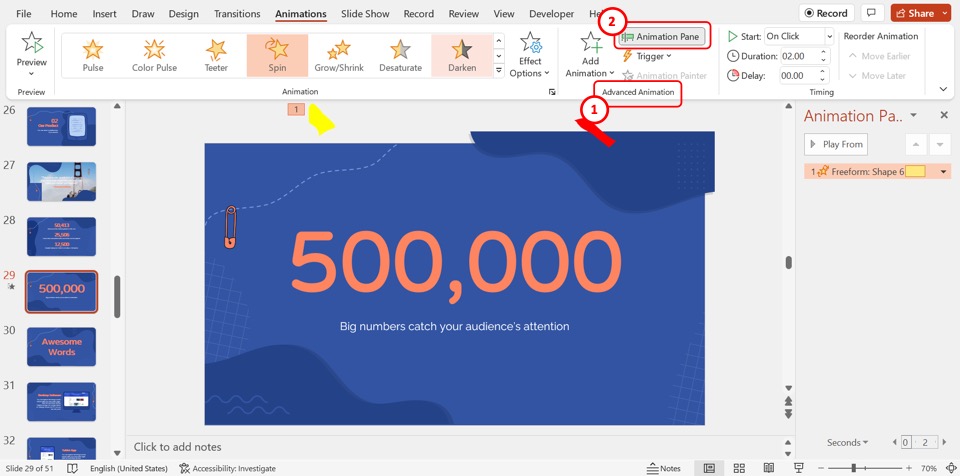
The next step is to click on the “Animation Pane” option in the “Advanced Animation” group of the “Animations”menu. This will open the “Animations Pane” sidebar on the right side of the screen.
Step-9: Click on the “Start With Previous” option
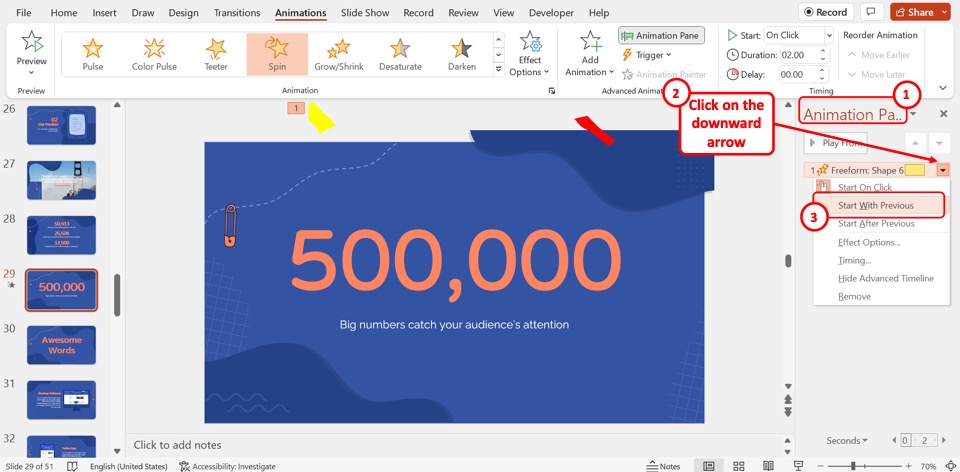
In the “Animation Pane” sidebar, click on the down arrow by the “0 Freeform Shape” option. Then click on the “Start With Previous” option in the dropdown menu.
Step-10: Click on the “Timing” option
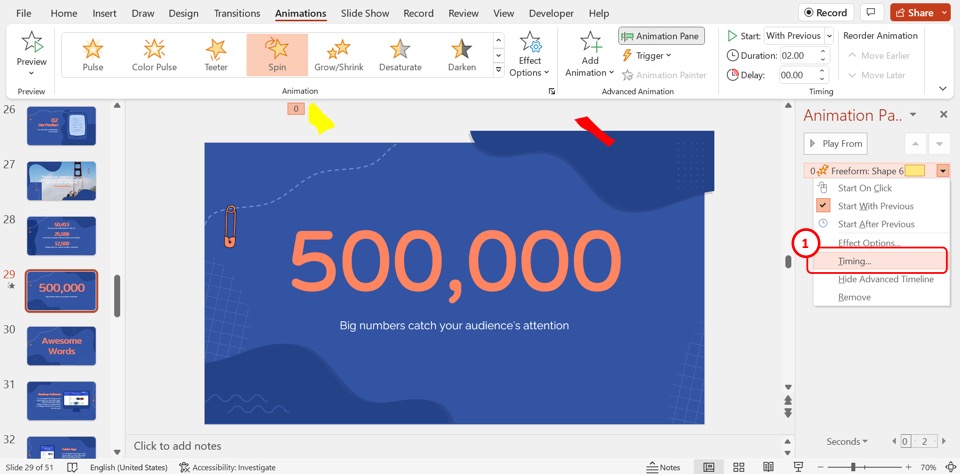
In the same dropdown menu, you have to now click on the “Timing” option. This will open the “Spin” dialog box.
Step-11: Click on the “Repeat” option
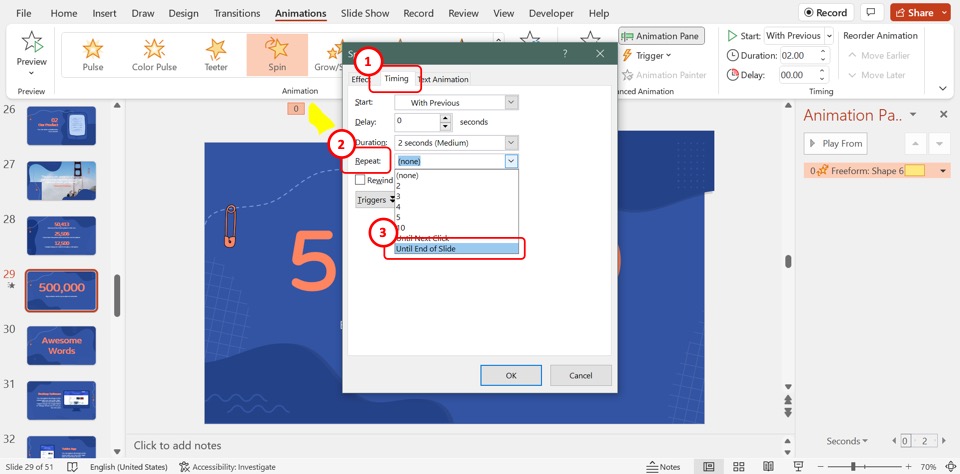
In the “Timing” tab of the “Spin” dialog box, click on the “Repeat” option. Then click on the “Until End of Slide”option in the dropdown list.
Step-12: Click on the “Add Animation” option
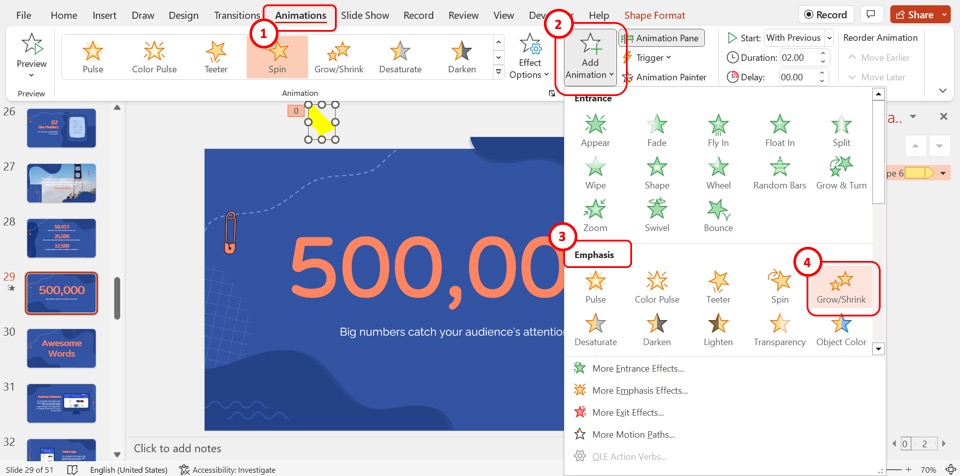
The next step is to add a second animation effect to the same freeform shape. Click on the “Add Animation” option in the “Animations” menu. In the “Emphasis” section of the dropdown menu, click on the “Grow/Shrink” option.
Step-13: Click on “Effect Options”
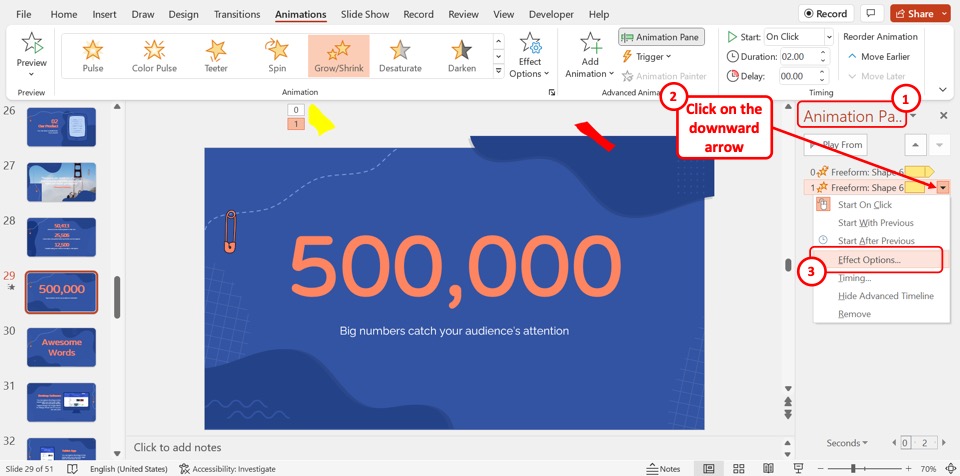
In the “Animations Pane” sidebar, click on the down arrow by the “1 Freeform Shape” option. Then click on the “Effect Options” option from the dropdown menu to open the “Grow/Shrink” dialog box.
Step-14: Click on the “Horizontal” option
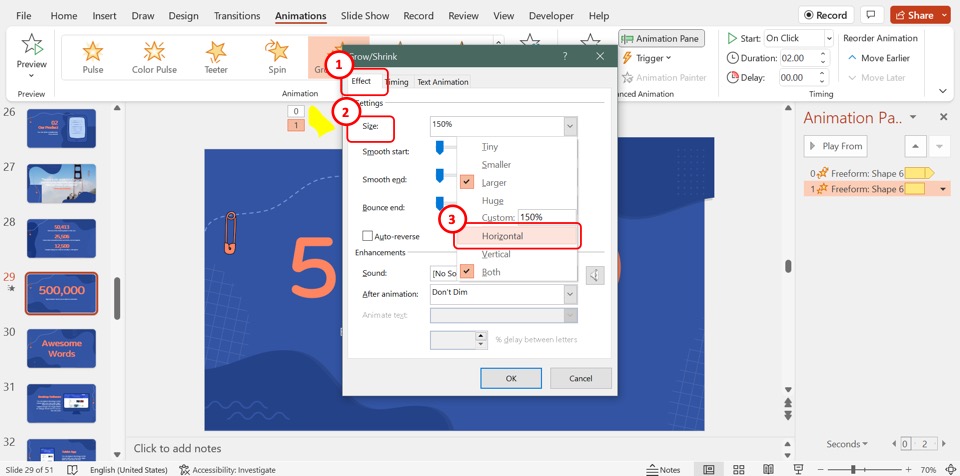
In the “Effect” tab of the “Grow/Shrink” dialog box, click on the “Size” option. Then click on the “Horizontal” option in the dropdown list.
Step-15: Click on the “Auto-Reverse” option
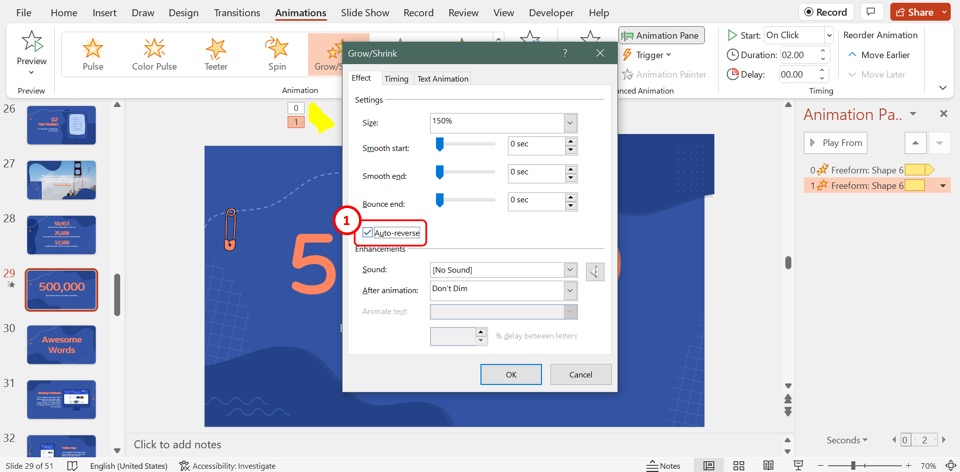
The next step is to click on the “Auto-reverse” option in the “Effect” tab of the “Grow/Shrink” dialog box.
Step-16: Click on the “With Previous” option
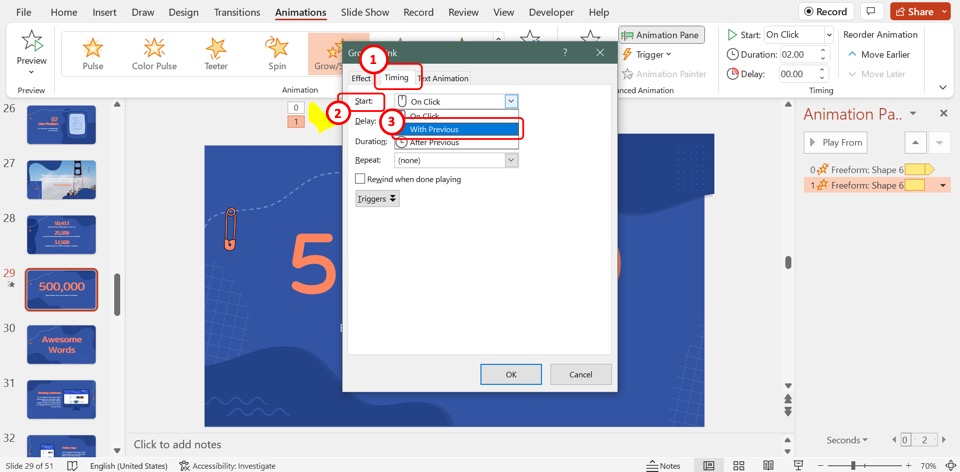
In the “Grow/Shrink” dialog box, click on the “Timing” tab. Then click on the “Start” option. In the dropdown list, select the “With Previous” option.
Step-17: Click on the “Repeat” option
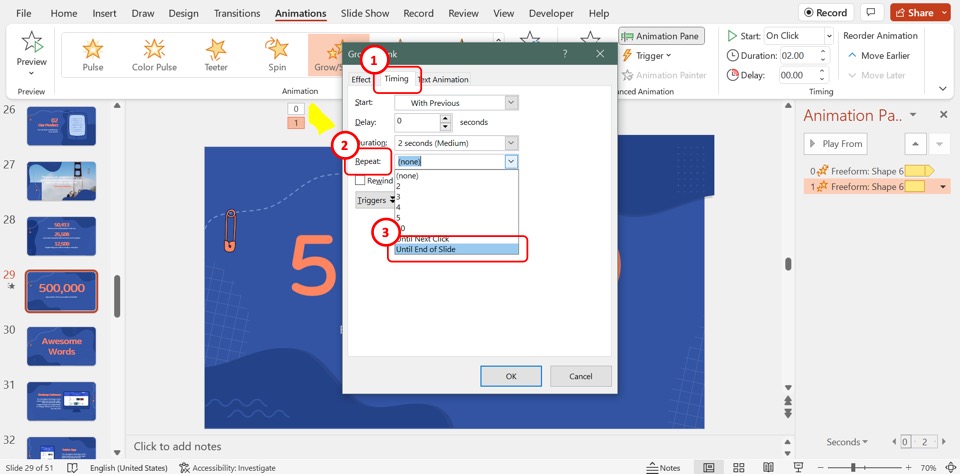
In the “Timing” tab of the “Grow/Shrink” dialog box, click on the “Repeat” option. In the dropdown list under the “Repeat” option, click on the “Until End of Slide” option.
Step-18: Click on the “OK” button
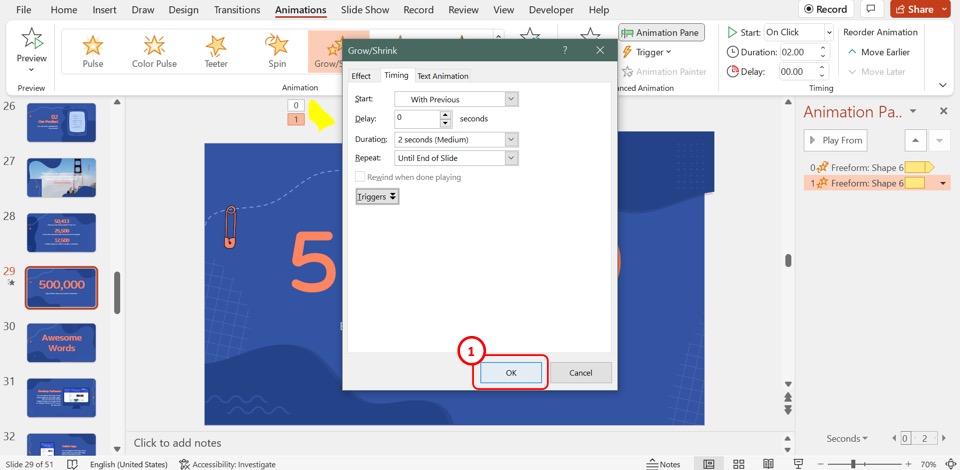
The next step is to close the “Grow/Shrink” dialog box. All you have to do is click on the “OK” button at the bottom of the dialog box.
Step-19: Click on the “Custom Path” option
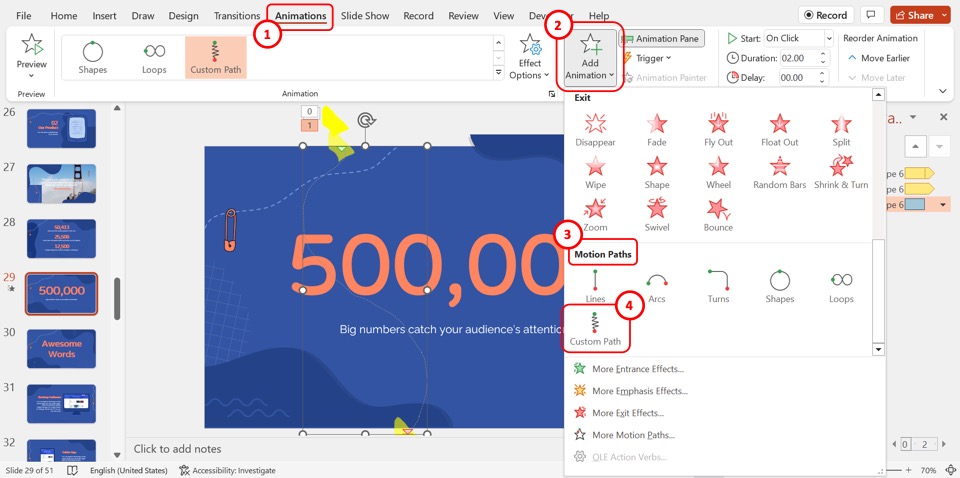
In the “Animations” menu, click on the “Add Animations” option. Scroll to the bottom of the dropdown menu under the “Add Animations” option. Then click on the “Custom Path” option in the “Motion Paths” section.
Step-20: Draw the motion path
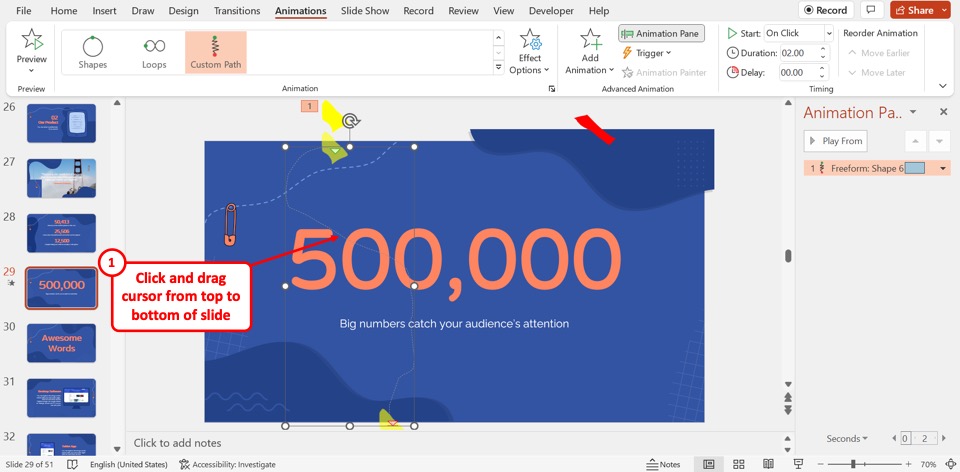
Now all you have to do is draw the path where the confetti will fall. Click and drag the cursor in a curved line from the top to the bottom of the slide.
Step-21: Click on “Effect Options”
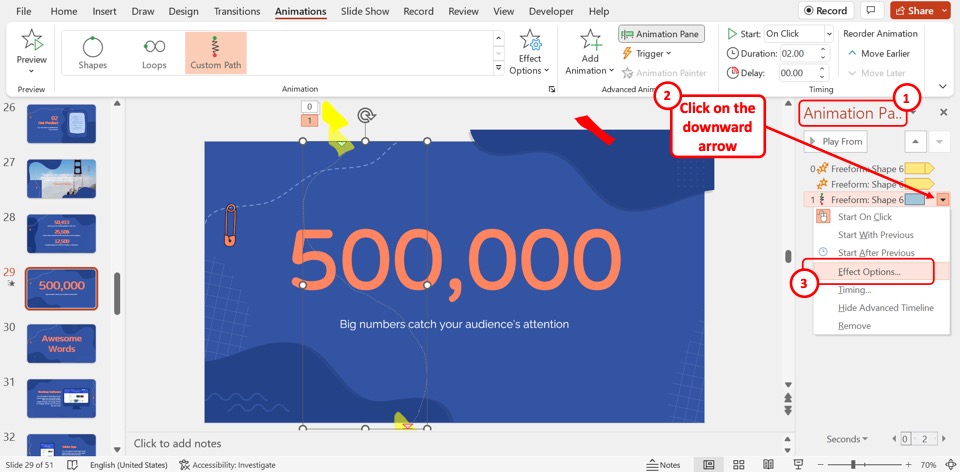
In the “Animation Pane” sidebar on the right side of the screen, click on the down arrow by the “1 Freeform Shape”which is the third option in the sidebar. Click on the “Effect Options” option in the dropdown menu.
Step-22: Click on the “Smooth start” option
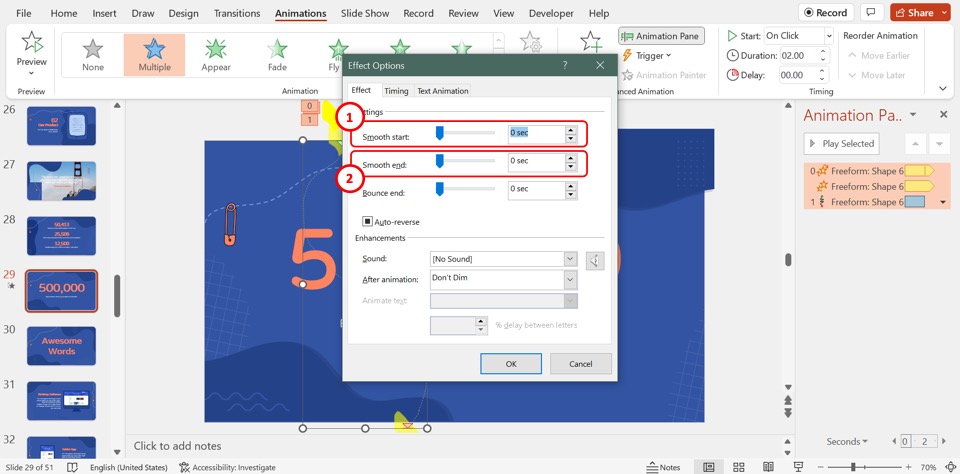
In the “Effect” tab of the “Effect Options” dialog box, click on the “Smooth start” slider and drag it to the left to set it to “0 sec”. Similarly, drag the “Smooth end” slider to set it to “0 sec”.
Step-23: Click on the “Start” option
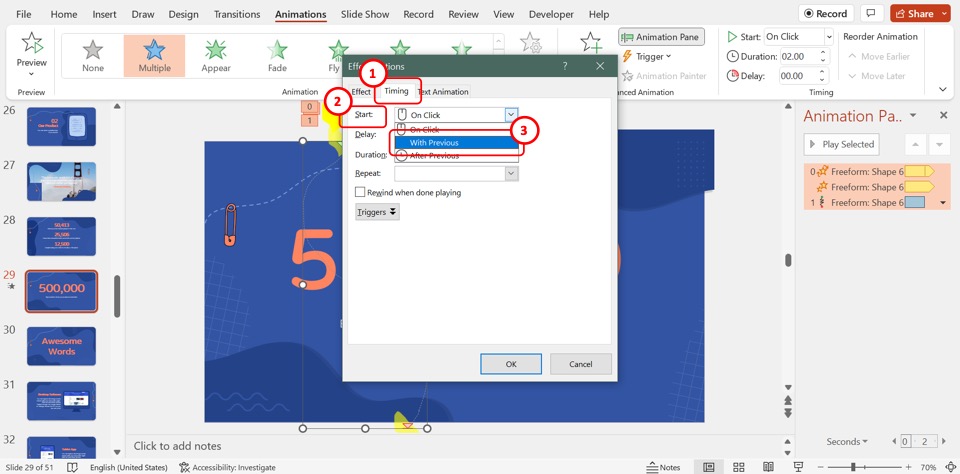
Click on the “Timing” tab in the “Effect Options” dialog box. Then click on the “Start” box. In the dropdown list under the “Start” box, click on the “With Previous” option.
Step-24: Click on the “Duration” option
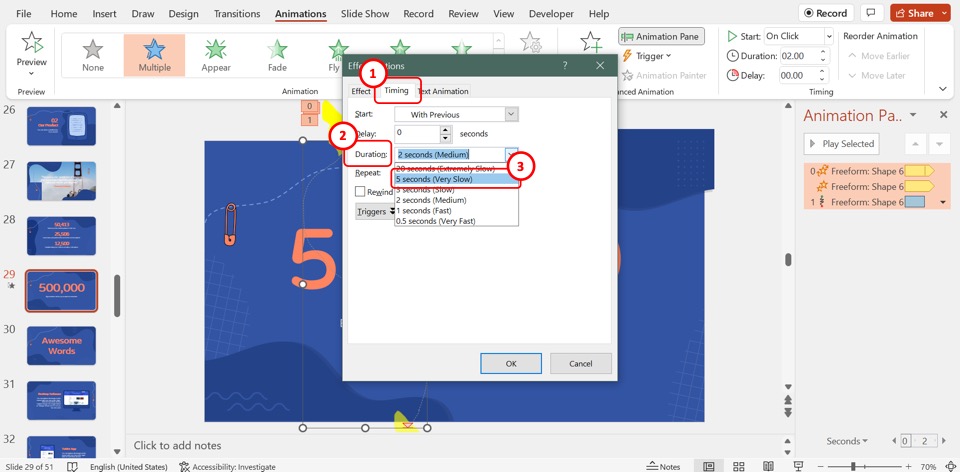
Now you have to click on the “Duration” box in the “Effect Options” dialog box. In the dropdown list under the “Duration” box, click on the “5 seconds (Very Slow)” option.
Step-25: Click on the “Until End of Slide” option
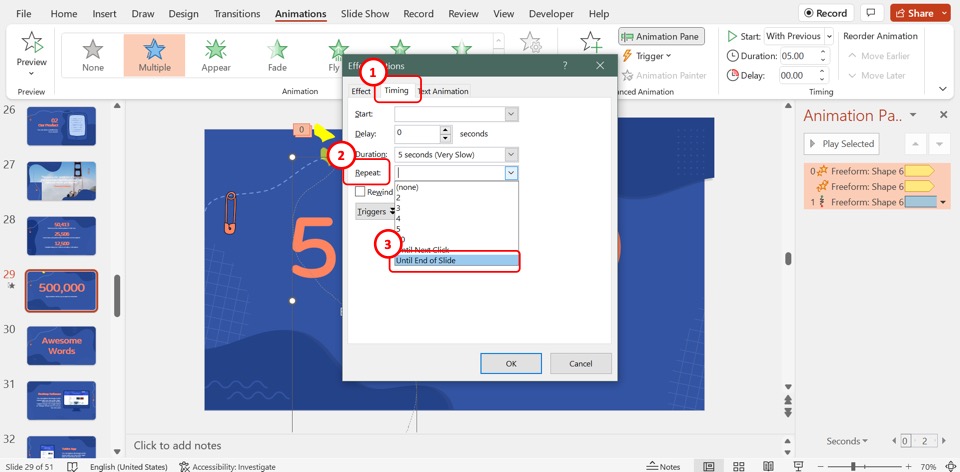
In the “Timing” tab, click on the “Repeat” option. Then click on the “Until End of Slide” option in the dropdown list under the “Repeat” box.
Step-26: Click on the “OK” option

Now all you have to do is click on the “OK” button at the bottom of the “Effect Options” dialog box to close it.
Step-27: Click on the “Copy” option
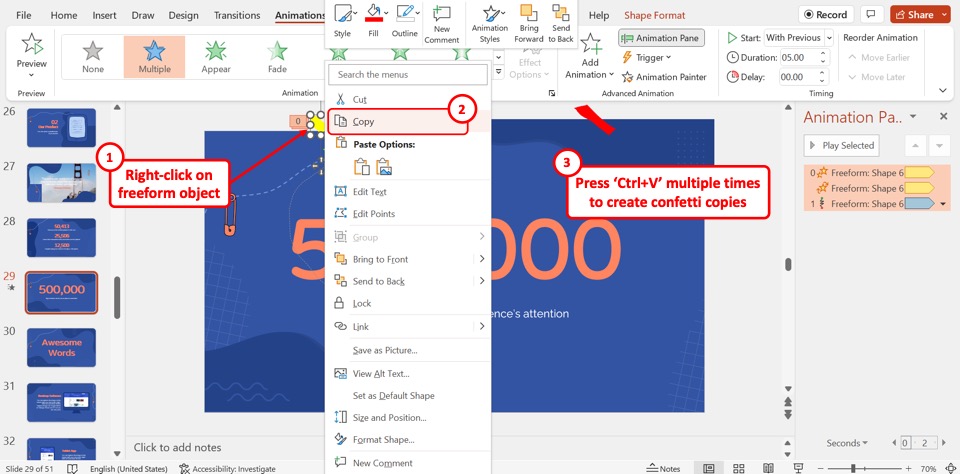
The next step is to create multiple confetti. To do so, “Right Click” on the freeform shape. Click on the “Copy” option in the right-click menu. Then press the “Ctrl+V” keys on your keyboard multiple times to paste multiple copies of the confetti.
Step-28: Click on the “Shape Format” tab
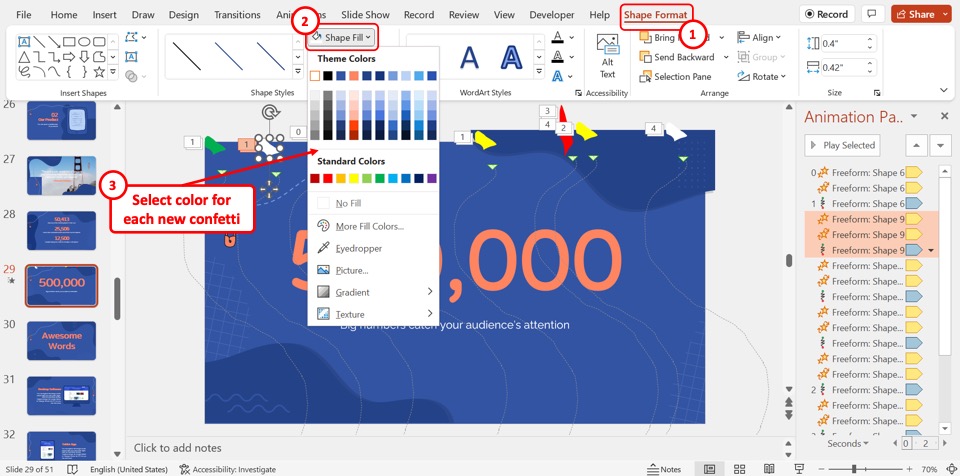
Now you can change the color of each confetti. To do so, click on the “Shape Format” tab in the menu ribbon. In the “Shape Format” menu, click on the “Shape Fill” option to select a color from the dropdown list.
Step-29: Click on the “Edit Points” option

“Right Click” on the motion path of the pasted freeform shape. In the right-click menu, click on the “Edit Points” option. Now you can change the motion path of each confetti.
Step-30: Click on the “With Previous” option
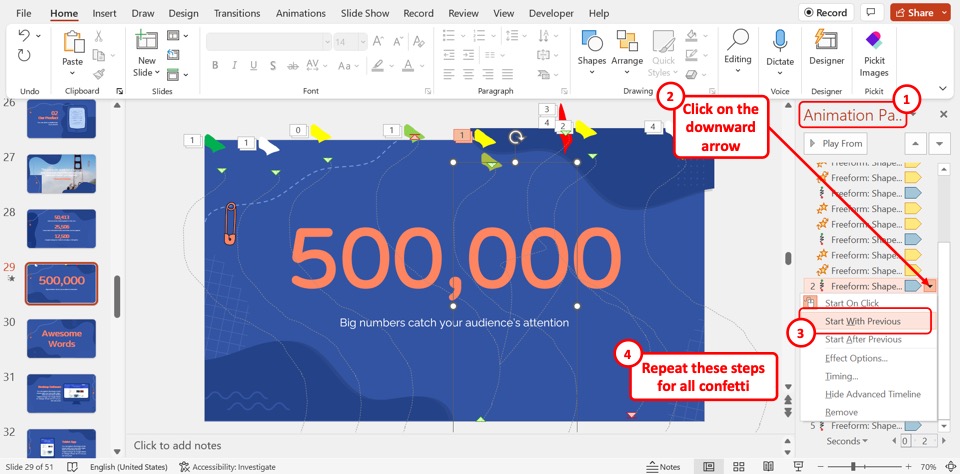
In the “Animation Pane” on the right side of the screen, click on the down arrow by the “2 Freeform Shape” option. Then click on the “Start With Previous” option in the dropdown menu. Repeat for each confetti.
Step-31: Resize the freeform shape
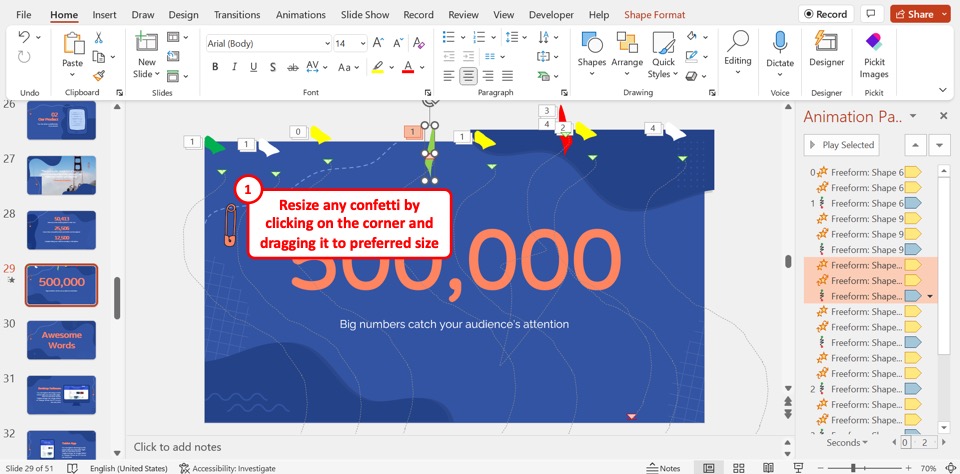
Finally, you can resize each shape to create various-sized confetti. All you have to do is click on the corner of the confetti and drag it to your preferred size.
Credit to lookstudio (on Freepik) for the featured image of this article (further edited).