When you are creating a presentation in Google Slides, invariably, you will also need to work with shapes in Google Slides at some point in time! And, one of the most common things you will need to know is how to fill shapes in Google Slides!
In this article, I’ll show you how to fill shapes in Google Slides in a detailed step-by-step manner. Plus, I’ll also share with you a few additional tricks like adding gradient color, transparency, and images to the shape!
So, without further adieu, let’s get started!
A quick note here – I’ve captured all the steps to fill shapes in Google Slides in a video format. If you wish to learn by watching a video, you can do so by clicking on the play button on the below video
If you prefer learning by reading, you can continue with the steps mentioned in the article!
1. How to Fill Shape with Color in Google Slides?
In Google Slides, using the shape that matches your brand colors or the color of the theme of your presentation can make your presentation visually engaging.
By default, the shapes are usually gray or transparent but you can fill them with any color you want.
1.1 Fill Shape with Color in Google Slides
To fill a shape with color in Google Slides, first, select the shape on your slide. Then, click on the “Fill Color” option in the toolbar. From the dropdown that appears, click on a color to apply the color to the shape.
Let’s understand this further in the detailed steps mentioned below –
Step-1: Click on “Fill Color”
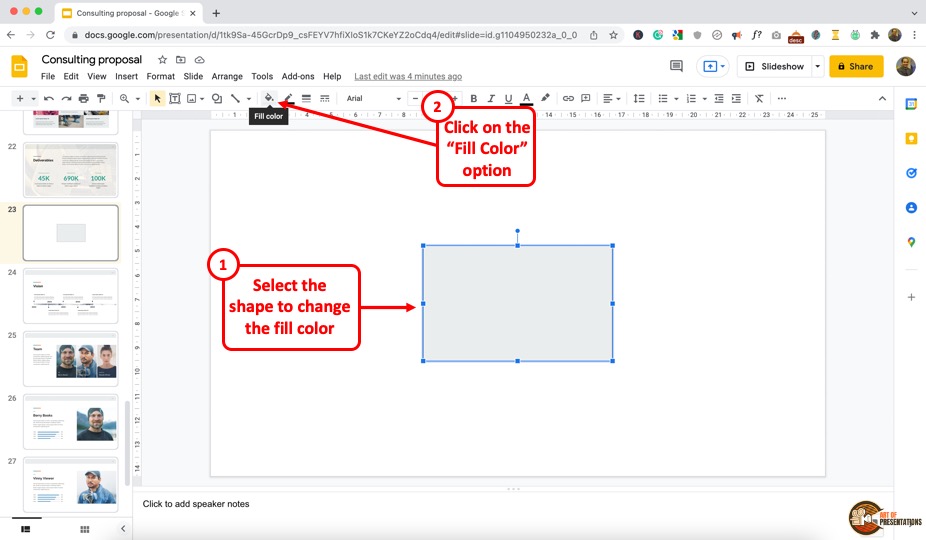
First, make sure that you insert a shape on the slide in Google Slides. Then, select the shape and then click on the “Fill color” icon in the toolbar located under the menu bar at the top of the screen. Click on the “Solid” tab for solid colors.
Step-2: Choose a Color
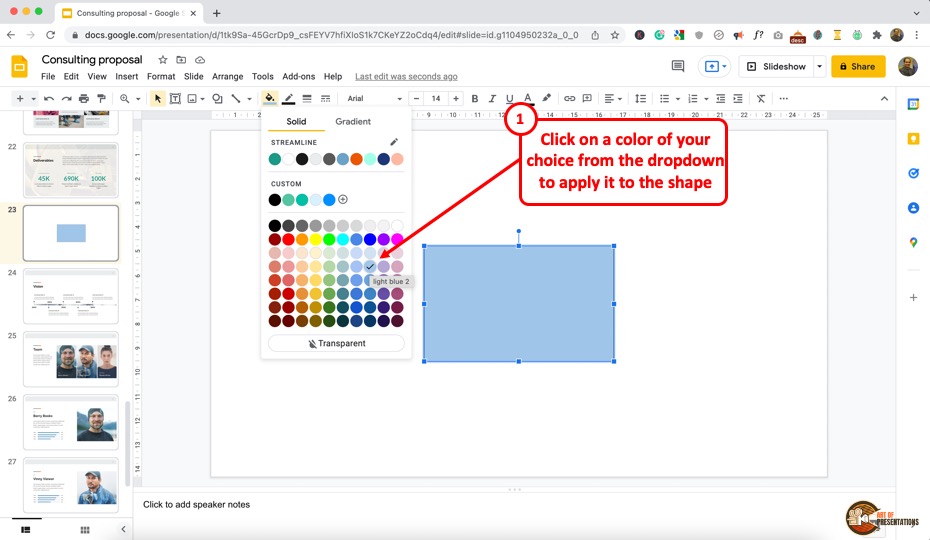
Now you can select a color in the “Solid” tab. You will find a variety of color options present in the dropdown. Simply click on any one of the colors to apply it to the shape (as shown in the image above).
If you need to use a color that is not present in the dropdown by default, you can click on the “+” button under the “Custom” option.
In the window that pops up next, simply choose a color as per your preference. Alternatively, you can also use the HEX code of the color. If you are not sure of the “HEX” or RGB color code of your preferred color, you can also use the eyedropper tool. Check out my guide on how to use the eyedropper tool in Google Slides!
1.2 How to Fill Shape with Gradient Color in Google Slides?
In Google Slides, you can also fill a shape with a gradient color. All you have to do is follow the 2 simple steps.
Step-1: Click on the “Gradient” tab
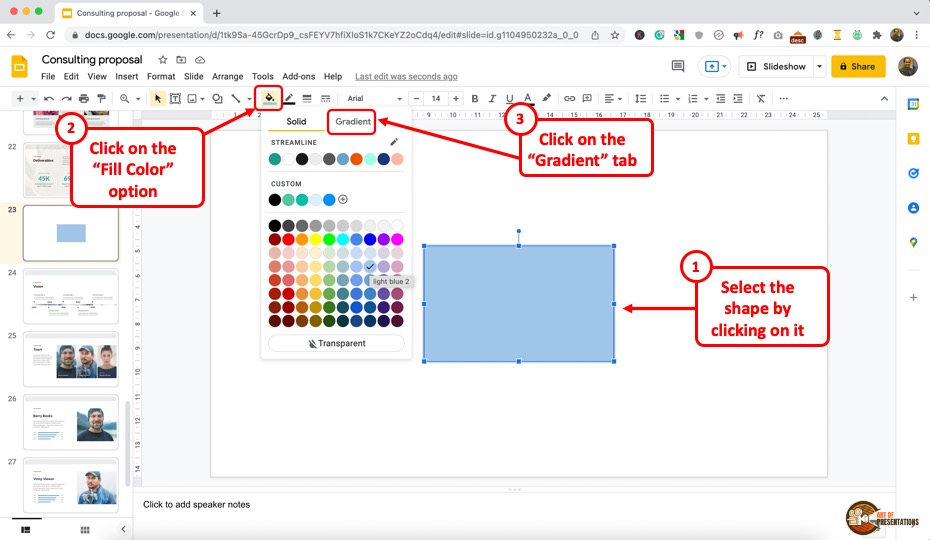
First, select the shape to which you intend to add the gradient fill color. Then, in the toolbar, click on the “Fill color” icon after selecting the shape. After that, click on the “Gradient” tab in the “Fill color” dropdown menu.
Step-2: Click on the “OK” button
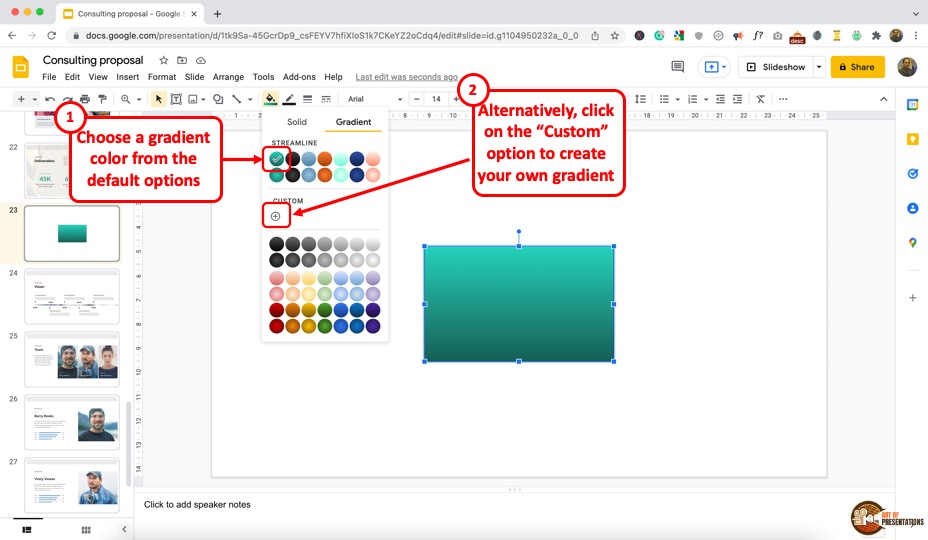
You will see a bunch of gradient colors in the dropdown by default. These are automatically set as per your theme in Google Slides.
You can select a color gradient from the theme colors. Alternatively, you can also click on the “+” icon in the “Custom” section for more gradient colors.
Step-3: Add a custom gradient color

When you click on the “+” button, a new window will pop open. You can change the color and further customize the gradient settings for your custom color.
Once you have adjusted the gradient color, simply click on “OK” to apply the gradient color.
1.3 Adding Color to Multiple Shapes in Google Slides
Google Slides does not have any feature that allows you to select all shapes in a presentation, However, you can add color to multiple shapes in a single slide at once. To do so, follow the 3 simple steps.
Step-1: Select All the Shapes on the Slide
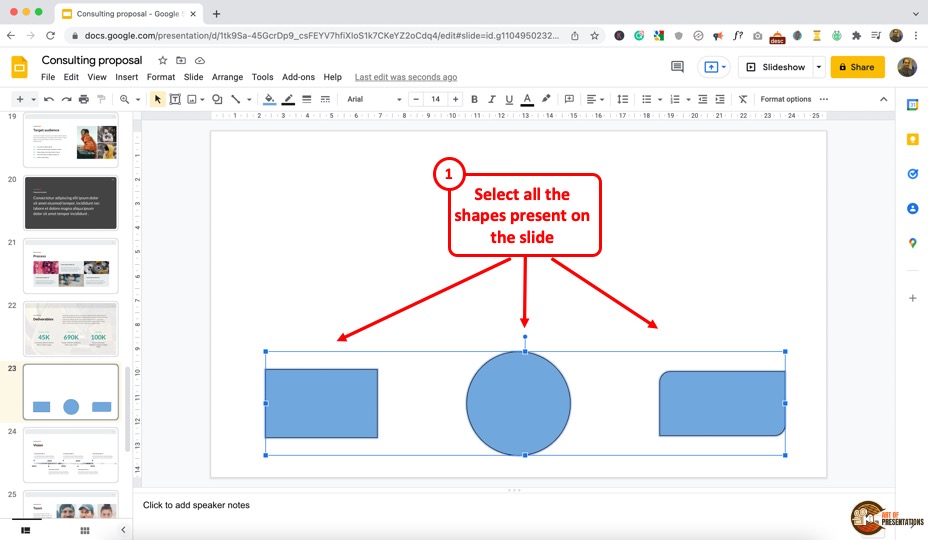
To select all the shapes present on the slide. You can do that using a couple of different methods.
You can either hold the “shift” key on your keyboard while you individually click on the shapes. Alternatively, if you have just the shapes on your slide, you can also use the “Ctrl+A” keys to select all the shapes on the slide.
Step-2: Click on “Fill color”
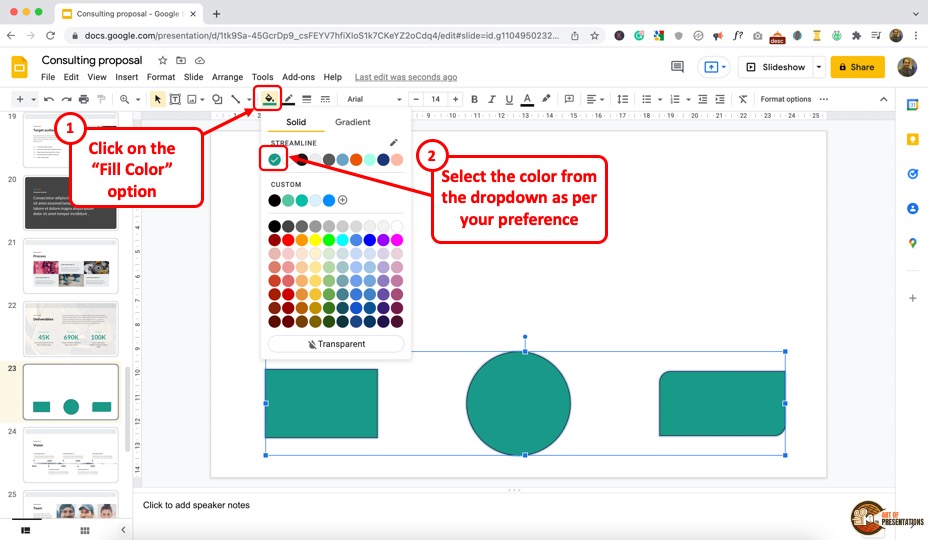
The next step is to click on the “Fill color” option in the toolbar. You can select either of the “Solid” or “Gradient” colors.
Simply click on the color of your choice from the dropdown that appears. Alternatively, just the way we did before, you can also create a custom color.
1.4 How to Change the Color of a Shape in Google Slides?
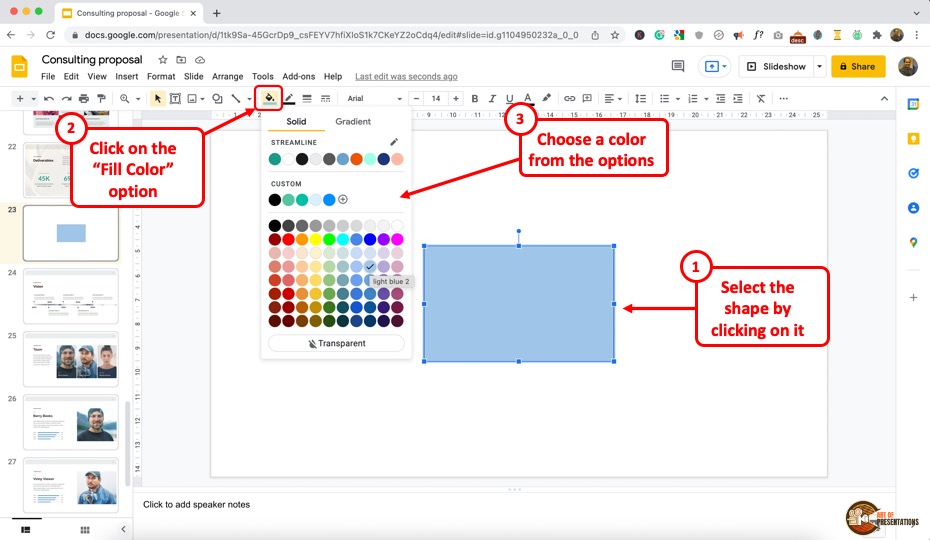
Changing the color of the shape fill in Google Slides works just the same way as adding the color to shape (process described in the previous sections).
All you have to do is select the shape and click on the “Fill color” icon in the toolbar. Then, from the dropdown, simply click on the color you wish to apply and the shape color will change automatically.
2. How to Add Transparency to Shape Color in Google Slides?
In Google Slides, you can also change the transparency of a shape, along with adding and removing colors. To add transparency to a shape color, follow the 2 quick steps.
Step-1: Click on “Fill color”
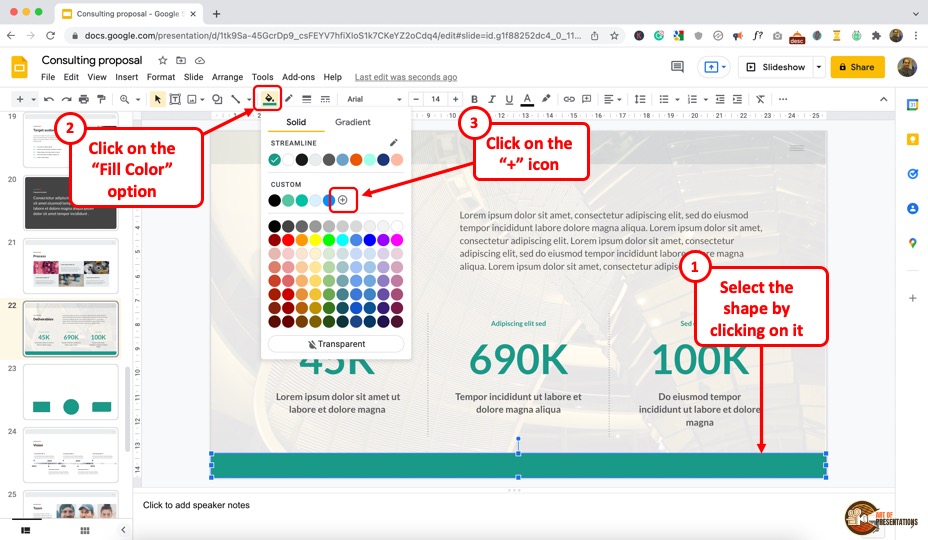
In the Google Slides presentation, select the shape and then click on the “Fill color” icon in the toolbar. This will open a color menu.
Step-2: Drag the slider under the “Transparency” option
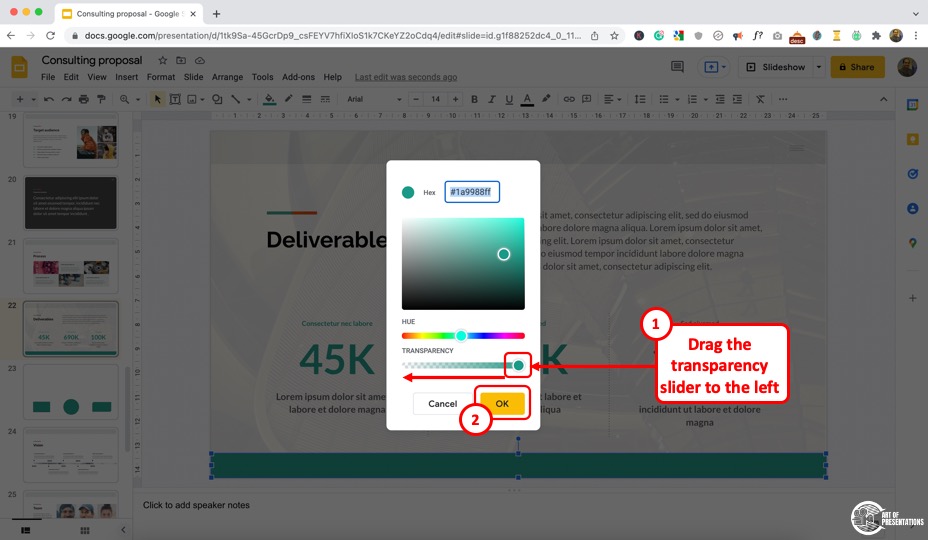
The next step is to click on the “+” icon under the “Custom” option. Then all you have to do is drag the slider in the “Transparency” section. You can increase the transparency by dragging it to the left and decrease it by dragging it to the right. Then click on the “OK” button to save the color transparency.
3. How to Fill Shapes with Picture in Google Slides?
Although you can’t directly fill a shape with picture in Google Slides, you to do have the option to mask an image with a shape. The end result of this option is similar to that of filling a shape with a picture.
Here’s what you need to do to add an image to a shape –
Step-1: Click on “Insert image”

The first step is to insert an image in your Google Slides presentation. You can insert an image on your slides in Google Slides in multiple different ways.
In the toolbar located at the top of the screen right under the menu ribbon, click on the “Insert image” icon.
Then, select the “Upload from computer” option from the dropdown menu if you have the image on your computer. This will open a “File Explorer” window. You can simply browse to the folder and upload the image to your slides.
Alternatively, you can also click on the “Search the web” option and insert an image directly from the web.
From the sidebar that appears on the right part of the screen, type in the keyword relevant for the image. Then, select the image your want to insert by clicking on it. Finally, click on the “Insert” button at the bottom.
Step-2: Conver the Image to a Shape

Once the image has been inserted, you can proceed to convert the image to the shape that you desire.
For the sake of this example, we shall convert the inserted image to a circular shape. This will give an effect of filling a circular shape with an image.
First, select the image. Then, click on the “Downward facing arrow” next to the crop button on the toolbar of your Google Slides interface.
Next, from the dropdown, click on the “Shapes” option and choose a shape of your choice. For this example, we shall click on the “Oval” option since there is no option to choose a circle.
Step-3: Adjust the Image Cropping

You may notice that the image gets filled into an oval shape. Since we want to display the image in a circle, we shall adjust the cropped area of the image.
To convert the shape of the cropped image to a circle, first select the image. Then, click on the “Crop Image” button on the toolbar. Next, adjust the “Crop Handles” inwards such that the image takes up a circular shape.
Step-4: Resize and reposition the image

The picture will now be filled inside a circular shape. Now, you can easily resize, reposition or even format the image for further editing!
4. Can You Fill Shapes with Patterns in Google Slides?
Currently, Google Slides does not allow you to fill shapes with patterns. You can fill shapes with a solid color, gradient color, or images. However, you can use an image that has patterns to fill a shape in order to create a similar effect of filling shapes with patterns!
Simply identify an image that has the patterns of your choice. Insert that image on your slide and you can mask the image as per the steps described in the previous section.
5. How to Change Color of the Shape Border?
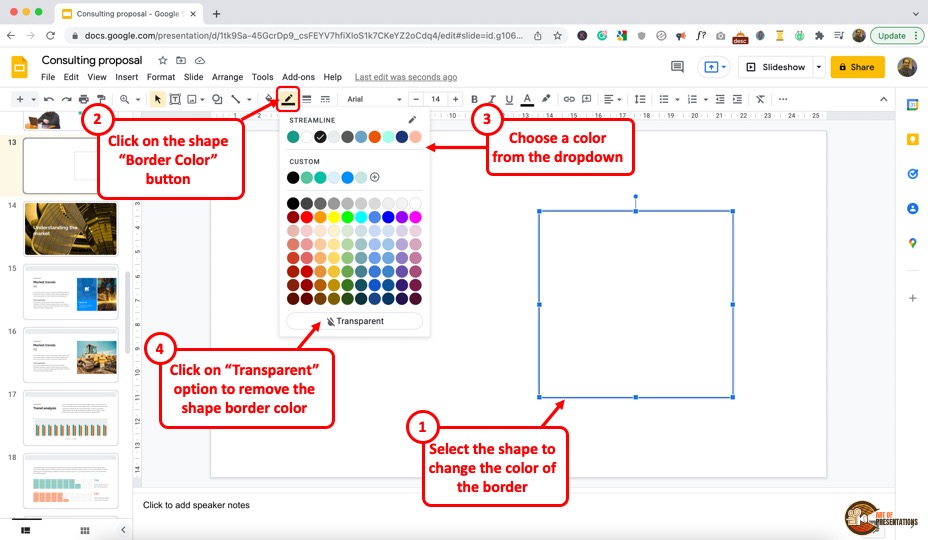
The Google Slides shape borders can be edited quite easily.
To change the shape border color, first, select the shape. Then, click on the “Border color” option in the toolbar. This looks like a pencil. Click on it. Choose your preferred shape border color from the dropdown that appears. You can also click on the “Transparent” option for a transparent border.
6. Can You Merge Shapes in Google Slides?
There is currently no direct way to merge shapes in Google Slides since there is no such feature available.
However, to make multiple shapes look like they are merged together, you can position them in a manner such that they look like the shapes have been merged.
Here’s how you can create a merge shape appearance in Google Slides.
Step 1 – Add Multiple Shapes to Your Slide

The first step is to make sure that you add multiple shapes to the slide.
In the example above, I’m adding a circle on top of the rectangle that already exists on the slide.
To add a circular shape to the slide. First, click on the “Insert” tab. Then, click on the “Shape” option from the dropdown. Next, select the “Shapes” option and finally click on the “Oval” shape option.
Your cursor will change in to a crosshair. Now, make sure that you hold the “Shift” key on your keyboard and drag the curson on your slide. This will create a perfect circle instead of an oval shape.
Step 2 – Match the Shape Fill Color and Border Color of the Two Shapes
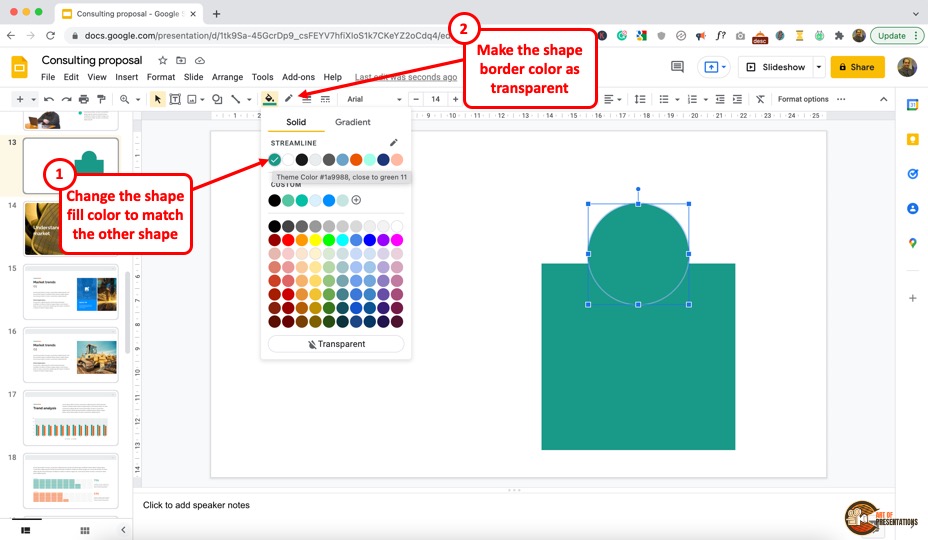
In the next step, make sure that you adjust the fill color of the two shapes to exactly match each other.
Follow the steps mentioned earlier in the article to adjust the shape fill color and border color. You can change the color of the shape by clicking “Fill Color” option in the toolbar.
Likewise, make sure that you choose the “Transparent” option for the “Border Color” from the toolbar for both the shapes.
Finally, adjust the position of the two shapes on top of each other as per your requirement. You can use your mouse to drag and drop the shapes anywhere on the slide.
Step 3 – Add More Shapes and Repeate the Process

The last step of the process requires you to add more shapes and repeat the process of adjusting the shape fill color and border color.
Then, adjust all the shapes to create a “Merged” shape kind of an effect in Google Slides.
7. Other Shape Formatting Options in Google Slides
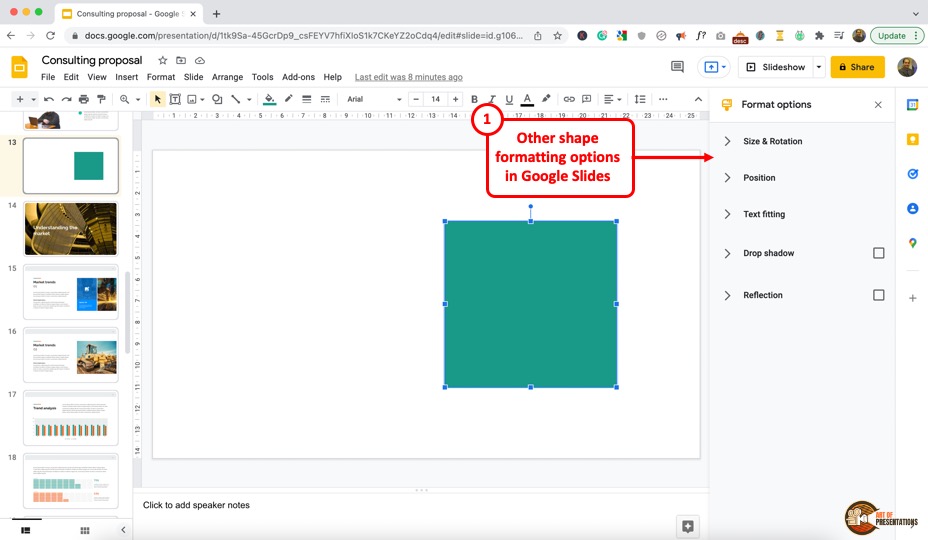
There are other shape formatting options available in Google Slides.
To access the formatting option, “Right Click” on the shape and select the “Format options” option. There are five formatting options available, which are: “Size & Rotation”, “Position”, “Text fitting”, “Drop shadow”, and “Reflection”.
Check out my other article to learn all the details about formatting shapes in Google Slides.
Credit to freepik for the featured image of this article (further edited)

![How to Fill Shapes in Google Slides? [Complete Guide!]](https://artofpresentations.com/wp-content/uploads/2022/01/Featured-Image-How-to-Fill-Shapes-in-Google-Slides.webp)