
PowerPoint is a powerful piece of software and it keeps getting better. With PowerPoint, you can add transitions and animations to your presentations and add a bit of flavor. But, what exactly are animations and transitions in PowerPoint?
Animations in PowerPoint are special visual or sound effects that can be applied to elements present on a slide such as text, shape, image, icon, etc. Whereas, Transitions in PowerPoint are special visual effects applied to a complete slide. The transition effects can only be seen as one slide moves to the next.
In this article, we are going to take a deep-dive into PowerPoint animations and transitions. We will be looking at the differences between the two, what each of them does, and how you can use both of them together to make your presentations really stand out. So for everything you need to know, keep reading!
What is Animation in PowerPoint?
Ok, so before we jump into the article, we are first going to discuss what exactly animations in PowerPoint are. Let’s use the text as an example. Imagine if you will, two PowerPoint presentations, each on the same slide with text.
Now imagine on the one presentation your text comes flying in and then pulsates on the screen while the other just remains dormant old text.
That is the best explanation of what animations are that I can think of. You get different types of animations in PowerPoint and we will be taking a bit of a deep-dive into what these are in the upcoming section.
Types of Animations in PowerPoint?
- Classification 1 – Intro Effects, Emphasize Effects, Exit Effects: As their names suggest, you can animate a piece of your presentation to enter or exit a slide, also to add emphasis on something. You could also use them for no reason other than to spice up the presentation.
- Classification 2 – Basic, Subtle, Moderate, Exciting: This is a broad classification as it encompasses all of the animation effects, and each of the animations under classification 1, falls under one of these.
How to Add Animation in PowerPoint?
The first step to having animations in your presentation is to first understand how to add them in. So, here’s how to add animations to any PowerPoint presentation slide in order to make them really stand out. Follow the below easy steps.
- In your PowerPoint presentation, create or add whatever it is you want to animate.
- Go to the “Animations” tab on the top and select it.
- Click on “Add Animation Pane” to open the animation pane on the right. Here you will get to see all the animation effects that are added to the slide.
- Click on your desired animation by selecting it. You can choose from the ones that appear or just to the right of that, you can select “Add Animation”.
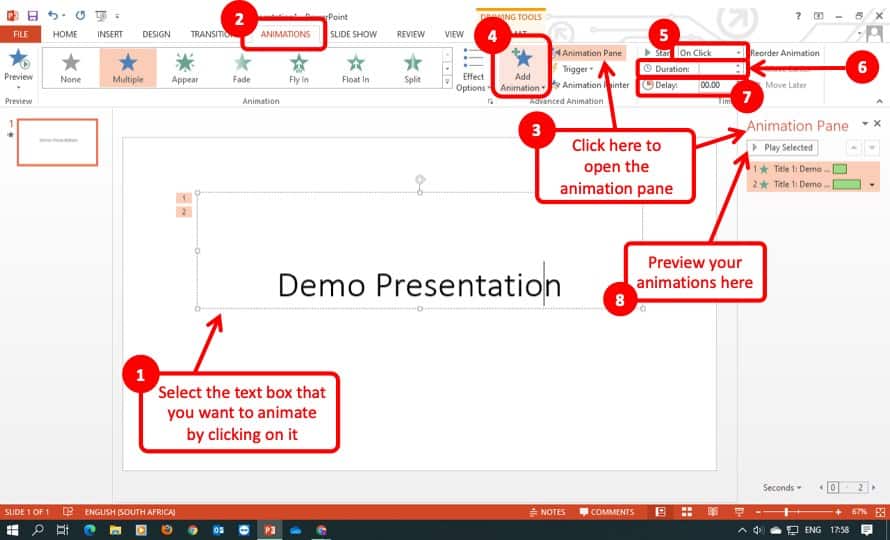
- In the image above, you can see on the top right, a set of options. Use this to set the duration of the animation.
- Select whether you want the animation to be automatic or activated by clicking on it.
- Select the desired delay.
- Preview the animation.
- Save the presentation and you are done.
How to Animate Shapes in PowerPoint?
Animating shapes in PowerPoint allows you to animate multiple elements within a slide. If done well, this is great for giving a professional touch to your presentation that will make people remember it more effectively.
Here’s how you can animate shapes in PowerPoint in 11 easy steps!
- Add the shape to your presentation by selecting the “Insert Tab” in your presentation.
- Go to the “Shapes option” as per the picture below.
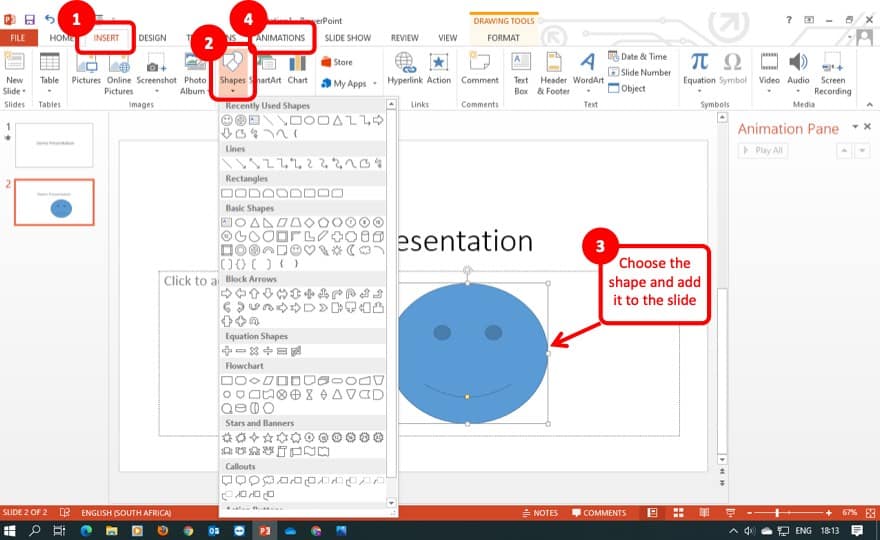
- Select the shape that you intend to add.
- Add it to the presentation by holding the left mouse button and scaling the shape.
- Go to the “Animations” tab on the top and select it.
- Click on your desired animation by selecting it. You can choose from the ones that appear or just to the right of that, you can select “Add Animation.
- Set the duration of the animation.
- Select whether you want the animation to be automatic or activated by clicking on it.
- Select the desired delay.
- Preview the animation.
- Save the presentation and you are done.
How to Animate Text in PowerPoint?
Let’s be honest for a second, a presentation with a lot of text might seem slightly boring but it really does not have to be. Being able to animate your text can take a presentation that has a lot of text and turn it into something that people will remember.
Animating text in PowerPoint presentations is great for the audience because it allows them to feel as if the text means more than what it is actually trying to tell them. This is always a great thing for anyone who is trying to sell a product or an idea.
So, here are my 9 easy steps on how to animate text in PowerPoint.
- Add your text to the presentation.
- Edit the text as you wish.
- Go to the “Animations” tab on the top and select it.
- Click on your desired animation by selecting it. You can choose from the ones that appear or just to the right of that, you can select “Add Animation.
- Set the duration of the animation.
- Select whether you want the animation to be automatic or activated by clicking on it.
- Select the desired delay.
- Preview the animation.
- Save the presentation and you are done.
How to Animate Objects (such as Images or Icons) in PowerPoint?
A good PowerPoint presentation will contain a lot of images and icons. This is because, in a presentation, you need to get a message across and a lot of people, in fact, most people can remember things a lot easier by visual representation. That being said, here are my 9 easy steps on how to animate objects such as images and icons in PowerPoint.
- In your presentation, go to the “Insert” tab on the top and select it.
- Select the “Picture” option. Alternatively, you can just drag and drop an image or icon.
- Go to the “Animations” tab on the top and select it.
- Click on your desired animation by selecting it. You can choose from the ones that appear or just to the right of that, you can select “Add Animation.
- Set the duration of the animation.
- Select whether you want the animation to be automatic or activated by clicking on it.
- Select the desired delay.
- Preview the animation.
- Save the presentation and you are done.
How to Add Animation in PowerPoint on Mac?
Although PowerPoint also works on Mac, sometimes the options are not exactly the same as they are in Windows.
So here are my steps on how to add animations in PowerPoint on Mac.
- Select the Text Box that you want to animate by clicking on it.
- Go to the “Animations” tab on the top and select it.
- Click on the “Animation Pane” to open the pane for animation on the right side of the slide.
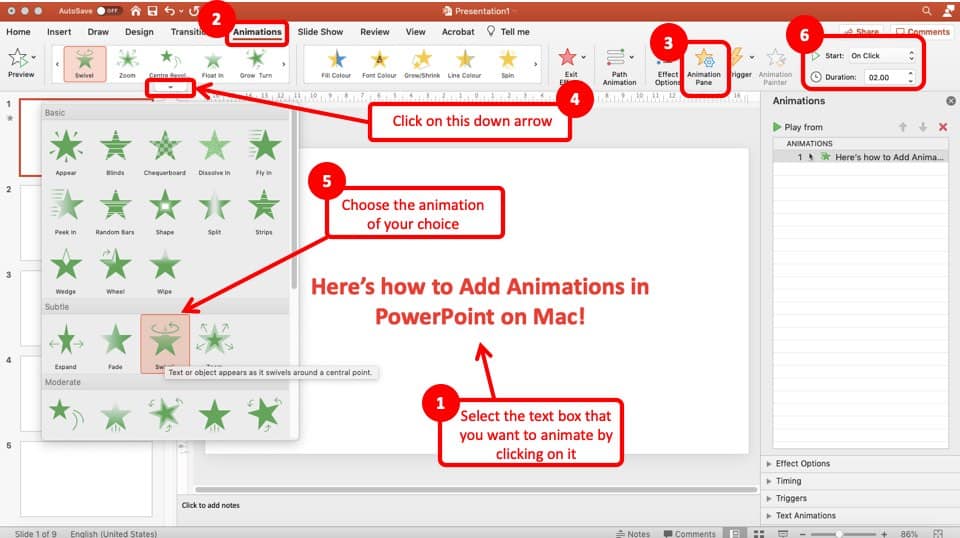
- Click on the downward arrow as indicated in the image above.
- Choose your desired animation by clicking on it.
- Set the duration of the animation. Select whether you want the animation to be automatic or activated by clicking on it.
- Select the desired delay.
- Preview the animation.
- Save the presentation and you are done.
What are Transitions in PowerPoint?
You know that old saying that goes “first impressions count the most.” Well, that is very true when it comes to your presentations.
One of the ways to make a good first impression is to use simple but effective transitions on your presentation.
PowerPoint allows you to add transitions into your presentation. Transitions are basically visual effects that can be applied to a complete slide rather than individual elements on a slide. Moreover, the transition is only visible when you move from one slide to another.
Transitions also allow you to make your presentation look and feel better. It does this by allowing you to add transitions to every single slide or to multiple slides at once. The transition is simply the way that one slide goes out of the screen and the new one comes in.
Should You Use Transitions in PowerPoint?
You might be a little bit intimidated by transitions because you may be thinking that you aren’t a creative enough person to make the most out of them. Allow me to just stop you right there just for a moment.
Using transitions in your PowerPoint presentation is actually quite easy. Furthermore, by choosing the correct type of transition, you can actually create a positive impact on the audience.
While some feel that the transitions make your presentation look a bit “gimmicky”, but the trick is really to add a subtle transition.
Moreover, using transitions selectively can definitely make your presentation look and feel a bit more interesting.
What are the 3 Main Types of Transitions in PowerPoint?
Much like with the animations, there are three main groups of transitions and you can find these in the transitions menu in PowerPoint. For the sake of this article, I will highlight the three main groups of transitions in PowerPoint for you.
- Subtle: Still adds excitement to your presentation without being too flashy.
- Dynamic: This is a perfect balance and has the potential to add to your presentation while still being professional.
- Exciting: This is your go-to when you need to sell something or when your presentation contains a lot of text.
Having those different groups is great because we all have different personalities and we are all making presentations for different reasons. You can either choose what type of transition you want to use based on your audience or your personality, the choice is yours.
How to Add Transition to your PowerPoint?
Now, it’s time to start adding transitions to your PowerPoint presentation so allow me to give you my 9 easy steps on how to add transitions to your presentation.
- Open your PowerPoint presentation.
- Create a new slide.
- Go to the “Transitions” tab in the menu bar at the top and select it.
- You should see a row of popular transitions. Select the one you want.
- Select the “Effect Options” drop-down” menu to further customize the transition.
- Select the transition that you want.
- Edit the duration.
- Apply a sound if applicable.
- Save the presentation and you are done.
If you want to apply the same transition to all of your slides, you can just select the “Apply to all” option.
This is great if you want your presentation to be uniform. If more of your slides have the same transition but some are different, you can decrease your workload by adding the most common one to all. Then, edit the other slides individually.
How to Make Your Slides Transition Automatically?
Sometimes we don’t want to be constantly changing the slides. Perhaps we just want the slides to transition to the next slide automatically after a certain duration.
So here are my 7 easy steps on how to make your slides transition automatically in PowerPoint
- Open your PowerPoint presentation.
- Create a new slide.
- Go to the “Transitions” tab in the menu bar at the top and select it.
- After adding your transitions and editing them, stay on the “Transitions”.
- To the top right, you will see an option called “Advance Slide”. Select the “After” option.
- Select how long you want each slide to last before it changes.
- Save the presentation and you are done.
Setting up slides to transition automatically can be especially helpful when creating a presentation for a kiosk where you don’t want to keep controlling the slides throughout the day, and you perhaps want them to transition automatically.
If you are interested in knowing how to exactly loop your presentation so that it continues to play (especially to be displayed at a kiosk), then make sure you check out the other article that I wrote earlier –
It is important to note that the speaker giving the presentation can stop the slides if he or she feels like they need more time to explain what’s going on. This is also good if they have an audience that is engaging with them, remember this is a good problem to have because an engaged audience is a good audience.
To pause an automatic slide, simply click on the presentation to pause it or, you can use the pause button if you are using a presentation remote control.
What is the Difference between Animations and Transitions in PowerPoint?
There are a number of differences between a slide and a transition. While they do both animate the presentation, they do so in different ways and they are used for completely different things. Let’s get into it.
Transitions affect the entire slide from the way it comes into focus and then leaves. When it comes to animations, they affect the content within the slide such as the text and/or charts.
You can use both of these options together in your presentations. Doing so will set your presentation apart from the standard old boring presentation that so many people put together when they are in a rush.
Final Thoughts
That just about wraps up this article, here are some of my final thought regarding this topic.
The goal of this article was not just to explain the difference between animations and transitions, it was to also encourage you to use them.
Our main goal of this website is to help you deliver the best impression with your work. So, bookmark this page and keep it as a reference.
Make sure you check out some of our other articles on the website. If you’ve perhaps got a question about presentations, we’ve most likely covered it on our website! So, be sure to check other articles out.