Okay, so you have this big event coming up and you need to showcase a company profile of your organisation at a kiosk. You have the company presentation but you are wondering, “How the heck am I going to turn my PPT into a self running presentation that runs in a loop automatically?”
Don’t worry, this is exactly what we are going to learn today. Plus, we share some of the most useful and important tips that you should remember while displaying a PowerPoint presentation for a kiosk. This will ensure that you have a presentation that almost always runs like a video!
But first, can you loop a PowerPoint presentation? Yes, you can definitely loop a PowerPoint presentation. To do this, we’ll need to make all our slides auto advance from to the next slide using the “Transition” tab, and then switching our PPT to the kiosk display mode in PowerPoint such that it runs automatically in a loop.
Let’s learn a bit more about it.
How to Loop your PowerPoint Presentation?
In order to ensure that the presentation plays in a loop, we will have to carry out this procedure in two steps. The first thing that you need to do is to make sure that your presentation shows the next slide automatically when put it slide show mode. Once you have done this, the next step would be to ensure that your presentation jumps back to the first slide when it is done displaying all the slides in your PPT. Doing so will make sure that your presentation continuously keeps playing in a loop.
It is not important to follow steps 1 and 2 in the same order as mentioned below. This means you can also complete step 2 first and then complete step 1. However, it is important that you carry out both the steps in order to achieve the desired result. So, let’s look at both the steps in detail below –
Step 1 – Make a presentation self-running
One of the key steps to ensure that your presentation runs in a loop automatically, is to make sure that it is self-running. The last thing that you would want to do is to manually click to proceed to the next slide for the whole day!
Making your presentation self-running is pretty simple.

Simply open the presentation that you would like to convert into a automatically running PPT. Click on any one slide from the presentation. Go to the “Transition” tab and click on it.
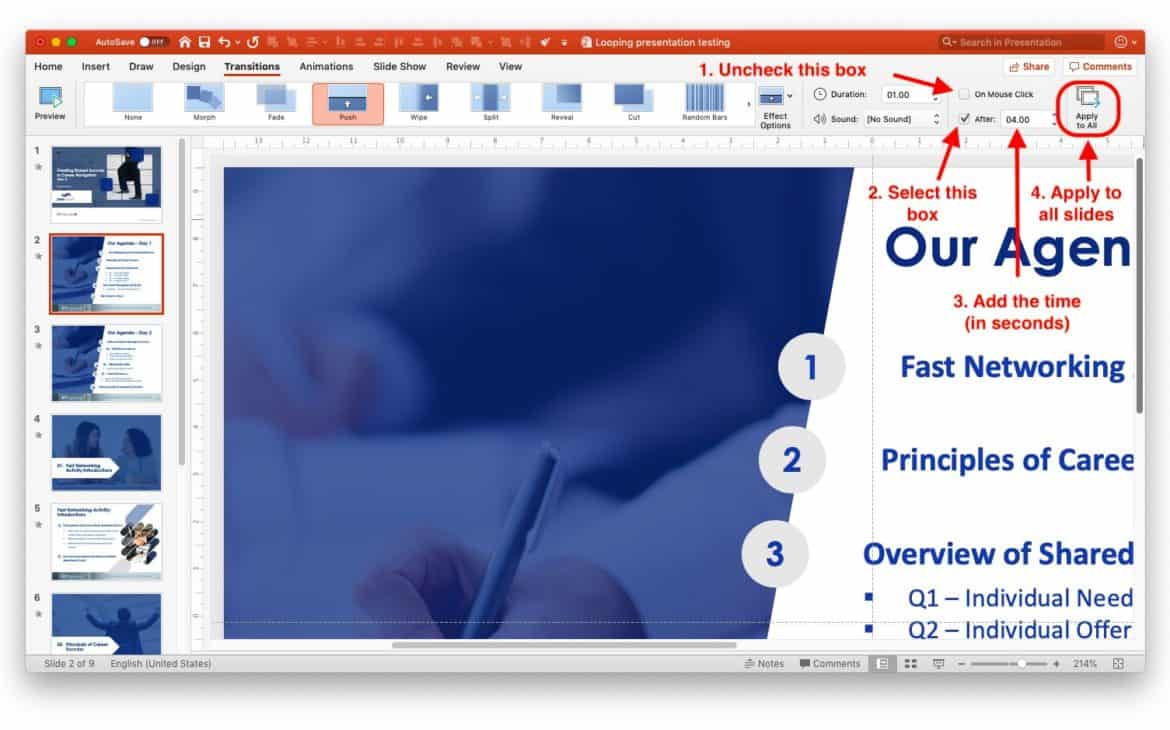
As a next step, make sure you uncheck the “on mouse click” box, and select the “After” option by clicking on the check box. This will ensure that your presentation now shows the next slide after a certain number of seconds rather than a mouse/keyboard click.
Once you have done that, just input the number of seconds that you would like PowerPoint to spend on each slide. I recommend putting a value in the range of 3-5 seconds based on my prior experience. However, I would also suggest that you do a bit of trial and error before finalising the exact number of seconds that work for your presentation.
Once you have identified exactly how many seconds you would like PowerPoint to spend on each slide, make sure to click on “Apply to All”. This will ensure that the transition setting of this slide is applied to every single slide in your presentation.
Note – If you have different transitions setting already set up for each slide, then, instead of clicking on “Apply to All”, make sure that you have selected all the slides by clicking on any one slide in the slide view section and then pressing “Ctrl +A” (or Command + A for Mac).
Step 2 – Loop your PPT by putting it in Kiosk Mode
Once you have made sure that your presentation is self-running, the next step to make sure that your presentation runs in loop.
Just like the first step, this is also quite easy. Let’s have a look –
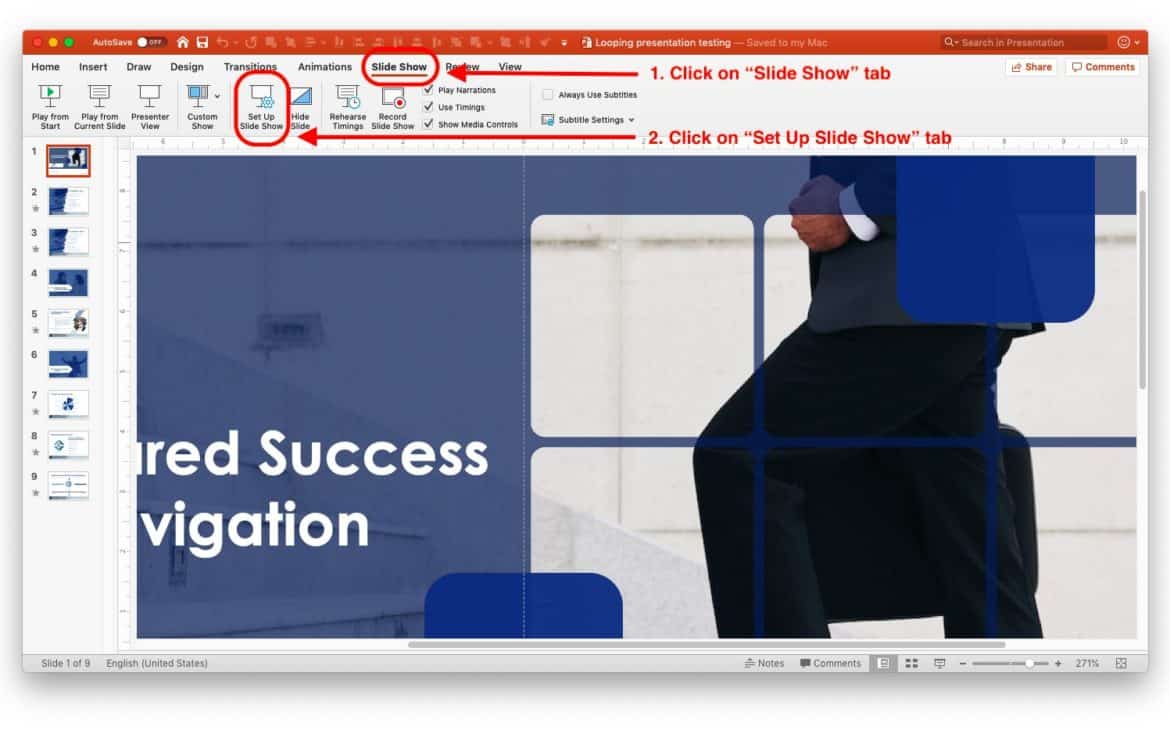
First, you need to click on the “Slide Show” option in the Menu Bar. On the ribbon, you need to then click on “Set Up Slide Show”. What this option does is allows you to set up how you would like to PowerPoint to play your slide show when running in full screen (or slide show mode).
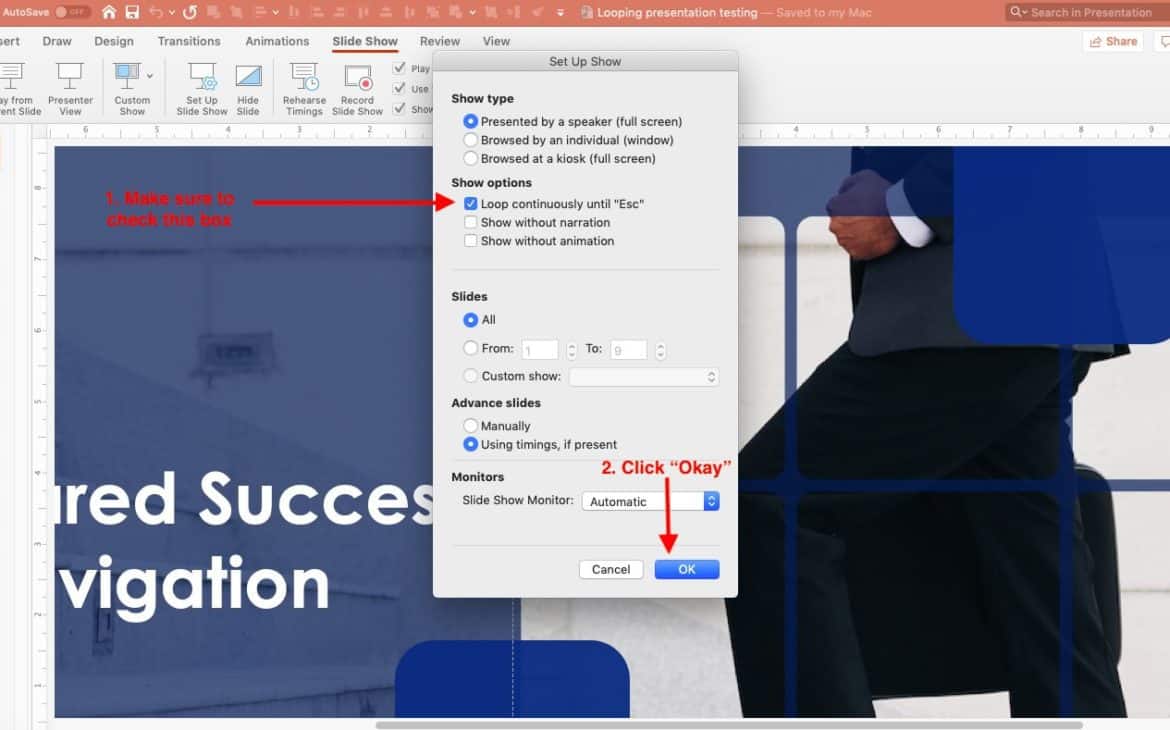
When you click on the Set Up Slide Show option, a window with multiple options will pop-up on the screen. Under the “Show Options”, identify and select “Loop continuously until Esc”. This basically means that once this option is selected, PowerPoint will loop your slide until you press the “Esc” or the Escape key on your keyboard.
You might also notice the “Browsed at a Kiosk” option under the “Show Type” option on the same pop-up window. This option also does exactly the same thing of looping the PowerPoint slides continuously. Thus, you could also select this option.
Next, just click “Okay” to confirm. Your slides will now loop endlessly automatically until the escape button is pressed on the keyboard. You can try and check if the presentation runs as desired by putting the presentation in slide show mode. The shortcut for that is Shift + Command + Return key on your keyboard for Mac users and F5 for Windows users (Shift + F5 for slide show from current slide)
Can I Loop a Presentation with a Video in it?
That is a great question that many of you might have especially when there is a supporting video or a testimonial or a product review that you want your audience coming to the kiosk to notice.
You can definitely make a PowerPoint presentation run in a loop even when you have a video in the presentation. However, you need to make sure that the video is not on YouTube or any other external location, it needs to be added on the PowerPoint slide.
You can add the video to your PowerPoint presentation by clicking on “Insert”, then selecting “Video” on the insert ribbon. PowerPoint will then ask you to browse to the location of your video file. Do that, select the video from your local hard disk, and click “Okay”. You should have the video inserted on your slide. Alternatively, you can also copy the video from a from the folder in which the video is located, open the target slide on which you need the video to be embedded, and paste it.
Things to keep in mind while looping a presentation with a video file –
- Make sure that the video is present on the local computer hard disk and not as an online resource
- Ensure that the slide on which the video has been added also has self-running enabled as explained in “Step – 1” above.
Can I loop just a few Specific Slides of a PPT Presentation?
There might be times when you don’t want to run the complete PowerPoint presentation a loop. Instead, you just want to repeat just a few slides from the presentation. So, can this be done? Absolutely Yes!
Putting a few specific slides in a loop is as easy as looping the complete presentation. The process is similar to the two steps mentioned above.
However, do keep a few things to keep in mind –
- Only consecutive slides can loop – When putting a few specific slides in a loop instead of the complete presentation, the slides in question should all be together. This means, you could choose to put slides 1, 2, 3 & 4 or slides 4, 5, 6, 7 & 8 because they are all consecutive slides. However, slides 2, 5, 7, 9 can’t be put in a loop as they are not consecutive slides. To solve this problem, you can create a copy of all the slides that you want to loop at the end of presentation, and put them in a loop.
- Apply Step 1 & 2 to only specific slides – Before beginning the steps 1 & 2 mentioned above, make sure that you have selected the specific slides that you wish to loop and not the complete presentation.
- DO NOT click “Apply to All” after step 1 – Ensure that you DO NOT click on “Apply to All” at the end of step 1 as this will make sure that the transition settings that you have selected will be applied to all your slides.
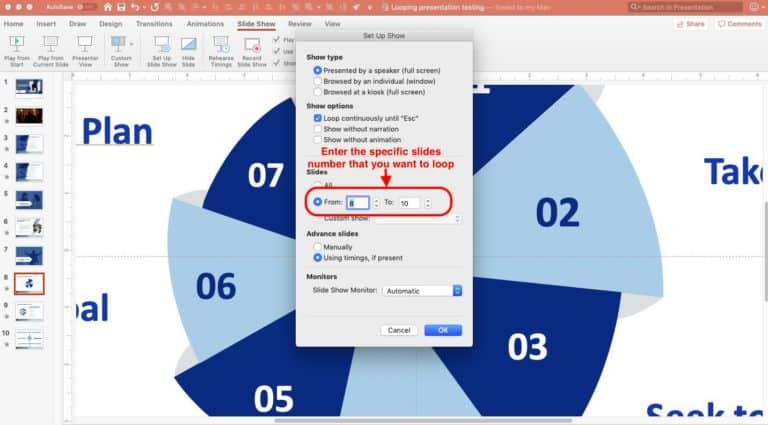
At the end of step 2, after you have selected “Loop continuously until Esc” and right before clicking OK, make sure to enter the specific slide numbers that you would like PowerPoint to loop. Remember – the slides that you want to loop should be consecutive slides.
What are Some Other Uses of a Presentation running in a Loop?
Making your PowerPoint presentation run automatically in a loop can be useful in situations more than one. The most obvious need to run a presentation continuously is when you are at a kiosk (for e.g. at an event representing your company). But there are some often other times when you feel the need to loop a presentation. I’m sharing some of the other situations when you might need to loop a PowerPoint presentation below –
1. At a Marketing Roadshow –
There are times when your company decides to generate awareness about a new product they are going to launch. One of the methods deployed is to hire a vehicle (with or without an open back), play some visuals accompanied with some audio and distribute a one page flyer to its potential customers. The marketing effort can be more detailed at times, however, the visual that often supports such a campaign can often be a presentation that needs to run continuously without interruption.
2. At a Sales Centre –
Another great use case for a continuous looping presentation. When you visit a sales centre/showroom of a company – a real estate company or even a vehicle showroom, you may notice a presentation playing in such an office. This is often because the customers who walk in may have questions about the product or offering and having a beautiful looping presentation can grab the attention of a customer.
3. Reception/Cafeteria of a company –
Often, various companies use a looping presentation to share more information about the company to its visitors or employees. You may notice a presentation that plays in a loop at the company reception giving information about the company or even at your cafeteria telling you about a new employee initiative taken up by the company. These are all great examples where a presentation running automatically in a loop can be useful.
Conclusion
Running a PowerPoint presentation in a loop continuously is simply and super helpful. My hope is that by reading this blog post, you now know how to loop your PPT and are ready for the next event!
Our goal on this blog is to create content that helps YOU create fantastic presentations; especially if you have never been a designer. We’ve started our blog with non-designers in mind, and we have got some amazing content on our site to help YOU design better.
If you have any topics in mind that you would want us to write about, be sure to drop us a comment below. In case you need us to work with you and improve the design of your presentation, write to us on [email protected]. Our team will be happy to help you with your requirements.
Lastly, your contribution can make this world a better place for presentations! All you have to do is simply share this blog in your network and help other fellow non-designers with their designs!