![[Tutorial!] How to Enable Developer Tab in PowerPoint?](https://artofpresentations.com/wp-content/uploads/2020/10/Featured-Image-How-to-Add-Developer-Tab-to-the-Ribbon-in-PowerPoint.jpg)

Okay, so you have been using PowerPoint for quite a while and you are starting to consider yourself an expert in making presentations. That is great! But, did you know that there are more ways of taking control of your presentation? This can be done through the developer tab. But, what exactly is the develop tab in PowerPoint, and how do you enable it?
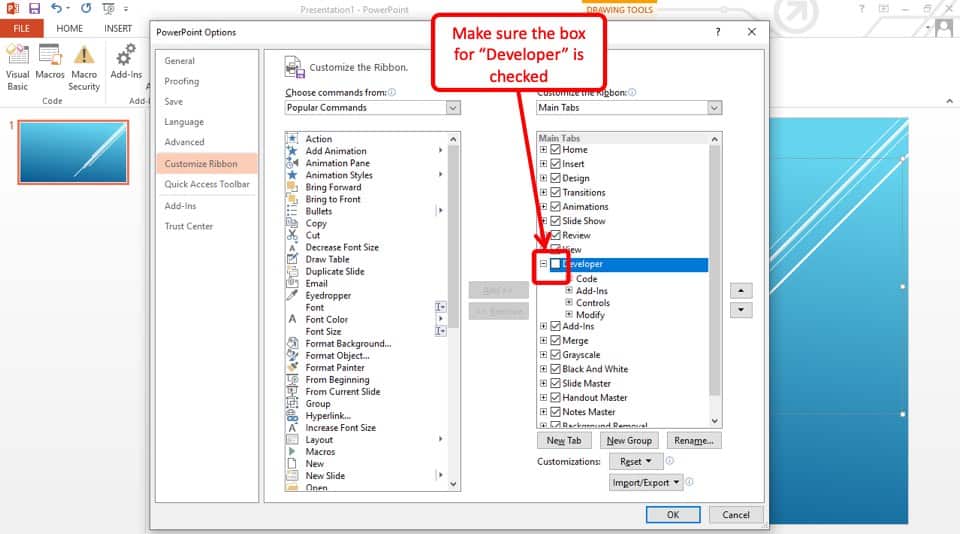
To enable developer tab in PowerPoint, go to “Files” >> “Options” >> “Customize Ribbon” >> “Main Tabs”. Once you are at the “Main Tabs section, make sure to enable the “Developer” option by putting a checkmark in the box. You can follow the same process for PowerPoint on Mac as well.
In the following sections, we will be discussing everything that you need to know about the developer tab. I will walk you through how to enable it, how to use it, what it is used for, and of course, how to use it on Mac. So, for everything you need to know about the PowerPoint developer tab, keep reading!
How to Enable the Develop Tab in PowerPoint? (Step-by-Step Guide)
Enabling the developer tool in PowerPoint is the first step to you taking full control of your presentation. In this section, we will go through a few easy steps on how to add the developer tab in PowerPoint on Windows.
So let’s jump straight into it.
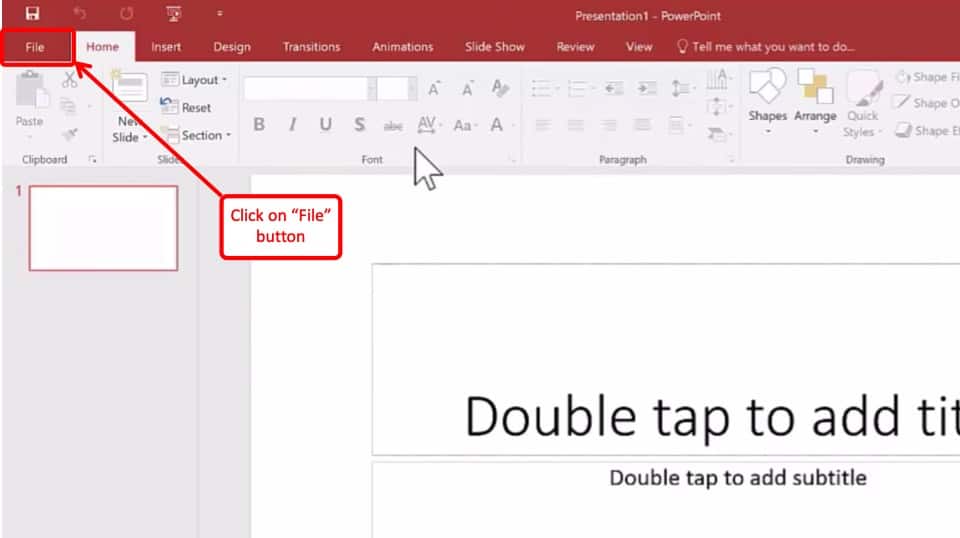
- Go to the “Files” Tab in PowerPoint and Click on it
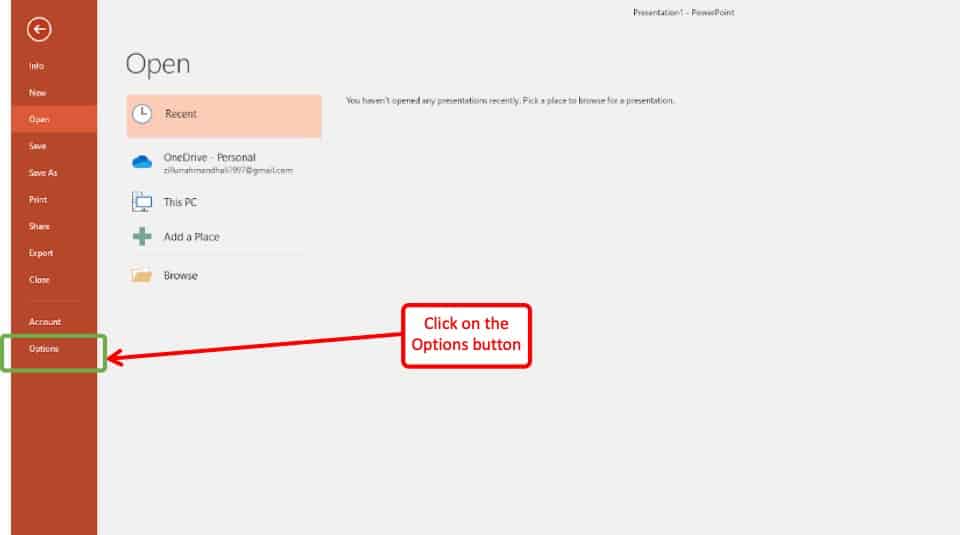
- Click on “Options”
In the window that opens up, select the “Options” setting. You should see a new window pop-up.
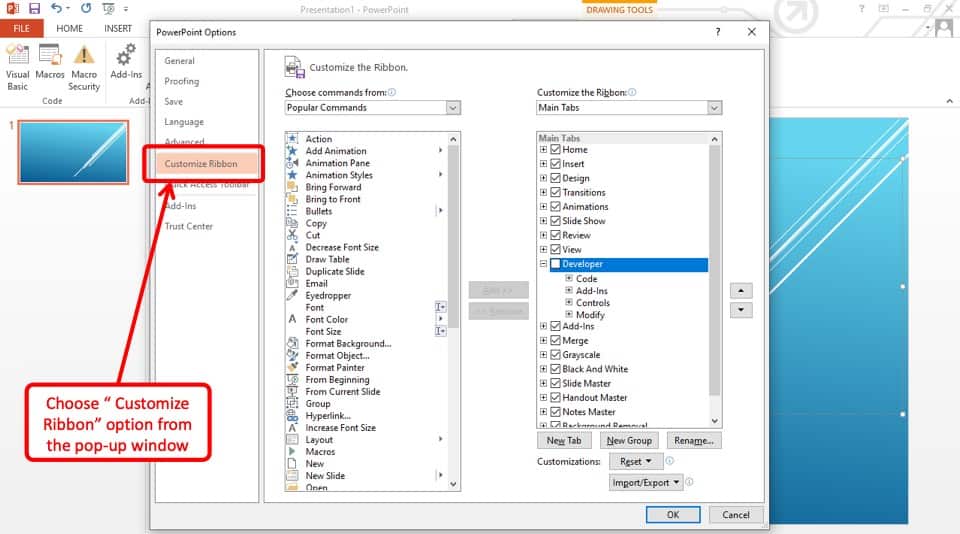
- Click on “Customize Ribbon”
In the pop-up window that shows up, locate, and click on the “Customize Ribbon” option on the left side of the window.
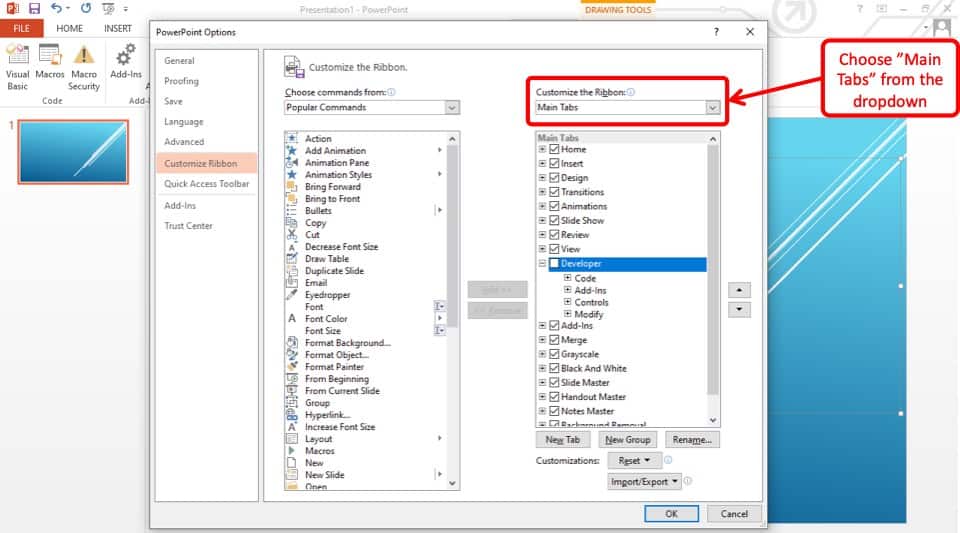
- Select “Main Tabs” from the dropdown menu
On the right side of the pop-up window, you will see a dropdown menu. Click on it and choose “Main Tabs”.
- Enable the “Developer” tab
In the window below the dropdown menu, locate and select “Develop” by checking the box next to the option.
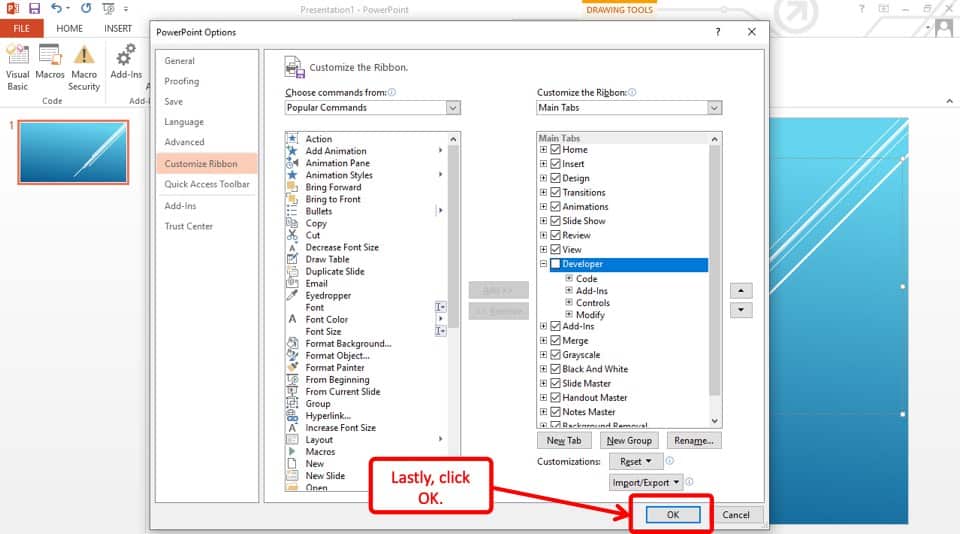
- Click “OK”
Lastly, click “OK” to save the settings and close the window.
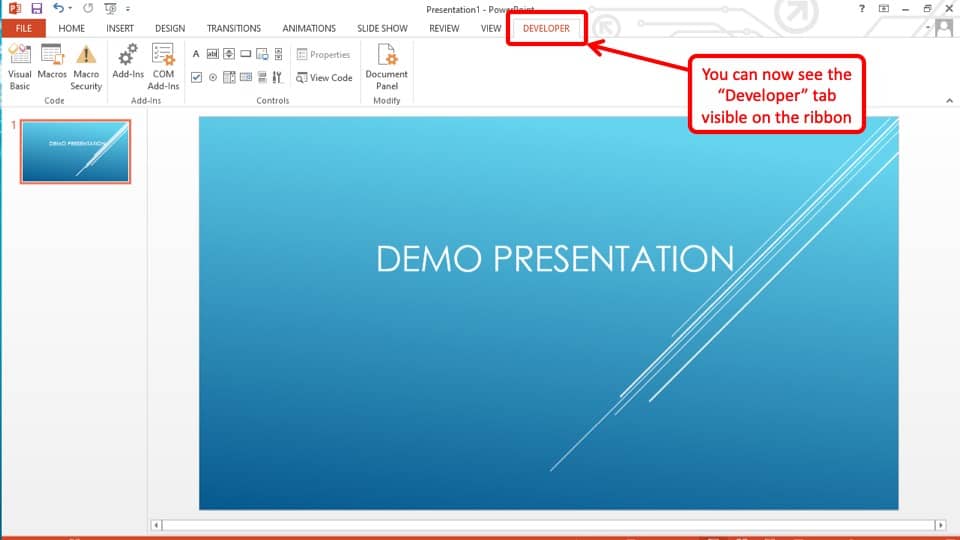
- Verify if “Developer” tab has been enabled
You will now be able to see the develop tab in the PowerPoint Ribbon on the extreme right.
Once you are on that tab, you will be able to start using all the options and features available. We will highlight a few of those features right after our step by step tutorial for Mac.
How To Enable PowerPoint Developer Tab On Mac
Now that we have discussed how to enable the developer tab on Windows, I think it would be best to discuss how you can enable the developer tab if you are on Mac. The process is the same as in windows.
- Go to the “PowerPoint” menu when you are using PowerPoint. You will be able to see this to the right of the “Apple logo”.
- In the drop-down menu, select the “Preferences” setting. You should get a pop-up window. [Note – if you are unable to locate the preferences option, you can also use the keyboard shortcut – Cmd+,)
- In the pop-up window, go to the “Ribbon & Toolbar” option and select it.
- On the right-hand side of the pop-up window, you will see a small drop-down menu. Look for “Main Tabs”.
- In that small drop-down menu, you want to select the “Developer” option. It will have a tick next to it when it is selected.
- Click “OK” and you are done.
*Important* – Please note that for Mac users, the developer tab in PowerPoint has been discontinued in Office 2016, Office 365, and Office 2019 variations. However, you will be able to locate all the options under the developer tab now under various other tabs on the PowerPoint ribbon.
How to Use Develop Tab in PowerPoint?
- Write macros: This is a series of commands that you can program within PowerPoint to automate certain tasks. Simply click on the developer tab and select macros to start recording macros and then in future presentations you can just run them automatically. This is a great time-saving feature.
- Use XML commands: XML stands for extensive markup language and it allows you to basically write code in a way that does not require too much coding knowledge. In the developer tab, all it does is give you more control over the presentation and how your future presentations will work.
- Use ActiveX controls: This is an advanced software framework created by Microsoft. I say that it is advanced because for the average PowerPoint user it is. What it allows you to do, is to have further control of how you imbed and link objects within PowerPoint. So, if you are struggling, let’s say with a chart, you would use ActiveX to fully customize it.
- Create applications to use with Microsoft Office programs: Again, this is a very advanced feature and should only be used by people who have an idea of what they are doing but let’s discuss what this feature allows you to do.
If you know how to write applications, you can write custom ones that are designed to work alongside your PowerPoint presentations. If you can do this, then well done to you because some companies charge a lot of money to do this.
- Use form controls in Microsoft Excel: This feature is especially great for teachers as it allows them to create forms for their students which is more common in 2020 than ever before due to online learning. Using the developer tab you will be able to take more control over your forms and how they present themselves within your presentation.
- Work with the ShapeSheet in Microsoft Visio: Microsoft shape sheet and Visio work together to allow you to display any Office 365 work online easily between you and your colleagues.
To do this, you must have the developer tab open where you will see a small arrow that brings down a few options, and within these options, you will see shape sheets. Now you will be able to edit how your work is shared online.
- Create new shapes and stencils in Microsoft Visio: Microsoft does a great job of giving you everything that you need to make great presentations just by using their regular interface but the developer tab allows you to take it a step further. It allows you to create your own shapes and stencils.
This is great for anyone who is creative and wants to make presentations that are different from anything else out there with their own shapes.
Why do you Need to Use the PowerPoint Developer Tab?
When we first start using PowerPoint, it is easy enough to understand how to make simple presentations. For any questions that you do have, you could just come on to this site and we have probably answered it already, especially for the things that are a of a more complex nature.
All of that being said, using PowerPoint for more technical presentations might require that you take more control of the PowerPoint software itself. The developer tab allows you to do this. You will find that most people who use PowerPoint very often will start using the Developer tab at some point.
Final Thoughts
That brings us to the end of this article and tutorial. As with all of our content, the goal was to make something that people might find complicated and make it easy to understand. We discussed how to enable the developer tab and what it allows you to do.
A note that I would like to add is, if you are a little overwhelmed with all the options in the Developer tab, you can just practice. Have a separate and personal presentation that you use to learn all the tricks and features within the developer tab. Also, don’t forget to bookmark this page as a reference.