
So, you have been asked to take an online session for students or perhaps for a group of executives. You need to use the Scribble Tool on Google Slides for showcasing annotations on a real-time basis but you don’t know how? Well, it is rather quite easy.
To use the scribble tool on Google Slides, simply click on the ‘Insert’ tab found in the menu bar of Google Slides. From the dropdown menu, go to ‘Line’ and from the next menu, simply select ‘Scribble’.
The scribble tool may not be used as much but when you do need to, it is better to know how to use it rather than not. But, there is more to it though.
Keep on reading to know when you should use the scribble tool and the places you can use it. I will go into details with screenshots so you can understand it properly.
A Quick Note Before We Begin – if you want to make jaw-dropping presentations, I would recommend using one of these Presentation Designs. The best part is – it is only $16.5 a month, but you get to download and use as many presentation designs as you like! I personally use it from time-to-time, and it makes my task of making beautiful presentations really quick and easy!
What is the Scribble Tool for Google Slides?
Before you use the scribble tool, let me tell you what it is. Knowing how a tool works is always better. That way you can actually use it the way it is meant to be used. That is honestly true for every tool.
Think of the scribble tool as a freehand drawing pen tool. You use your mouse to create any shape you want. After you finish drawing the shape and let go of your mouse, Google Slides will automatically create a more refined version of the shape you just drew.
This is great for creating shapes that are not already present in the presentation software. You can create your own shapes and have the software tweak them for you. There are more formatting options for it as well. I will touch on that a little bit later in this guide.
What is Scribble Tool Used for in Google Slides?
Use the scribble tool basically when you need to scribble something on your presentation. If there is an uncommon shape you need to draw or anything that requires you to make a freehand shape, this tool will come in handy.
Scribble tool is also perfectly suited for making annotations during a live presentation session using Google Slides. If you need to highlight something on the presentation, or perhaps you need to write a formula on a part of the slide, scribble tool allows you to do that!
Now that you know what the scribble tool in Google Slide is, let’s get on how to use it.
How to Use a Scribble Tool on Google Slides?
Using the scribble tool on Google Slides is pretty easy and intuitive. This is not surprising given Google’s years of expertise in creating user-friendly software for billions of its users. Here is a step-by-step guide on how to use it.
Step 1 – Open Google Slides
The first step is really to start with opening a new Google Slides presentation. Open your presentation to start using the tool. You can either create a new presentation from scratch or use the tool on an existing presentation you want to edit.
To open Google Slides, simply click here or type in “slides.google.com” in the address bar of your browser.
You may be asked to login to your Google (Gmail) account. Once you’ve logged in, we’ll move on to the next step.
Step 2 – Open a Presentation or Create a New One
The second step is to open a presentation you want to edit or create a new blank presentation. When you click on Google Slides, you will see this page.

Click on the ‘+’ icon where it says ‘Blank’ to open a new presentation. It goes without saying that you can also open a previously made presentation from here. After you create a new presentation, you will see this.
Step 3 – Click on ‘Insert’ and then click on “Line”
It is smooth sailing from here. All you need to do to start scribbling is select the ‘Scribble’ option on Google Slides. To do this, you need to click on the ‘Insert’ tab as shown below.
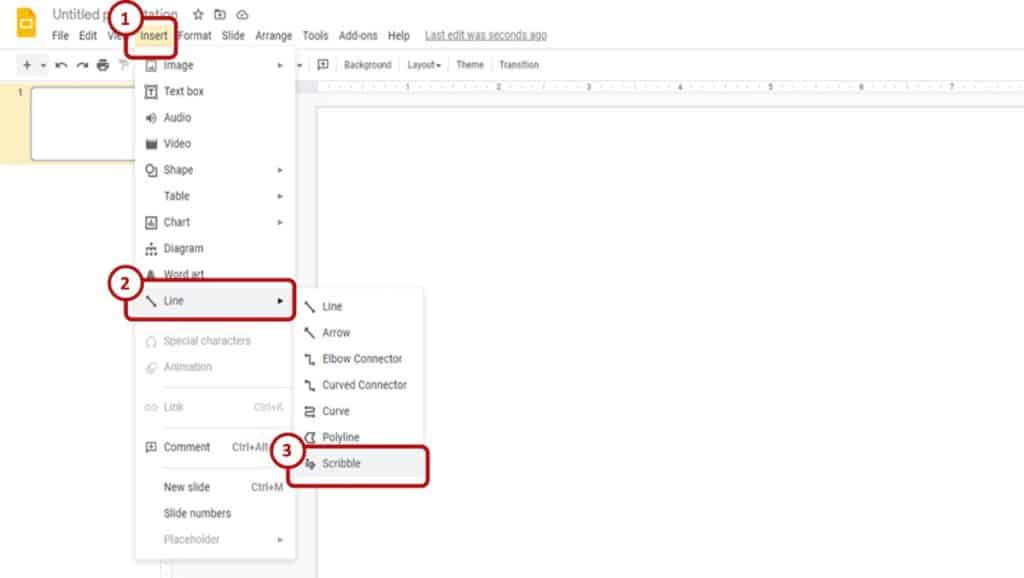
You will see a drop-down menu with all the inserting options available to you. You can add a picture, video, shape, charts, diagrams, lines and a lot more. For us, we want to scribble on our presentation. To do this, now you will hover your mouse on the ‘Line’ option as shown below.
Hovering on ‘Line’ will give you all the types of lines you can add. At the bottom, you can see the ‘Scribble’ option. Simply click on that and Google slides will take you to scribble mode.
Step 4 – Click on ‘Scribble’ and start Scribbling
After you click on ‘Scribble’ from the drop-down line options you can start scribbling right away. Your cursor will turn into a ‘+’ sign. Look at the screenshot. I drew a random shape and Google Slides automatically refined it for me.
It turned it into a shape itself. You can now format it, resize it, change the color, rotate, and more.

How to Change the Scribble Color on Google Slides?
Google Slide not only allows you to scribble, but you can also make changes to the shape you just created. As I mentioned before, you can change the color, size, rotation, and more.
The way you do it is pretty easy.
Changing the Scribble Color on Google Slides
Let us first take a look at how to change the color of your scribble on Google Slides.
So, changing colors is actually quite straight forward. It works similar to how you would change the color of a shape on Google Slides.
But, here’s the step-by-step process to help you understand it –
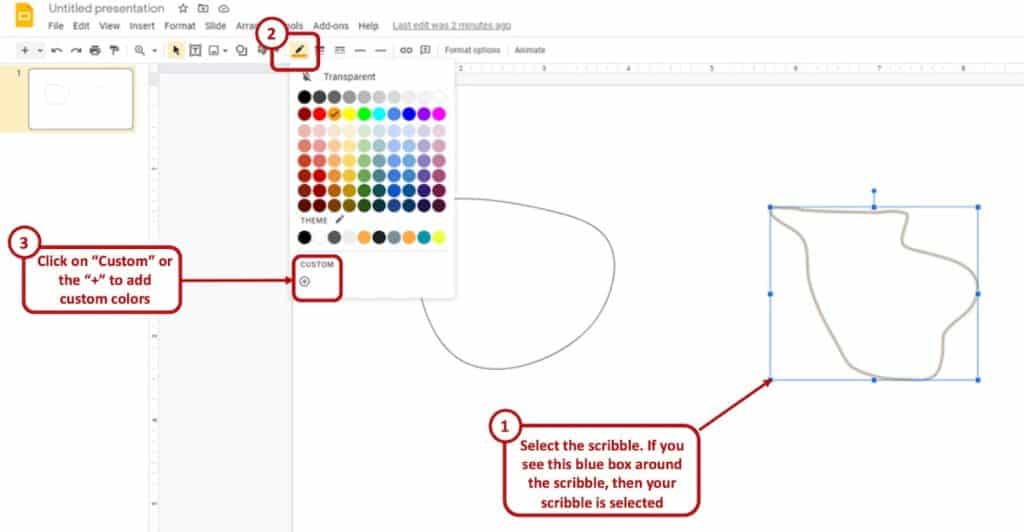
Step 1 – Select the Scribble
The first step is really to click on the scribble that you just created and ensure that you have selected it.
You’ll know when you have selected the scribble if you see a blue color box surrounding your scribble that you have created on Google Slides.
Once you’ve done that, let’s move on to step 2.
Step 2 – Change the Scribble Color
The next step is really to change the scribble color. It is just that simple.
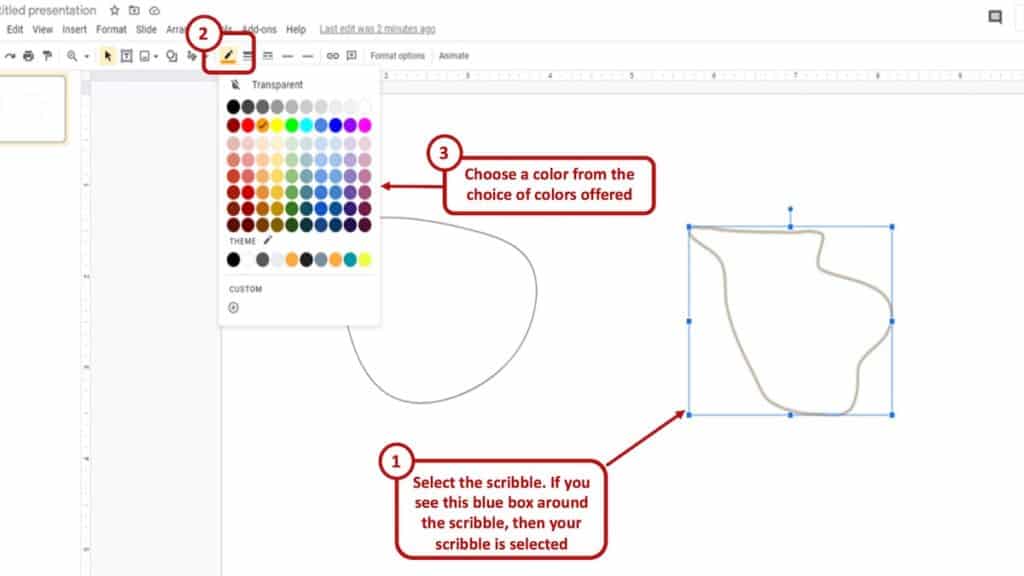
To change the scribble color, make sure you click on the “Line Color” tool from the tool bar on Google Slides.
Google Slides will then show you an array of colors. Choose a color as per your preference to change the color of the scribble. Pick the color you want from here and voila! You are all done.
Sometimes you might not see a specific color you want from the preset color options. Do not worry though. You can have custom colors.
Step 3 – Picking a Custom Color
To pick a custom color, click on ‘Custom’ from the color palette drop-down.
You can either click on the ‘+’ sign or the word ‘custom’ itself. Once you click it, you will be taken to the color picking section.
From here, pick and choose any color you want. There is a color slider to choose the hues. If you know the color code you want, punch the code in and click ‘Ok’. It is as simple as that.
How to Format the Scribbles on Google Slides?
Google Slides will treat the scribble you created like any shape from the list of preset shapes. This means you can interact with it just like you would if you added a ‘square’ or ‘triangle’ shape from the ‘Insert’ tab.
To resize it, click and hold down on any of the corners and drag it to either make it small or big. After you have it to your desired size, simply let go and the shape will adjust automatically.
To rotate it, click and hold on to the small point at top of the shape. You can rotate it to whatever angle you want. There is another way to resize and rotate that is by going to the formatting options.
Here’s how you can use the formatting options for a Scribble on Google Slides –
Select the shape by clicking on it. Google Slides will now present you with a couple of formatting options.
Step 1 – Click on Formatting

The ‘Formatting Options’ will be at the top. Clicking that will reveal a side tab like this image above.
Step 2 – Make Desired Changes
You will see all the formatting options available to you on the side tab. You can rotate and resize, change the position and also add drop shadows or reflections.
This image showcased in step 1 shows all the size and rotation options when you click on the side tab. You can do the same for all the options here. I will not include the screenshots as it is pretty straightforward.
Can you Keep Scribble Selected on Google Slides?
You will immediately notice one thing after you have made your first scribble. The tool disappears and you are put back to the default cursor. If you need to make a scribble again you need to go through the process of selecting the scribble tool all over again. That might be a hassle if you need to repeat it a few times.
Unfortunately, that is how it is for now. Google does not allow you to keep the scribble tool selected. Once you draw a single shape, you need to reselect the tool to start scribbling again. This is a limitation of Google Slides as of this point.
Can you Draw on Google Slides while Presenting?
You can’t draw on Google Slides while presenting. There are two small workarounds for this though. Enter Jamboard. With Google Jamboard, you can convert your Google Slides into an image and annotate it. Since Jamboard is a collaborative tool, it makes it easy for groups of people to come together and brainstorm.
There are two ways you can draw on Google Slides when in presentation mode. Let’s start with method 1.
Method 1 – Using Jamboard and Google Slides together
Jamboard is an interactive system made available as part of Google Workspace (formerly known as G Suite). Jamboard has been specifically designed and provided by Google for online collaboration!
Using Jamboard and Google Slides together can help you up your online tutoring or collaboration game significantly.
Here’s what you need to do to draw on Google Slides while presenting –
Step 1 – Export slide as an image
First up you would want to turn your Google Slide into an image. Doing this is pretty easy. One thing to note here is you can only export a single slide as an image at a time.
Anyway, select the slide you want to annotate on. Click ‘File’ on the upper hand side, then click on ‘Download’ and download as a JPEG file.
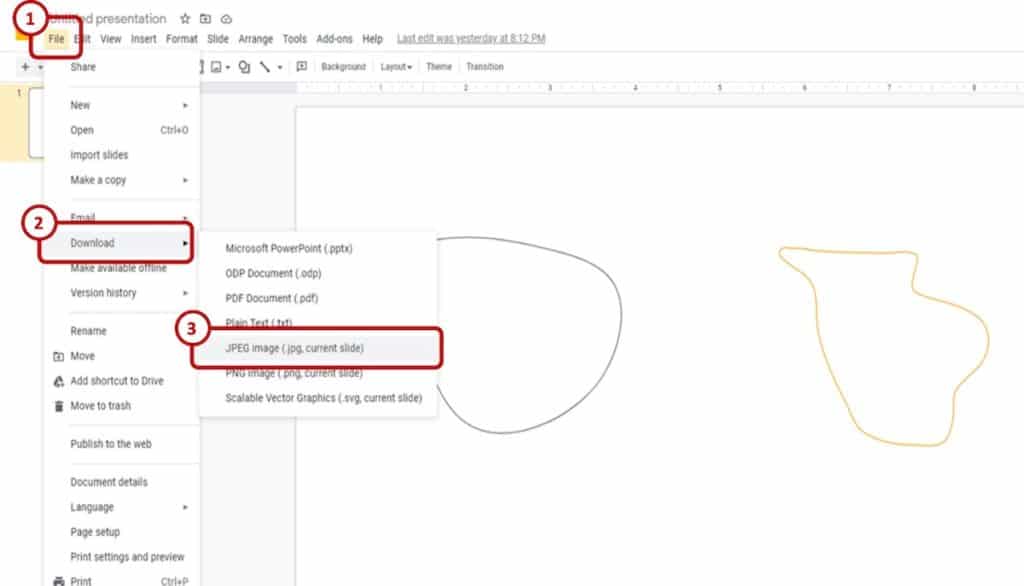
It will look something like this. Now you can import this image on Google Drive and bring it to Jamboard.
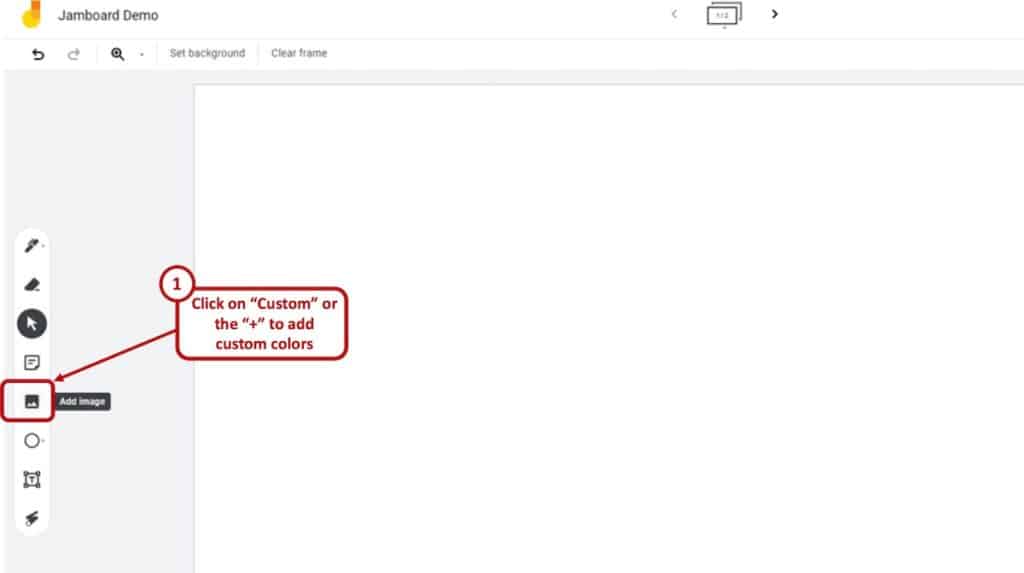
Step 2 – Go to Jamboard and Click ‘Add Image’
Now, you will need to upload the image to Jamboard. To go to your Jamboard homepage, simply type in jamboard.google.com in the address bar of your browser or click here. You may then be asked to log in to your Google account. Once you are logged in, you will be taken to the homepage of your Jamboard.
The image below is your Jamboard home page. This is what you will see when you first visit the site. You will see an options tab on the left of the screen. There will be a ‘Add image’ option. Click it.
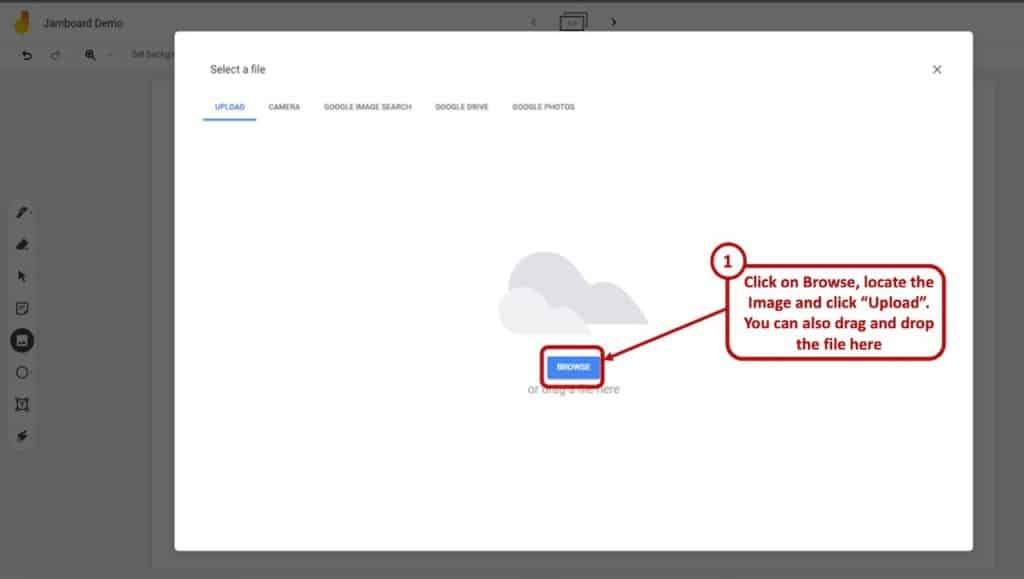
Step 3 – Upload Image from where you want
Jamboard allows you to upload images from a couple of places. You can either upload it from your computer, Google Drive, Google Camera and more.
For demo purposes, we uploaded the same demo slide. When you upload the image, the image will not be the same size as the full background. You will need to resize it to fit the whole thing. You can easily do this by dragging the image by its corners and filling the background.
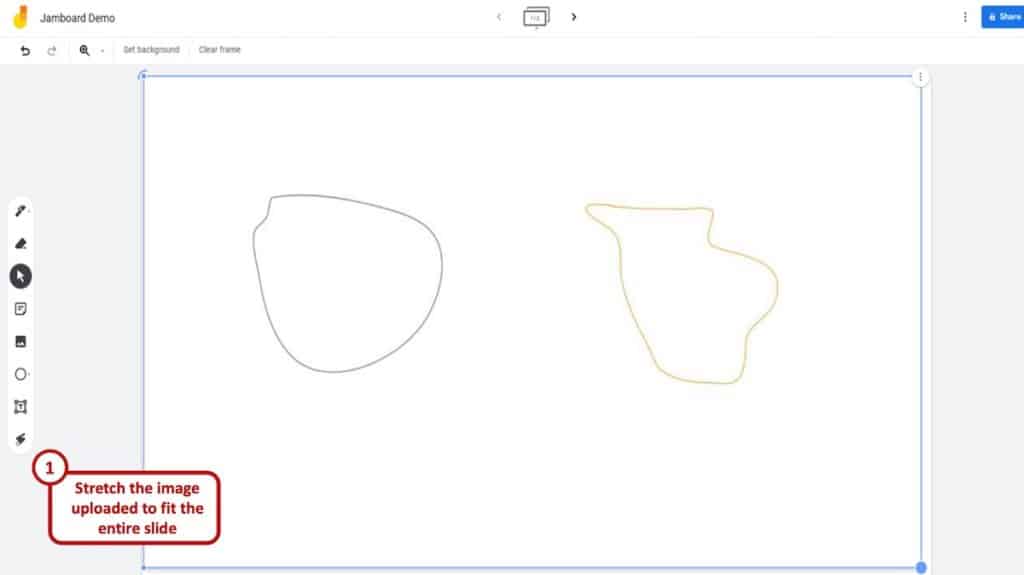
After you drag it to fit the background, you can annotate on it and draw however you would like.
Note:
If you do not want to upload an image and would rather have an immovable background as the image of the slide, you can change the background itself to be the image. This will make the image fixed in a position that you can draw over afterward.
To do this click on the ‘Change background’ option above and at the left side of the magnifying icon and select the image you want to annotate over.
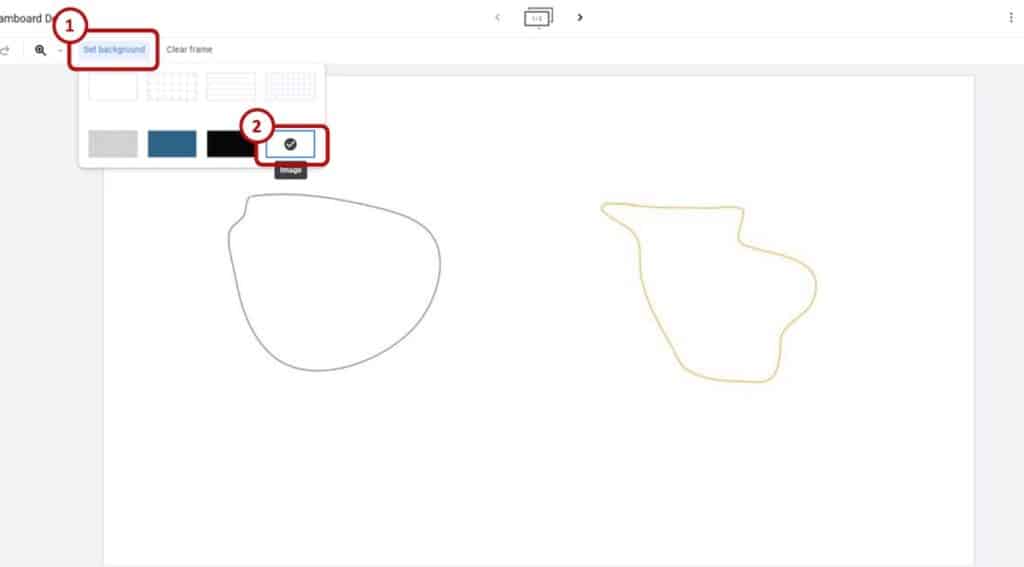
On the lower left-hand side, you will see an option to upload any image and set it as the background.
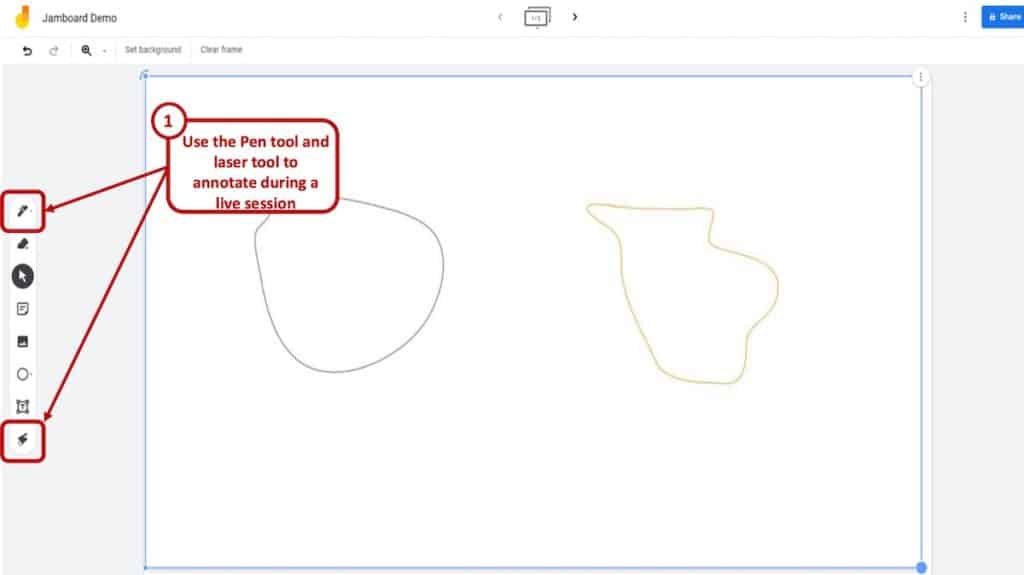
You can now annotate over the image by using the tools on the left-hand side. Pen over it or draw different shapes. There is also a ‘Laser’ tool that allows you to trace a line that will disappear after you let go of the mouse.
This is helpful when you are explaining something to others and do not want a permanent line on the image.
Method 2 – Publishing to Web and Using Web Paint Chrome Extension
We will be the first to admit, the first method is a bit cumbersome. Thankfully, there is a second method you can opt for. That is by publishing your presentation to the web and using a chrome extension called ‘Web Paint’.
Before you can use this method, you will need to get a chrome extension from the Chrome Web Store.
Step 1 – Install the extension to Google Chrome Web Browser
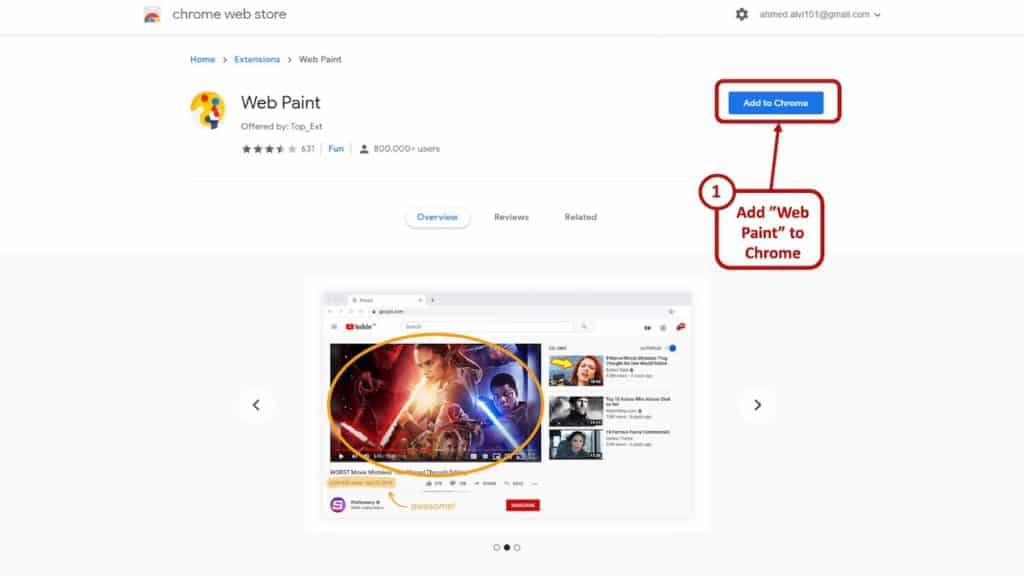
Open the Chrome Web Store. Search ‘Web Paint‘ and you will find the extension. Once you find it, add it to chrome. You will have the extension installed on your chrome web browser.
Step 2 – Add a Keyboard Shortcut
After that, you will need to add a keyboard shortcut for that extension to launch it. To do this, click on the three dots on the upper left-hand side of Google Chrome and click on ‘Settings’.
After you click on ‘Settings’ you will land here. On the bottom left you will see an option to manage extensions.
Click on extensions. You will land on the extension manager.
Step 3 – Add keyboard shortcut
On the left-hand side, you will see a hamburger menu option. Click that to open keyboard shortcuts.
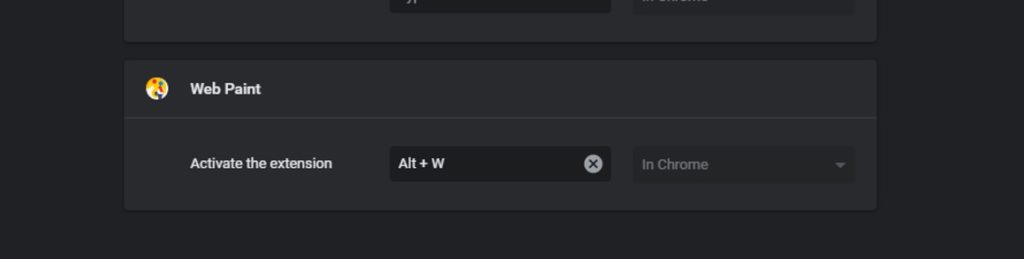
Click keyboard shortcut and assign a keyboard shortcut for the extension. I have mine set as ALT + W. Make sure to set it to something that will not interfere with any other functionalities.
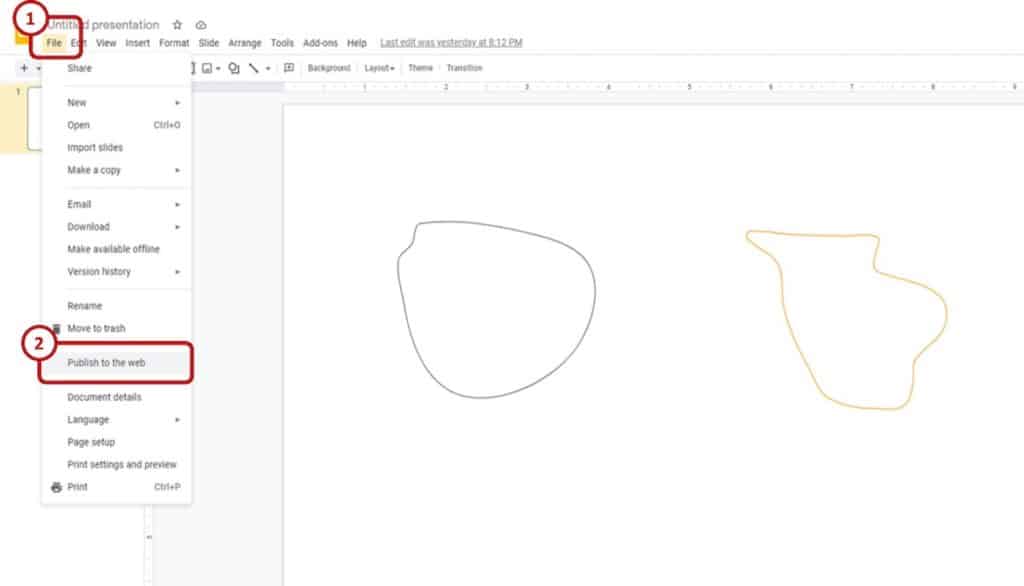
Step 4 – Publish Presentation to the web
Now you need to publish your Google Slide presentation to the web. You cannot annotate on the normal presentation view as I have mentioned before. Click on ‘File’ on the top-right hand side on Google Slides. Then click ‘Publish to the web’.
When you click ‘Publish to the web’, you will see these options.
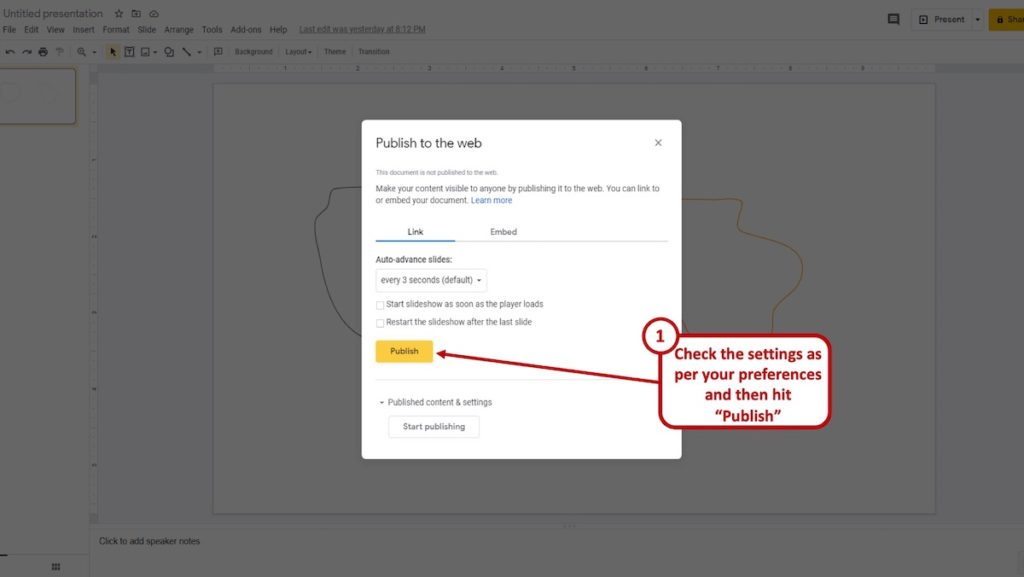
Choose the settings you can want and then click ‘Publish’. You will be given a link. This link is shareable and anyone who has the link can now view your presentation.
Step 5 – Use the keyboard shortcut to start annotating
Copy and paste the link on Chrome’s address bar and press ‘Enter’. Now press the keyboard shortcut combo you set for the Web Paint extension. In my case, it is ALT + W.
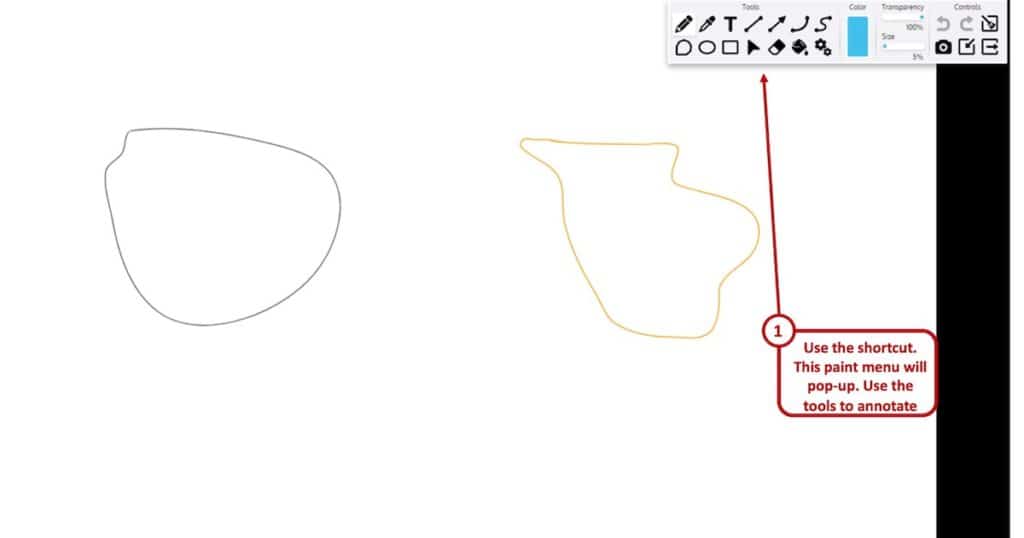
The extension’s annotation tools will be visible on top of the slides and you can draw on the slides from here.
How to Scribble on Google Slides using iPad?
Unfortunately scribbling on Google Slides if you are using an iPad is not possible at the moment. You can use third-party apps that let you do this very easily. There are apps for the iPad like Pear Note or Notability.
A great feature of the iPad is the Apple Pencil. It allows you to draw and write on the tablet with ease and feels very similar to writing on paper. I have to be the bearer of bad news here though.
Google’s apps do not support the Apple Pencil at this moment. Other apps from Microsoft and Adobe do support Apple Pencil. So, you can draw and use the Pencil on PowerPoint, for example.
You will need to export the Google slides as PDF and use the Pencil on an app that does support it.
Does XP Pen work on Google Slides?
XP Pens does not work on Google Slides either. You will need to convert it into a PDF and use it with a compatible app. Or you can export the presentation as a PowerPoint presentation and use the XP Pen that way.
Final Thoughts
There you have it. Now you know how to use scribble tool on Google Slides and a host of other ways to make the best use of this free presentation software. There are some limitations, but the ability to collaborate easily and it being free is one of its major strengths.
Thank you for reading till the end. I hope this article was able to help you learn how to use the scribble tool on Google Slides and also to annotate during a live online session!