![How to Circle Something in PowerPoint? [Step-by-Step Guide!]](https://artofpresentations.com/wp-content/uploads/2023/03/Featured-Image.jpg)
Circling something in PowerPoint is a useful tool to emphasize or highlight important content in a presentation. By using a circle shape or drawing a circle around an item, you can draw attention to it and help your audience better understand your message.
To circle something in PowerPoint, go to the “Illustrations” group of the “Insert” tab. Select the “oval” shape in the “Shapes” option and draw it over the required item. Then, click on “Shape Outline” to outline the shape and “Shape Fill” to select the “No Fill” option in the “Shape Format” menu.
This article will let you learn step-by-step how to circle something in PowerPoint, making it easier for you to create engaging and impactful presentations. Let’s get started!
1. How to Insert a Circle in PowerPoint?
In Microsoft PowerPoint, the “Shapes” feature allows you to insert any shape including a circle into your presentation slide. To insert a circle into the presentation slide, follow the 3 simple steps.
Step-1: Click on the “Insert” tab
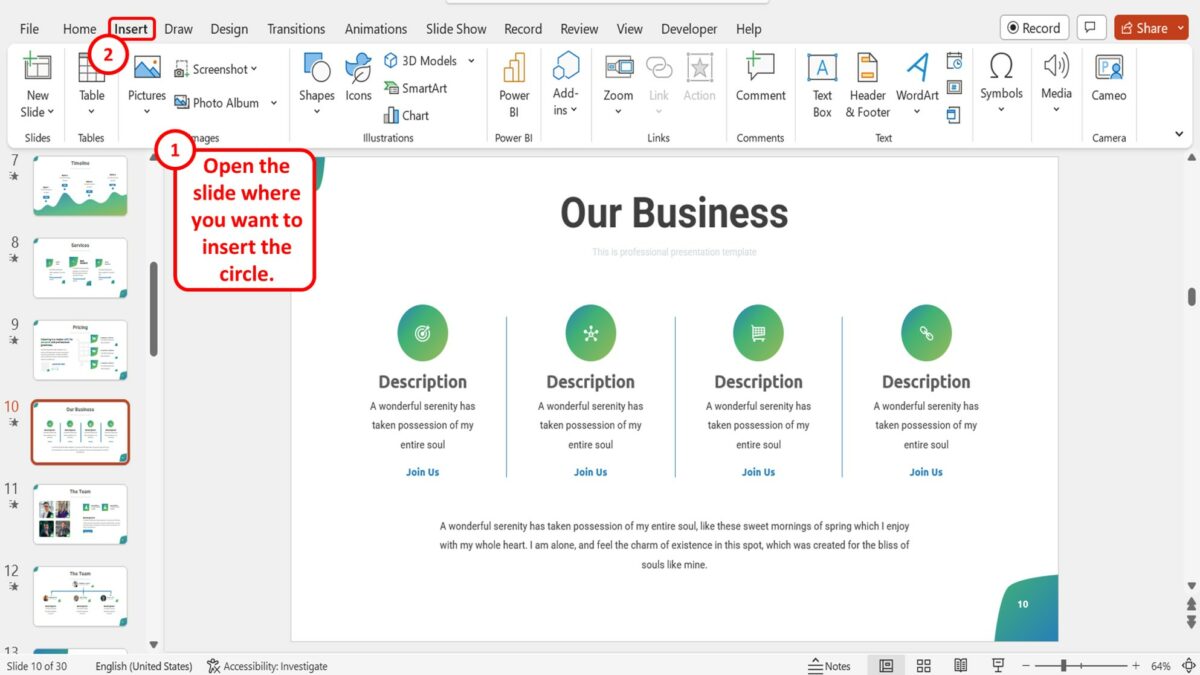
In the presentation file, open the slide where you want to insert the circle. Then click on the “Insert” tab in the menu ribbon located at the top of the screen.
Step-2: Click on the “Shapes” option
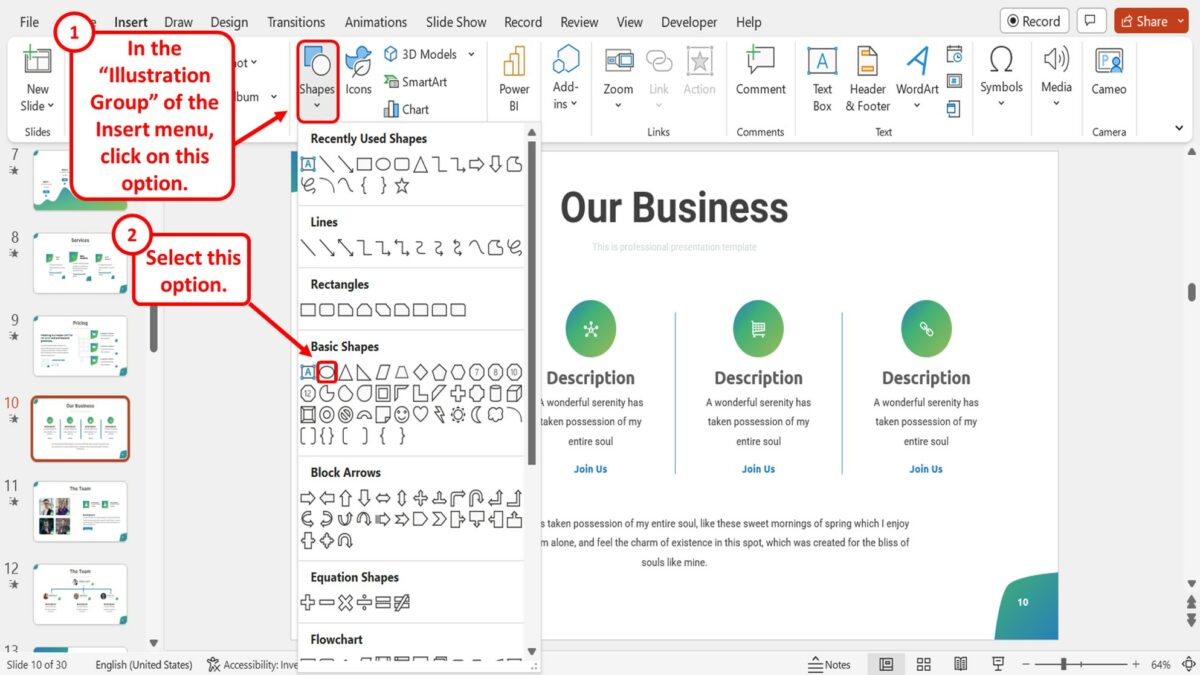
In the “Illustrations” group of the “Insert” menu, click on the “Shapes” option. Then click on the “Oval” option in the “Basic Shapes” section of the dropdown menu under the “Shapes” option.
Step-3: Draw the circle
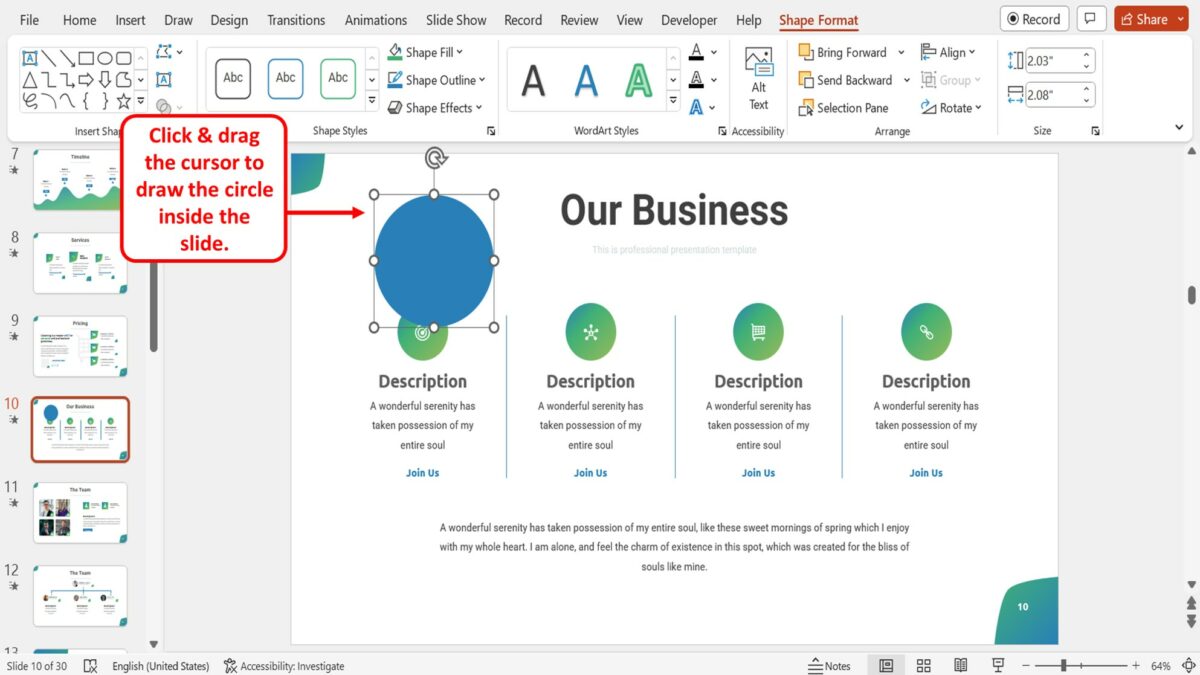
Now all you have to do is click and drag the cursor on the open slide to draw the circle inside the slide.
2. How to Draw a Circle in PowerPoint?
Using the “Draw” feature in Microsoft PowerPoint, you can draw a freeform circle. To do so, follow the 4 easy steps.
Step-1: Click on the “Draw” tab
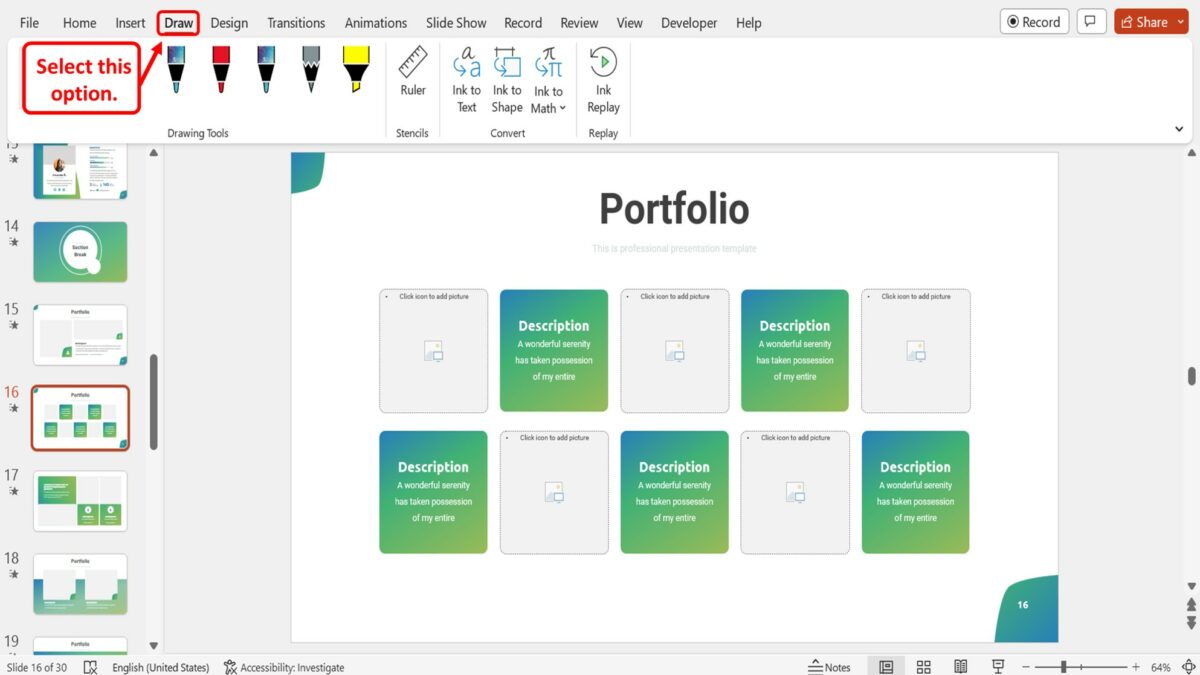
In the menu ribbon located at the top of the screen, you have to first click on the “Draw” tab to open the “Draw” menu.
Step-2: Draw the circle
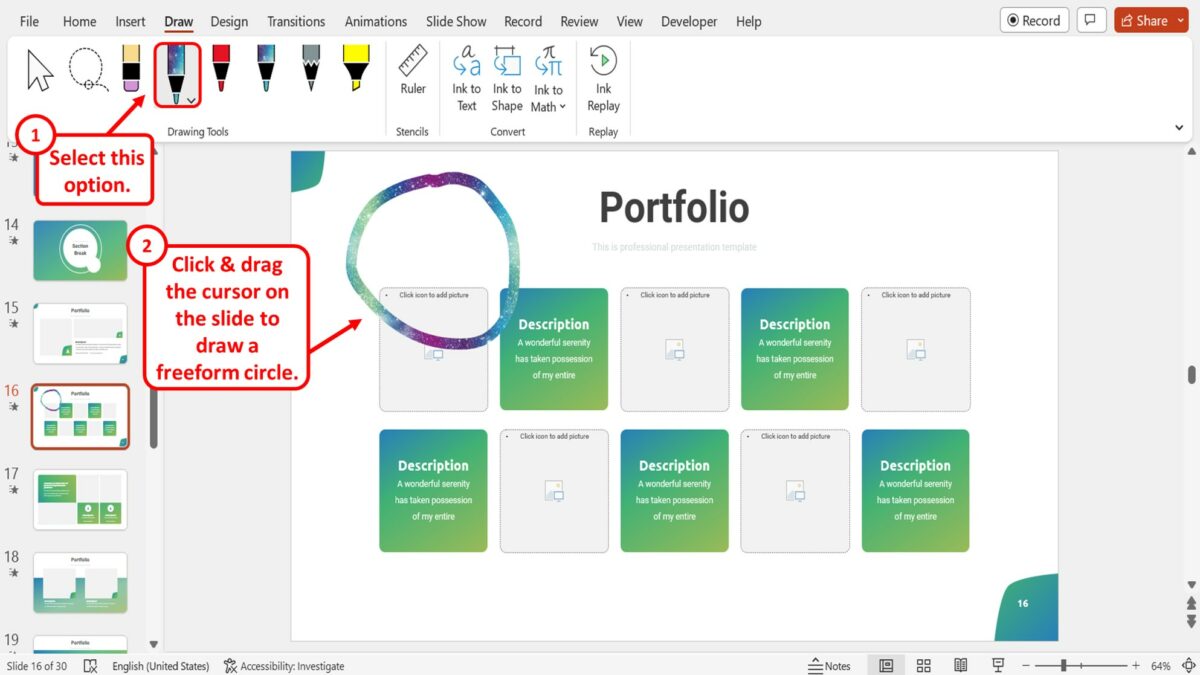
In the “Drawing Tools” group of the “Draw” menu, click on the “Pen” option. Then all you have to do is click and drag the cursor on the slide to draw a freeform circle.
Step-3: Click on the “Select” option
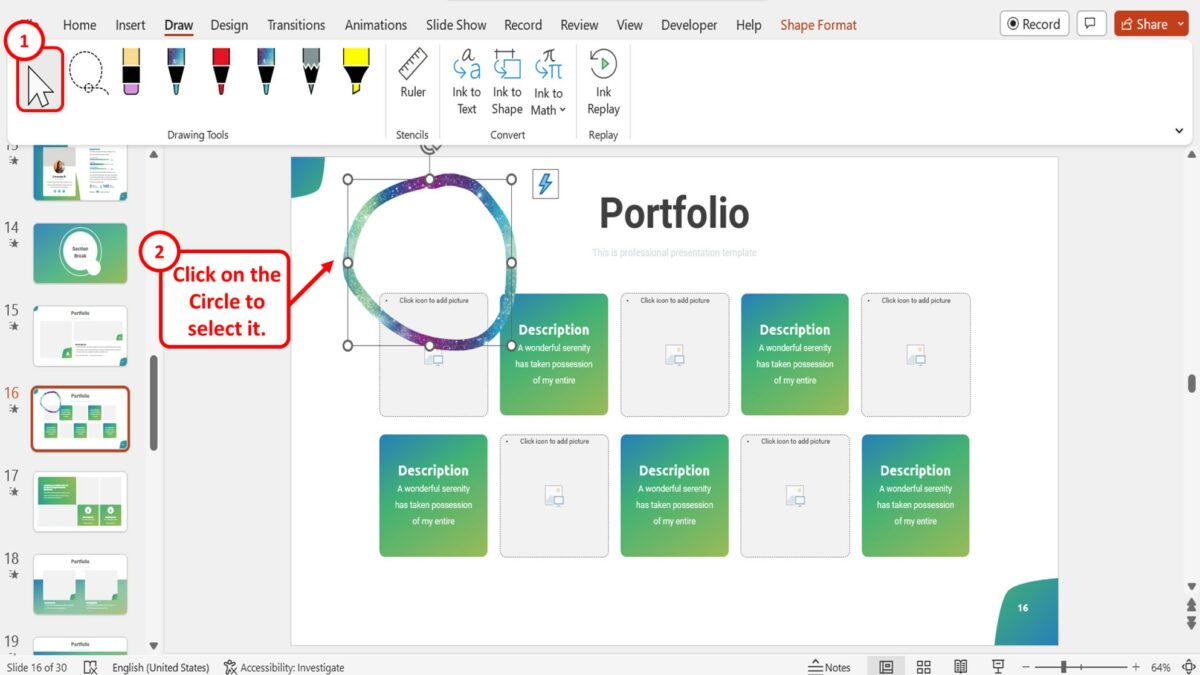
If you want to convert the freeform circle to a proper circle, you can do so by using the “Convert” feature. Click on the “Select” option in the “Drawing Tools” group of the “Draw” menu. Then click on the circle on the slide to select it.
Step-4: Click on the “Ink to Shape” option

The final step is to click on the “Ink to Shape” option in the “Convert” group of the “Draw” menu to convert the freeform circle into a proper circle shape.
2.1 How to Draw a Circle with Annotation Tools in PowerPoint?
During a presentation, you can use the “Annotation Tools” in Microsoft PowerPoint “Slide Show” view to draw a circle around a text or object to highlight it. All you have to do is follow the 3 easy steps.
Step-1: Click on the “Slide Show” tab
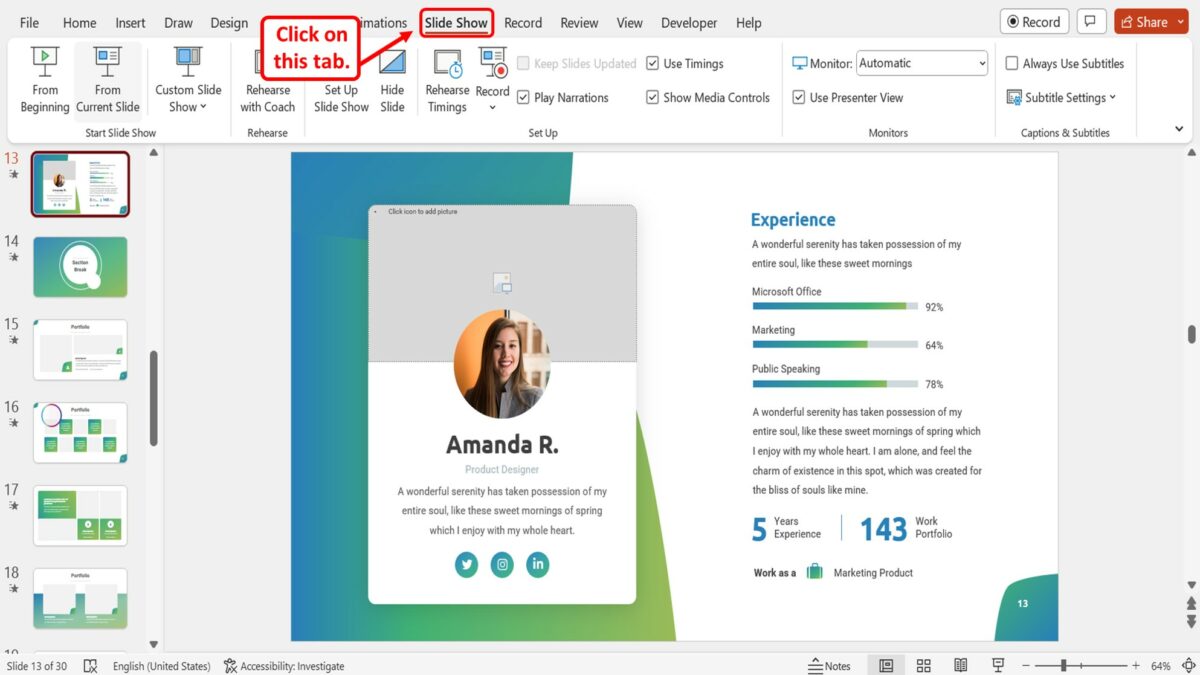
The first step is to open the “Slide Show” view. To do so, click on the “Slide Show” tab in the menu ribbon.
Step-2: Click on the “From Current Slide” option

Click on the “From Current Slide” option in the “Start Slide Show” group of the “Slide Show” menu. You can alternatively press the “Shift+F5” keys on your keyboard to start the presentation.
Step-3: Click on the “Pen” option
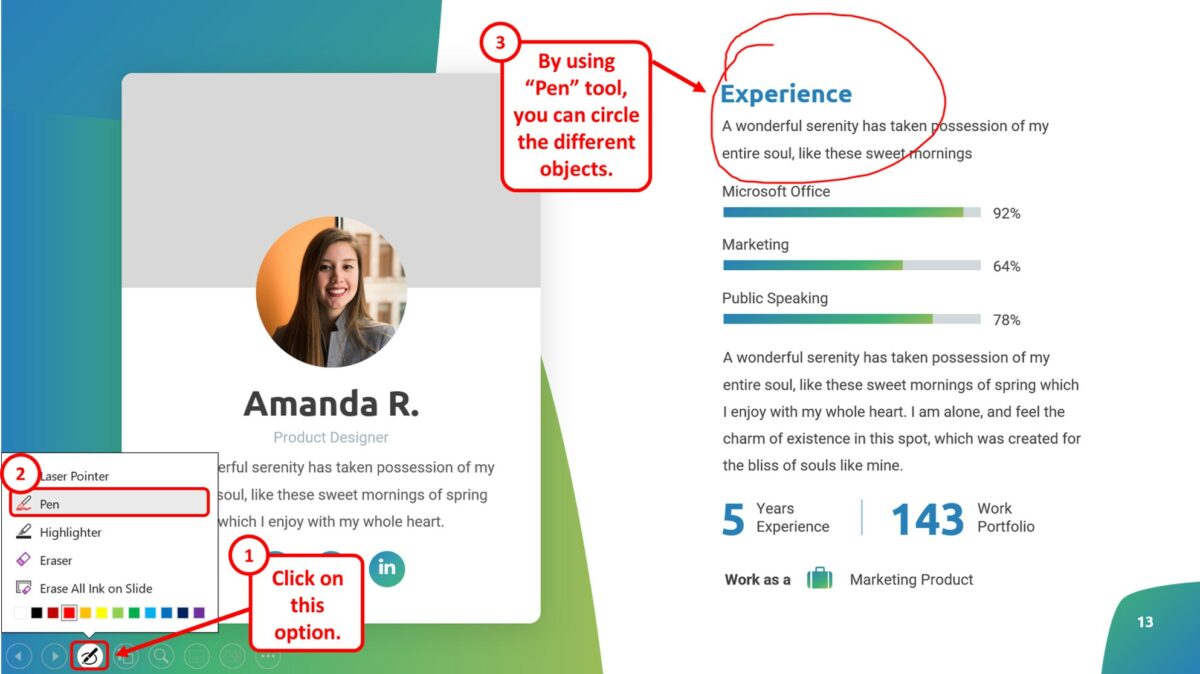
In the “Slide Show” view, click on the “Annotations” toolbar at the bottom of the screen. Then click on the “Pen” option from the pop-up menu. You can now use the “Pen” tool to circle different objects on the slide during the presentation.
3. How to Circle an Item in PowerPoint?
To circle an item in Microsoft PowerPoint, you have to use the “Shapes” feature available in the “Insert” menu. All you have to do is follow the 5 simple steps.
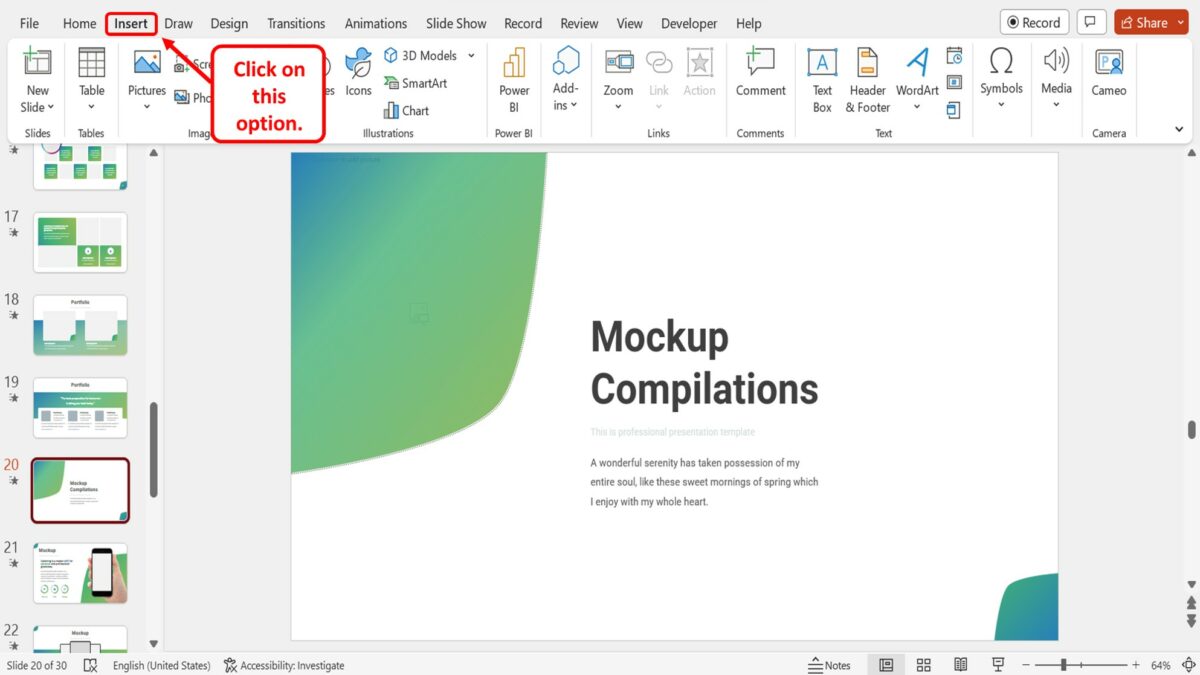
Step-1: Click on the “Insert” tab
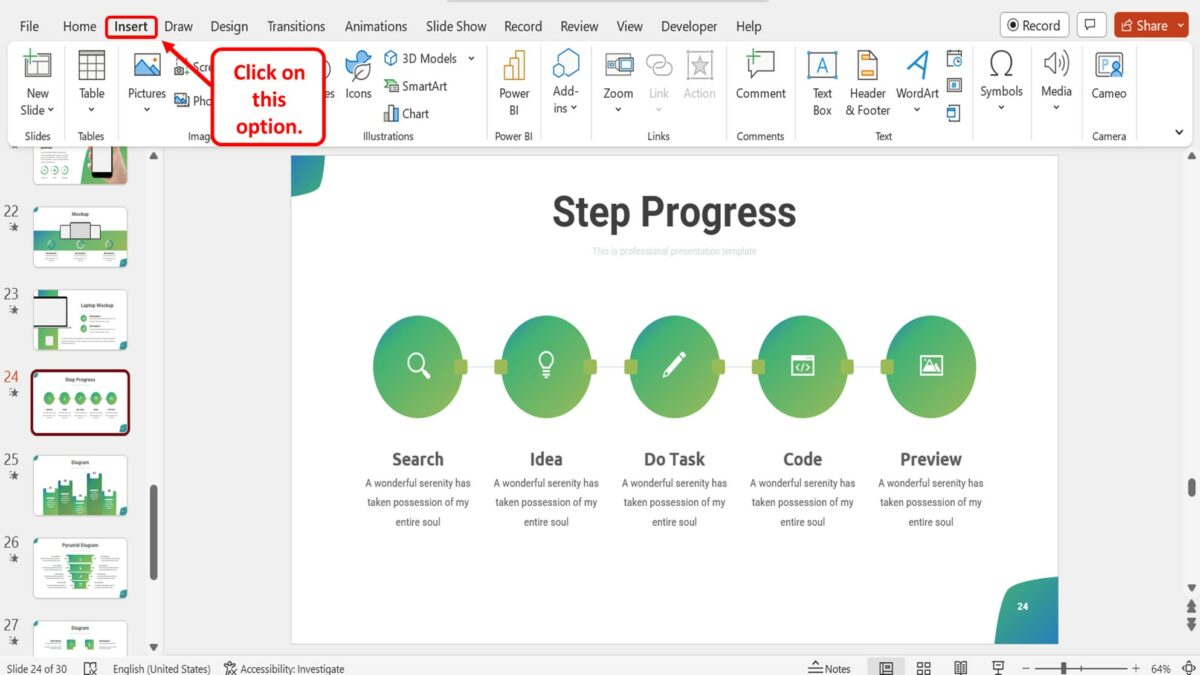
The first step is to open the “Insert” menu. Click on the “Insert” tab in the menu ribbon located at the top of the screen.
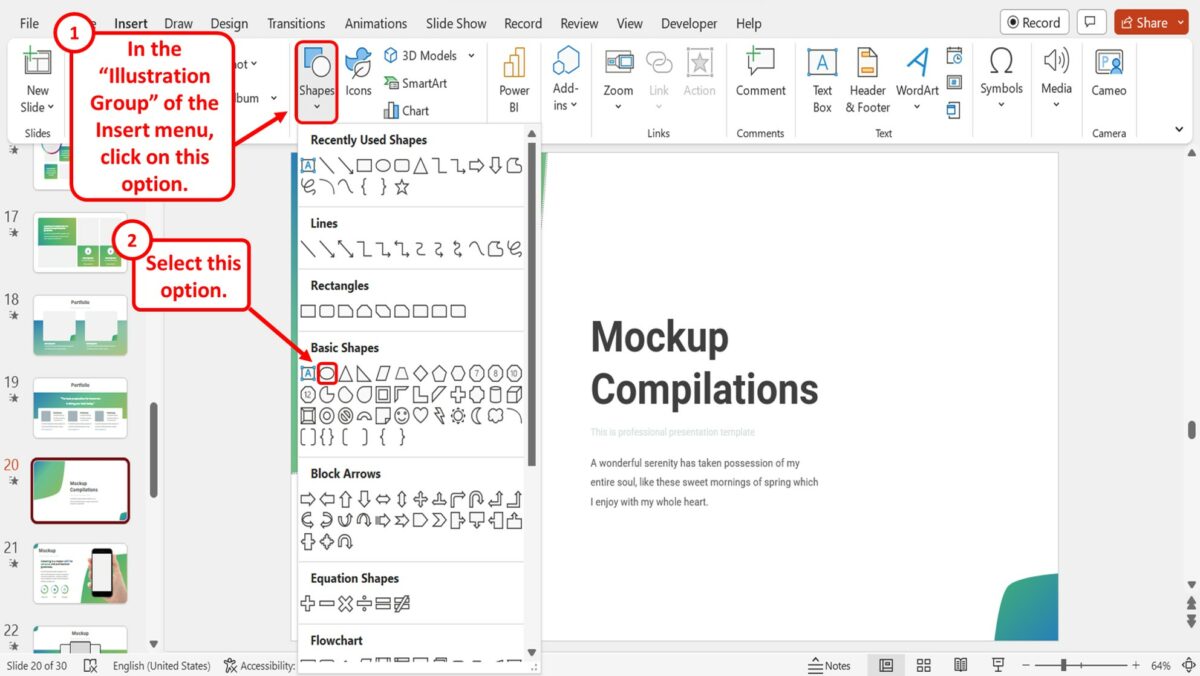
Step-2: Click on the “Shapes” option
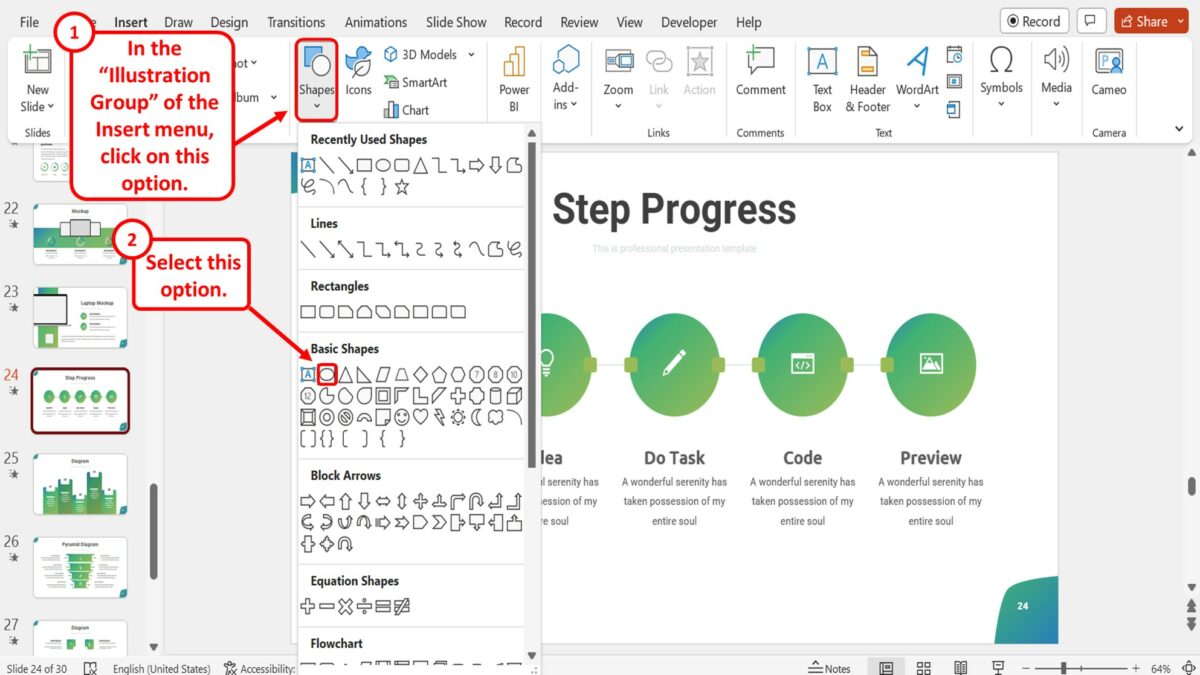
In the “Illustrations” group of the “Insert” menu, click on the “Shapes” option. In the “Basic Shapes” section of the dropdown menu under the “Shapes” option, click on the “Oval” option.
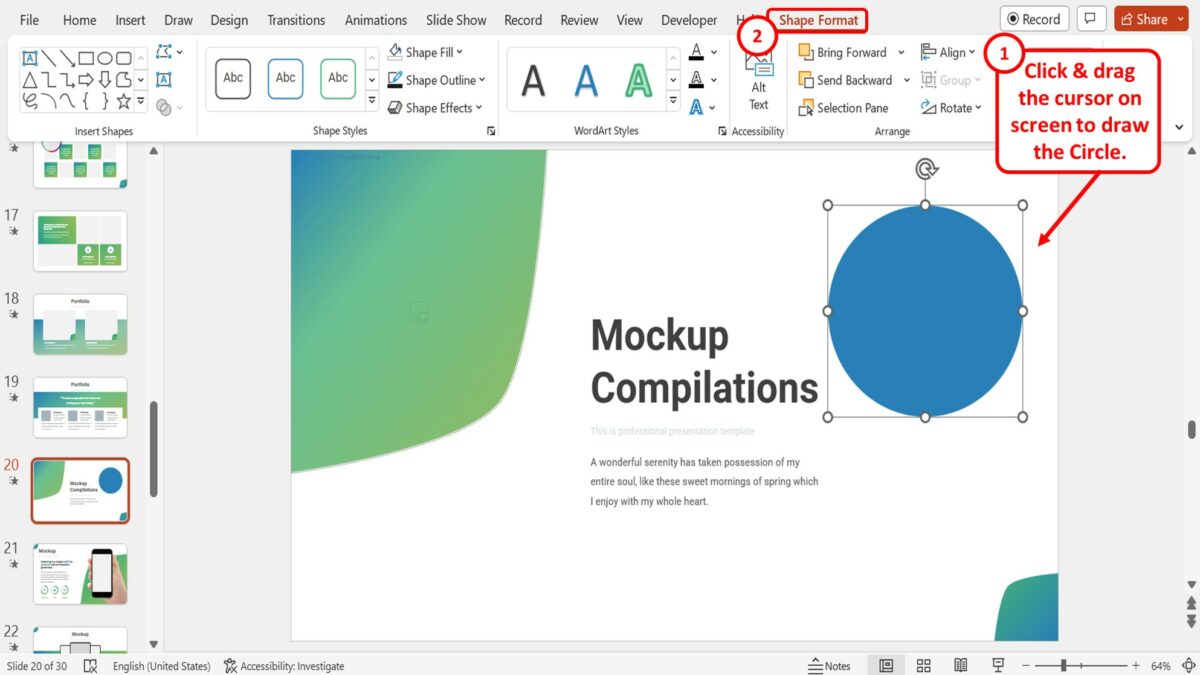
Step-3: Click on the “Shape Format” tab
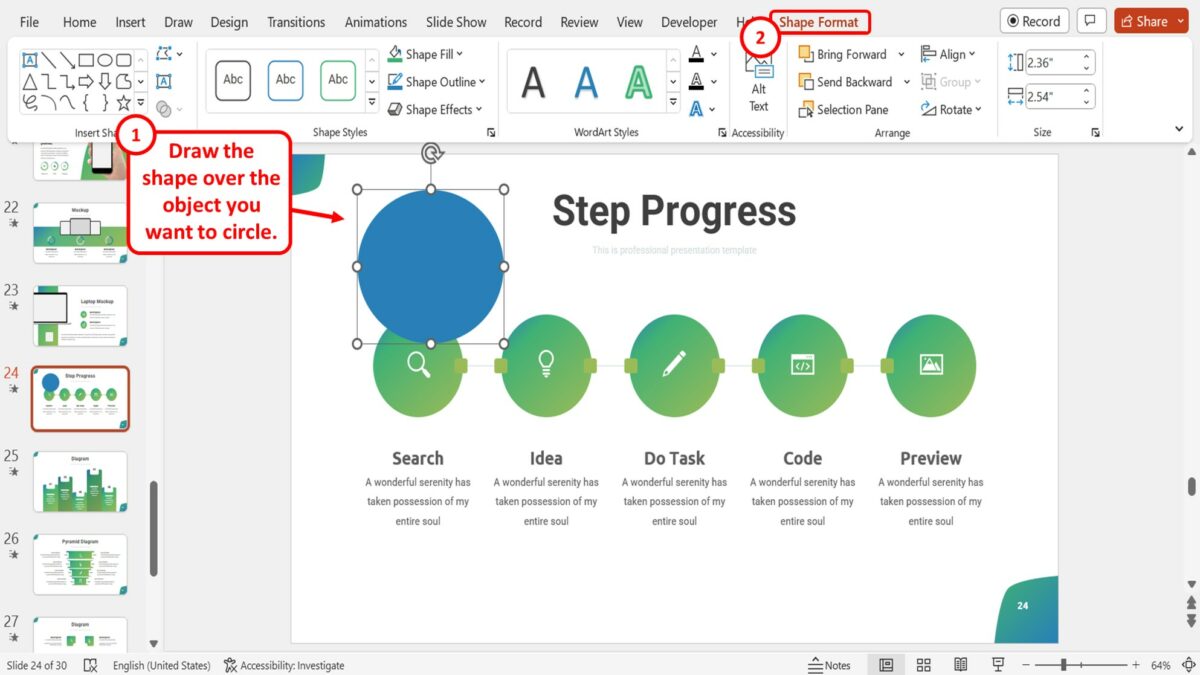
The next step is to draw the shape over the object that you want to circle on the slide. Then click on the “Shape Format” tab which is the last option in the menu ribbon at the top of the screen.
Step-4: Click on the “Shape Outline” option
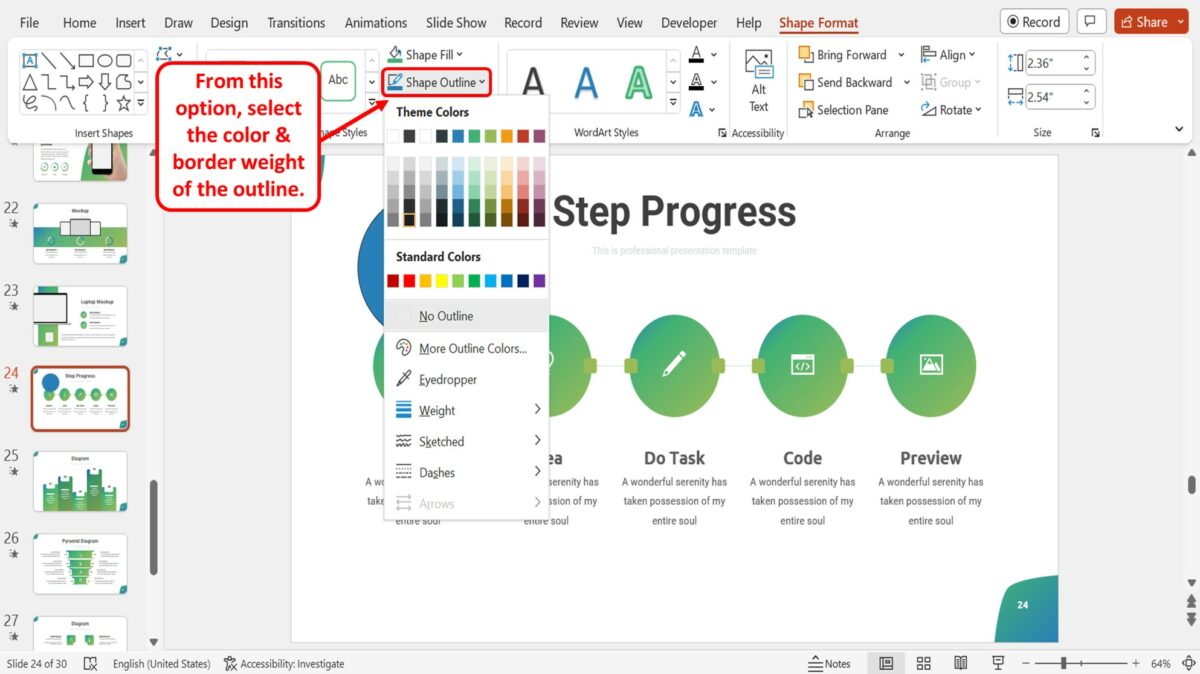
In the “Shape Styles” group of the “Shape Format” menu, click on the “Shape Outline” option. In the dropdown menu under the “Shape Outline” option, you can now select an outline color and customize the border weight of the outline. Add a dark and heavy outline to the shape.
Step-5: Click on the “Shape Fill” option
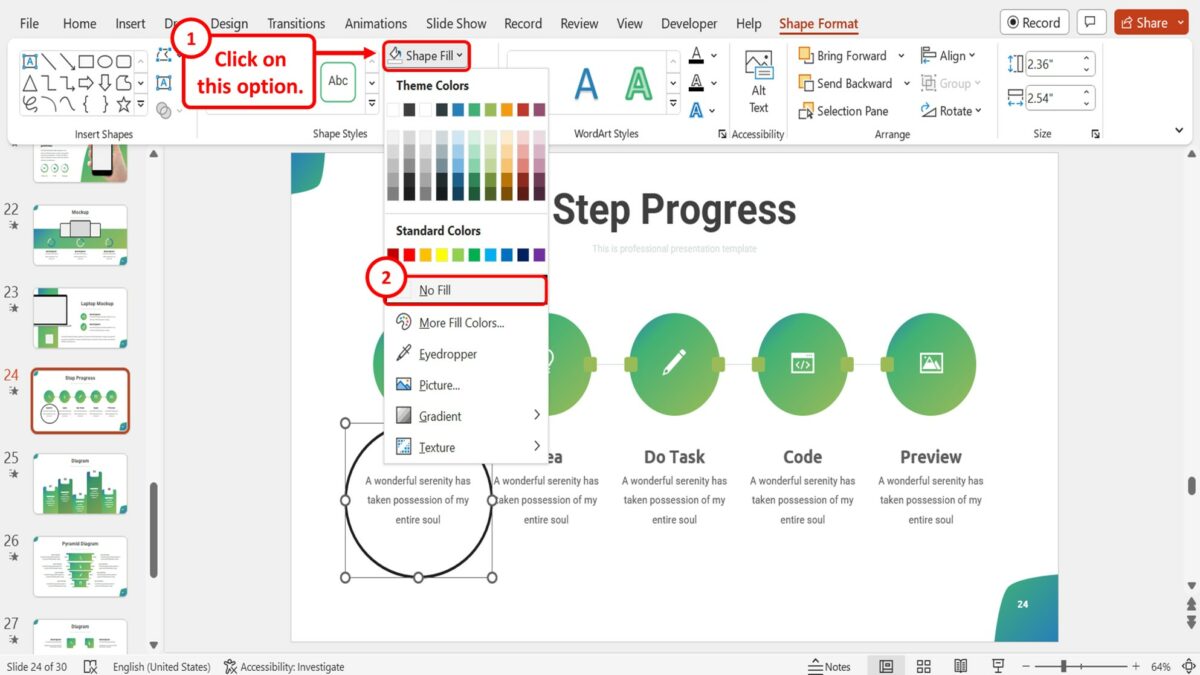
The final step is to make the shape transparent to show the item you have circled. Click on the “Shape Fill” option located above the “Shape Outline” option in the “Shape Format” menu. Then all you have to do is click on the “No Fill” option in the dropdown menu under the “Shape Fill” option.
4. How to Insert Text in a Circle in PowerPoint?
In Microsoft PowerPoint, you can type inside a shape to add text to it. To insert text inside a circle in PowerPoint, follow the 5 simple steps.
Step-1: Click on the “Insert” tab
The first step is to click on the “Insert” tab in the menu ribbon located at the top of the screen to open the “Insert” menu.
Step-2: Click on the “Oval” option
The next step is to insert the circle into the slide. To do so, click on the “Shapes” option in the “Illustrations” group of the “Insert” menu. In the dropdown menu under the “Shapes” option, click on the “Oval” icon in the “Basic Shapes” section.
Step-3: Click on the “Shape Format” tab
Now all you have to do is click and drag the cursor on the screen to draw the circle. Then click on the “Shape Format” tab in the menu ribbon located at the top of the screen.
Step-4: Click on the “Shape Styles” gallery
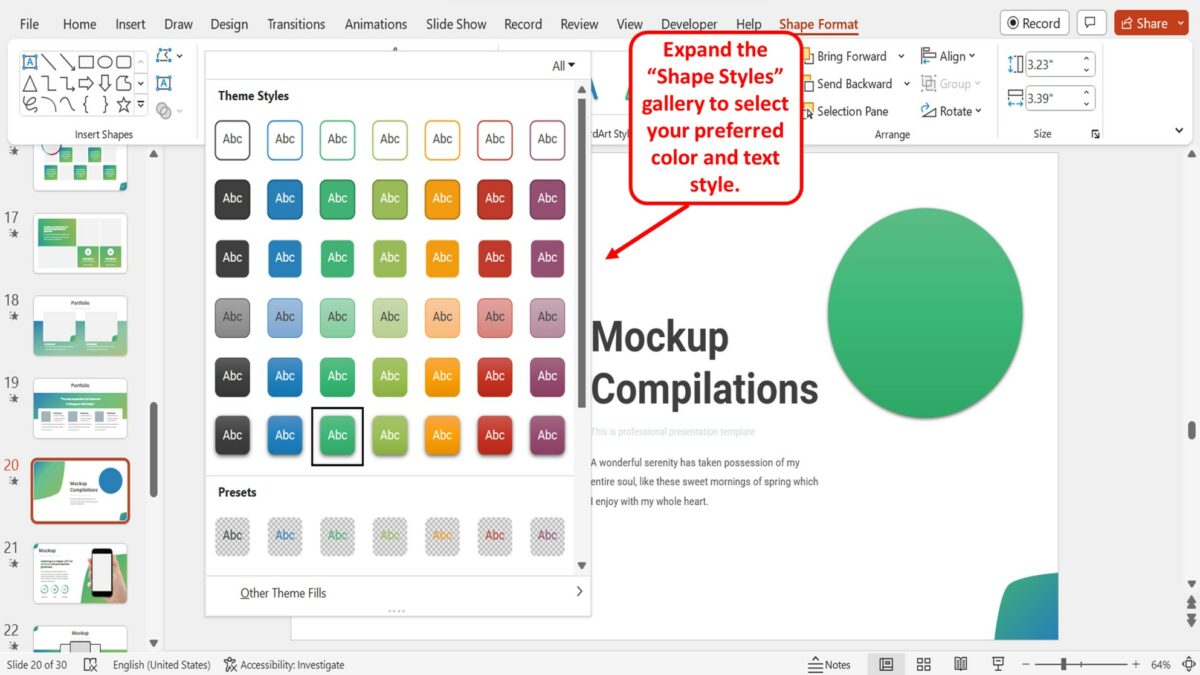
In the “Shape Format” menu, you have to now expand the “Shape Styles” gallery. Click on the “More” option which is the down arrow at the bottom right corner of the “Shape Styles” gallery. Then click on your preferred color and text style for the circle.
Step-5: “Double Click” on the circle
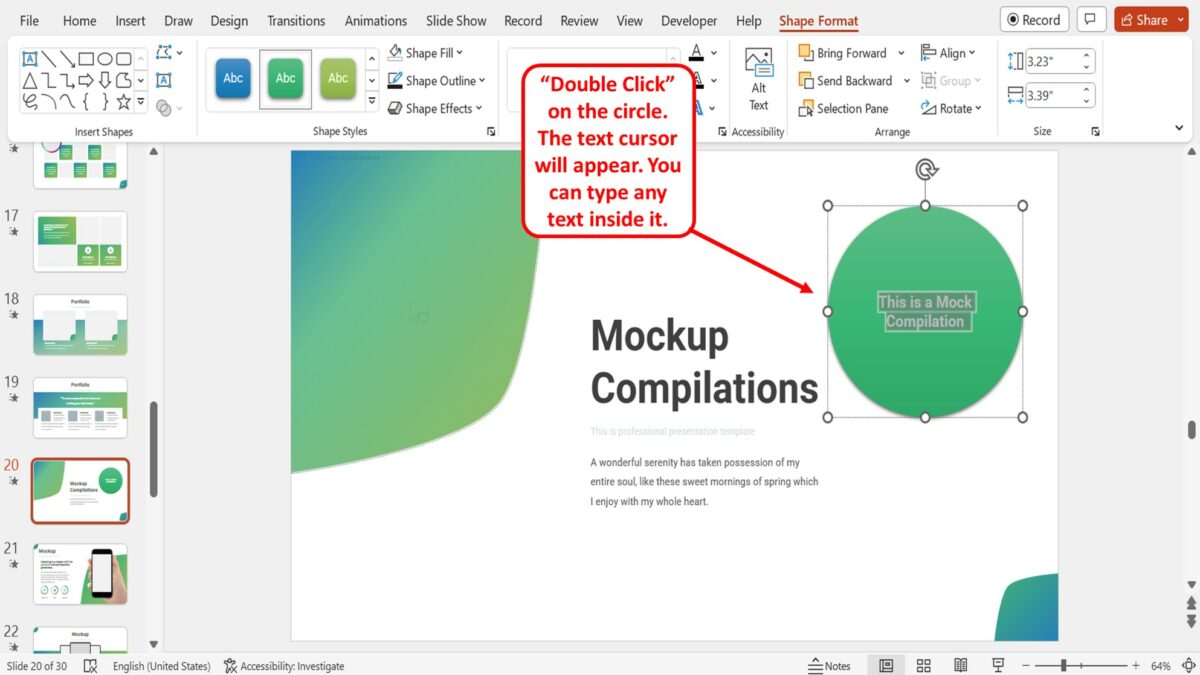
Now all you have to do is “Double Click” on the circle you have inserted into the slide. The text cursor will appear. You can now type in any text that you want to add inside the circle.