Have you ever been in a situation where you find this perfect image for your slide and then put it on your PPT, but when you project it on a big screen the image gets totally pixelated or blurred? Trust me, we’ve all been there! 🙂 In case you are wondering, the cause of the problem is Image Resolution.
So, why does this happen and what can you do to avoid this? Today, we learn all about image resolution for your PowerPoint presentation and a few quick things that can help you avoid such a situation.
But first, what is the best image resolution for using an image in PowerPoint? Any image that has a resolution of at least 150 PPI (Pixels Per Inch) should be good enough to be used in PowerPoint without getting pixelated or stretched when displayed on a standard projector screen.
The topic of image resolution can be very complex if not understood correctly. So, let’s break it down!
What does image resolution mean?
In order to truly understand what image resolution means, we need to first understand a few other fundamental concepts. The best place for us to start would be to really understand what an image is made of i.e. pixels.
What is a pixel?
Pixel stands for picture element. Pixel is the smallest element that can be displayed on a screen. It is that tiny, tiny, single little square that shows up on screen when you really zoom in to an image to the maximum. When these pixels are all put together stacked tightly in a grid, it ultimately creates an image you see on your screen.
Let’s look at the following example –
![]()
![]()
When you take an image as represented in image A above, and zoom in further, you will notice that the original image starts to blur. When you continue zooming in further, you will reach a stage where the original image is unrecognizable. You will also notice a bunch of boxes. All these boxes have different color elements and are stacked together to form the original image. These individual boxes are called “PIXEL” and it forms the basic building block of an image.
So, what is an Image Size?
The size of an image means the total number of pixels stacked in the width (w) by the total number of pixels stacked in height (h) of a particular image. This is also known as the dimensions of an image.
Image size = width (w) x height (h) of an image
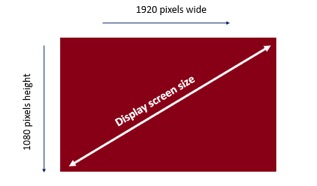
For example, a typical 1920 X 1080 image file size means that an image with a width of 1920 pixels and an image height of 1080 pixels. It is measured in pixels since 1 pixel is a unit measurement of an image. Thus, the total number of pixels in an 2073600 pixels or approximately 2 megapixels (2 mp). Thus, when you say your phone camera is 2 megapixels, it means that your phone camera can capture an image with the dimension of 1920 by 1080 pixels.
NOTE: Image Size is not the same as Image File Size. Image file size is the actual storage space that an image occupies on the hard disk of your computer. This is measured in bytes (normally kilobytes (kb) or megabytes (mb))
Image Resolution –
When people ask about Image Resolution usually, in layman terms, they are referring to the clarity of a photo. They are trying to understand how clear a particular image is. Thus, people mostly assume that having more pixels in an image means it has a high image resolution.
While this assumption mentioned above is not entirely incorrect, however, in reality, image resolutions constitutes of two elements –
- The total number of pixels in the height and width of an image respectively (dimensions of the image)
- Screen size across which the said image is being displayed (usually measured in inches)
Image resolution is reflected in the number of pixels in an image displayed on screen. It is not just the number of pixels in an image or the pixel dimensions that matter, it is equally important to know the size of the screen on which a particular image will be displayed. This will be the true resolution of an image.
What is the unit of measurement of image resolution?
Image resolutions are measured in pixels per inch (PPI). This is the most common unit used for measurement for image resolution of digital images. Pixels per inch or PPI is a number that basically indicates the number of pixels arranged by width (column) and height (row) in a 1 inch square box. This is also known as the density of pixels or Pixel Density which is the same as Image resolution.
Let’s look at the following example –
![]()
![]()
As you may notice, 1 pixel in 1 inch will mean 1 PPI. Similarly –
- 2 pixels in width and 2 pixels in height arranged in 1 inch will result in an image resolution of 2 PPI. This image will have a total of 4 pixels in an inch.
- An image resolution of 8 ppi will mean that the image has 8 pixels of width and height in a 1 inch area. It also has a total of 64 pixels.
Similarly, 72 ppi means 72 pixels each in width and height of an inch of screen area. A higher ppi value means more pixels are stacked closer to each other. Thus, Higher the PPI value, higher is the image resolution and better is the quality of the image.
Okay, so why does an image become pixelated while using a projector?
At the beginning of this post, we talked about a situation where you find this perfect image for your slide and it looks great on your computer. But, the moment you display it on a larger screen such as a projector, the image gets pixelated.
What is often really the problem here is that the image resolution is well suited for a smaller screen, but is not suited for a projector screen as the image resolution decreases when projected on a larger screen.
Confused? Let’s have a look at an example –
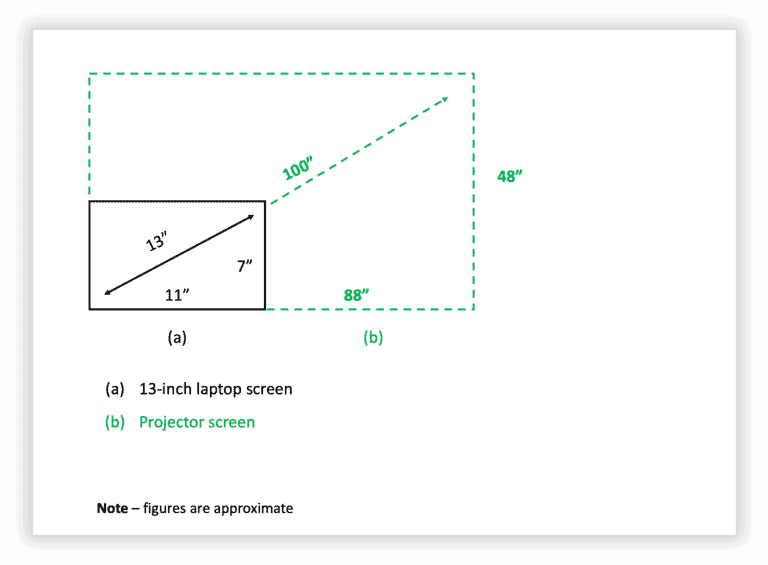
Consider an image that has dimensions of 600 pixels (width) x 400 pixels (height) and is stretched to fit the screen of the laptop. Thus, the total pixels that the image contains are 240,000 (600 times 400).
When it is being displayed on a laptop screen of 13 inches, these 240,000 pixels are being displayed over an area of 13 sq. inches (size of the monitor). However, when we project this image onto a bigger projector screen of about 100”, the same 240,000 pixels are now being projected over a screen size that is nearly 9 to 10 times that of a laptop.
Thus, since the size of the screen on which the image is displayed has increased 9 folds, but the image dimensions have remained the same, the resolution of the image (ppi or pixel density) decreases by nearly 9 times as well. This is one of the key reasons for the image to become pixelated when displayed on a projector screen.
While image dimensions and resolution are definitely one of the key factors responsible for this. But there are often other factors that influence the sharpness of an image while projecting it on a big screen.
Another factor to keep in mind would be the output resolution of the projector. Most standard projectors have what’s known as an XGA resolution. It can project an image with the resolution of 1024 x 768 pixels. Thus, even if the image has higher pixel dimensions, the projector will shrink it down to its output resolution capacity mentioned above. A quick calculation shows that an XGA projector has an effective resolution of about 102.5 ppi. There are better projectors that you may encounter, but most modern projectors that you would use for giving a presentation would often end up with an effective resolution of less than 150 ppi.
For estimating sharpness of an image, you should keep the following in mind –
- The pixel density (PPI) of your image i.e. how closely are pixels stacked in a 1×1 inch square in your image.
- The screen size of the monitor or screen
- The output capacity or PPI of the projector
- Viewing distance from the screen
Formula for calculation the pixel density is (for the geek in you) –
Pixel Density= Root((Horizontal Number of Pixel^2) + (Vertical Number of Pixel^2))/Screen Size
What is the resolution of a PowerPoint slides?
There are two types of presentation formats –
- Classic 4:3 slide format
- 16:9 widescreen format
For the 4:3 screen presentation format, the dimensions of an image that covers the complete slide would be usually 1024 pixels wide x 768 high. This will cover the whole slide.
Similarly, for a 16:9 widescreen presentation format, the dimensions of the image would usually be 1920 pixels wide x 1080 pixels high. This will cover the whole slide.
How to check the resolution of an image?
Image resolution can easily be checked on your computer.
For Windows –
To check the image resolution on a Windows Operating System, simply right-click on the image you want to check, go to Properties, within that go to the Details tab, and finally scroll to the Image section to view the resolution.
A word of caution here – we have often seen that although you are able to check the resolution by this method on Windows, it is not always accurate. A better approach would be to use an online tool described in a later step.
For Mac –
Checking the image resolution for Mac users is a lot easier and more accurate that it is for the Windows users.
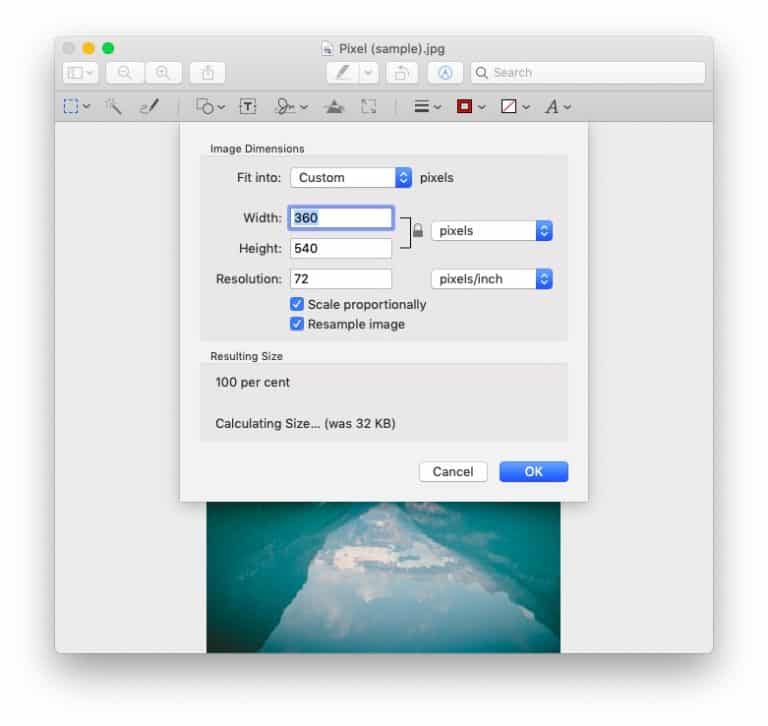
The process is simple. Just open the image using the default “Preview” option by double clicking on the image. Next, click on “Tools”, and then select “adjust size”. You will notice that a window pops-up giving the details of the pixels and the image resolution as showcased in the image above. In the above example, the image resolution is 72 ppi with the image having a dimension of 360 x 540 pixels.
You can also reduce the image resolution by changing the value of the resolution in this pop up box. For example, you can replace 72 with 50 in the above example and the image resolution will change to 50 ppi instead of 72 ppi.
Can I change a low resolution image to a high resolution image?
A low-resolution file cannot be scaled up using PowerPoint. Thus, it is highly recommended to start with a high-resolution image first in PowerPoint. However, there are a few other options for scaling up an image.
In order to scale up a low-resolution image, you will need to use software such as Adobe Photoshop or GIMP.
Video on how to upscale your image resolution in Photoshop
Another way to upscale your photo would be to use an online tool. I’ve tested several different tools that claim to increase your image resolution. However, the only one that seemed to work is this – https://image.online-convert.com/convert-to-jpg. This tool can also be helpful if you are not sure about the resolution of your image as you can convert an image to a desired resolution regardless of its existing dimensions and pixel density (a perfect alternative to Windows OS users)
Can I set a default image resolution option in PowerPoint?
There is a default image compression within PowerPoint. It can be set to either of the three options:
- 220 ppi
- 150 ppi
- 96 ppi
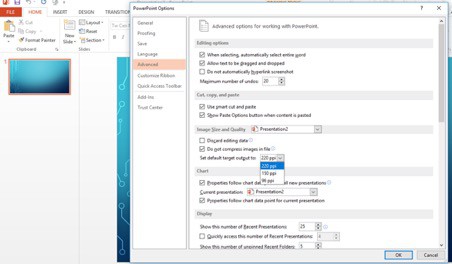
Do check and set your default image resolution or compression option:
- Open PowerPoint file
- Go to File
- Choose Options
- Within that go to Advanced
- Check Image size and quality
- Choose the ppi setting from the dropdown i.e. 220ppi, 150ppi or 96ppi.
Does a change in image resolution affect file size?
Well, more often than not, when you have a high-resolution file the file size tends to be high as well. The denser the pixels (PPI), the more file size it would likely consume on your hard drive.
However, there is no absolute direct link between image resolution and file size. Megapixels is NOT equal to megabytes. The file size depends on the file format i.e. RAW, PNG, JPEG etc. Each format has its own inherent compression standard. So, for example, a 10-megapixel image may vary in file size it consumes basis the image format.
What is the difference between screen, web and print resolution?
Screen resolution and web resolution are relevant when the images are only being used on screen. Thus, resolution of such images is measured in pixels per inch (PPI). However, when the image is used for printing purposes, the resolution of the image is measured in dots per inch (DPI)
This is because pixels only exist on digital screens. Whereas, printers keep a measure of the number of dots per inch while printing on a physical paper.
Images to be displayed on websites should have an image resolution of at least 72 PPI. If the same images are being displayed to a bigger screen, 150 PPI resolution is recommended.
For Print, the most ideal is to have a 300 DPI as most home and general office printers are set to print at 300 DPI.
Conclusion
Image resolution can be a complex topic. However, I hope that this post has helped you understand certain concepts about image resolution, and also aided in ensuring that you never get to have pixelated images during your next presentation.
Our goal on this blog is to create content that helps YOU create fantastic presentations; especially if you have never been a designer. We’ve started our blog with non-designers in mind, and we have got some amazing content on our site to help YOU design better.
If you have any topics in mind that you would want us to write about, be sure to drop us a comment below. In case you need us to work with you and improve the design of your presentation, write to us on [email protected]. Our team will be happy to help you with your requirements.
Lastly, your contribution can make this world a better place for presentations! All you have to do is simply share this blog in your network and help other fellow non-designers with their designs!