![SmartArt in PowerPoint – A Complete Guide [With Pictures!]](https://artofpresentations.com/wp-content/uploads/2021/08/Featured-Image-How-to-Use-SmartArt-in-PowerPoint-Optimized.jpg)
If you want to make your presentation slides look aesthetically pleasing but you lack the design skills to make that happen, SmartArt in PowerPoint will certainly be a good place to start!
SmartArt is a feature in PowerPoint that allows you to automatically create visually engaging designs and charts for your content. Using SmartArt in PowerPoint requires minimal design skills but provides a significant design improvement to the content on the slides.
SmartArt provides design options for lists, processes, hierarchy, relationships, and many other content types.
In this article, we shall understand the SmartArt feature in PowerPoint in complete detail, and also learn how to use SmartArt in PowerPoint even when you are a beginner!
So, without any further delay, let’s get started!
1. What is SmartArt in PowerPoint?
SmartArt is an engaging way to present your messages to an audience using Microsoft PowerPoint. Through SmartArt, you can convey the information of your presentation through graphical charts, lists, diagrams, and you can also create complicated graphics such as Ven diagrams and organizational charts.
SmartArt makes it easier for you to get your message across by presenting them in visual graphics.
2. Where is SmartArt in PowerPoint?
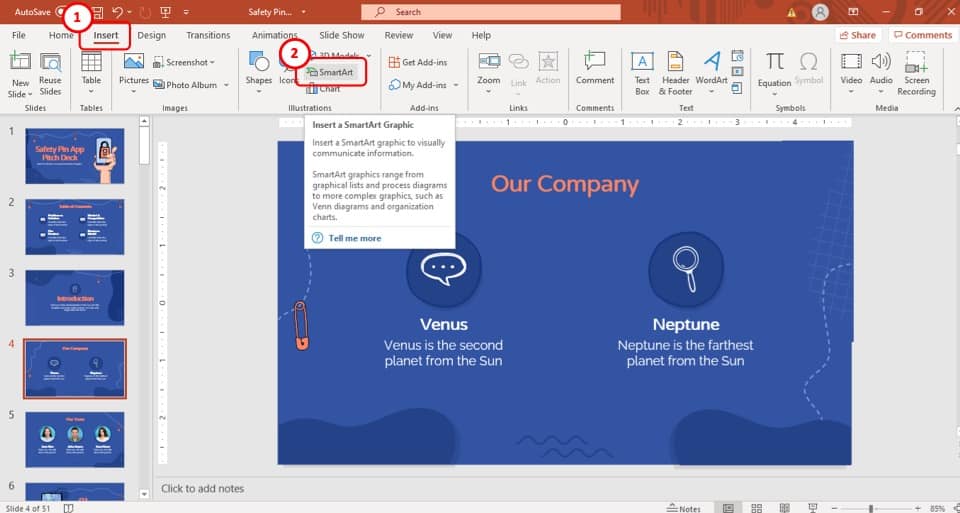
To use SmartArt in your presentation, you have to use the “SmartArt” option located in the “Illustration” section of the “Insert” tab.
The icon for “SmartArt” looks like a green arrow pointing towards the right with a small rectangular box over one portion of the arrow. It is the second option in the right of the “Illustration” section, immediately under the “3D Models” section.
3. Types of SmartArt Graphics in PowerPoint
There are a total of 9 different categories in SmartArt. The categories have been divided according to the purpose of their use and style. A description of the 9 categories is given below;
1. List:
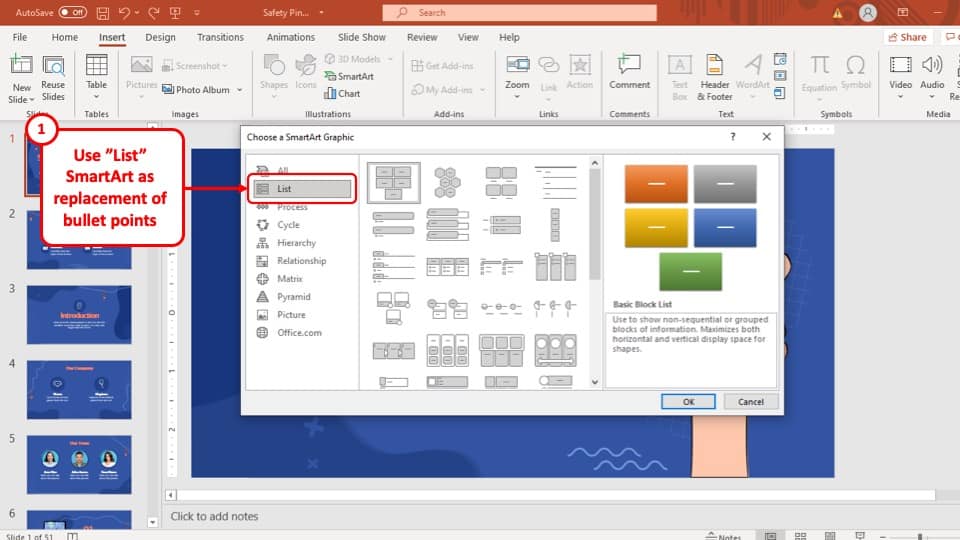
In this category, you will find a lot of suitable SmartArt options ranging from Basic Block List, Alternating Hexagons, to Horizontal Bullet List, and many more. You can use them to make your lists stand out in your PowerPoint presentation.
2. Process:
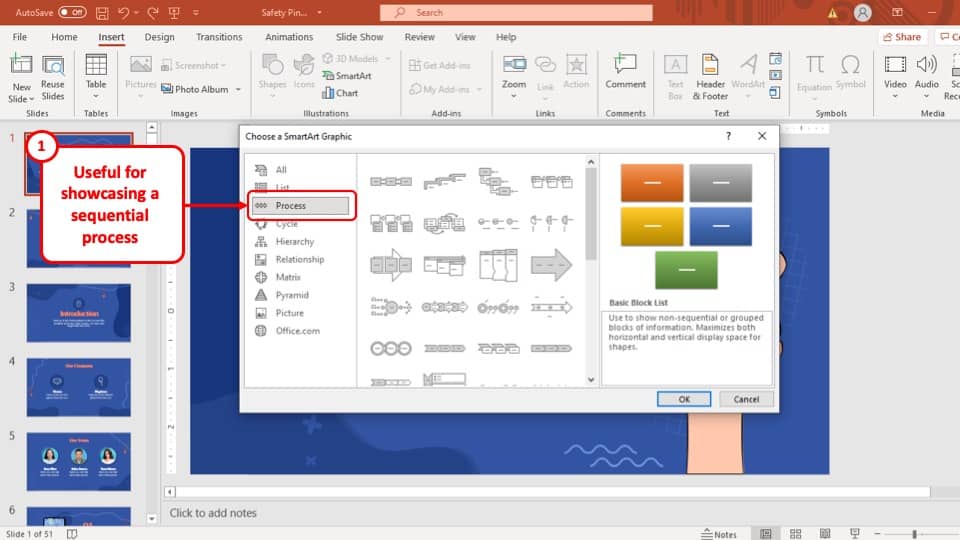
Using the SmartArt from this category, you will be able to engagingly present different processes in a way that the process will be clearly, precisely, and simply understood by the audience.
Some of the most noteworthy options include Picture Accent Process, Continuous Arrow Process, Vertical Bending Process, and many more.
3. Cycle:
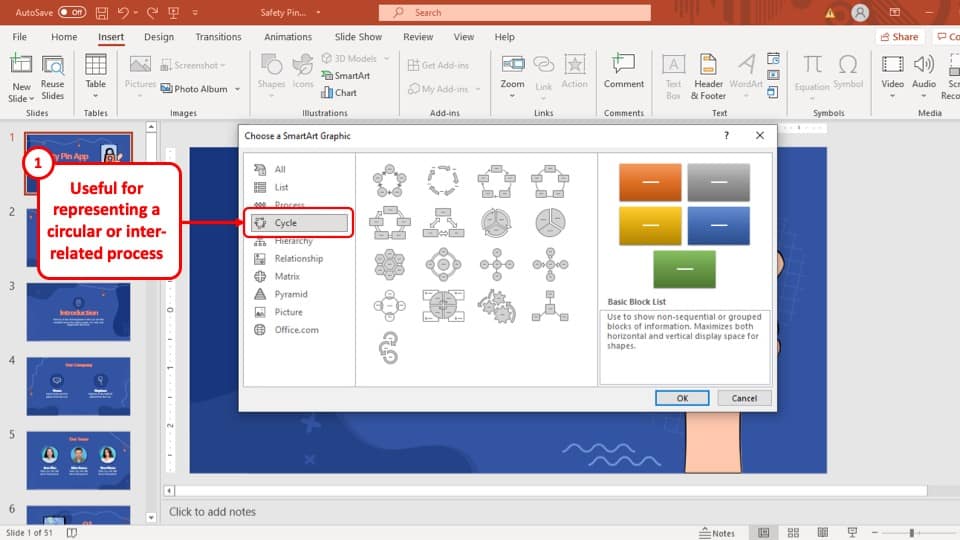
The options in this category will help you to present cyclical graphs and processes. All the options in this SmartArt category are different variations of designs that help to express cyclical topics.
This includes the Basic cycle, Text cycle, Block cycle, Basic pie, and many more.
4. Hierarchy:
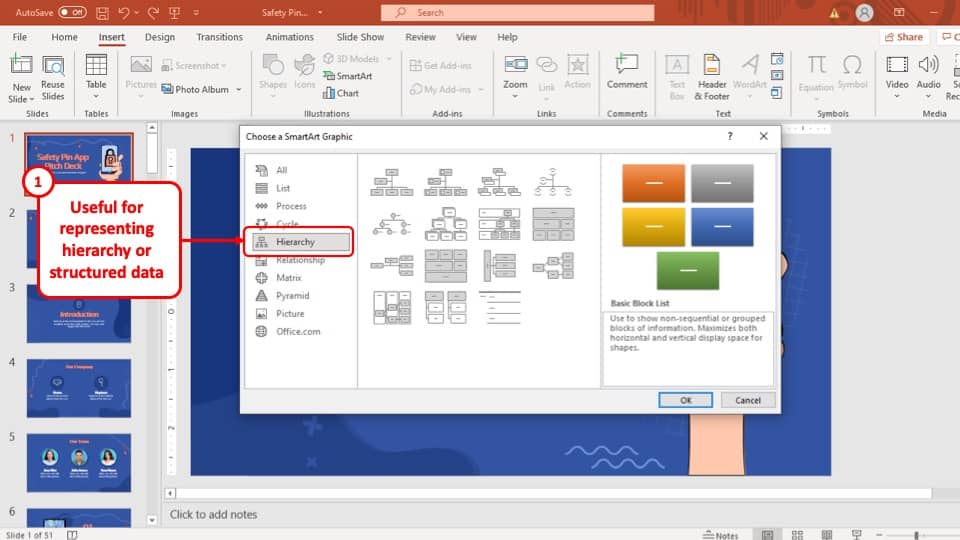
With the help of the options that are available in this SmartArt category, you will be able to present hierarchical structures or and connections between two subjects.
The SmartArt in this category is provided as a different combination of rectangular boxes connected to each other. These include Organizational Chart, Picture Organizational Chart, Labelled Hierarchy, etc.
5. Relationship:
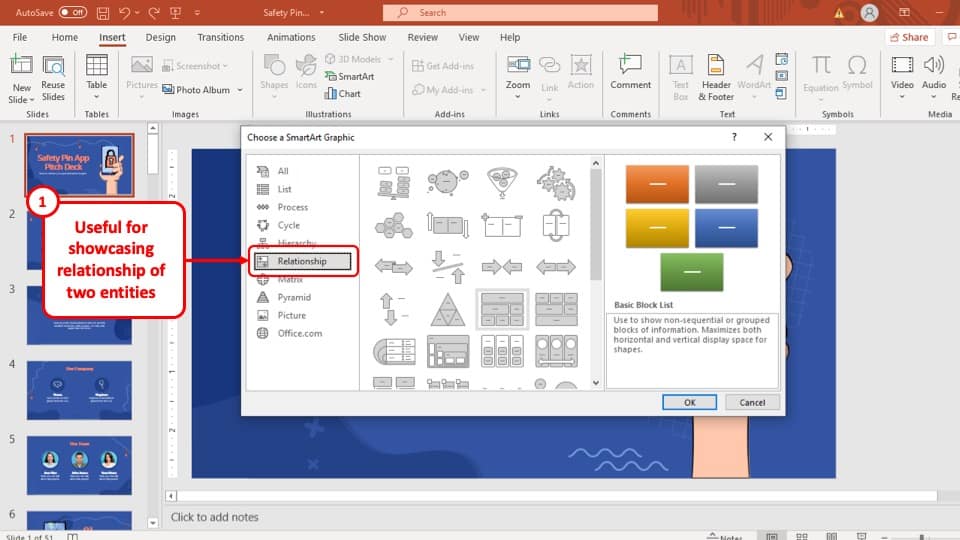
This SmartArt category will help to present topics that are related to each other, whether it be for pointing out differences, weighing two options by comparing them, or simply graphically present the relationship between them.
Notable options in this category are Segmented Pyramid, Basic Venn, Interconnected Rings, etc.
6. Matrix:
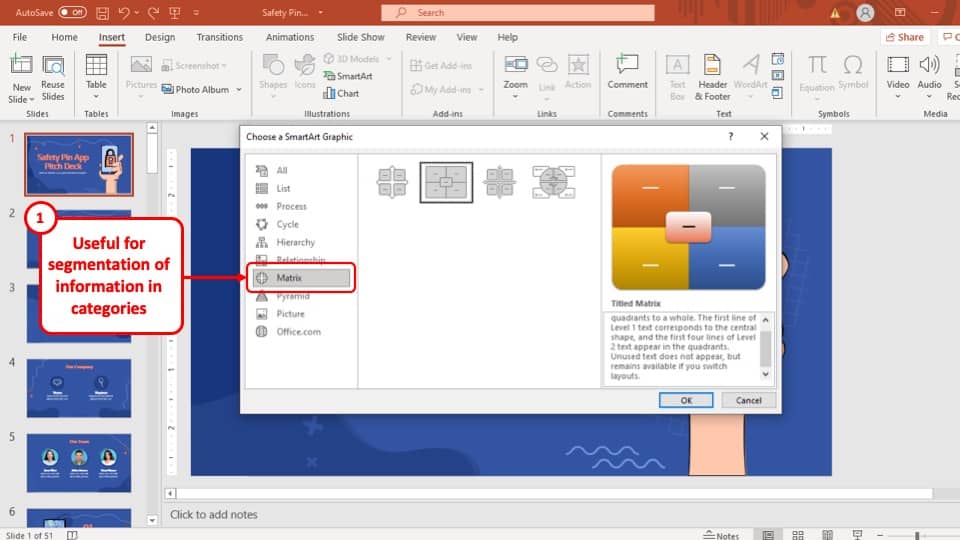
This smart art is used to graphically present different matrices. It differentiates different subjects in quadrants and ties them together to show what they mean to each other as a whole.
All the options in the category are four boxes that are connected to reveal that they are a part of the same unit.
7. Pyramid:
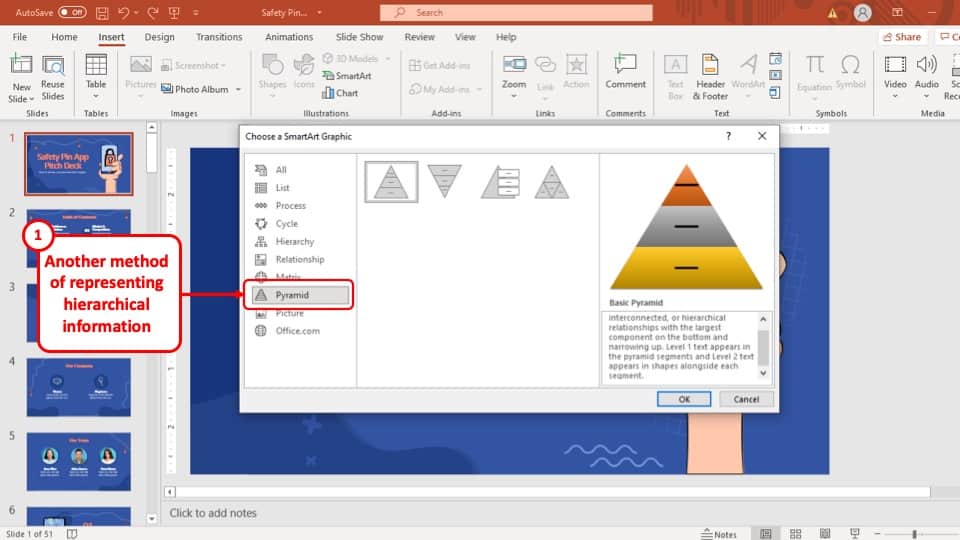
The SmartArt options in this category give you different choices to graphically present pyramidal hierarchies. The options are all variations of a hierarchical pyramid structure.
8. Picture:
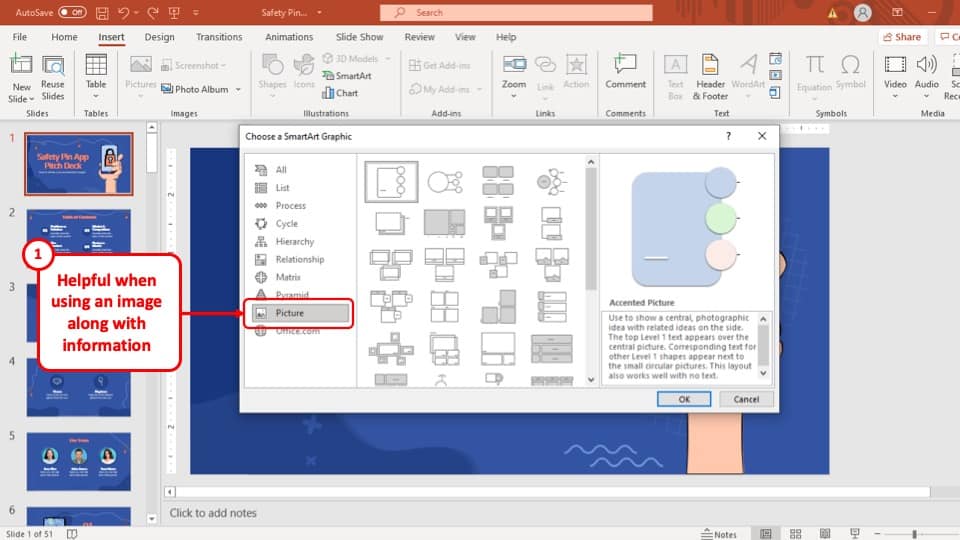
The SmartArt options in this category give you the choice to choose from different graphical charts that you can use to present pictures with captions and other details in your PowerPoint presentation.
4. How to Use SmartArt in PowerPoint?
To use SmartArt in your PowerPoint presentation, you will have to use the “SmartArt” function in the “Illustration” section of the “Insert” tab. The whole process is described in easy steps below.
Step-1: Click on the “SmartArt” function
To begin, you have to select the slide where you want to add your SmartArt and then go to the “Insert” tab of the ribbon of your PowerPoint window. In the “Insert” tab, you will find the “SmartArt” function in the “Illustration” section. Click on the “SmartArt” button.
Step-2: Select your preferred SmartArt
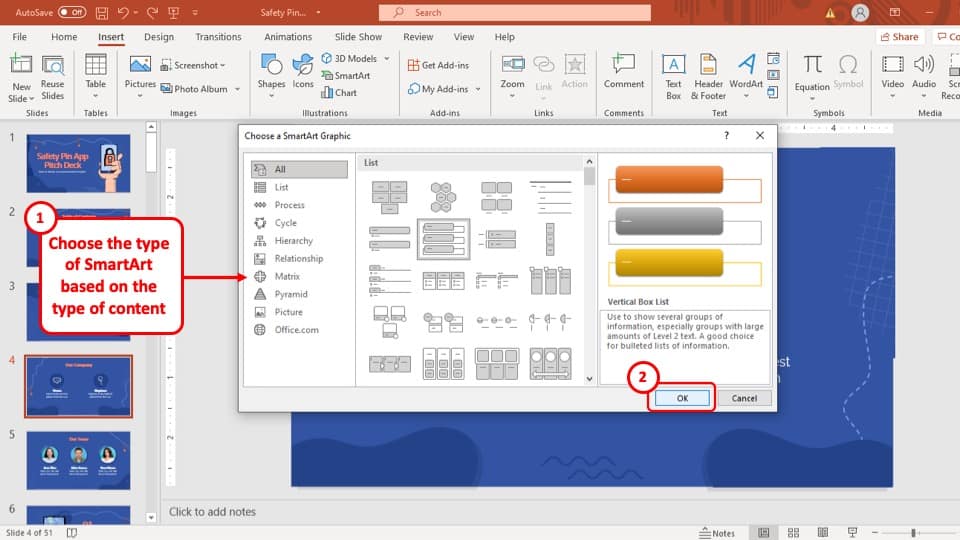
After clicking on the “SmartArt” function, a pop-up window will appear at the centre of your PowerPoint window. From the pop-up window, select your preferred style of SmartArt and then click on the “Ok” button which is located at the bottom right corner of the pop-up window.
The SmartArt will be added to the selected slide immediately.
5. How to Edit SmartArt in PowerPoint?
The process of editing SmartArt in your PowerPoint presentation is explained is 2 easy steps below.
Step-1: Click on the arrow in the margin line
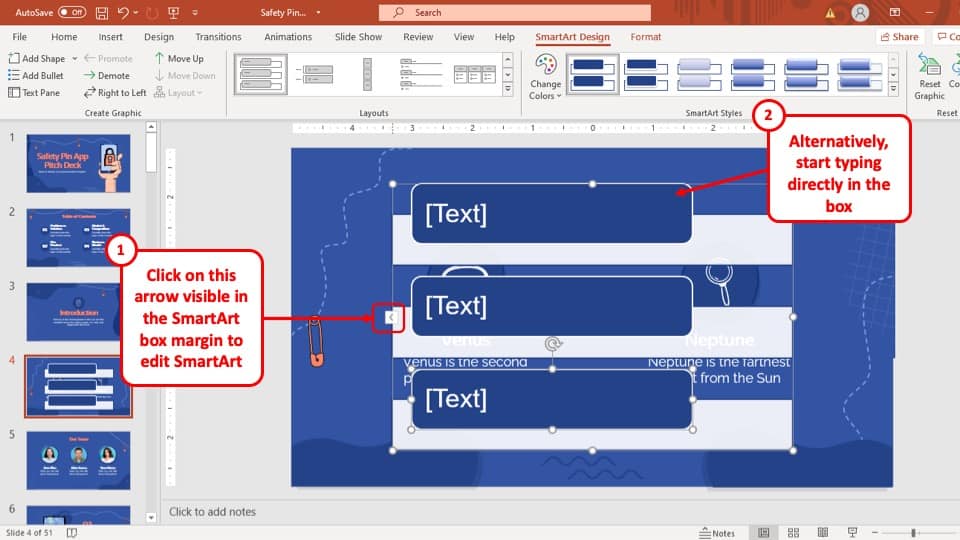
After you have added a SmartArt in your PowerPoint presentation, to edit the boxes, you can type in your text directly into the boxes but the most reliable way to do it is to use the “Text Pane”.
To open the “Text Pane” click on the tiny arrow pointing towards the left which is located at the middle part of the left margin of the newly added graphic SmartArt.
Step-2: Edit the texts in the “Text Pane”
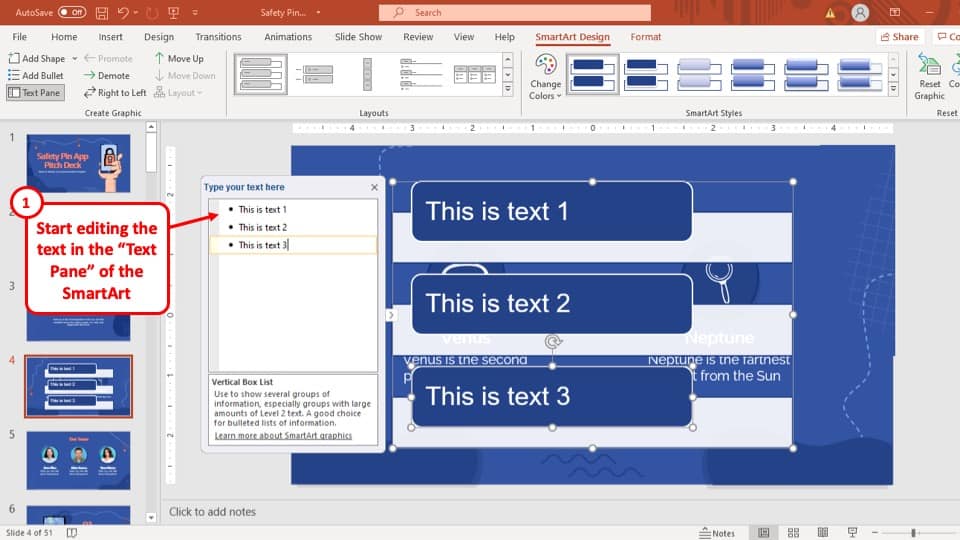
In the “Text Pane” there are corresponding sections for each of the boxes in the SmartArt graphics. To add text, simply edit the text in the “Text Pane” and the text in the box of the SmartArt will change accordingly.
5a. How to Add More Boxes to SmartArt in PowerPoint?
Adding more boxes to SmartArt is very easy.
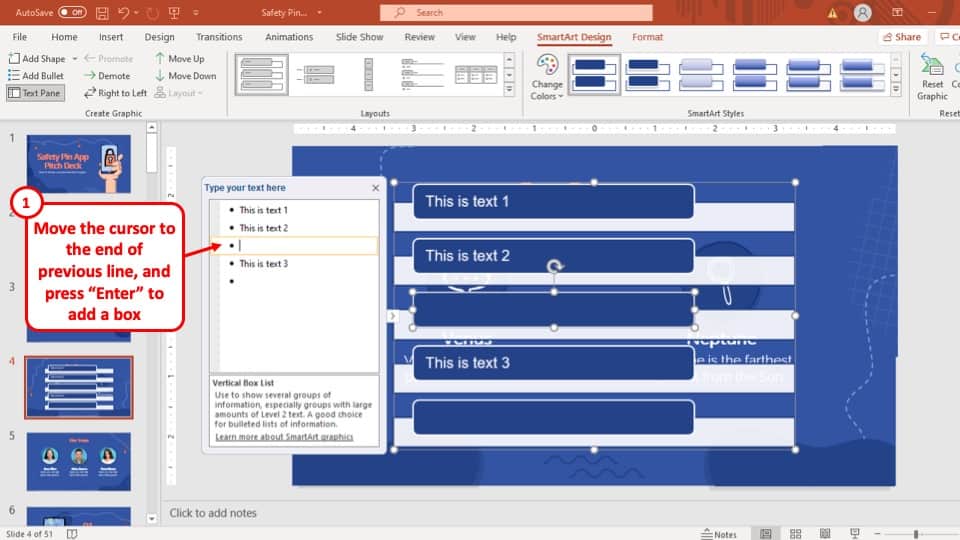
To add another box to the SmartArt in your PowerPoint presentation, simply press the “Enter” key on the keyboard of your computer, while the blinking cursor is on the box right before the place where you want to add another box.
Hitting “Enter” on the “Text Pane” will add a box immediately below where the blinking cursor is located.
6. How to Add Icons to SmartArt in PowerPoint?
Adding icons to your SmartArt in Powerpoint is not. as straightforward as you would like. But, here’s one way you can insert icons to your SmartArt. Keep in mind, this method works only if you have an Office 365 version of PowerPoint! If you don’t use Office 365, I highly recommend that you get it as it provides several advantages over other versions of Microsoft Office (including the Design Ideas feature!)
Let’s learn the steps to add icon to your SmartArt –
Step 1 – Insert a SmartArt with a Picture
The first step is to insert a SmartArt to your slide. To do that, simply go to the “Insert” tab and click on the “SmartArt” icon.
Now, it is important to choose the right type of SmarArt for this purpose.
It is best advised to go with a SmartArt that contains a picture placeholder. Alternatively, simply go to the “Picture” section, and choose a SmartArt that you like.
Step 2 – Edit the SmartArt
Once you’ve chosen the SmartArt, edit the text as per the content of your slide. For some designs, you may also want to adjust the size of the image placeholder.
To adjust the size of the image placeholder, simply select all the placeholders in the SmartArt, hold the “Shift” key on your keyboard, and drag from any one corner of the placeholder inwards.
When you’re done, simple let go off the mouse and then the shift key of your keyboard.
Step 3 – Change Picture Graphic to Icon
Now this is an important step. We need to change the graphic for the SmartArt from an image to an icon.
To do that, right-click on the picture placeholder, then click on “Change Graphic“, and from the options, click on “From Icons“.
If you are not using Office 365, you may not see this option as the option of adding icon directly in PowerPoint is available only in Office 365 version.
Step 4 – Add an Icon
Now it is time to add an icon.
In the new window that opens up, click on the “Icons” tab. Then, in the search box, look for an icon appropriate to the text on the slide.
Finally, select an icon that you like and click on it and click on “Insert“. This will insert the icon to one of your picture placeholders.
Step 5 – Repeat the Process for All Picture Graphics
Now all you need to do is repeat the steps 3 & 4 for all the picture placeholders in your SmartArt, and you will have a complete SmartArt with icons!
Now, if you are using an older version of powerpoint (or any version other than that in Office 365), you will need to first download an icon to your computer in a PNG or JPEG file. Then, click on the image placeholder, navigate to the folder where you’ve saved the icon file, and select the file to add to SmartArt.
The difference between the two methods is that in the first method, we are converting an image to an icon graphic. Whereas in the second method, we are basically converting an icon directly to an image and adding that to the image placeholder.
7. How to Convert Text to SmartArt in PowerPoint?
To convert the text in your PowerPoint presentation easily into SmartArt, you can use the “Convert to SmartArt Graphic” option in the “Home” tab. The whole process is described in simple steps below.
Step-1: Select the text
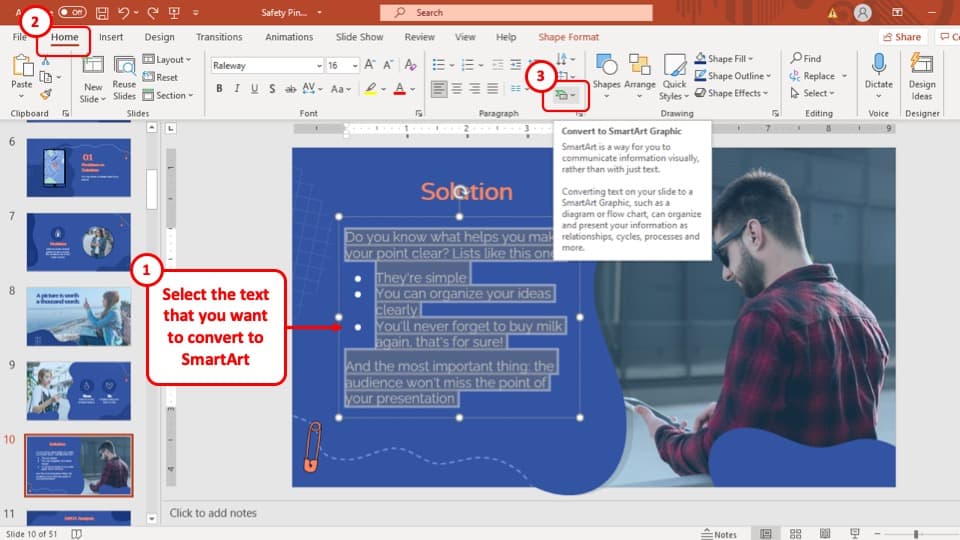
The first step to converting the text in your PowerPoint to SmartArt is to select the text. So at first, go to the slide that has the text you want to convert into SmartArt and hold the “Left” mouse button while dragging the cursor over the text.
Step-2: Click on the “Convert to SmartArt Graphic” option
After you have selected the text that you want to convert into SmartArt, click on the “Convert to SmartArt Graphic” button which is located in the “Paragraph” section of the “Home” tab.
It has the same icon of the “SmartArt” function from the “Insert” tab.
Step-3: Select your preferred style of SmartArt
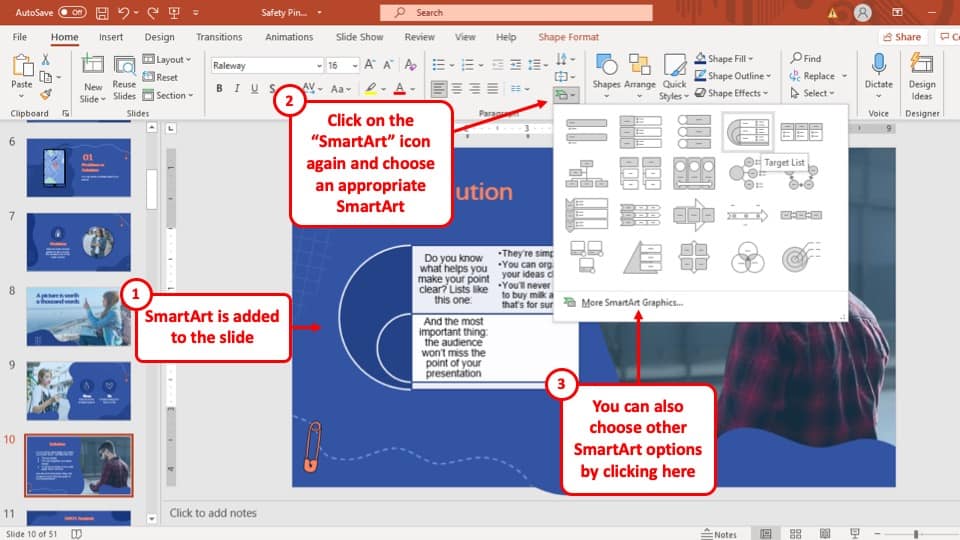
After you click on the “Convert to SmartArt Graphic” button a drop-down menu will open. From the drop-down menu, select your preferred style of SmartArt and the text will be converted into that SmartArt graphic.
If you want more options to choose from, click on the “More SmartArt Graphics” option which will open a pop-up window. From there, select your preferred SmartArt graphic and hit the “Ok” button at the bottom right corner of the pop-up window.
8. How to Convert Bulleted List to SmartArt in PowerPoint?
Converting bullet points into SmartArt is identical to converting text to SmartArt.
Simply select the bullet points that you want to convert into SmartArt and then choose your preferred SmartArt graphic from the “Convert to SmartArt Graphic” option and the bullet points will be converted to your preferred SmartArt.
One suggestion would be to choose any list type of SmartArt to get the best results.
9. How to Rotate SmartArt in PowerPoint?
To rotate SmartArt in PowerPoint, you have to use the “Rotate Objects” option in the “Format” tab. The whole process is described step-by-step below.
Step-1: Select the SmartArt graphics
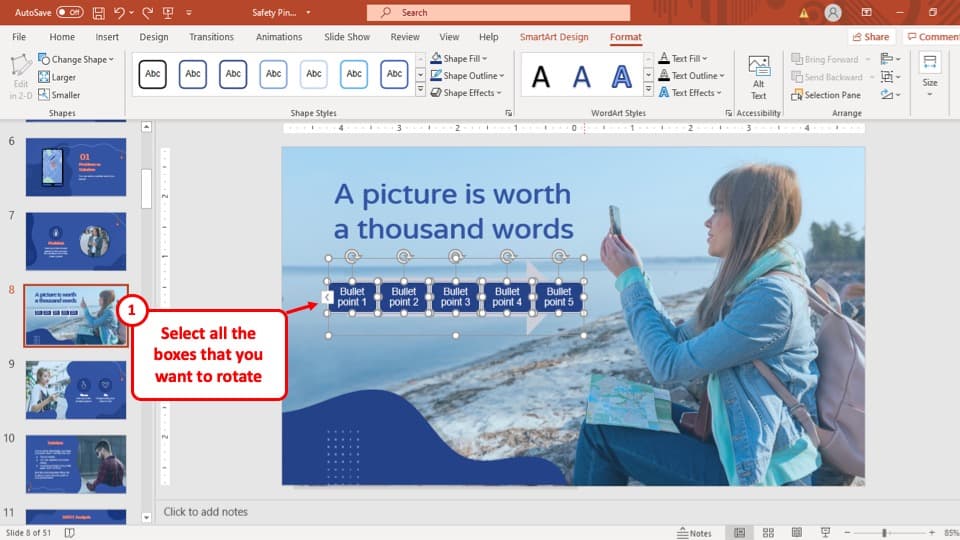
To start, you have to select all the SmartArt graphics in your PowerPoint presentation that you want to rotate. Simply click on them while holding the “Shift” button on the keyboard of your computer to select multiple SmartArt graphics simultaneously.
Step-2: Click on the “Rotate Objects” button
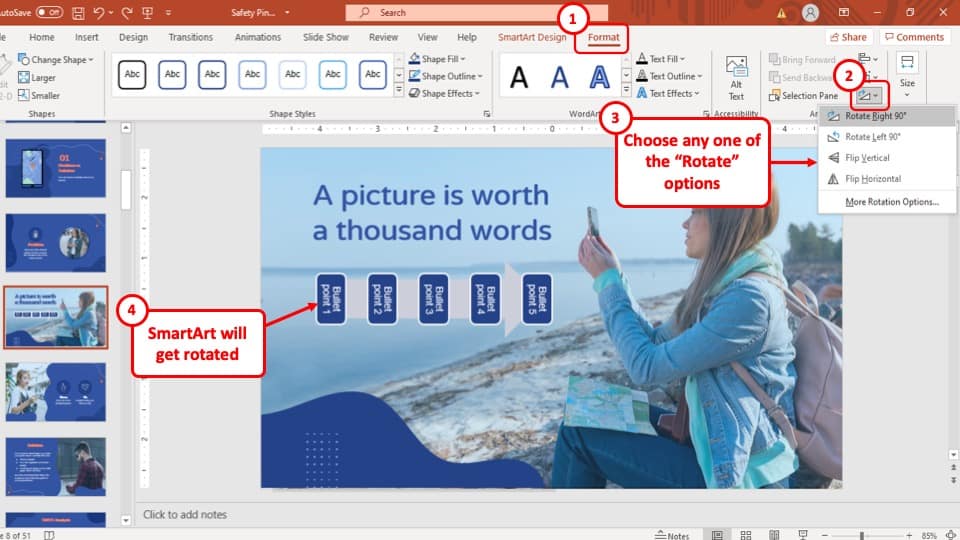
In this step, you have to go to the “Format” tab and select the “Rotate Objects” button which is located in the “Arrange” section of the tab. The icon looks like a right-angled triangle with a twisted arrow point towards the right.
Step-3: Select your preferred rotation
After clicking on the “Rotate Objects” button, a drop-down menu will appear on screen. In that drop-down menu, you will be given the option to rotate the object 90 degrees to the left or right and flip the object horizontally or vertically.
Simply select the rotation you want to give to the SmartArt graphics and the selected SmartArt will change accordingly.
10. How to Modify Organizational Chart in PowerPoint?
You can modify organization chart in PowerPoint in plenty of ways. You can modify the style, colour or even the entire layout of the SmartArt if you want to.
The first step is to select the organizational chart and click on the “SmartArt Design” ribbon. Then, follow the descriptions given below to modify the style, colour, and layout of an organizational chart (or any SmartArt graphic) in your PowerPoint presentation.
Modify the Style
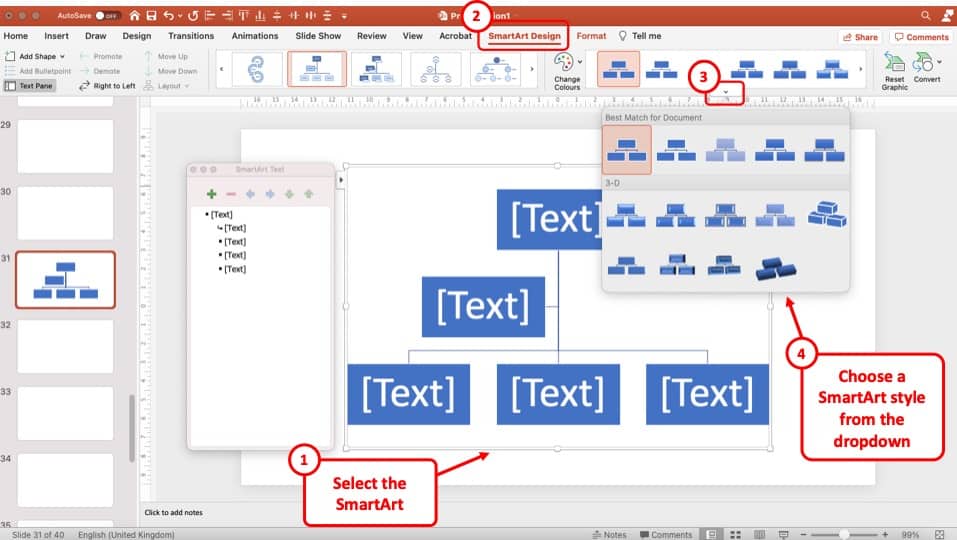
On the SmartArt Design ribbon, click on the “Style” option. You will see an arrow to open the drawer with more options. Click on it. This will open a dropdown menu.
From here, select your preferred style of organizational chart and the chart will change accordingly.
Modify the Color
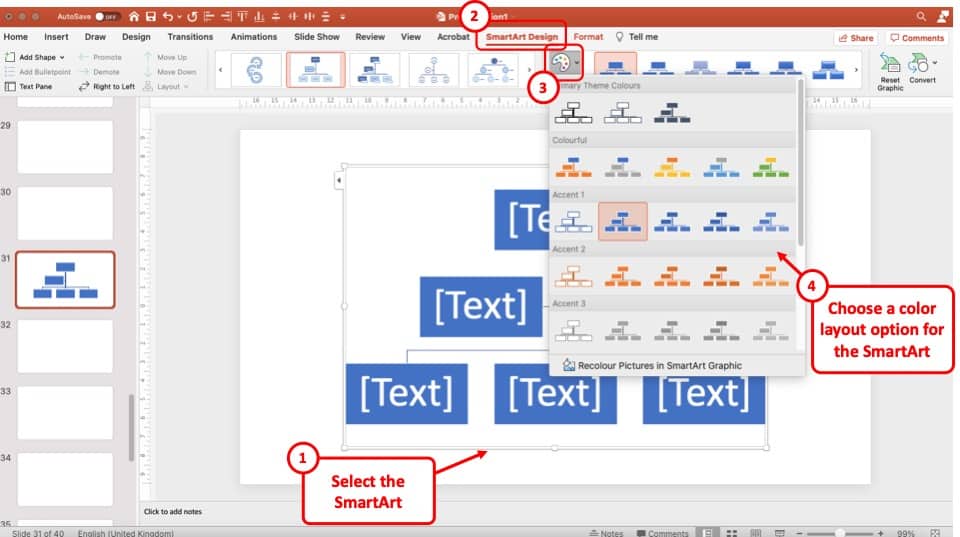
To change the color, again, choose the “Color” option from the SmartArt Design ribbon. Then, select your preferred colour from the dropdown menu and the color will be applied to your graphic based. onyour selection.
Modify the Layout
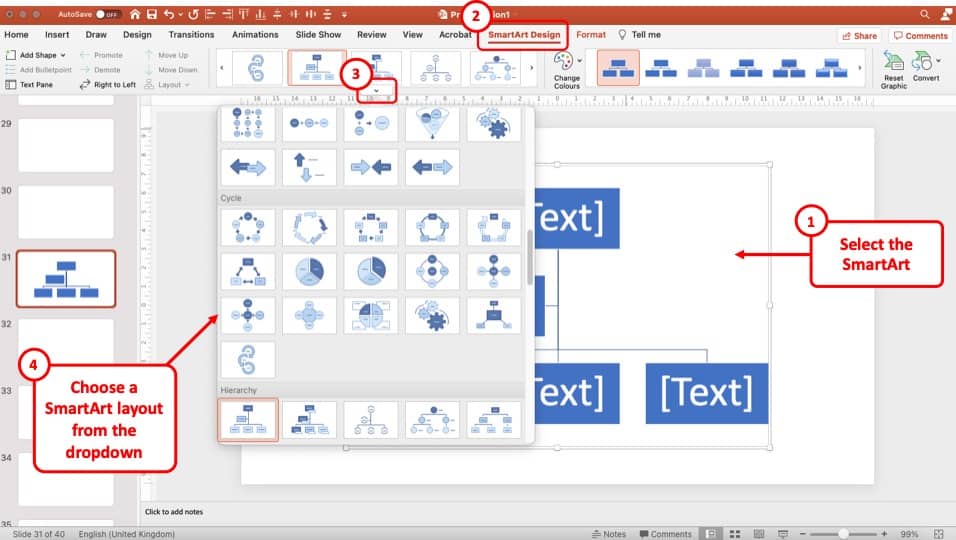
You can also change the layout of your graphic. For instance, if you don’t like the type of SmartArt you’ve chosen for your organizational chart, you can choose a different design option from the layout.
To change the layout of the organizational chart entirely, select the “Layout” option from the SmartArt Design ribbon, and select your preferred layout from the dropdown menu that appears on the screen.
The layout of the organizational chart will change accordingly based on your selection.
Reset the SmartArt Graphic

If you are not completely satisfied with the revised design option, you can also choose to reset the graphic and start from scratch once again.
To reset the SmartArt graphic, select the graphic and right-click on it. From the options, click on “Reset Graphic”. You can also select the SmartArt graphic. Then, click on the “SmartArt Design” tab, and select the “Reset Graphic” option from the ribbon.
This will reverse the design changes done to the SmartArt after it was inserted.
11. How to Get Additional SmartArt Graphics in PowerPoint?
To get additional SmartArt graphics in your PowerPoint presentation, you can check out other third-party websites that provide infographic templates.
There are plenty of websites that offer this service but the one that I recommend the most is Envato. Envato is a great platform that provides creative assets and resources for you to use in your PowerPoint presentation. The templates that they provide are not only affordable but also one of the highest quality and match with the latest design trends.
I personally use Envato from time to time for my projects. So, it is only fair that I share some of my personal favorite SmartArt-like infographic templates to help get started.
Below are 3 recommendations for SmartArt infographics from me to add to your SmartArt arsenal.
1. Infographic General Template

This Infographic General template provides multiple different options for a variety of generic uses. These can be used in multiple different PowerPoint presentations.
If you are looking for great infographic designs that are not specific to any particular niche or theme, you should definitely consider this option!
2. Infographic Complete Bundle
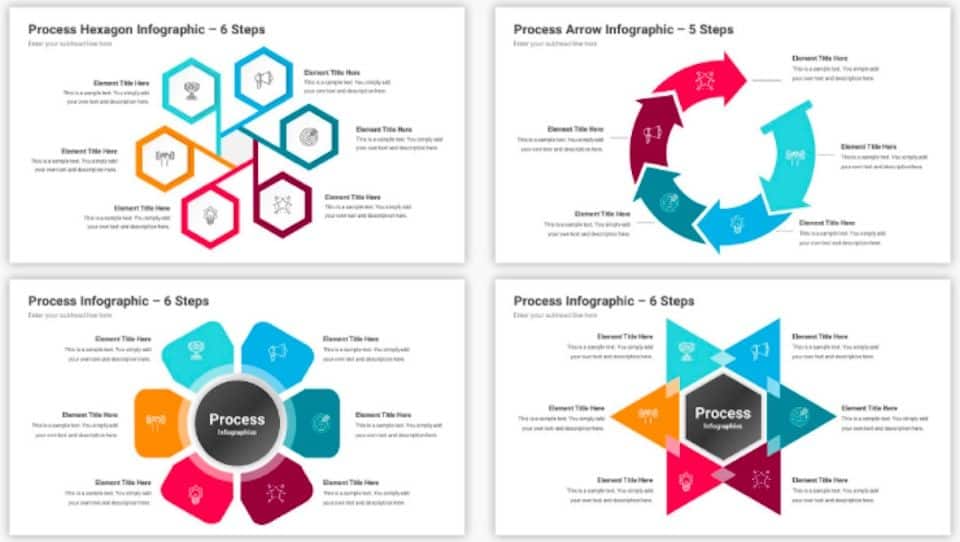
If you want to get an infographic set that should serve as an ultimate pack, then this complete bundle is exactly what its name suggests.
Although it comes at a fairly affordable cost, and it does provide a ton of different infographic options that most usual templates don’t provide, I felt like the design of the infographics is just a bit old.
But, that won’t be a concern for most people and you will most likely appreciate the variety provided.
Click on the button to check out the infographic template.
3. Pictorial Infographics
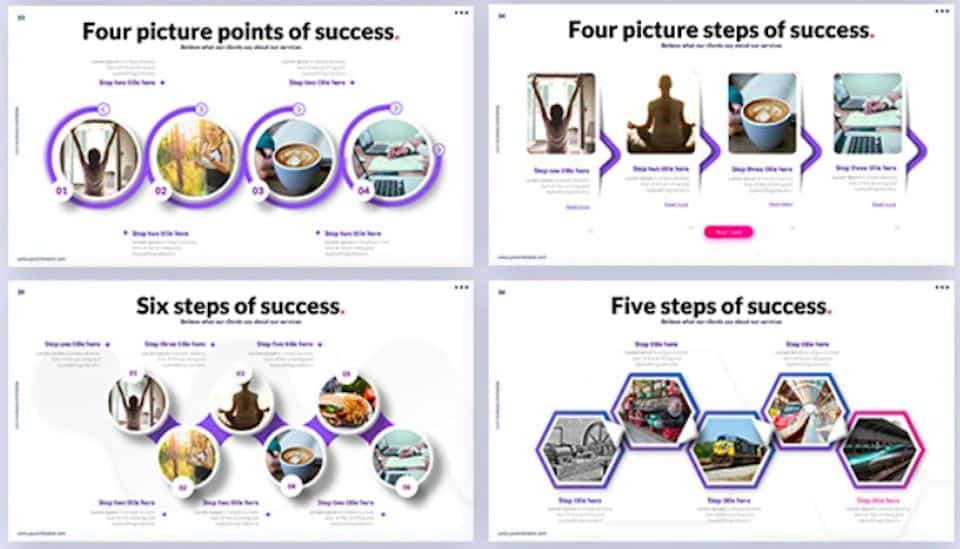
What most infographic templates won’t provide you is a set of picture-based infographics.
This is exactly where this pictorial infographic template comes into the picture (don’t mind my pun!). This template provides a huge variety of designs that not only look modern and minimalistic but also allow you to add images to the graphics.
Check out the template by clicking on the button below.
Credit to drobotdean (on Freepik) for the featured image of this article (further edited)