
Google Slides is a great presentation design application! You can easily use it to create all kinds of presentations. But, one thing that Google Slides users always wonder is whether you can record audio with Google Slides!
Google Slides does not record audio directly. To add narration or voice-over to your presentation, you can record the audio file(s) separately using your computer’s built-in audio recorder or using third-party tools such as online-voice-recorder, and upload the files to add audio to Google Slides.
In this article, I will extensively discuss how you can add narration or any other audio files to Google Slides. Make sure that you go through the complete article to get a better understanding of this topic!
Can You Record Audio on Google Slides?
For some presentation creators, adding audio to your presentation is a fundamental necessity for making the project successful. For instance, teachers often use narration with their presentations to make it really effective.
Unfortunately, you cannot directly use Google slide to record your voice or a sound effect. For that, you have to use a third-party app or a browser extension.
There are various ways available for you to record your audio. If you are using a Windows or IOS operating system, there is a built-in recorder available for you to use.
A quick search in your operating system can give a helpful result. For windows, just click on the “Windows Logo” on the bottom left corner of the screen, and type in “voice recorder”.
For Mac OS, you can open up “Launchpad”, and type in “voice recorder”.
Once you’ve finished recording the voice notes, you will then need to attach the file to the presentation.
Let’s understand how can you do that in a step by step manner below.
How to Add Narration to Google Slides?
Although the “voice recording” option is not available on Google Slides right now, you can easily attach recorded voice notes to your presentation. Of course, it is not restricted to just voice audio. You can attach any sound effect that the content of your presentation demands.
The steps of attaching narrations (or any other audio files) are easy and straightforward.
1. Record Your Audio
The first obvious thing you need to do is record your voice. Fortunately, you can use many applications to do so. There is a red dot in most of the apps. You can use the basic recording app of your smartphone as well.
Speak throughout the slide and keep the content of the audio relevant to the topic. When you’re done, press the Pause button; which is represented by a square symbol. Upon completion of the video, make sure you saved the audio file.
Pro Tip!
When recording narration for each slide, save the file name as the slide number followed by the title of the slide. This will make it easier for you to go through your audio files when adding them to the presentation!
Alternatively, you can also record individual voice notes for each slide. (In fact, this is what I would recommend you to do). Just make sure that you press “Stop” once you’ve completed the voice notes for each slide and save it by the slide number and title of the slide. That way, you can easily
2. Upload Audio to Google Drive
Once you’re done recording the voice notes, you’ll now need to transfer the audio files to your Google Drive in order make the process of adding the audio files to your Google Slides presentation a lot easier.
On your Google Drive, press the “New” option and a list of choices will be open. Choose “Upload File“.
Then, go to the folder where you saved the voice notes that you just recorded. Upload the recording to Google Drive. You may want to change the name of the file to ensure easy identification in case you haven’t yet done that.
3. Insert Audio in Google Slides
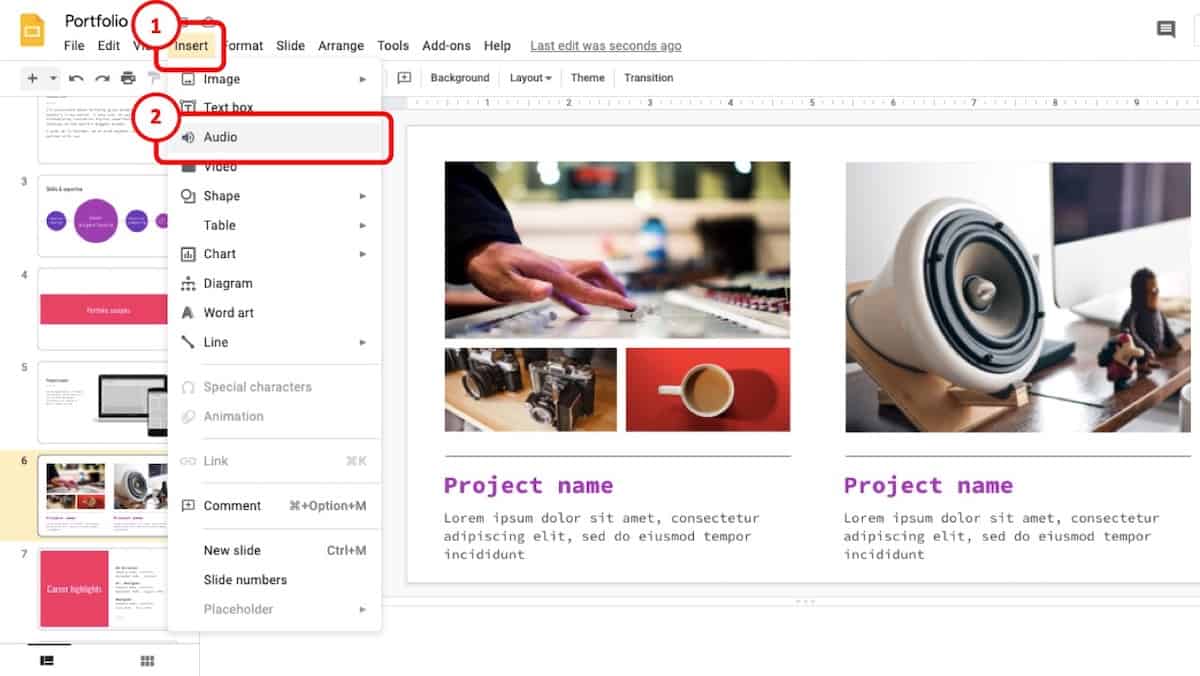
You will now be able to insert the recording that you’ve made. For that, pick the slide where you’d like to plot the audio. Press on the Insert tab, which will display a drop-down list. You should see the “Audio” option in the third row. Click on it.
4. Adjust the Audio on Google Slides
Now, find the right recording that you made for your presentation. By heading to the recent segment, you will find the audio file that you have recorded. Just select the file by pressing the select button which should be at the middle bottom corner of the screen.
Once that is done, you should see a speaker symbol. You can even change the position of that symbol if you desire.
Now, you can set the proper audio option which should be suitable for the content of the slide. Not only that, you can further change the style of the audio by pressing the speaker button to make your presentation look more professional. You may adjust how the sound is played after picking it.
For example, you can make the sound of your voice louder. It can be achieved by modifying the Volume portion while presenting. You can also control the beginning of the audio and how far it continues.
Use Online Voice Recorder for Google Slides
In case you are unable to find voice recorder on your computer or perhaps you don’t have a system to record audio on your computer, you can also use online voice recorder to record narration for Google Slides.
There are multiple third-party applications that are available. I’ll mention the top 2 options for you –
1. HablaCloud’s ChromeMP3 Recorder
The first platform I would like to share is perhaps one of the easiest applications to use amongst the ones that are available.
This tool is called HablaCloud web program “ChromeMP3 Recorder”.
However, this tool is a web-based app and not a webpage, meaning that it only operates on Chromebooks, not on devices like Macs or PCs. Even though it is available on the Chrome Web Store, however, you can only install it if you are using a Chrome book.
Pros
- User-friendly.
- Simple.
Cons
- Audio editing is not available.
- Only works with Chrombook
2. Online Voice Recorder
If you are not using a Chromebook, then one of the best voice recorder tools is the Online Voice Recorder. It not only allows you to record your voice, but also edit it directly in the browser itself!
Once you are done with the recording, you can download the narration and upload it directly in Google Drive and attach it to your Google Slides presentation (as described above in the article).
It is completely FREE to use and a perfect tool that I would recommend for you.
Pros
- FREE to use
- User-friendly and Easy to Use interface.
- Allows you to trim the audio files directly in the browser.
Cons
- Enhanced Audio editing is not available.
Final Thoughts
As you can see, you can use several audio features to make your presentation look sound and professional. “Google Slides Record Audio?” is a popular question among the people who create presentations and here, I have vastly answered it. Hopefully, after reading the whole article, you can perfectly format the ways of your presentation.
Image Credit for the featured image of this article goes to Kroshka_Nastya