
When I was creating a Powerpoint presentation on my home computer, I realized the name of the author was not what I wanted. So, I found out how to do it, and thought I’d write this helpful article to explain how to do it.
To change the author name in PowerPoint, click on File > Options. This will open up additional settings to choose from. Then click on ‘Personalize your copy of Microsoft Office’. Then overwrite the name that is in the ‘User name’ box with the name you want.
To do this on an existing document is a bit different, and you can also remove other authors from the list to make it easier. So, below, I will explain how to do this, as well as, other helpful tips about using author names in Powerpoint.
How to Edit the Author Name in PowerPoint (Step-by-Step Tutorial)
Although it might seem daunting at first, changing the name of the author is pretty straight forward.
The setting to change the author name is found under File > Options > Personalize your copy of Microsoft Office.
Step 1 – Click on the File Button
On the top-left corner of your PowerPoint window, you’ll notice a “File” option. When you click on the File Option, you basically enter in back-end of the system. You’ll see a ton of different options here.
Step 2 – Click on the Option Tab
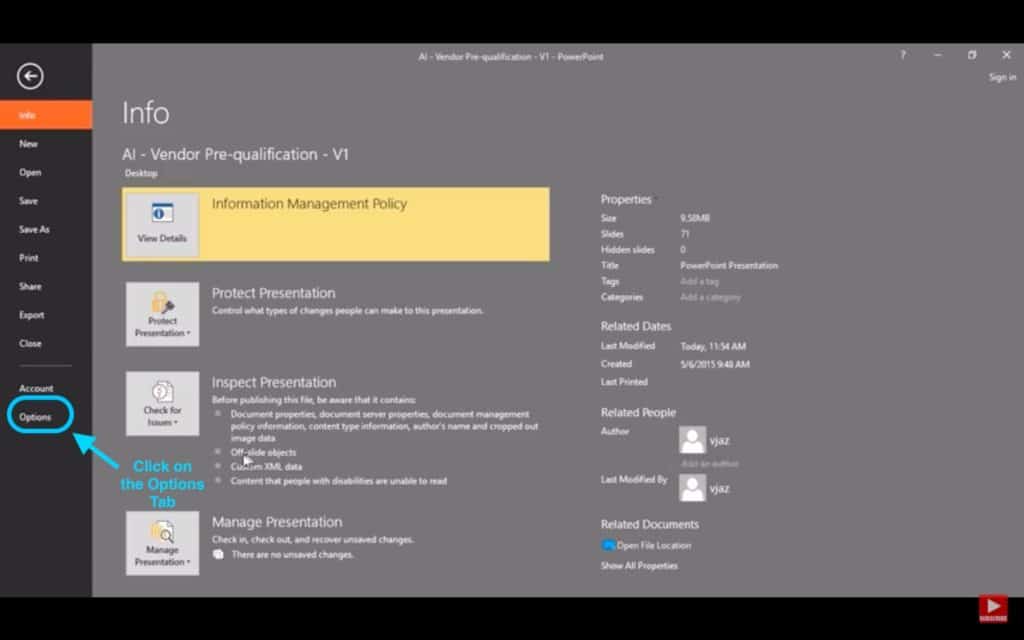
On the far left side of the screen, you’ll notice an “Options” tab at the bottom of the list of options. Click on it.
This will open up the settings where you can update the user name field.
Step 3 – Change the Username to the Desired Name
In the new window that pops-up, click on the “Username” field under “Personalize your copy of Microsoft Office”.
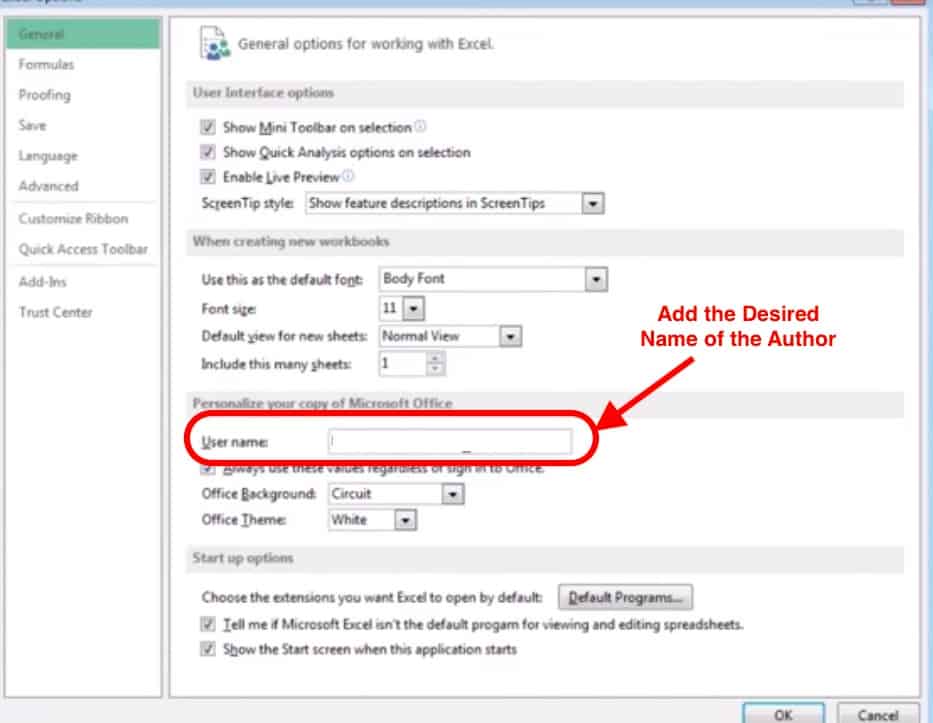
If there is a name that is already existing, select it and change it with the name that you desire. This will update the user name for the document you are working on, as well as, any future documents you create using that computer.
How to Change the Author Name of an Existing Document?
The above method works great when you want to make sure that all your future documents have the correct author name. But sometimes, you may also want to change the author name of an existing document.
This may be when you are perhaps on a University, Library, or a friend’s computer, and you will only want to change the author’s name for the specific presentation you are working on. This is because otherwise, any documents other people make using that computer will also have your name on it!
To do this click File > Author > Related People. From there you need to right click on the author name, and click Edit Property. This will open up an Edit Person box, where you can type in the name you want.
This has no effect on the author’s name for subsequent new documents that are created. If you want PowerPoint to change the author’s name permanently, it can only be done using the other method described above.
How to Add an Author in PowerPoint?
Adding an Author in PowerPoint is also similar to the process of changing the name of the author in the sense that it can be done from the back-end of the PowerPoint file.
Let’s go through it step-by-step.
Step 1 – Click on the File Button
As we did before, in order to get into the back-end of the PowerPoint, we will first go on the “File” from the top left corner of our computer screen on the PowerPoint Window.
Step 2 – Click on the Info Tab
You will most likely end up on the “Info” tab by default.

If you are not on the “Info” Tab by default, make sure you first click on the “Info” Tab from the left part of your screen.
Next, under the related people’s section, click on the “Add an Author” and start typing the name of the author that you would like to add.
How to Remove Author Name from a PowerPoint File?
Sometimes, we want to make sure that there is no author name in the file. Alternatively, sometimes, we just don’t want to share any information about not just the author but any other personal information.
How to Remove All User Information from a PowerPoint File?
Sometimes for security, you might want to remove the personal information that gets stored in Powerpoint. This information gets automatically stored to help in restoring changes that have been accidentally made, and to track changes for collaboration purposes.
Nowadays, most people use a task management app such as Trello or Clickup to track changes and updates, however, keeping this information can be vital if sensitive or hard to find information gets accidentally deleted. This has happened to all of us.
To remove all user information, follow these steps –
Step 1 – Click on the File Button
As before, click on the File button on the top left corner of your presentation file.
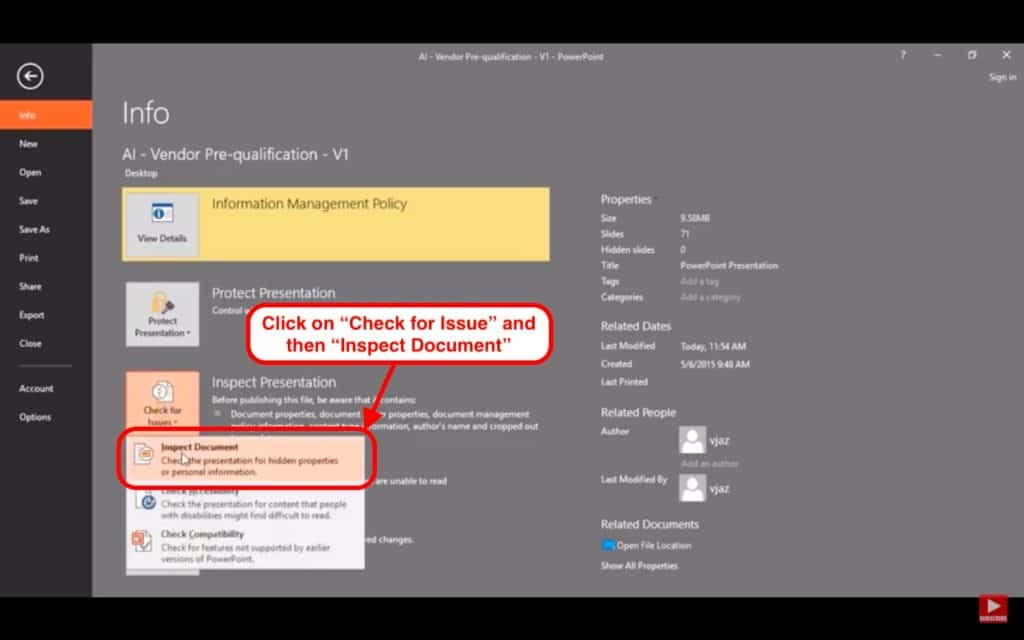
Step 2 – Click on “Check for Issue”
On the “Info” Tab, under the “Inspect Presentation” section, click on the “Check for Issue” button, and choose “Inspect Document” from the dropdown.
Step 3 – Click Inspect, and Remove All
A new window will pop-up with the “Document Inspect Window”, select all the options showcased in the pop-up window.
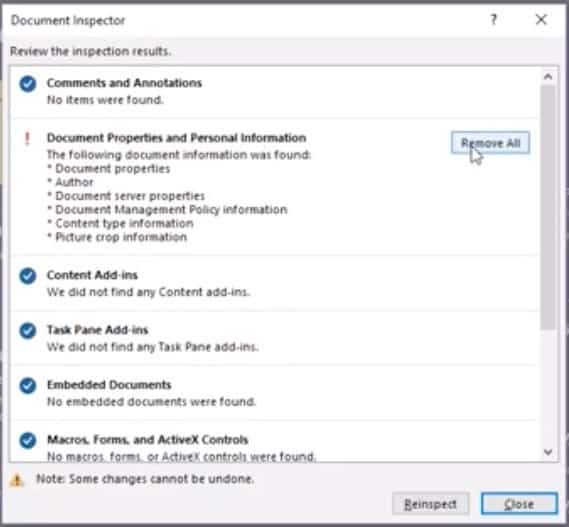
Then, click on “Remove All”, and wait for a few moments. PowerPoint will then remove all personal information related to the file including the name of the author and other details.
Alternative Method to Remove Author Name from a PowerPoint File
Another method of changing the author on Windows Operating System is by using the “File Properties” option.
- You want to click ‘Save As’, which is found by clicking File at the top of the page.
- At the bottom of the box that opens there is an option called Tools, click this then click on General Options…
- There is a checkbox under Privacy options which says ‘Remove automatically created personal information from this file on save.
- Make sure this checkbox is checked and then hit OK.
Why is the Author Name of a File Important?
For most people, the Author Name doesn’t even matter. In fact, most people don’t even know where the Author name is reflected!
However, for a few who are aware of it, the author name can be of importance.
- Author Name of PowerPoint File can determine the name of the person who has created the PowerPoint file.
- Author Name is also visible while commenting on a PowerPoint file (or in track changes mode in Microsoft Word and Excel files)
How to Change Author in PowerPoint on Mac OS?
If you are using a Mac OS, you can still very easily change the author name on the file. Here’s how to do it –
Step 1 – Click on the File Button
Just like in Windows you need to click on the “File” button of the window.
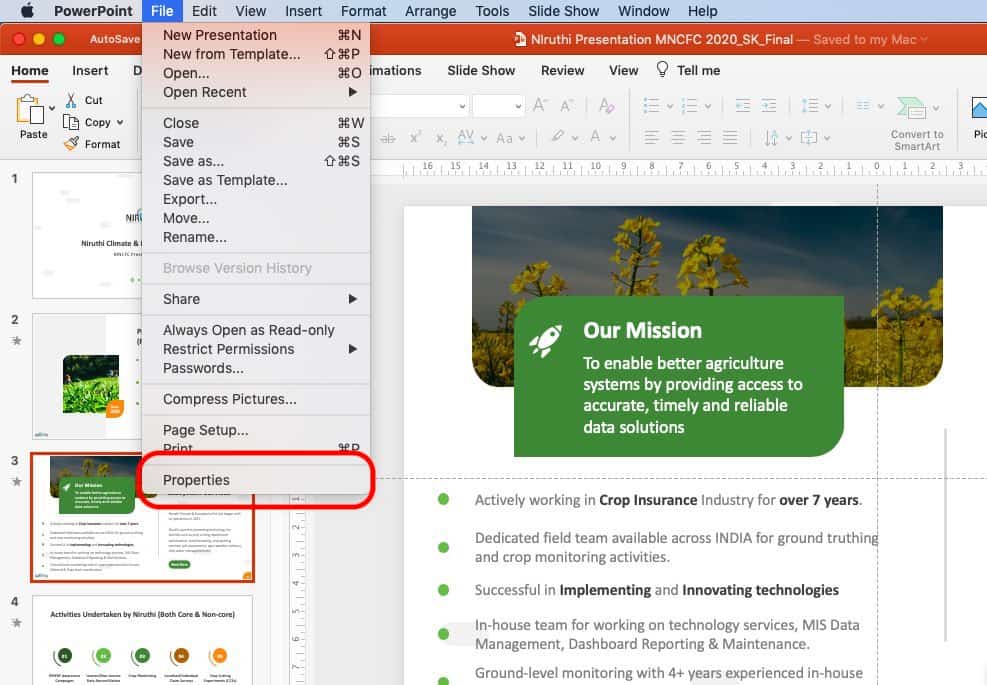
When you click on the File button, you’ll notice a dropdown with a bunch of different options. Click on “Properties” option from the dropdown as indicated in the image above.
Step 2 – Click on Summary from the Pop-up Window
Upon clicking the “properties” option, a new window will pop-up.
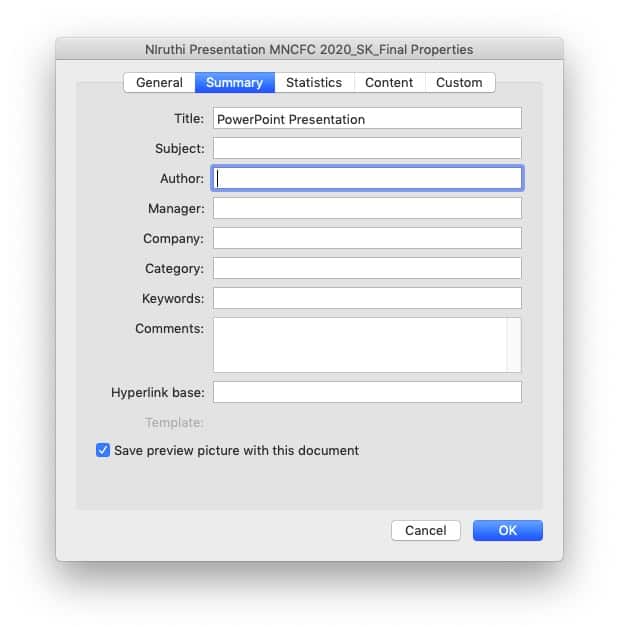
The window will by default be on the “General” option. You’ll need to go to the “Summary” tab on the top options.
Step 3 – Change the Author Name
On the Summary Tab, you’ll notice the section for “Author”. If there is an existing author name, simply highlight the name and change it with the desired author name for the document.
Once you’ve entered the name, make sure you click on “OK” to let the change be accepted.
How to Change Author Name in Microsoft Word or Excel?
The process of changing the author name is for Microsoft Word or Excel is similar to the process described above.
There is no significant difference in the process.
Final Thoughts
Changing the author name may be important for you or may be not. Whatever be the case, it is important to know exactly how to change the name of the author.
I hope this article helps you understand the exact steps on how to change the author name in PowerPoint.