![How to Add or Remove Add-Ins in PowerPoint? [Full Guide!]](https://artofpresentations.com/wp-content/uploads/2021/10/Featured-Image-How-to-Add-or-Remove-Add-ins-in-PowerPoint-optimized.webp)
PowerPoint is a great tool when it comes to designing a presentation. But, it is not a perfect tool! There is always a scope for a few additional features. This is where “Add-ins” in PowerPoint comes into the picture. What’s more, adding an Add-in in PowerPoint is quite easy!
To add an add-in in PowerPoint, first, click on the “Insert” tab. Then, click on the “Get add-in” option. In the new window that opens up, search for the add-in that you want to install, locate it and click on “Add”. Then, click on “Continue” and the add-in will be added to your PowerPoint!
In this article, we will take a look at everything there is to know about add-ins in PowerPoint. We shall learn some benefits and drawbacks, how to install or remove them, how to disable them, and much more! Plus, I’ll also share a few best free add-ins that you should have for PowerPoint!
So, let’s get started!
1. What are Add-ins in PowerPoint?
Add-ins in PowerPoint are supplemental applications that provide additional functionality that is either not present in PowerPoint or too cumbersome to carry out traditionally. Add-ins can be easily added or removed from PowerPoint with a few clicks.
Once installed, it gets added to the “My Add-ins” section under the “Get Add-ins” tool. This allows you to easily access the add-ins that you’ve installed.
Using add-ins allows you to get access to presentation templates and infographics, or access images from the web directly in PowerPoint, or get additional functionality like adding a countdown timer, inserting live web pages, taking live polls by using forms, adding icons to your slides, and much more!
2. Are Add-ins Free in PowerPoint?
Some add-ins are completely free in PowerPoint. Whereas, a few other add-ins require you to pay to use it. However, most add-ins in PowerPoint adopt a freemium model. This means, you can install the add-ins for free with some basic features but you need to pay to access the premium features.
Thus, there are both paid and free add-ins in PowerPoint. At the time of writing this article, there are a total of 198 add-ins listed on the official website of Microsoft Office.
However, the list is way beyond 198 add-ins when you consider 3rd party add-ins and add-ins from open-source websites. But not all of these Add-ins are free to users.
Again, sometimes the free add-ins require you to buy subscriptions or one-time purchases, which gives you access to the more practical functions and features offered by the add-in.
Nonetheless, Microsoft PowerPoint has more than enough free add-in options that will help you get by just fine.
3. How to Install an Add-in in PowerPoint?
You can install Add-in in your PowerPoint using the Microsoft office store, which is located in the insert tab. Follow the 4 easy steps described below to install your preferred Add-in in your PowerPoint presentation.
Step-1: Click on the “Insert” tab
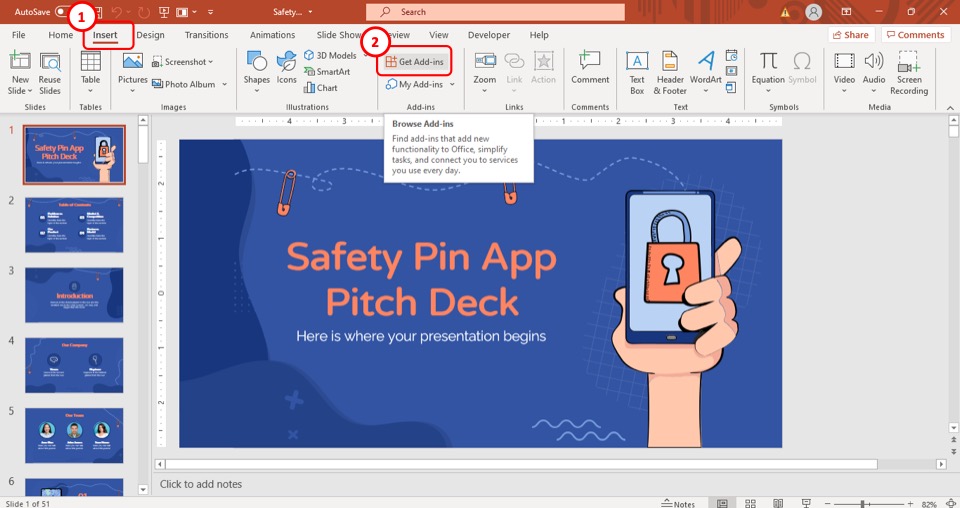
The first step of the process is to click on the “Insert” tab, which is the 3rd tab in the ribbon of your PowerPoint.
Step-2: Click on the “Get Add-ins” button
After you have accessed the “Insert” tab, all you have to do is to click on the “Get Add-ins” button. It is the first button in the “Add-ins” section of the “Insert” tab.
Step-3: Select your preferred Add-in
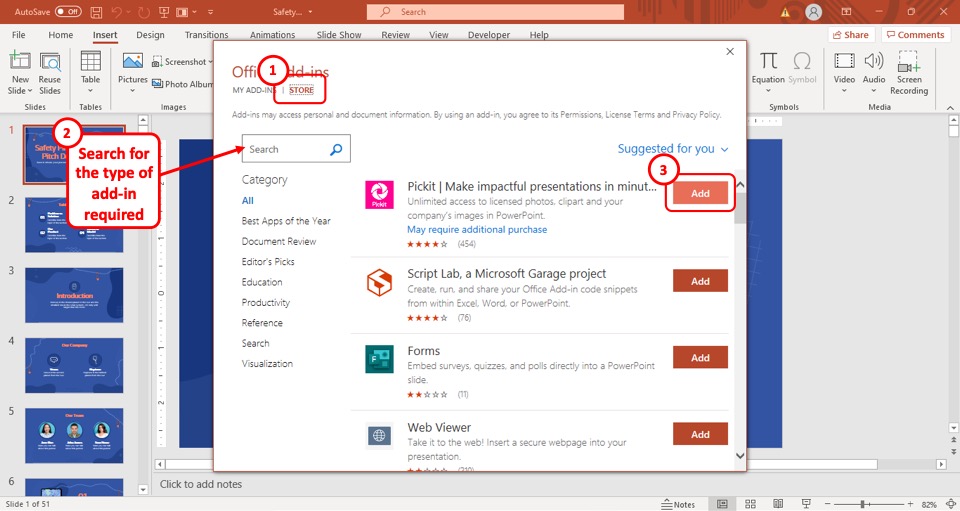
Once you’ve clicked on the “Get Add-ins” button, a pop-up window will appear on your screen.
From the pop-up window, find your preferred Add-in, and then select the orange “Add” button to the right of the Add-in, in the pop-up window.
Step-4: Click on the Check box and hit “Continue”
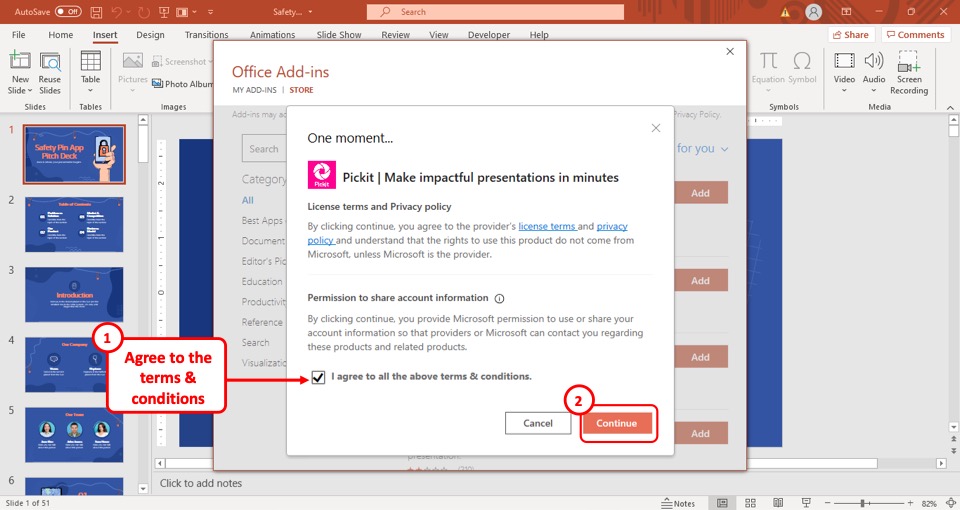
After you have selected your preferred Add-in and clicked on the “Add” button, yet another pop-up window will appear on your screen.
Click on the check box to agree with all the terms and conditions of installing the Add-in and then hit the “Continue” button located at the bottom right corner of the pop-up window.
After that, restart your PowerPoint and the Add-in will be added automatically.
3.2 How to Install a Third-party Add-in in PowerPoint?
Sometimes, there are situations where you add-in that you want to install is not available in the Microsoft Store or you can’t access it using the traditional method within PowerPoint (as described above).
In that case, you will need to add the add-in in PowerPoint using a different method. Here’s what you need to do –
Step 1 – Click on the “File” tab
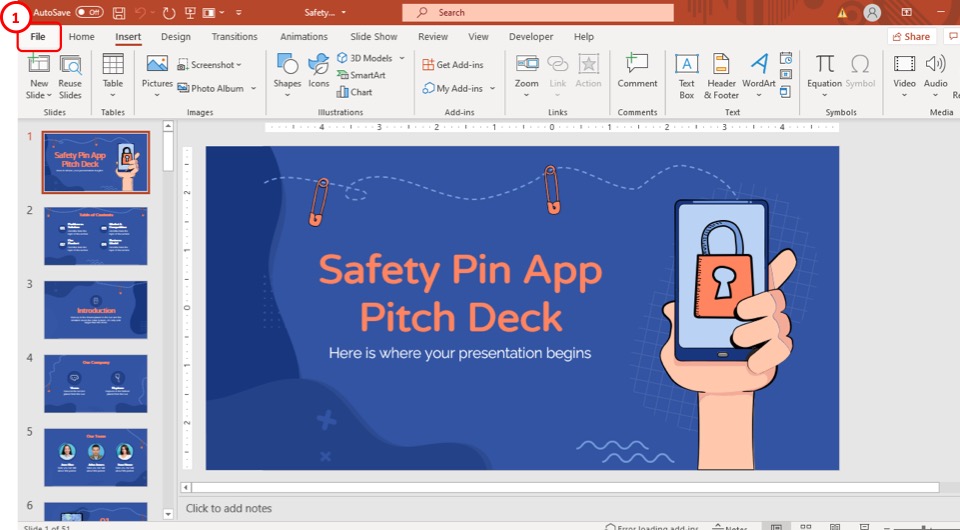
The first step is to click on the “File” tab. This will open up the backend of PowerPoint.
Step 2 – Click on the “Options” button
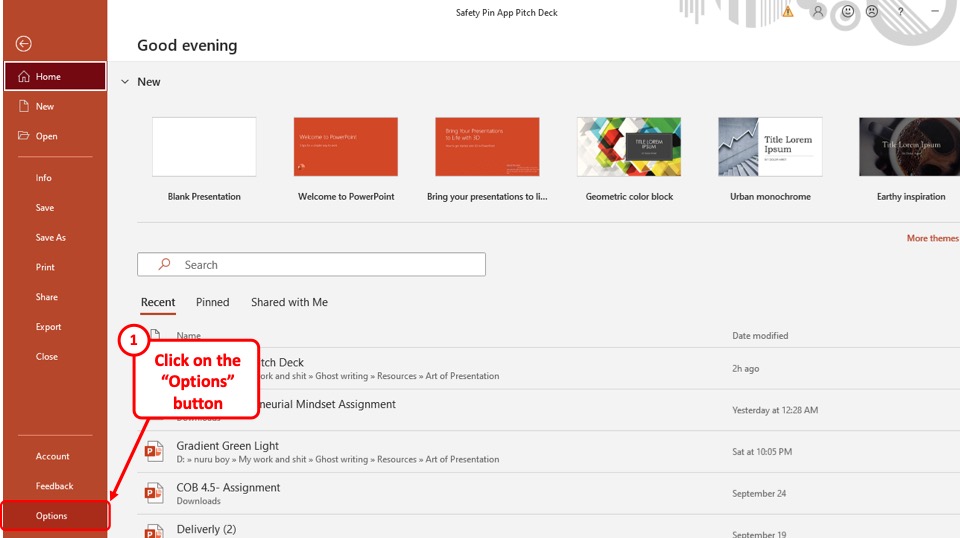
From the left part of the screen, click on the “Options” button present in the bottom left part of your screen. This will open up a new window.
Step 3 – Open the Add-ins option

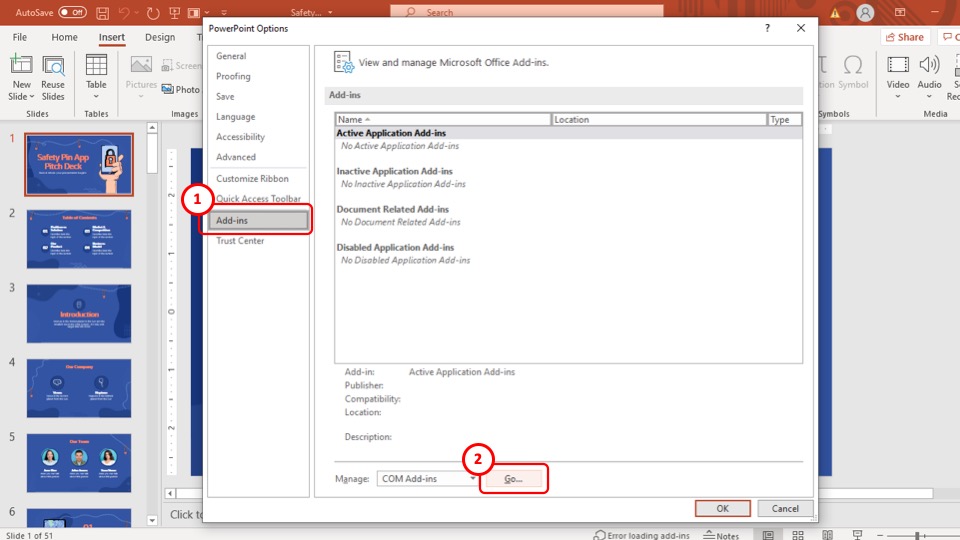
In the next step, from the options on the left, click on the “Add-in” option.
This will provide you with a different set of features. At the bottom of the window, click on the dropdown under the “Manage” section.
Then, from the dropdown, click on “PowerPoint Add-ins“, and click on “Go“.
Step 4 – Add the third-party add-in
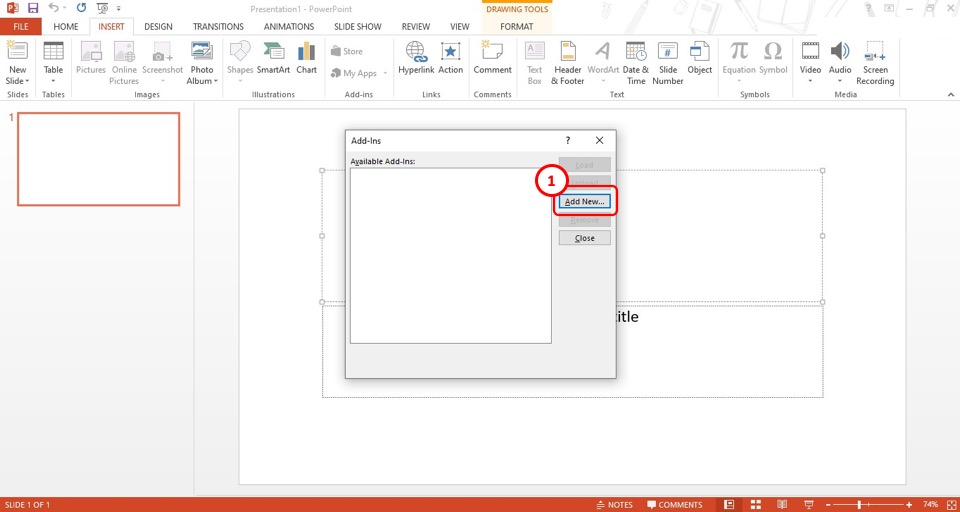
The last step of the process is to simply add the third-party add-in.
To do that, click on the “Add New” option. This will open up the file explorer on your computer. Browse to the location where you have saved the third-party add-in. Click on it to select it, and then click “Ok“.
You may be prompted with a security notice. Click on “Enable Macros” and close the PowerPoint application to restart it.
That’s it! When you restart the application, you will notice that add-in has been added to PowerPoint.
3.3 How to Install an Add-in in PowerPoint on Mac?
The process of installing Add-ins in PowerPoint using a mac computer is the same as installing an Add-in using a Windows computer.
Simply go to the “Insert” tab and follow the instructions discussed above. The only notable difference is that the window to search for the add-in opens up in an existing browser.
You will need to login to your Microsoft Account (the one that you have used for activating the Microsoft Office), and the add-in will automatically be installed once you click on “Get Add-in“.
4. Three Best FREE Add-ins for PowerPoint?
To help you pick which add-in will boost your productivity the most, below are our top 3 picks for add-ins that you can use in your PowerPoint.
1. Office Timeline: This PowerPoint Add-in allows you to create graphs, charts, timelines, and Gantt charts with just a click of a button.
All the graphics that you create using this Add-in have the potential to be highly sophisticated and customizable.
This add-in eliminates your need to manually create sophisticated charts and helps you create more professional and engaging presentations.
2. Pexels: This add-in provides a huge collection of copyright-free images that you can choose from and add to your presentation.
By using this add-in, you get instant access to thousands of pictures that are free to use and help you create an engaging presentation using relevant pictures that fit your message.
3. Power User for PowerPoint: This add-in is specifically made for those who depend on PowerPoint regularly and are looking to make their workflow more efficient.
The add-in provides over 500 PowerPoint templates, 6,000 vectors, over a million pictures, 250 editable maps along with a wide selection of diagrams and advanced charts.
This add-in will save you time, labor and help you create professional presentations in with greatly reduced amount of time!
5. Benefits of Using an Add-in in PowerPoint
There are several benefits of using add-ins in your PowerPoint. Below are 3 of the major benefits that you can enjoy right now by using add-ins in your PowerPoint.
1. Increases Efficiency: add-ins will make your overall experience with PowerPoint a lot easier. add-ins can significantly reduce the time and effort required to make a presentation.
For example, manually making Gantt chart to describe the duration of a project that you’re a part of can be difficult and time-consuming. But, with the help of the “Office Timeline” Add-in, you get access to hundreds of pre-made, professional Gantt charts that you can just customize to fit your preference.
And so, add-ins will make your work more efficient and help you create better presentations.
2. Easy access to tools and resources: The add-ins that you install in your PowerPoint presentation are often tools or shortcuts to tools that you use regularly. This allows you to do more with less effort.
For example, it is a tedious job to find the right photo for your presentation from the internet. It will take at least two or three searches on Google for you to have the photo that blends in with your presentation.
Then comes the task of finding a different photo that matches the one you already have in your presentation. However, with the help of Pixels, you can do all of that with just a click of a button.
Plus, you don’t need to upload a photo everytime. You can simply have the photo added directly to your presentation!
3. Adding customized features to your PowerPoint: With the help of add-ins, you can make your PowerPoint have all the necessary tools that you need.
Add-ins give you the experience of having a powerful presentation tool that is tailor-made for you and fills in the gap that is sometime left behind by the Microsoft Office team.
With the right add-ins in your arsenal, it will make your experience with PowerPoint more custom features that are otherwise not available or will take a long time to accomplish the same task.
6. Drawbacks of Using an Add-in in PowerPoint? (at least one drawback)
Like all things wonderful, there are a few drawbacks to using the Add-ins in your PowerPoint. Two of them are discussed below.
1. It can sometimes be difficult to use: Although add-ins make the process of making presentations more efficient on PowerPoint, they can sometimes have the opposite effect.
Some add-ins are sophisticated and used for specific purposes which might confuse some beginner users. And so, adding those to your PowerPoint may make the process harder for you than the alternative.
Moreover, a small number of add-ins provide trial versions of the add-in for the first few days and then ask you to subscribe to their service. The drawback is that in some cases, the payment methods are sometimes not clear, which makes it difficult for you to purchase them.
2. Some Add-ins make the PowerPoint software run slower: Sometimes when you install an add-in, it adds to the size of your PowerPoint file. Thus the size of your presentation gets larger size than usual, and can sometimes make your PowerPoint application run a lot slower.
Since add-ins take up additional RAM in your computer, it can sometimes even cause the software to crash altogether.
However, the add-ins that cause this problem are usually from third-party sources.
7. How to Remove Add-ins in PowerPoint?
If you don’t like the add-in that you installed, or perhaps the add-in that you added doesn’t fulfil the purpose for which it was added in the first place, you will feel the need to remove the add-in in PowerPoint!
To remove an add-in from PowerPoint, click on the “File” tab. Then, click on the “Options” button. From the new window, click on the “Add-ins” option. Under the “Manage” section, click on “Go..”. From the new window that opens up, select the add-in that you want to delete, and click “Remove”.
Here’s a visual representation with the detailed steps so that you can understand the above mentioned process better!
Step-1: Go to the “File” tab
The first step of the process is to go to the “File” tab, which is the first tab in the ribbon of your PowerPoint. By clicking on it you will be taken to a new window.
Step-2: Click on the “Options” button
After you have accessed the “File” tab, all you have to do is to click on the “Options” button which is located in the bottom left corner of the “File” tab.
After that, a pop-up window will appear on your screen.
Step-3: Click on the “Add-ins” option
After you click on the “Options” button in the “File” tab, the PowerPoint Options pop-up window will appear on your screen.
From the pop-up window, click on the “Add-ins” option which is the second to last option in the pop-up window and located at the left of the pop-up window.
Step-4: Click on the “Go..” button
After you select the “Add-ins” option, you will be taken to a new page in the pop-up window.
On this page, click on the “Go..” button, which is located at the bottom middle part of the pop-up window, beside the manage option. This will open yet another pop-up window on your screen.
Step-5: Click on the “Remove” button
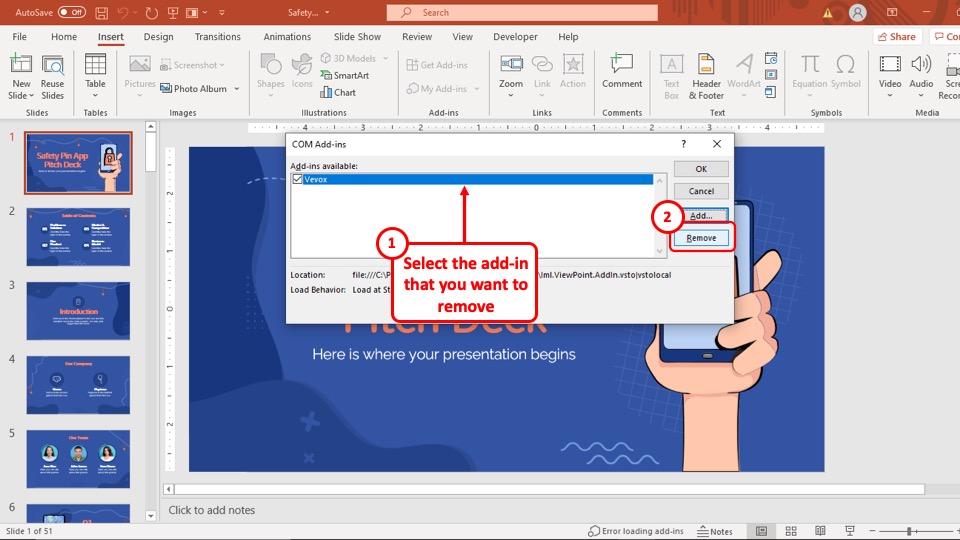
After you open the pop-up window by clicking on the “Go..” button, all you have to do is to select the Add-ins that you want to remove.
Then click on the “Remove” button, which is the last option to the right of the pop-up window. After that, the Add-in will be removed automatically.
7.2 How to Remove Add-ins in PowerPoint from Mac?
The process of removing add-ins in PowerPoint on Mac is similar but slightly different. Here are the steps that you need to follow if you want to remove an add-in on Mac –
Step 1 – Open the “My Add-ins” window
The first step is to click on the “Insert” tab. Then, from the ribbon, click on the “My Add-ins“. This will open a new window.
Step 2 – Select and right-click on the add-in
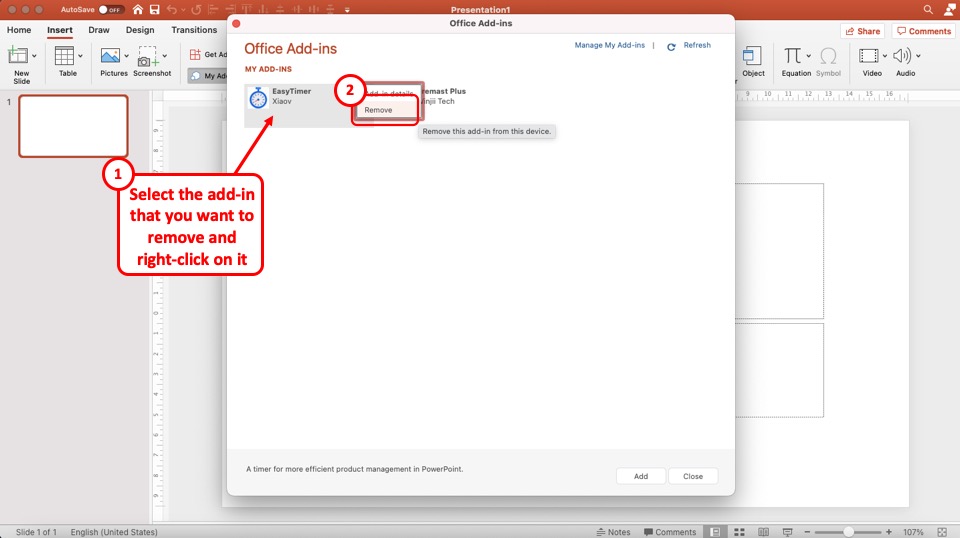
In the next step, simply select and right-click on the add-in that you want to delete. Then, from the options that appear, simply click on “Remove“.
Step 3 – Click on “Remove”
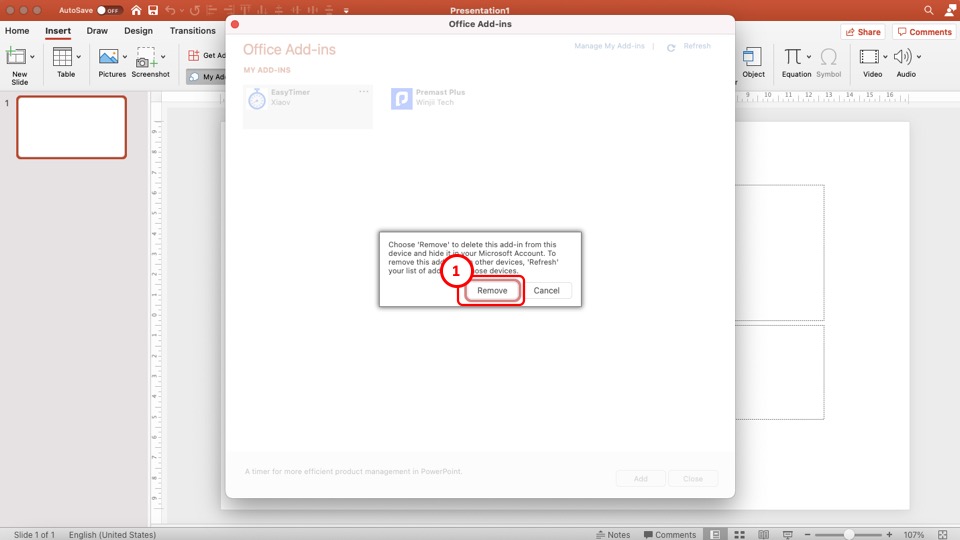
In the final step, PowerPoint will ask you for a final confirmation whether you really want to remove the add-in. Simply click on the “Remove” option and the add-in will be removed.
8. How to Disable Add-ins in PowerPoint Permanently?
Rather than permanently disabling an add-in in your PowerPoint, it is better to uninstall the add-in and remove it. You can do that from the process described above.
However, if you want to temporarily disable a add-in, follow the steps described in the above section for removing the add-in. Then, in the last step, here’s what you need to do –

When you come to the final window, instead of click on the “Remove”, simply “Uncheck” the tick box and click “OK“.
This will disable the add-in.
9. How to Enable Add-ins in PowerPoint?
To enable an Add-in in your PowerPoint, all you have to do is to go to the “COM Add-ins” pop-up window.
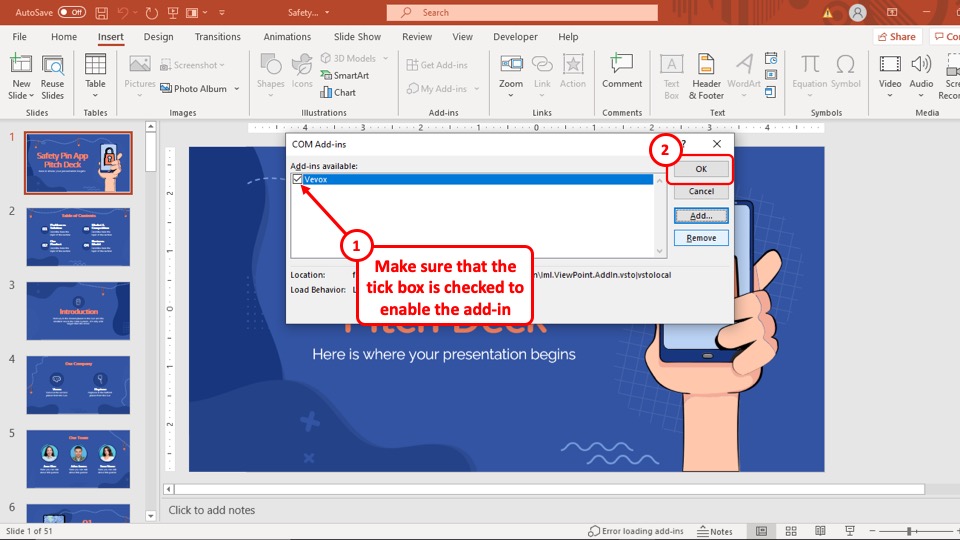
Then, click on the check box to add a tick mark on the add-in that you want to enable and click on the “OK” button (as indicated in the image above).
This will enable the add-in for you to use while making your PowerPoint presentation.
10. How to Manage Installed Add-ins in PowerPoint?
To manage Add-ins that are installed in your PowerPoint, you have to go to the PowerPoint Options pop-up window, which can be accessed from the “Options” button in the “File” tab.
At the very bottom of the “Add-in” section in the PowerPoint Options pop-up window, you can view the different options you can choose to manage the Add-ins that are installed in your PowerPoint.
Using these options, you will be able to add, disable, enable or remove the add-ins in PowerPoint.
11. Troubleshooting Add-ins in PowerPoint
Sometimes, users may encounter issues or errors either while installing an add-in or using an add-in in PowerPoint. It is difficult to explain every single error that you may face.
However, I’ve described some of the most common errors that you may encounter when using add-ins in PowerPoint with ways to get around the errors!
11.1 Add-in Not Working in PowerPoint
Sometimes, the add-in just fails to work. This can happen due to multiple reasons.
Perhaps there was an error while installing the add-in or maybe the add-in is just using too much RAM on your computer. It is also possible that the add-in is simply corrupted.
The best solution to this problem is to remove the add-in from your PowerPoint and reinstall it. After reinstalling the add-in, restart your PowerPoint file. If needed, restart your computer. Most likely, the add-in will start working.
Sometimes, the add-in doesn’t work even though it has installed properly. It perhaps has worked before, but now it may not be working. This may flummox you at first!
This may happen sometimes when the add-in may be dependant on the internet connection to operate. You may be either not be connected to the internet or perhaps the connection speed may be slow.
For such a situation, just wait a bit patiently. Alternatively, try using it after some time. Sometimes, disabling and enabling it can do the trick.
11.2 PowerPoint Keeps Crashing due to Add-in
Sometimes, your PowerPoint software itself can crash due to an error in an add-in that you’re using in your PowerPoint. This can be really frustrating as you my even up losing your PPT files that you were working on!
This may happen for several reasons. Some of the major reasons can be that the add-in that you’re using is not up-to-date, or you have an unstable internet connection, or there may even be a bug that needs to be fixed in the add-in.
The best way to solve this problem is to update the add-in or reinstall it in your PowerPoint. However, if that doesn’t work, there might be other issues at play here other than just an add-in.
Make sure that you check out our full guide on how to fix and prevent your PowerPoint from crashing!
11.3 How to fix the “Error Loading Add-in” issue in PowerPoint
One of the most annoying error that you get related to add-ins in PowerPoint is the “Error loading add-in”. This appears when you try to install an add-in by PowerPoint simply fails to install the add-in and gives this error instead.
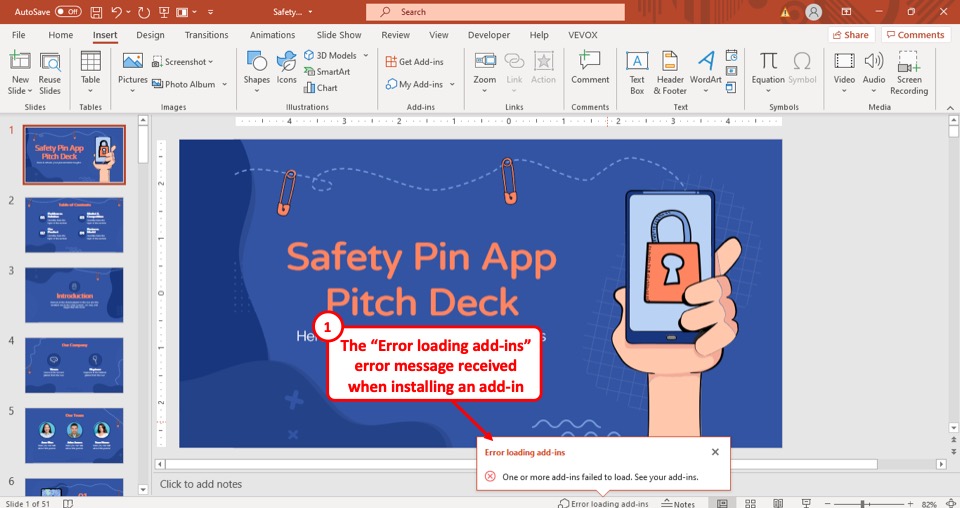
The major reason why an add-in is not getting installed in your PowerPoint is that you are not properly signed in to your Microsoft Office account.
To solve this issue, make sure you are properly logged in with your Microsoft account, restart the PowerPoint software, and try again. After that, you should be able to install the add-in in your PowerPoint.
11.4 PowerPoint Can Not Load Add-in Error
The most common reason why an add-in fails to load in PowerPoint is that the macros settings might be set too high.
When the Macro settings are set too high, PowerPoint encounters issues in loading add-ins and ultimately does not load the add-in at all.
To solve this issue, you have to go to the PowerPoint Options menu in the “File” tab and follow the steps given below.
Step-1: Open the PowerPoint Options
First, click on the “File” tab. This will open the backend of PowerPoint.
From this section, click on the “options” button at the bottom left corner of the screen (as shown in the image above).
Step-2: Select the “Trust Centre” option
After you go through the PowerPoint Options pop-up window, select the “Trust Centre” option which is the last option on the left part of the window (check the image shown in step 3 below).
It will take you to the next page in the pop-up window.
Step-3: Select the “Trust Centre Settings”
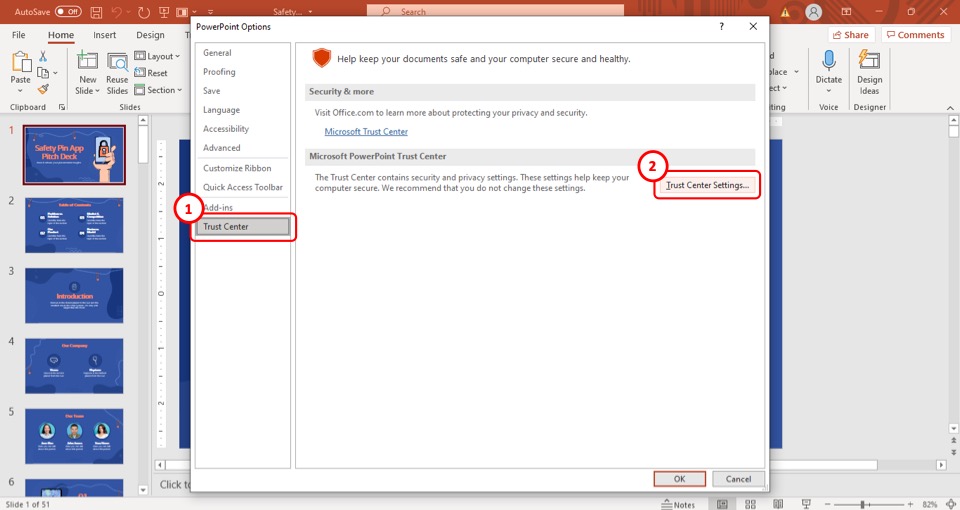
After you go to the “Trust Centre” option, select the “Trust Centre Settings” option located at the right in the pop-up window.
Step-4: Select the “Disable all macros with notification” option
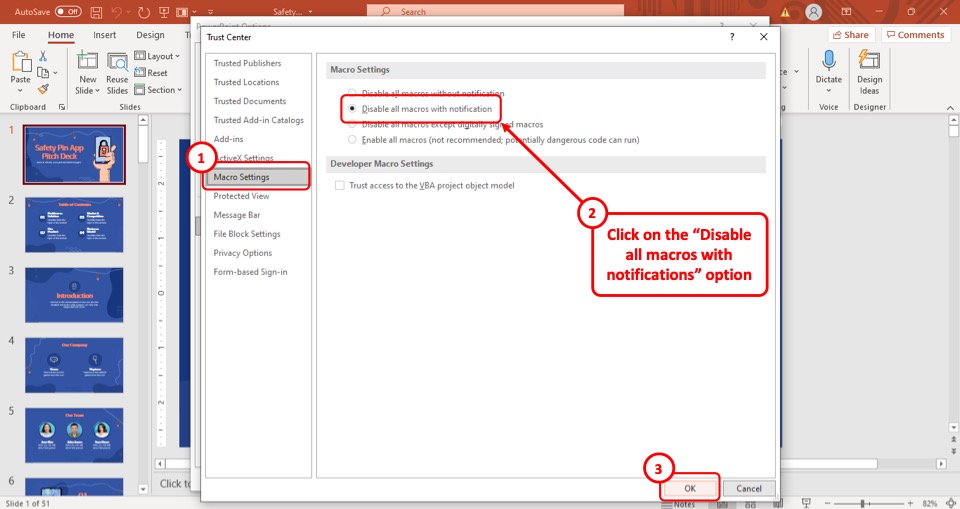
After you click on the “Trust Centre” settings, a new pop-up window will appear on your screen.
In this pop-up window, select the “Disable all macros with notifications” option which is the second option in the “Macros Settings” section.
After that, click on the “OK” button located at the bottom right corner of the pop-up window. The issue that you were having should be resolved immediately after that.
Credit to diana.grytsku (on Freepik) for the featured image of this article (further edited).