![Google Slides Add-Ons: A Helpful Guide! [with Top 5 Add-ons!]](https://artofpresentations.com/wp-content/uploads/2021/07/Featured-Image-Google-Slides-add-ons.jpg)
Google Slides is a great presentation application. One of the greatest advantages of using Google Slides is that it is completely free! However, since it is totally free, it also only has barebones features and to use more powerful features in Google Slides, one has to depend on Add-Ons!
Add-ons in Google Slides are independent plugins that allow you to add additional functionality to your Google Slides presentation. Add-ons can be accessed through the Google Workspace Marketplace. Some add-ons are paid while many add-ons are free to use for Google Slides.
You may be wondering – how exactly do you install these add-ons on Google Slides, and which Add-ons should you choose? Well, that’s exactly what we will discuss in this article.
So, let’s get started!
What are Add-ons in Google Slides?
Add-ons are basically third-party applications on Google Slides that enhances its functionalities and provide you with more options on what you can do on Google Slides.
Add-ons make the experience of making presentations and presenting them more efficient and powerful by increasing the available set of tools provided by Google Slides.
From having access to infinite stock images and icons at the click of a button to converting files on your Google Slides window, add-ons provide a way to make presentations faster and easier.
Are Add-ons for Google Slides Free?
Most add-ons for Google Slides are free to download. Some Add-ons with advanced features however may cost a reasonable amount of money. Moreover, most free add-ons offer in-app purchases.
That said, it is important to mention that you can find a free add-on for all your basic needs in Google Slides.
Are Add-ons for Google Slides Safe?
One of the most common concerns that users often have is with the security of the add-ons. What happens when you install an add-on in Google Slides? Will your personal information or account-related information be compromised?
Add-ons for Google Slides can be considered fairly safe. Since add-ons are available only through a marketplace managed by Google (Google Workspace Marketplace), they go through thorough scrutiny before being available to general users for download.
However, like most apps, add-ons in Google Slides may ask you for certain permissions to get access to your G-suite data. After installing an add-on, the app may ask you for your permission to “view and manage files in your Google Drive” or “View your email address”.
Some concerns may arise about third-party software getting access to your data, but the terms and conditions are always provided along with it. So, it is always your choice whether you want to agree to those terms or not.
It is generally not harmful to use add-ons in Google Slides, but it is also better to read up a bit about what you’re agreeing to before using it.
How to Add an Add-on in Google Slides?
Adding an add-on in Google Slides is a very easy process.
To add an add-on to your Google Slides, you have to go to the “Add-ons” tab which is located in the ribbon of your Google Slides. It is the second to last tab, right beside the “Help” tab on the ribbon.
The whole process of adding an add-on in your Google Slides is explained in the 5 easy steps below.
Step-1: Go to the “Add-on” tab
The first step is to click on the add-ons tab which is located in the ribbon of your Google Slides.
Step-2: Click on the “Get add-ons” option
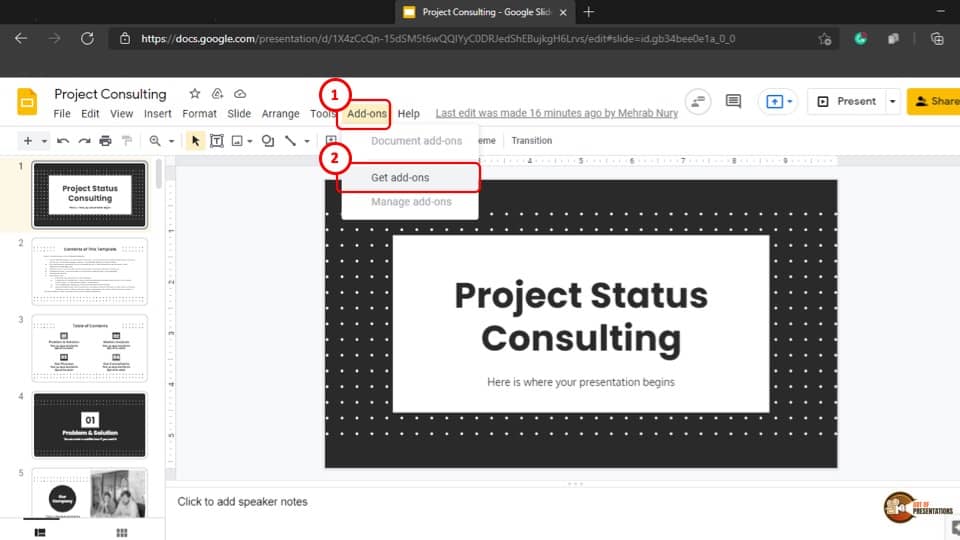
After clicking on the “Add-ons” tab, a drop-down menu will appear. From that drop-down menu, select the “Get add-ons” option.
Step-3: Select your preferred add-on
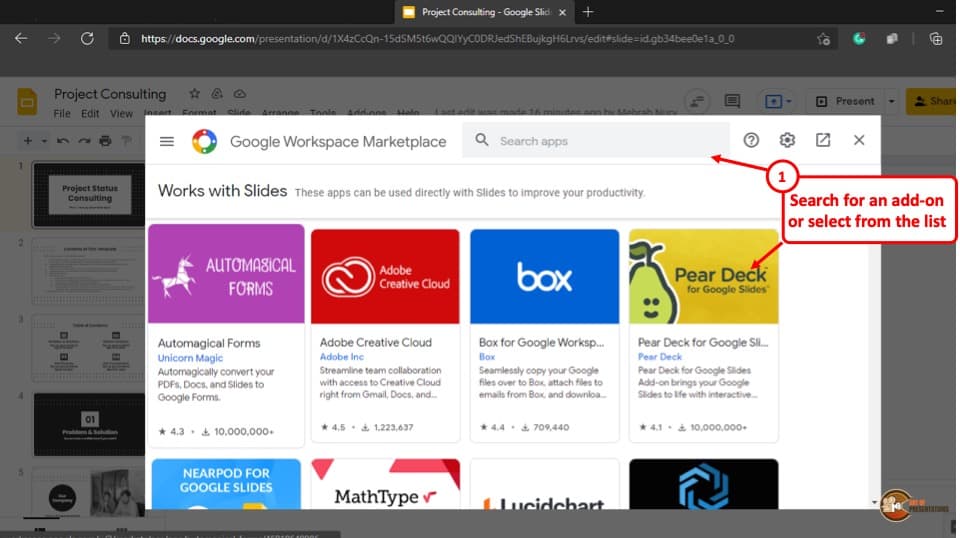
A pop-up window will appear on your screen after clicking on the “Get add-ons” option. From that pop-up window, select your preferred add-on. There are thousands of options to choose from. Simply select the add-on which best fits your purpose and a new pop-up window will appear.
Step-4: Click on the “Install” button
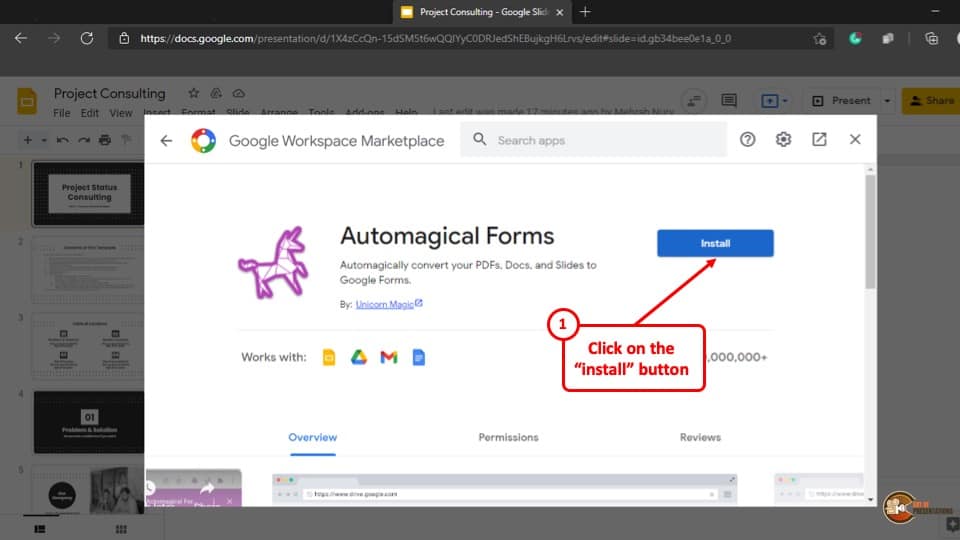
From the newly opened pop-up window, click on the blue “Install” button at the upper right part of your screen.
Step-5: Click on the “Continue” button
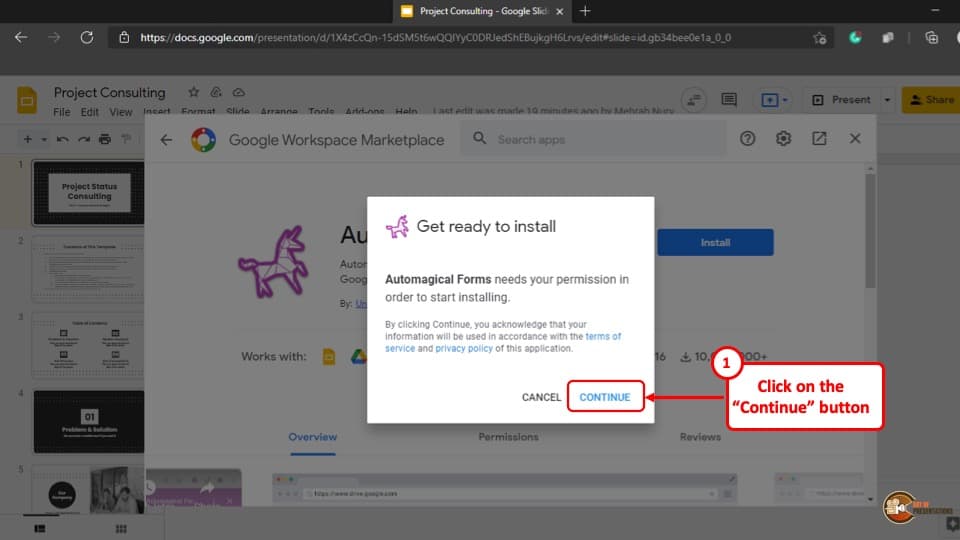
By clicking on the “Install” button, yet another pop-up will appear on your screen asking for permissions required to start the installing process.
Click on the blue “Continue” button and the add-on will be installed to your Google Slides automatically.
Once the add-on has been installed, you should be able to access it under the “Add-ons” tab on your Google Slides presentation.
5 Best Add-ons for Google Slides [Overall]
To help you decide which add-ons you need to enhance your presenting ability, here is a list of the 5 best add-ons for Google Slides that you can add to your arsenal.
1. CloudApp: This is an add-on that allows you to record anything that is present on your screen. It integrates Google Slides to help you record the screen of your computer.
It is very useful to record video tutorials or record your presentation with good video quality. With this add-on, you can even add gifs and images to your screen.
2. Icons for Slides & Docs: The name speaks quite well for itself. This add-on gives you access to over 1800 icons readily available in your Google Slides. This add-on provides icons from one of the most famous free icon websites i.e. flat icon.
3. Paletti: This add-on is a great time saver. By using this add-on, you no longer have to change the color of each slide individually. This add-on allows you to change the color of your slides with the click of a button. There are more than 200 shades of colors to choose from and everything in this add-on is absolutely free.
4. Slides Toolbox: This add-on comes along with a set of tools that you can use to instantly edit text formatting, import and export files, and access page tools, chart tools, and image tools.
5. Unsplash: Unsplash is an add-on that gives you access to unlimited high-definition stock images that you can use to make your presentations stand out. All the photos in this add-on are stock-free, which means you can also share your presentations globally.
5 Best Add-ons for Remote Learning [for Teachers & Students]
Google Slides has some wonderful add-ons to make the learning experience feel more engaging. They can come in handy for both the teachers and the students. Here is a list of the 5 best add-ons for remote learning:
1. Pear Deck: Pear Deck is an excellent add-on that allows teachers to directly ask questions to their students. The questions instantly pop up on the screen of the students in order for them to give their answers in real-time.
It makes the presentation more interactive which helps the students learn and helps the teachers teach more easily.
2. Slides Toolbox: This add-on makes repetitive tasks more efficient by providing tools to organize tasks and data. It allows you to express more through your presentation since the add-on will take care of the repetitive tasks.
3. Lucidcharts: This add-on allows you to make graphical charts seamlessly and add other visuals. Through lucid charts, you will be able to express your messages better with the use of charts and diagrams.
4. MathType: With the use of this add-on, you will be able to take your typeset languages and convert them to images and add them to your Google Slides presentation. You can use this add-on to add math equations as well as chemical equations!
5. Voice Notes for Google Docs: This add-on allows you to use your voice to give feedback to your students. Although the name says Google Docs, it can also be used with Google Slides.
This add-on is particularly useful for teachers when they have to give feedback to students on multiple assignments as it speeds up the workflow drastically.
6. TalkingDeck [BONUS]: This add-on allows you to automatically convert your Google Slides presentation into a narration. It even allows you to choose an avatar that is displayed on the screen during the narration. This gives your tutorial presentation a much more professional look.
It is a paid add-on but you do get a free trial to try it out!
Credit to diana.grytsku (on Freepik) for the Featured Image of this Article (further edited)