
It is hard to accept but even the most seasoned PowerPoint users find it hard to create a table of contents that is visually modern-looking and interactive! The “Zoom” feature can help not only with the table of contents but much more than that!
The zoom feature in PowerPoint helps create visual links between sections of your presentation. It makes the presentation interactive by adding a clickable thumbnail of a slide or a section in your presentation and allowing you to easily navigate within your presentation with cool effects!
Even if you use PowerPoint regularly, chances are you aren’t fully aware of the “Zoom” feature in PowerPoint.
And, by now if you are thinking about zooming in on the slides using the functions provided at the bottom-right corner of PowerPoint, then you really need to go through this article as you might not be aware of one of the most awesome features in PowerPoint called “Zoom“.
1. What is Zoom in PowerPoint?
Imagine if you could just click on an image on your slide and it just zooms into that image, opening the section of your presentation that provides more information about that image! The “Zoom” feature in PowerPoint, does exactly that!
The zoom feature in Microsoft PowerPoint is a new feature that makes your presentations interactive and dynamic. Using the zoom feature in PowerPoint, you can create a zoom slide from which you can jump to and from specific slides or sections in any order you may need during the presentation.
Let’s explore this feature by checking out some of the different types of “zoom” that you can add to your presentation –
1a. Summary Zoom
The “Summary Zoom” in Microsoft PowerPoint is a landing page where you can see the summarized slides within a page.
In the summary zoom, you can select which slides to show. You can even create summary slides to show on the summary zoom. During the presentation, you can click on any slide on the summary to proceed according to the need of the audience rather than the preset slide progression.
1b. Section Zoom
In Microsoft PowerPoint, “Section Zoom” is a slide that contains the preview and the link to the sections within the presentation.
You can click on them to jump from one section to another to highlight the important parts of your presentation.
1c. Slide Zoom
The “Slide Zoom” feature in PowerPoint allows you to navigate freely through the slides in a presentation. In the slide zoom, you can add all the slides or a few selected slides.
From this section, you can move freely between slides, emphasize the important slides, and even cut the presentation short without seeming so to the audience.
2. How to Insert Slide Zoom in Microsoft PowerPoint?
To use the “Zoom” feature in PowerPoint, first, click on the “Insert” tab. Then, click on the “Zoom” button from the ribbon. Choose the type of zoom from “Summary”, “Section”, and “Slide” zoom. Next, select the slides from the window that pops up by holding the “Ctrl” key, and click on “Insert”.
Here’s a step-by-step process with visual aids on what you need to do –
Step-1: Click on the “Insert” tab
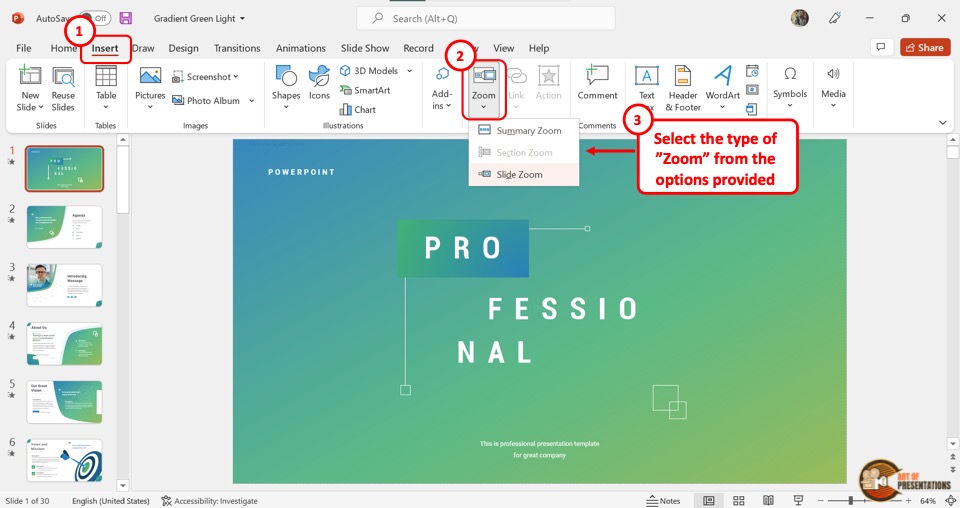
The first step is to open the “Insert” menu. Click on the “Insert” tab which is located in the menu ribbon at the top of the screen.
Step-2: Click on the “Zoom” button
In the “Links” section of the “Insert” menu, click on the “Zoom” button. This will open a dropdown menu. Click on the “Slide Zoom” option from the dropdown menu.
Step-3: Choose the Slide and Click on “Insert”
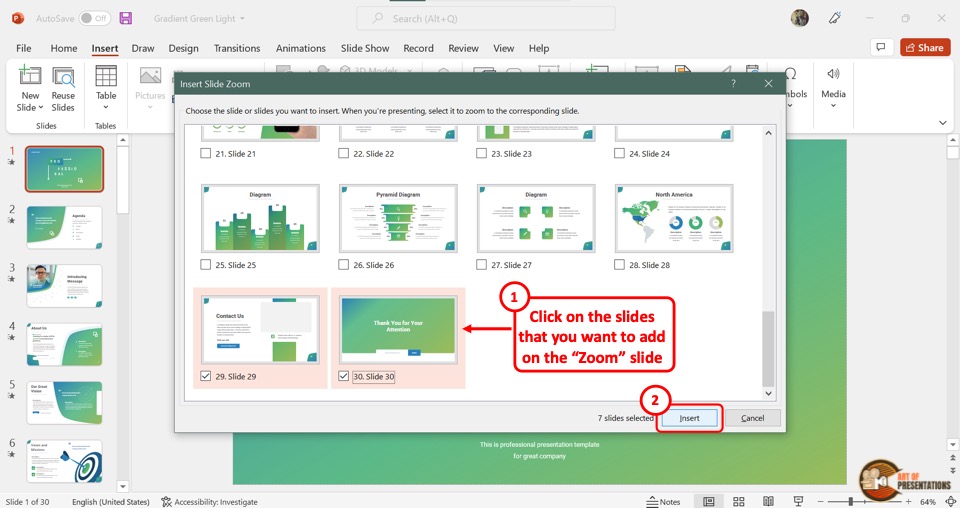
Clicking on the “Slide Zoom” option will open the “Insert Slide Zoom” dialog box.
Select the slides you want to include in the slide zoom and then click on the “Insert” button at the bottom of the dialog box. Now all you have to do is arrange the slides in the slide zoom according to your preference.
3. How to Edit Slide Zoom in PowerPoint?
Once you add the slide zoom to your presentation, you can easily edit it. To access the editing pane, all you have to do is click on the slide zoom. Then click on the “Zoom” tab in the menu ribbon.
3a. Change Borders in Slide Zoom
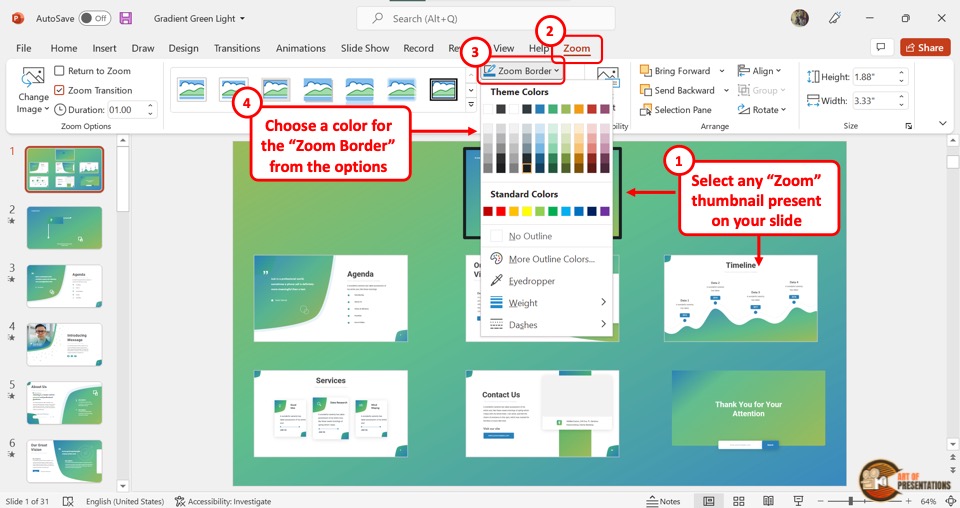
To add or change the border of the slides in slide zoom, click on the “Zoom Border” option. In the dropdown menu, you can click on your preferred color for the border.
You can also click on the “Weight” option and select the border width from the secondary menu. To change the border design, click on the “Dashes” option.
3b. Add Effects in Slide Zoom
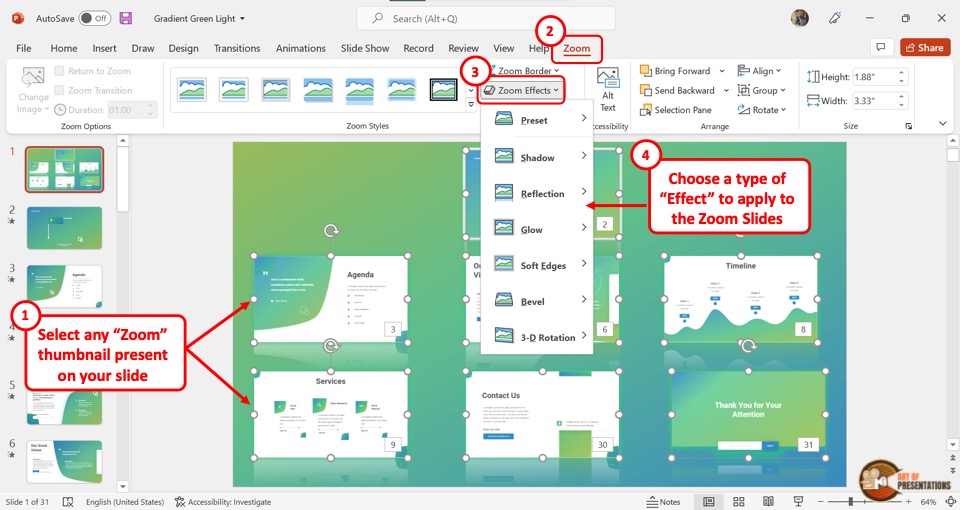
You can add various effects in the slide zoom. To do so, you have to first click on a single or multiple slides in the slide zooms where you want to add effects.
Then click on the “Zoom Effects” option. In the dropdown menu, you can click on any effect option to open a secondary pop-up menu. Click on your preferred effect. You can add multiple effects on a single zoom slide.
3c. Remove Background in Slide Zoom

In Microsoft PowerPoint slide zoom, you can remove the slide background of each slide in the slide zoom. Click on the “Zoom Background” option in the “Zoom Styles” section under the “Zoom” tab. This will remove the background of the selected slide.
4. How to Change Picture in Slide Zoom?
In Slide Zoom, the default thumbnail pictures are a screenshot of the slides. However, you can change the pictures if you want. All you have to do is follow the 4 easy steps.
Step-1: Click on the “Zoom” tab
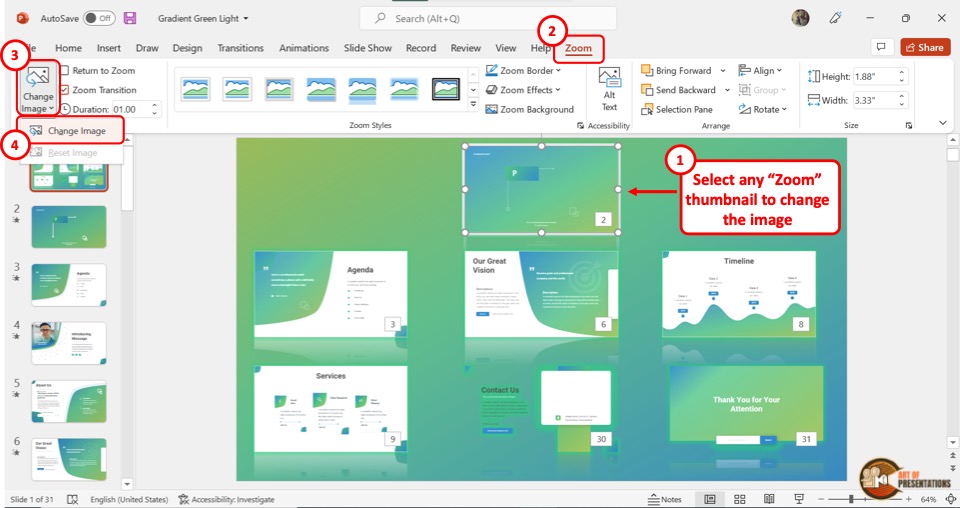
The first step is to click on the slide thumbnail that you want to change. Then click on the “Zoom” tab at which is the last tab in the menu ribbon.
Step-2: Click on the “Change Image” option
The second step is to click on the “Change Image” button which is the first option in the “Zoom Options” section of the “Zoom” menu (as shown in the image in step 1).
Then click on the “Change Image” option from the dropdown menu.
Step-3: Click on “From a File”
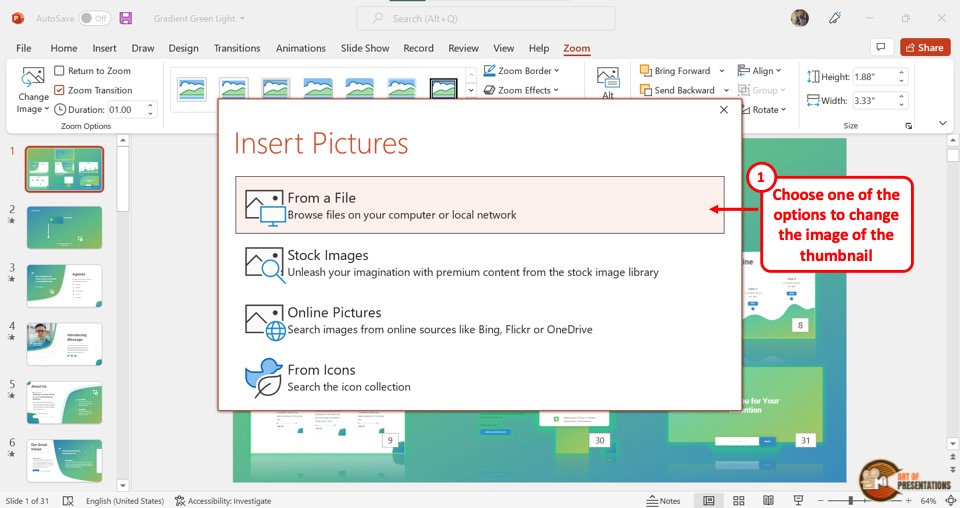
When you click on the “Change Image” option, it will open a dialog box. In the “Insert Pictures” dialog box, click on the “From a File” option. This will open another dialog box.
Step-4: Click on the “Insert” button
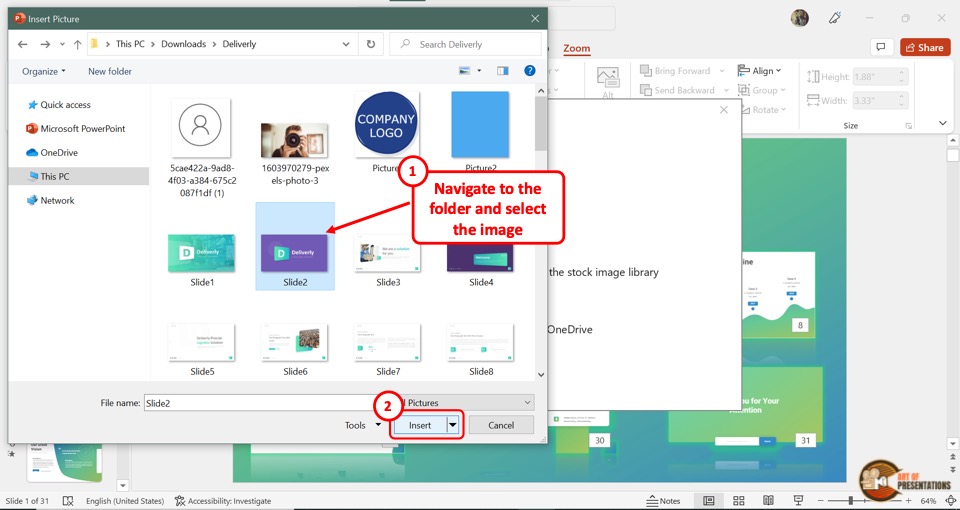
In the “Insert Picture” dialog box, click on the image which you want to add to the slide thumbnail in the slide zoom.
Then click on the “Insert” button at the bottom of the dialog box. In the slide zoom, the original thumbnail will be changed to the selected image.
4a. How to Reset Picture in Slide Zoom?
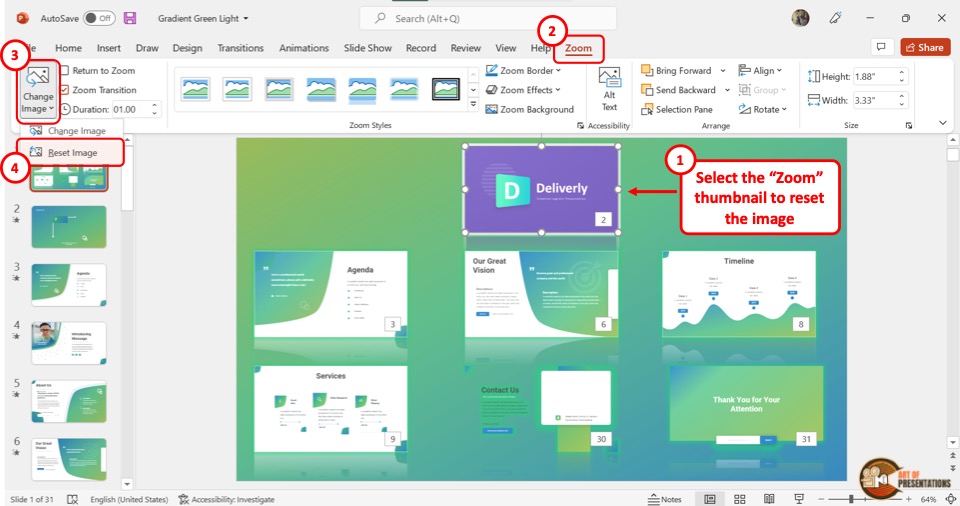
Once you change the picture of the slide thumbnail in the PowerPoint slide zoom, you can revert it to the original thumbnail.
All you have to do is click on the “Change Image” button in the “Zoom” menu. Then click on the “Reset Image” option from the dropdown menu.
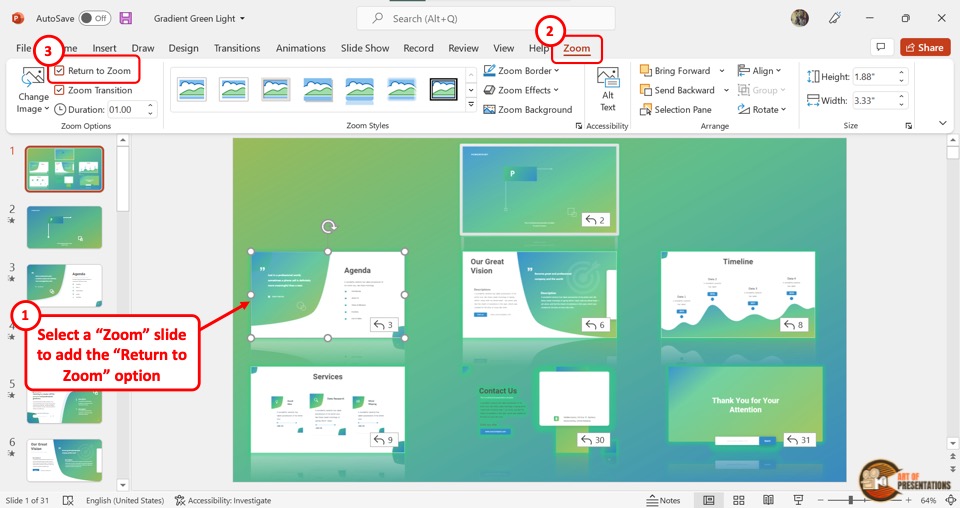
5. How to Stop Slide Zoom?

In the Microsoft PowerPoint slide show, the presentation will return to the slide zoom, after each slide. To stop this, select the slide in the slide zoom and then click on the “Zoom” tab in the menu bar.
In the “Zoom” menu, click on the “Return to Zoom” option. The checkmark in the box next to it will disappear. This will stop the slides from returning to the slide zoom screen.
5a. How to Return to Slide Zoom?
Once you stop the slide zoom on Microsoft PowerPoint, you can turn on the feature again. All you have to do is select the slide again and click on the “Zoom” tab. Then click on the box next to the “Return to Zoom” option.
The checkmark will appear again. Now the screen will return to the slide zoom after the selected slide during the presentation.
Credit to nakaridore (on Freepik) for the featured image of this article (further edited)