![Working with Slides in Google Slides! [Add, Delete & More]](https://artofpresentations.com/wp-content/uploads/2022/10/Featured-Image-3.jpg)
You are probably familiar with Microsoft PowerPoint that allows you to create your presentations and present on desktop. Google Slides is a similar tool, except it is hosted on the server of Google and allows multiple people to collaborate on the presentation at the same time.
Perhaps, you already heard about Google Slides but don’t feel sure how well it can be used to create presentations. So, it is best if you stay along with us and learn a complete guide of working with slides in Google Slides.
When creating a presentation or modifying an existing one, Google Slides offers a variety of options to work on your slides. you may want to create a new slide keeping the same design or sometimes you may want to delete a slide if no longer need it in your presentation.
In some cases, you also find it convenient to duplicate the slides in order to reuse elements from the previous slides, such as text boxes. In addition to this, you may want to use the slides from another presentations, rearrange your slides, or even hide a slide you want to make invisible during the presentation but may need it later.
In this article, you’ll learn how all of these functions along with shortcut keys work in Google slides. Are you ready to get started?
1. How to Insert Slides in Google Slides?
In Google Slides, you can insert a slide in different methods. The quickest method is to click on the plus icon which is the first icon in the toolbar at the top of the screen.
1.1 Method 1 – Using the “Slide” Menu

To insert a new slide using the “Slide” menu, you have to first click on the “Slide” option in the menu bar. Then click on the “New slide” option from the “Slide” menu to insert a slide.
1.2 Method 2 – Using the “Enter” Key
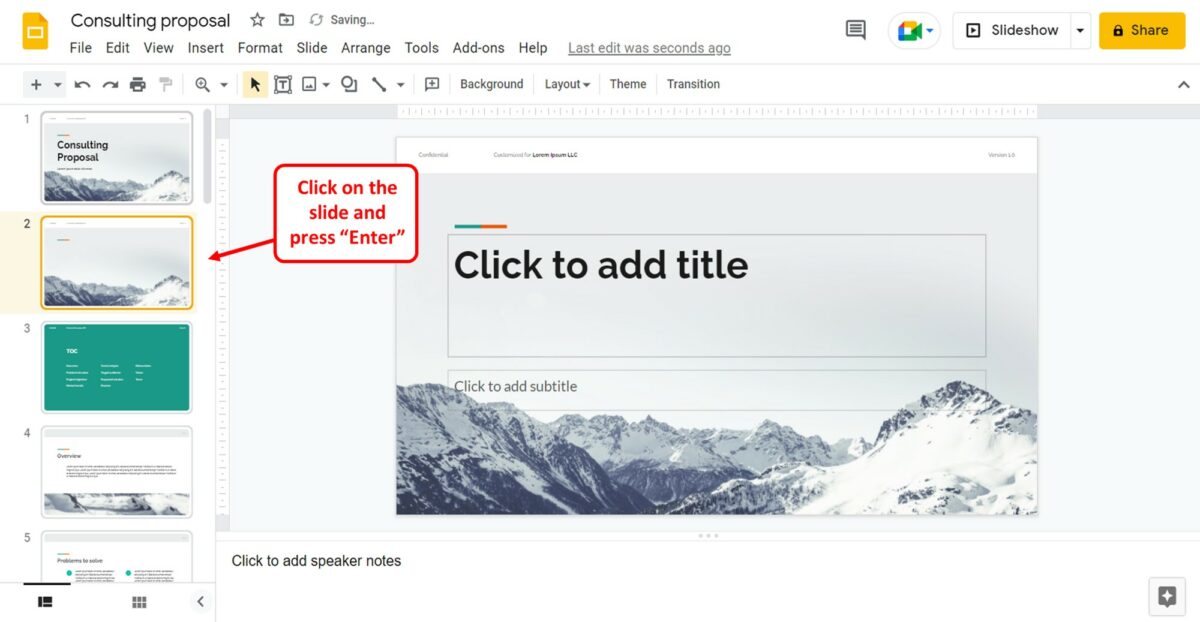
You can also insert a slide using the “Enter” key. All you have to do is click on a slide in the slide thumbnail pane and press the “Enter” key on your keyboard to insert a new slide under the selected slide.
1.3 Method 3 – Using the Keyboard Shortcut
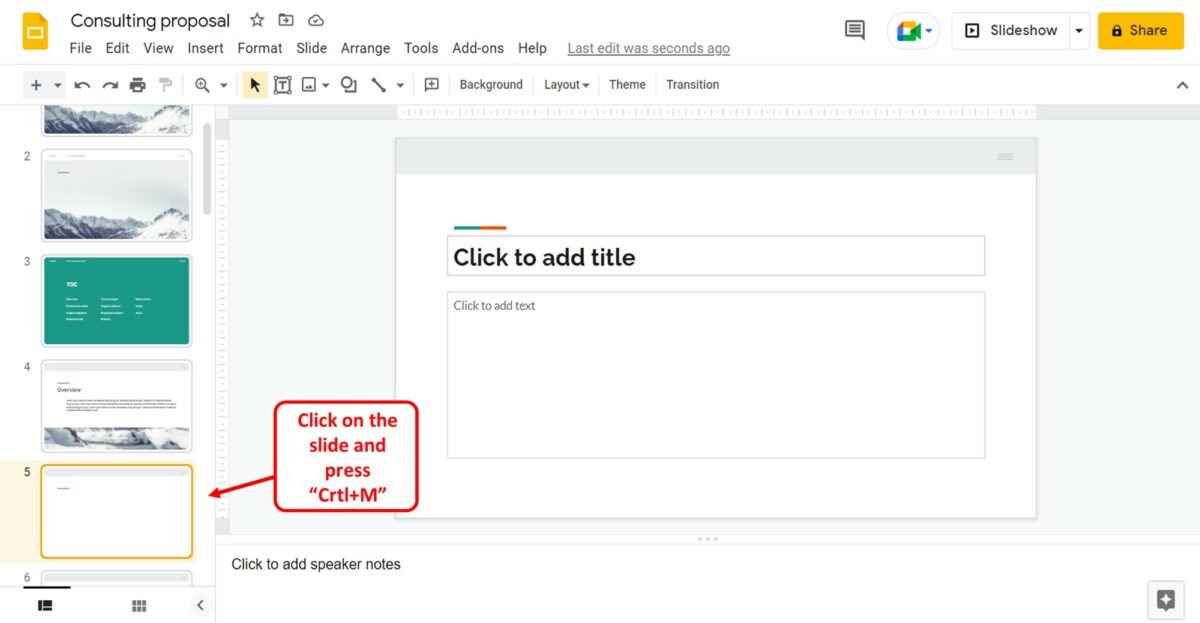
To quickly insert a slide, you can use the keyboard shortcut. Press the “Ctrl+M” keys on your keyboard to insert a new slide right under the open slide.
2. How to Add Slides in Google Slides on Android?
To insert a slide in the Google Slides application for android, you have to tap on the “New slide” option. It is available at the bottom right corner of the screen. Then all you have to do is click on the slide layout for the new slide from the pop-up list.
3. How to Copy and Paste Slides in Google Slides?
In Google Slides, you can use the available “Copy” and “Paste” features to import slides from one source to another. There are different methods you can follow to copy and paste slides.
3.1 Method 1 – Using Keyboard Shortcut
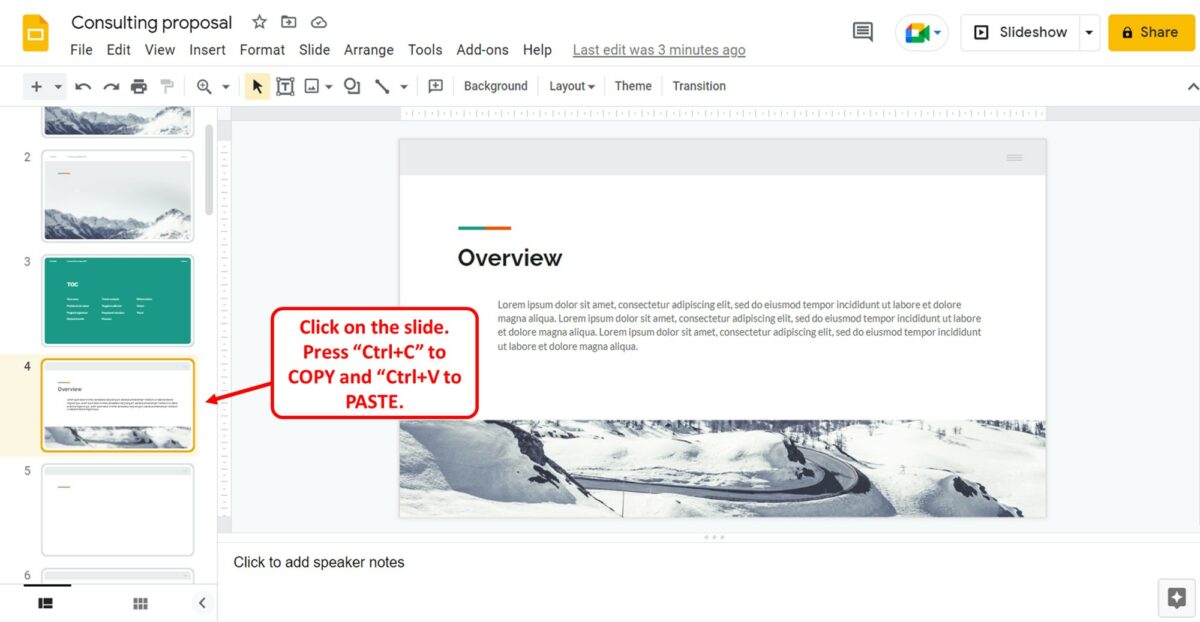
To copy a slide, you have to first click on the slide in the slide thumbnail pane. Then all you have to do is press the “Ctrl+C” keys on your keyboard. To paste a slide, you have to click where you want the slide pasted in the slide thumbnail pane. Then press the “Ctrl+V” keys on the keyboard to paste a slide.
3.2 Method 2 – Using “Right-click”
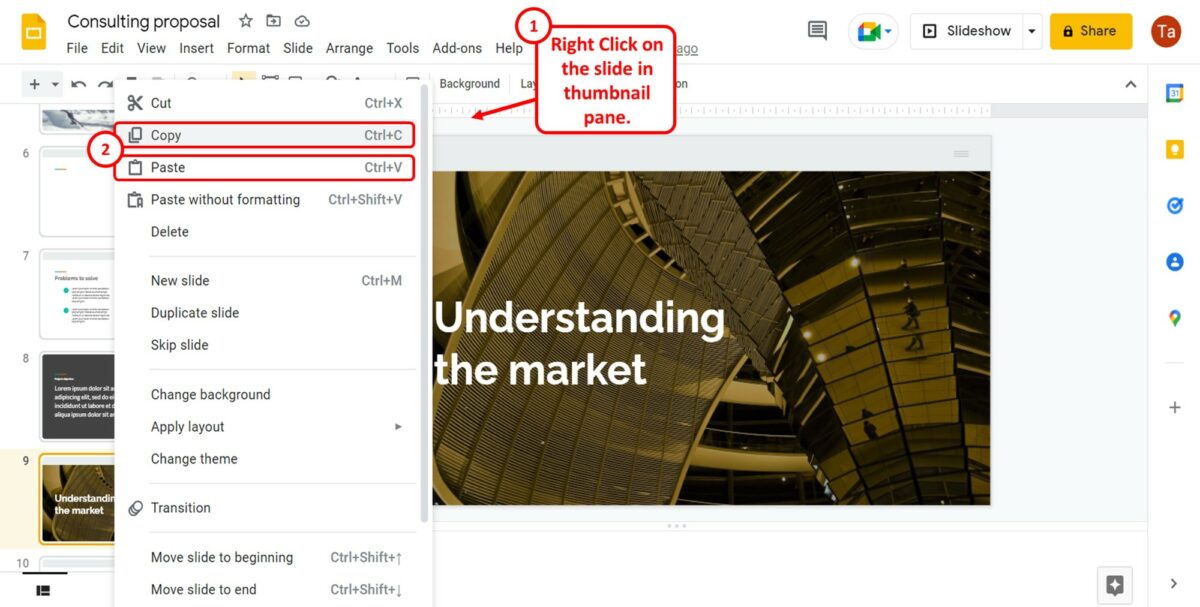
To use the right-click menu to copy or paste a slide, you have to “Right Click” on a slide in the slide thumbnail pane. Then click on the “Copy” or the “Paste” option in the right-click menu.
3.3 Method 3 – Using the “Edit” Menu
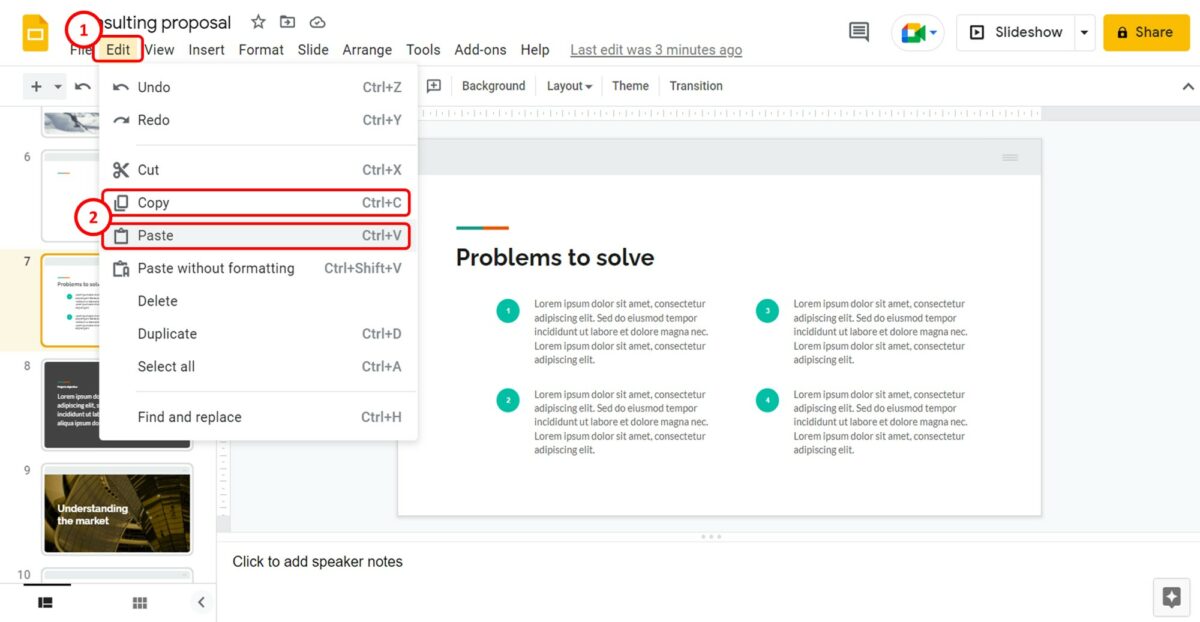
In the menu bar at the top of the screen, click on the “Edit” menu. Then click on the “Copy” option in the dropdown menu to copy the open slide. You can click on the “Paste” option to paste a slide.
4. How to Copy Multiple Slides in Google Slides?
To copy multiple slides in Google Slides, all you have to do is follow the 2 quick steps.
Step-1: Select multiple slides
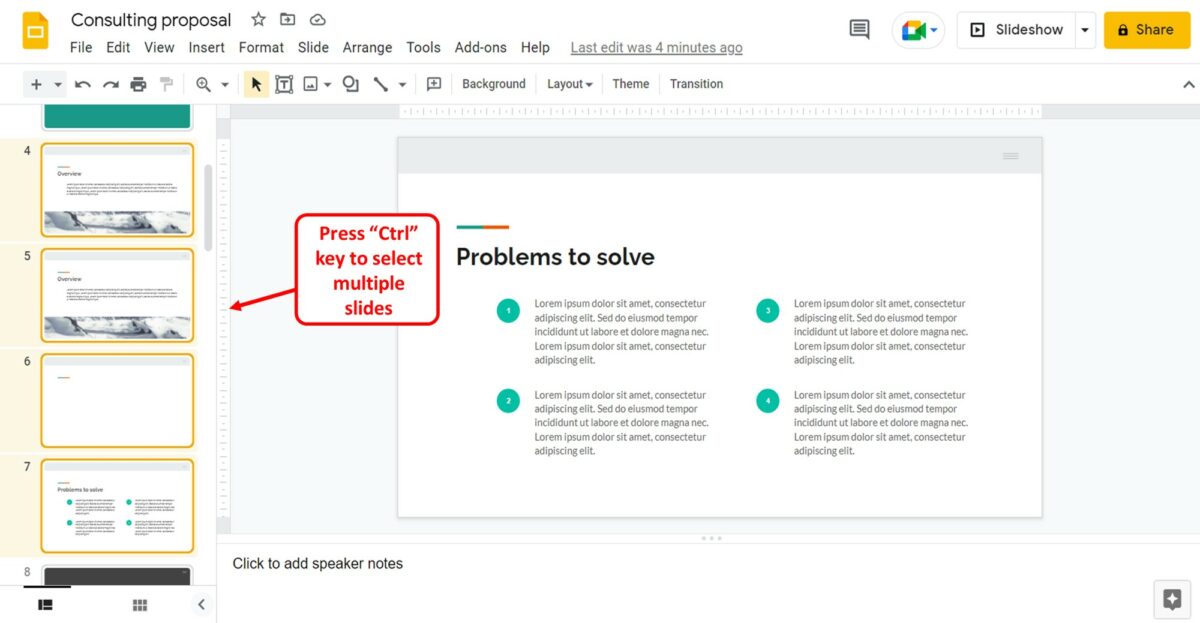
In the slide thumbnail pane on the left side of the screen, you have to first select multiple files together. Press the “Ctrl” key on your keyboard and click on the slides that you want to copy.
Step-2: Click on the “Copy” option
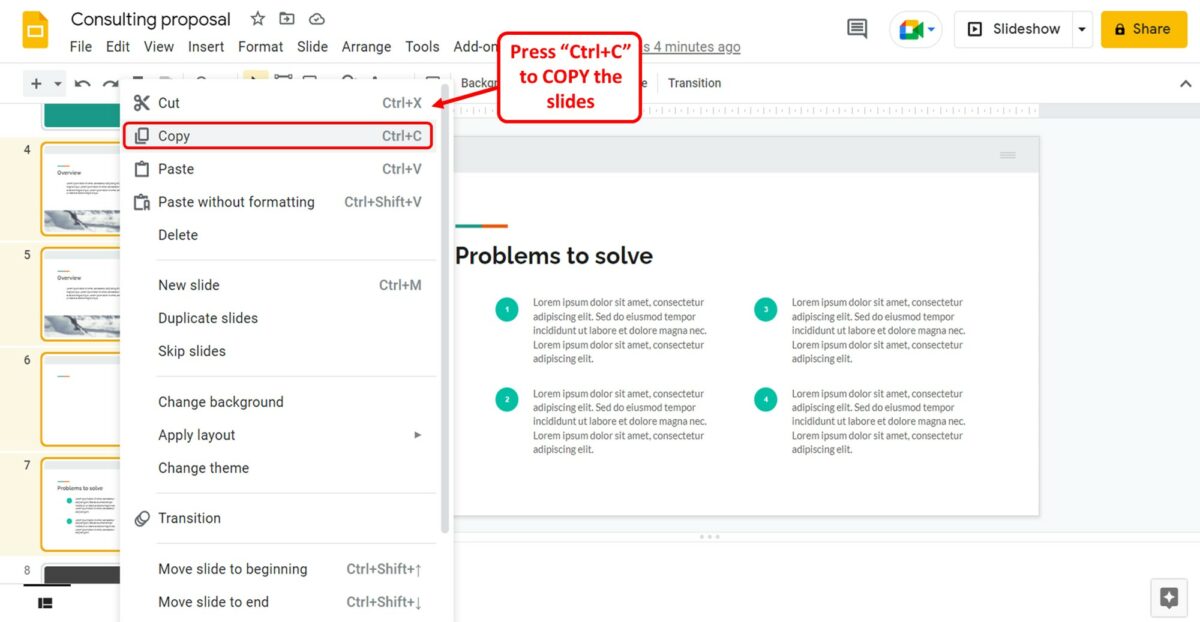
Now all you have to do is press the “Ctrl+C” keys on your keyboard to copy the multiple selected files. You can also refer to section 3 for more methods of copying a slide.
5. How to Copy Slides from One Google Slides Presentation to Another?
In Google Slides, you can copy a slide from one presentation and quickly paste it into another presentation. Google Slides offers options to link entire presentations to slides. To copy a slide from one Google Slides presentation to another, follow the 3 easy steps.
Step-1: Click on the “Copy” option
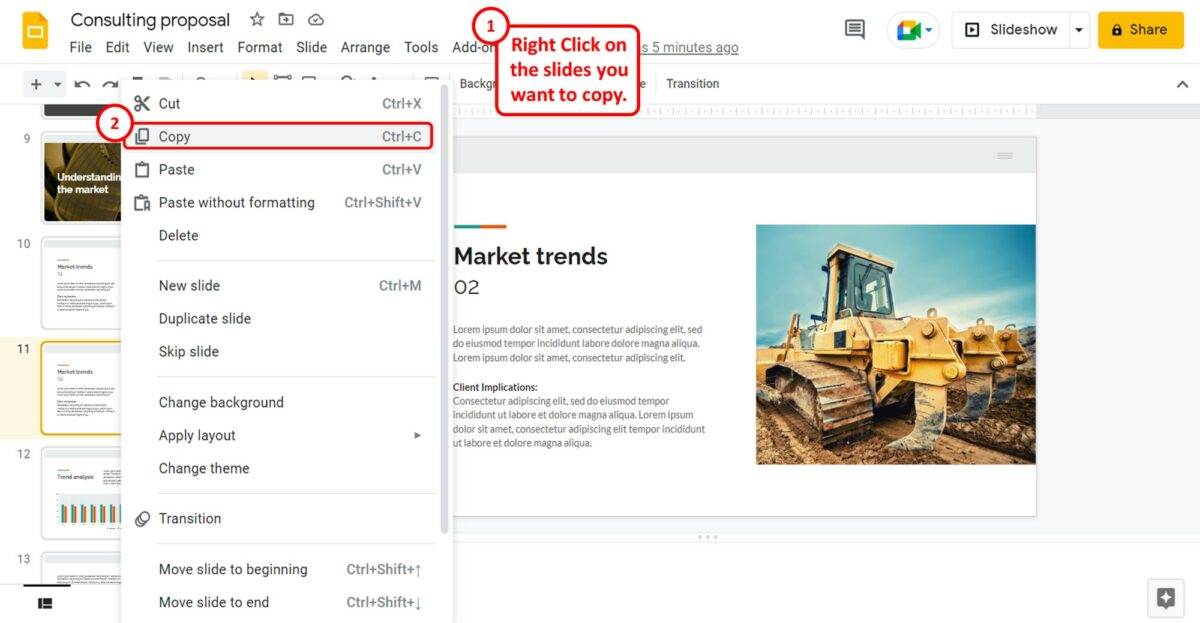
The first step is to copy the slide. To do so, “Right Click” on the slide in the slide thumbnail pane and click on the “Copy” option.
You can alternatively press the “Ctrl+C” keys on your keyboard to copy the presentation slide.
Step-2: Click on the “Paste” option
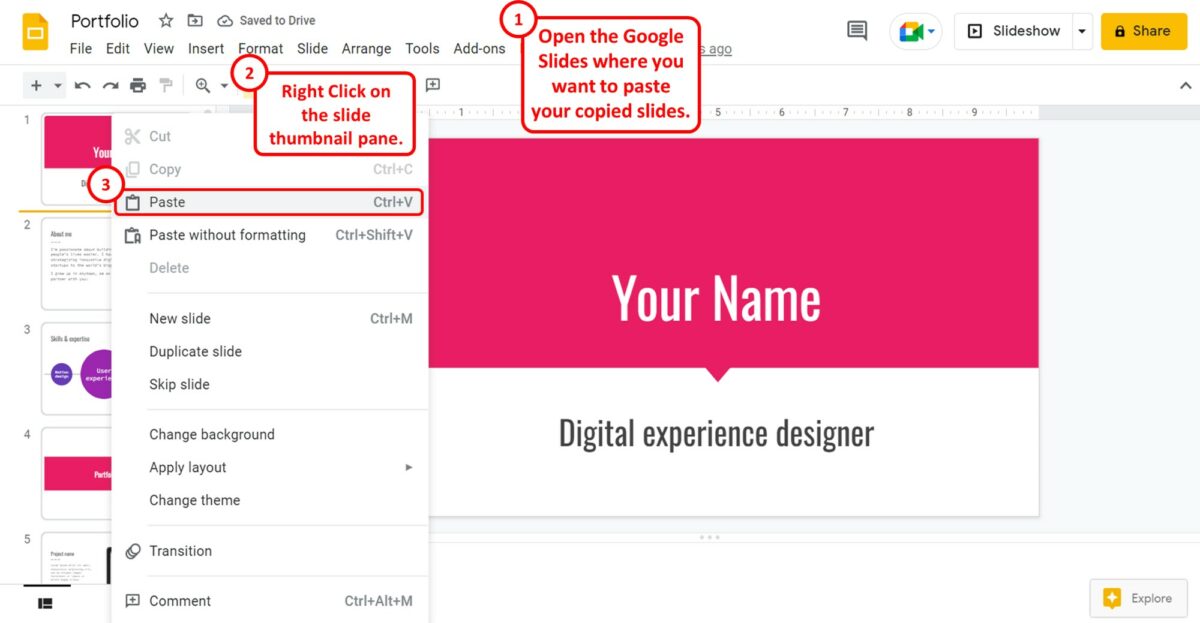
The next step is to open the Google Slides presentation where you want to paste the slide. “Right Click” on the slide thumbnail pane on the left side of the screen. Then click on the “Paste” option from the right-click menu.
Alternatively, you can press the “Ctrl+V” keys on your keyboard.
Step-3: Select an import style
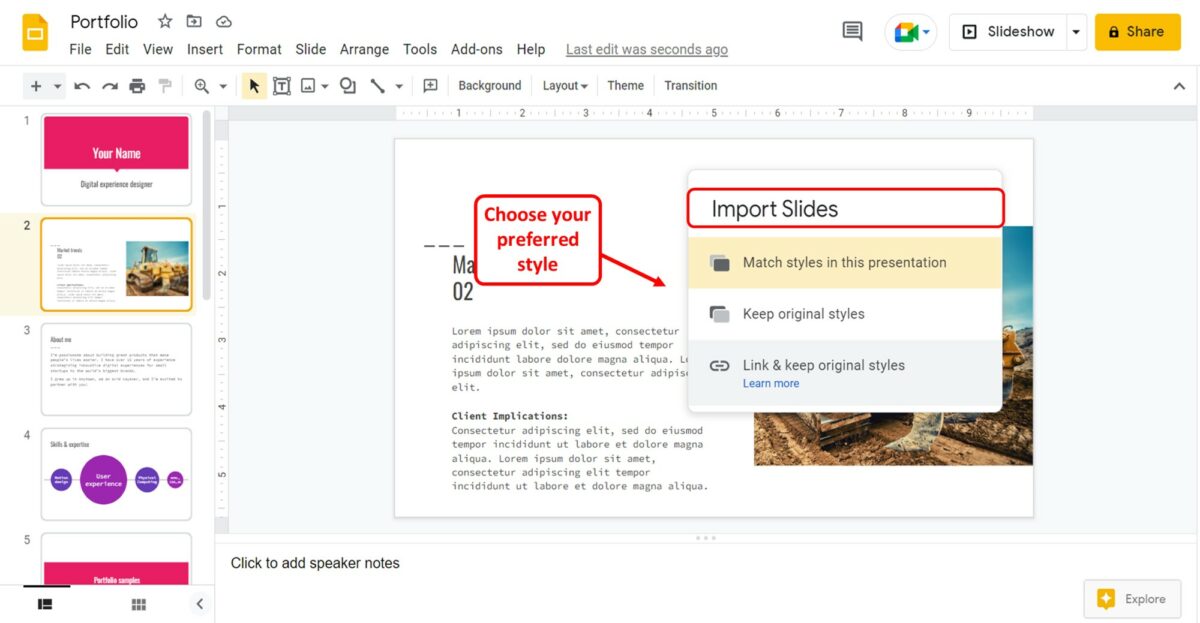
When you paste the slide, a dialog box will appear on top of the slide. In the “Import Slides” dialog box, click on the paste option that you prefer for the pasted slide.
5.1 Match Styles With Original Presentation
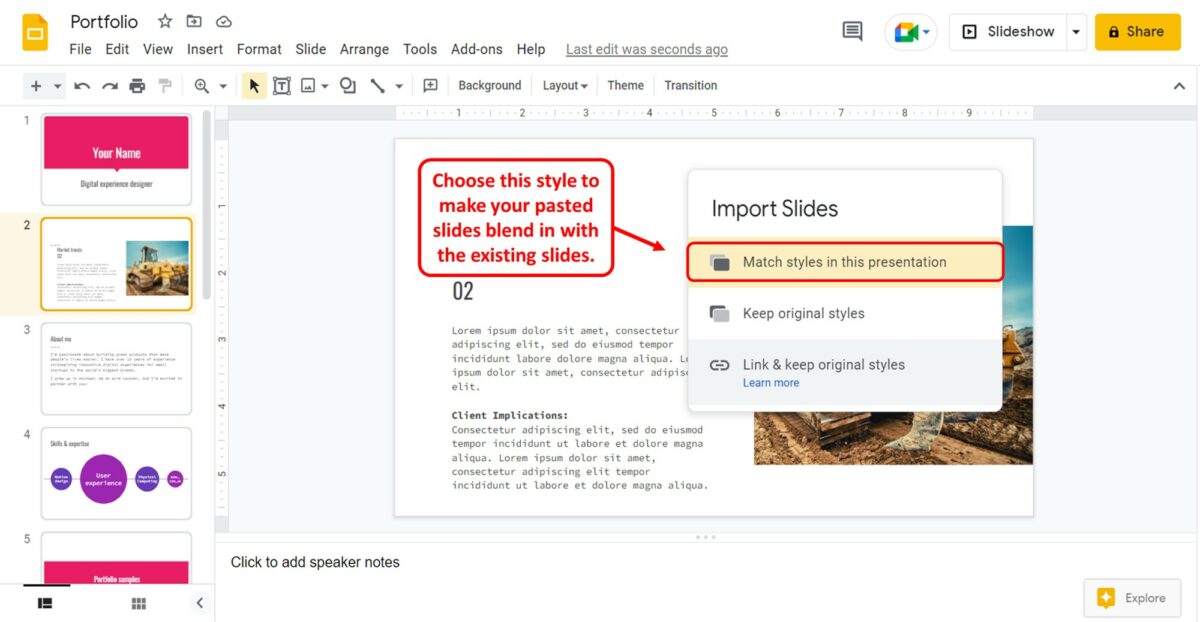
The “Match styles in this presentation” option in the “Import Slides” dialog box will change the theme of the pasted slide to match the theme of the Google Slides presentation file where it is pasted. You can choose this option to make the pasted slide blend in with the rest of the presentation.
5.2 Keep Original Styles
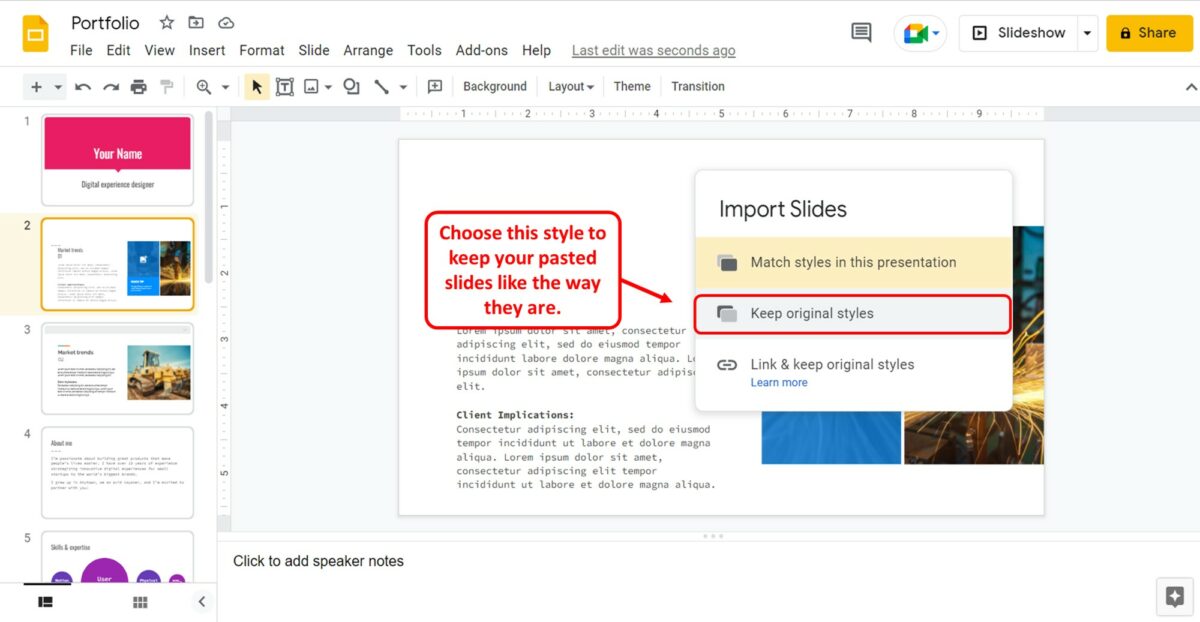
The “Keep original styles” option in the “Import Slides” dialog box allows you to preserve the theme and the style of the original file which the slide is imported from.
5.3 Link and Keep Original Styles

The last option in the “Import Slides” dialog box, “Link & keep original styles” allows you to keep the pasted slide in its original theme.
It also automatically adds the link to the original presentation file to the imported slide. You can click on the “Link” icon at the top of the slide to open the link or remove it.
6. How to Import Slides from PowerPoint into Google Slides?
In Google Slides, you can import slides from Microsoft PowerPoint. To do so, you can use the “Import slides” feature available in Google Slides. All you have to do is follow the 5 simple steps.
Step-1: Click on the “Import slides” option
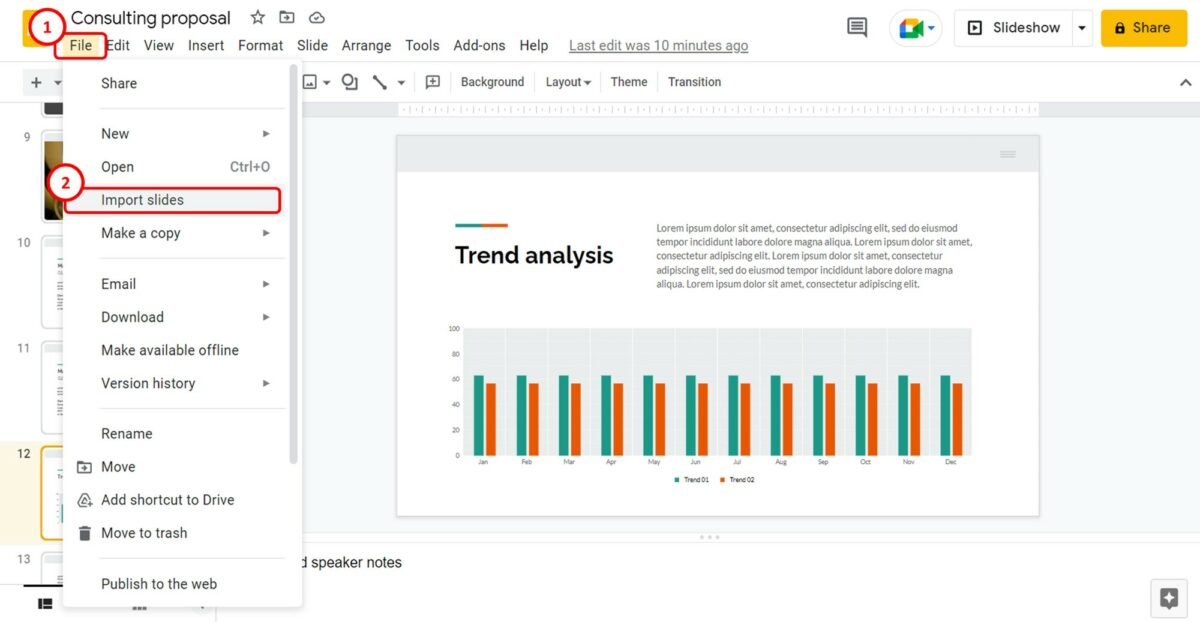
The first step is to click on the “File” menu which is the first option in the menu bar at the top of the screen. Then click on the “Import slides” option in the “File” dropdown menu to open a dialog box.
Step-2: Click on the “Upload” tab
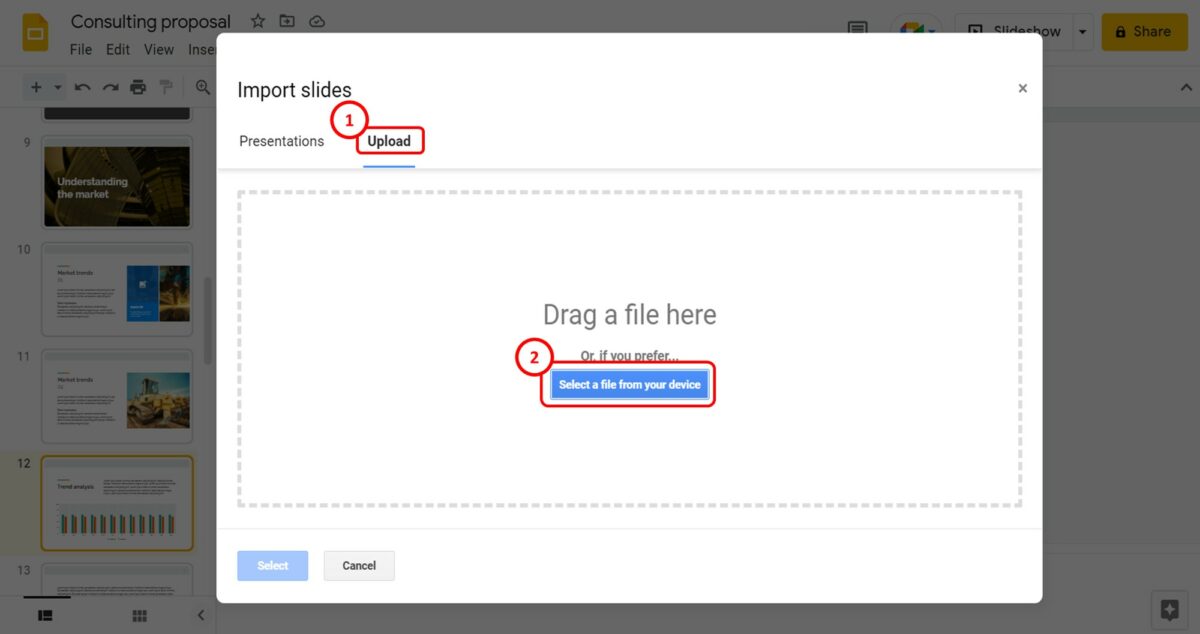
In the “Import slides” dialog box, click on the “Upload” tab at the top. Then click on the “Select a file from your device” option in the middle of the dialog box.
Step-3: Click on the “Open” button
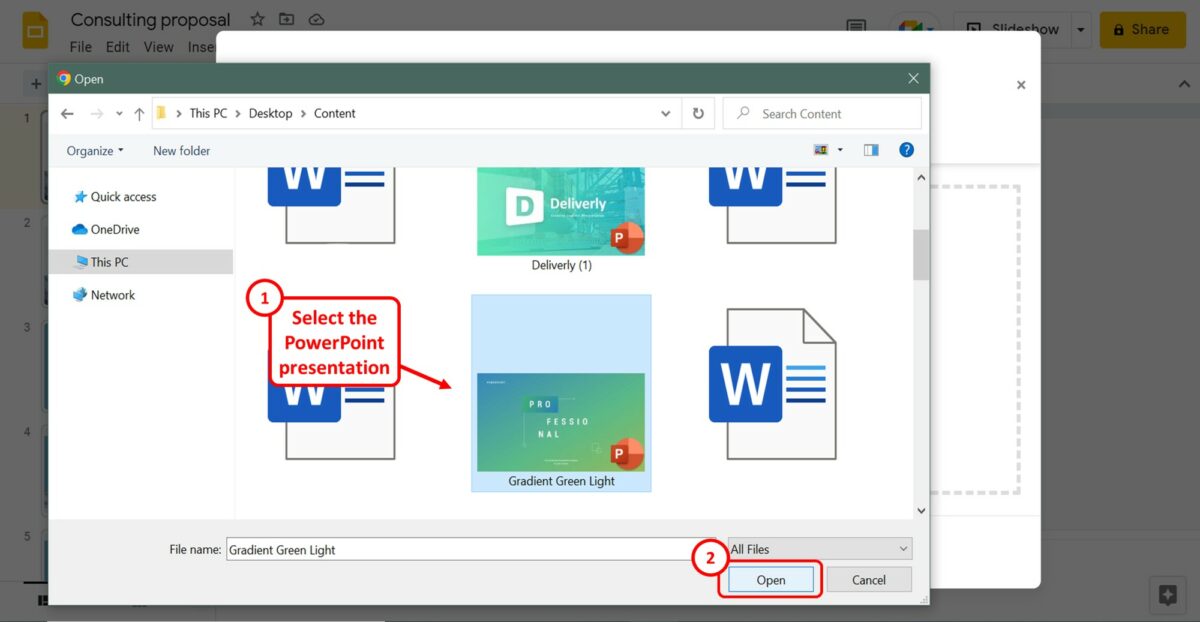
In the “File Explorer” dialog, select the PowerPoint presentation file that you want to import. Then click on the “Open” button at the bottom of the dialog box.
Step-4: Select preferred slides
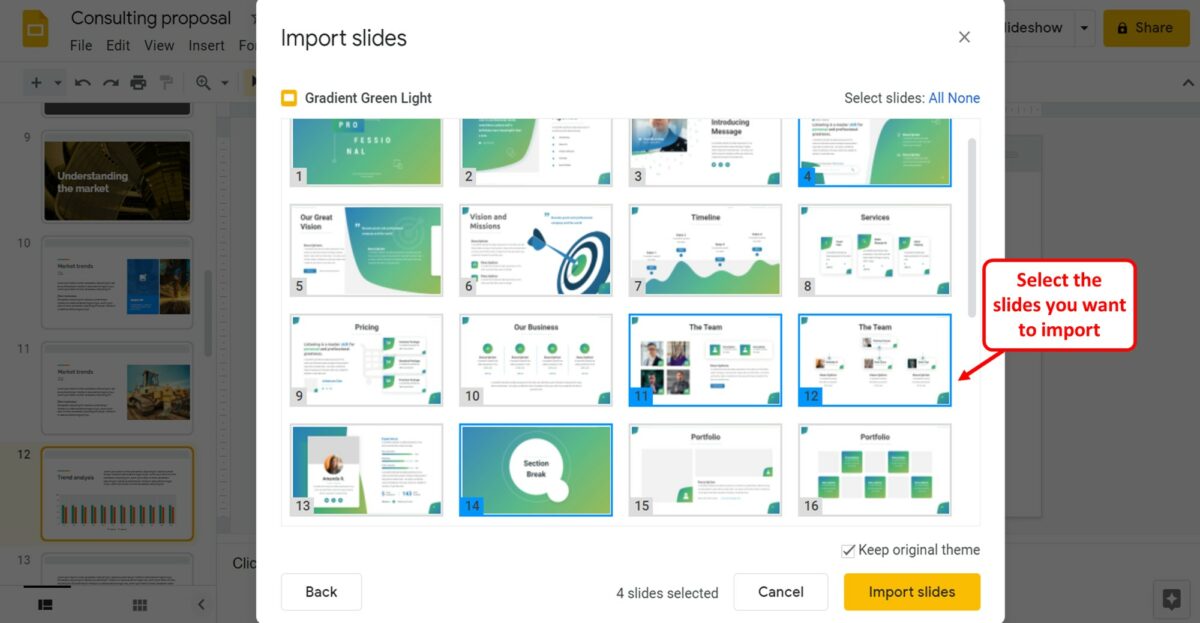
In the “Import slides” dialog box, click on the slides that you want to import. You can also click on the “All” option at the top right corner to select all the slides from the PowerPoint file.
Step-5: Click on the “Import slides” button
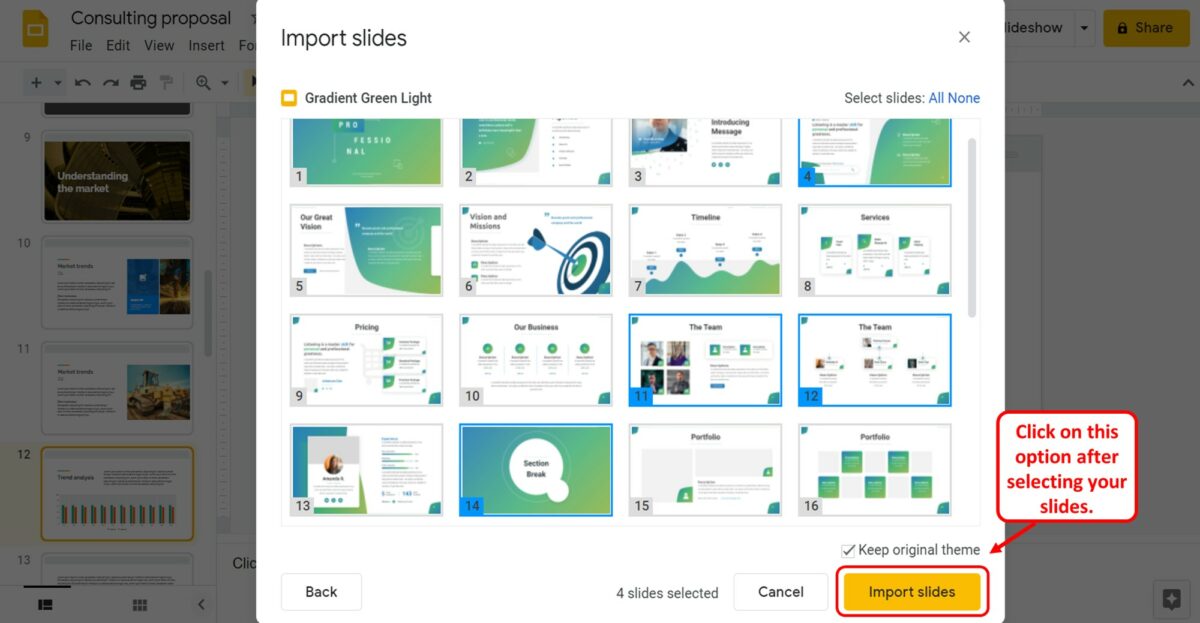
Now all you have to do is click on the “Import slides” button at the bottom of the dialog box to import the selected slides from PowerPoint to the Google Slides file.
7. How to Duplicate Slides in Google Slides?
The “Duplicate” feature in Google Slides allows you to create a duplicate copy of the selected slide within the same presentation file. You can duplicate a slide using different methods.
7.1 Method 1 – Using “Right-click”
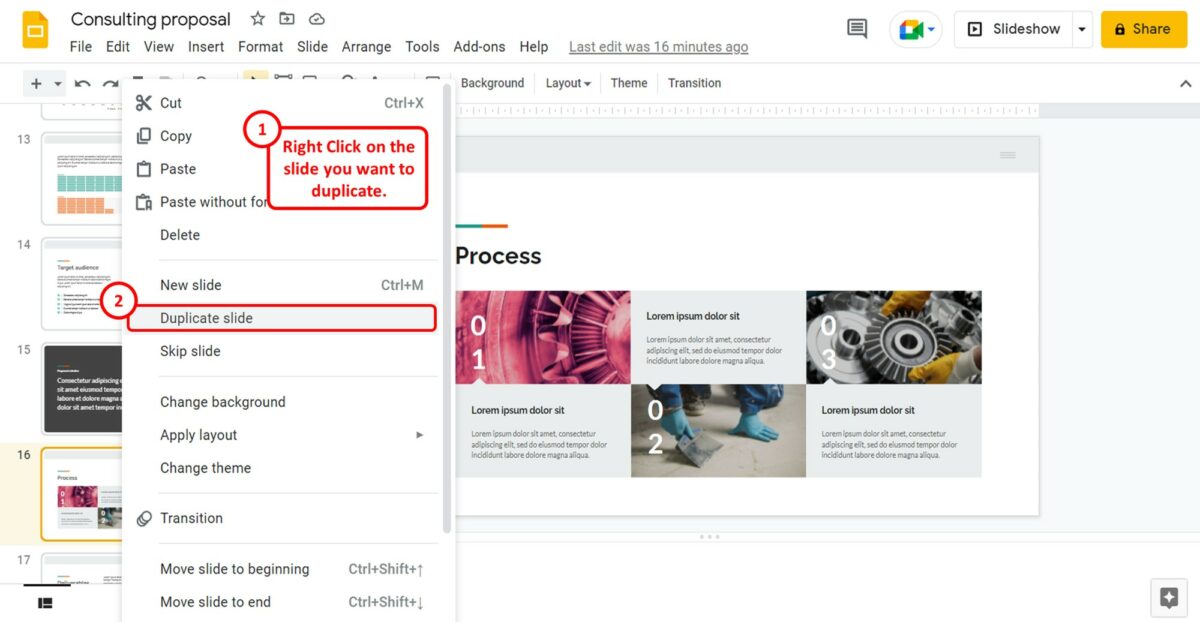
In Google Slides, you can duplicate a slide using the right-click menu. In the slide thumbnail pane, “Right Click” on the slide you want to duplicate. Then click on the “Duplicate slide” option in the right-click menu to duplicate the slide.
7.2 Method 2 – Using the Duplicate Function
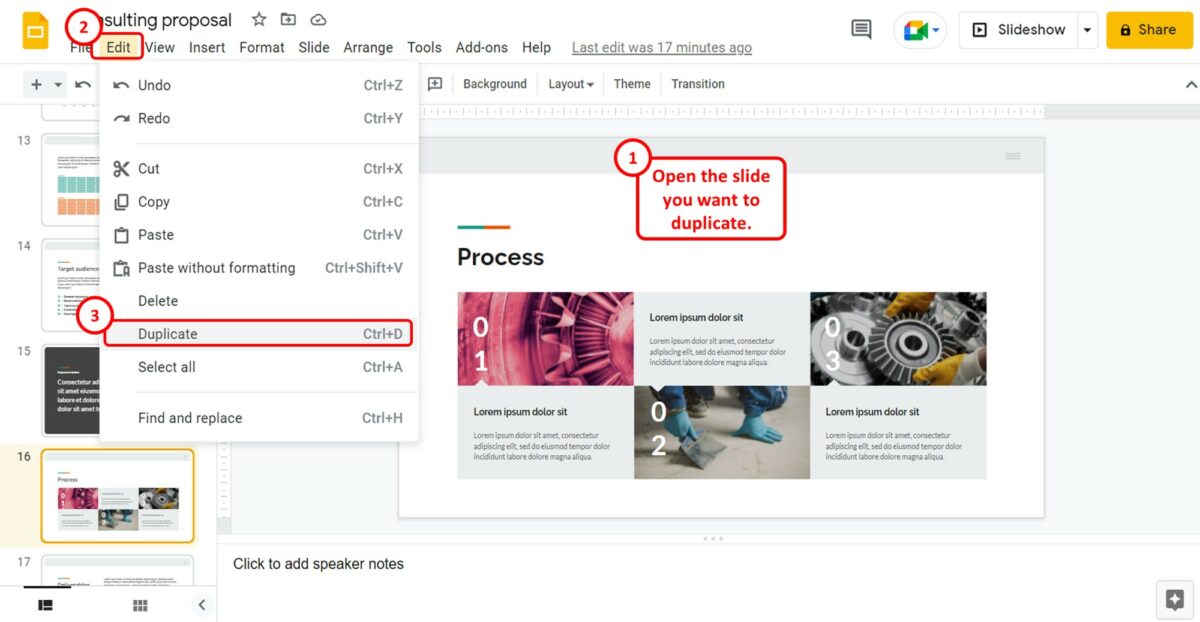
To duplicate a slide using the “Duplicate” function, you have to first open the slide that you want to duplicate. Then click on the “Edit” tab in the menu bar at the top of the screen. Finally, all you have to do is click on the “Duplicate” option in the “Edit” dropdown menu.
8. How to Delete Slides in Google Slides?
In Google Slides, you can delete a slide quickly using the right-click menu. To learn more about deleting slides, you can read my article here.
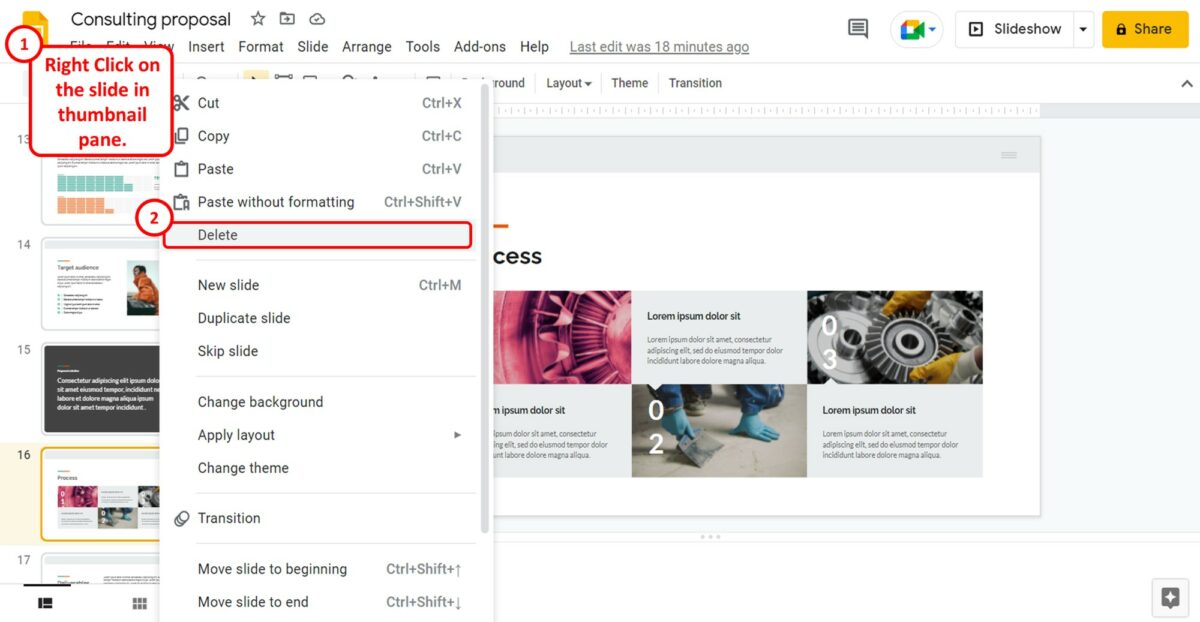
To delete a slide, all you have to do is “Right Click” on the slide that you want to delete from the slide thumbnail pane on the left side of the screen. Then click on the “Delete” option in the right-click menu.
Alternatively, you can press the “Delete” key or the “Backspace” key on your keyboard to delete the selected slide.
8.1 How to Delete Multiple Slides in Google Slides?
Using the “Delete” option, you can also delete multiple slides in Google Slides. To do so, follow the 2 simple steps.
Step-1: Select multiple slides
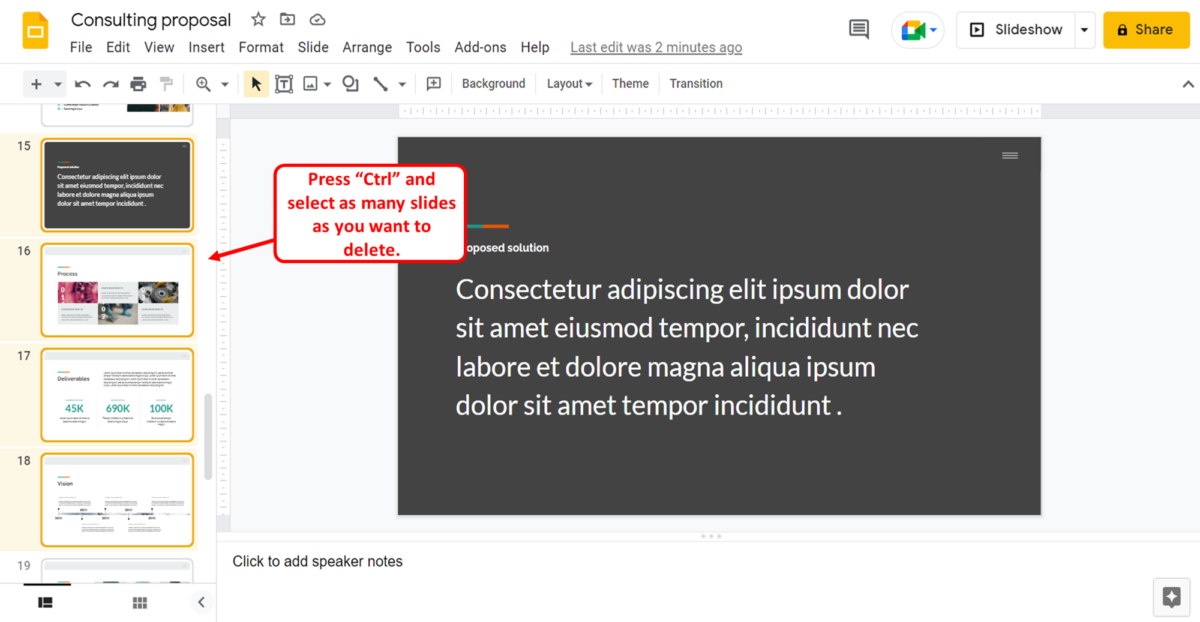
The first step is to select multiple slides. In the slide thumbnail pane on the left side of the screen, press the “Ctrl” key on your keyboard and click on as many slides as you want to delete.
Step-2: Click on the “Delete” option
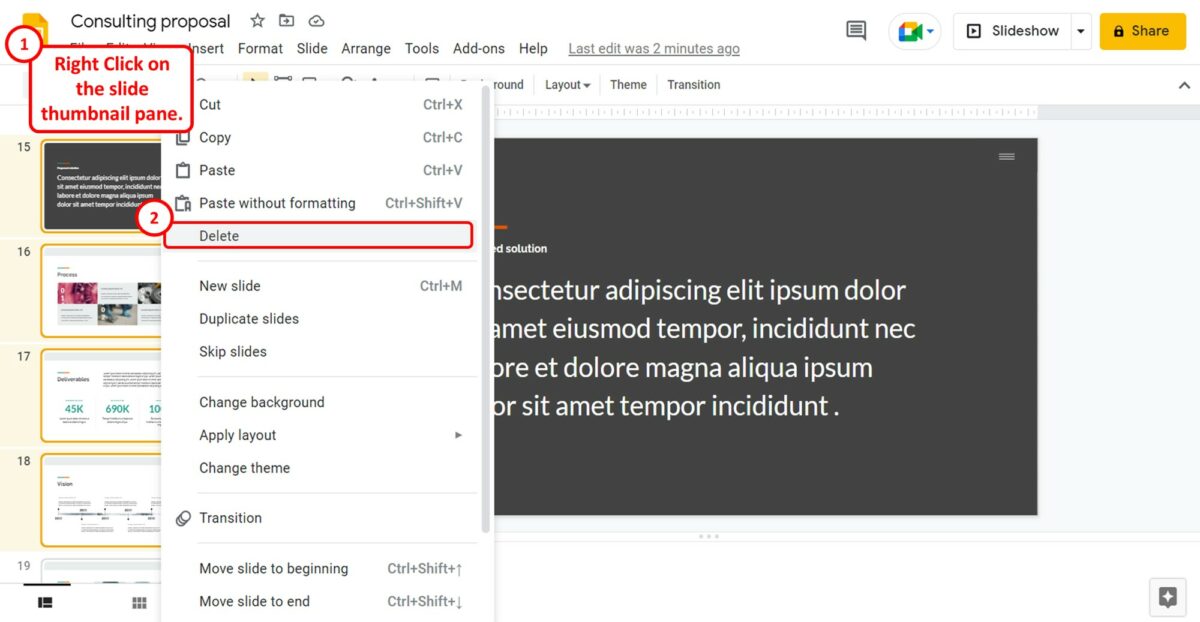
The next step is to “Right Click” on the slide thumbnail pane. Click on the “Delete” option in the right-click menu to delete all the selected slides at once. Alternatively, you can press the “Delete” key or the “Backspace” key on your keyboard.
9. How to Hide or Skip Slides in Google Slides?

The “Skip slide” option in Google Slides allows you to hide or skip a slide during the presentation without deleting the slide from the presentation file.
To hide or skip a slide, you have to first open the slide. Then click on the “Slide” option in the menu bar at the top of the screen. In the dropdown menu under the “Slide” option, click on the “Skip slide” option to hide the slide from the presentation.
10. How to Move or Reorder Slides in Google Slides?
In Google Slides, you can easily rearrange the order of slides after creating them. There are different methods you can use to move or reorder a slide.
10.1 Method 1 – Drag and Drop
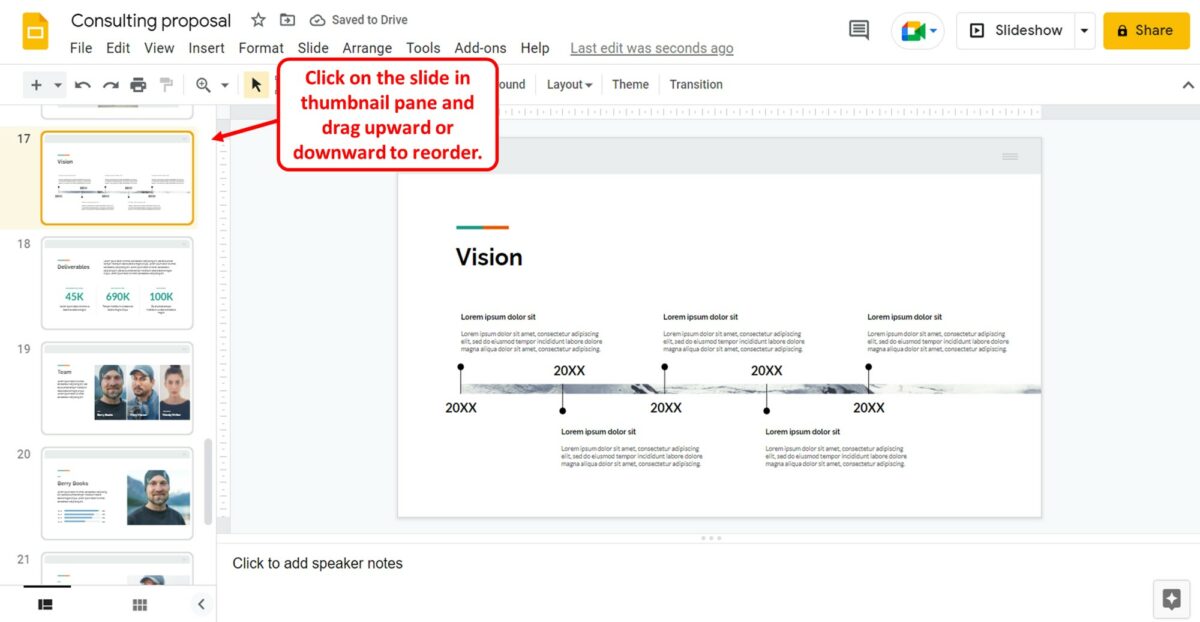
To move a slide up or down in Google Slides, you can simply drag and drop it. All you have to do is click on the slide in the slide thumbnail pane. Then drag the slide thumbnail to reorder it.
10.2 Method 2 – Using “Ctrl+Arrow”
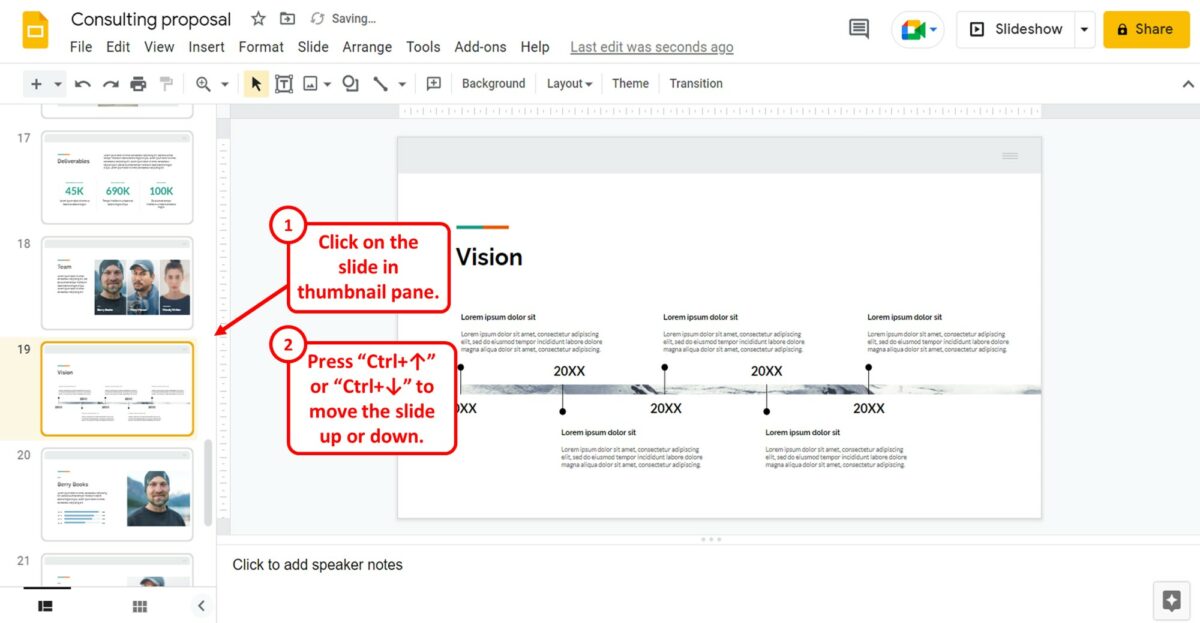
You can also move a slide up or down using the arrow keys on your keyboard. You have to first click on the slide in the slide pane on the left side of the screen. Then press the “Ctrl+↑” keys on your keyboard to move the slide up, and the “Ctrl+↓” keys to move the slide down.
10.3 Method 3 – Using Grid View
Using the “Grid view” option in Google Slides, you can easily rearrange the presentation slides. To move a slide up or down using the “Grid view”, follow the 2 simple steps.
Step-1: Click on the “Grid view” option
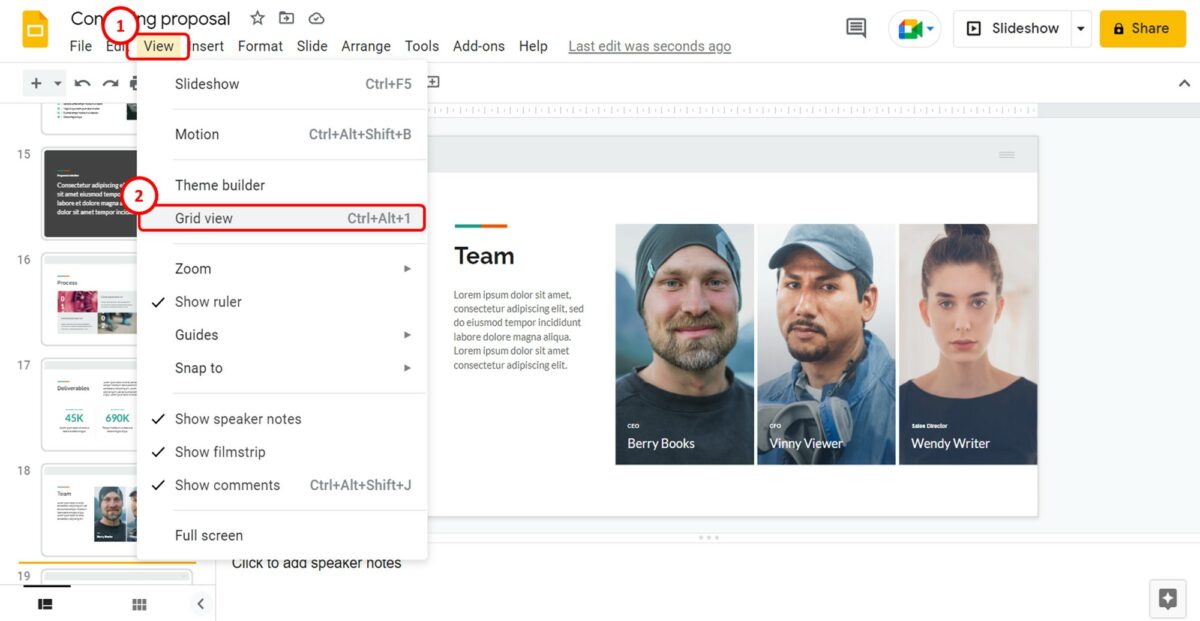
In the menu bar at the top of the screen, click on the “View” tab. Then click on the “Grid view” option from the dropdown menu under the “View” option.
Step-2: Drag the slides

In the “Grid view” screen, you can now rearrange the slides in any way you want. All you have to do is click on a slide and drag it to a different position.
10.4 Moving Slides to the Beginning or End of the Presentation
To move a slide all the way to the beginning or to the end of the presentation, you can use the “Move Slide” option. All you have to do is follow the 2 quick steps.
Step-1: Click on the “Slide” tab
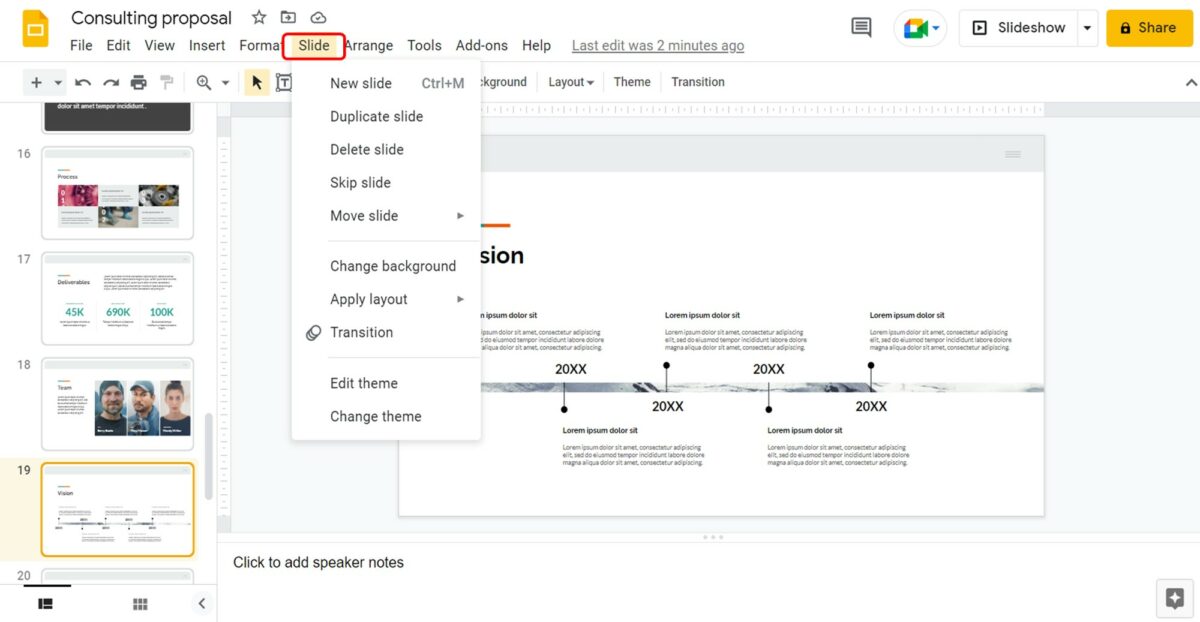
The first step is to open the slide that you want to move. Then click on the “Slide” tab at the top of the screen.
Step-2: Click on the “Move slide to beginning” or “Move slide to end” option
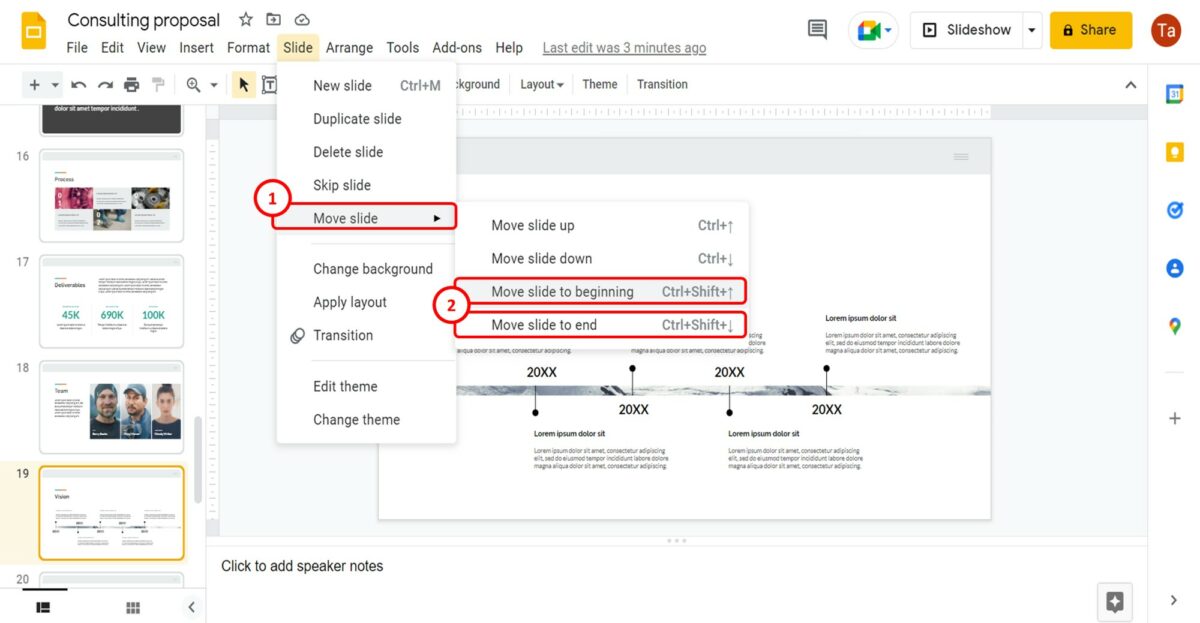
In the “Slide” dropdown menu, click on the “Move slide” option to open another menu. Now all you have to do is click on the “Move slide to beginning” option or the “Move slide to end” option. Alternatively, you can press the “Ctrl+Shift+↑” keys on your keyboard to move the slide to the beginning, and the “Ctrl+Shift+↓” keys to move the slide to the end of the presentation.
11. How to Link Slides in Google Slides?
In Google Slides, you can use the “Link” option to link any source to an object inside a slide. You can read my article here to learn all about hyperlinking in Google Slides. To link a slide, you have to first click on a text or another object in a slide where you want to add the link. Then follow the 2 easy steps.
Step-1: Click on the “Insert Link” option

In the toolbar at the top of the screen, click on the “Insert link” option. It is the link icon on the right side. This will open a dialog box.
Step-2: Type in the slide number
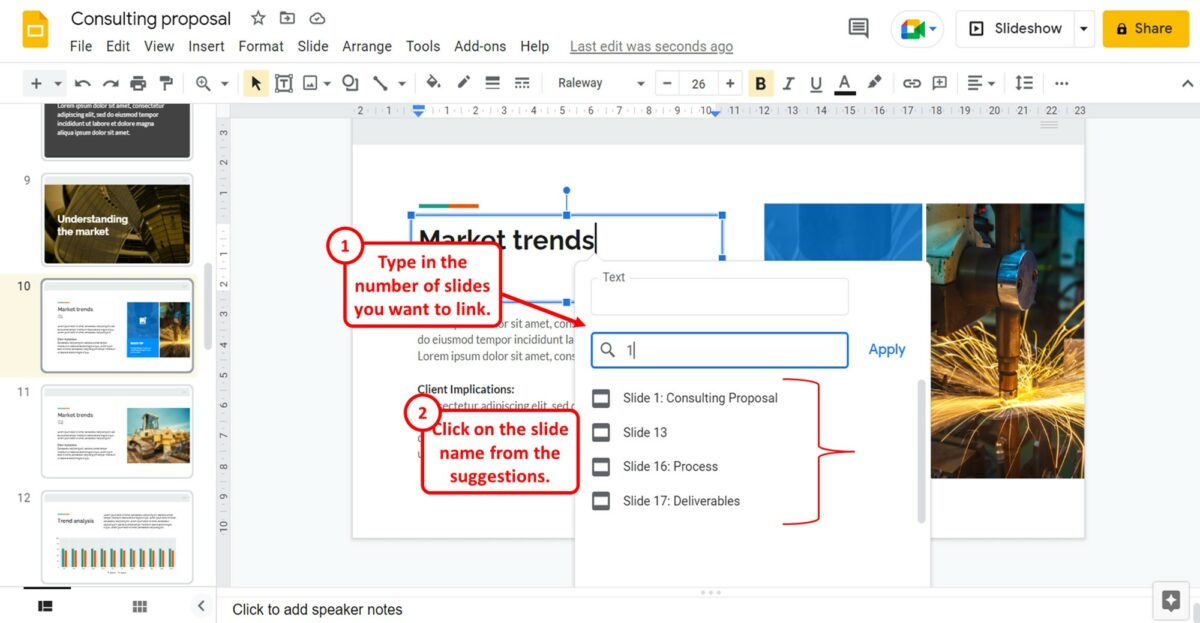
In the search box inside the dialog, all you have to do is type in the number of the slide that you want to link. Then click on the slide name from the suggestions under the search box to link the slide to the selected object.
12. How to Zoom In On Google Slides?
The “Zoom” feature in Google Slides allows you to zoom in and out on a slide. To read more about the uses of this feature, you can find my article here. To zoom in on a slide, follow the 2 quick steps.
Step-1: Click on the “Zoom” option
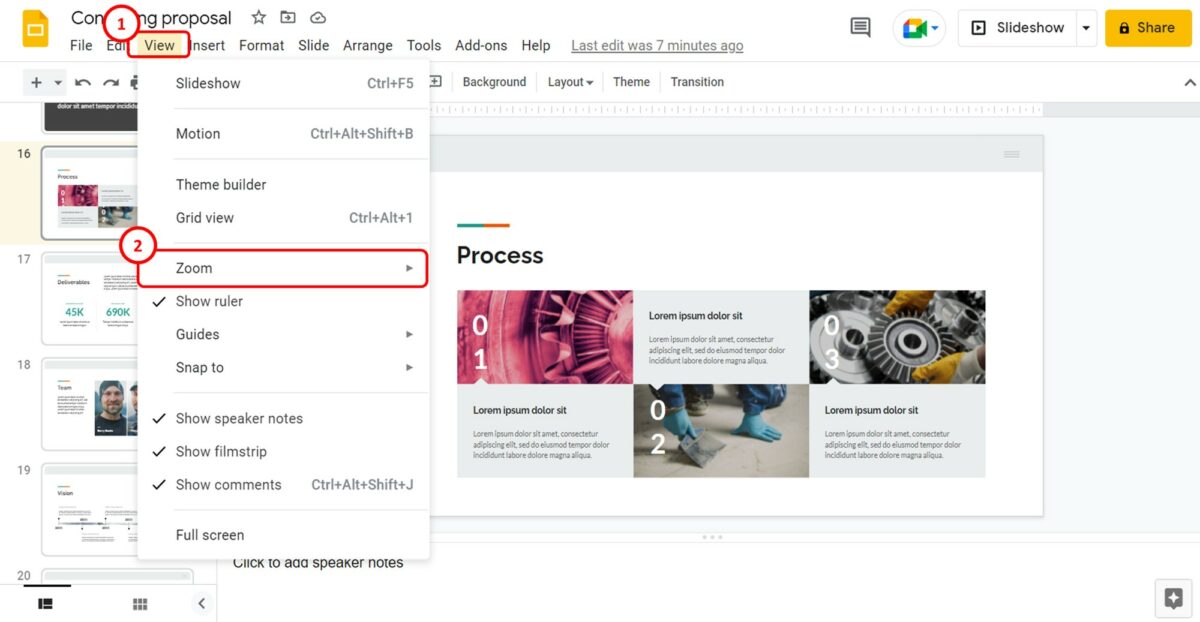
The first step is to click on the “View” tab at the top of the screen. In the “View” dropdown menu, click on the “Zoom” option.
Step-2: Click on the preferred zoom option
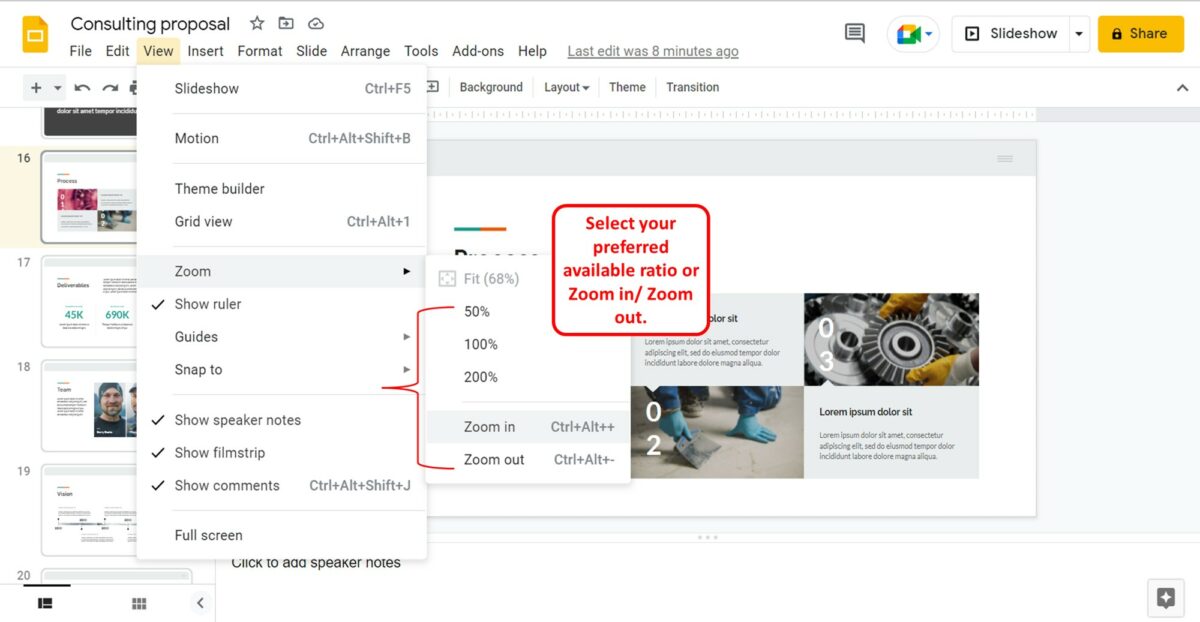
In the secondary menu beside the “Zoom” option, you can now select your preferred option. Click on the “200%” option to zoom the screen to double the original size. You can also click on the “Zoom in” option. Alternatively, you can press the “Ctrl+Alt++” keys on your keyboard to zoom in.
13. Can You Group Slides in Google Slides?
Google Slides does not have any feature that you can use to group multiple slides together. The “Group” feature in the “Arrange” tab allows you to group multiple objects inside the same slide together to treat them as a single object. However, you cannot group slides together in Google Slides.