![WordArt in PowerPoint – A Beginner’s Guide! [With Pictures]](https://artofpresentations.com/wp-content/uploads/2021/06/Featured-Image-How-to-Use-WordArt-in-PowerPoint.jpg)
When you want your text to standout and look different in your PowerPoint presentation, WordArt is a great place to start! But, what exactly is WordArt in PowerPoint and how should we used it?
WordArt in PowerPoint is a tool that provides a quick way to make the text standout by adding special effects such as glow effect, 3D effect, shadow, rotation and even curved text! To add WordArt in PowerPoint, simply click on “Insert”, and then “WordArt”.
Once you have added the WordArt in PowerPoint, it is good to know how to customize WordArt in PowerPoint. So, in this article, I will be providing you all the details on how to add WordArt (in a step-by-step manner), how to customize it to make it look nice, and how to clear the WordArt effect from the text!
So, let’s get started!
A Quick Note Before We Begin – For the purpose of this article, I shall be using a presentation template from Envato. With Envato, you get access to thousands of presentation designs so you never run out of options again. Not only is Envato very affordable, but it is also the best in the business when it comes to templates!
1. What is WordArt in PowerPoint?
WordArt is a fun and attractive way to make your text stand out in your PowerPoint presentation. It allows you to make your text appear in different effects such as a 3-D effect, curved text effect, color gradients, etc.
To use the WordArt feature in the PowerPoint presentation, you have to select the “Insert WordArt” button in the “Text” section of the “Insert” tab of the ribbon.
2. Why is WordArt Used in PowerPoint?
The main purpose of using WordArt in PowerPoint is to grab the attention of the audience by emphasizing the text in an eye-catching manner! The WordArt feature gives users the option to insert effects by customizing the shadows, outline, texture, etc. to selected texts in PowerPoint.
WordArt has been used ever since PowerPoint became a household name! In fact, WordArt was one of the key features that made PowerPoint popular initially.
As more and more people used WordArt without any discretion, over the years, more design options were added to presentation applications making WordArt a bit redundant.
Today, WordArt in PowerPoint is just one of the features available and it is not talked about that often. Nevertheless, there is still a huge merit in using WordArt as long as it is used discretely!
3. How to Insert WordArt in PowerPoint?
The process of inserting WordArt in your PowerPoint presentation is described in 2 easy steps below.
Step-1: Click on the “Insert WordArt” button
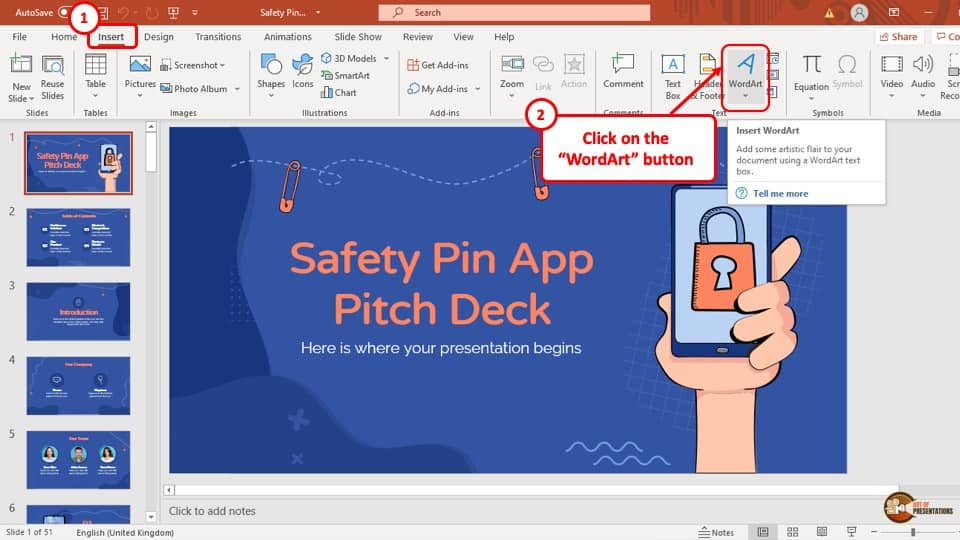
The first step of inserting WordArt to text in your PowerPoint presentation is to go to the “Insert” tab. In the “Text” section of the “Insert” tab, select the icon that looks like a tilted letter ‘A’ (check the image above), which is the “Insert WordArt” button.
A drop-down menu will appear on screen after click on the button.
Step-2: Select the preferred WordArt effect

The drop-down menu will give you a range of WordArt style options to choose from.
Simply select the effect you want to give to the text and a placeholder with the effect of the WordArt will automatically appear in the middle of the screen.
Clear the sentence ‘Your Text Here’ and type in the text to insert a Word art in your PowerPoint presentation.
4. How to Convert Existing Text to WordArt in PowerPoint?
To convert an existing text to WordArt in your PowerPoint presentation, you can use the method described above. But, let me show you another way to add WordArt to the text in PowerPoint.
You can use the “WordArt Style” section of the “Shape Format” tab. The whole process is described step-by-step below.
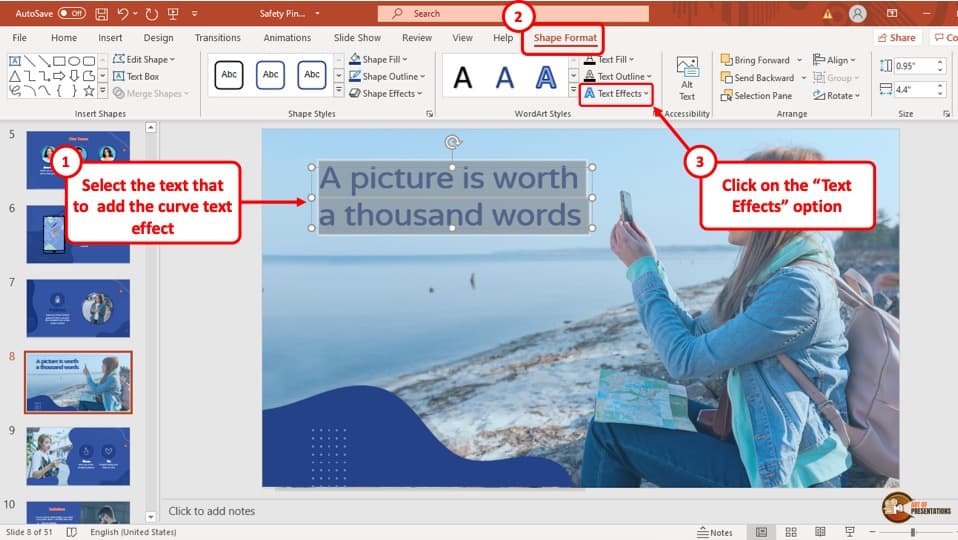
Step-1: Select the text and go to the “Shape Format” tab
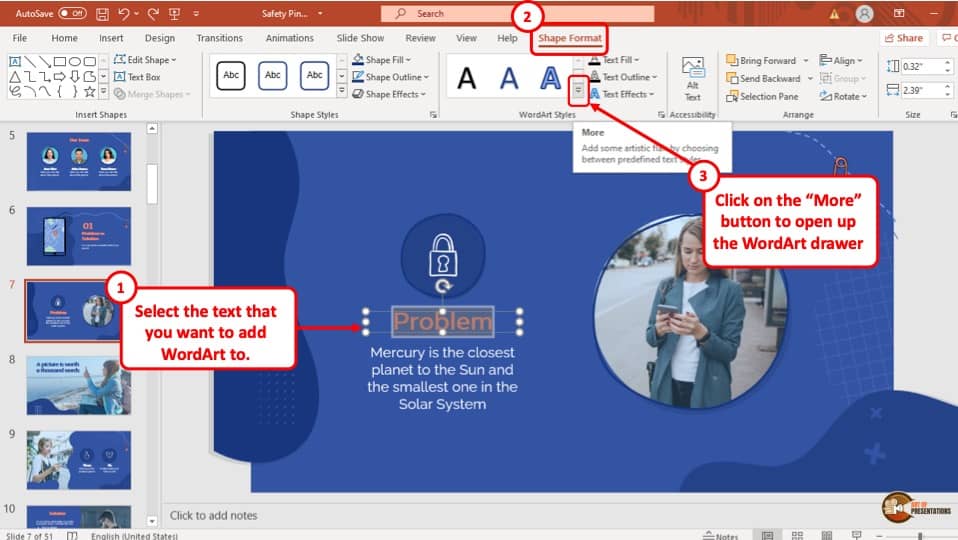
The first step of the process is to select the text that you want to convert into a WordArt and go to the “Shape Format” tab of the ribbon.
Step-2: Click on the “More” button
After going to the “Shape Format” tab, you will be able to see the “WordArt” section, which is the third section of the “Shape Format” tab.
Click on the “More” button which has the icon of a small arrow pointing downwards with a horizontal line over it. After selecting the “More” button, a drop-down menu will appear. (please refer to the image in step 1)
Step-3: Select you preferred WordArt style.
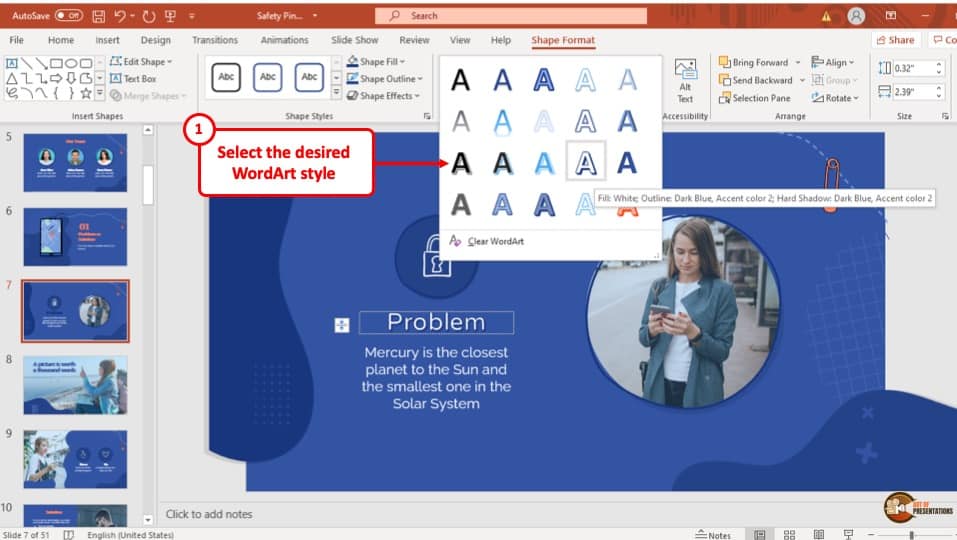
Now all you have to do is click on the preferred WordArt style that you want the selected text to convert to. After picking and clicking on your desired WordArt style, the selected existing text will be changed into the preferred WordArt style.
5. How to Edit WordArt in PowerPoint?
The first thing to know is that you can apply all the formatting options to WordArt text just the way you can format the text in PowerPoint. That means you can apply the bold, italics, underline, and other font formatting options to your WordArt Text!
I have written a detailed article on how to format text in PowerPoint correctly. So, make sure you check out that article as well!
Furthermore, the WordArt feature allows you to edit the WordArt style of texts to a great extent. Users can change the style of a WordArt by using the “Text Fill” option, the “Text Outline” option, and the “Text Effect” option.
A description of all the tools that you can use in the WordArt feature are described below –
Text Fill
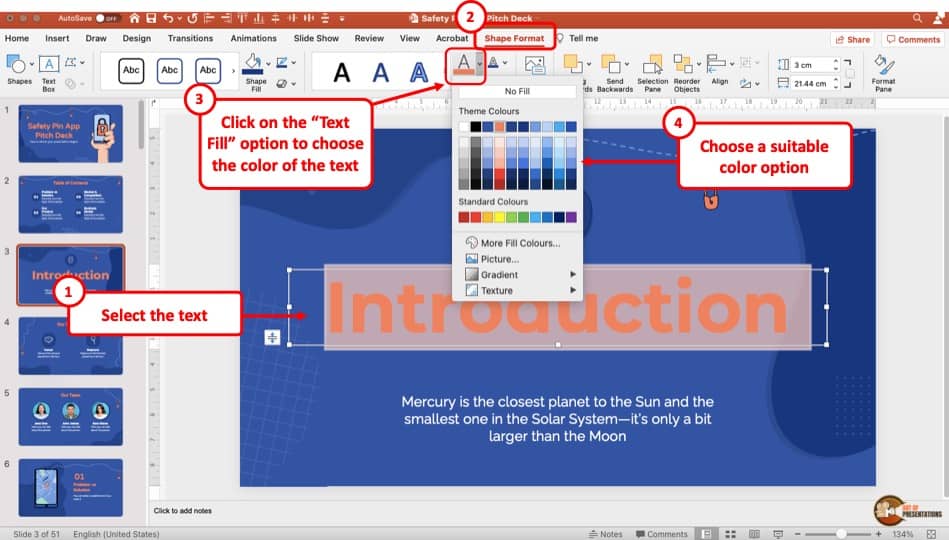
Text fill is a tool that you can use to fill the WordArt with colors, texture, gradient or even pictures. The “Text Fill” tool is the first option in the “WordArt Styles” section of the “Shape Format” tab.
To use a “Text Fill” in your WordArt text, select the text you want to fill and then select your preferred text fill and the text will change accordingly.
Text Outline

The “Text Outline” tools allows users to customize the outline of the WordArt and change the color, line style and width. It is the second option in the “WordArt Style” section of the “Shape Format” tab.
To customize the outline of your WordArt, select the WordArt text you want to customize the outline of and then select your preferred style of outline from the drop-down menu of the “Text Outline” option and the outline of the WordArt will change accordingly.
Text Effect
The “Text Effect” tool is the most fun to use among the three tools of the “WordArt Style” section. It allows users to insert various effects to the WordArt such as shadows, reflection, glow, 3-D rotation, etc. This is the last option of the “WordArt Style” section.
To insert an effect to you WordArt text, select the text you want to add an effect to and then simply select the preferred effect from the “Text Effect” drop-down menu and the WordArt text will change accordingly.
There are 6 types of text effects that you can add. Let’s take a look at each of these in detail below –
1. Shadow Text Effect

The shadow text effect will add a shadow to the text that you have selected. You can apply the shadow to the outer or the inner part of the text. Plus, you can also add perspective shadow that will be visible below the text.
You can also adjust the direction of the shadow as per your liking. There are ton of different options that you can play with. Simply click on “Shadow Options” to open up the details of the shadow.
2. Reflection Text Effect
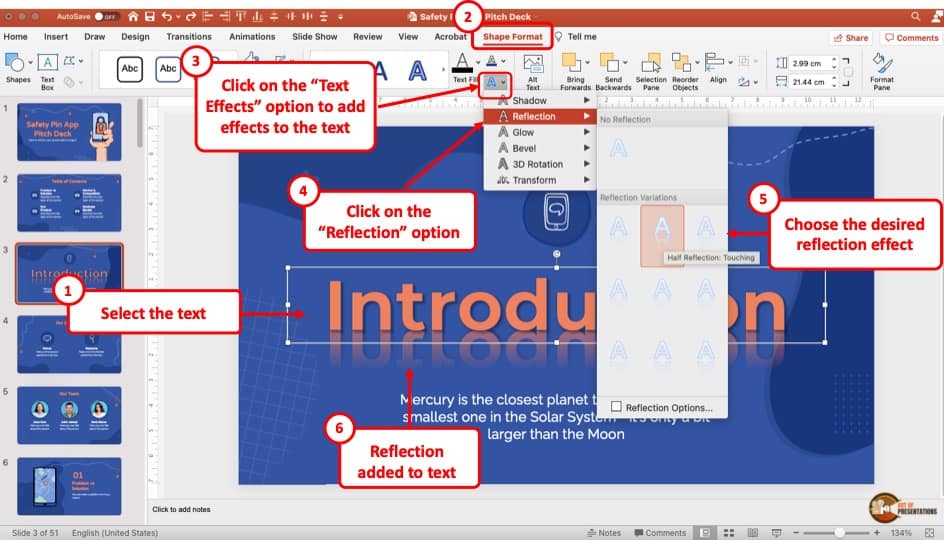
The reflection text effect will add the reflection effect to the text. This adds an effect to the text as if the text is floating over water.
There are various options to choose from the dropdown. Each of these options may look quite similar but add a subtle and a distinct reflection!
You can also click on the “Reflection Options”
3. Glow Text Effect
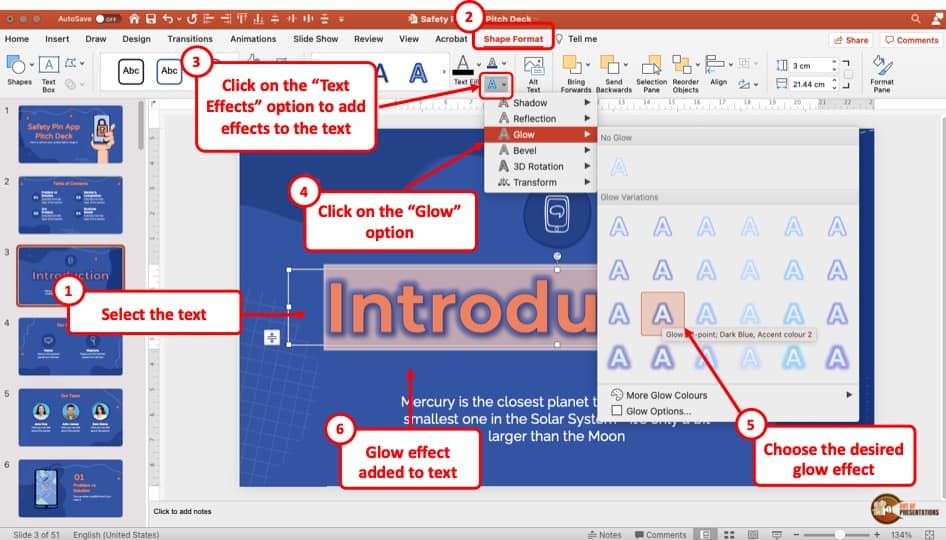
It is easy to get confused between the “Shadow Text Effect” option and the “Glow Text Effect” option. However, these are two different effects!
The “Glow Text Effect” will add a glow to the text. Think of it as a neon shop sign at night when seen from far. You can see the text but you will also see the glow around the text.
Again, there are multiple different options to choose. Furthermore, you can also customize the glow effect further by clicking on the “Glow Options”. You can change the blur, distance, or the direction of the glow effect.
You can also choose a different color for the glow around the text.
4. Bevel Text Effect
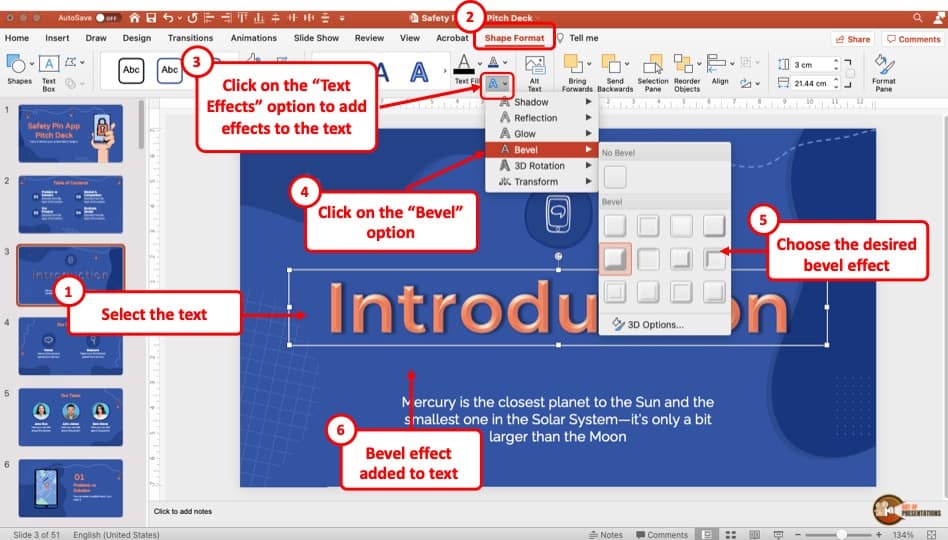
The next option is the “Bevel Text Effect“. This option adds a bevel to the text. You can adjust the bevels but I must admit – this is one of my least favorite text effect option. In my opinion, it doesn’t really add any modern style to the text design.
That said, it is just my opinion and there are vary many ways you can use this text effect! It is especially useful when you want to add nostalgic touch to your text in PowerPoint!
5. 3D Rotation Text Effect
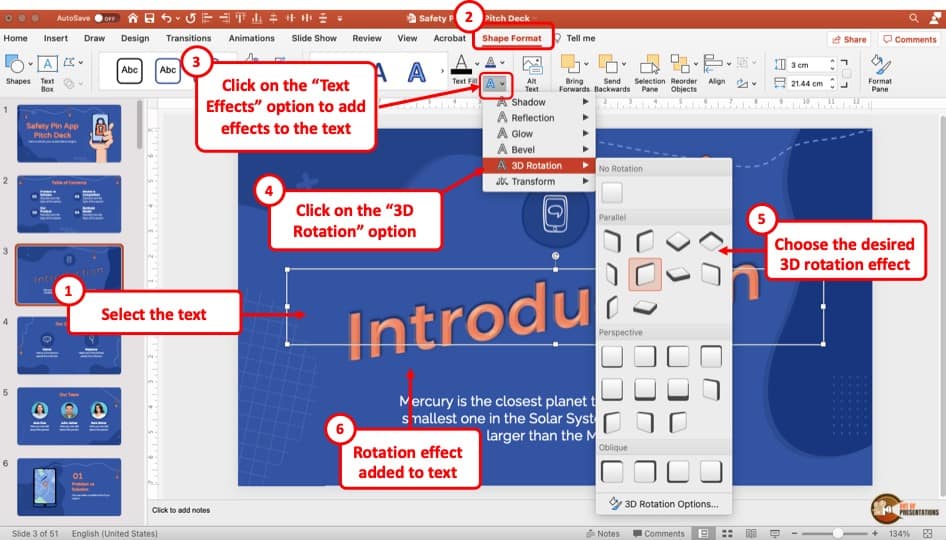
The “3D Rotation Text Effect” does exactly what the name sounds like. It allows you to rotate the text. Furthermore, this option also allows you to make the text look 3 dimensional.
There are several default options that are already ready to use as is. However, you can also further tinker with the rotation angle and adjust it as per your requirement by clicking on the “3D Rotation Options“
You can also make the text look 3-dimensional by adding “Depth“, “Depth Color” and “Contour” options available “3D Format” settings under the “3D Rotation Options“
6. Transform Text Effect
The “Transform Text Effect” can help you transform the text by changing the direction of flow of text. Using this option, you can also curve text in PowerPoint (discussed in detail in the next section).
The transform text effect option will transform the overall shape of the text.
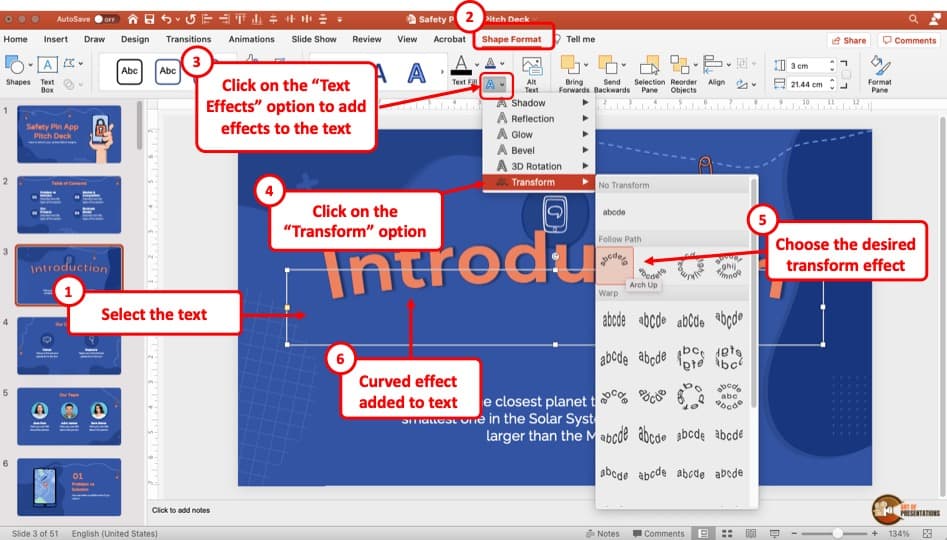
6. How to Curve Text in PowerPoint?
To curve text in your PowerPoint presentation, you have to use the “Transform” effect in the WordArt “Text Effect” tool drop-down menu. Here’s how to do it in a step-by-step process.
Step-1: Go to the “Shape Format” tab
To begin, select the WordArt text that you want to curve, and you will see that it will automatically take you to the “Shape Format” tab in the ribbon of the PowerPoint presentation.
Step-2: Go to the “Transform” option.
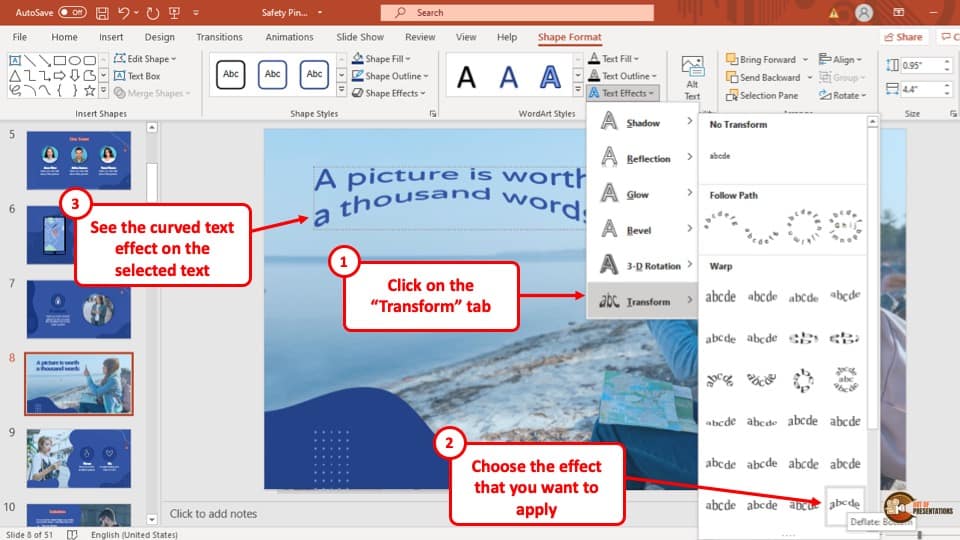
The next step is to select the “Transform” option from the “Text effect” tool in the “WordArt Style” section which is located in the “Shape Format” tab. After selecting the “Transform” option, another drop-down menu will appear on your screen.
Step-3: Select your preferred style of WordArt curve
The new drop-down menu of the “Transform” option has numerous transformation styles to choose from. Simply select your preferred text curve and the selected text will curve accordingly (check the image above in step 2 for visual reference).
7. How to Clear WordArt in PowerPoint?
If you don’t like how the effect looks on the text and you would like to start from scratch, then you can use the “Clear WordArt” option. The whole process is described in 3 simple steps below.
Step-1: Go to the “Shape Format” tab
The first thing that you have to do is to select the WordArt text in your PowerPoint presentation. After that head on to the “Shape Format” tab located in the ribbon.
Step-2: Click on the “More” button
With the WordArt text selected and after accessing the “Shape Format” tab, click on the “More” button in the “WordArt Style” section. It will open a drop-down menu.
Step-3: Select the “Clear WordArt” button
In the final step, all you have to do is select the “Clear WordArt” button at the bottom of the drop-down of the “More” button. After selecting the “Clear WordArt” button, the text will be cleared of WordArt immediately.
Credit to Katemangostar (on Freepik) for the Featured Image (further edited) of this article