![Using Tables in PowerPoint [Everything You Need to Know]](https://artofpresentations.com/wp-content/uploads/2022/06/Featured-Image-Using-tables-in-PowerPoint.webp)
Using tables is a smart and efficient way to represent data in PowerPoint. It gives you the flexibility to show various permutations and combinations as well as make it simpler for your audience to understand the data.
But, it is often very difficult to work with tables in PowerPoint. The truth is, there are several options that are often either overlooked or unknown to people that can make their tables look really cool!
So, in this article, I’ll share with you a complete beginner’s guide on how to use tables in PowerPoint.
I do want to mention that sharing all of the information in just one article and keeping it readable is not possible. So, throughout the article, I shall link other detailed articles that go more in-depth into that topic! I would encourage you to open those articles that interest you for further information!
Now, without any further delay, let’s get started!
1. Add Tables in PowerPoint
In Microsoft PowerPoint, you can insert a new blank table using the “Insert” tab. I’ve written a detailed article on adding tables to your PowerPoint presentation. Make sure you check it out for more tips!
Meanwhile, here’s one way to add a table in PowerPoint –
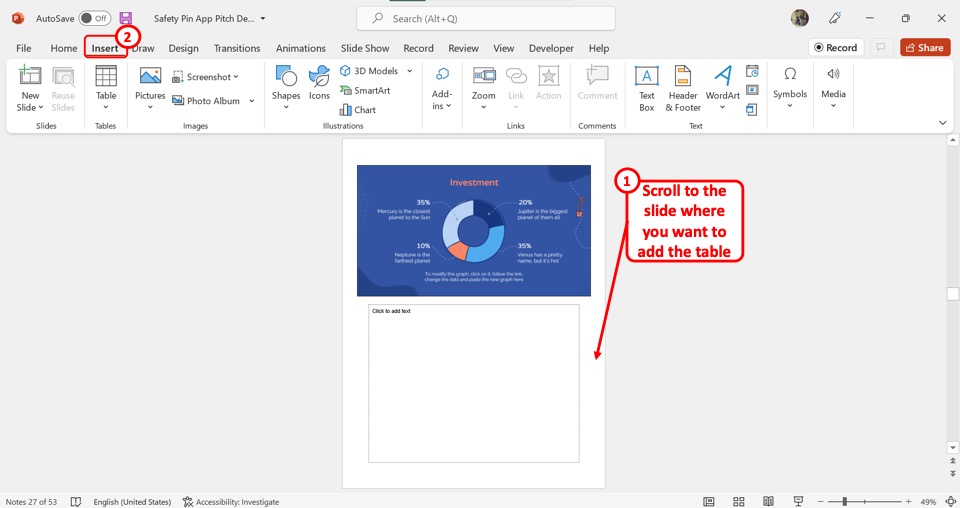
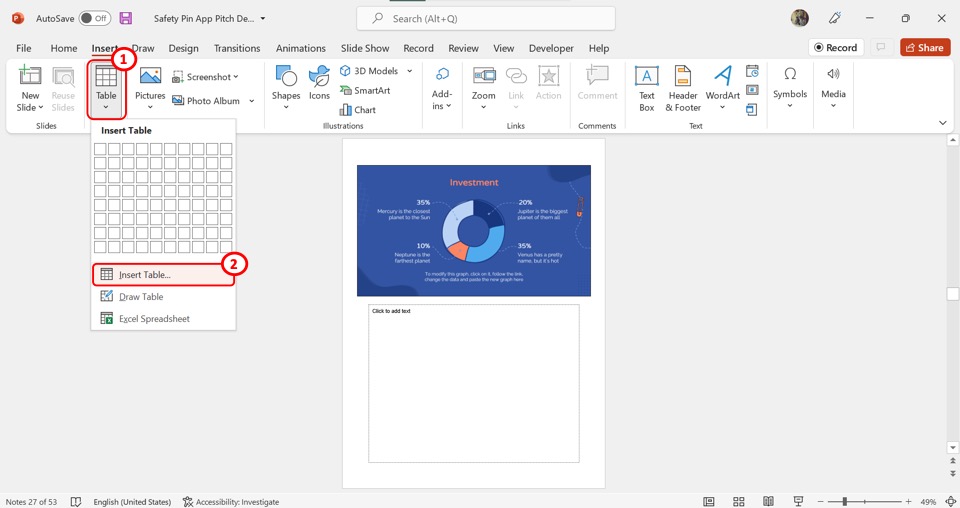
Step-1: Click on the “Insert” tab
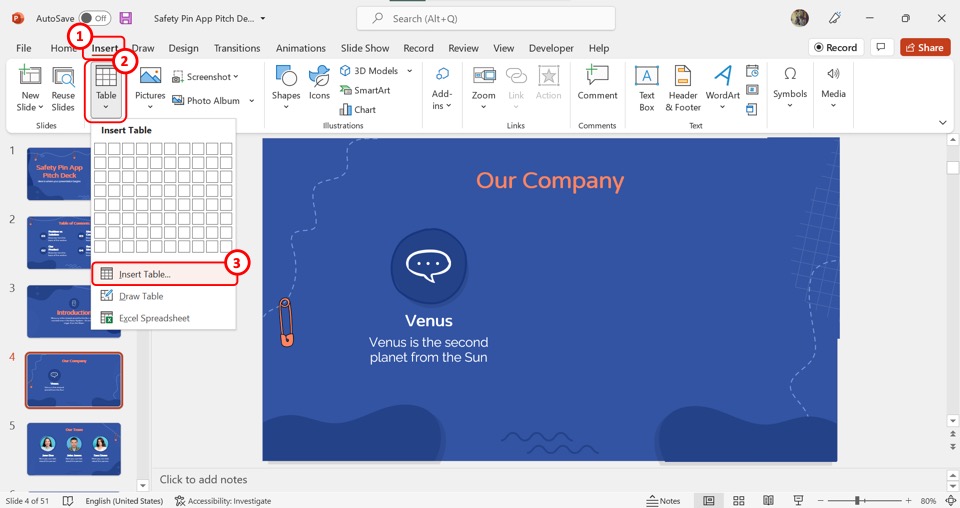
The first step is to open the “Insert” menu. To do so, click on the “Insert” tab in the menu ribbon located at the top of the screen. In the “Insert” menu, click on the “Table” option and then click on the “Insert Table” option in the dropdown menu under the “Table” option.
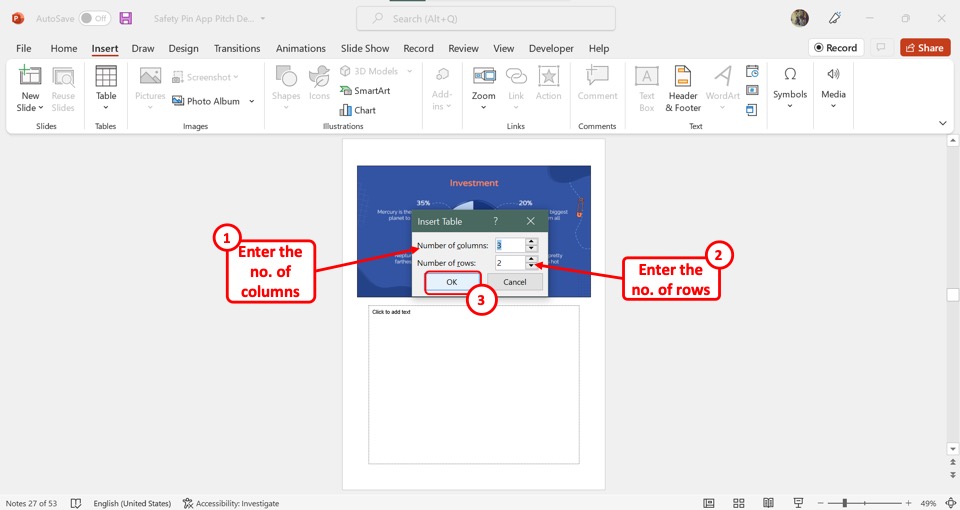
Step-2: Set the number of columns and rows
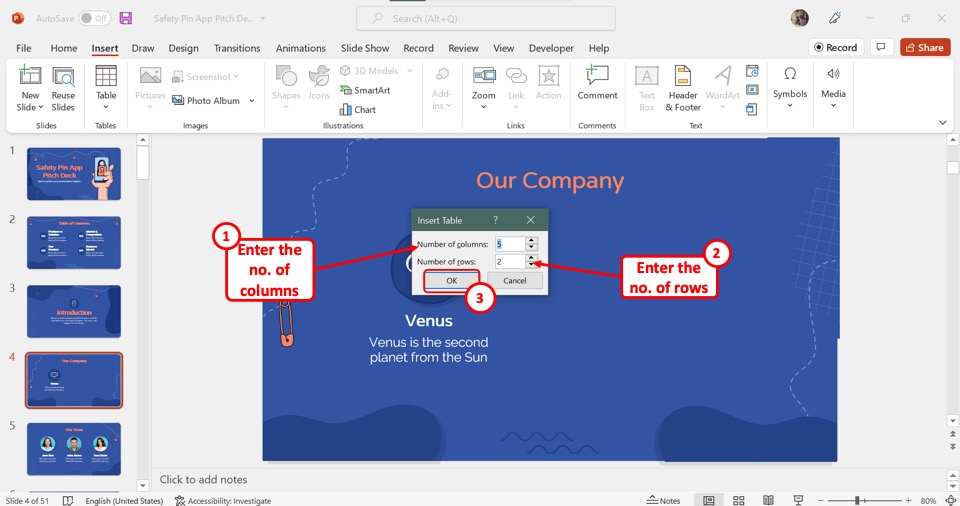
In the “Insert Table” dialog box, click on the “Number of columns” box and type in the number of columns you want to add to the table. Similarly, type in the preferred number of rows for the table in the “Number of rows” box.
Step-3: Click on the “OK” button
Now all you have to do is click on the “OK” button at the bottom of the “Insert Table” dialog box to insert the table.
2. How to Align Text in a Table in PowerPoint?
In Microsoft PowerPoint, you can align the text in a cell, column, row, or the entire table both horizontally and vertically. You can do so by using the “Alignment” option. I cover this exclusively in my other article on how to align text in a table in PowerPoint. Make sure to check out that article!
That said, you should know the following steps at the very least in order to align text in a table correctly in PowerPoint –
Step-1: Click on the “Layout” tab
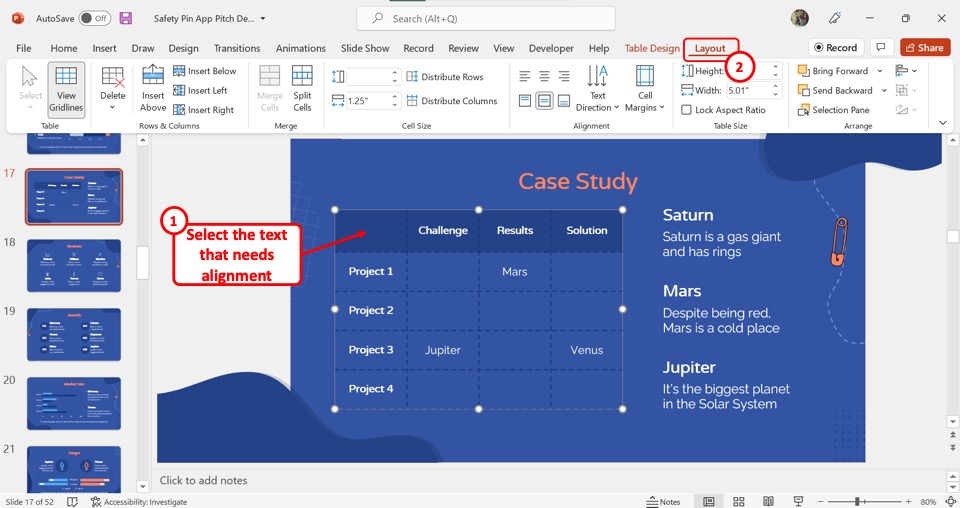
The first step is to highlight the text that you want to align inside the table to select them. Then click on the “Layout” tab which is the last tab in the menu ribbon located at the top of the screen.
Step-2: Select preferred alignment
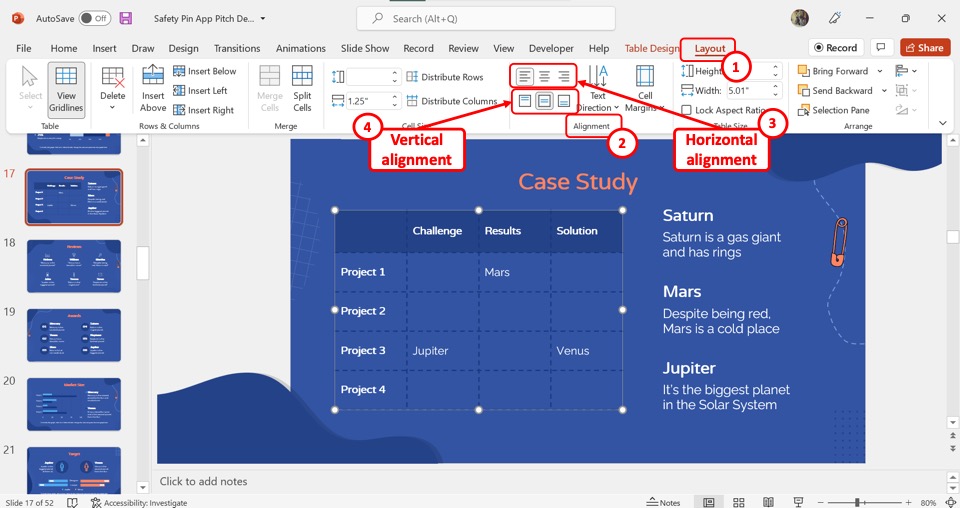
In the “Alignment” group of the “Layout” tab, you can now select your preferred alignment options. The options available for the horizontal alignment are “Left”, “Center”, and “Right”.
The vertical alignment options are available in the second row which are the “Top”, the “Middle”, and the “Bottom”. You can choose any combination of the vertical and horizontal alignment for the selected text in the table.
3. How to Move or Resize Table in PowerPoint?
PowerPoint also allows you to resize and move your table easily. Again, I go in-depth into this topic in my other article where I show different methods to move or resize a table in PowerPoint.
Here’s one way to change the size or position of a table. You will need to use the “Format Shape” option, follow the 4 simple steps.
Step-1: Click on the “Format Shape” option
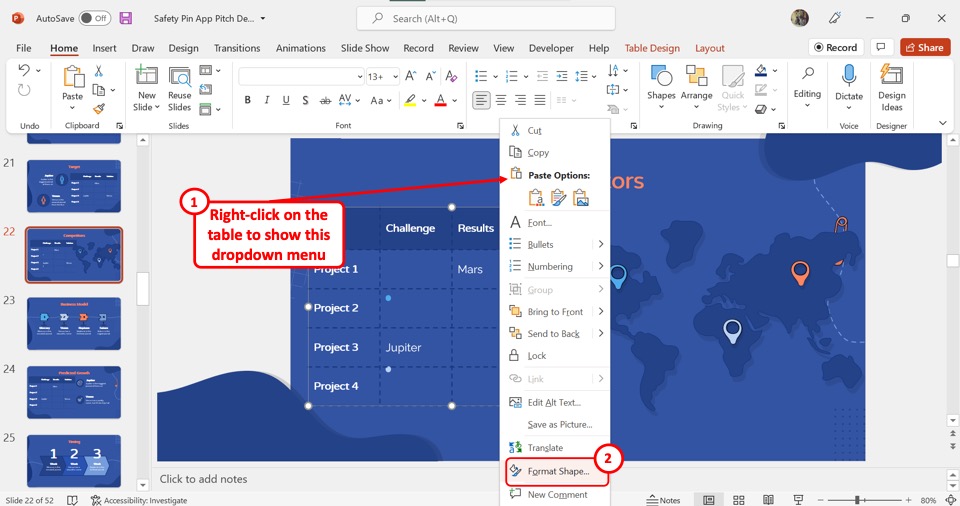
In the open slide, “Right Click” on the table that you want to move or resize. In the right-click menu, click on the “Format Shape” option to open the sidebar.
Step-2: Click on the “Size and Properties” option
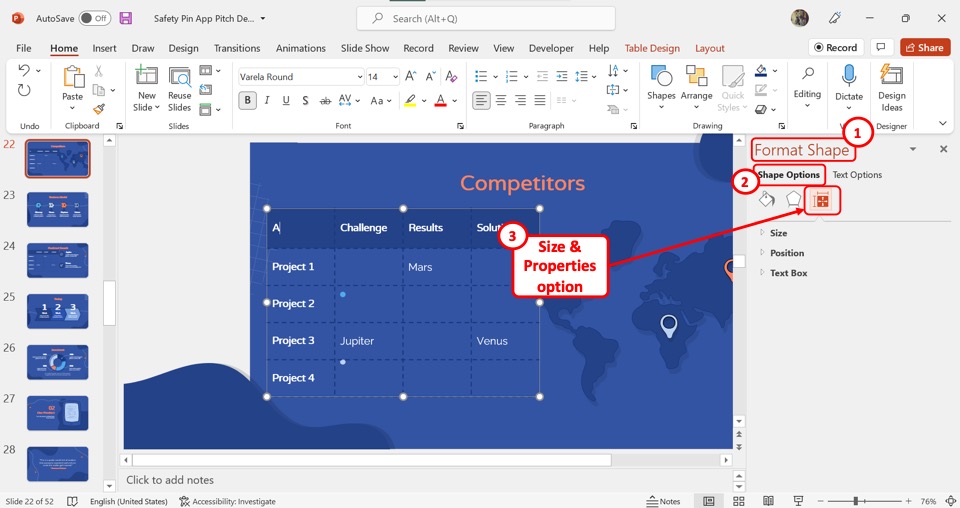
In the “Format Shape” sidebar located on the right side of the screen, you have to click on the “Shape Options” tab. Then click on the “Size and Properties” option which is the third icon under the “Shape Options” tab.
Step-3: Click on the “Size” option
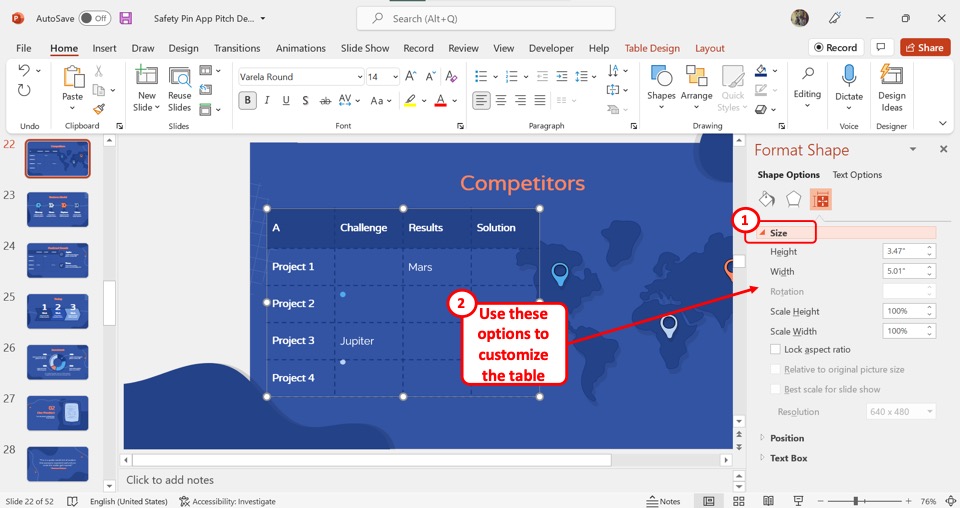
To resize the table, all you have to do now is click on the “Size” option in the “Format Shape” sidebar. This will expand the resize options that you can use to customize the size of the selected table.
Step-4: Click on the “Position” option

To change the table position, all you have to do now is click on the “Position” option in the “Format Shape” sidebar. This will expand the reposition options that you can use to customize the position of the selected table inside the slide.
4. Using Table Styles in PowerPoint
The table style in Microsoft PowerPoint is a gallery of predesigned table designs that you can use inside your presentation slide.
You can access the table style options in the “Table Style” group of the “Table Design” tab. Click here to read more about how to use these table styles including how to copy tables style from one table to another.
To apply a table style to a selected table, follow the 2 easy steps.
Step-1: Click on the “Table Design” tab
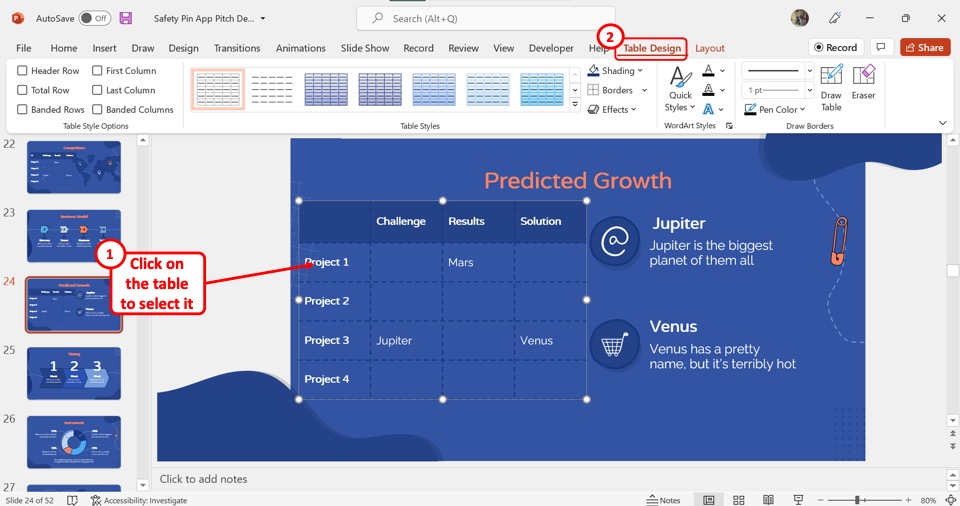
You have to first access the contextual tabs for the table. To do so, click on a table to select it. Then click on the contextual tab “Table Design” from the menu ribbon located at the top of the screen.
Step-2: Click on the “Table Styles” gallery
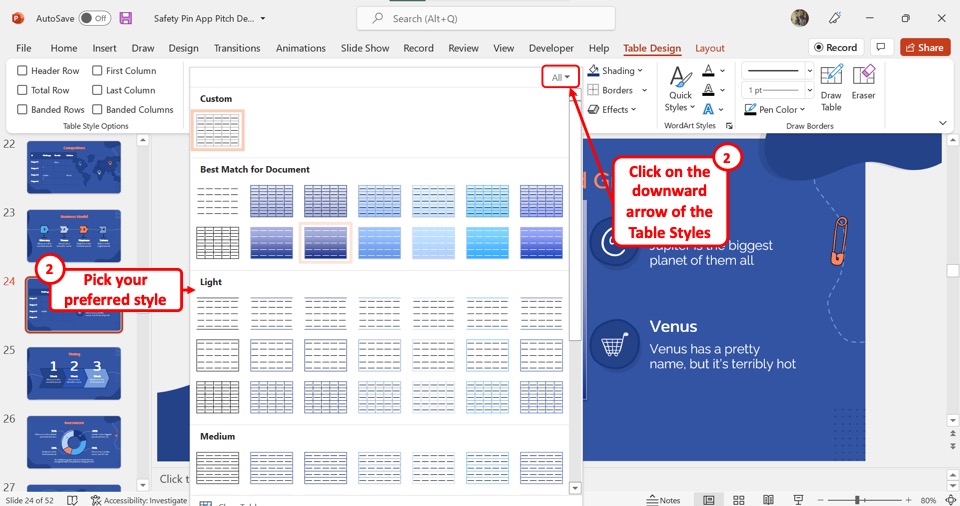
In the “Table Design” tab, you have to now click on the “More” option which is the downward arrow on the “Table Styles” gallery to expand it. Then all you have to do is click on your preferred table style for the selected table from the gallery.
5. Add Table Border in PowerPoint
The borders in a table in PowerPoint are easily insertable and removable. Read my other article to learn about different methods of adding a table border.
Meanwhile, here’s one way to add a table border using the “Borders” option.
Step-1: Click on the “Table Design” tab

The first step is to click on the table to which you want to add borders. Then click on the “Table Design” tab from the menu ribbon located at the top of the screen.
Step-2: Click on the “Borders” option
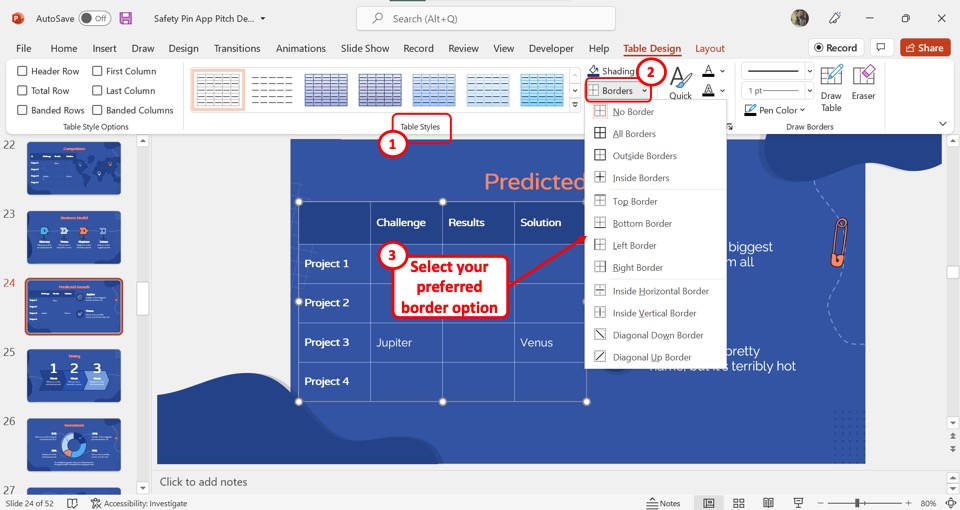
In the “Table Styles” group of the “Table Design” tab, click on the downward arrow by the “Borders” option. Then click on your preferred border option from the dropdown menu under the “Borders” option to add borders to the selected table.
6. Change Table Border Color in PowerPoint
Microsoft PowerPoint allows you to customize the border color of individual cells, rows, columns, or the entire table in a slide.
In my other article on how to change table border color in PowerPoint, I show you how to customize the table border, and even for each cell, row, or column!
That said, here’s how to change the border color of the entire table –
Step-1: Click on the “Table Design” tab
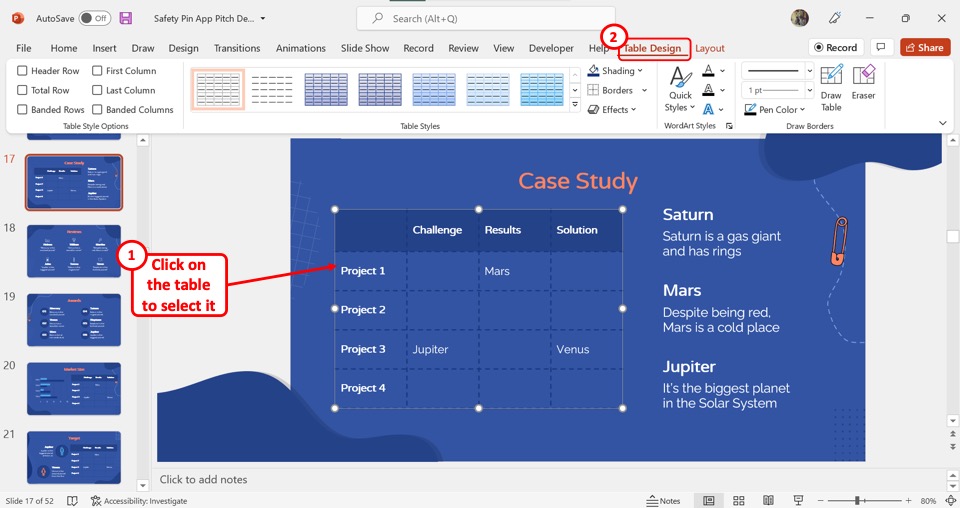
The first step is to click anywhere on the table to access the contextual tabs. Then click on the “Table Design” tab from the menu ribbon.
Step-2: Click on the “Pen Color” option
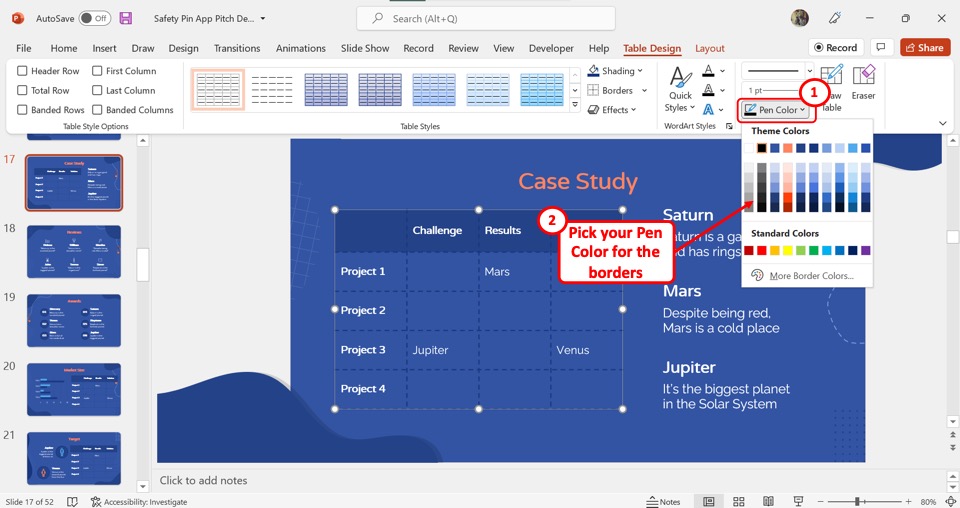
In the “Draw Borders” group of the “Table Design” tab, click on the “Pen Color” option. Then select a preferred color from the dropdown menu under the “Pen Color” option.
Step-3: Click on the “Borders” option
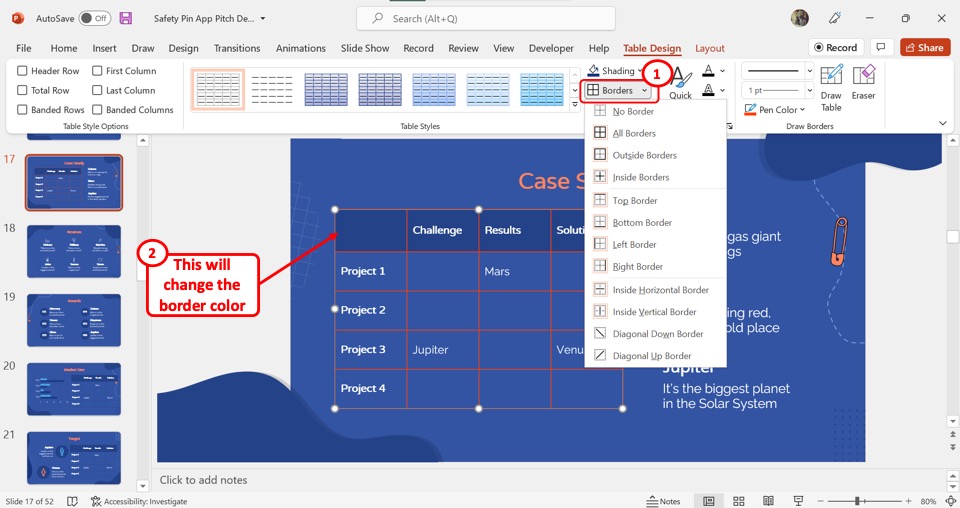
Now all you have to do is click on the “Borders” option in the “Table Styles” group to change the border color to the newly selected color.
7. Changing Table Color in PowerPoint
Using the “Format Shape” sidebar in Microsoft PowerPoint, you can change the color of the table. All you have to do is follow the 3 easy steps.
Step-1: Click on the “Format Shape” option
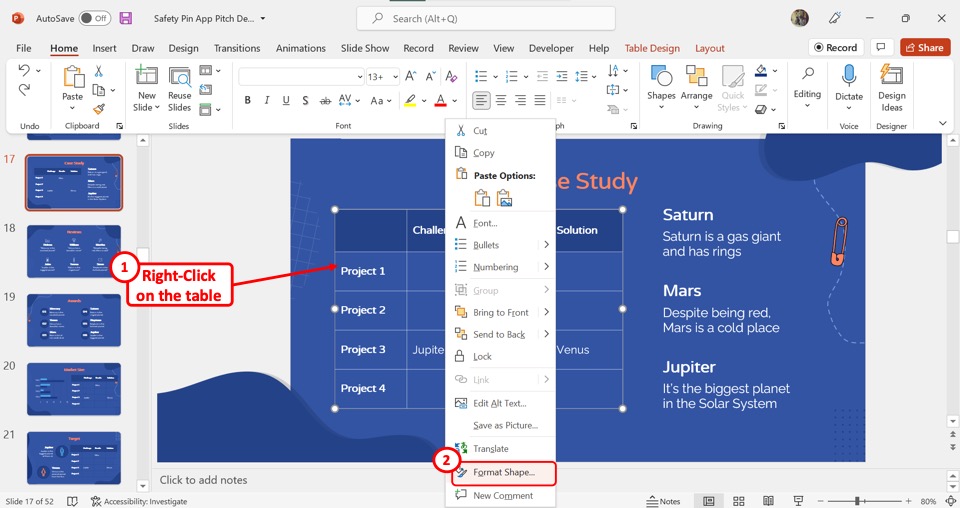
The first step is to “Right Click” on the table where you want to add the color. Then click on the “Format Shape” option from the right-click menu.
Step-2: Click on the “Solid Fill” option
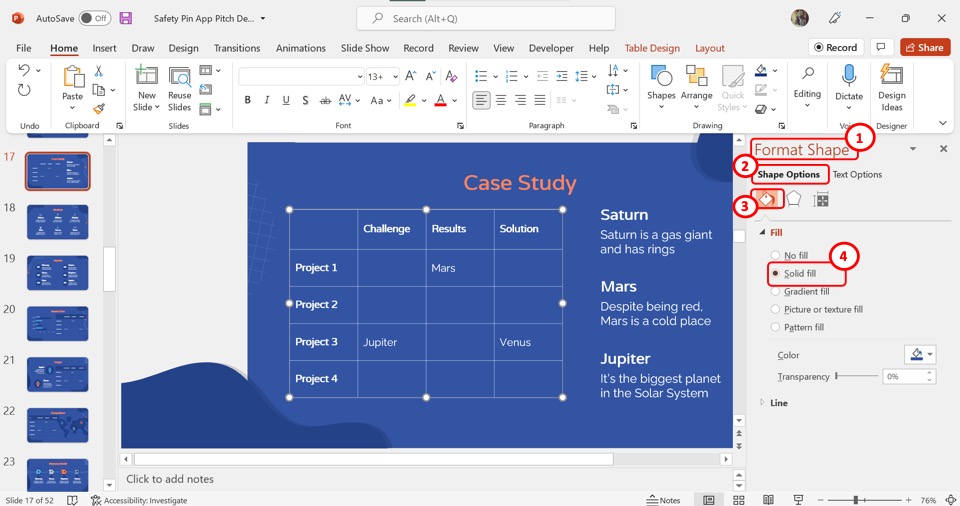
In the “Format Shape” sidebar, click on the “Solid fill” option under the “Fill” section. This will expand the color fill options.
Step-3: Click on the “Color” box
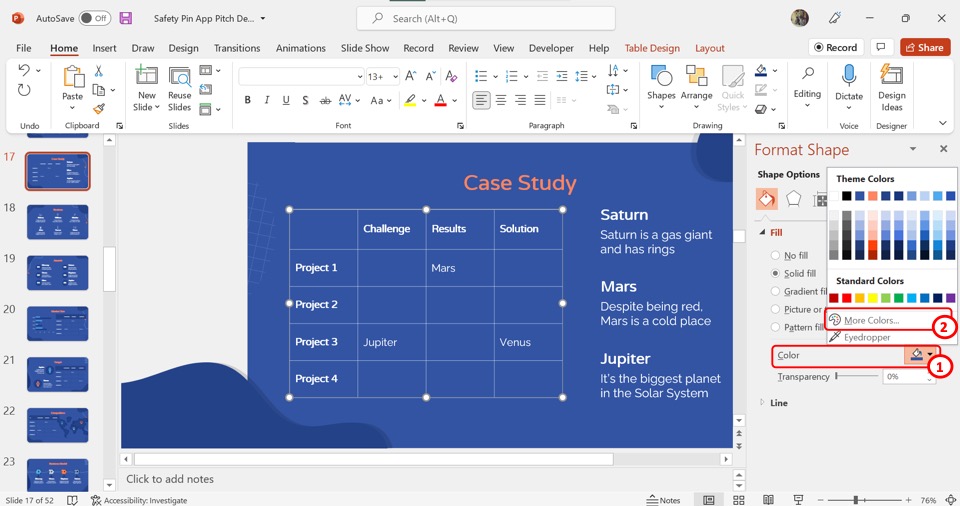
The next step is to click on the “Color” box. Now you can select a background color from the pop-up menu. You can also click on the “More Colors” option to access more colors.
8. How to Format a Table in PowerPoint?
The “Format Shape” option in PowerPoint contains various features that you can use to format a table inside the presentation slide.
To access the “Format Shape” option, all you have to do is “Right Click” on a table. Then click on the “Format Shape” option from the bottom of the right-click menu to open the “Format Shape” sidebar. You can now use the options available in the sidebar to format the table.
There are actually several other table formatting options that are available. To learn more about formatting tables in PowerPoint, check out my article here.
9. How to Insert a Pivot Table in PowerPoint?
Pivot tables are a special type of table where you can sort data during the presentation to tend to your audience’s understanding.
The process to insert a pivot table in PowerPoint from Excel needs some understanding and practice to do it right. To add a pivot table using the “Insert Object” feature, follow the 4 simple steps.
Step-1: Click on the “Insert” tab
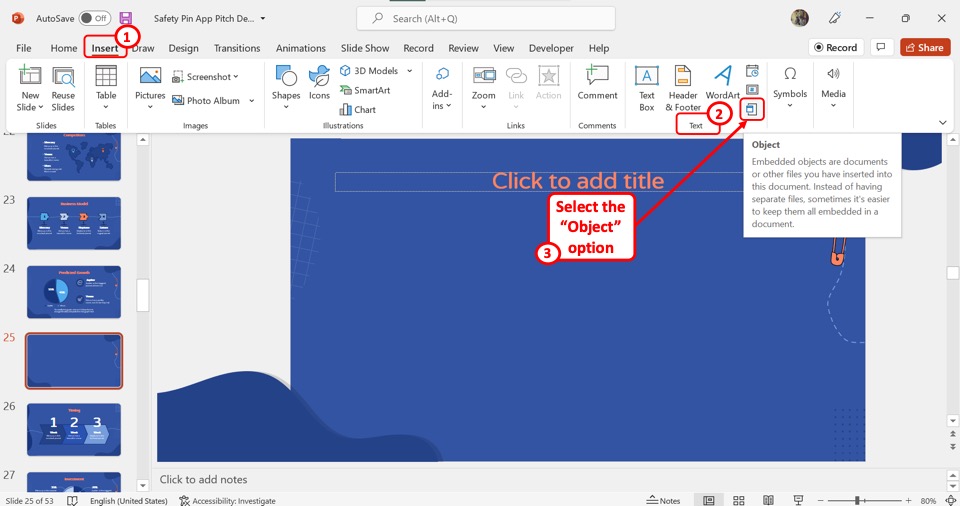
In the menu ribbon located at the top of the screen, click on the “Insert” tab. Then click on the “Object” option which is the bottom icon in the “Text” group of the “Insert” menu.
Step-2: Click on the “Create from file” option
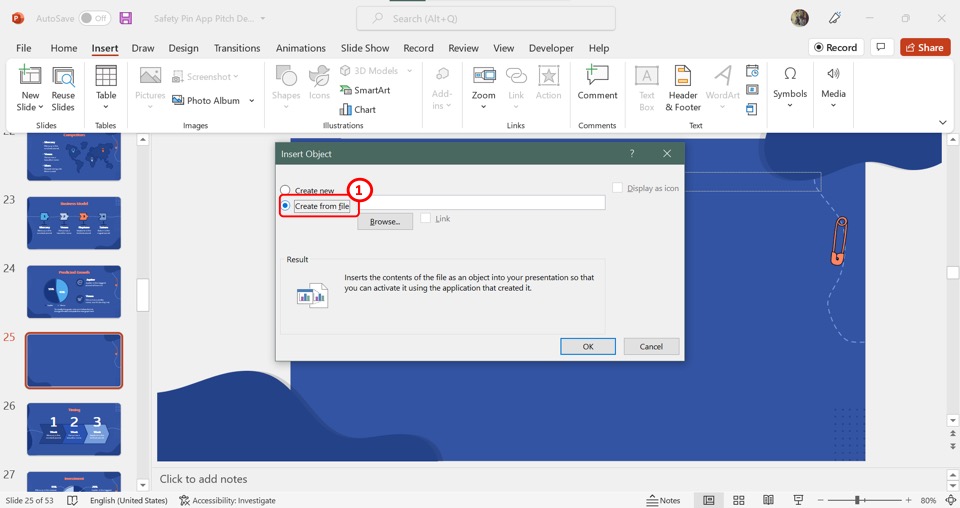
In the left column of the “Insert Object” dialog box, click on the “Create from file” option to insert an existing Excel file from your device to the PowerPoint slide.
Step-3: Click on the “Browse” option
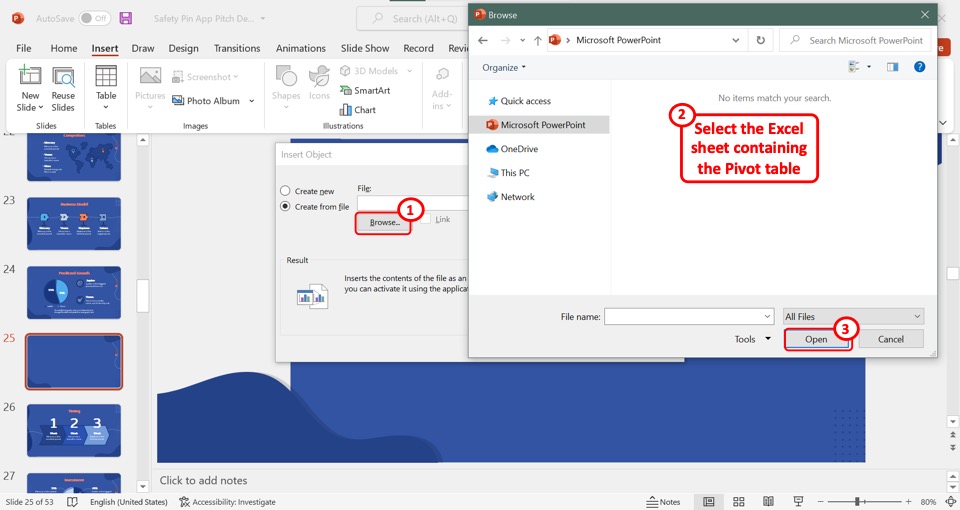
The next step is to click on the “Browse” button in the “Insert Object” dialog box to open the “Browse” dialog box. In the “Browse” dialog box, select the Excel sheet containing the pivot table and then click on the “Open” button at the bottom.
Step-4: Click on the “OK” button

Click on the “Link” option in the “Insert Object” dialog box to add the hyperlink. Then all you have to do is click on the “OK” button at the bottom of the dialog box to insert the pivot table into the PowerPoint slide.
10. How to Insert a Table in PowerPoint Notes?
Not many people are aware that you can actually also insert a table in the notes section in PowerPoint.
You can use the “Notes View” option to add and read speaker notes. You can add any object including tables to your speaker notes. To learn about the detailed steps for adding, viewing, and editing tables in PowerPoint notes, read my article here.
To add a table in the “Notes View”, follow the 5 easy steps.
Step-1: Click on the “Notes Page” option
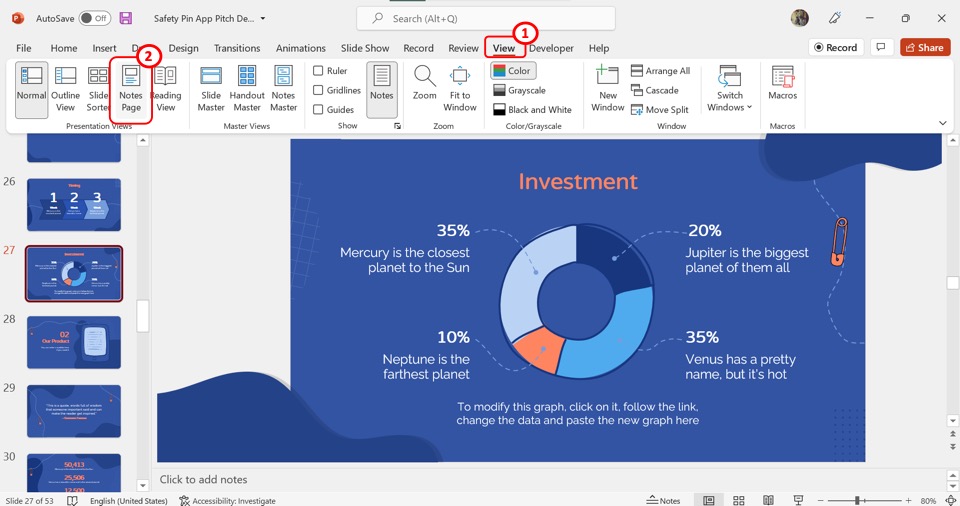
In the menu ribbon located at the top of the screen, click on the “View” tab. In the “View” menu, click on the “Notes Page” option from the “Presentation Views” group.
Step-2: Click on the “Insert” tab
The next step is to scroll down in the “Notes Page” to find the slide where you want to add the table. Then click on the “Insert” tab in the menu ribbon to open the “Insert” menu.
Step-3: Click on the “Insert Table” option
Now all you have to do is click on the “Table” option in the “Insert” menu. Then click on the “Insert Table” option from the dropdown menu under the “Table” option.
Step-4: Select the number of columns and rows
In the “Insert Table” dialog box, you can now type in the preferred number of columns and rows in the “Number of columns” box and the “Number of rows” box respectively.
Step-5: Click on the “OK” button
Finally, you can click on the “OK” button at the bottom of the “Insert Table” dialog box to insert the table into the slide notes.
11. How to Insert Table in PowerPoint from Excel?
The “Insert Table” feature in Microsoft PowerPoint allows you to only add new tables to your slide. To insert a table from Microsoft Excel, you can use the “Paste Special” feature in PowerPoint. You can read more about inserting a table in PowerPoint from excel in detail in my article here.
Here are a few steps involved in brief –
Step-1: Click on the “Copy” option
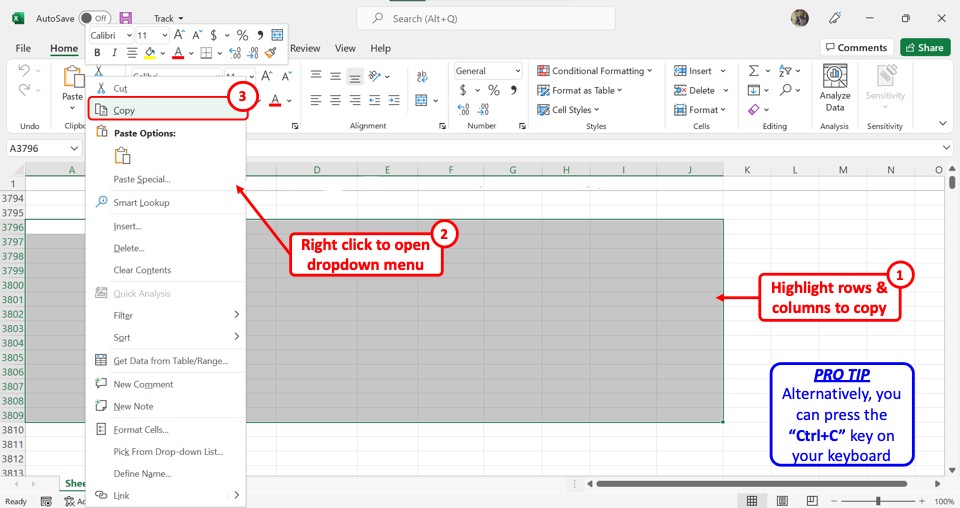
The first step is to copy the Excel table. To do so, open the Microsoft Excel worksheet and highlight the preferred columns and rows to select them. Then “Right Click” on it and click on the “Copy” option. Alternatively, you can press the “Ctrl+C” keys on your keyboard.
Step-2: Click on the “Paste Special” option

Now you have to return to the PowerPoint file. In the “Paste” group of the “Home” tab, click on the downward arrow under the “Paste” icon. Then click on the “Paste Special” option from the dropdown menu under the “Paste” option.
Step-3: Click on the “Microsoft Excel Worksheet Object” option
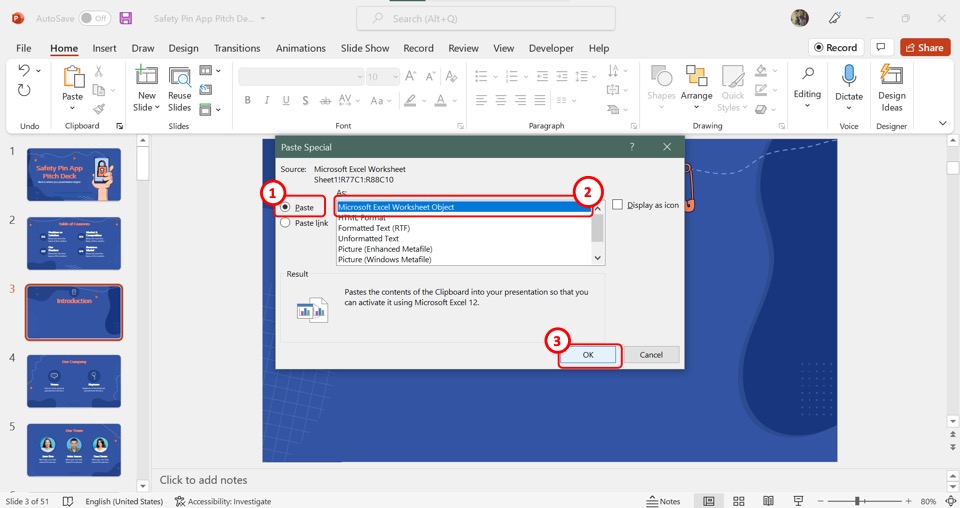
In the “Paste Special” dialog box, click on the “Paste” option from the left column. Then click on the “Microsoft Excel Worksheet Object” option from the “As” section in the middle of the dialog box.
Step-4: Click on the “OK” button
Now all you have to do is click on the “OK” button at the bottom of the “Paste Special” dialog box to paste the Excel table into the open PowerPoint slide.
12. How to Animate Table in PowerPoint?
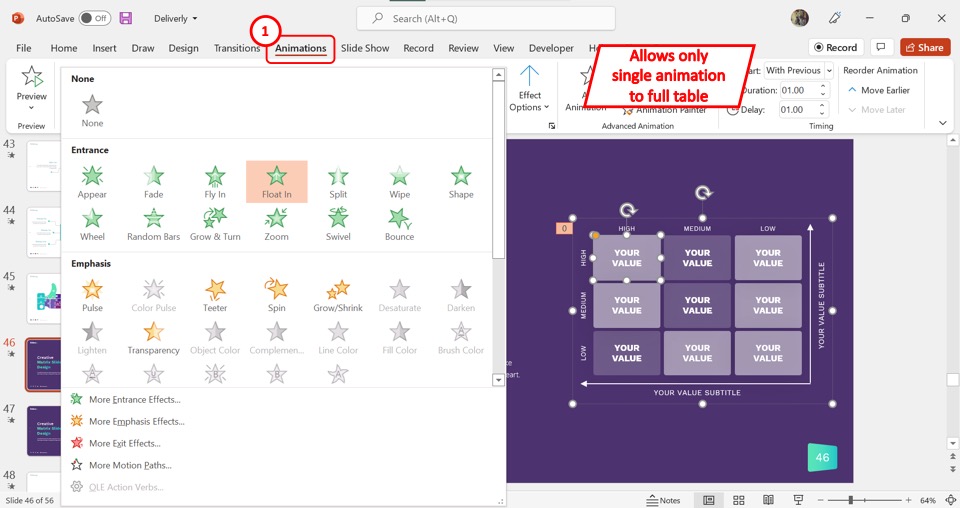
The “Animations” tab in the menu ribbon in Microsoft PowerPoint lets you animate any object inside the presentation slides.
However, when you animate a table in PowerPoint, you can only apply a single animation style to the entire table. To animate the cells, rows, or columns of a table separately, you can follow some hacks.
I’ve covered these hacks in my other article where I show 4 ways to animate a table in PowerPoint. Make sure to give it a read!
13. How to Sort Table in PowerPoint?
In Microsoft PowerPoint, there is actually no feature that allows you to sort a selected table.
However, you can export the table to Microsoft Word or to Microsoft Excel and sort it there. The “Sort” feature is only available in the tables in Microsoft Excel and Microsoft Word.
The process is a bit cumbersome. Nevertheless, I’ve covered the complete steps in my other article where I show detailed steps to sort a PowerPoint table.
14. Transpose Table in PowerPoint?
Lastly, sometimes, you need to convert the data from rows into columns and vice-versa. Unfortunately, PowerPoint doesn’t allow you to transpose a table on a slide!
However, I’ve shared an amazing hack to circumvent this problem by exporting the table in Excel. Check out my detailed article on how to transpose a table in PowerPoint.
Credit to cookie_studio (on Freepik) for the featured image of this article (further edited).