![How to Uninstall and Reinstall PowerPoint? [Complete Guide!]](https://artofpresentations.com/wp-content/uploads/2021/10/Featured-Image-How-to-Uninstall-and-Reinstall-PowerPoint-optimized.webp)
If you have ever faced issues with your PowerPoint files that you can’t easily troubleshoot, chances are that you will need to perhaps uninstall and reinstall PowerPoint completely!
Although the process seems quite daunting at first, if you know exactly how to uninstall and reinstall the application, there is nothing to worry about!
In this article, I will do a deep dive on how to uninstall PowerPoint (rather Microsoft Office). The steps that I will share in this article will work for most versions of Microsoft Office. Then, I will also help you understand how to reinstall the office application later in the article!
So, let’s get started!
1. Can You Uninstall Just PowerPoint from Microsoft Office?
You can uninstall just the PowerPoint application instead of Microsoft Office as long as you have installed it using the Microsoft Store. However, this option is only available for some of the newer versions of Microsoft Office.
For most people using PowerPoint, you won’t have the option of uninstalling or reinstalling just Microsoft PowerPoint instead of Microsoft Office.
Important – One thing to remember is that uninstalling Microsoft Office won’t delete the files that have been created using any of the applications!
So, if you have created a PowerPoint presentation for your company or an event, by uninstalling Microsoft Office, the presentation file won’t get deleted!
2. How to Uninstall PowerPoint on Windows PC
There are four methods through which you can uninstall Microsoft Office from your computer. You can either use the control panel, or the Microsoft store, or use PowerShell, or uninstall it using support tools.
All the process of uninstalling Microsoft Office from your computer is described in the sections below.
2a. Method 1 – Uninstall Microsoft Office from Control Panel
To uninstall Microsoft Office from the Control Panel of your computer, follow the simple process described in the easy steps below.
Step-1: Open to the Control Panel
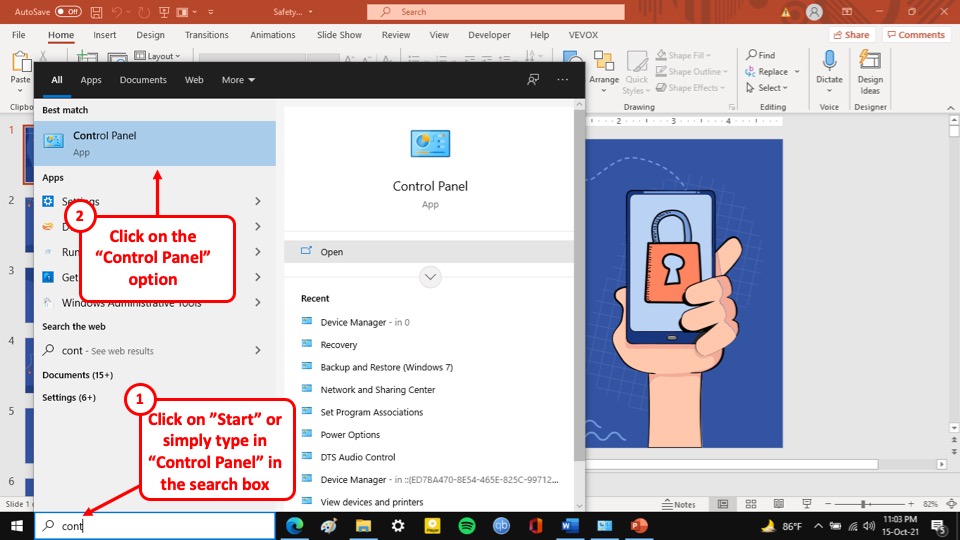
The first step of the process is to open the start menu of your computer and search for the “Control Panel.” After that, click on the “Open” button, below the Control Panel thumbnail.
Step-2: Click on “Uninstall a program”
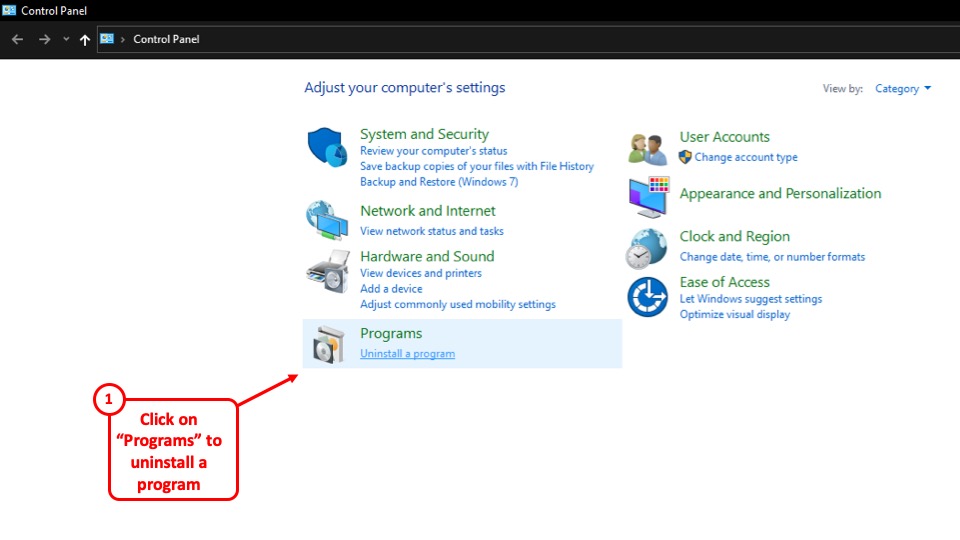
After you have clicked on the “Open” button, a window will open on your screen. In that new window, click on the “Uninstall a program” option. It is the last option on the left side of the screen, under the “Programs” option.
Step-3: Click on the “Uninstall” button
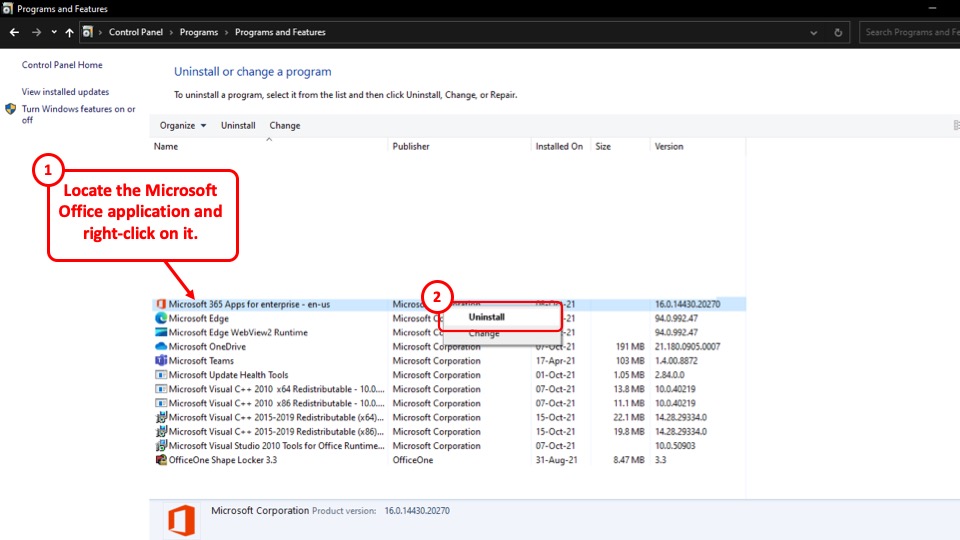
When you select the “Uninstall a program” button, a new page will appear in the window. Now, find the Microsoft Office program in this window, “Right-click” on it, and select the “Uninstall” button from the drop-down menu. It is the first of the two options in the drop-down menu.
After that, follow the prompts provided in the uninstallation wizard for the program, and the Microsoft Office program will be removed from your computer.
2b. Method 2 – Uninstall Microsoft Office from the Microsoft Store
To uninstall Microsoft Office from the Microsoft Store, at first you have to go to the start menu and open the “Settings” option. Follow the simple steps described below which elaborately explains the whole process.
Step-1: Go to the “Settings” menu
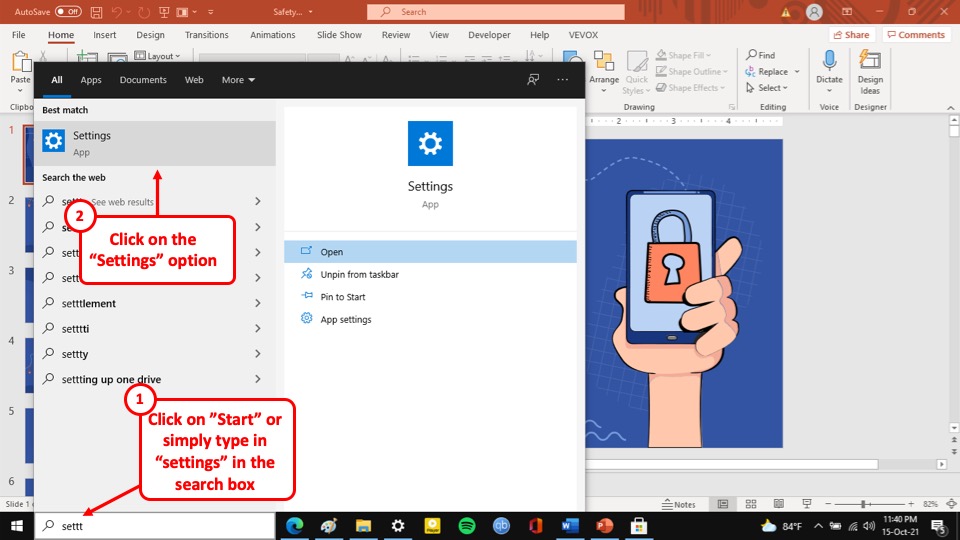
The first step of the process is to go to the “Start” menu of your computer and search for the “Settings” option. After that, click on the “Open” button located immediately under the “Settings” thumbnail. This will open a new window on your screen.
Step-2: Click on the “Apps” button
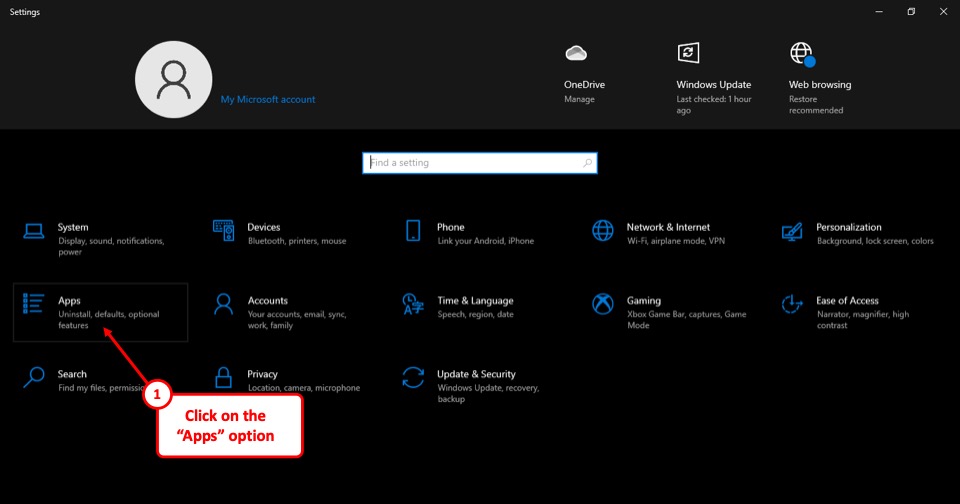
After you click on the “Open” button, a new window will appear on your screen. From that window, select the “Apps” button. It is the second option in the left-most column in the window.
Step-3: Click on the “Microsoft Office” program
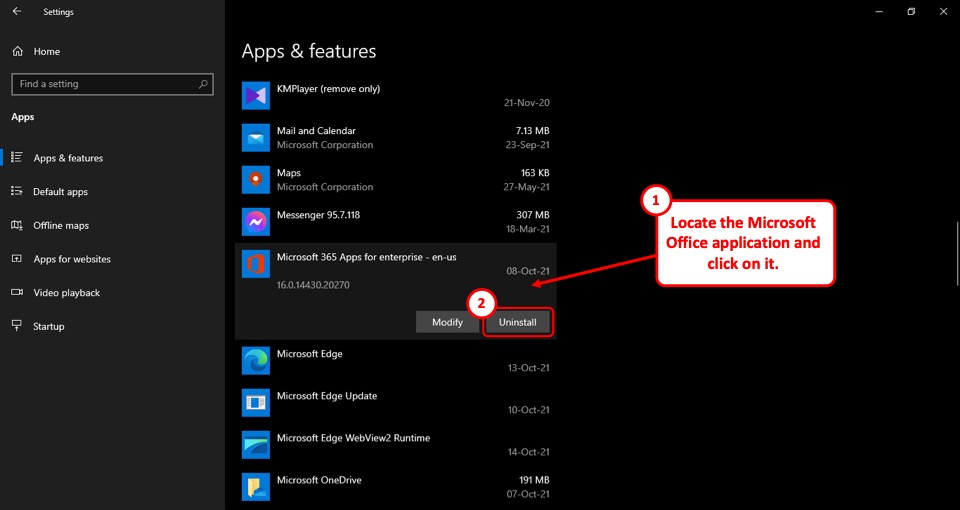
Once you have clicked on the “Apps” button, you will be taken to a new page in the window called “Apps & features”. Now, in this window, find the version of the “Microsoft Office” program installed on your computer and then select it using the mouse of your computer.
Step-4: Click on the “Uninstall” button
After you have selected the version of “Microsoft Office” installed on your computer, click on the “Uninstall” button, to the right of the “Modify” button.
This will open the “Uninstallation Wizard” on your screen. Follow the prompts of the “Uninstallation Wizard” and the “Microsoft Office” program will be uninstalled from your computer.
2c. Method 3 – Manually Uninstall Microsoft Office Using PowerShell
To uninstall Microsoft Office from your computer using PowerShell, you have to open the Windows PowerShell app from the Start menu of your computer.
Follow the 3 steps given below, and you will be able to uninstall Microsoft Office from your computer using Windows PowerShell.
Step-1: Click on the “Run as Administrator” button
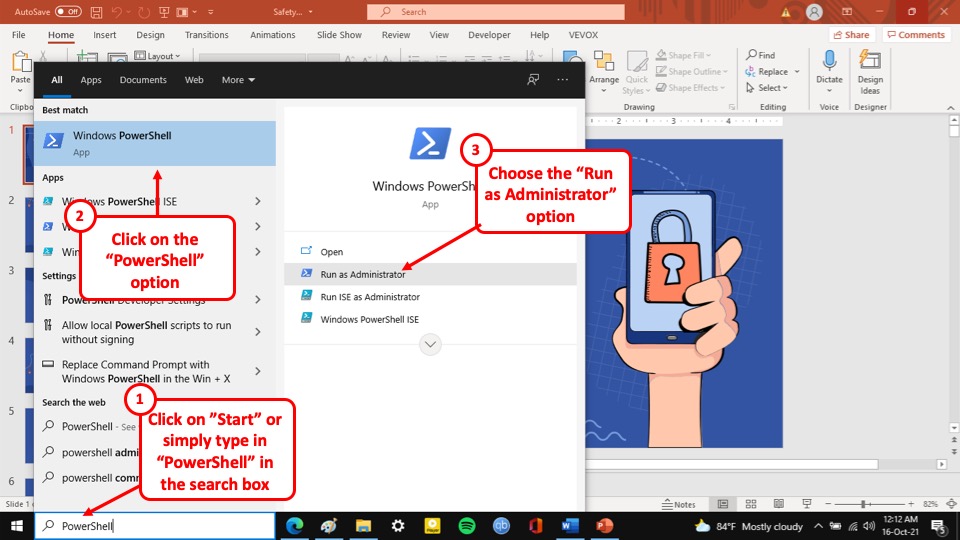
The first step of the process is to go to the “Start” menu of your computer and search for “Windows PowerShell”. Once you find it, click on the “Open” button. This will open a new window on the screen of your computer.
Step-2: Type in the command in the pop-up window
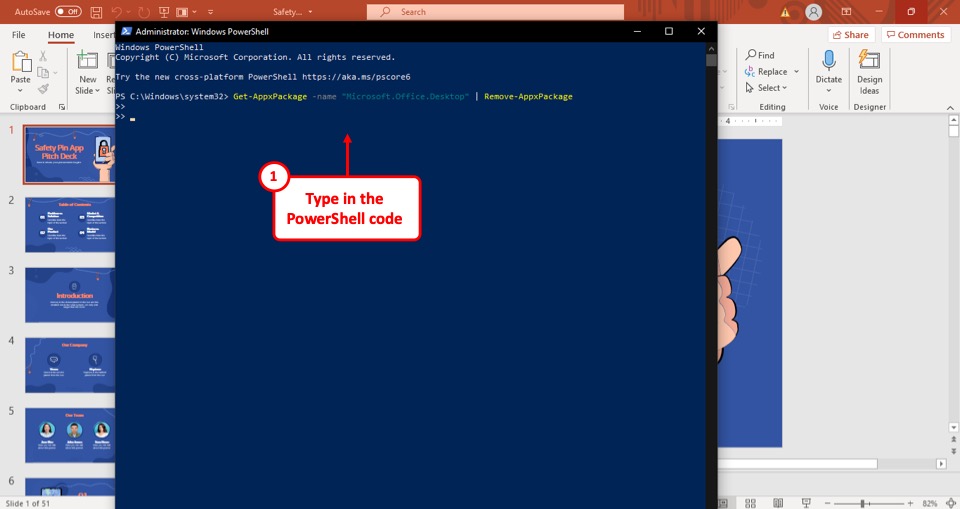
After you have clicked on the “Run as Administrator” button, a pop-up window will appear on your screen. You can write commands in the pop-up window.
Now all you have to do is to copy the command written within the quotation marks below and paste it on the pop-up window.
“Get-AppxPackage -name “Microsoft.Office.Desktop” | Remove-AppxPackage”
After that press the “Enter” key on the keyboard of your computer.
Step-3: Check if “Microsoft Office” was uninstalled
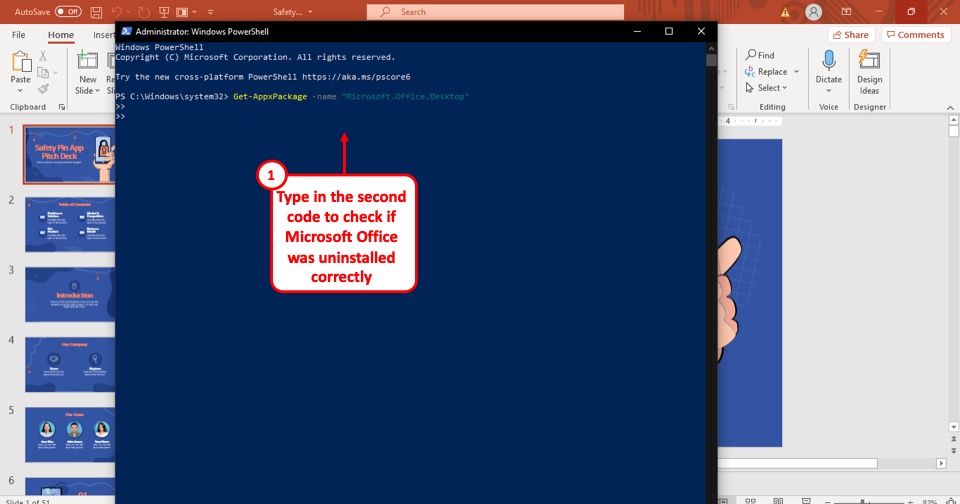
After you hit the “Enter” button on the keyboard of your computer, a new prompt will open. On the new prompt, which looks identical to the pop-up window, type in the following command written within the quotation marks below.
“Get-AppxPackage -name “Microsoft.Office.Desktop”
If you see that yet another prompt opens in the pop-up window and there is no additional information displayed there, then the Microsoft Office program has been uninstalled from your computer successfully.
2d. Method 4 – Using Uninstall Support Tool
To uninstall Microsoft Office from your computer permanently using the Uninstall support tool, you have to download the support tool first. The whole process is described step-by-step below.
Step-1: Download the support tool
The first step of the process is to download the support tool that you will use to uninstall Microsoft Office from your computer. Click here to download the Microsoft Support tool.
Step-2: Select the “Install” button
After you have downloaded the Supporting tool installation file, open it by clicking on the “Open file” button from the browser of your computer.
After you have clicked on the “Open file” button, a pop-up window will appear on your screen. Click on the “Install” button located in the pop-up screen that appears on your screen.
Step-3: Follow the Uninstall Office support tool prompts
After the Uninstall Office support tool finishes installing in your computer, a pop-up window will appear on your screen. From that window, click on the “Next” button and then follow the prompt as it appears on your screen.
After the successful uninstallation of the Microsoft Office program, your computer will restart automatically.
Step-4: Finish the installation process
After your computer restarts, the Uninstall Office support tool will automatically pop up on your screen. Simply click on the “Finish” button and the Microsoft Office program will be uninstalled from your computer permanently until you reinstall it.
3. How to Uninstall PowerPoint on Mac?
To Uninstall PowerPoint on your Mac computer, you have to go to the finder navigation bar and then go to applications, select the PowerPoint file, and move it to the trash from the drop-down menu. The entire process is described in easy steps below.
Step-1: Go to the “Applications” section
The first step of this process is to go to the “Finder navigation bar” located on the left of the screen. In the “Finder navigation bar”, select the “Application” section.
Step-2: Select the Microsoft PowerPoint file
After you select the “Applications” section, a new page will appear on your screen. From that page, find the Microsoft PowerPoint file and click on it.
Step-3: Select the “Move to Trash” option
In the last step, after you have selected the Microsoft PowerPoint file, “Right-click” on the Microsoft PowerPoint file. This will open a drop-down menu.
From the drop-down menu, select the “Move to Trash” option and Microsoft PowerPoint will be uninstalled from your mac computer automatically.
3a. How to Uninstall Office for Mac 2011?
The process of uninstalling Microsoft office from your Mac 2011 is almost identical to uninstalling Microsoft PowerPoint from other versions of Mac computer.
The only difference is that instead of selecting the Microsoft PowerPoint file, you will have to select the Microsoft Office file. So, simply follow the steps described in the previous section of this article and select Microsoft Office instead of Microsoft PowerPoint.
This way you will be able to uninstall Microsoft Office from your Mac 2011 computer.
3b. How to Completely Remove Office for Mac?
To completely remove Microsoft Office from your Mac computer, at first, you have to delete the Microsoft PowerPoint file, and then remove all the supporting files of Microsoft office that are present in your Mac computer. The entire process is described below.
Step-1: Remove Microsoft Office
The first step of the process is to delete Microsoft Office from your Mac computer. So, follow the process described in the previous section and select the Microsoft Office file from the Applications section and move it to trash.
Step-2: Go to the “Library” section
The second step of the process is to go to the “Library” of your Mac computer. To do this, all you have to do is to click on the “Go” tab and then select the “Library” option from the drop-down menu.
Step-3: Go to the “Container” folder
Once you have clicked on the “Library” option, a pop-up window will appear on your screen. From the “Container” folder, select all the files that start with ‘com.Microsoft’ and then move them to trash.
Step-4: Go to the “Group Container” folder
After you have deleted the files that start with ‘com.Microsoft’ from the “Container” folder, go back to the “Library” folder and then double click on the “Group Container” folder.
Step-5: Delete all the “Microsoft Office” files
By double-clicking on the “Group Container” folder, you will be taken to another page in the window. In this folder, select the following files and then move them to trash.
- UBF8T346G9.ms
- UBF8T346G9.Office
- UBF8T346G9.OfficeOneDriveSyncIntegration
- UBF8T346G9.OfficeOsfWebHost
- UBF8T346G9.OneDriveStandaloneSuite
Step-6: Clear the Trash of your computer
Once you have deleted the Microsoft Office files from the “Container” and “Group Container” folder, all you have to do is clear the trash of your Mac computer and then Microsoft Office will be completely removed, and all the files Microsoft Office files will be deleted.
3c. How to Remove Office License Files on a Mac?
To remove Office License Files on your Mac computer, you have to download a license removal tool. The whole process is described in easy steps below.
Step-1: Download the License removal tool
The first step of the process is to download the license removal tool. You can download the license removal tool by clicking on this link.
Step-2: Install the License removal tool
Once you have downloaded the installation file, you to the “Download” folder of your Mac computer and open the “.pkg” file. After opening the installation file, a pop-up window will appear on your screen. Click on the “Continue” button and follow the prompts of the installation wizard.
Step-3: Remove Office License
After you have successfully installed the Office License Removal software, click on the “Install” button, when you’re ready to remove the Office License from your computer. After that, follow the prompt given on the Office License Removal Software and the license of the Microsoft Office in your Mac computer will be removed automatically.
Step-4: Uninstall the Office License Removal software
Once you have finished removing the license of the Microsoft PowerPoint in your computer, simply move the Office License Removal software to Trash and it will be uninstalled automatically.
4. How to Uninstall PowerPoint in Microsoft Office 365?
Unfortunately, there is no way of uninstalling individual apps from the Microsoft 365 suite. However, if you download Microsoft 365 from the Microsoft store, only then you can delete individual apps from the Microsoft 365 suite.
So first, make sure that your version of the Microsoft 365 was downloaded from the Microsoft Store and then follow the steps described below.
Step-1: Go to the “Apps and Features” option
The first step of the process is to go to the “Settings” menu and navigate to the “Apps” section. From the “Apps” section, you will be able to find the “Apps and Features” option.
Step-2: Go to the “Advanced Options” section
The next step of this process is to find the “Microsoft Office Desktop Apps” file from the “Apps and Features” option. After that click on the “Microsoft Office Desktop Apps” file, and then click on the “Advanced Options” button that appears after you click on the “Microsoft Office Desktop Apps” file.
Step-3: Click on the “Uninstall” button
Once you have clicked on the “Advanced options” button, you will be taken to another window. From this window, click on the “Microsoft PowerPoint” file and then click on the “Uninstall” button.
Once you have clicked on the “Uninstall” button, only Microsoft PowerPoint will be uninstalled from your computer without affecting the other apps in the Microsoft 365 suite.
5. How to Reinstall PowerPoint?
There are differences in the steps to install Microsoft PowerPoint for the different versions of Microsoft Office on your computer. In the section below, I will explain how to reinstall Microsoft Office on your computer depending on which version of the software you are trying to install.
5a. How to Reinstall PowerPoint in Microsoft Office 365?
To reinstall PowerPoint in your Microsoft Office 365 you have to reinstall the Microsoft 365 suite altogether. The process of reinstalling Microsoft 365 on your computer is explained in easy steps below.
Step-1: Get a Microsoft Office 365
The first step is to get hold of the Microsoft Office 365 application. Simply click on the link to purchase the application. You can buy it from the Office website as well, however, you will get the same product at a cheaper price using the link above.
Step-2: Enter the product key
You will receive the product key along with the invoice in your email. Make sure you check your email once the purchase is complete in order to receive the product key.
Then, when you will be prompted to enter the product key of your Microsoft Office software, simply enter the product key of the Microsoft Office 365 software and then hit the “Next” button.
Step-3: Open the Installation file
In this step, all you have to do is to go to the “Download” folder on your computer and open the installation file you downloaded from the Microsoft Office website.
This will open a prompt saying, “Do you want to allow this app to make changes to your device?”. When you see the prompt, click on the “Yes” button.
Step-4: Finish Installing Microsoft Office 365
Once you have selected the “Yes” button from the prompt, the installation process will begin automatically.
After the installation process is finished, another prompt will appear on your screen saying “You’re all set! Office is installed now“.
When you see the prompt, click on the close button to finish the installation process.
5b. How to Reinstall PowerPoint in Microsoft Office 2016?
To install the Microsoft Office 2016 version of Microsoft PowerPoint, you have to follow a very similar process used to install Microsoft office 365.
To do this, sign in using the account associated with your Microsoft Office 2016 software on the Microsoft Office website, and then go to the “Service and Subscription” option located at the top of the page.
From the drop-down menu, select the Microsoft PowerPoint product and the installation file will be downloaded to your computer. Every step after that is identical to installing Microsoft Office 365.
So, once you have downloaded the Microsoft PowerPoint file, follow the instructions given in the previous section, and the Microsoft Office 2016 version of PowerPoint will be added to your computer.
5c. How to Reinstall PowerPoint in Microsoft Office 2013?
The process of reinstalling the Microsoft Office 2013 version of Microsoft PowerPoint is identical to reinstalling the Microsoft Office 2016 version of Microsoft PowerPoint. So, sign in to the Microsoft Office website using the Microsoft account associated with your Microsoft Office 2013 and follow the instructions described in the previous section.
5d. How to Reinstall PowerPoint in Microsoft Office 2010?
To install the Microsoft Office 2010 version of Microsoft PowerPoint, you’ll need to install the entire suite of Microsoft PowerPoint 2010 on your computer.
However, Microsoft Office 2010 is not supported anymore, and so you’ll need an installation disk and a product key to finish the process. The detail of this process is described in 5 easy steps below.
Step-1: Insert the Microsoft Office 2010 installation disk
To begin, you have to insert the Microsoft 2010 installation disk into your computer. After you insert the installation disk, the installation wizard should start immediately. If it doesn’t start automatically, double click on the “Disc Drive” which says “SETUP.EXE”
Step-2: Enter the Product key
After you have opened the “SETUP.EXE” installation file, you will be prompted to enter the Product key of the Microsoft Office 2010 software. Simply enter the product key in the input box prompt on your screen and then hit the “Continue” button.
Step-3: Read the Microsoft Software License Terms
After you have entered the product key of your Microsoft Office 2010 software, you will be prompted to read its terms and conditions. After that, checkmark on the “I accept the terms of this agreement” box and hit the “Continue” button
Step-4: finish the installation process
After you hit the “Continue” button, follow the prompt of the installation wizard to finish the installation process of Microsoft Office 2010. After the installation process is complete, click on the “Close” button.
Step-5: Activate Microsoft Office 2010
After you finish installing Microsoft Office 2010, the activation wizard pop-up window will appear on your screen. In the pop-up window, select the “I want to activate the software over the internet” option and then hit the next button.
Follow the Prompts of the Activation wizard and once the activation process completes, you will be able to use the Microsoft Office 2010 version of Microsoft PowerPoint on your computer.
5e. How to Reinstall PowerPoint in Microsoft Office on Mac?
To reinstall Microsoft PowerPoint on your Mac computer, you have installed the Microsoft Office software. Sign in to the Microsoft Office website using the Microsoft account associated with Microsoft Office software, download the installation file and follow the simple process described below.
Step-1: Open the installation file
The first step of the process is to open the .pkg installation file from the “Download” folder of your computer. This will open a pop-up window.
Step-2: Follow the prompts of the installation wizard
After you have opened the installation file, follow the prompts such as agreeing to the terms and conditions, how you want to install the software, freeing up disk space or moving it to another drive, etc.
Step-3: Finish Installing Microsoft Office
In the last step, you will be asked to enter the login password of your Mac computer, then all you have to do is click “Continue” and when the installation process is finished hit the “Close” button and the Microsoft Office software will be installed in your mac computer.
6. Can You Reinstall Microsoft Office Without a Product Key?
You don’t need to enter a product key at the time of the installation process. So, you can reinstall Microsoft Office without a product key. However, you will need to enter the product once you have used the application about 25 times after installation!
So, if you are wondering whether you need a product key for the installation process? The answer is no. You don’t need a product key during the installation process.
Microsoft allows you to open PowerPoint and other applications from its suite about 25 times before you need to enter the product key to continue using it. If you don’t, the application will still continue to operate but with reduced functionalities.
However, if your question is do you need to enter the product key again since you are not installing it for the first time, the answer is most likely yes! Every time you install a Microsoft Office Product, you will need to install a product key or login to your Microsoft Account.
What to do If You Can’t Remember the Product Key?
I know it is hard to remember the product key for a product that you may perhaps have bought a few years ago! (Trust me, I’ve been through that!)
But, a few things that can help you remember the product key are as follows –
- Your product key is a set of 25 alphanumeric characters in a random sequence.
- Check for the CD case or the product package in which you received the Microsoft Office software.
- Check if you received a certificate of authenticity within the box or from the store owner. Perhaps, you may have stored it safely and forgotten about it.
- If you bought your Microsoft Office from an online store (like Amazon), you may have received the key on the invoice in your email.
- If you are using a newer version of Microsoft Office, try logging into your Microsoft Account through any of the Microsoft Office application. For the most recent Microsoft Office applications (Office 2016 and above), your account is your product key.
If you don’t know much about using product keys in Microsoft Office, check out this link from the Microsoft Support page where the support team has answered a lot of valuable FAQs about using product keys.
Likewise, check out this Microsoft Support page if you need help finding your product key.
There are a ton of valuable insights provided on both the above links. I’d highly recommend checking them out even if you don’t fall in either of the two categories of support that you are seeking.
Lastly, if you simply can not locate your product key, and just can’t get the application to work, perhaps it is time to get the latest and the greatest version of PowerPoint i.e. using Microsoft Office 365. Click on the link if you do plan to upgrade.
Credit to drobotdean (on Freepik) for the featured image of this article (further edited)