![Toolbar in Google Slides [Everything You Need to Know!]](https://artofpresentations.com/wp-content/uploads/2021/09/Featured-Image-Toolbar-in-Google-Slides.jpg)
When working with Google Slides to create a presentation, one of the first things that you may need to know is about the toolbar in Google Slides!
The toolbar in a presentation application is usually quite important as it provides access to the tools that you need to use in order to create a presentation.
So, in this article, we shall learn a thing or two about the toolbar in Google Slides. You will get to learn how to access the toolbar in Google Slides, and the key menu items in the toolbar. Plus, we will also learn how to hide the toolbar to get more viewability of the slides!
So, let’s get started!
1. Purpose of a Toolbar in Google Slides?
Google Slides offers access to presentations that can be created, edited, and saved on the cloud.
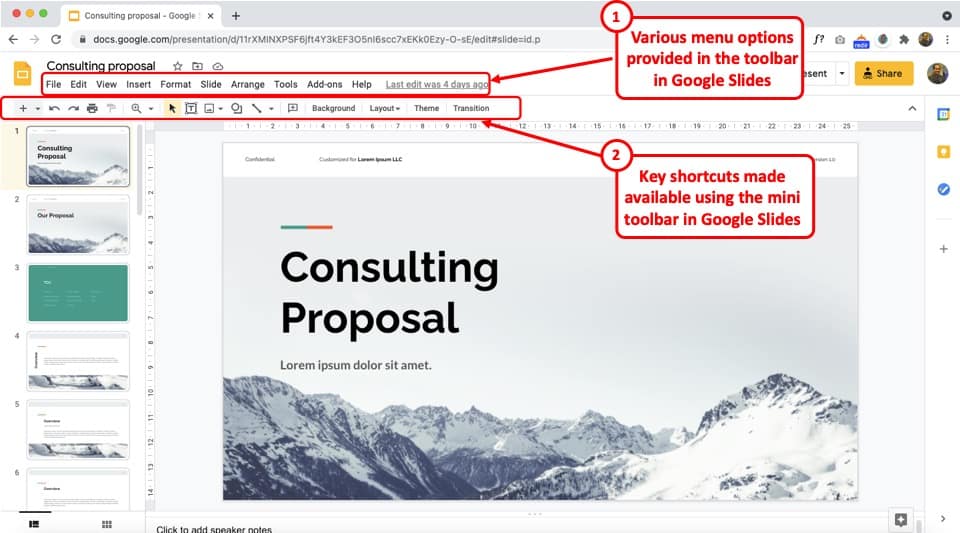
The toolbar found on top of the screen in Google Slides contains multiple “Menus” such as “File”, “Edit”. “View”, “Insert”, “Format”, “Slide”, “Arrange”, etc. Each “Menu” contains a dropdown list of actions or tools. These actions allow you to edit or create a presentation.
The main purpose of the Google Slides toolbar is to offer all the editing options in one place arranged and classed under ten separate “Menu” options so that all the features are organized for easy access and editing by the user.
2. How to Access the Toolbar in Google Slides?
The toolbar in Google Slides is on the top of the screen, right under the title of the presentation.
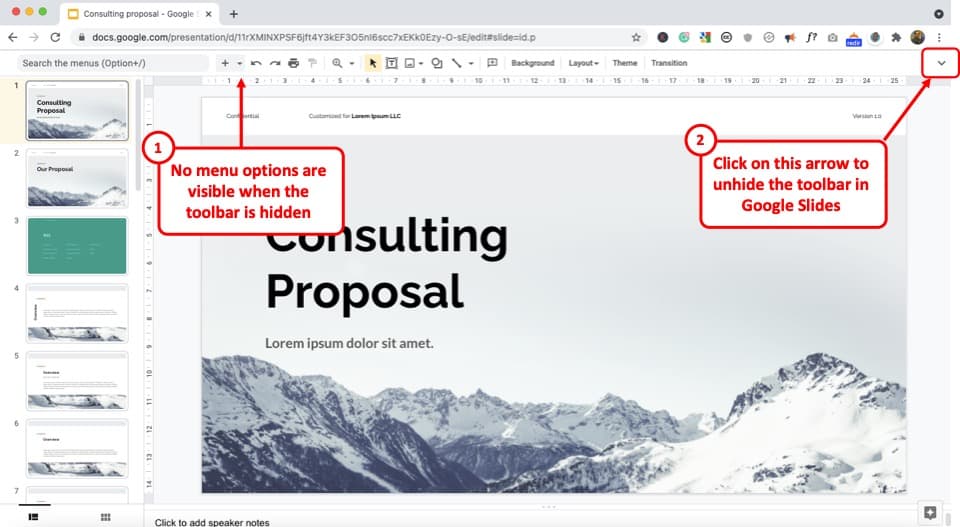
Google Slides allows the users to hide and unhide the toolbar. To access a hidden toolbar, click on the downward-facing arrow or the “Show the menus” button.
If you are using your keyboard, press on the shortcut keys “Ctrl+Shift+F”.
2a. Where is the Toolbar on the iPad?
On the iPad, the Google Slides toolbar is on the top of the screen. The topmost line of the toolbar contains a few common “Menus”.
The next line of the toolbar is separated based on the item inside a slide you want to edit. To access the toolbar for editing text, tap on the “Text box” on a slide. This will reveal the toolbar on the top of the screen.
2b. How to Access the Toolbar on Android?
On an Android device, the Google Slides app has a separate toolbar for each content of a slide. The toolbars are available at the bottom of the screen.
To access the toolbar, you have to follow 2 quick steps.
Step-1: Click on “Edit slide”
In the Google Slides presentation, at first, click on the slide that you want to edit. Then click on the “Edit slide” button. This will lead you to a new screen containing the slide you are editing.
Step-2: Click on the item you want to edit
In the new screen, click on any item on the slide to edit it. Click on the “Text Box” to reveal the text toolbar at the bottom of the screen. For an image toolbar, click on the “Image” in the slide.
3. Menu Options in Toolbar in Google Slides
Currently, there are 10 menu options provided in the toolbar in Google Slides. As mentioned before, these 10 menus further contain more tools and features that are clubbed together based upon their use.
Here are the 10 menu options visible in the toolbar in Google Slides –
- File – The “File” menu contains various options that are associated with the complete presentation file. This menu allows you to open a new file, make a copy of the file, download the file, rename the file, or even print the file.
There are several other options that are provided. If you need to carry out a file related operation, the “File” menu should be the first place to look for the required feature. - Edit – The “Edit” menu, much like the format and the arrange menu, allows you to use some of the editing functions that are used while creating or editing a presentation. This menu allows you to execute features like cut, copy, paste, and much more!
Most of the functions provided in the “Edit” menu are text-related. So, if you are looking for a feature to edit the text, this is the first menu you should be checking. - View – The “View” menu in Google Slides provides options to adjust the way you view your presenation.
So, in this menu, you will get access to features that allow you to adjust the zoom of the slide, view the slides in presentation mode, access the master slides through the theme builder, or even add rulers and guides to your slide. - Insert – The “Insert” menu is great if you want to add any element on the slide. If you want to insert a text box, an audio file, video file, a table, graph or chart, or even an image, you need to use the “Insert” menu.
- Format – Much like the “Edit” menu, the “Format” menu also provides several options that are super helpful when editing or creating a presentation.
This menu provides options that will help you to change the format or the visual appeal of a object in Google Slides. So, you can change the way you text looks by adding bold, or italics format style.
Likewise, you can also change the color and size of the text using the “Text” options in the format menu. Check out our complete guide on how to edit text in Google Slides. - Slide – If you are looking for a feature that is specifically applied to the slide itself and not to an element on a slide, you should be able to find it in the “Slide” menu in Google Slides.
The “Slides” menu allows you to add, duplicate, or delete a slide. You can even choose to change background or apply a transition to a slide in Google Slides thorugh this menu. - Arrange – The “Arrange” menu is useful for accessing the set of features in Google Slides that allow you to organize the elements present on the slide.
For instance, you can group or ungroup objects, arrange their order, or even align and distribute them using this menu. - Tools – The “Tools” menu can easily be confused with something that provides all the various tools within Google Slides.
However, the “Tools” menu actually provides additional tools that are either not available or can’t be clubbed with any other menu.
You can use the explore option (which is super amazing), use the spell-check option, check the links present in the presentation, or even use your voice to type speaker notes!
- Add-ons – As the name suggests, this menu provides access to al the add-ons that you may have installed for your Google Slides application.
Although Google Slides provides you with all the basic tools for creating or editing a presentation, you can also use an add-on to supplement a feature that may be lacking!
Check out our list of top add-ons to have on Google Slides! - Help – Lastly, the “Help” menu provides you with support options. You can easily access some basic training material for Google Slides, search for functions if you aren’t able to locate it, and also provide feedback to Google on ways to improve Google Slides!
In addition to all these menu options, Google Slides also provides a mini toolbar. This mini toolbar essentially adds a shortcut to some of the most commonly used functions from the various menus.
Lastly, it is important to remember that some of these functions can also be accessed by using the right-click option on an object or an element.
4. Can you Customize Toolbar in Google Slides?
The toolbar in Google Slides is pre-set. Thus, currently, you can not customize the toolbar.
Meaning, unlike PowerPoint, you don’t get a quick access toolbar where you can customize and add your own shortcuts.
That said, for ease of access, the toolbar has some changes made in each update of the software. For instance, you can use the search option to find a “Menu” easily without customizing the toolbar.
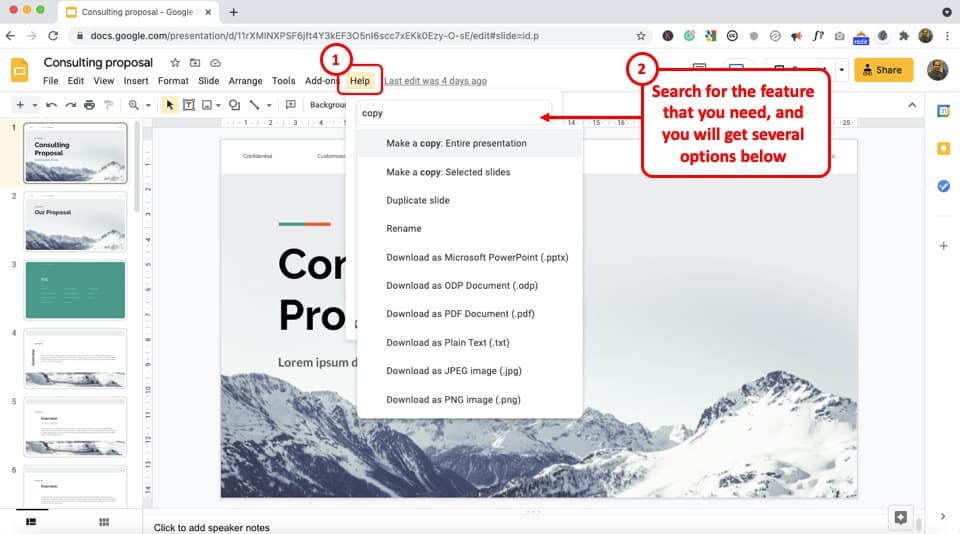
To do that, click on the “Help” menu and then click on “Search the menus” to search for any function within Google Slides. Alternatively, you can also press the “Alt+/” keys on your keyboard (or option+/ on Mac) to type in and search the feature you are looking for.
This greatly eliminates the need to have quick access to a feature or even the need to customize the toolbar.
4. How to Hide Toolbar in Google Slides?

You can hide the toolbar in Google Slides to magnify the slide you are editing.
To hide the toolbar in Google Slides, look for the upward-facing arrow on the top right corner of the screen. Click on the arrow or “Hide the menus” button.
Alternatively, you can press the shortcut keys “Ctrl+Shift+F” on your keyboard to hide the toolbar in Google Slides.
5. How to Unhide Toolbar in Google Slides?
Hiding and unhiding the toolbar in Google Slides requires you to follow the same process.
To unhide the toolbar, click on the downward arrow on the top right corner, which is the “Show the menus” button. Alternatively, you can press the shortcut keys “Ctrl+Shift+F” together on your keyboard and the hidden toolbar will appear on top of your screen.
6. Presenter Toolbar in Google Slides
Google Slides also provides a separate toolbar known as “Presenter Toolbar”. This presenter toolbar is only visible when presenting the slides.
The options provided in this toolbar are limited specifically to the features that may be used when delivering a presentation.
Let’s take a look at how to access this toolbar and use the features in the presenter toolbar in Google Slides –
Step 1 – Enter the “Present” View
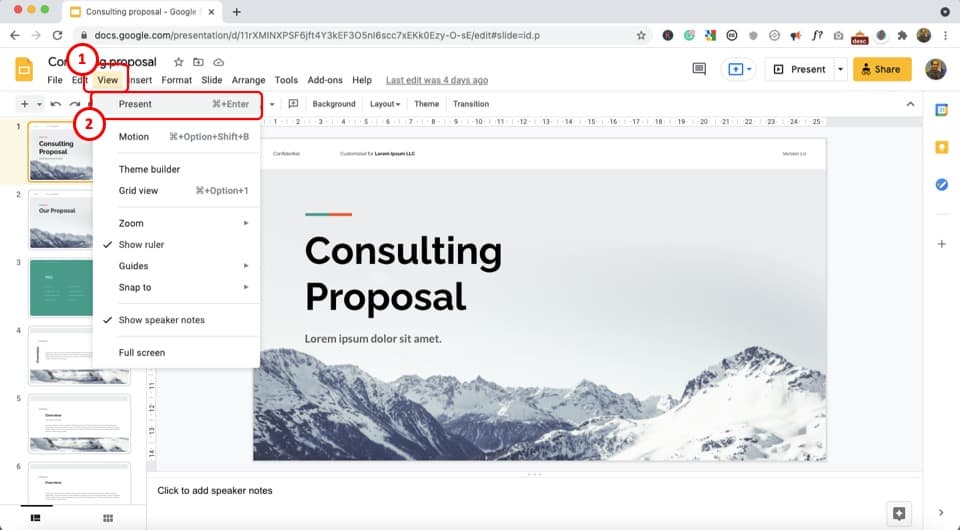
The first step is to enter into the “Present” view. The present view allows you to show just the slides to your audience.
As you may have figured by now, to access the present view, you need to click on the “View” menu. From the dropdown, click on the “Present” option.
You can also use the keyboard shortcut “Ctrl+Enter” (or Cmd+Enter on Mac) to directly enter the “Present” view.
One thing to note is that the present view is not the same as the “Presenter View”. The presenter view in Google Slides creates a separate window each for the viewability of slides and the options to control the slides.
Step 2 – Quickly Access a Different Slide
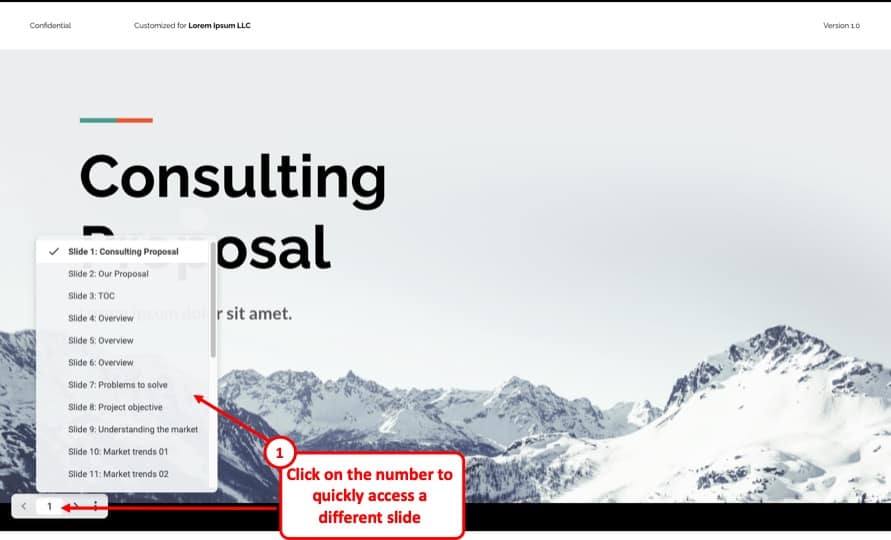
Once you enter the present view, move the cursor of your mouse to the bottom left corner of the screen.
You will notice the presenter toolbar appear. The presenter toolbar will have two key functions on it.
The first feature allows you to quickly access a different slide within your presentation. To use this feature, simply click on the number (which represents the current slide number). Then, from the dropdown, simply choose a different slide that you want to present.
Step 3 – Access More Options in Presenter Toolbar
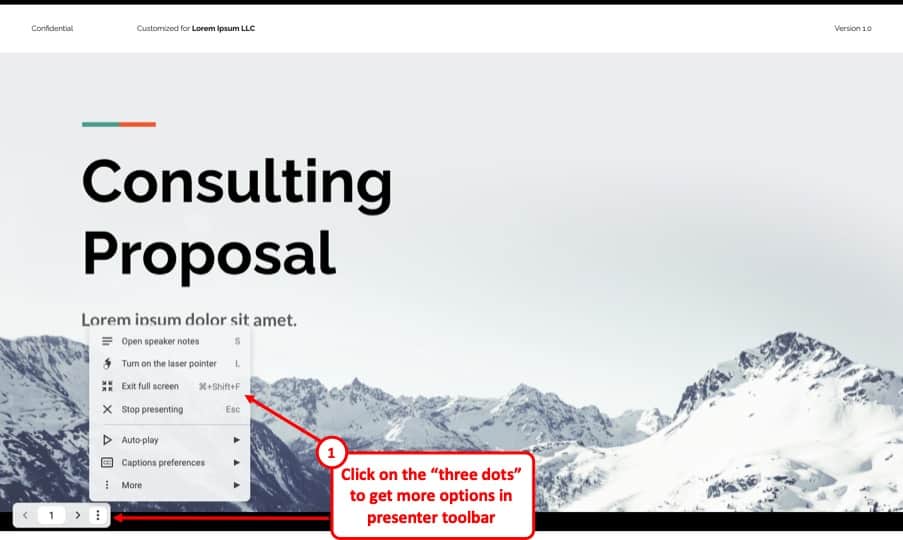
You can also click on the “three dots” on the presenter toolbar.
This will open a menu that shall contain several different helpful options. For instance, you can open the speaker notes, convert your mouse to use it as a laser pointer, or even set up autoplay for Google Slides.
You can also use the “Exit full screen” option to get back to the normal view from the “Present” view.
7. Troubleshooting the Toolbar in Google Slides
Google Slides toolbar can automatically hide or change size when reloading. If you run into problems regarding the toolbar, follow these methods to troubleshoot the toolbar.
7a. Google Slides Toolbar Disappeared – How to get it back?
If the Google Slides toolbar disappeared, it is likely that the toolbar has been automatically hidden.
To retrieve the toolbar, click on the “Show the menus” button which looks like a downward arrow. If you cannot find the arrow on your screen, press the keys “Ctrl+Shift+F” on your keyboard.
This will reveal the Google Slides toolbar.
7b. Google Slides Toolbar is Too Small
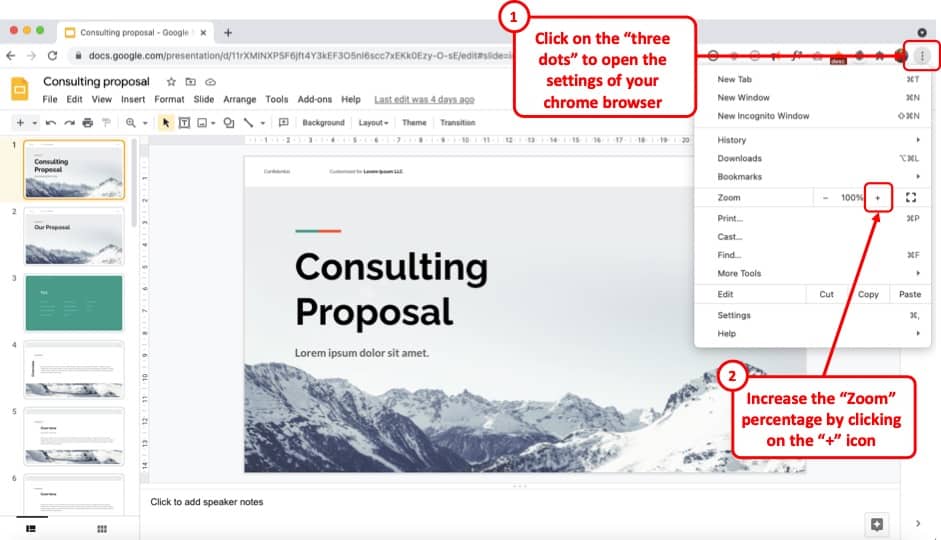
The Google Slides toolbar can look small because of system settings. Look for the “Settings” option which is a three-dot icon on the right of the search bar of your browser.
Click on the “Settings” option, and under it, find the “Zoom” option. Click on the “+” button beside the “Zoom” option to increase the size of the toolbar.
Keep clicking on the “+” button until the toolbars are the preferred size. Alternatively, on your keyboard, simultaneously press on the “Ctrl” key and the “+” key to zoom in on the screen.
This will also adjust the size of the toolbar.
Credit to cookie_studio (on Freepik) for the featured image for this article (further edited)