![Text Box in PowerPoint [Add, Resize, Copy, Delete & More!]](https://artofpresentations.com/wp-content/uploads/2022/09/Featured-Image-Textbox-in-Powerpoint.webp)
The first thing that MOST presentations open with are a title slide that usually has the title of the presentation, the date, or the organization name! But, do you ever wonder how the creator put these in? The answer is using “Text Boxes”!
Although presentations can be completely image-based, however, that is rarely the case. For most presentation creators, you need to have at least some text on your slides!
Using a text box in your PowerPoint presentation allows you to resize the text and make large or small, add color, and other customization options. But, how do you add a text box in PowerPoint?
The simplest way to add a text box to a PowerPoint presentation is to click on the “Insert Tab” on the menu ribbon and click on the “Text Box” option under the “Text” group. After this, simply drag your mouse to create the text box in the slide in the preferred position.
There are so many things you can do with that simple text box. My goal with this article is to share with you everything you need to know while working with a text box in PowerPoint. We shall cover some basics such as how to add a text box, cut, copy and paste them, and some advanced topics such as how to rotate a text box or make them scrollable!
Read on in this article to learn some other tricks using the text box.
1. How to Insert a Text Box in PowerPoint?
A text box in Microsoft PowerPoint is an object that contains texts that can be edited into different font faces, sizes, colors, positions, etc. To insert a text box in Powerpoint, follow the 2 simple steps.
Step-1: Click on the “Insert” tab
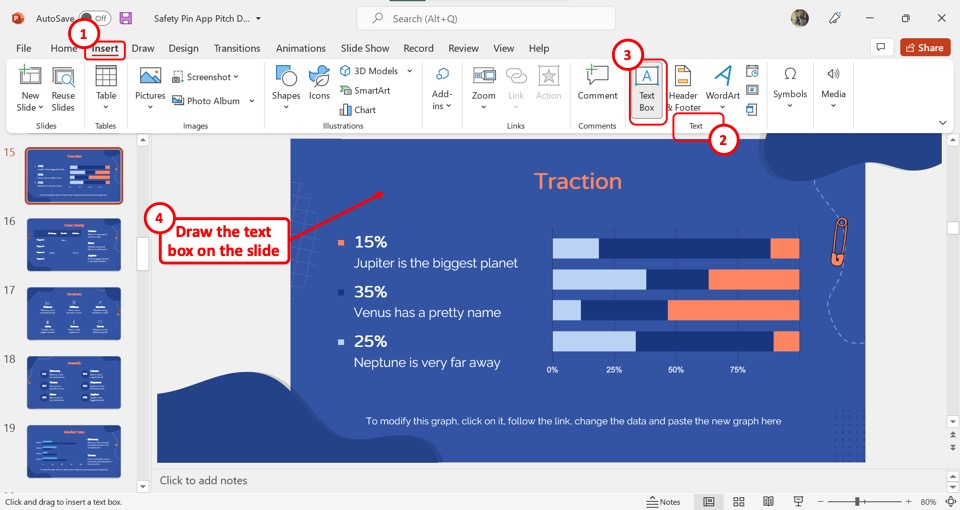
The first step is to open the “Insert” menu. To do so, click on the “Insert” tab in the menu ribbon located at the top of the screen.
Step-2: Click on the “Text Box” option
In the “Insert” menu, click on the “Text Box” option which is the first option in the “Text” section. The “Text Box” icon looks like the letter A. Now all you have to do is draw the text box on the slide. (as shown in Step 1 diagram)
1a. Shortcut to Insert Text Box in PowerPoint
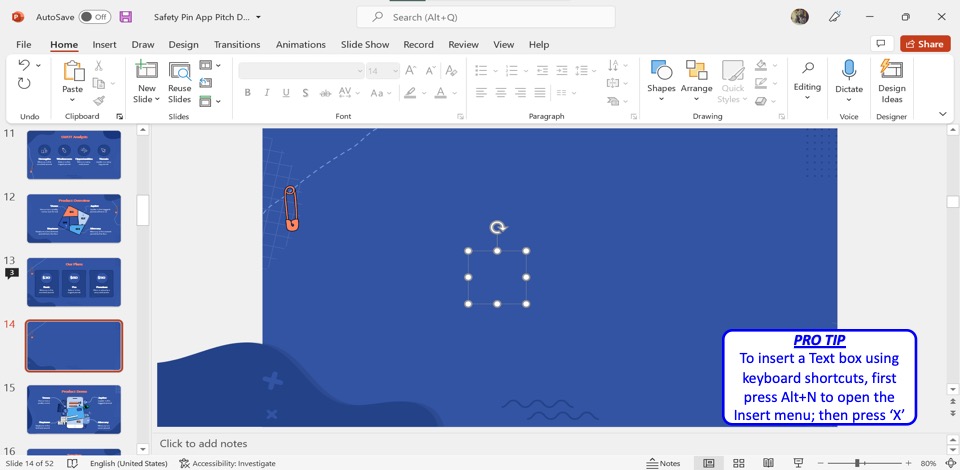
In Microsoft PowerPoint, you can also insert a text box using the keyboard shortcuts. To do so, you have to first press the “Alt+N” keys on your keyboard. This will open the “Insert” menu. Then press the “X” key on your keyboard to insert the text box in the slide.
2. How to Add or Edit Text in a Text Box in PowerPoint?
You can add or edit the text in a text box in a PowerPoint slide with only one click. All you have to do is select the text box and then type in the preferred text.
2a. How to Add Text in a Text Box in PowerPoint?
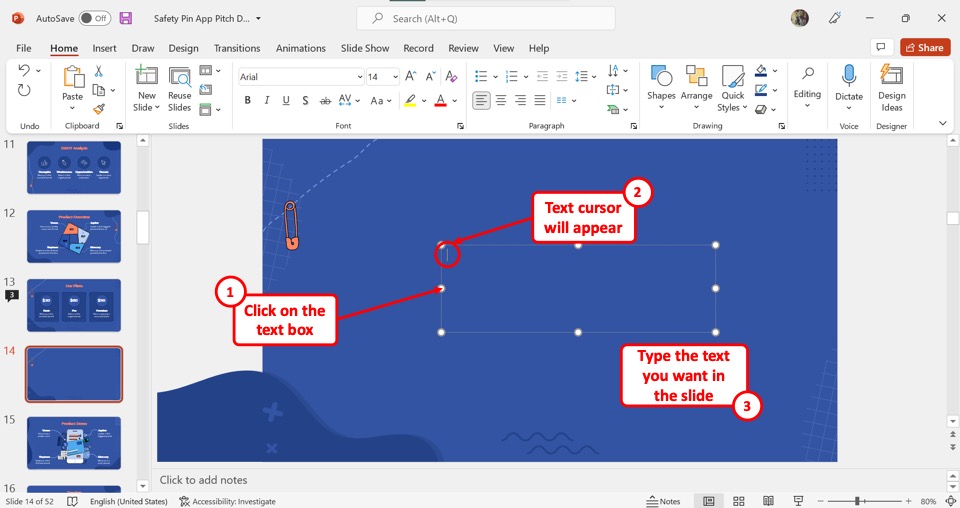
To add text in a textbox, all you have to do is simply click on the text box. A text cursor will appear inside the text box. You can then type in the text in the text box in the PowerPoint slide.
2b. How to Edit Text in a Text Box in PowerPoint?
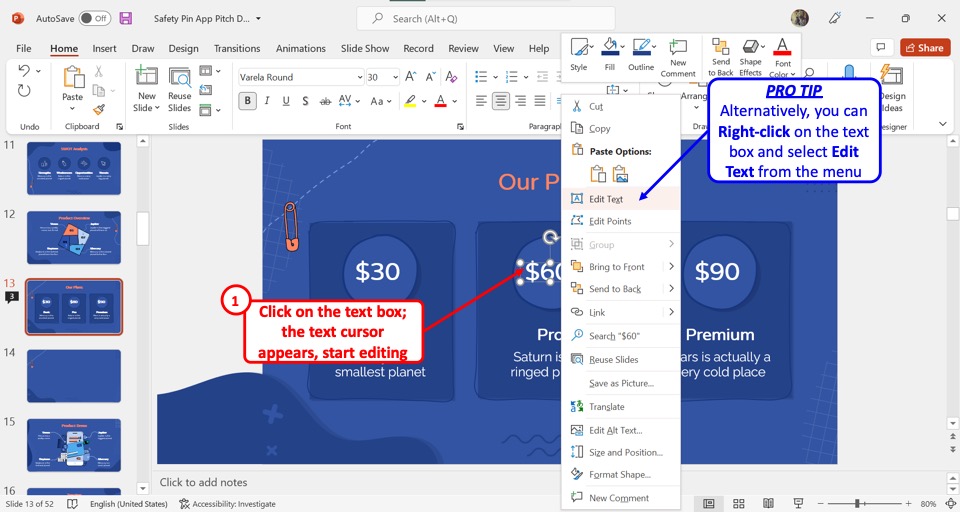
To edit the text in a textbox in PowerPoint, click on the textbox. You will see a text cursor appear inside the textbox. You can now edit the text. Alternatively, you can “Right Click” on the textbox and select the “Edit Text” option from the pop-up menu.
3. How to Resize Text Box in PowerPoint?
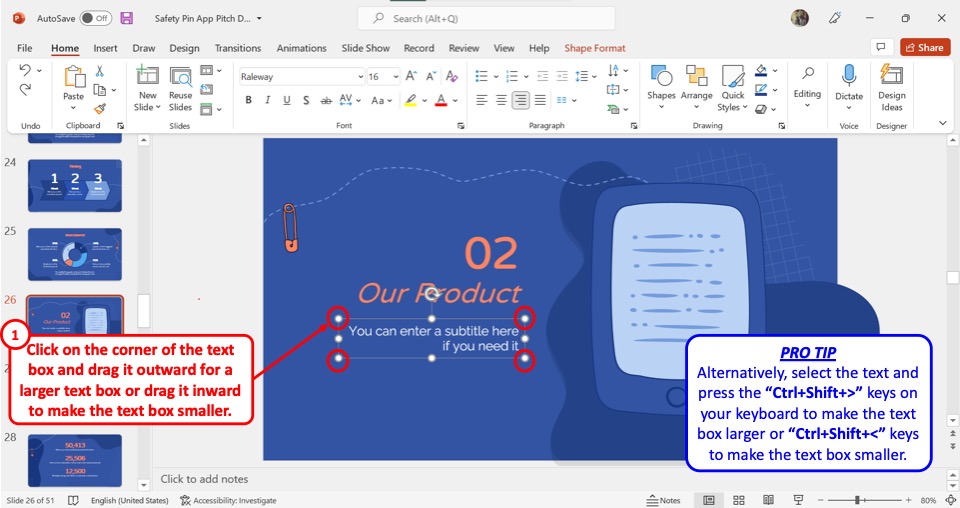
To resize a text box in PowerPoint, all you have to do is click on the corner of the text box and drag it outward for a larger text box or drag it inward to make the text box smaller.
Alternatively, you can select the text inside the text box and press the “Ctrl+Shift+>” keys on your keyboard to make the text box larger. Press the “Ctrl+Shift+<” keys to make the text box smaller.
3a. How to Resize Multiple Text Boxes in PowerPoint?
To resize multiple text boxes in PowerPoint, follow the 3 simple steps.
Step-1: Select multiple text boxes
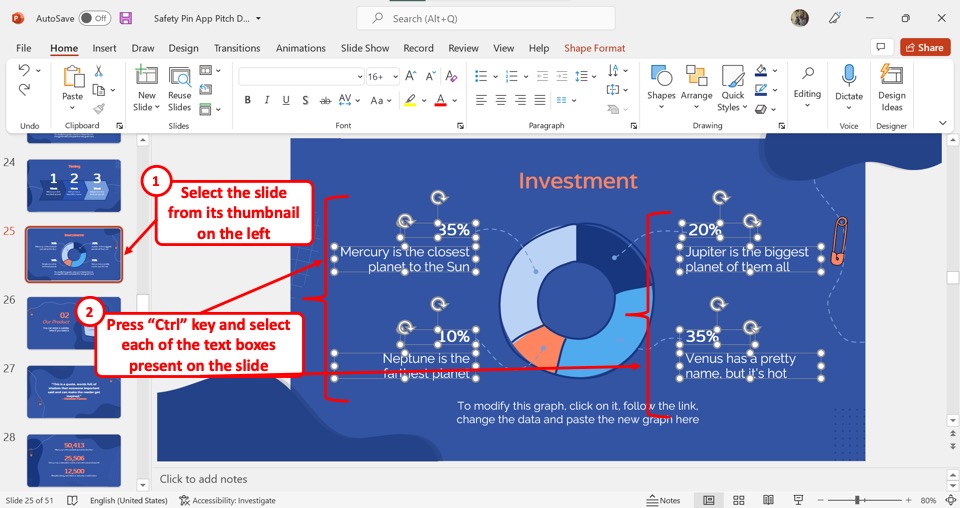
The first step is to select all the text boxes within a slide that you want to resize. To do so, you have to first open the slide from the slide thumbnail panel on the left side of the screen. Then press and hold the “Ctrl” key on your keyboard and click on each of the text boxes.
Step-2: Click on the “Size and Position” option
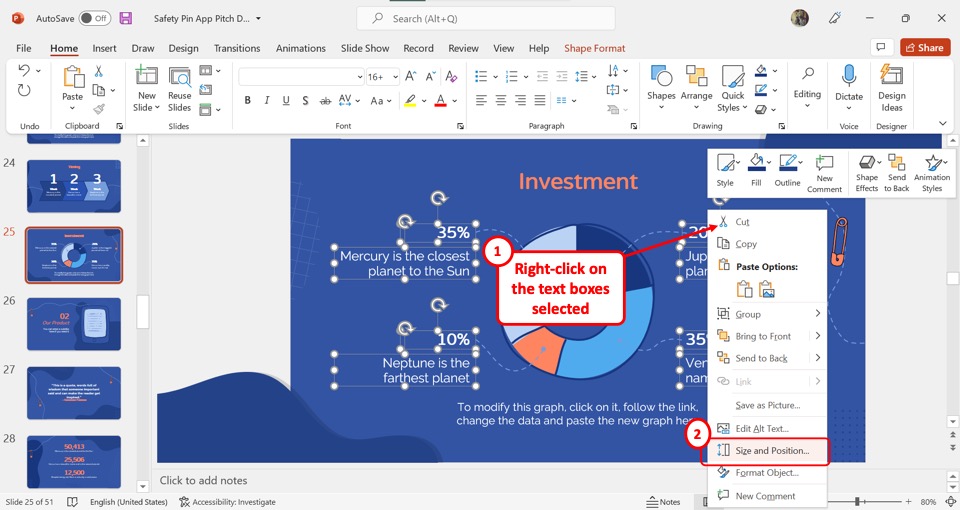
The next step is to “Right Click” on the selected text boxes. Then click on the “Size and Position” option from the right-click menu. This will open the “Format Shape” sidebar on the right side of the screen.
Step-3: Click on the “Height” and “Width” boxes
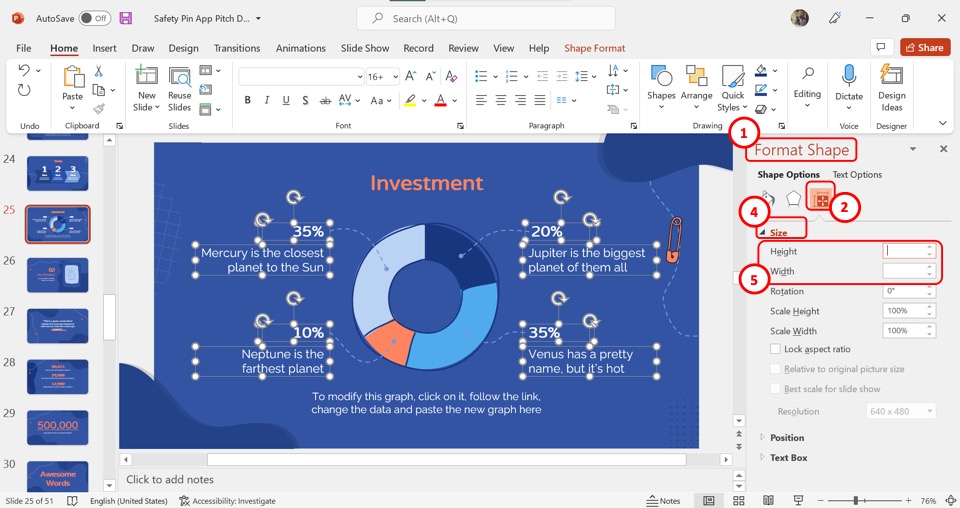
Under the “Size” section in the “Format Shape” sidebar, click on the box next to “Height”. Now you can enter your preferred height for the selected text boxes. Similarly, you can click on the “Width” box to change the width of the text box.
4. How to Create Multiple Text Boxes in PowerPoint?
To create multiple text boxes in PowerPoint, you can click on the “Text Box” option in the “Insert” tab. Alternatively, you can follow the other mentioned methods to quickly create multiple text boxes.
4a. Using the Duplicate Function
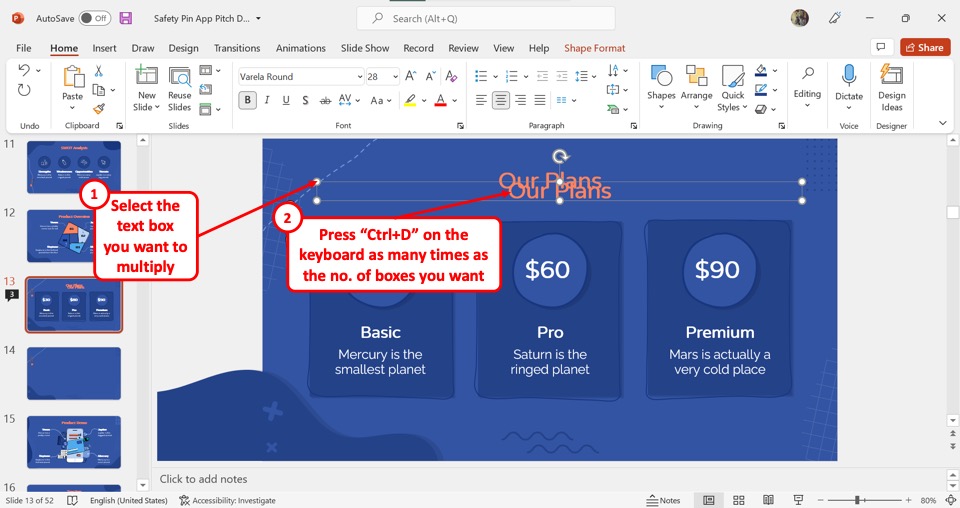
After inserting a text box, you can duplicate it into multiple text boxes. To do so, you have to first click on the text box. Then press the “Ctrl+D” keys on your keyboard to duplicate the text boxes. You can repeatedly press the “Ctrl+D” keys on your keyboard until you have created the preferred number of text boxes.
4b. Using Copy and Paste
To create multiple text boxes using copy and paste, you have to first insert a text box from the “Insert” tab. Then follow the 2 easy steps.
Step-1: Click on the “Copy” option
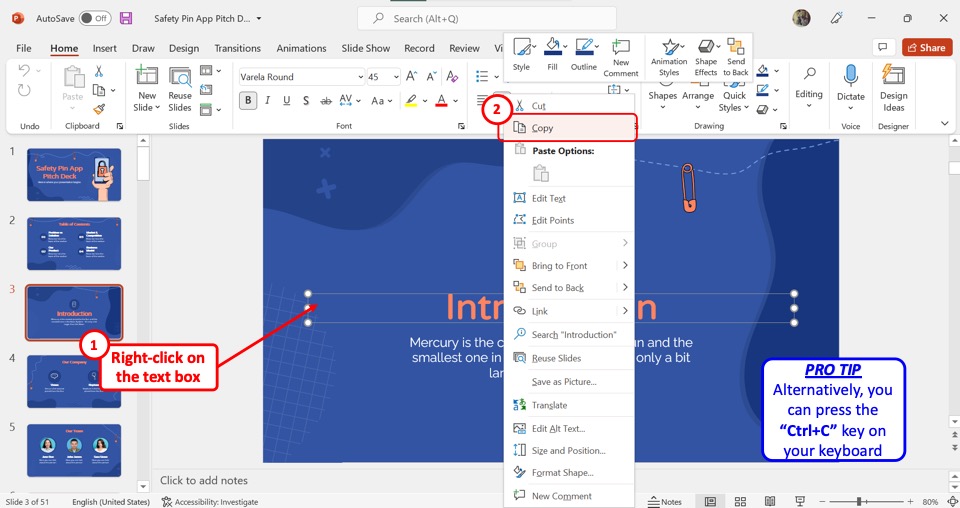
In the open slide where you want to create multiple text boxes, “Right Click” on the text box. Then click on the “Copy” option from the right-click menu. You can alternatively press the “Ctrl+C” keys on your keyboard to copy the text box.
Step-2: Click on “Paste”
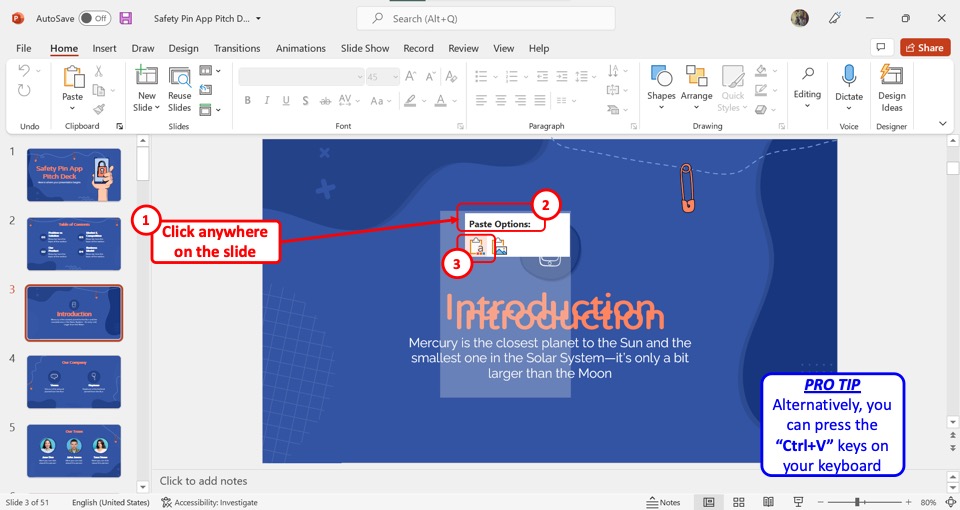
Now all you have to do is “Right Click” anywhere on the slide and select the “Use Destination Theme” option under the “Paste Options”. This will paste the copied text box onto the slide. Alternatively, you can press the “Ctrl+V” keys on your keyboard. Repeat this step until you have created the preferred number of text boxes.
4c. Using Control and Shift Keys
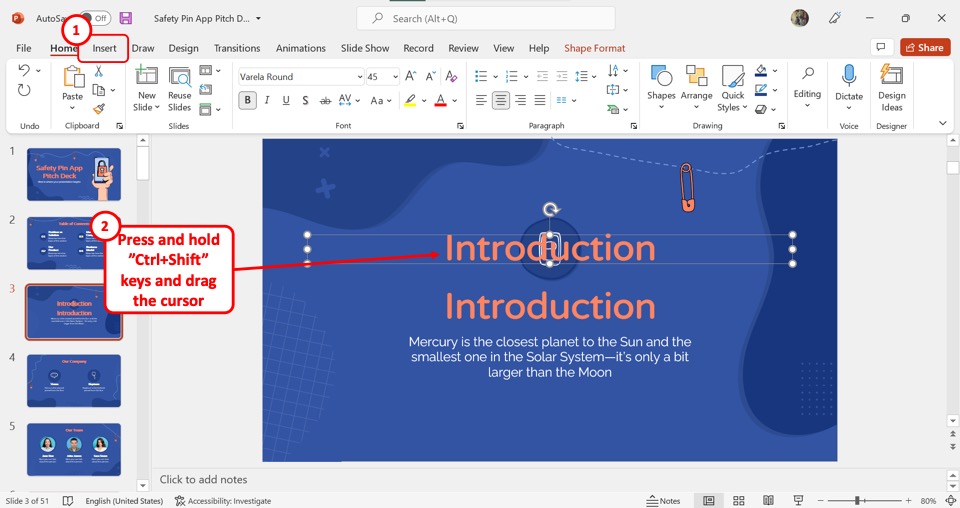
You can also create multiple text boxes quickly using the Control and Shift keys. First, you have to insert a text box from the “Insert” tab. Then press and hold the “Ctrl+Shift” keys on your keyboard and use your cursor to drag the text box. You will see a new duplicate text box appear. You can repeat the process as many times as you need.
5. How to Align and Reposition Text Boxes in PowerPoint?
In Microsoft PowerPoint, you can align the text boxes with the left, right, or center of the slide. Besides, you can also drag the text box to reposition it. I’ve covered the topic of aligning in PowerPoint in more detail in another article. Do make sure to check that out as well.
5a. How to Align Text Boxes in PowerPoint?
To align text boxes in PowerPoint, all you have to do is follow the 2 easy steps.
Step-1: Click on the “Shape Format” tab
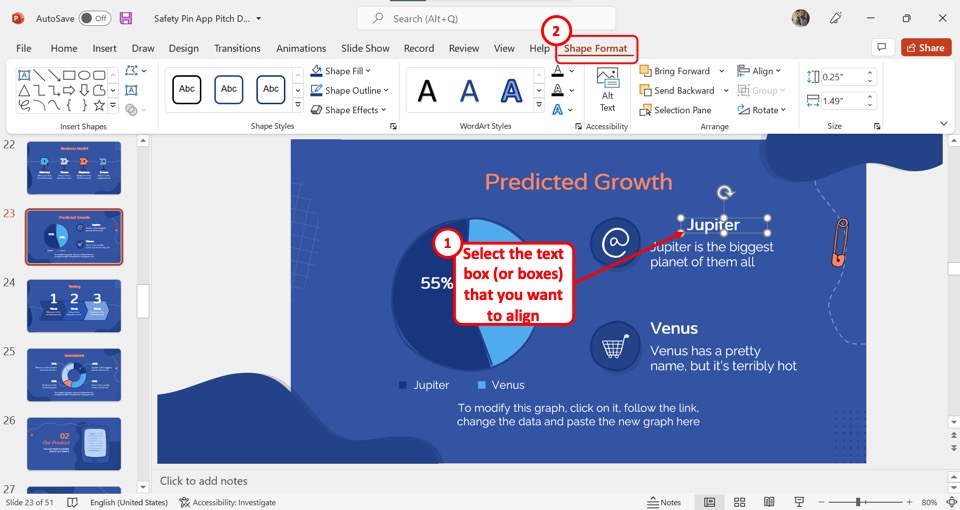
In the open slide, click on the text box or multiple text boxes which you want to align. Then click on the “Shape Format” tab in the menu ribbon located at the top of the screen.
Step-2: Click on the “Align” option
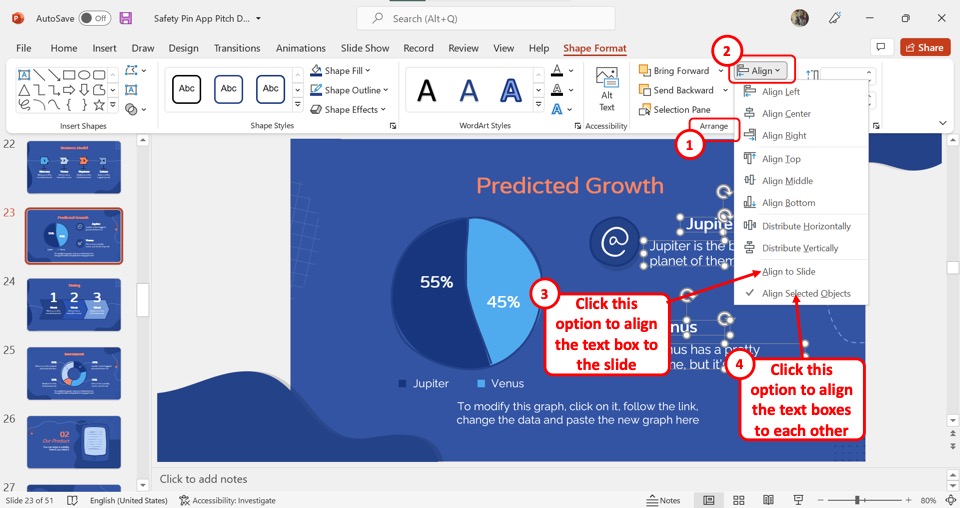
In the “Arrange” section of the “Shape Format” tab, click on the “Align” option. This will open a dropdown menu with various alignment options. Now all you have to do is click on your preferred alignment option.
Click on the “Align to Slide” option to align the text box with the slide. You can also click on the “Align Selected Objects” option to align multiple text boxes to each other.
5b. How to Reposition Text Boxes in PowerPoint?
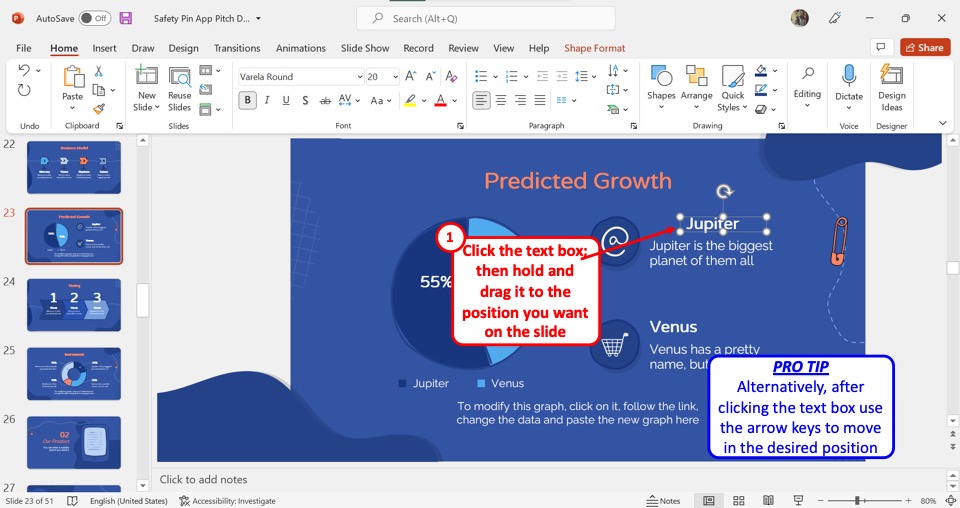
To reposition a text box in PowerPoint, all you have to do is click on the text box and drag it to a different position in the slide. Alternatively, you can press and hold the arrow keys on your keyboard to move the text boxes in a certain direction.
6. How to Add Color to a Text Box in PowerPoint?
By default, the text boxes in Microsoft PowerPoint are transparent. Adding color to a text box can add emphasis to a certain text and grab more attention. To add color to a text box in PowerPoint, follow the 3 quick steps.
Step-1: Click on the “Shape Format” tab

To add color to a text box in PowerPoint, you have to first select the text box. Then click on the “Shape Format” tab which is the last tab in the menu ribbon located at the top of the screen.
Step-2: Click on the “Shape Fill” option
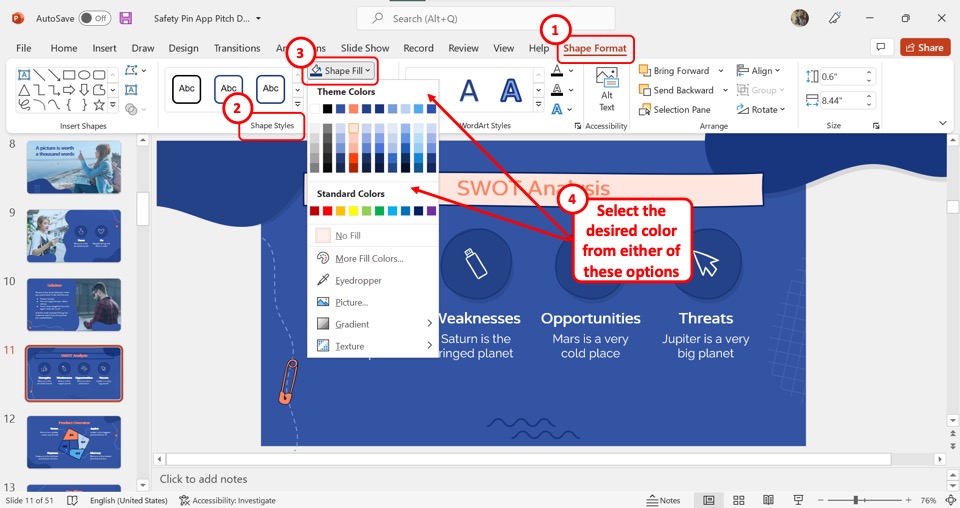
The next step is to click on the “Shape Fill” option from the “Shape Styles” section in the “Shape Format” menu. This will open a dropdown menu. Now all you have to do is click on the preferred color from the “Theme Color” section or the “Standard Colors” section.
Step-3: Click on the “More Fill Colors” option
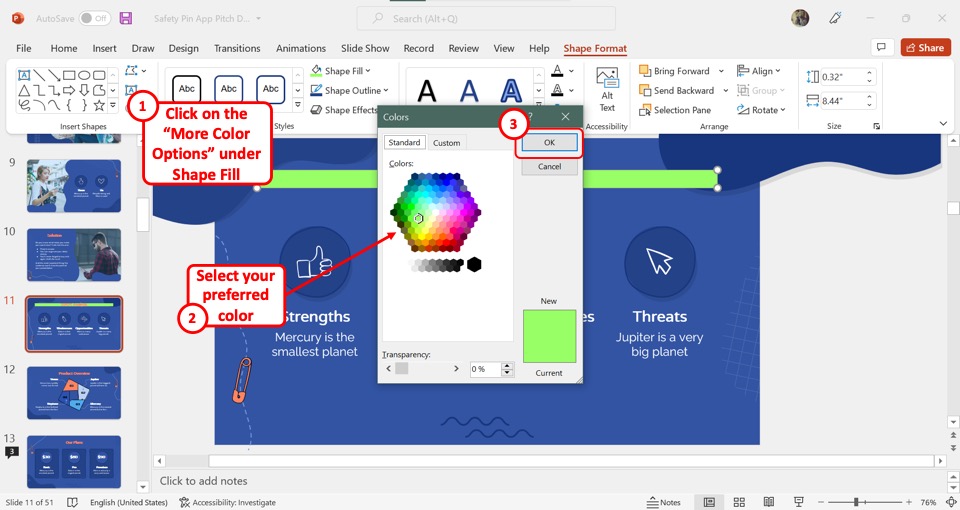
If you cannot find the color you want in neither the “Theme Color” section nor the “Standard Colors” section, you can click on the “More Fill Colors” option. This will open the “Colors” dialog box. Select your preferred color and then click on the “OK” button on the right side of the dialog box.
7. How to Add a Border to a Text Box in PowerPoint?
In PowerPoint, you can easily add a border around the text, and also change the color and weight of the border. To add a border to a text box in PowerPoint, all you have to do is follow the 2 simple steps.
Step-1: Click on the “Shape Format” tab
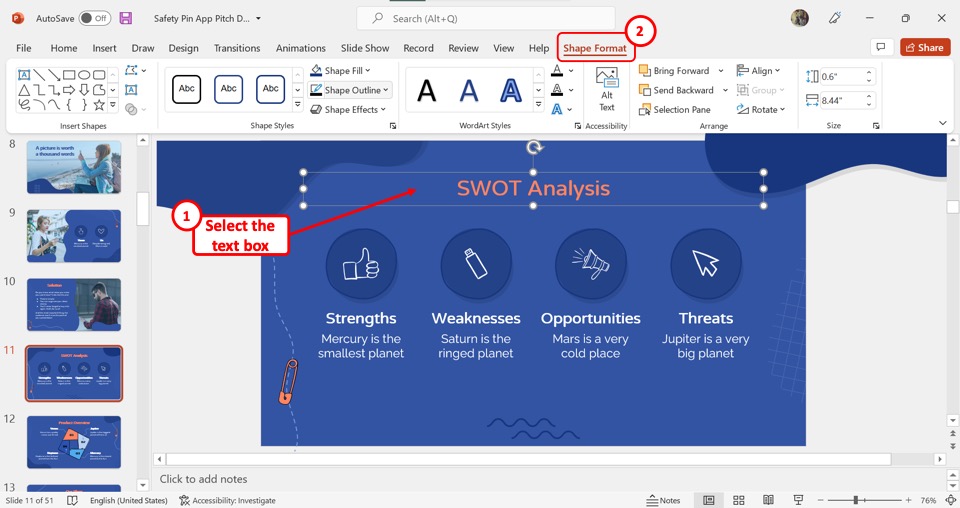
The first step is to open the “Shape Format” menu. To do so, you have to first select the text box. Then click on the “Shape Format” tab in the menu ribbon located at the top of the screen.
Step-2: Click on the “Shape Outline” option
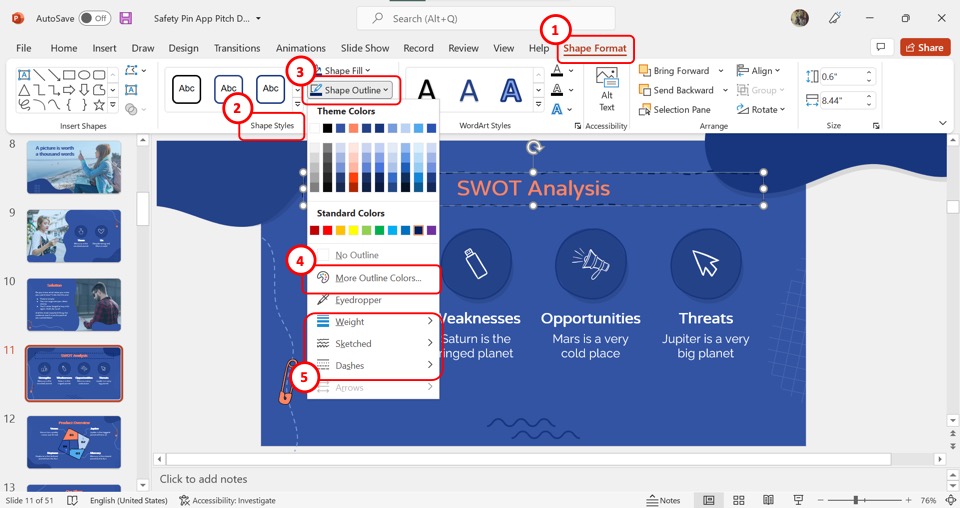
The next step is to click on the “Shape Outline” option from the “Shape Styles” section under the “Shape Format” tab. This will open a dropdown menu. You can click on the “More Outline Colors” option to select a border color. Click on the “Weight” option to select a border weight, and the “Sketched” and “Dashes” options for different border designs.
8. How to Rotate a Text Box?
Microsoft PowerPoint has a “Rotate” feature that allows you to rotate objects such as text, shape, image, etc. I’ve actually written a more in-depth tutorial on how to rotate text in PowerPoint. Make sure you check out that article to learn more!
Meanwhile, here’s a brief way to rotate a text box. You can follow the below-mentioned steps to do so –
Step-1: Click on the “Arrange” button
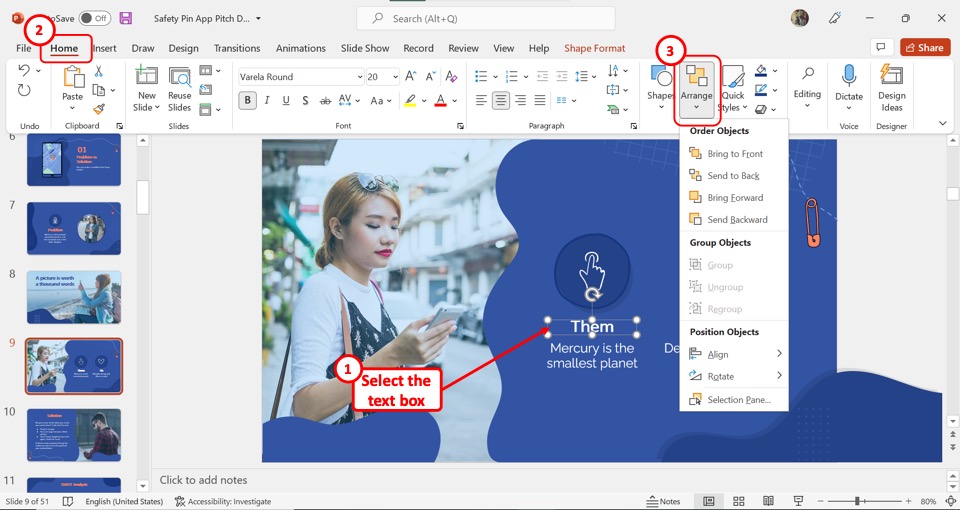
You have to first click on the text box which you want to rotate. Then click on the “Arrange” button which is the second option in the “Drawing” section under the “Home” tab. This will open a dropdown menu.
Step-2: Click on the “Rotate” option
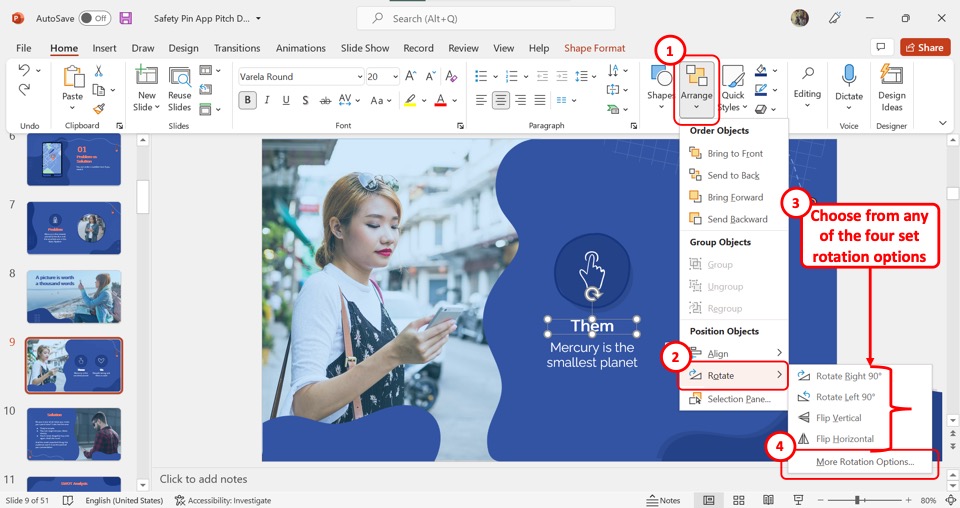
In the dropdown menu under the “Arrange” button, click on the “Rotate” option. This will open another menu. You can choose a rotation angle from the four options: “Rotate Right 90°”, “Rotate Left 90°”, “Flip Vertical”, and “Flip Horizontal”. You can also click on “More Rotation Options” for selecting any angle of rotation.
Step-3: Click on the “Rotation” box
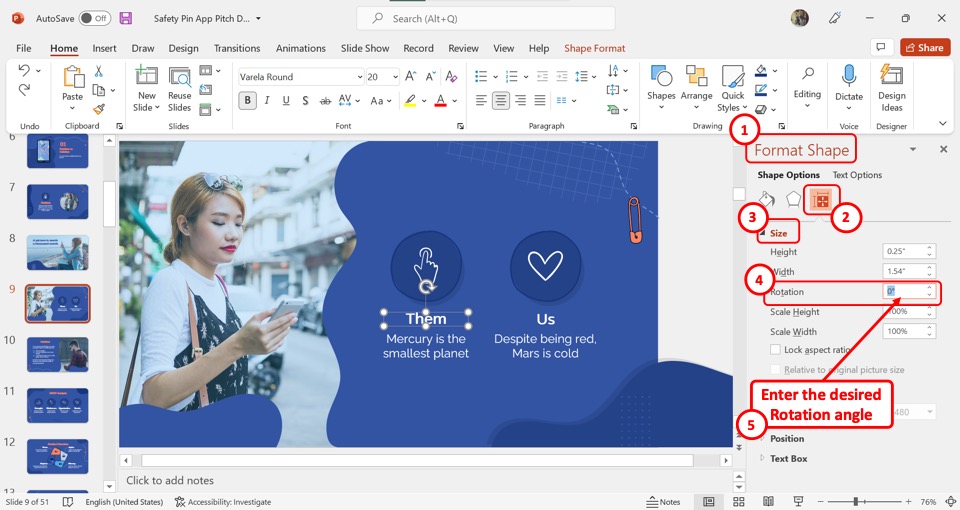
When you click on the “More Rotation Options” option, it will open the “Format Shape” sidebar on the right side of the screen. Under the “Size” section of the sidebar, click on the box next to the “Rotation” option. You can now type in your preferred angle of rotation.
9. How to Delete a Text Box in PowerPoint?
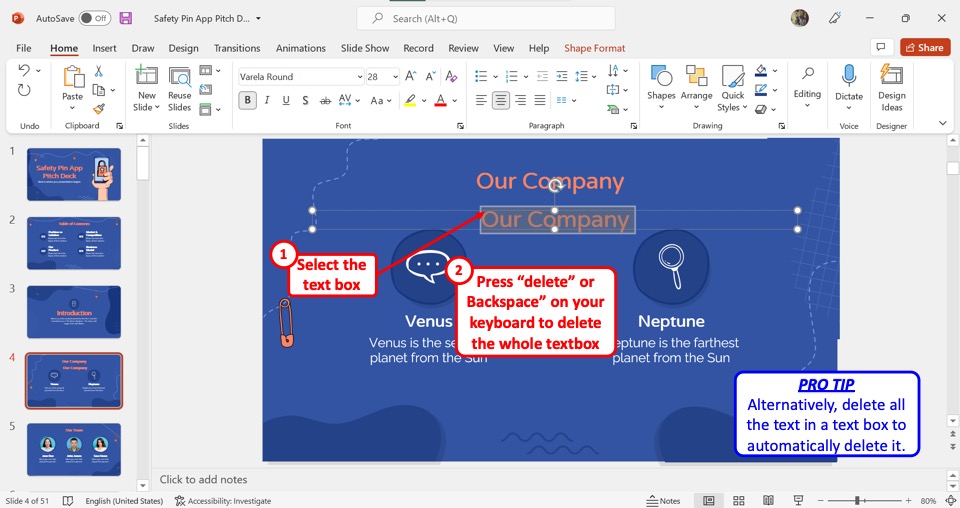
In Microsoft PowerPoint, you can delete a text box only with the help of your keyboard. First, you have to click on the text box you want to delete. Then press the “delete” key or the “backspace” key on your keyboard. This will delete the text box. Alternatively, you can delete all the text in a text box to automatically delete it.
10. How to Create a Scrolling Text Box in PowerPoint?
The scrolling text box in Microsoft PowerPoint gives your presentation a more interesting look. You can make your audience pay more attention to a large chunk of text by adding a scrolling text box in your presentation. All you have to do is follow the 9 simple steps.
Step-1: Click on the “File” tab
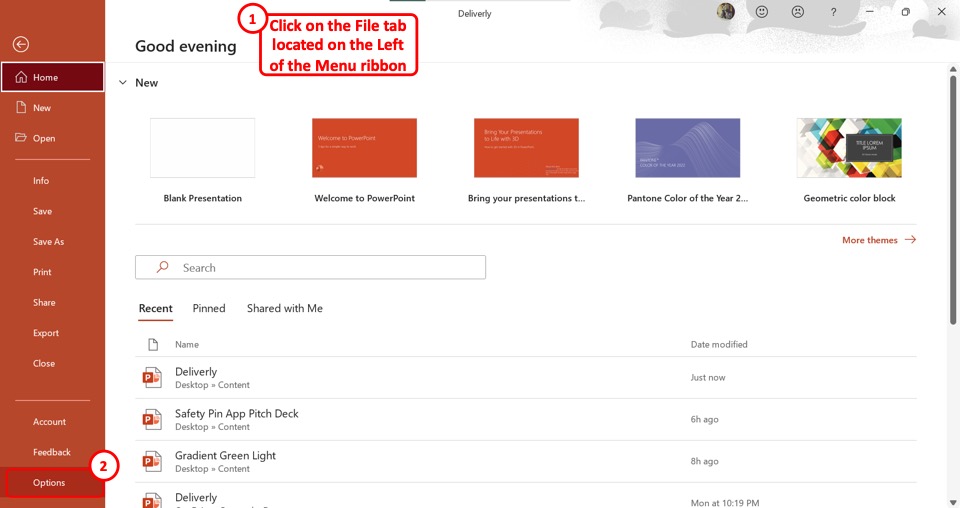
To add a scrolling text box, you have to first enable the “Developer” tab. To do so, click on the “File” tab located on the left corner of the menu ribbon at the top of the screen. In the sidebar on the left side of the screen in the “File” menu, click on the “Options” option at the bottom. This will open a dialog box.
Step-2: Click on the “Customize Ribbon” option
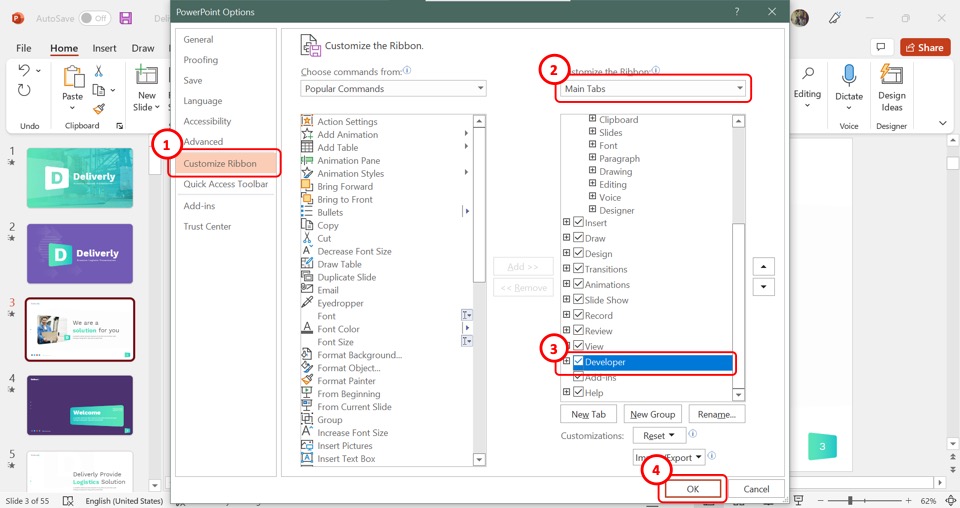
The second step is to click on the “Customize Ribbon” option. It is located in the sidebar on the left side of the “PowerPoint Options” dialog box. This will allow you to customize the tabs in the menu ribbon of the PowerPoint.
Step-3: Click on the “Developer” option
On the right side of the “PowerPoint Options” dialog box, you will see the “Main Tabs” option. Scroll down in the box under the “Main Tabs” option and click on the “Developer” option. A checkmark will appear on the box at the left side of the “Developer” option. (shown in the image above)
Step-4: Click on the “OK” button
To add the “Developer” tab to the PowerPoint menu ribbon, all you have to do now is to click on the “OK” button at the bottom of the “PowerPoint Options” dialog box. (shown in the image above)
Step-5: Click on the “Developer” tab
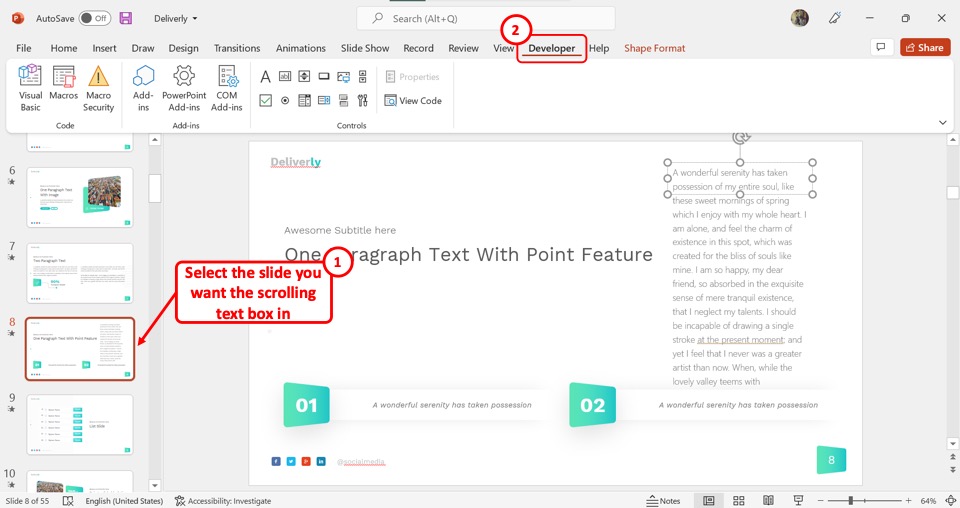
Now you can access the “Developer” tab. From the slide thumbnail pane, click on the slide where you want to add the scrolling text box. Then click on the “Developer” tab in the menu ribbon at the top of the screen.
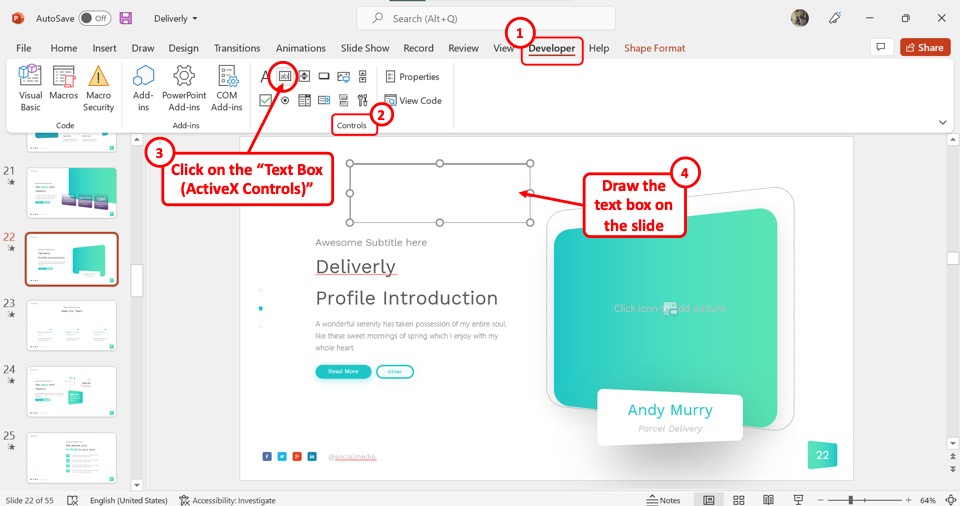
Step-6: Click on the “Text Box (ActiveX Controls)” icon
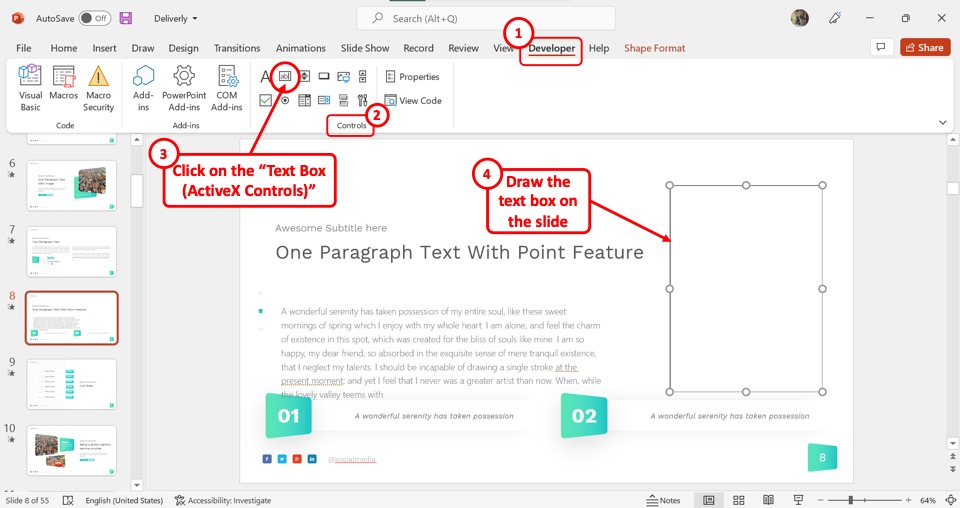
In the “Developer” menu, click on the “Text Box (ActiveX Controls)” icon from the “Controls” section. It is the icon that looks like a rectangle with the letters ab inside it. Then you have to draw the text box on the slide.
Step-7: Click on the “Properties” option
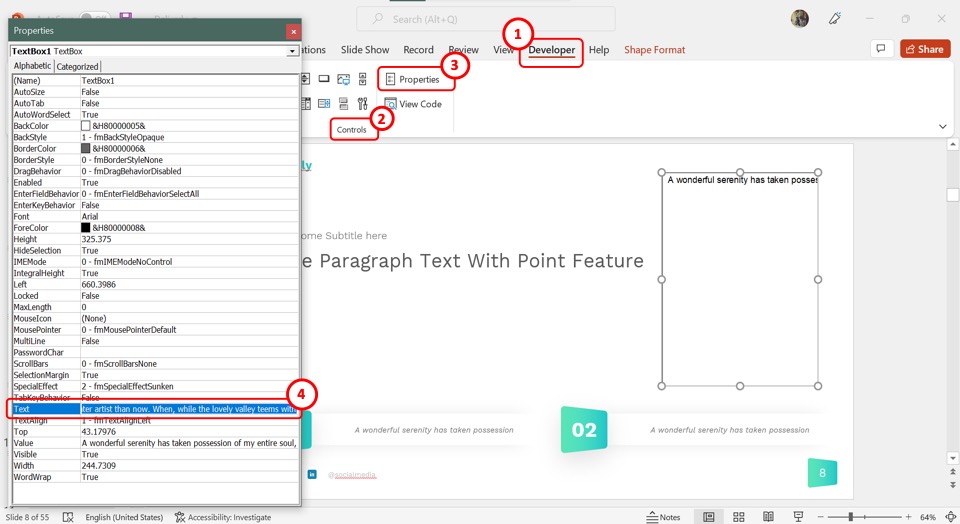
Since the newly inserted text box is a developer tool, you can directly add text to it. To add text, click on the “Properties” option from the “Controls” section of the “Developer” menu. In the “Properties” dialog box, click on the box next to the “Text” option and type in the text for the text box.
Step-8: Click on the “Multiline” option
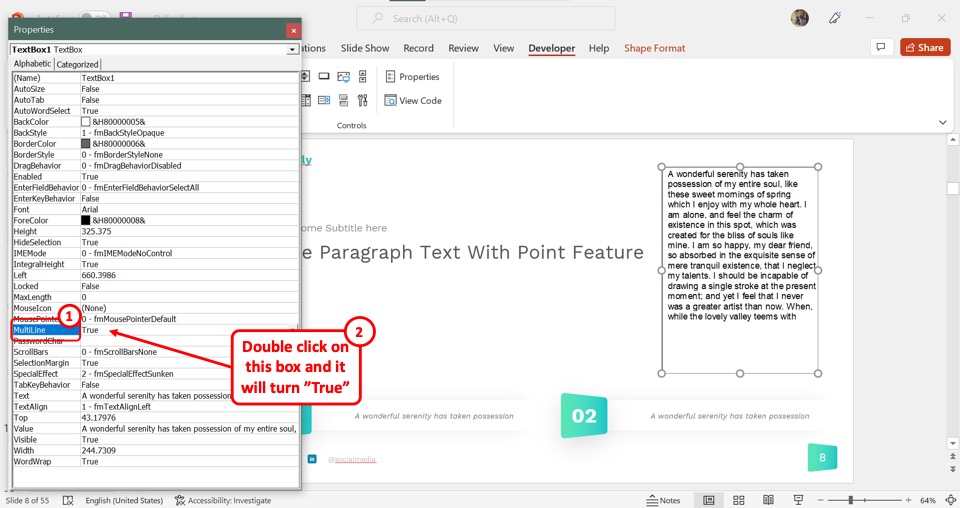
Now you have to “Double Click” on the box next to the “Multiline” option. This will change the “Multiline” value to “True”.
Step-9: Click on the “ScrollBars” option

Finally, click on the “ScrollBars” option and select the “3 – fmScrollBarsBoth” value. Then click on the red “X” on the upper right corner of the “Properties” dialog box. Now all you have to do is start the presentation where you can scroll through the text box.
11. How to Add an Interactive Text Box in PowerPoint?
An interactive text box in PowerPoint allows you to add or remove text in the text box while in the “Slide Show” view during the presentation. To add an interactive text box, follow the 4 quick steps.
Step-1: Click on the “Developer” tab
The first step is to click on the “Developer” tab from the menu ribbon. In the “Developer” menu, click on the “Text Box (ActiveX Control)” icon which looks like a box with the letters ab inside it. Then draw the text box on the slide.
Step-2: Click on the “Properties” option

Now you have to select the text box and then click on the “Properties” option in the “Developer” menu. In the “Properties” dialog box, keep the “Text” option empty so that you can add text later during the presentation.
Step-3: Click on the “BorderStyle” option
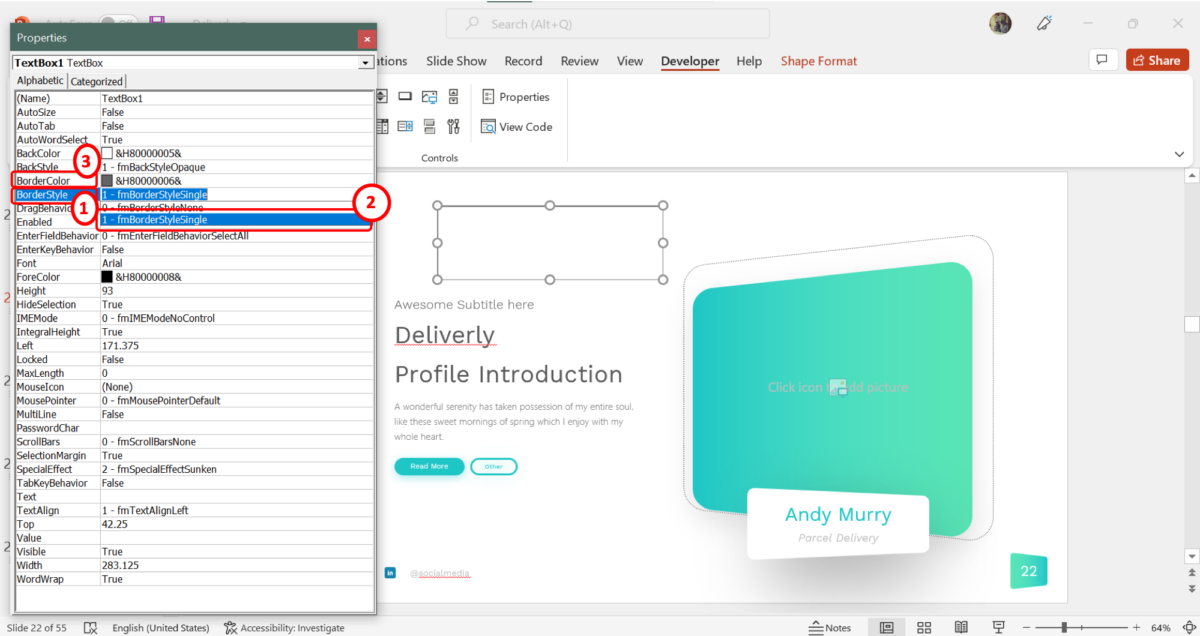
Since the text box will be empty, a dark bold border will help you to identify the text box during the presentation. To add a border, click on the “BorderStyle” box and select the “1-fmBorderStyleSingle” option. To edit the border color, click on the “BorderColor” option and select a dark color from the dropdown menu.
Step-4: Click on the “MultiLine” option

Click on the “Multiline” box and click on the “True” option from the dropdown menu. Finally, you have to click on the red “X” box in the top right corner of the “Properties” dialog box. Now you can add text in the text box during the presentation.
12. Can You Add a Curved Text Box in PowerPoint?
In a Microsoft PowerPoint presentation, you cannot add a curved text box. However, you can add text to a curved shape. All you have to do is follow the 3 easy steps.
Step-1: Click on the “Insert” tab
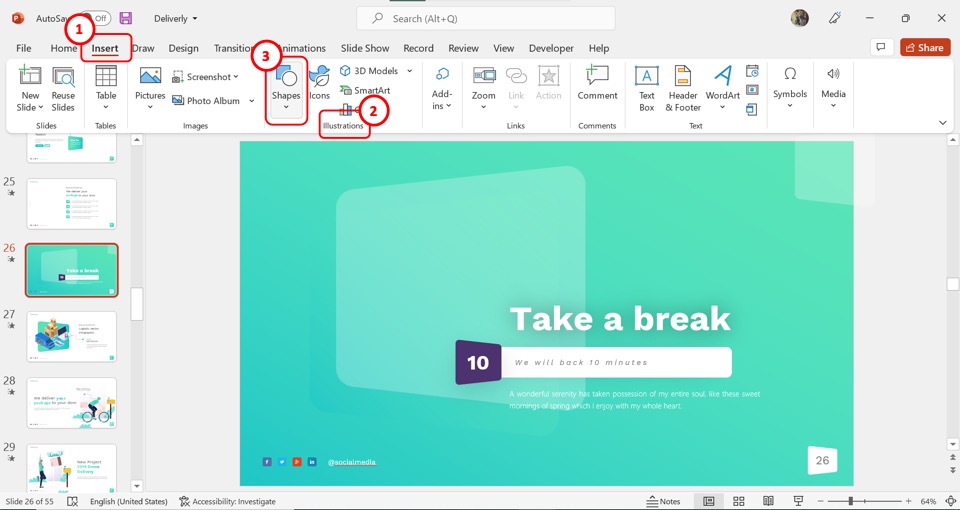
In the menu ribbon at the top of the screen, click on the “Insert” tab. Then click on the “Shapes” option in the “Illustrations” section of the “Insert” menu.
Step-2: Select a curved shape
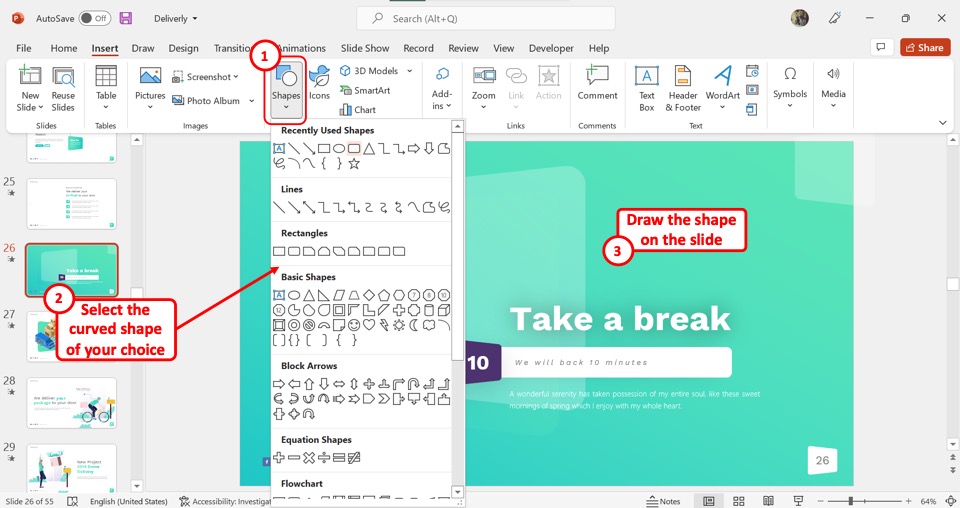
In the dropdown menu under the “Shapes” option, click on your preferred curved shape. Then draw the shape on the slide.
Step-3: Click on “Shape Styles”
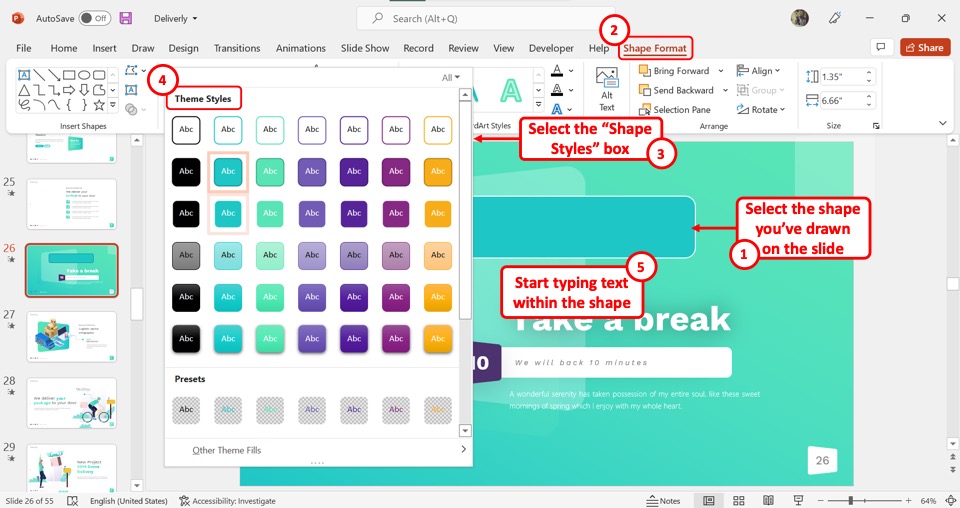
Now all you have to do is select the shape on the slide and click on the “Shape Styles” box in the “Shape Format” menu. Click on your preferred style from the “Theme Styles”. Then type in the text inside the shape.
13. Troubleshooting Text Within a Text Box –
When editing your Microsoft PowerPoint presentation, you may run into problems. You can easily troubleshoot to solve the common issues.
13a. Text Box Keeps Cutting Off Text
In Microsoft PowerPoint, third-party fonts can be cut off from the top or bottom in a text box. Sometimes, they are even cut off in the middle of a word. To fix this problem, follow the 3 easy steps.
Step-1: Click on the “Format Text Effects” option
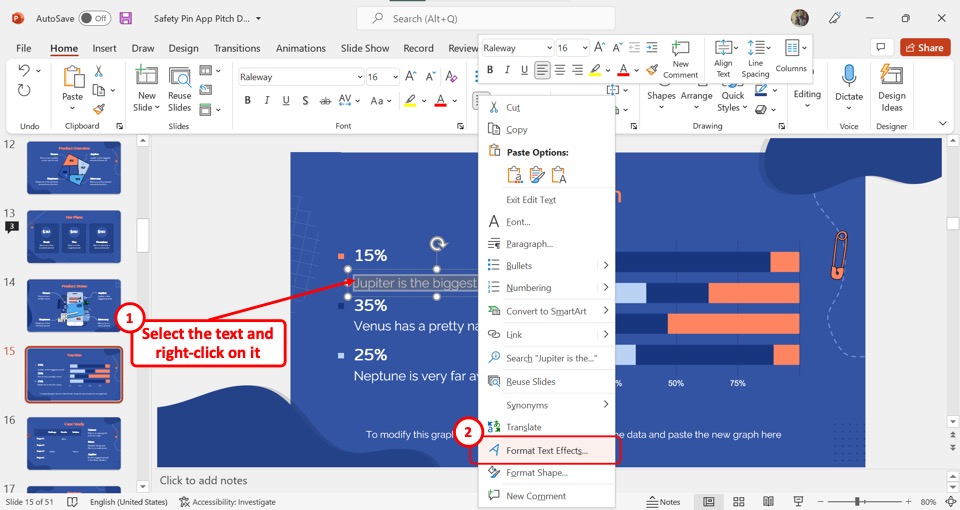
The first step is to select the text within the text box and then “Right Click” on it. In the right-click menu, click on the “Format Text Effects” option. This will open the “Text Options” tab in the “Format Shape” sidebar.
Step-2: Click on the “Textbox” icon
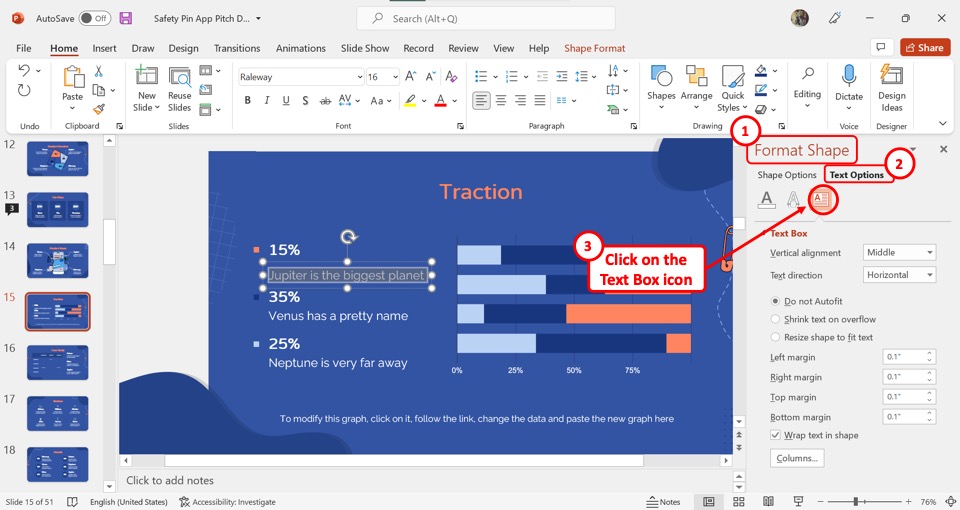
In the “Format Shape” sidebar located on the right side of the screen, click on the “Textbox” icon. The “Textbox” icon is the third icon under the “Text Options” tab and looks like the letter A in a paragraph.
Step-3: Click on the “Wrap text in shape” box
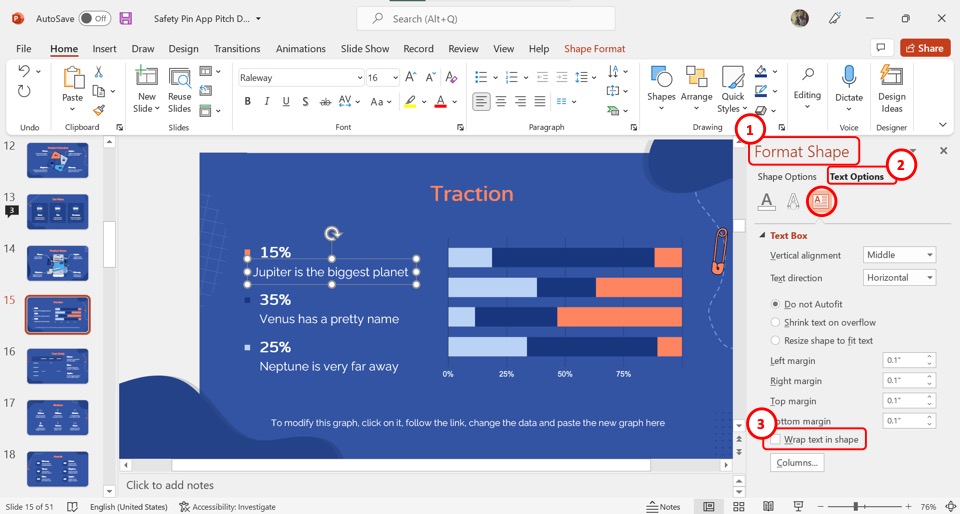
Under the “Text Box” section in the “Format Shape” sidebar, click on the “Wrap text in shape” option at the bottom. You will notice that the checkmark will disappear from the box at the left side of the “Wrap text in shape” option. The text box will not cut off texts now.
13b. Text Box Keep Resizing with Text
Microsoft PowerPoint has a default feature called “Resize shape to fit text”. This feature causes the text box to resize with the size of the text. In many cases, this may be inconvenient. To fix this problem, all you have to do is follow the 3 simple steps.
Step-1: Click on the “Format Shape” option
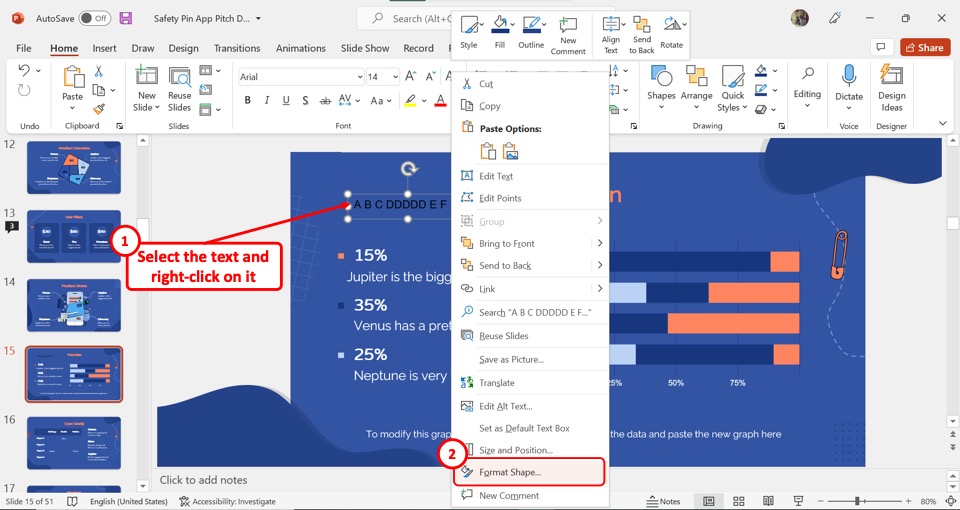
The first step is to select the text box that keeps resizing with the text. Then “Right Click” on it and click on the “Format Shape” option from the right-click menu. This will open a sidebar on the right side of the screen.
Step-2: Click on the “Text Options” tab
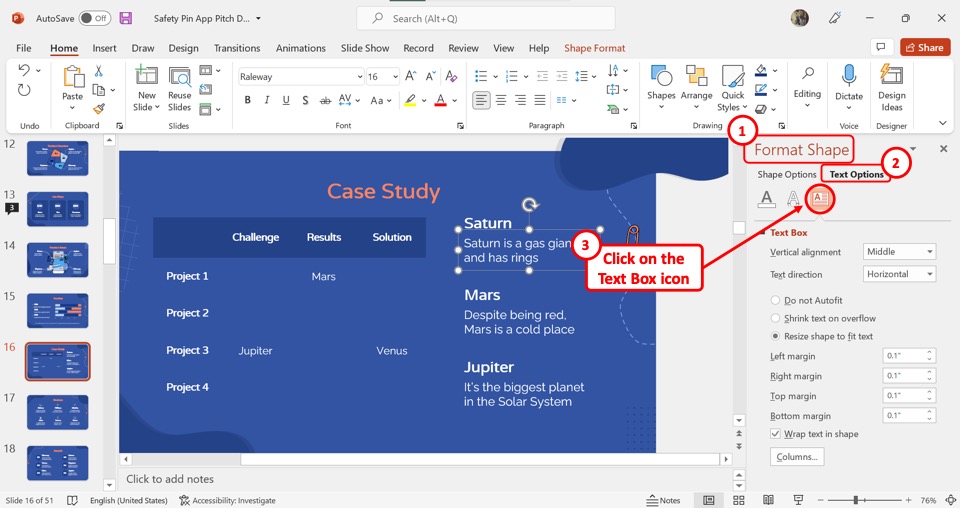
In the “Format Shape” sidebar located on the right side of the screen, click on the “Text Options” tab. Under the “Text Options” tab, click on the “Textbox” option which is the third icon. This will open the “Text Box” section in the “Format Shape” sidebar.
Step-3: Click on the “Do not Autofit” option
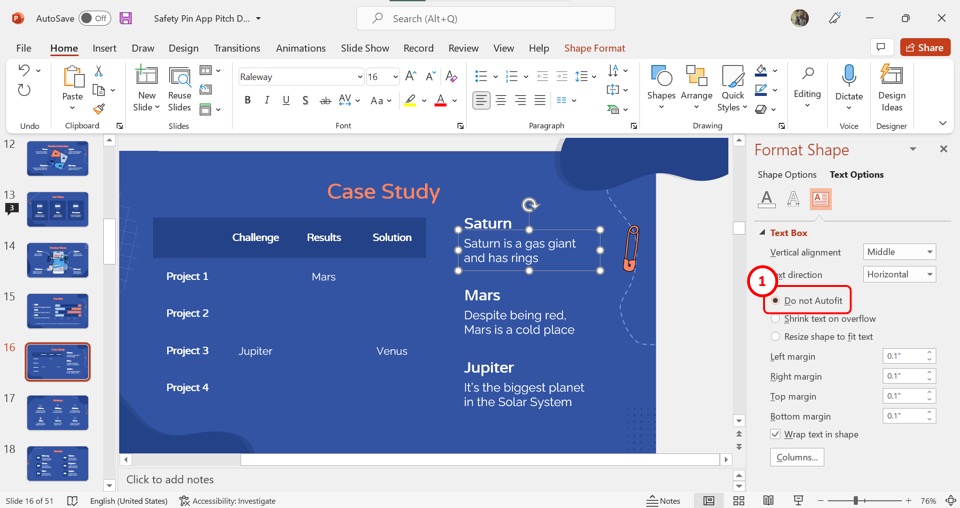
The final step is to click on the “Do not Autofit” option under the “Text Box” section. The circle at the left of the “Do Not Autofit” option will be filled. You can now resize the text and text box independently, and the text box will no longer resize with the texts.
13c. Text Box in PowerPoint is Locked
If the text box in a slide in your PowerPoint presentation is locked, this is because the text box is a part of the master slide rather than the editable slides. You can unlock the text box using the “Slide Master” view. All you have to do is follow the 3 quick steps.
Step-1: Click on the “Slide Master” option
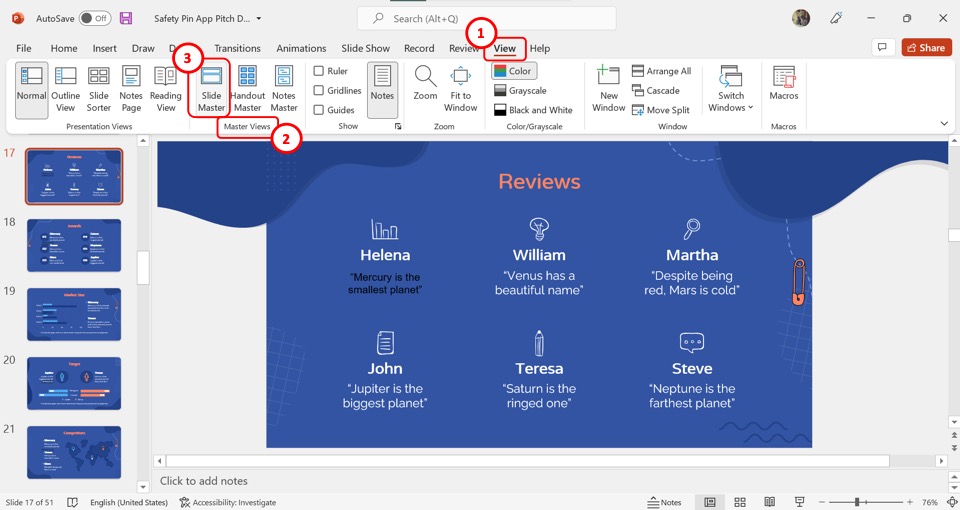
To be able to edit or delete the text box, you have to access the “Slide Master” view. To do so, click on the “View” tab from the menu ribbon which is located at the top of the screen. In the “Master Views” section of the “View” menu, click on the “Slide Master” option. This will open the “Slide Master” view.
Step-2: Click on the text box
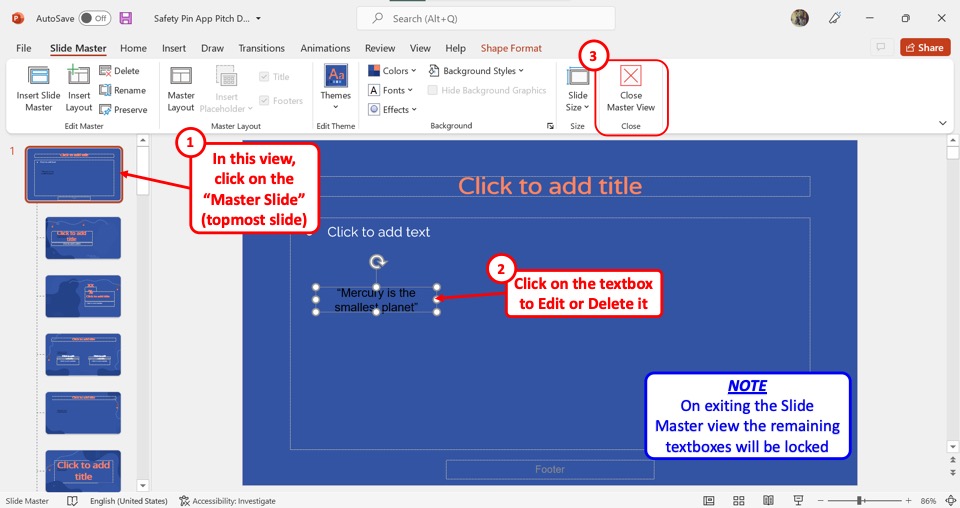
The next step is to edit the text box. In the slide layout panel on the left side of the screen. Click on the topmost slide which is the master slide. In the master slide, you can now click on the text box to edit or delete it. However, once you exit the “Slide Master” view, the text box will be locked again.
Step-3: Click on the “Close Master View” button
Once you have edited or deleted the text box, click on the “Close Master View” option under the “Slide Master” tab. This will return the screen to the “Normal” view where the text box is no longer editable. (as shown in the image above)
Credit to wayhomestudio (on Freepik) for the featured image of this article (further edited).