
When you start using Google Slides, one of the first things that you need to know is how to work with “Text Box” in Google Slides. After all, your presentation is only as good as the message it communicates!
So, in this article, we shall understand everything there is to know about text boxes in Google Slides! We will take a look at how to add a text box, how to customize it such as adding color, border, transparency, etc. We will also understand how to adjust the size, rotation, position of a text box, and much much more!
Basically, if you ever need to know anything about a text box, this is the article you need. So, I suggest that you bookmark this article for future reading.
And now, with any further delay, let’s get started!
1. How to Insert a Text Box in Google Slides?
Google Slides have a “Text box” feature that allows you to add new text in a slide without a text placeholder. To insert a text box in a slide, follow the 2 easy steps.
Step-1: Click on the “Insert” menu
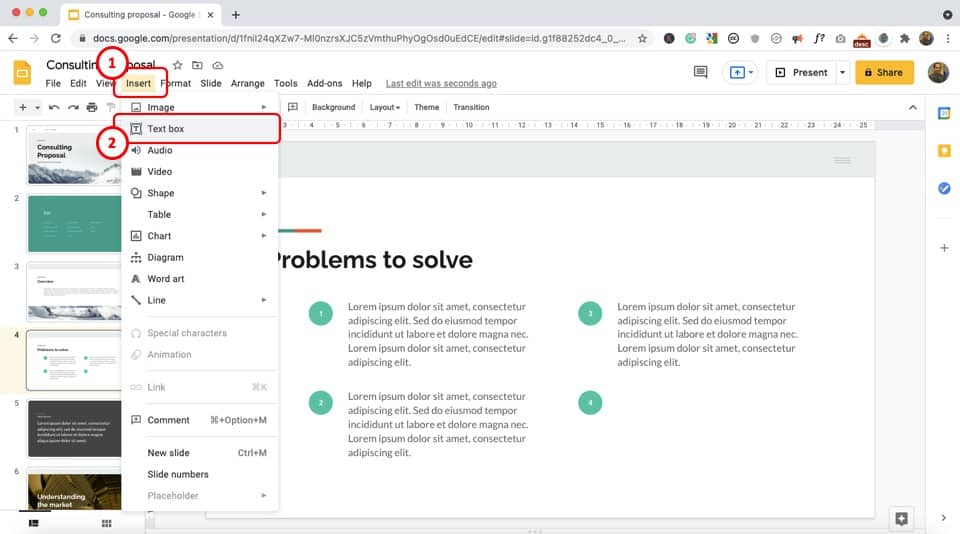
The first step is to open the slide where you want to insert the text box. Then click on the “Insert” button from the menu bar located at the top of the screen. It will open a dropdown menu.
Step-2: Select the “Text box” option
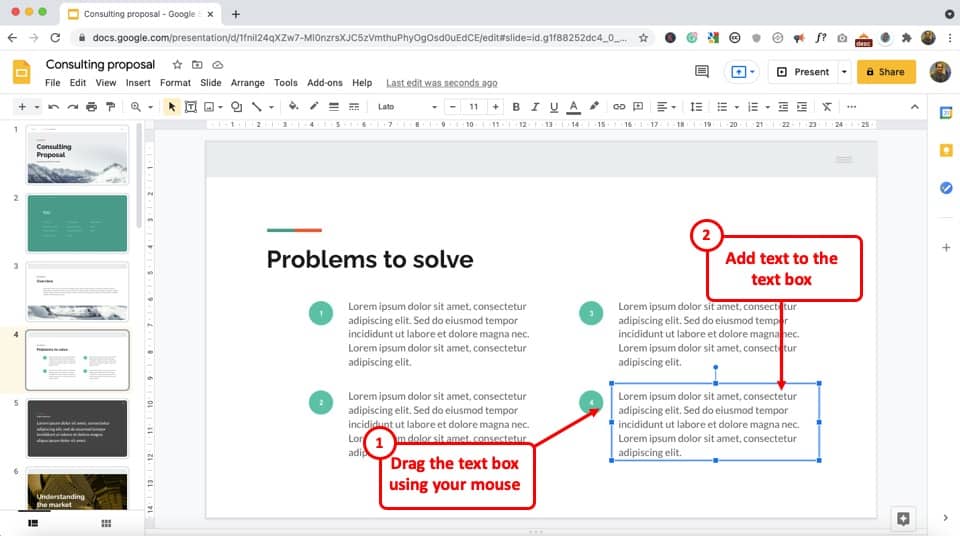
In the dropdown menu, click on the “Text box” option. Now, all you have to do is draw a new empty text box in the opened slide to insert the text box.
1a. Shortcut to Insert a Text Box
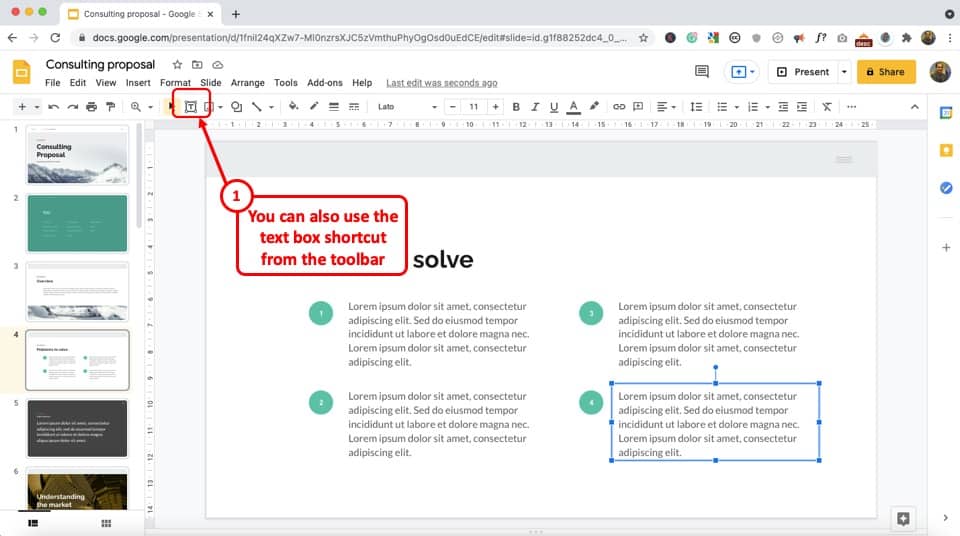
Google Slides also has a quick shortcut method for adding a text box in a slide.
All you have to do is click on the “Text box” icon which looks like the letter ‘T’ located in the toolbar at the top of the screen. Then you can draw the text box inside the selected slide.
2. How to Change the Border of a Text Box in Google Slides?
A border around a text box accentuates the texts in a slide. To add or change the border of a text box, click on the text box. Then click on any of the following icons in the toolbar.
Border color
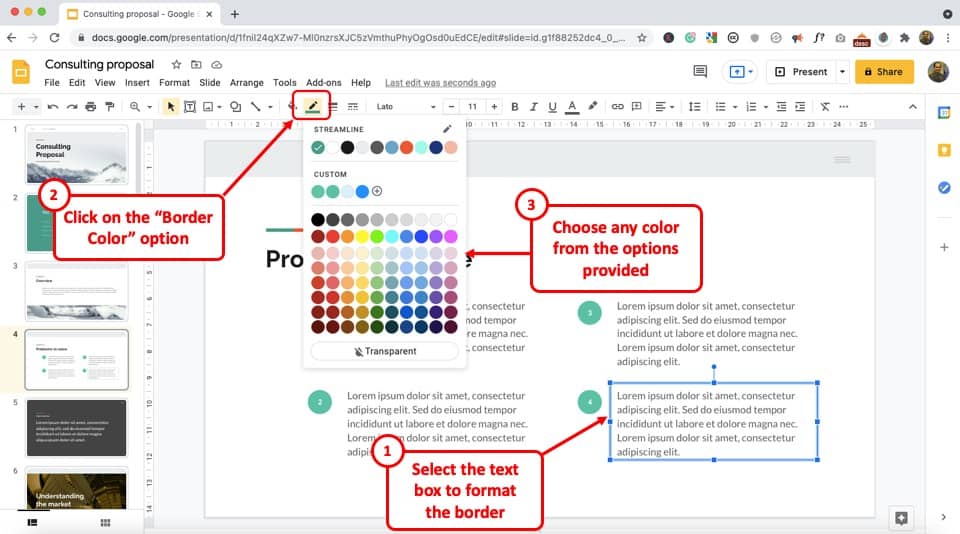
The “Border color” icon looks like a pencil. You can click on the icon to reveal a color palette and click on any color for the text box border. You can also select the “Transparent” option for no border.
Border weight
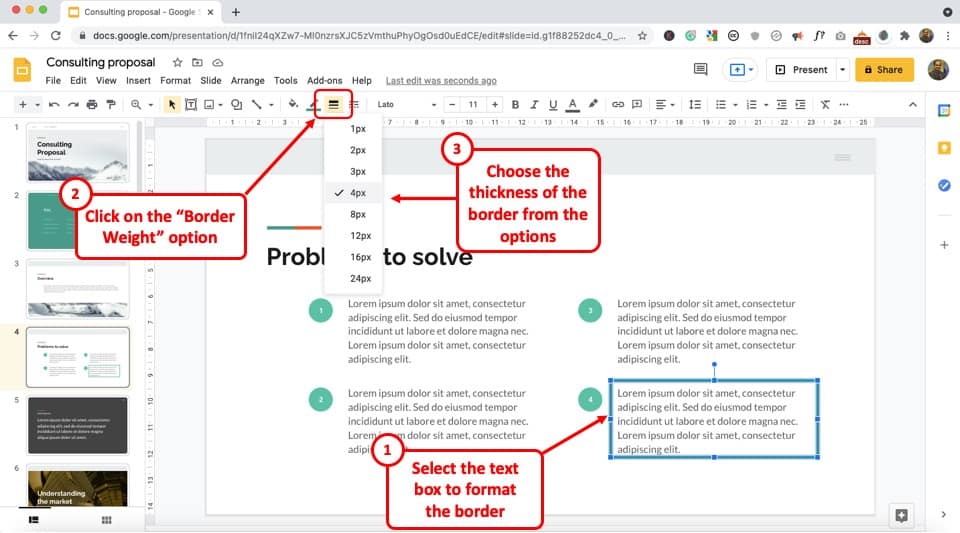
The “Border weight” icon is located in the toolbar and looks like three horizontal lines.
You can click on the “Border weight” icon to reveal a dropdown menu containing different border thickness options from “1px” to “24px”.
Border dash
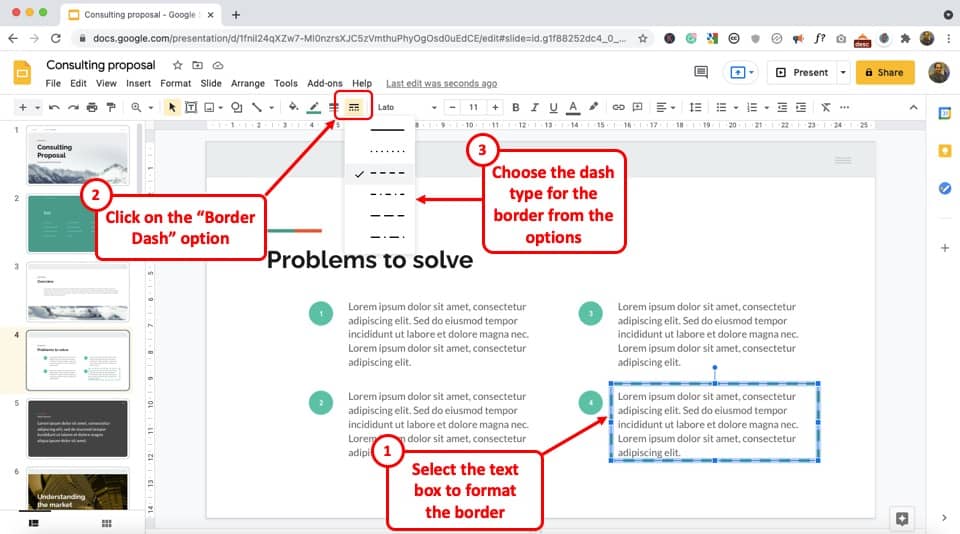
The “Border dash” icon is next to the “Border weight” icon. By clicking on the “Border dash” icon, you can access a dropdown menu containing various border styles.
3. How to Add Background Color to a Text Box in Google Slides?
In Google Slides, you can add background color in a text box to make the text look more aesthetically pleasing.
To add background color to a text box in Google Slides, first, select the text box. Then, click on the “Fill Color” option from the toolbar. From the dropdown, choose a color as per your preference, and click on it. Go with a light background color if you have text that has a dark color.
Here’s a visual explanation of adding a background color to a text box.
Step-1: Click on the “Fill color” icon
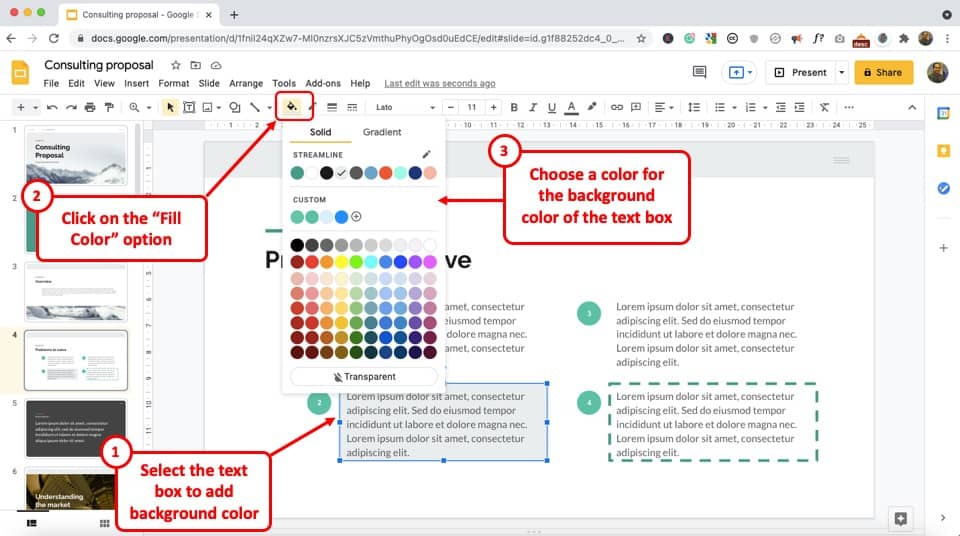
In the opened slide, click on the text box to access editing options in the toolbar. Then click on the “Fill color” icon in the toolbar located at the top of the screen, right under the menu bar.
Pro Tip! By default, Google Slides doesn’t have an eyedropper tool to select a color on the screen. But, check out this hack on how to get the eyedropper tool in Google Slides!
Step-2: Select your preferred color
In the “Fill color” menu, click on your preferred color for the text box background. You can also click on the “+” icon under the “Custom” option to select a color not shown in the primary menu.
Besides, you can click on the “Gradient” option to select a color gradient background for the text box.
3b. How to Remove Background Color from Text Box in Google Slides?
You can also just as easily remove the background color from a text box.
To remove the background color from the text box in Google Slides, select the text box. Then, click on the “Fill Color” option. From the dropdown, click on the “Transparent” option at the bottom. This will make the text box background transparent and remove the background color.

Some people may choose to click on the “White” color from the dropdown. This might work too as long as you have a white background of the slide.
If you have a colored slide background, the white color background of the text box will stand out and not look good.
4. How to Add Columns within a Text Box in Google Slides?
Currently, there is no direct way to split the text into columns in a text box in Google Slides as it does provide any feature that allows you to do so.
However, you can create a visual effect of text split into two columns in Google Slides. To create columns, you have to insert separate text boxes and arrange them as columns.
Here’s how to do it –
Step-1: Copy the text box
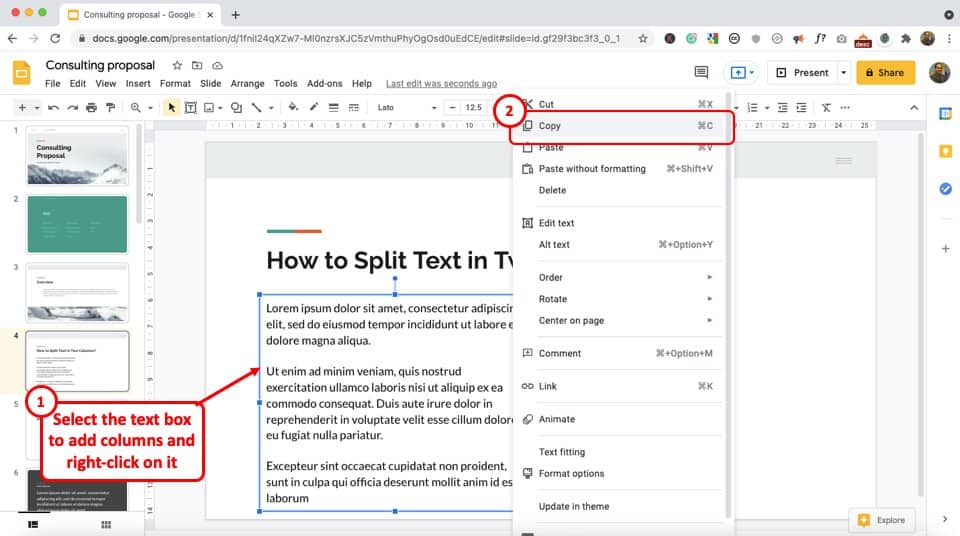
The first step is to create two identical text boxes such that you can arrange them as columns.
To copy the text box, select the text box and right-click on it. Then, from the options, click on “Copy“. You can also press “Ctrl+C” to copy.
Alternatively, you can also simply duplicate the text box. Select the text box. Then, click on the “Edit” menu located at the top of the screen. Under the “Edit” menu, click on the “Duplicate” option. You can also press the “Ctrl+D” keys on your keyboard.
Step-2: Paste and rearrange the text box
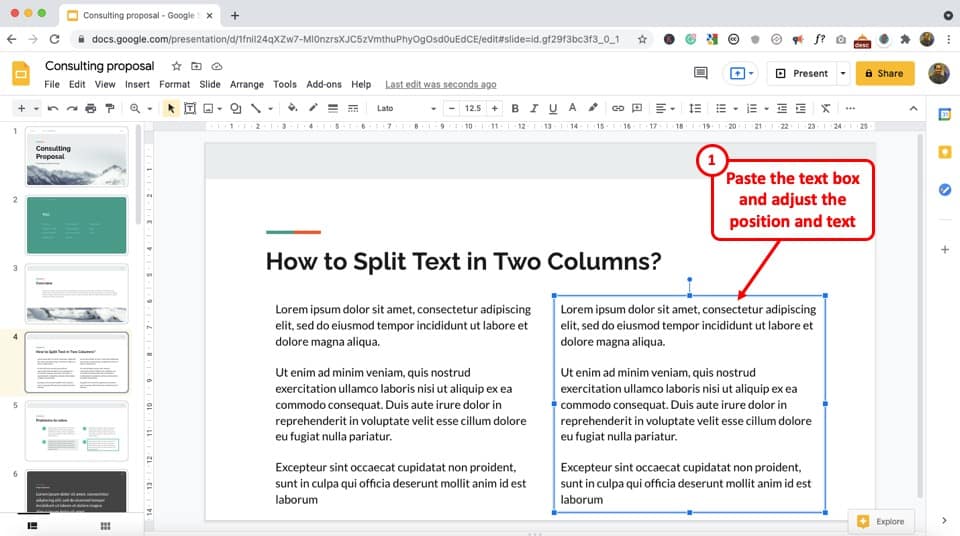
To paste the copy of the text box, simply press “Ctrl+V” using your keyboard.
You will see two identical text boxes in the slide. Now, all you have to do is resize and move the text boxes into two aligned columns.
You can add text to the separate text boxes to make it appear like two columns.
5. How to Increase Transparency of a Text Box?
In Google Slides, you can add a background color to the text box as well as adjust the transparency of the background color.
To do so, you have to first make sure the text box has a solid background color. Then all you have to do is follow the 2 quick steps.
Step-1: Click on “Fill color”
To access the text box editing option in the toolbar, click on the text box. Then click on the “Fill color” icon in the toolbar to open the color palette.
To make sure you have a solid color as the text box background, click on the “Solid” option. You cannot change the transparency of a “Gradient” text box background.
Step-2: Select the “Custom” option
Now, you have to click on the “+” icon under the “Custom” option to open the color settings.
Click on the bar under the “Transparency” option and drag it towards the left or the right to increase or decrease the transparency respectively. Then click on the “OK” button to save the increased transparency.
It is important to note that when viewing a text box with transparent background on a slide with white background, it may seem that you’ve just made the color lighter.
However, you will see the effect of transparency added to the text box only when you place the text box over an image or a slide with a colored background.
6. How to Make Rounded Corners of a Text Box in Google Slides?
Google Slides does not allow you to customize the shape of a text box. However, you can use the “Shape” feature to create a rounded corner look for a text box. Follow the 3 quick steps below.
Step-1: Make the text box “Transparent”
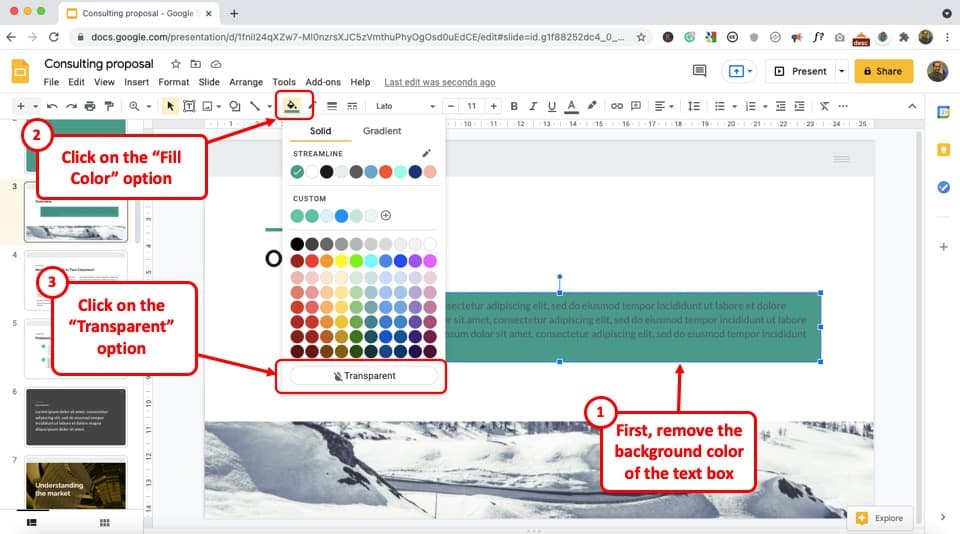
The first step is to make sure the text box has no background color. To do so, click on the “Fill color” icon. Then select the “Transparent” option under the color palette in the “Fill color” menu.
Step-2: Add a curved rectangle
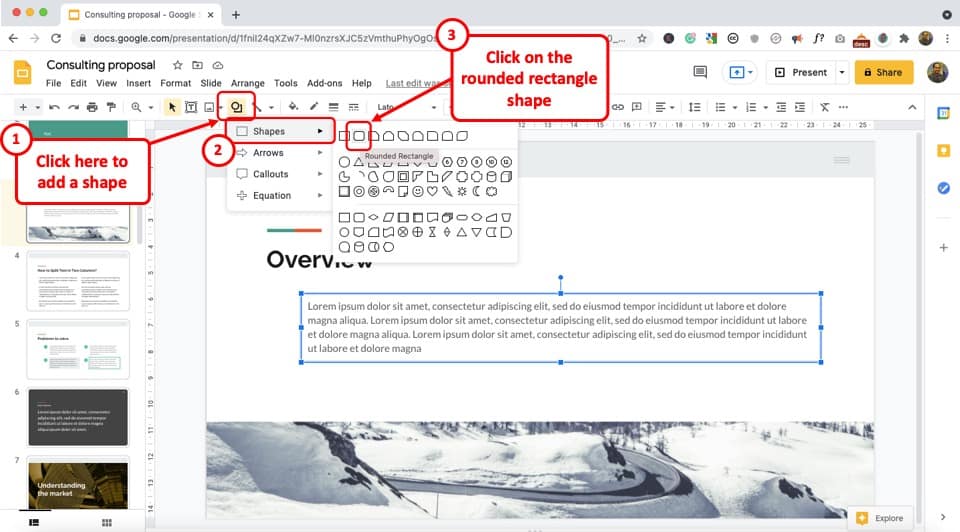
In the toolbar located at the top of the screen right under the menu bar, click on the “Shape” icon to open a dropdown menu. Now, all you have to do is click on the “Shapes” option and then click on the “Rounded Rectangle” icon in the “Shapes” option.
Step-3: Change the shape order using the “Send to back” option
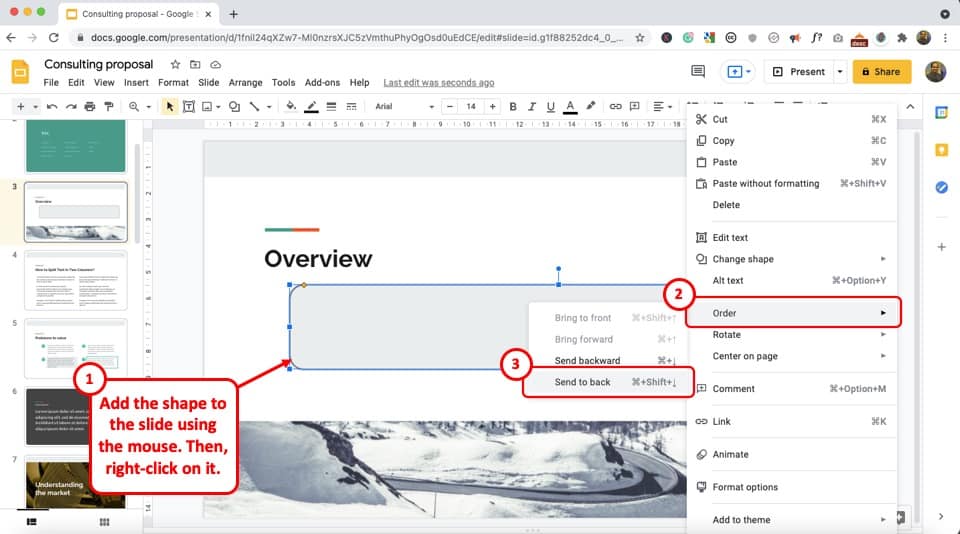
The last step is to draw the “Rounded Rectangle” shape over the text box and add your preferred color to the shape.
Then “Right Click” on the shape and hover the arrow on the “Order” option.Click on the “Send backward” option in the secondary menu beside the “Order” option.
Step-4: Adjust the curves of the rectangle
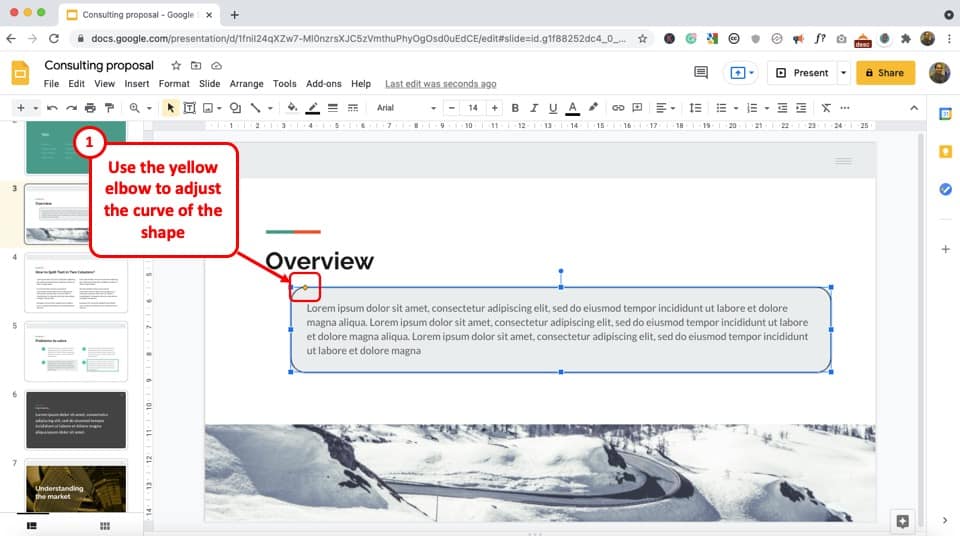
You’ll notice that the curved rectangle will give a feeling that the text box has the curved edges.
To increase or decrease the curve, simply click on the yellow elbow on the top left corner of the shape (as indicated in the image above), and drag it either to the right or left respectively.
7. Can You Lock a Text Box in Google Slides?
Unfortunately, Google Slides does not have any feature that allows you to lock a text box.
However, if you want to insert a text box on all the slide in the same position on a slide, you can use the “Theme Builder” to do this. This works similar to the slide master in PowerPoint!
Note – You may also want to check out my other article on “Slide Master in Google Slides” to know more on this topic!
Using the theme builder also allows you to lock the text box on the front end. This means, the users will not be able to edit or move the text box on the slides in the normal view. They will, however, be able to adjust the text box if they access the theme builder to make changes.
Although this is not recommended for most common use cases of a text box. However, this method to lock a text box is extremely useful when adding footers or such cases where you know the information is going to remain the same on all the slides.
Here’s how to add a text box in the theme builder so that it is locked in a position –
Step-1: Open the “Theme Builder”

The first step is to open the theme builder within Google Slides.
To open the theme builder in Google Slides, first, click on the “View” menu. Then from the dropdown, click on the “Theme Builder” option.
This will open slide layouts within the theme builder window.
Step-2: Add text box on the “Master Slide”
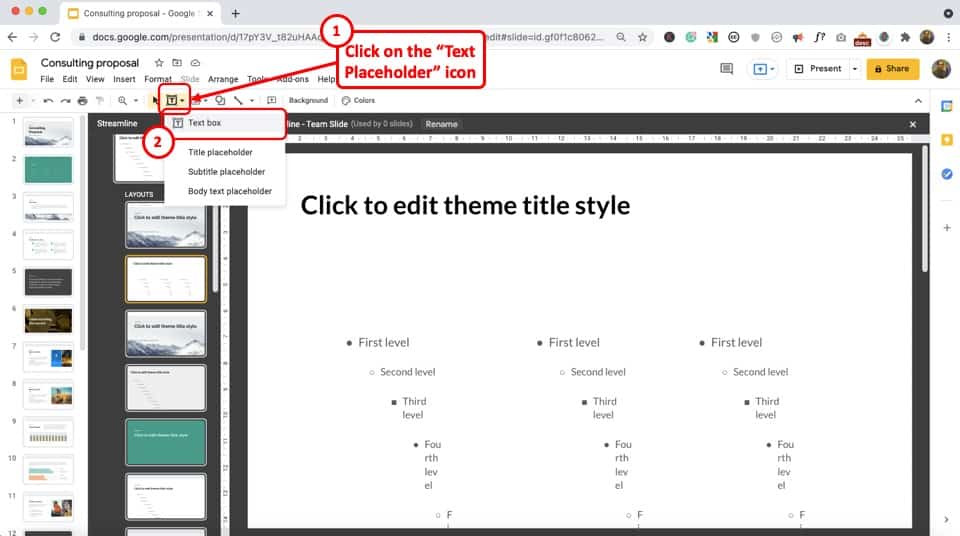
The next step is to add the text box to the slides in the them builder.
Now, first click on the “Master Slide“. Then, click on the “Text Box” icon from the toolbar. From the dropdown, click on the “Text Box” option.
It is important to note that the “Text Box” option will only be enabled on the “Master Slide” i.e. the first slide in the slide layout on the left. You can recognize the master slide easily as it has a larger slide thumbnail than the other layouts in the theme builder!
Step-3: Add the text box to the slide
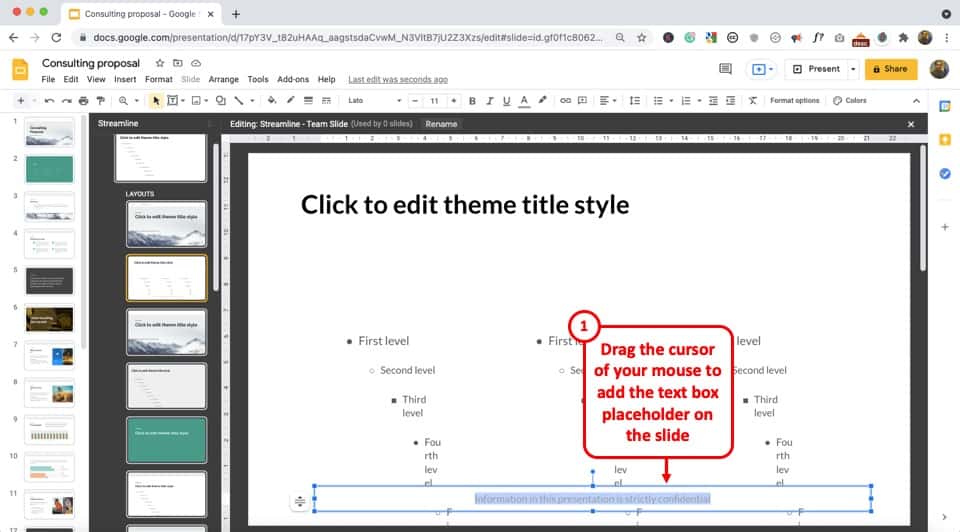
The last step of the process is to simply add the text box on the master slide as you would add it using the mouse.
Simply drag the cursor on your slide to add the text box! Then, place it where you would like it to be positioned.
8. How to Move a Text Box in Google Slides?
In Google Slides, you can move a text box to another position two different methods. Both of them are shown below:
Method 1 – Using the “Position” feature
To move a text box using the “Position” feature, follow the 3 quick steps.
Step-1: Click on “Format options”
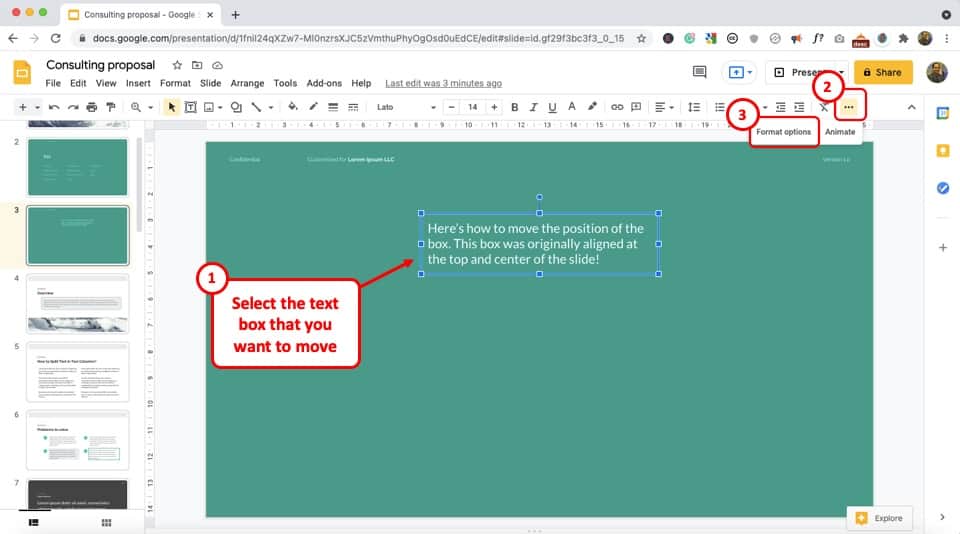
Click on the text box to select it. Then click on the “More” button in the toolbar to open more icons under the toolbar and click on the “Format options” button.
This will open a sidebar on the right side of your screen.
Step-2: Click on “Position”
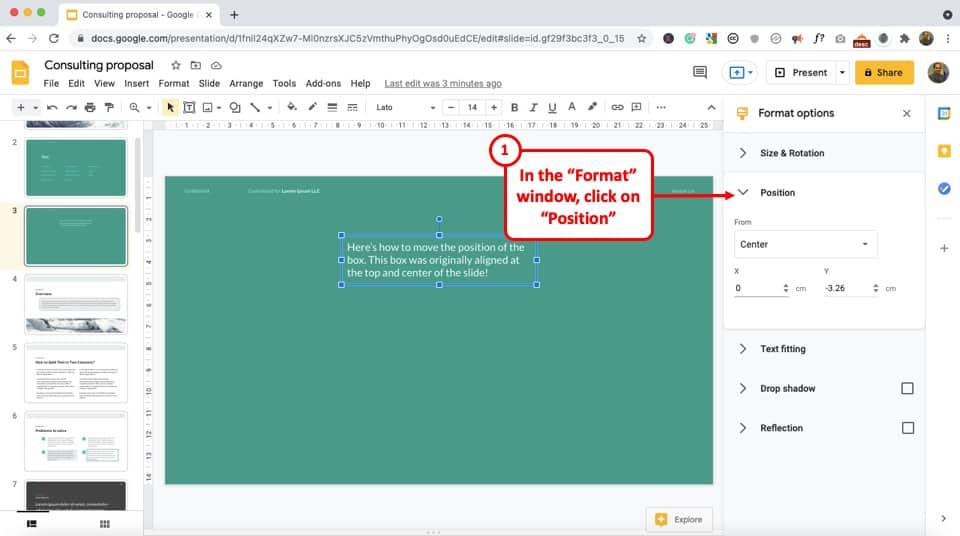
In the “Format options” sidebar, click on the “Position” option which is the second option. It will reveal the options to reposition the text box.
Step-3: Click on the “X” and “Y” boxes
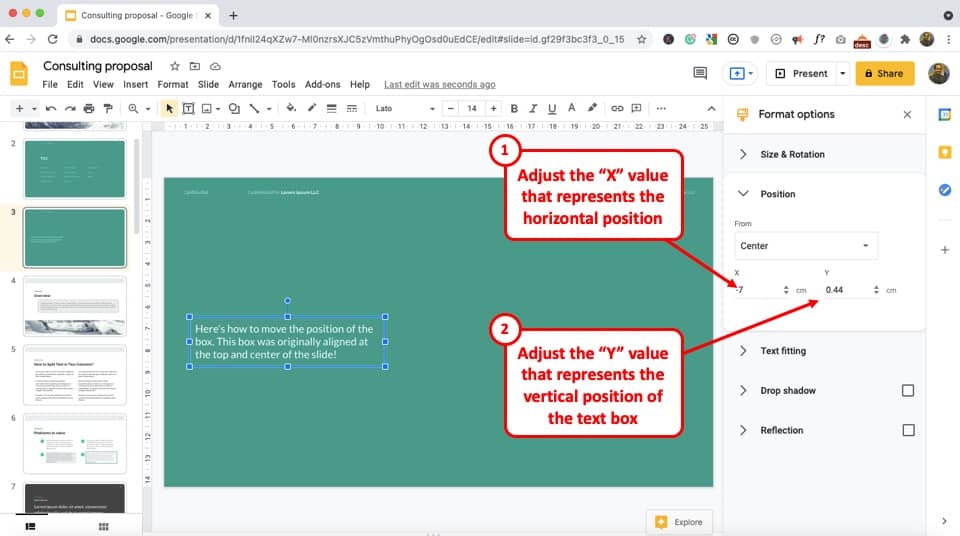
Now, all you have to do is click on either the “X” box or the “Y” box and change the numbers.
Click on the “X” box and increase the value to move the text box to the right and decrease the value to move it towards the left.
You can also click on the “Y” box and decrease or increase the value to move the text box upwards and downwards respectively.
Remember, X and Y value of 0 each is basically the center of the slide. From there on, think of it as an X and Y graph and simply adjust the values accordingly to move the text box.
Method 2 – Using your mouse
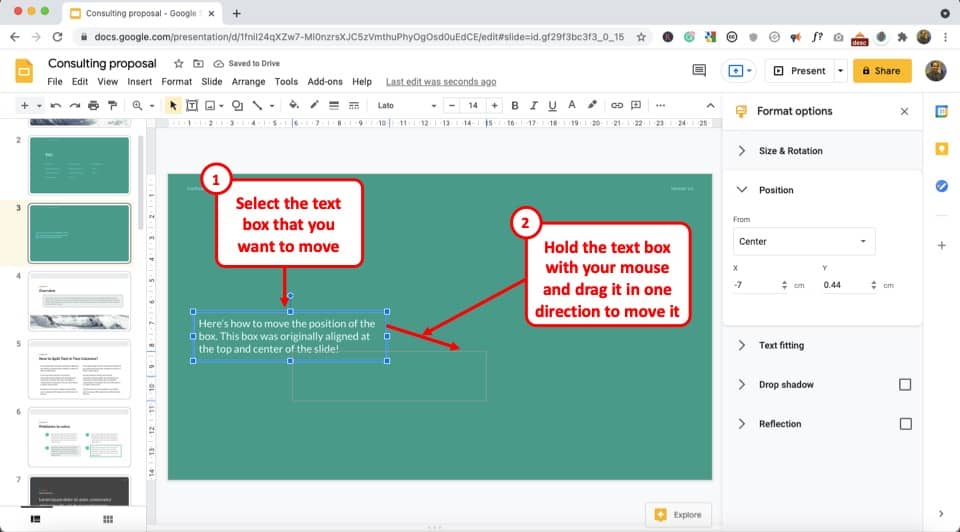
You can also move the text box quickly and easily using your mouse. In fact, you can move most of the elements on the slide in this manner.
To move a text box, all you have to do is hover over the text box to turn your cursor into a “Moving Cursor” which looks like a cross with four arrows pointed to four sides. Now you can click and hold on to the text box and move the text box to your desired position.
9. How to Duplicate a Text Box in Google Slides?
Google Slides allows you to duplicate a text box so that you do not have to create and reformat a text box every single time. You can duplicate a text box in two different ways.
You can either use the copy and paste functions. Alternatively, you can also use the duplicate function. The “Duplicate” function allows you to create a copy in a single action.
However, you can not duplicate items across multiple slides using the “Duplicate” function. You can only create a copy on a same slide.
Both the methods are described below –
9a. Using Copy and Paste
You can duplicate a text box from one slide to a new slide using the copy and paste options. Follow the 2 easy steps.
Step-1: Click on “Copy”
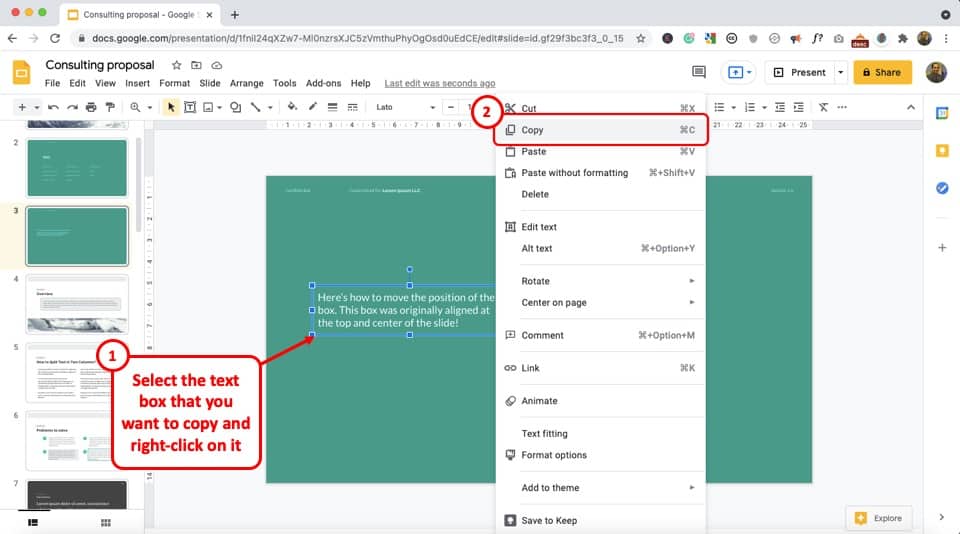
The first step is to “Right Click” on the text box that you want to duplicate. From the dropdown menu, click on the “Copy” option. Alternatively, you can press the “Ctrl+C” keys on your keyboard.
Step-2: Click on “Paste”
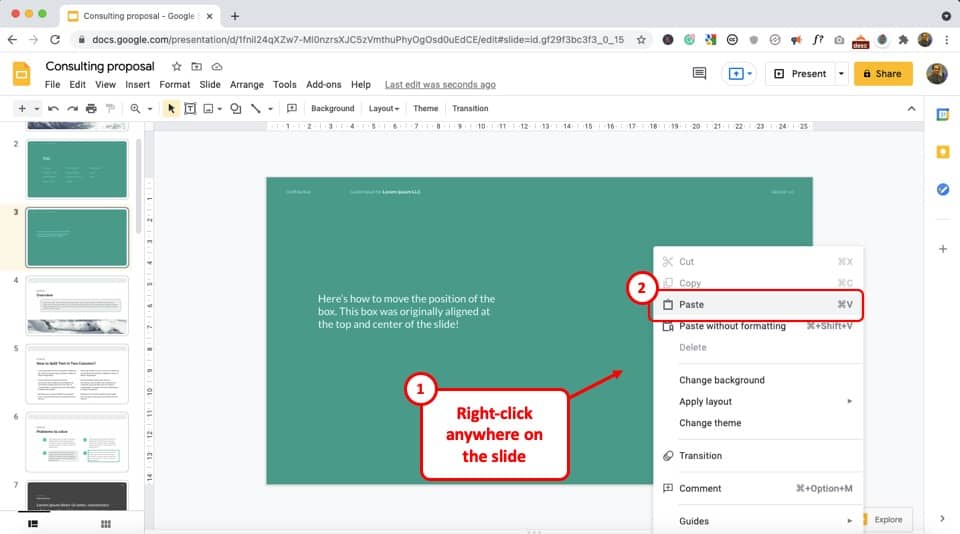
Now open the slide you want to paste the text box in from the slide navigation pane on the left side of the screen.
In the new slide, “Right Click” to open a dropdown menu and select the “Paste” option. Alternatively, you can press the “Ctrl+V” keys on your keyboard.
9b. Using Duplicate Function
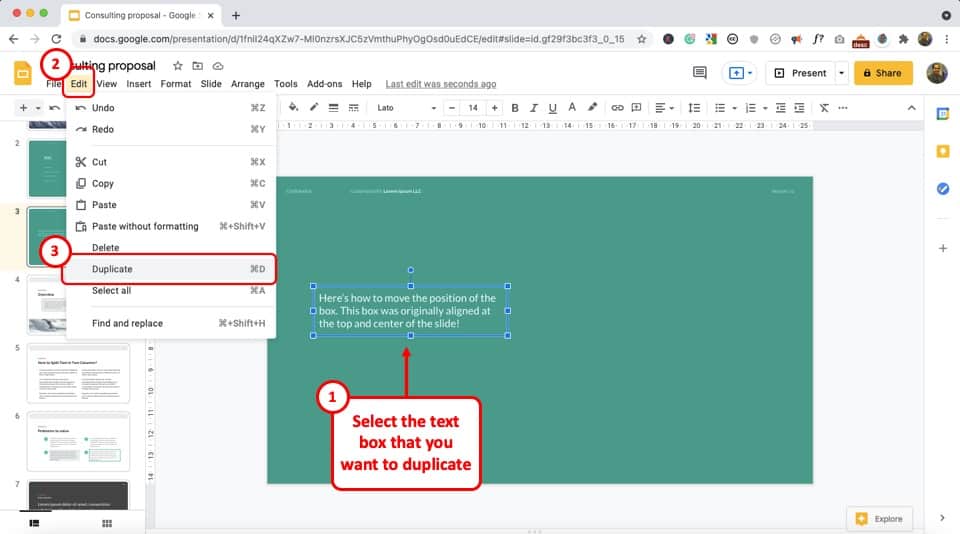
To duplicate a text box, all you have to do is select the text box and click on the “Edit” button in the menu bar. After that, click on the “Duplicate” option from the dropdown menu.
Alternatively, you can also use the keyboard shortcut by pressing the “Ctrl+D” keys on your keyboard.
10. How to Add Text to a Text Box in Google Slides?
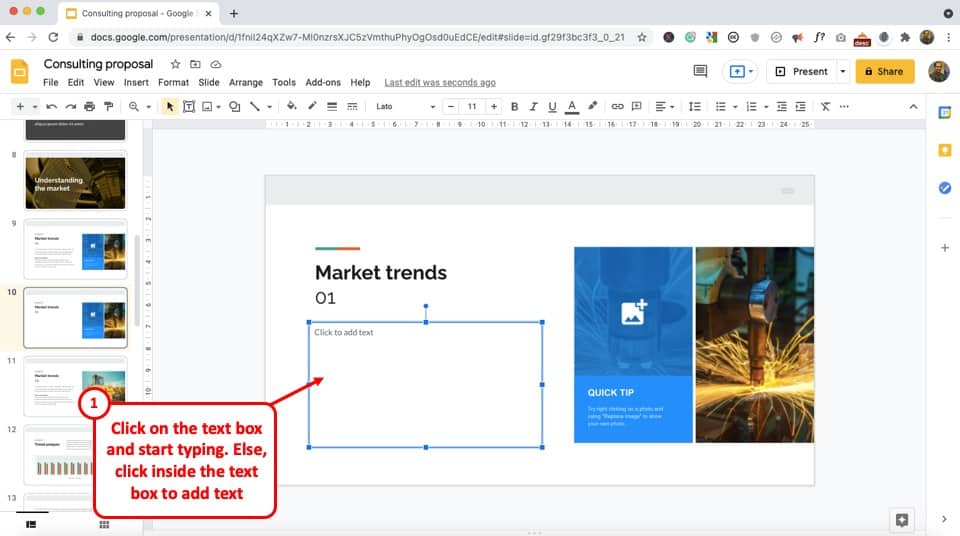
To add text to a text box in Google Slides, all you have to do is click inside the text box. Then you can type in text using your keyboard.
If you have the text box selected, you can simply start typing and the text will be added to the text box.
When you have a default text placeholder selected, you may also see a text appear in the text box that says “click to add text”. Don’t worry, this will disappear as soon as you start typing or click inside the text box!
11. How to Autofit Text in a Text Box in Google Slides?
The next thing that you may notice is that sometimes the text goes outside the text box. You can simply make the text box adjust its size according to the amount of text in it.
To do that, you need to use the “Autofit Text” feature in Google Slides. There are two methods to use the autofit text options for a text box in Google Slides.
Both the methods have been described below –
Method 1 – Using the “Format Options” panel
Here’s how to use the autofit text feature with this method –
Step-1: Open the “Autofit Text” options

The first step is to select the text box and “right-click” on it. From the options that are presented, simply click on the “Text Fitting” option.
Step-2: Adjust the “Autofit” options
This will directly open the autofit options in the format options panel on the right part of the screen. You will be presented with 3 options to choose from.
Option 1 – Do not autofit
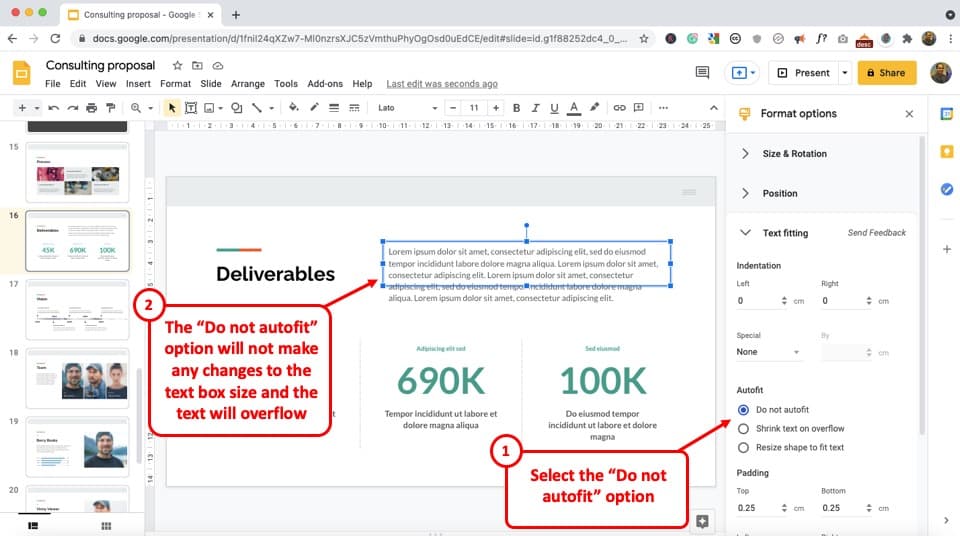
Choosing the “Do not autofit” option will not change the size of the text box even when the text goes outside the text box.
This setting will neither affect the text box nor the text.
Option 2 – Shrink text on overflow
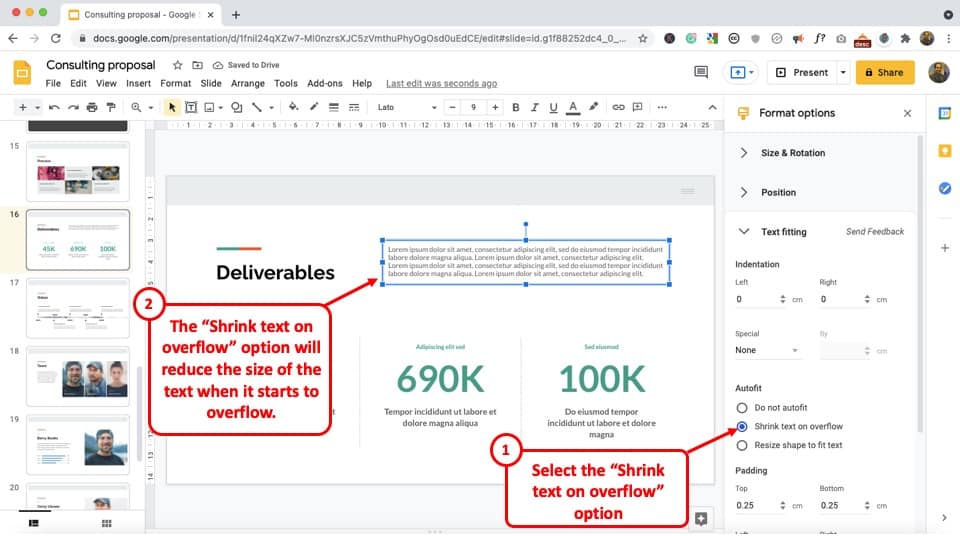
The “Shrink text on overflow” does exactly what it sounds. It will basically reduce the size of the text when the text starts to exceed the space provided in the text box.
This option will basically fix the size of the text box and adjust the size of the text according to that of the text box.
Option 3 – Resize shape to fit text
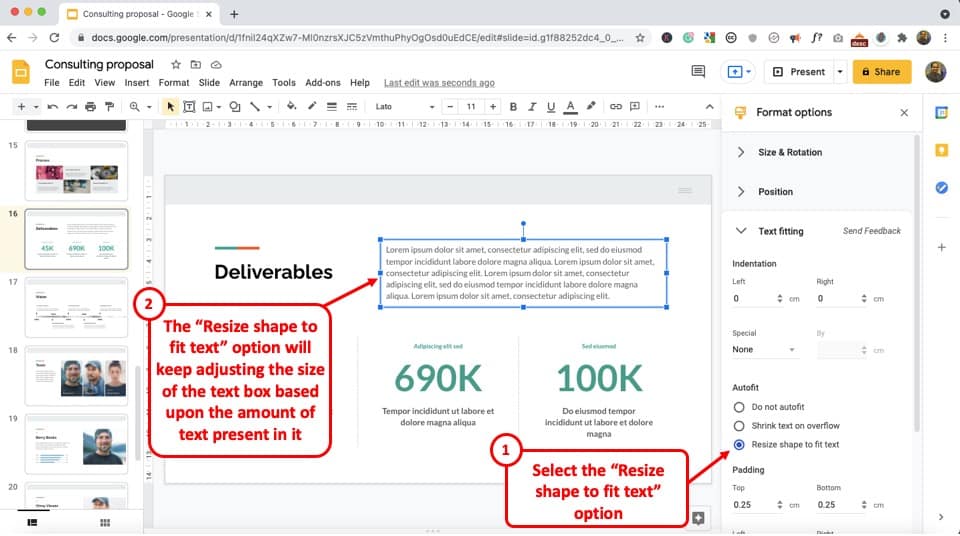
The last option provides is the “Resize shape to fit text” option.
This option too does exactly what the name sounds like! Using this option will basically fix the size of the text and adjust the size of the text box accordingly! It will resize the shape of the text box to fit the amount of text present.
So, as you increase the text, the text box will also increase the size accordingly.
Method 2 – Using the “Autofit text” shortcut
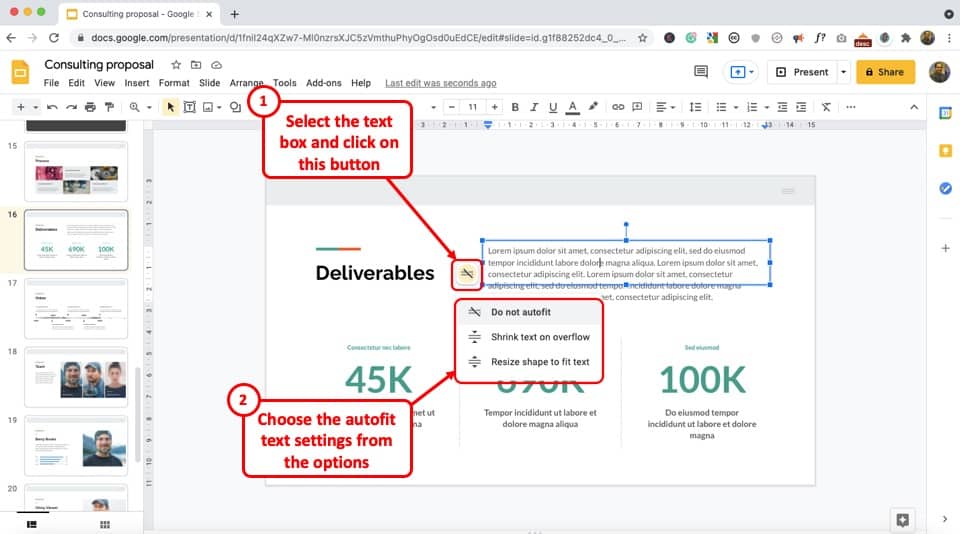
To use this feature, simply click on the text box. You will see an icon appear at the bottom left corner of the text box. It will have an icon that represents “not equal to”.
Click on it and a few options will appear. From the dropdown, choose one of the three options provided.
12. How to Resize a Text Box in Google Slides?
You can use the resize feature in a text box in Google Slides to change the height and width of the text box. Follow the 3 quick steps.
Step-1: Click on “Format options”

At first, select the text box and then click on the “More” option which is the three dots in the toolbar located right under the menu bar right at the top of the screen. Under the “More” option, click on “Format options”.
Step-2: Click on “Size & Rotation”
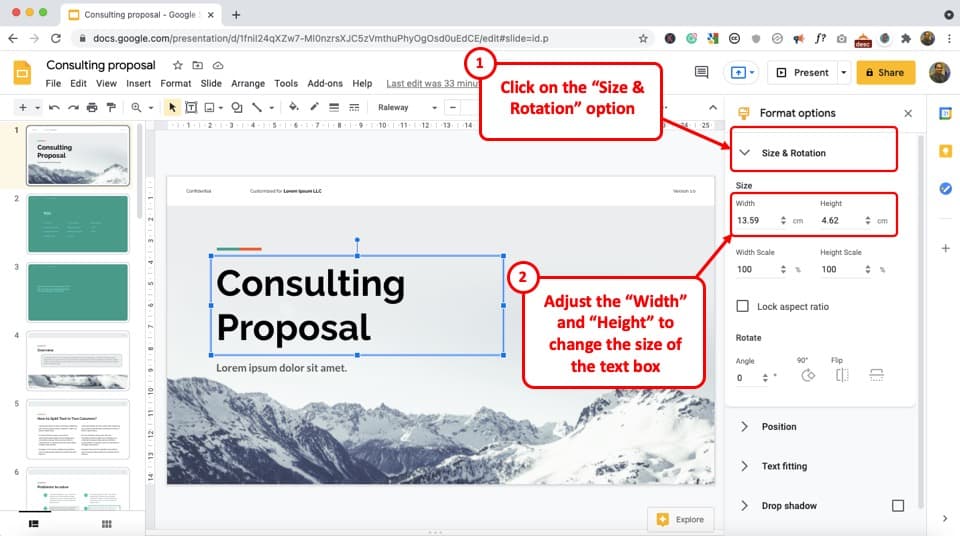
In the “Format options” sidebar on the right side of your screen, click on the “Size & Rotation” button to expand it.
Step-3: Click on the “Width” or “Height” box
Now, all you have to do is click on the “Width” and “Height” boxes under the “Size” option and change the size of the text box.
You can also preserve the width to height ratio when resizing by clicking on the “Lock aspect ratio” box.
13. How to Rotate a Text Box in Google Slides?
In Google Slides, you can rotate any item including the text box. Here’s how you can rotate the text box in Google Slides –
Step-1: Click on “Format options”
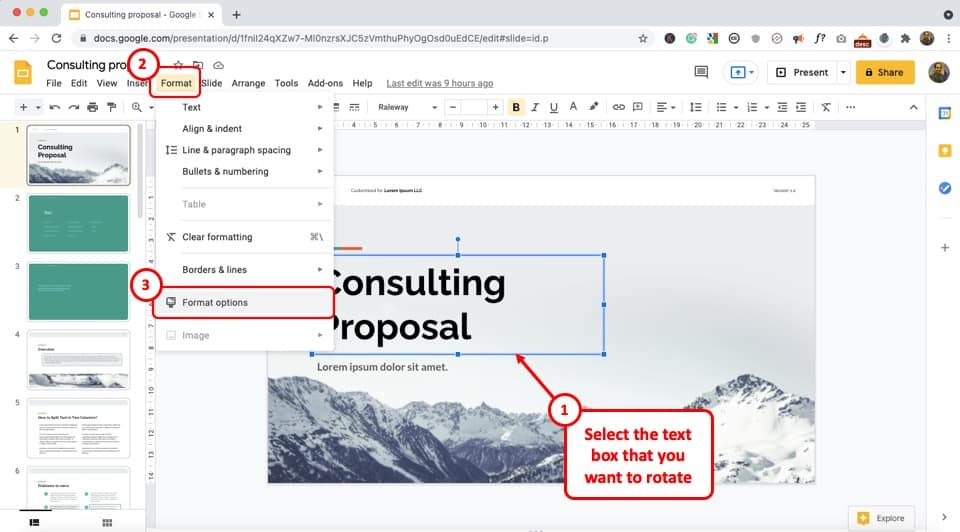
The first step is to select the text box by clicking on it.
Then, you have to click on the “Format” button in the menu bar located at the top of the screen. In the “Format” menu, select the “Format options” option.
Step-2: Click on “Size & Rotation”
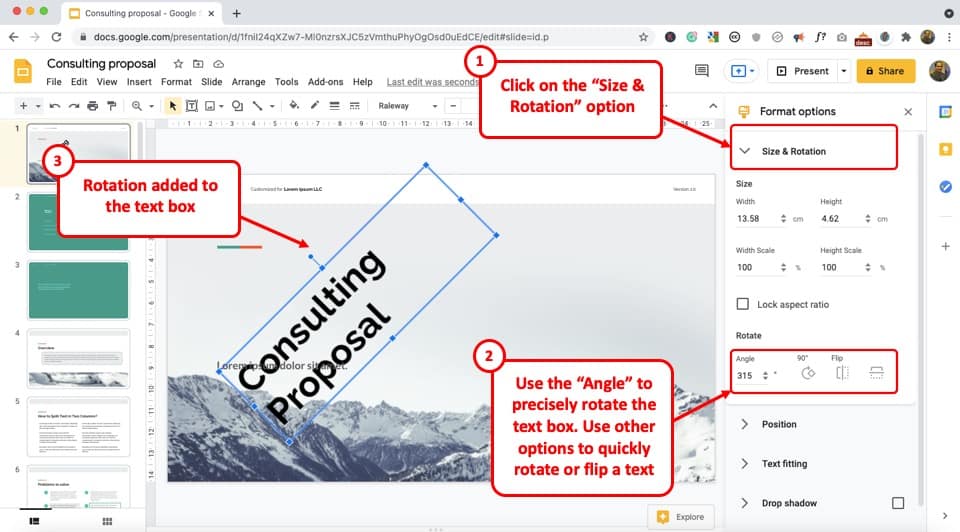
In the “Format options” sidebar located at the right side of your screen, click on the “Size & Rotation” button. It will reveal the “Size” and “Rotate” options.
Step-3: Select the rotation angle
You can click on the “Angle” button under the “Rotate” option and select your preferred angle of rotation for the text box.
You can also flip the text box by clicking on the “Flip horizontally” and “Flip vertically” icons located beside the “Angle” button.
14. How to Change the Order of a Text Box in Google Slides?
When we talk about changing the order of any element present on the slides in Google Slides, people often get confused about what this means.
It is important to understand that all the elements on a slide are stacked in layer form. This means each element forms a layer on a slide.
So, sometimes, an image that you just added to your slide may cover the existing text box on the slide simply because the image layer is above a particular text box layer on a slide. This may make you believe that the text box has been deleted or it may make it difficult for you to edit the text box.
And, you can fix this by changing the order of elements including the text box on a slide in Google Slides.
There are actually two different ways in which you can access the settings to change the order of any element including a text box.
Let’s take a look at both the methods below –
Method 1 – Using the “Right-click” option
This method is quite straightforward. Here are the steps that you need to follow –
Step-1: Right-click on the text box
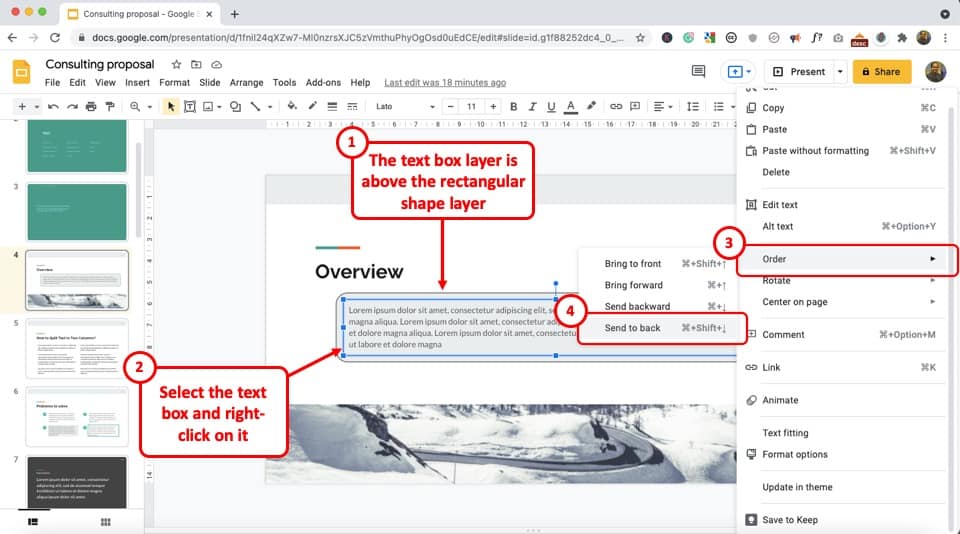
All you need to do is select an object such as a text box by clicking on it. Then, right-click on it.
A few options will be shown.
Step-2: Select the order
From the options, click on “Order” (as shown in the image in step 1), and choose the order setting as desired. For the sake of this example, we shall choose to click on “Send to back“.
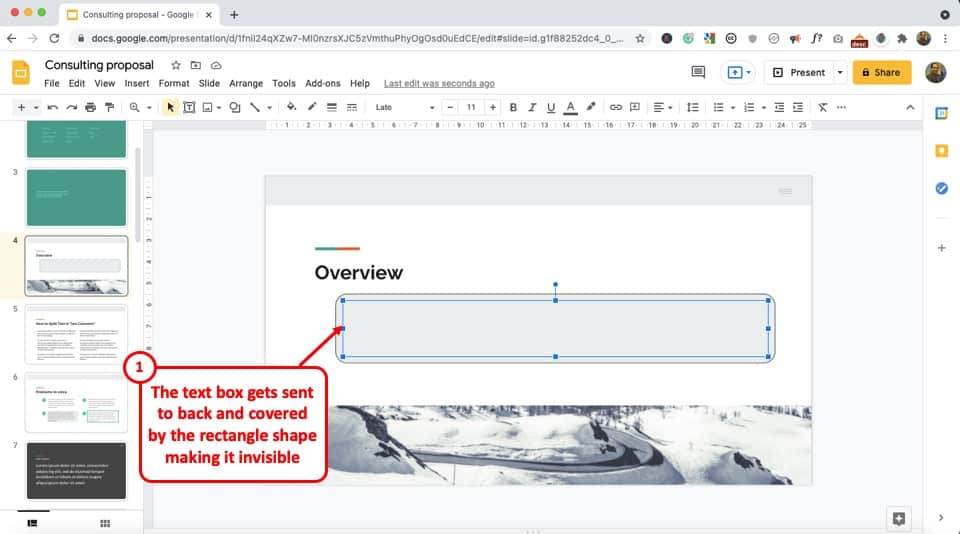
As you can see in the image above, although the text box exists on the slide, it is not visible simply because the layer of this particular text box has been moved to back and is now covered by the rectangle shape layer!
Method 2 – Using the “Arrange” menu
Another method to accessing the same options is by using the “Arrange” menu. Here’s how you can use this method –
Step-1: Click on “Arrange”
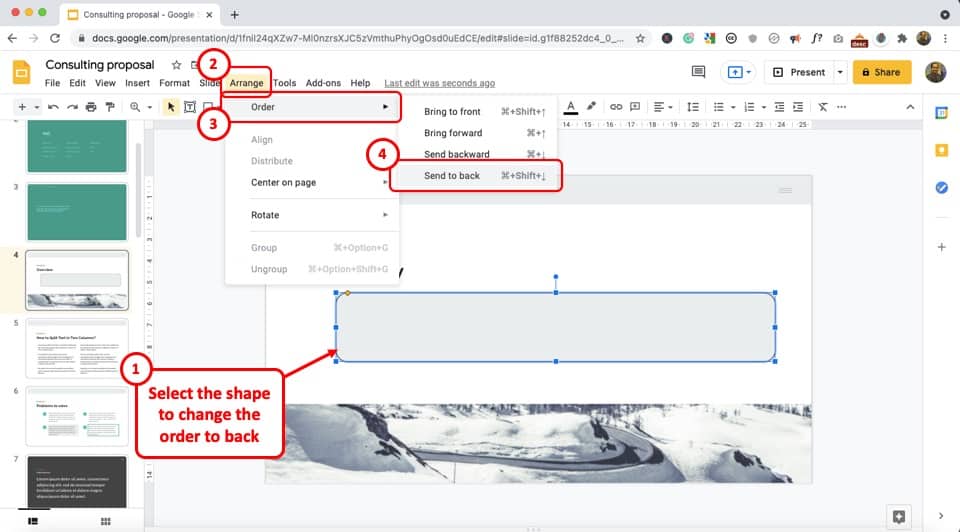
The first step is to click on the shape or a text box to select it. Then, click on the “Arrange” menu in the menu bar located at the top of the screen. This will open a dropdown menu.
Step-2: Click on the “Order” option
In the dropdown menu, click on the “Order” option to open another smaller menu.
Now, all you have to do is select your preferred order from the “Bring to front”, “Bring forward”, “Send to back” and “Send backward” options. (as shown in the image in step 1)
15. How to Align Text Box Quickly in Google Slides?
You can easily align two or more textboxes in such a manner that they are at the same vertical or horizontal level.
You can use the align tool in Google Slides to align shapes or text boxes together. Here’s what you need to do!
Step-1: Identify the text boxes that you need to align
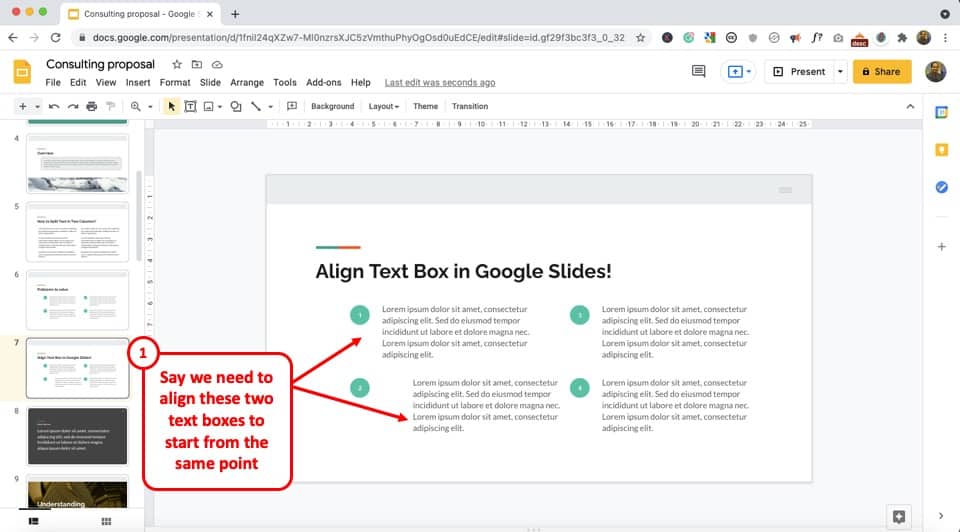
Identify the text boxes that you want to align.
In the above example, we would like to align the text box for point 1 and point 2. We can clearly see that the two text boxes are not starting at the same axis.
Thus, we need to move the second box towards the left.
Remember, we can move the box using our mouse as well. However, this will not align with the text box perfectly. In most cases, this will also take a lot longer to accomplish.
Step-2: Right-click and align the text boxes

Now, once the boxes have been selected, right-click on it. From the menu, click on “Align horizontally” because we want the box to move on a horizontal level.
Then, from the next menu, click on “Left“.
You will notice that the second box will align at the same level on the left as that of the first box!
16. How to Wrap Text Using Text Box in Google Slides?
Unfortunately, Google Slides doesn’t allow the wrapping of text around an image or another shape. However, there are ways in which you can circumvent this problem.
I’ve covered this topic in greater detail in another article. Make sure that you check out my other article on how to wrap text in Google Slides!
17. How to Delete a Text Box in Google Slides?
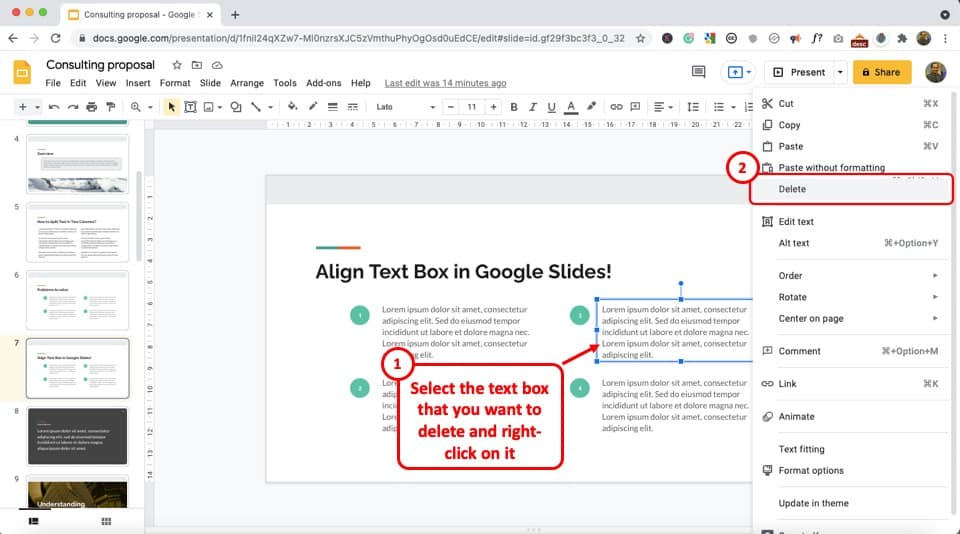
The process of deleting a text box in Google Slides is quite simple.
All you have to do is “Right Click” on the text box and select the “Delete” option from the dropdown menu. Alternatively, you can simply press the “Delete” key on your keyboard to get the job done.
Credit to wayhomestudio (on Freepik) for the featured image of this article (further edited).