SmartArt is a useful feature in PowerPoint, and it is great for beginners! But, what happens when you start using Google Slides now! Does Google Slides even have the SmartArt feature? How do you use the SmartArt feature in Google Slides?
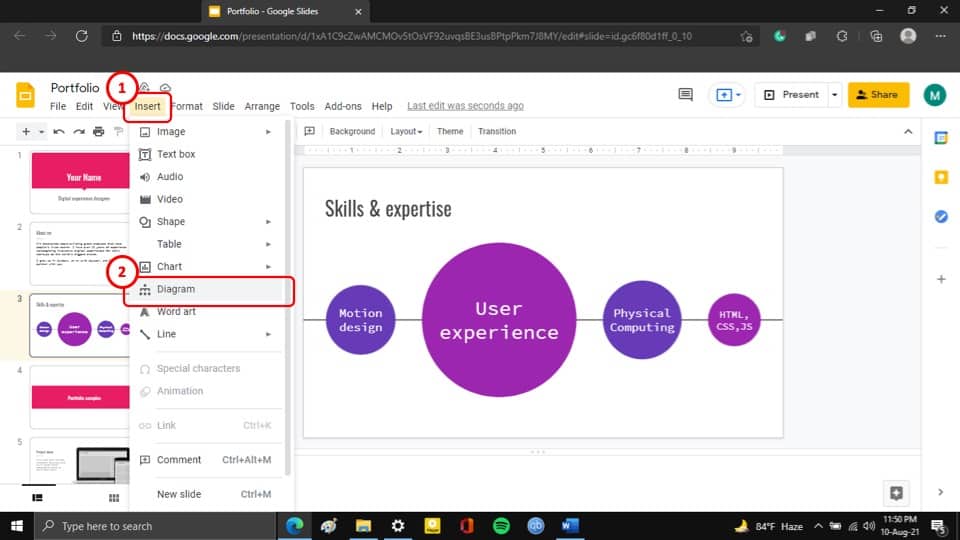
The SmartArt feature in Google Slides is known as the “Diagram” tool. To use SmartArt in Google Slides, click on the “Insert” tab. Then, from the dropdown, click on the “Diagram” option. A new panel will open on the right part of your screen with a few pre-built infographic options.
In this article, I’ll take you through a step-by-step process of using SmartArt (or the diagram feature) in Google Slides with visual guides. Plus, I’ll share with you a few ninja tips on how you can get additional infographics for your Google Slides presentation!
So, let’s get started!
Is there a SmartArt in Google Slides?
Let’s start with the basics first, how can you access the SmartArt feature in Google Slides?
As you may now be already aware, there is a SmartArt option in the Google Slides presentation too.
To use SmartArt in Google Slides, you have to use the “Diagram” feature, which is located in the “Insert” tab.
Unfortunately, the diagram feature in Google Slides does not provide as many graphic options as the SmartArt feature in Microsoft PowerPoint.
That said, you can use add-ons, and third-party websites to get access to a virtually infinite number of SmartArt and graphics options. We will talk about how you can do so later in the article.
2. How to Use Google Slide Diagrams Feature?
To use the “Diagram” feature in your Google Slides presentation, follow the simple steps described below.
Step-1: Click on the “Diagram” option

The first step of using the Diagrams feature is to click on the “Diagram” option which is located in the “Insert” tab of your Google Slides ribbon. This will open a sidebar to the right of your screen.
Step-2: Choose the type of graphic required
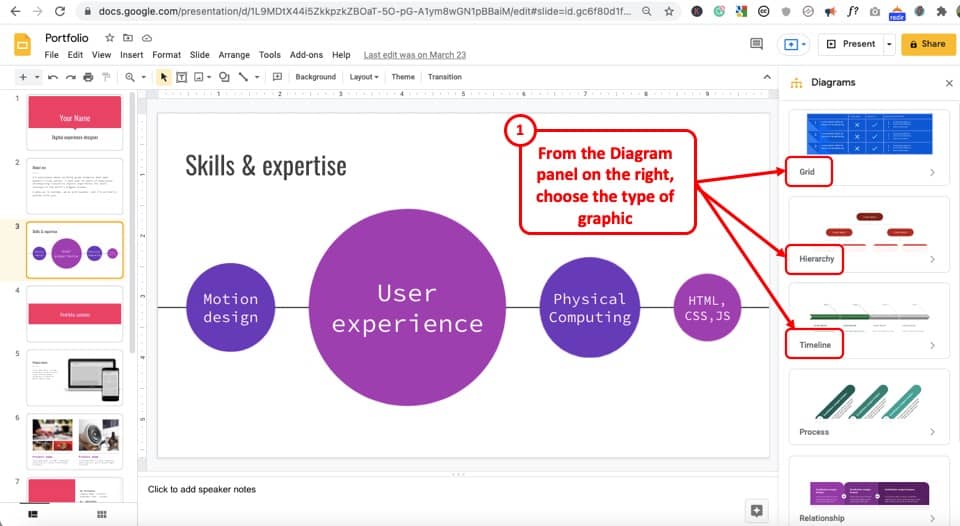
When you click on the “Diagram” option, you will notice a panel open on the right part of your screen. The first step here is to choose the type of graphic or SmartArt that you want to add to your presentation.
As I said before, there are not a ton of different options, but you do get a few helpful ones to choose from.
Step-3: Select your preferred number of layers
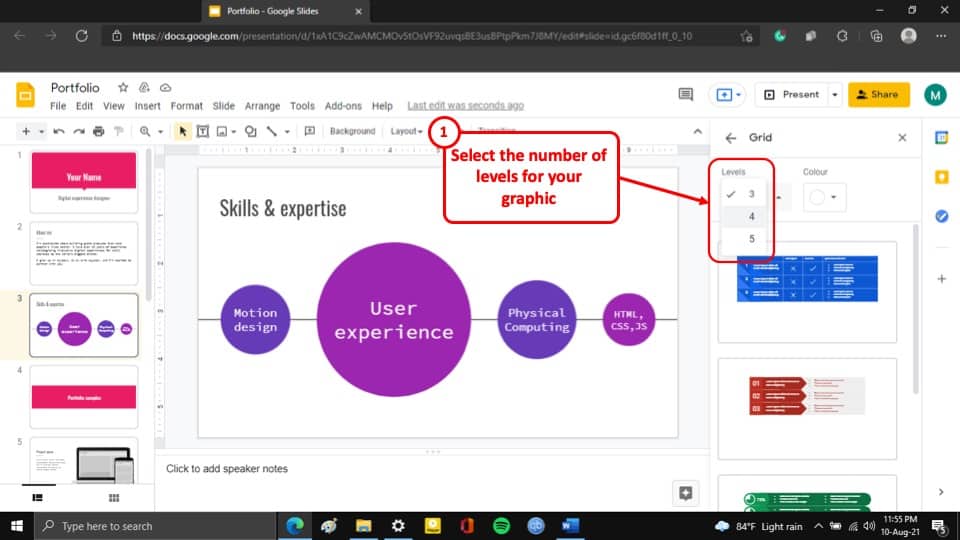
Once you’ve chosen the type of graphic you want, in the next step, you have to select the number of layers that you want your SmartArt diagram to have.
You can also choose to select the color that you want your SmartArt diagram to have. However, this is entirely optional.
Step-4: Select your preferred style of SmartArt diagram
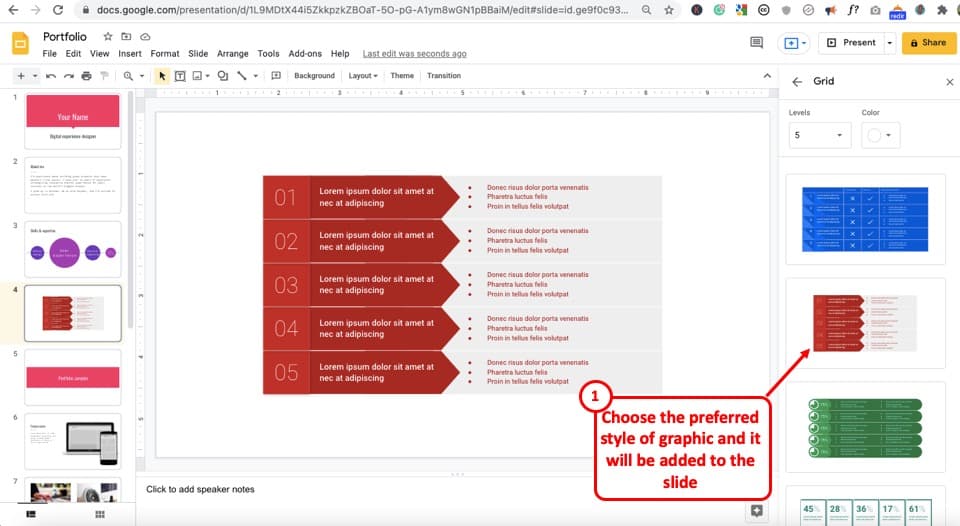
The last step is to select your preferred style of SmartArt diagram from the options available in the “Diagram” feature and then the SmartArt Diagram will automatically be inserted into your Google Slides presentation
2a. Options Available in the Diagram Feature in Google Slides
While you may have seen some of the types of graphics available in Google Slides, you may also be wondering how many different types of graphic options do you get from SmartArt or the Diagram feature in Google Slides.
There are a total of 6 distinct SmartArt diagram options. Each of the 6 options has separate purposes or use. Here’s the list of the six different types of diagrams graphics available in Google Slides by default –
- Grid: With diagrams in this option, you can graphically show information that needs to be expressed as a list or a priority. The grid diagram graphic makes you list visually appealing.
- Hierarchy: Diagrams in this option can be used to visually present a family tree or the succession of positions in your organisation. These diagrams are best used for information that are pyramidal or requires a defined hierarchy.
- Timeline: These diagrams will help you visually present the timeline of a project or process that you may need to describe to for the audience members. These graphics help you give an overview of the project timeframe.
- Process: The graphics under the “Process” diagram option help you showcase a workflow. You can show a unidirectional process as well as a circular process. You also get options to not just lable a particular step, but also provide a brief description for the particular step.
- Relationship: With the help of smart graphics in the “Relationship” diagram option, you can show relationship (as the name suggests) between two pieces of information.
- Cycle: The diagrams in this option can be used to visually represent cyclic or repeatable processes that usually end up in a loop.
3. How to Insert a Hierarchy Chart in Google Slides?
Now let’s take an actual example of inserting a smart graphic in Google Slides using the “Diagram” option. Let’s say we want to insert a hierarchy chart in Google Slides.
To insert a Hierarchy Chart in your Google Slides presentation, go to the “Diagram” option from the “Insert” tab as described earlier in this article and follow the steps given below.
Step-1: Open the “Diagram” feature
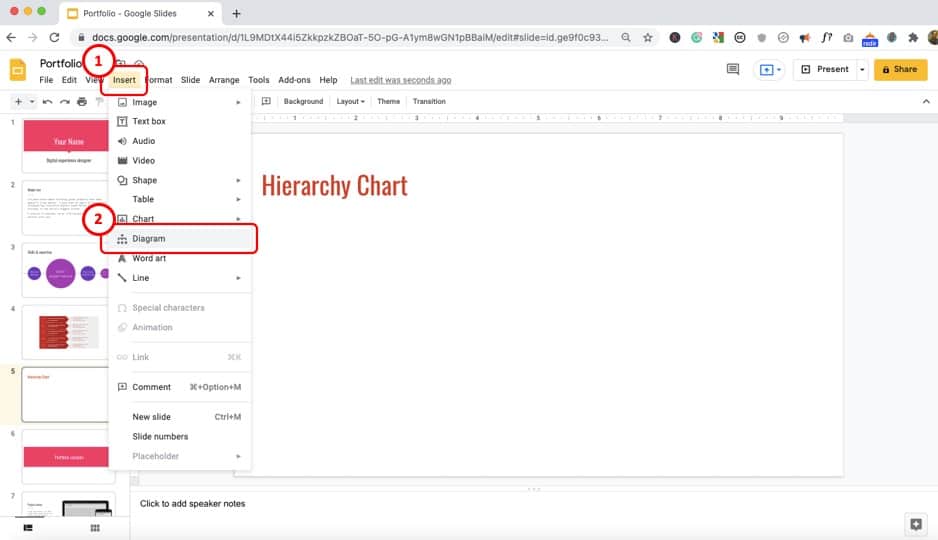
For the first step, as described above, click on the “Insert” tab and open the diagram option.
Step-2: Select the “Hierarchy” option
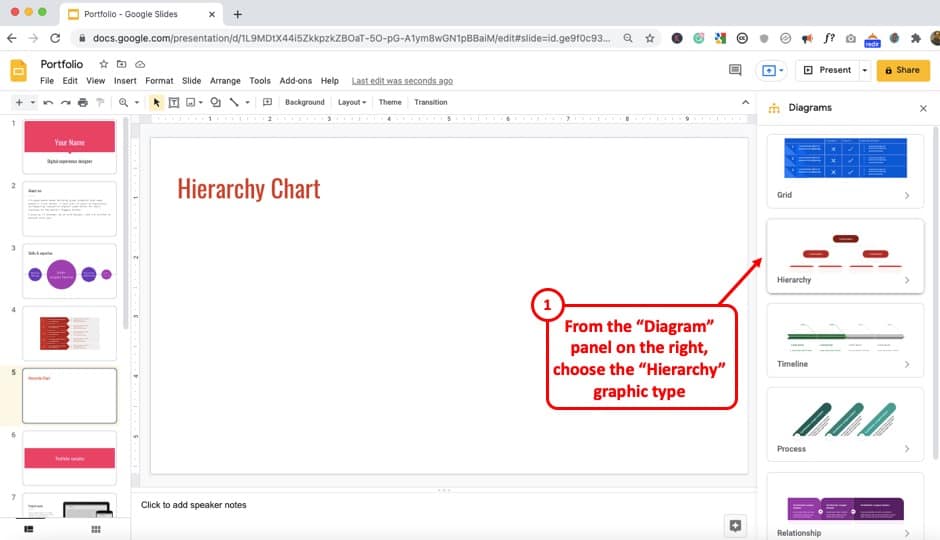
After you have clicked on the “Diagram” option, select the “Hierarchy” option from the sidebar to the right of your screen. It is the second option in the “Diagrams” sidebar.
Step-3: Select the color and the number of levels
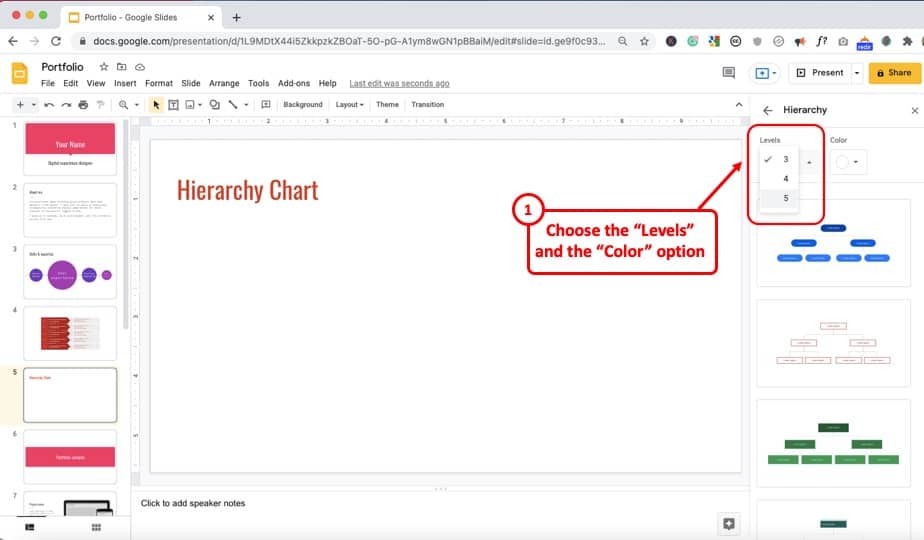
In this step, select your preferred number of levels to the SmartArt diagram and the color for the graphic. The hierarchy styles in the sidebar will change accordingly.
Step-4: Select your preferred style of hierarchy diagram
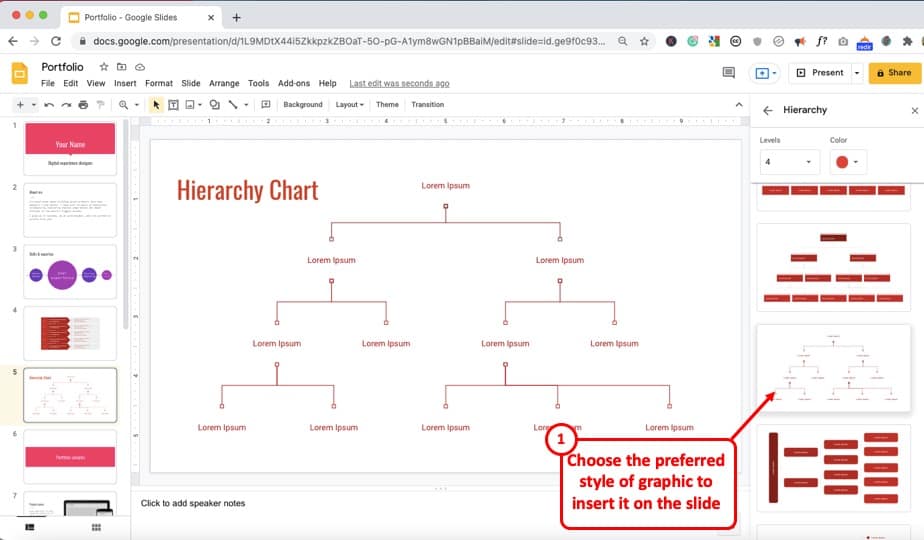
The final step is to look for the right style of hierarchy chart which will fit your PowerPoint presentation and then select it by clicking on it.
After you have clicked on the style of hierarchy chart in the sidebar, that chart will be added to the slide on your Google Slides presentation.
4. How to Insert a Flowchart in Google Slides?
Unfortunately, you can not add a flowchart directly in Google Slides using the diagram feature described above.
However, you can insert shapes manually create a flowchart. The process is described below –
Step-1: Click on a preferred shape
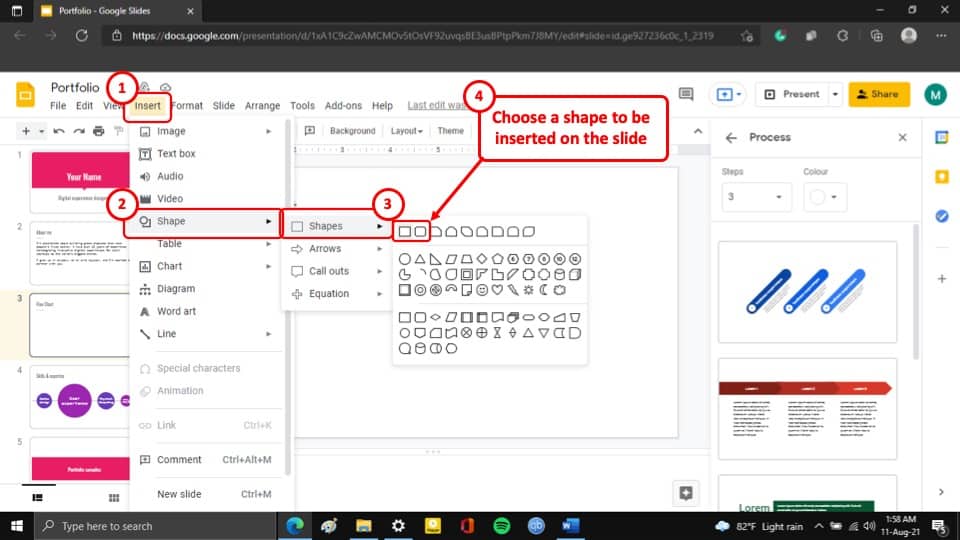
The first step is to insert the necessary boxes manually by selecting the shape that you prefer your flowchart to have.
Step-2: Add the shapes in the Slide
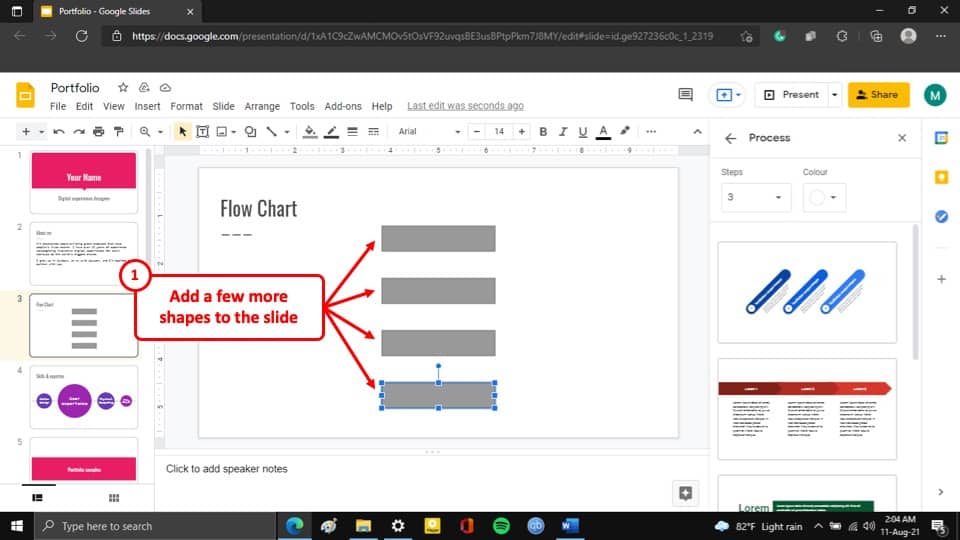
The second step is to add the shape to the slide of your Google Slides presentation. Next, duplicate the shapes by using the copy and paste functions in Google Slides. Add as many shapes as you need for your flowchart.
If you are not sure how to do this, check out our complete guide to format shapes in Google Slides. You will need to learn how to specifically arrange the shapes from that article.
Step-3: Add an arrow shape to the boxes
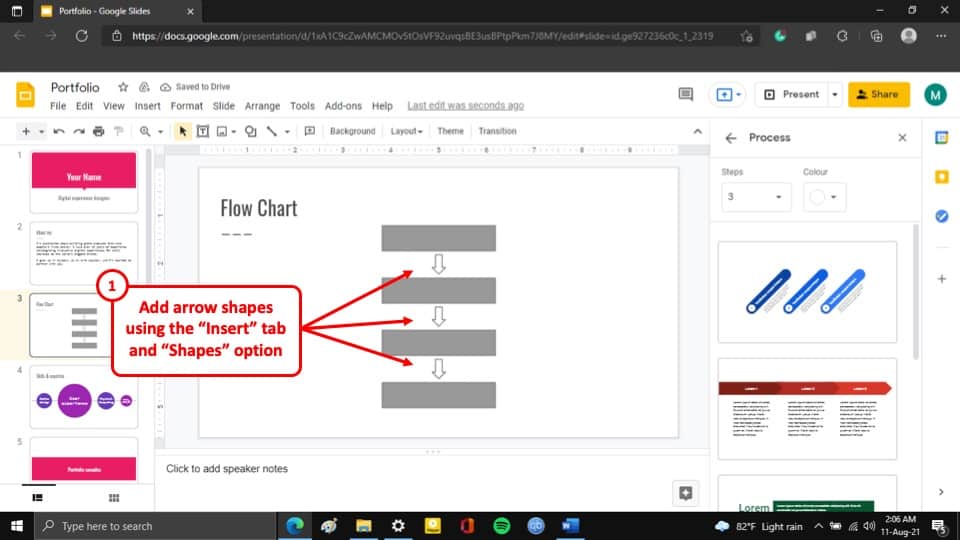
Add arrows to your slide. To add arrows, you need to click on the “Insert” tab. Then, select the “Shapes” option. From the menu, click on “Arrow”. Choose a type of arrow that you like, and the arrow will be added to the slide.
Once you’ve added the arrows, copy and paste (using the Ctrl+C and Ctrl+V shortcut keys) the number of arrows that you need in the flow chart and then arrange them on the slide appropriately
Finally, simply edit the rectangular shapes to add text. In this way, you can add a flow chart to your Google Slides presentation.
5. Other Ways to Get Infographics (Smart Designs) in Google Slides
As mentioned at the beginning of this article, Google Slides makes up for the lack of built-in templates for SmartArt by letting you get access to countless diagrams, infographics and other graphics illustrations from third-party websites. There are mainly two ways in which you can get Infographics or Smart designs for your Google Slides presentation. They are described in the following section.
5a. Using Add-ons
You can use various add-ons in your Google Slide to accomplish almost anything that you may need to make the process of creating a presentation more seamless and efficient. By using add-ons, you can add an extra button in your Google Slides that will allow you access to thousands of infographics and smart designs instantly.
We have an entire article dedicated to add-ons, where you can learn all about using an add-on in your Google Slides along with how to use add-ons to get infographics. Click here to read our article on the topic and learn more.
5b. Using Presentation Templates
You can also go to third-party websites that provide pre-made templates of presentations that you can use to spice up your presentation.
These websites offer a range of presentation templates that can serve different purposes and themes. You can even search for specific themes for a template that will best fit your presentation. The three most popular websites that you can get templates for your Google Slides presentation are,
- Envato Market – Envato Market is a great option when you just need one presentation template or a graphic. It is reasonably priced so you can easily afford to buy any template. Plus, there thousands of templates available that provide various graphic elements!
- Envato Elements – Envato Elements, just like Envato Market, allows you to get access to several best-in-class design templates. The best part of Envato Elements is that you get unlimited downloads. You can literally take a subscription for one month and download as many presentation templates as you want!
- Slides Go – You can also use Slides Go to access presentation templates. Unfortunately, graphics are usually not available but you can get templates for your presentation. The options are quite limited as of now but some of the templates look interesting.
6. 3 Best Google Slides Presentation Templates
To help you find the best templates for your Google Slides presentation, here are my top 3 picks for the Google Slides template
2. Business Proposal PowerPoint Template
The three templates put together will provide you with a ton of different design options to choose from, along with various infographic options! Although these have been primarily designed for PowerPoint, they work equally well on Google Slides too.
One challenge that you may face is that the designs of each of the templates don’t exactly match each other. That will be true for any two presentation templates that you purchase.
One way to fix that is to go with the unlimited download option with Envato Elements as mentioned in the previous section. This will allow you to download any presentation even if you like just one slide of that presentation!
Credit to cookie_studio (on Freepik) for the featured image of this article (further edited)

![Use SmartArt in Google Slides! [Here’s How to Get It!]](https://artofpresentations.com/wp-content/uploads/2021/08/Featured-Image-How-to-Get-SmartArt-on-Google-Slides-Optimized.jpg)