![How to Add & Fix Slides Numbers in PowerPoint? [An EASY Guide!]](https://artofpresentations.com/wp-content/uploads/2021/12/Featured-Image-Slide-Numbers-in-PowerPoint.webp)
Isn’t it annoying when you add a new slide within a sequence of slides in your PowerPoint presentation, and all your slide numbers go for a toss! If you are in this boat, then you’ve come to the right place!
Adding slide numbers can be confusing even after you’ve been using PowerPoint for quite some time. However, with the proper process of adding slides numbers in PowerPoint, you won’t go wrong. But, the question really is, what is the correct way to add slides numbers in PowerPoint?
To add slide numbers in PowerPoint, click on the “Insert” tab and click on the “Slide Number” option from the ribbon. Then, enable the “Slide Number” checkmark. Finally, click on the “Apply to All” option to apply slide numbers to all slides in your presentation.
This article will walk you through the complete details of adding slide numbers in PowerPoint in a step-by-step manner with visual references so that you can easily understand the process! You’ll also learn to add slide numbers in the “1 of X slides” format.
Furthermore, I’ll also show you how to exclude slide numbers from specific slides. In the end, I’ll help you troubleshoot some of the most common issues that you may be facing with slide numbers in PowerPoint. That, and much more!
So, let’s get started!
1. Adding Slide Numbers the Wrong Way! [Don’t Do This!]
First, let’s talk about what you shouldn’t do!
The easiest (and most common incorrect way) to add a slide number is by manually adding a text box on each slide, manually inputting the slide number, and placing it at the bottom of the slide. However, this is the wrong way to add slide numbers to your PowerPoint presentation.
If you add slide numbers this way, you have to add the slide number to each slide individually. Moreover, if you decide to place a new slide in the middle of your presentation, it messes up the sequence numbers for all the slides you just inserted slide numbers. Don’t do this!
The following part of this article discusses the different ways you can add slide numbers to your PowerPoint presentation efficiently.
2. How to Add Slides Numbers in PowerPoint? [Correct Way]
There are multiple ways to add slide numbers in PowerPoint. However, I’ll share the most straightforward method in this article with you.
A quick heads up – if you prefer watching the tutorial rather than reading about it, then check out my video below with the step-by-step instructions. However, if you prefer to read the instructions, continue with the article below.
Adding a Slide Number in PowerPoint Using the “Insert” Tab
Although you will see people talk about using the “Slide Master” to add slide numbers to your presentation, using slide layouts in PowerPoint can be confusing!
The easiest method is to use the “Insert” tab to add slide numbers to your slide. You can use this method even if you are a beginner!
So, what do you need to do? Let’s take a look –
Step-1: Insert a Blank Slide Layout
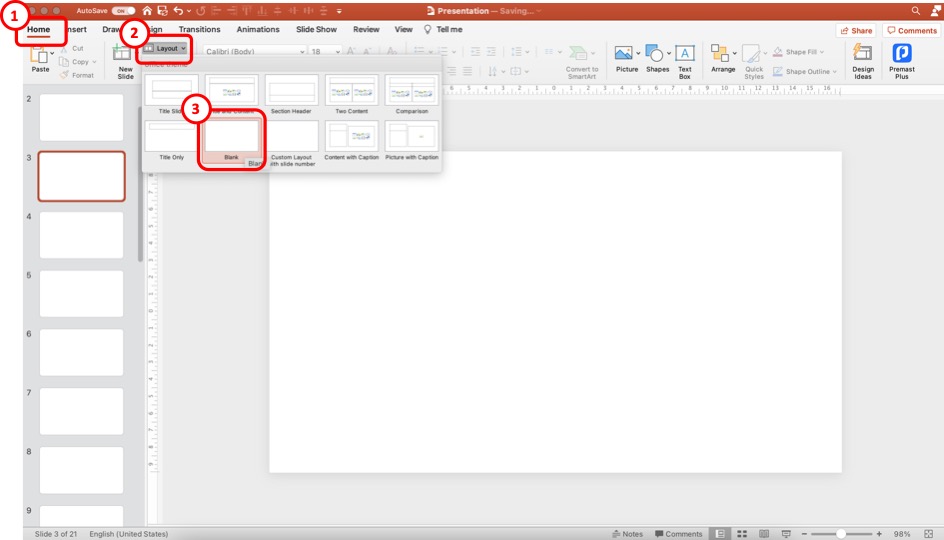
The first step of the process is to insert a blank slide in your presentation. This step is only optional. It is not necessary to do this every time. Don’t do this step, especially if you use a presentation template. But, for the sake of explanation and practice, this will be a helpful step.
Click on the “Home” tab to add a blank slide layout. Then, click on “Layout“, and from the options, click on the “Blank” slide option.
This will convert the slide layout of your current slide to a blank layout. You can also add a slide to your presentation and then convert it to a blank slide layout using the steps I just mentioned.
Step-2: Click on the “Slide Number” option
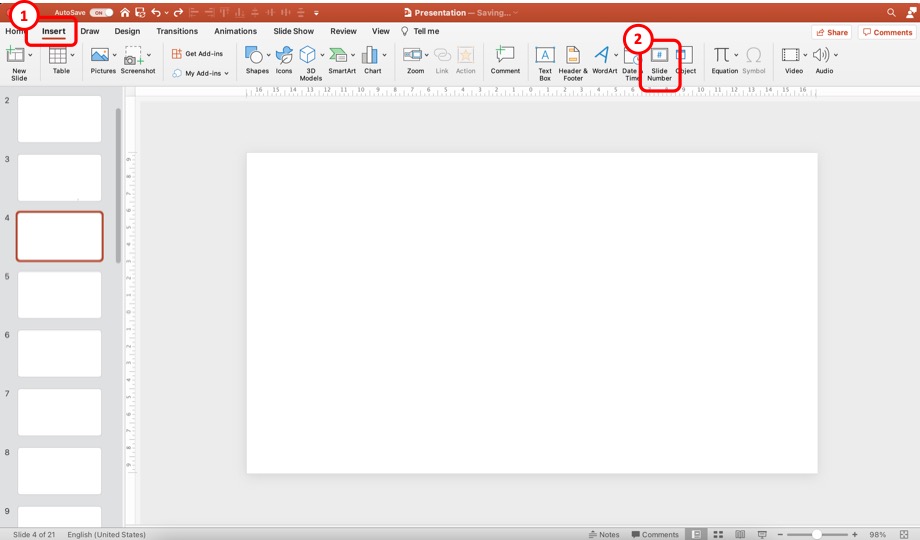
Now, click on the “Insert” tab. Then, from the options, click on the “Slide Number“. This will open a new pop-up window with more options.
Step-3: Add the Slide Numbers to the Slides
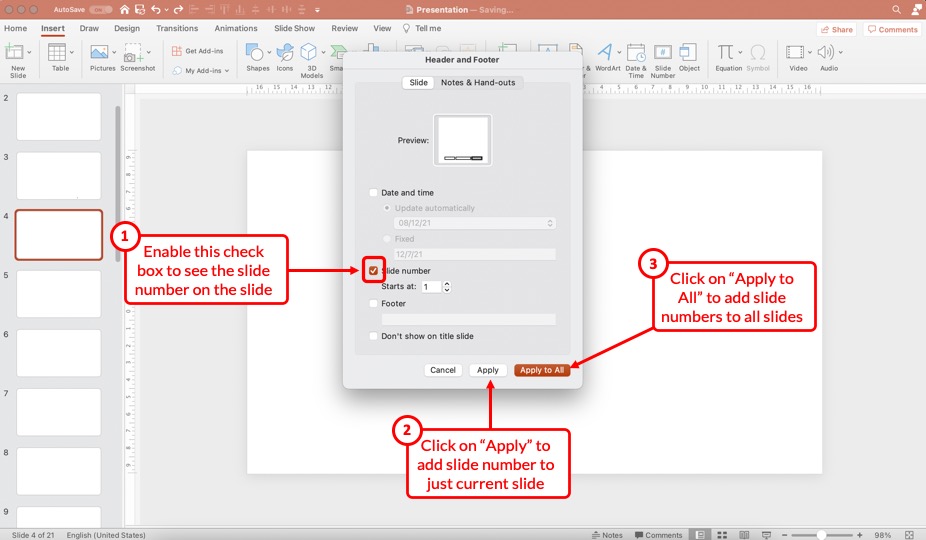
First, make sure that you enable the “Slide Number” option in the next step. Next, make sure that add a checkmark to the check box. You can choose to start the number at “1“.
Then, click on the “Apply” option to add the slide number to just the current slide. However, if you wish to add slide numbers to all the slides, click on the “Apply to All” option.
Don’t worry. We’ll look at how to disable slide numbers for specific slides slightly later in the article.
Step-4: Duplicate the Slide with the Slide Number
This is, again, an optional step.
Once you have the slide number added by clicking on “Apply” in the previous step, you need to copy and paste the slide in PowerPoint.
Make sure that you format the slide number on this slide before you start duplicating this slide. (check the rest of the article to know how to format the slide number)
However, duplicating the slide with a slide number is only helpful when starting with a new presentation. If you already have a bunch of different slides that have been designed especially using a presentation template, this step 4 won’t work.
If you are in that situation, select the “Apply to All” option in step 3. Then, check the section below to format the slide number in PowerPoint.
3. How to Remove Slide Number from Specific Slides
If you don’t want specific slides to show the slide number, you can easily toggle it off.
To remove slide numbers from specific slides in PowerPoint, first, select the slide. Then, click on the “Insert” tab, and click on the “Slide Number” button. Next, “Uncheck” the slide number option in the pop-up that appears, and click on “Apply” to remove the slide numbers from the selected slides.
I’m hopeful that the process mentioned above is self-explanatory. Nevertheless, here’s a step-by-step process to disable slide numbers for specific slides in your PowerPoint presentation.
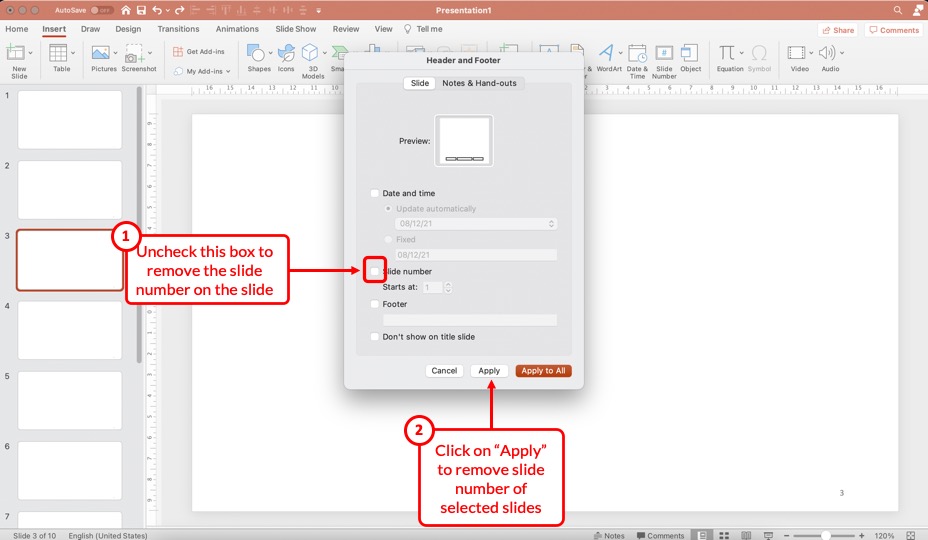
Step 1 – Select the Slides to Remove the Slide Number
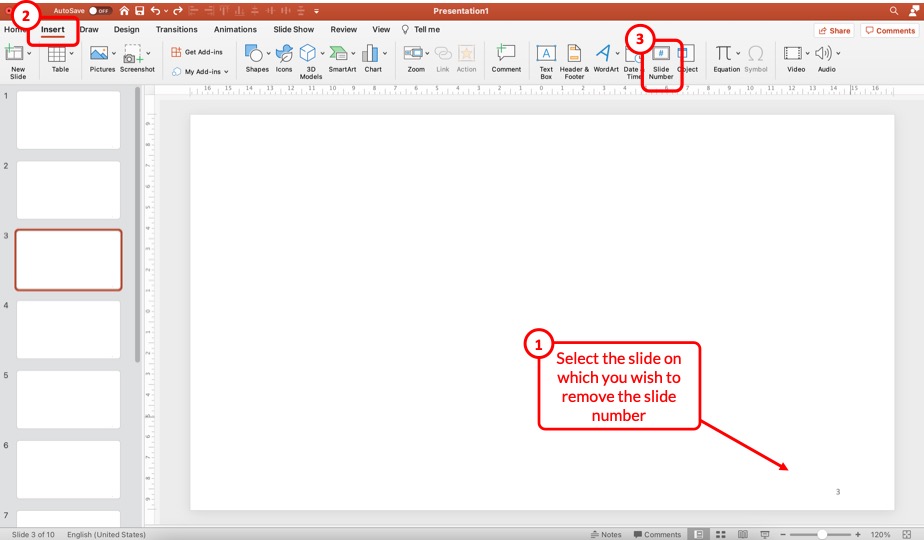
First, select the specific slides on which you wish to remove the slide numbers. You can use the “Ctrl” on your keyboard (or Cmd key for Mac) and click on the slides on the left part of the screen to select multiple slides at once.
Then, click on the “Insert” ribbon, and click on the “Slide Number” option from the ribbon. This will open a pop-up.
Step 2 – Uncheck the Slide Number Option

From the pop-up window that appears, uncheck the box for the “Slide Number” option and click on “Apply“. This will remove the slide number just on the selected slides.
4. How to Remove Slide Number from Title Slide in PowerPoint?
One common problem that you may encounter once you add the slide numbers to all your slides is that the title slide of your presentation also now shows a slide number!
Most of us usually don’t want the slide number visible on the title slide. So, how do you remove the slide number from the title slide of your PowerPoint presentation?
Well, there are three different methods you can use. Let’s take a look at them one by one.
Method 1 – Manually Removing the Slide Number
The easiest way is to remove the slide number from the title slide manually. Simply select the slide number on the title slide and hit the “Delete” key on your keyboard, and the slide number will be deleted.
This method works well for the title slide only since the title slide will always remain as the first slide in the presentation and won’t change its position in the sequence.
If you use this method on other slides, chances are you may want to move the slides around and may want the slide numbers back on the slide later. And, that may just complicate things for you. Instead, just follow the steps mentioned in the previous section to delete slide numbers on other slides.
However, sometimes, PowerPoint just doesn’t allow you to select the slide number field on the slide! In such a scenario, you can’t just delete the slide number.
This is where the other two methods come in handy!
Method 2 – Uncheck the Slide Number Option on the Title Slide
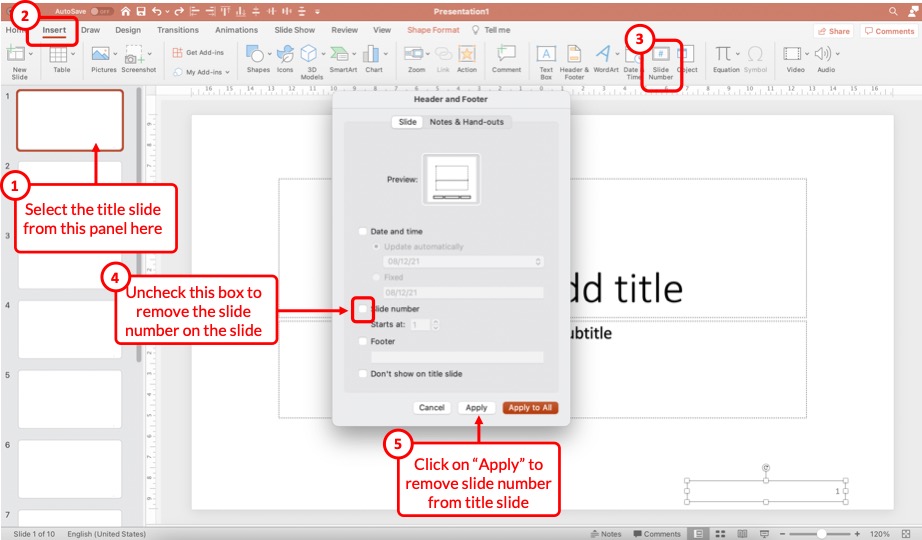
This method works just the same way as per the steps described in the previous section (section 3 above) of the article that describes the process to remove slide numbers from specific slides.
All you need to do is select the title slide by clicking on it. Then, click on the “Insert” tab. Next, click on the “Slide Number” option. From the pop-up that appears, uncheck the box for “Slide Number”, and click on “Apply“.
Just as before, this will remove the slide number from the selected slide.
Method 3 – Use the “Don’t Show on Title Slide” Option

You can also use the “Don’t show on title slide” option when adding the slide numbers to your presentation in order to avoid the slide number on the title slide!
To do so, repeat the steps of adding the slide number to your presentation. Then, enable the checkmark on the “Don’t show on title slide” option to remove the slide number from the title slide.
5. How to Remove Slide Numbers on All Slides in PowerPoint?
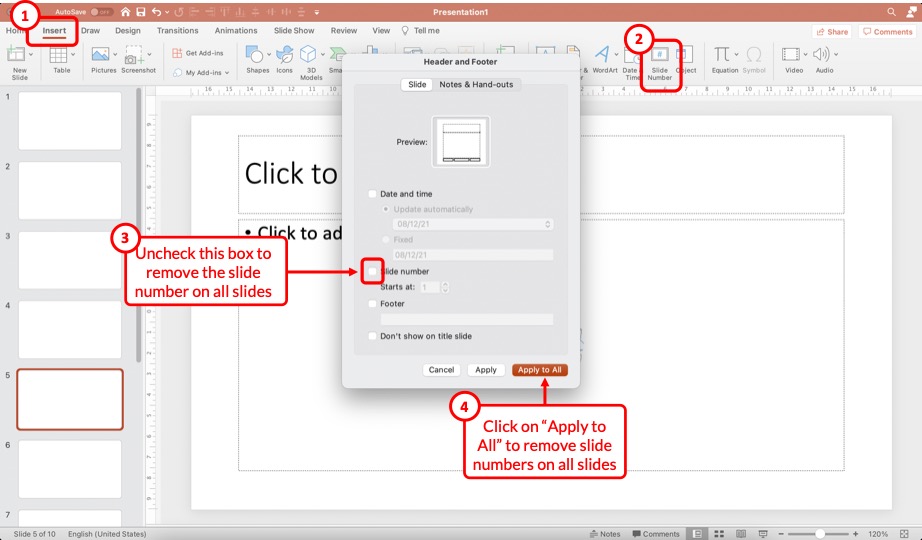
Removing slide numbers from all slides is just as easy as adding slide numbers to your slides!
To remove slide numbers from your PowerPoint presentation, click on the “Insert” tab. Then, click on the “Slide Number” option. From the pop-up that appears, uncheck the box for “Slide numbers”, and click on the “Apply to All” option.
Check the steps on the image shared above in case you need any further clarification.
Once all the steps are complete, you will notice that the slide number disappears from all slides!
6. How to Make Slide Numbers “1 of X Slides” in PowerPoint?
If you have a really long presentation that contains more than 50 slides, then you may want to use the “1 of X Slides” format! [Where “X” is the total number of slides that your presentation contains]
Doing so allows the audience to estimate the number of slides remaining in the presentation. So, how do you do that?
Let me share with you a ninja tip in this section! Here’s a step-by-step explanation of what you need to do!
Step 1 – Insert a Text Box on the Slide
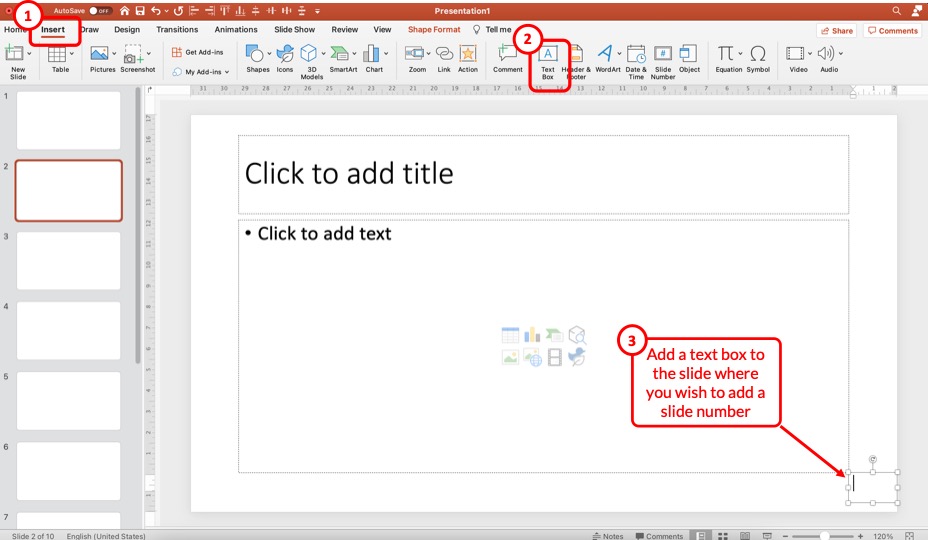
The first step is to insert a text box on the slide. To do that, click on the “Insert” tab. Then, click on the “Text Box” option from the ribbon. Next, just drag the cursor on the bottom right corner of your slide (or wherever you wish to have the slide number).
Step 2 – Insert the Slide Number
The next step is to insert the slide number. But, don’t add the slide number manually.
Instead, first, click inside the text box to make it active. Then, click on the “Insert” tab and click on the “Slide Number” option from the ribbon.
This will automatically insert the slide number inside the text box.
Step 3 – Add Text After the Slide Number
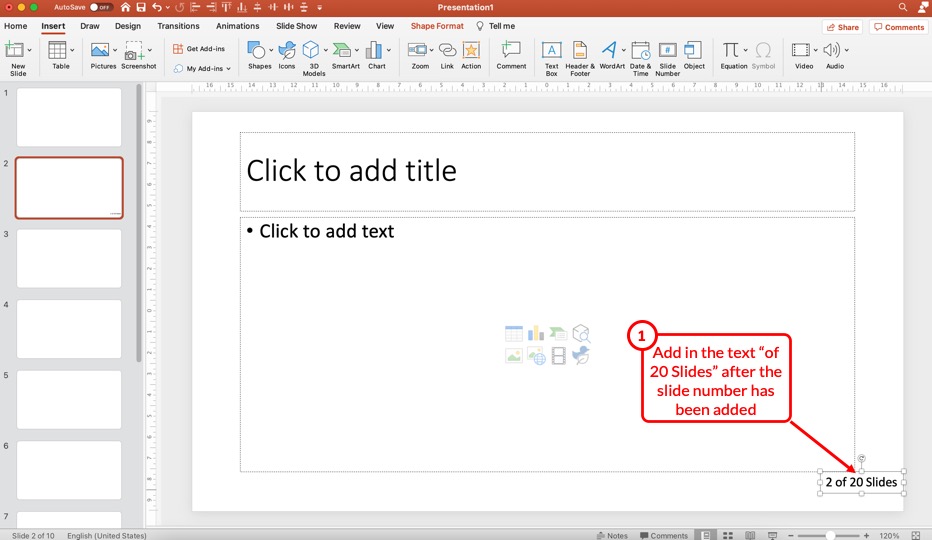
Now, simply add the text that you wish to appear after the slide number. In this case, I’ve added “of 20 Slides” after the slide number (as shown in the image above).
Step 4 – Copy and Paste the Text Box
Now, all you need to do is simply copy and paste this text box on all the slides!
Once you copy and paste the text box on other slides, you will notice that the slide number within the text box will change with the changing slide. However, “of 20 Slides” will remain constant!
Thus, it is advised to add such a slide number format to all slides once you’ve completed creating the presentation as it will provide you with a clear understanding of the exact number of slides in your presentation.
Don’t worry! Even if you move the slides around and change the sequence, the slide numbers will still change with the specific slide!
7. How to Format Slide Numbers in PowerPoint?
Formatting slides numbers is quite easy if you know what to do!
PowerPoint allows you to change the font color, font size, and even the font that is used for the slide numbers. Formatting a slide number works just like formatting text in PowerPoint.
There are two key processes to know when formatting a slide number in PowerPoint! Let’s take a look at both of them –
7.1 How to Format Slide Numbers for a Specific Slide Layout?
Formatting slide numbers of a specific slide layout will affect only those slides that use a particular type of slide layout. Here’s what you need to do –
Step 1 – Add Slide Numbers to the Slides
The first step is to add the slides numbers to your slide. Obviously, in order to edit the slide numbers and see the effect, the slide numbers need to be present on the slide.
So, if you haven’t added the slide numbers already, follow the steps mentioned earlier in the article and add the slide numbers first.
Step 2 – Check the Slide Layout
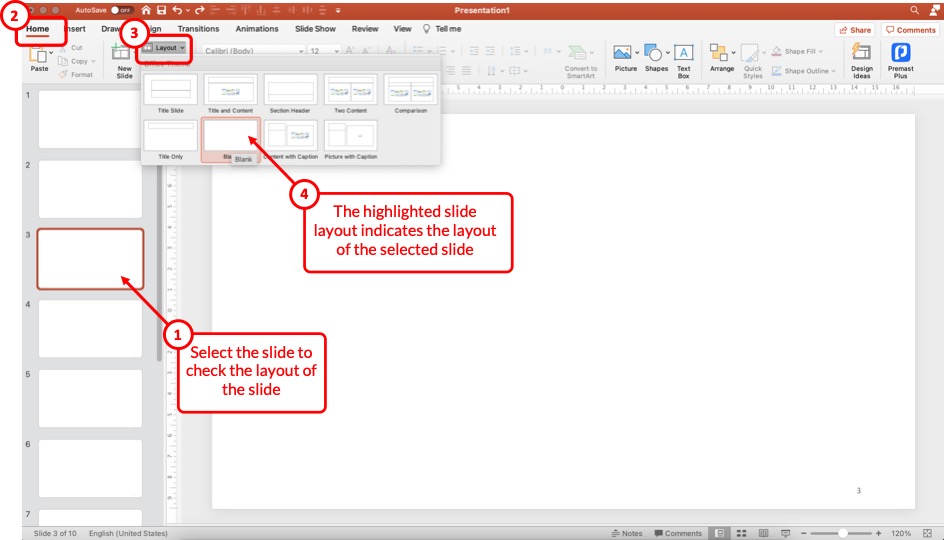
The next step that we need to take is to check the slide layout that is currently in use for the specific slide on which we intend to format the slide number.
To check the slide layout, first, select the slide. Then, click on the “Home” tab and click on the “Slide Layout” option from the ribbon.
The highlighted slide layout will indicate the layout the current slide uses.
Step 3 – Open the Slide Master View
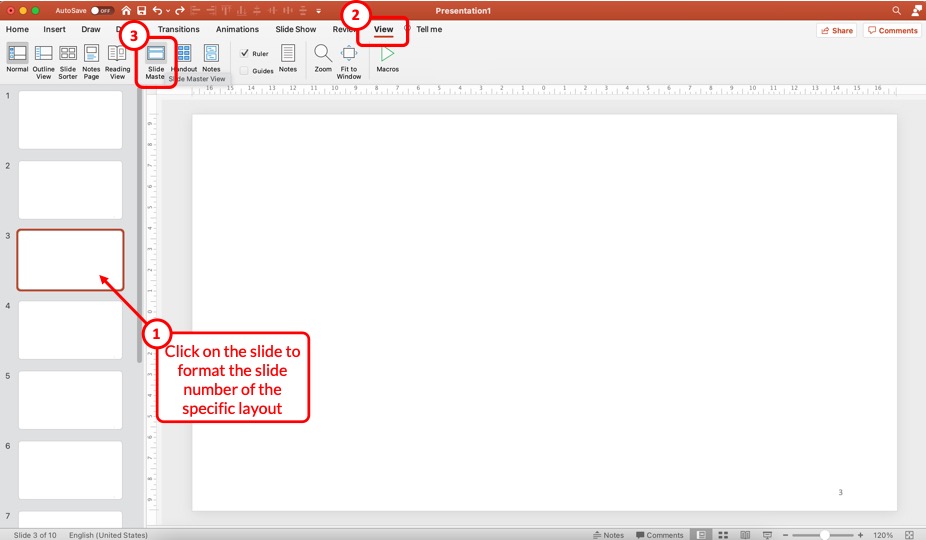
In the next step, we need to open the Slide Master View in PowerPoint.
To do that, first, click on the slide for which you wish to change the slide number format. Then, click on the “View” tab, and click on the “Slide Master” option from the ribbon.
This will open the slide master view in PowerPoint.
Slide 4 – Format the Slide Number for the Specific Slide Layout
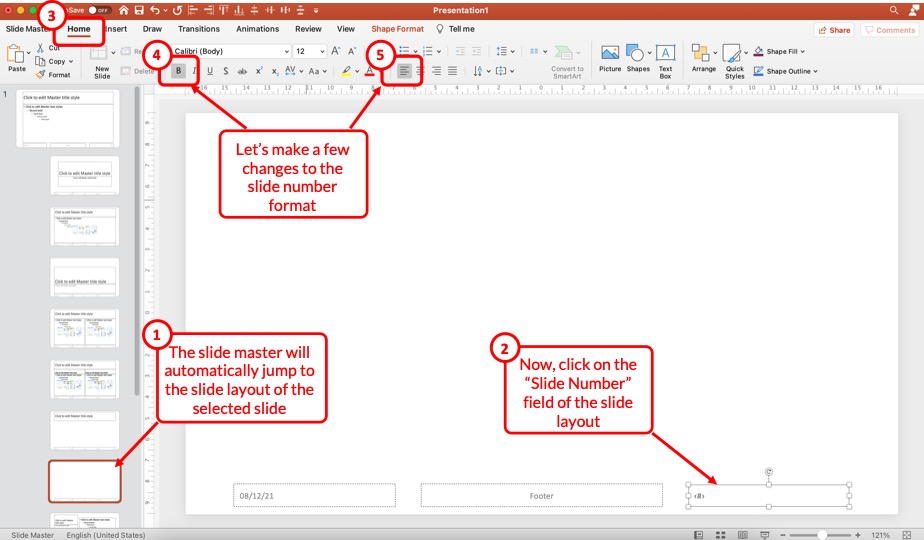
Now, first, make sure that you have the correct layout selected. By default, PowerPoint will open the slide layout of the slide that was selected before opening the slide master view.
Then, to make changes to the format of the slide number, select the slide number field present on the slide. Click on the “Home” tab, and make the changes as per your preference.
You can change the font, text alignment, text styles, font size, and much more! For the sake of this example, let’s change the alignment to left, and add a “Bold” style.
Slide 5 – Exit the Slide Master
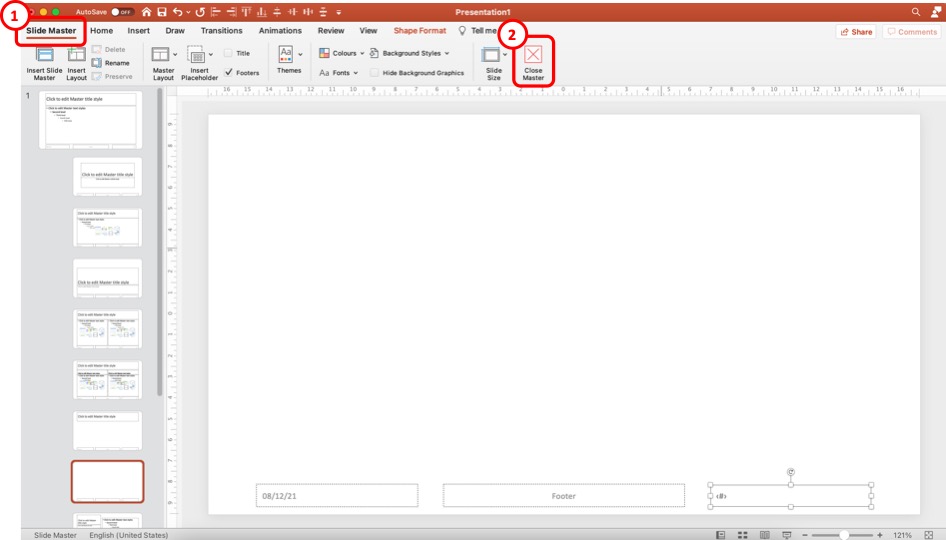
Once you’ve made the desired formatting changes, click on the “Slide Master” tab once again, and click on the “Close Master” option to exit the slide master.
Once you exit the slide master and open the normal view, you will notice that the formatting of the slide number on the current slide layout is different from other slides.
7.2 How to Format Slide Numbers on All Slides in PowerPoint?
If you wish to change the format of the slide number on all slides instead of specific slide layouts, you can do so just as easily. And, no! You don’t need to individually change the format of slide numbers on each slide!
Here’s what you need to do to change the slide numbers on all slides in PowerPoint –
Step 1 – Open the Slide Master View
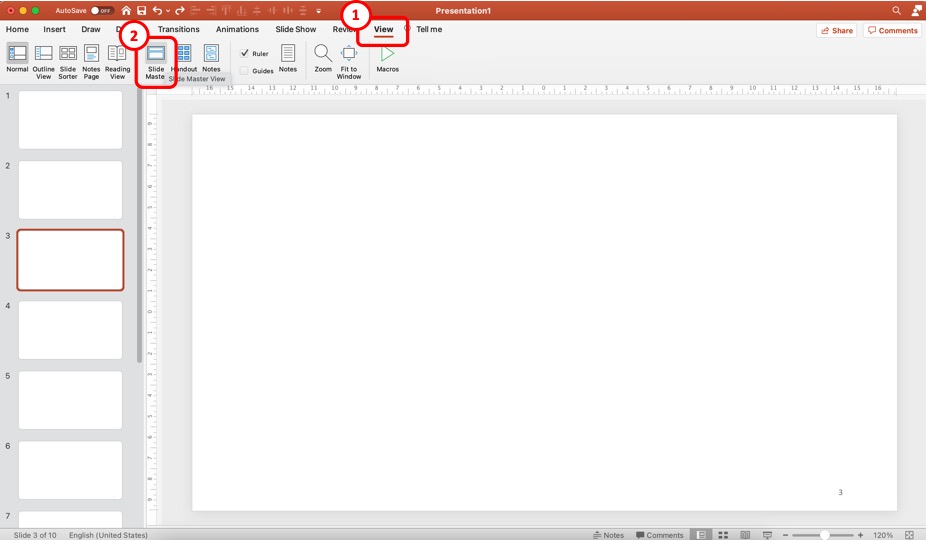
First, you need to open the slide master view in PowerPoint. Just as before, click on the “View” tab. Then, click on the “Slide Master” option from the ribbon.
Step 2 – Format the Slide Number Field on the “Master Slide”
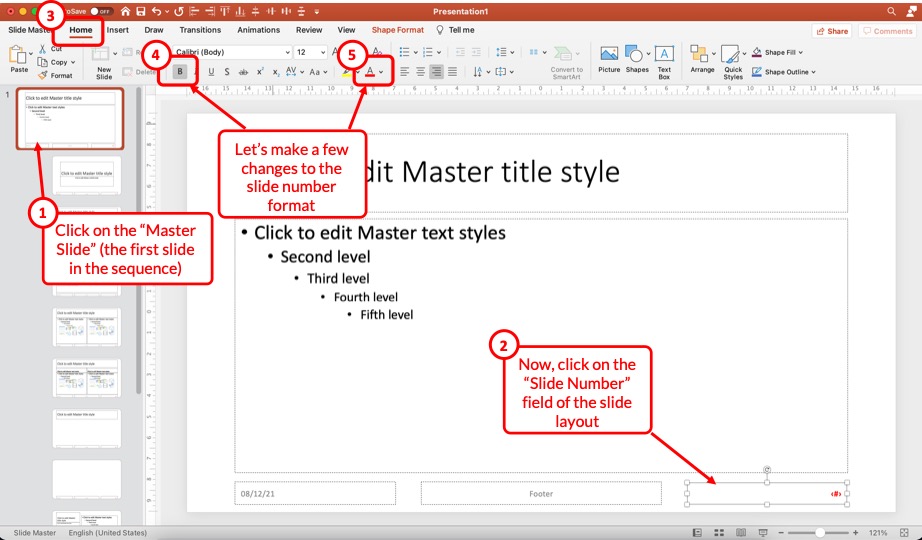
Once you open the slide master view, click on the “Master Slide” i.e. the first slide in the sequence (which is also larger in size than the other slides).
Next, make sure you select the slide number field on the bottom right of the slide. Then, click on the “Home” tab. Here you can make all the formatting changes that you need.
For the sake of this example, I’ll click on the “Bold” option and change the font color to red.
You can see the change taking place on the selected slide number field on the master slide.
Step 3 – Exit the Slide Master
The last step is to exit the slide master.
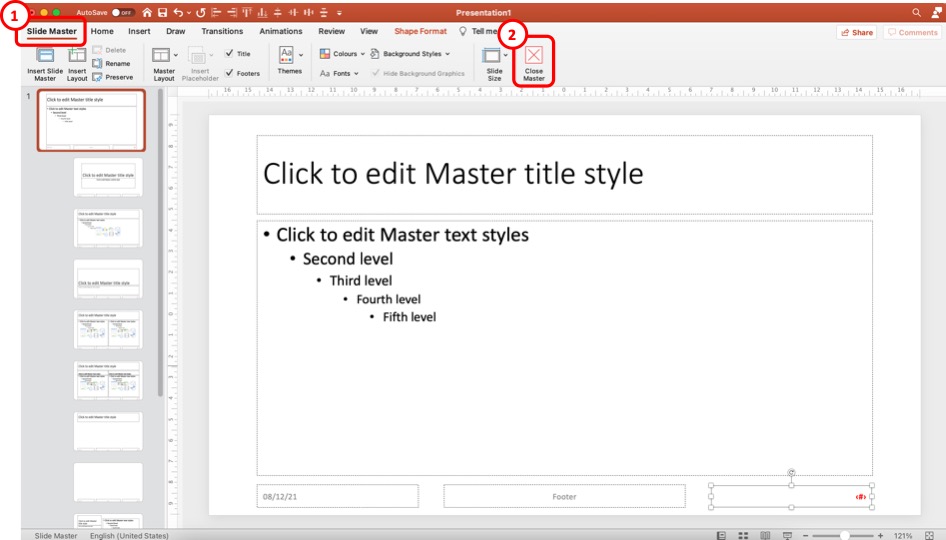
Once you have made all the changes to the slide number formatting, click on the “Slide Master“. Then, click on the “Close Master” options.
When you return to the normal view, you will notice that the formatting changes have been applied to all the slide numbers in your presentation.
Using the method described above, you can make changes to font color, font size, type of font, text alignment, and other formatting changes that you can normally make to text in PowerPoint!
8. How to Change the Position of Slide Numbers in PowerPoint?
To change the position of the slide numbers in your PowerPoint presentation, at first, select the text box of the slide number. After that click and hold the text box and drag it to your preferred position anywhere on the slide.
Once you’ve dragged it to where you want the slide numbers to be let go of the mouse button and the position of the slide number will change accordingly.
In order to change the position of slide number on all the slides, make sure that you use the method described in the previous section of the article (section 7.2)
9. Troubleshooting Slides Numbers in PowerPoint
While adding slide numbers to your PowerPoint presentation you may encounter some difficulties as some users of PowerPoint has.
There may be problems like the slide numbers not, showing the slide number may not be showing as “#”, you may have difficulty removing the slide number, or maybe you want the slide number to start from 0.
All these issues and possible reasons why you are encountering them are described in the following section.
9a. Slide Numbers Not Showing in PowerPoint
Sometimes you may find it difficult to add slide numbers to your PowerPoint presentation. Some of the reasons why you’re having this problem and possible ways to get around them are described below.
1. There may be a shape inserted over your slide number: Sometimes, there may be a shape or an image placed over the location where you inserted your slide number.
To solve this issue, click on the area where the slide number should be, and if there is a shape over it, “Right-click” on the shape and select the “Send to Back” option.
2. Make sure you have used the right layout: Some layouts don’t include the “Slide Number” placeholder in the slide. In that case, you won’t be able to see the slide number in slides using that layout.
To get around this issue, either insert a slide number placeholder in that layout or use a different layout that has a page number placeholder.
9b. Slide Number Showing as “#”
If the slide number is not showing as “#” in your PowerPoint presentation, then the presentation may be using multiple layouts.
To resolve this issue either use a different layout or manually insert a “Footer” in your PowerPoint presentation. After that that you should be able to see the “#” sign in the slide number placeholder.
9c. Can’t Remove Slide Number in PowerPoint?
You can’t remove slide numbers from your PowerPoint presentation by simply deleting them. This would only remove the slide number from the single slide where you deleted the slide number.
To remove slide number from all the slides in your PowerPoint, follow the instructions of excluding a slide from being number described earlier in this presentation, but instead of selecting the “Apply” button, select the “Apply all” button.
9d. Make Slide Number Start at 0
To make the slide number start from zero, follow the instructions given below.
Step-1: Select the “Customize Slide Size” option
The first step of the process is to select the “Customize Slide Size” option. To do that simply go to the “Design” tab from the ribbon of your presentation, click on the “Slide Size” button located in the “Customize” section of the “Design” tab.
After that, a dropdown menu will appear on your screen. From the dropdown menu, click on the “Customize Slide Size” option.
Step-2: Type in 0 in the “Number starts from” box
Finally, type in ‘0’ in the “Number starts from” box which is the last box in the “Slide Size” pop-up window, and then hit the “Ok” button. This will make the slide numbering start from zero.
Credit to drobotdean (on Freepik) for the featured image of this article (further edited)