
When I first started using PowerPoint, I had no idea about the “Slide Master”. In fact, when I first learned about it, I was quite confused. I didn’t quite understand its purpose and how it worked. Furthermore, some of the changes I made to the slide master were scary at first simply because I didn’t understand how it worked!
Slide Master in PowerPoint allows you to have master control over all slides. It allows you to make changes to all slides at once. You can also use the slide master to create footers, add watermarks and slide numbers, generate custom presentation templates, edit placeholders, among other things.
Retrospectively thinking, having a “Slide Master” in PowerPoint is such an important feature! Knowing how to use the slide master properly can help you save a lot of time while creating a presentation!
So, in this article, I’ll share with you all the details you need to know about a Slide Master in PowerPoint. Without further adieu, let’s get started!
1. What is the Slide Master In PowerPoint and Why is it Used?
Slide Master is a Microsoft PowerPoint feature that allows you to easily edit all the slides at once or the individual slide layouts of a presentation.
1a. What is a Slide Master?
The slide master in Microsoft PowerPoint contains all the information on the slide layout as well as the theme of a presentation. This includes the fonts, color, effects, background, and the size and position of the placeholders.
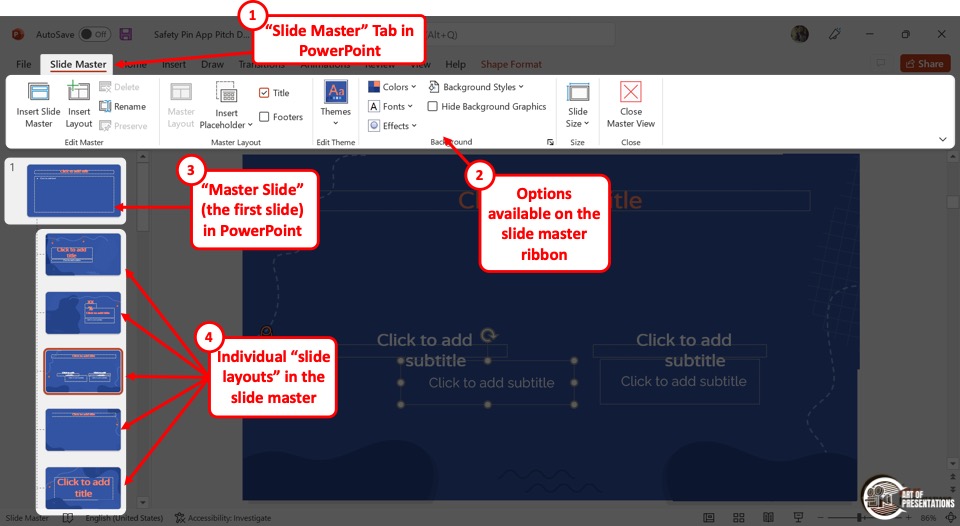
To access the slide master, first, click on the “View” tab in PowerPoint. Then, click on the “Slide Master” option. This will open the slide master view in PowerPoint.
The master slide is the top slide in a hierarchy of slides in a presentation (as shown in the image above). Changes that you make to the master slide impact all the slides in the slide master.
It is important to note that the actual design and content of the presentation must be added to the slides in the “Normal View”. Any images or content you add to the slide master will become uneditable in the normal view of the PowerPoint presentation.
The best way to use the slide master is by using “Placeholders”. I’ve written a detailed article on “Placeholders” in PowerPoint. Make sure to check out that article to learn more about them!
1b. Uses of Slide Master View in PowerPoint –
Since the slide master stores information about the theme and the layout of the slides in a PowerPoint presentation, you can use the “Slide Master” view to edit several elements in the presentation.
a. Change Slide Background
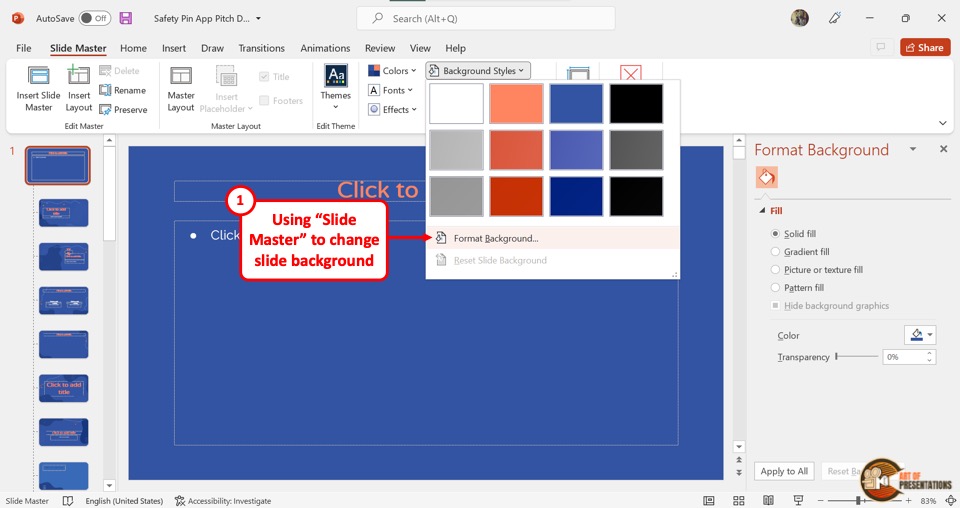
Using the “Slide Master” view, you can change the background of all the slides at once. The background editing features are available in the “Background” section of the “Slide Master” menu.
You can click on the “Colors” option to change the colors for the slides, the “Fonts” option to set a specific font for the presentation, and the “Effects” option for the background effects. Besides, you can click on the “Hide Background Graphics” option to remove all background graphics from the entire presentation.
Clicking on the “Format Background” option under the “Background Styles” button, you can access various customizable background colors and designs for the presentation.
b. Rearrange Placeholders in Slide Layout

In Microsoft PowerPoint “Slide Master” view, you can edit both the master slide and the slide layouts. By rearranging the placeholders in a slide layout, you will only create changes for the slides using that specific layout instead of the entire presentation.
To rearrange the placeholders, all you have to do is click on a placeholder and drag it to your preferred position on the slide.
c. Customize Overall Text Formatting
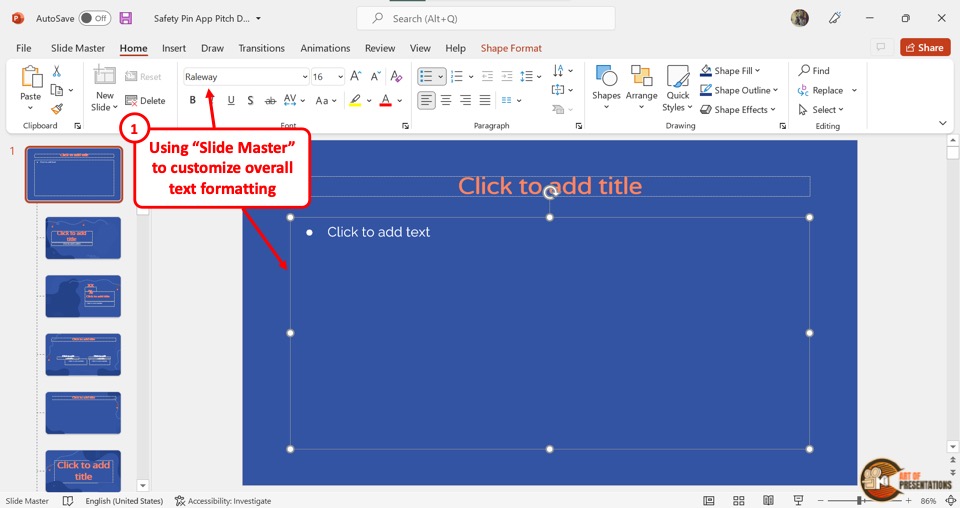
In the “Slide Master” view, you can easily change or customize the overall text formatting. You have to first click on the content placeholder in the master slide which is the top slide in the slide layout panel on the left side of the screen.
Then click on the “Home” tab from the menu ribbon. In the “Font” section of the “Home” menu, you can customize the fonts like the style, size, color, highlights, etc. This will customize the text of all the slides.
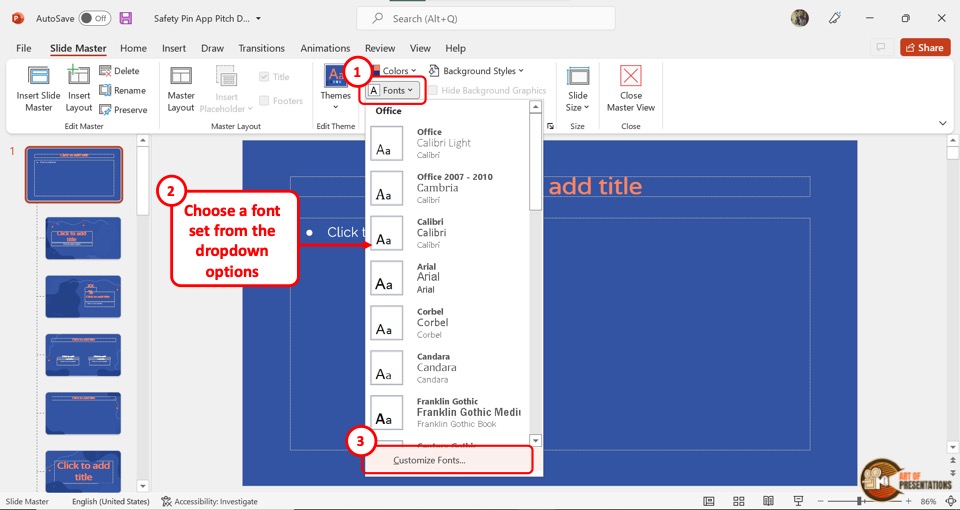
d. Customize Theme Fonts
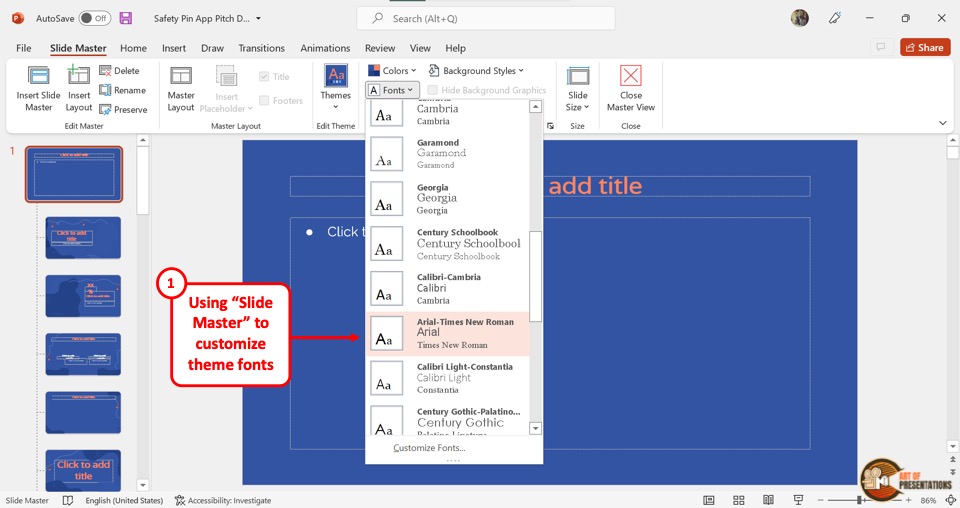
By customizing the theme fonts in the “Slide Master”, you can choose a set of fonts for various list levels of text in all the slides. To do so, click on the “Fonts” option in the “Background” section under the “Slide Master” tab. Then click on your preferred set of fonts from the dropdown menu.
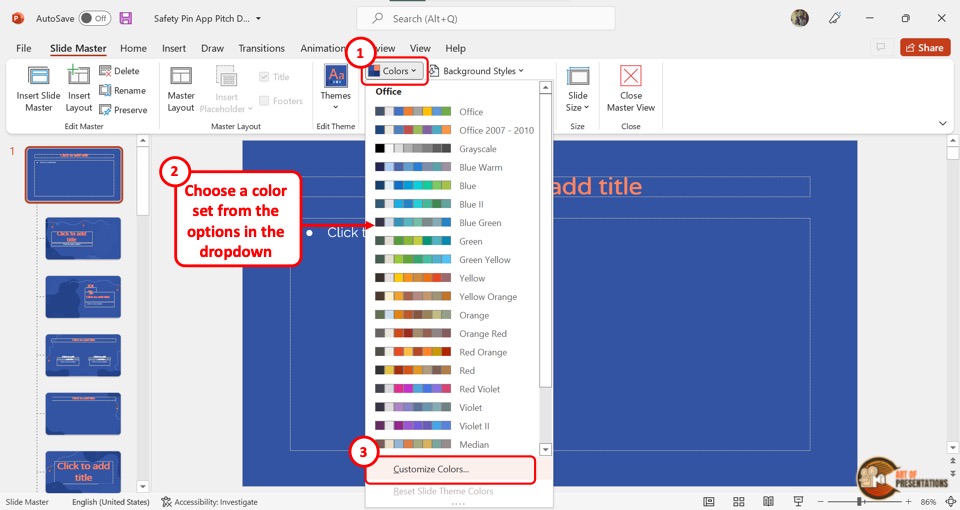
e. Customize Theme Colors
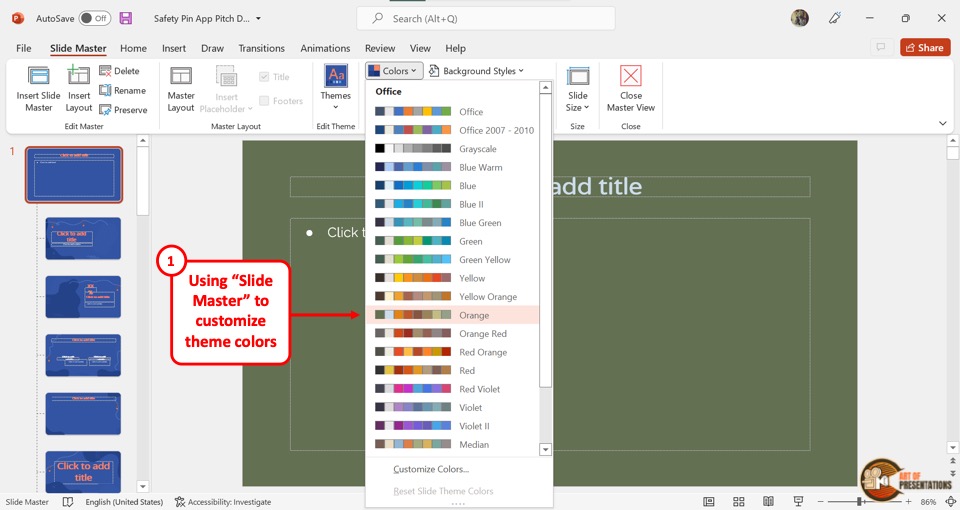
The theme color in a “Slide Master” contains a set of colors for various elements of the slides in a presentation like the background, heading, body text, etc. By customizing the theme color in “Slide Master”, you can customize the colors for the entire presentation.
All you have to do is click on the “Colors” option in the “Background” section of the “Slide Master” menu and select your preferred theme colors from the dropdown menu.
f. Create Unique Slide Layouts and Templates
Using the features in the “Slide Master” menu, you can edit any element and object in the presentation. You can change the color, font, arrangement, theme, etc. of the entire presentation.
You can also create and edit individual slide layouts. You can easily use the “Slide Master” view to create fully unique slide layouts and templates.
2. Difference Between Slide Master and a PowerPoint Template?
In Microsoft PowerPoint, a Slide Master contains information about the layout and the theme of the presentation.
A PowerPoint template, on the other hand, is a design or pattern of a slide or even a whole presentation. In short, a template is a copy of a presentation blueprint that can be edited to fit your needs, while the master slide stores the layout and theme of that template.
3. How to Access the Slide Master in PowerPoint?
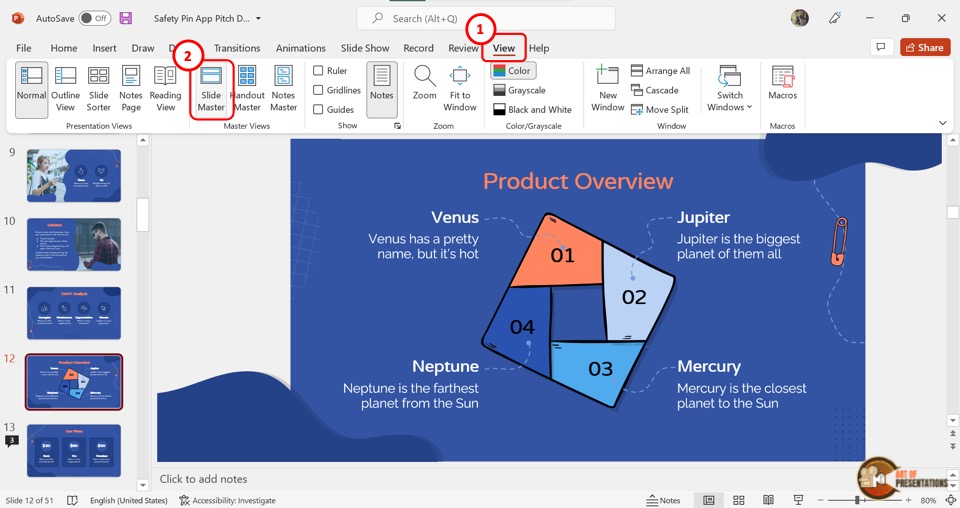
In Microsoft PowerPoint, you can access the slide master in the “View” menu. You have to first click on the “View” tab in the menu ribbon located at the top of the screen. Then click on the “Slide Master” option in the “Master Views” section of the “View” menu. This will open the “Slide Master” view where you can edit the master slide and the slide layouts.
4. How to Edit a Slide Master in PowerPoint?
Microsoft PowerPoint allows you to edit the slide master using the “Slide Master” view. You can edit the master slide itself, and also the slide layouts separately. You can even add or remove master slides and slide layouts.
4a. Using the Master Slide to Apply Changes to All Slide Layouts in PowerPoint
Since the master slide contains all the information on the theme and layouts of the entire presentation, any change in the master slide will be automatically applied to all the slide layouts under the master slide.
To apply changes in the master slide, all you have to do is click on the master slide from the slide layout panel and use the features available in all the tabs in the menu ribbon.
4b. How to Change Slide Background in the Slide Master?

In the “Slide Master” view, click on “Background Styles” and select the “Format Background” option from the dropdown menu. This will open a sidebar on the right side of the screen.
In the “Format Background” sidebar, you can change the color, gradient, or pattern of the background. You can also add an image as the background.
4c. How to Customize Fonts and Text Formatting in the Slide Master in PowerPoint?
To customize fonts and text formatting in the “Slide Master” view, you have to follow the 2 simple steps.
Step-1: Click on the “Customize Fonts” option
You have to first click on the master slide from the slide layout panel. Then click on the “Fonts” option from the “Background” section of the “Slide Master” menu. From the dropdown menu, click on the “Customize Fonts” option at the bottom.
Step-2: Click on the “Save” button

In the “Create New Theme Fonts” dialog box, click on the “Heading font” box to customize the heading and on the “Body font” box for the body text. Then click on the “Save” button at the bottom of the dialog box.
4d. How to Customize Theme Colors in Slide Master?
In the “Slide Master” view of Microsoft PowerPoint, you can customize the theme color by following the 2 easy steps.
Step-1: Click on “Customize Colors”
In the “Background” section of the “Slide Master” view, click on the “Colors” option. Then click on the “Customize Colors” option at the bottom of the dropdown menu.
Step-2: Click on “Save”
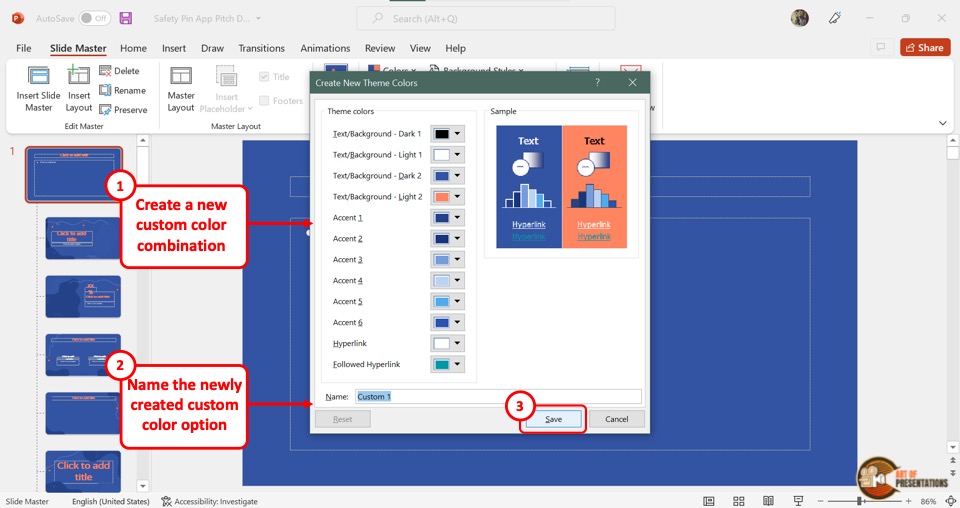
In the “Create New Theme Colors” dialog box, click on the box next to each option to select your preferred colors. Then all you have to do is click on the “Save” button at the bottom of the dialog box.
4e. How to Apply Effects in PowerPoint Slide Master?
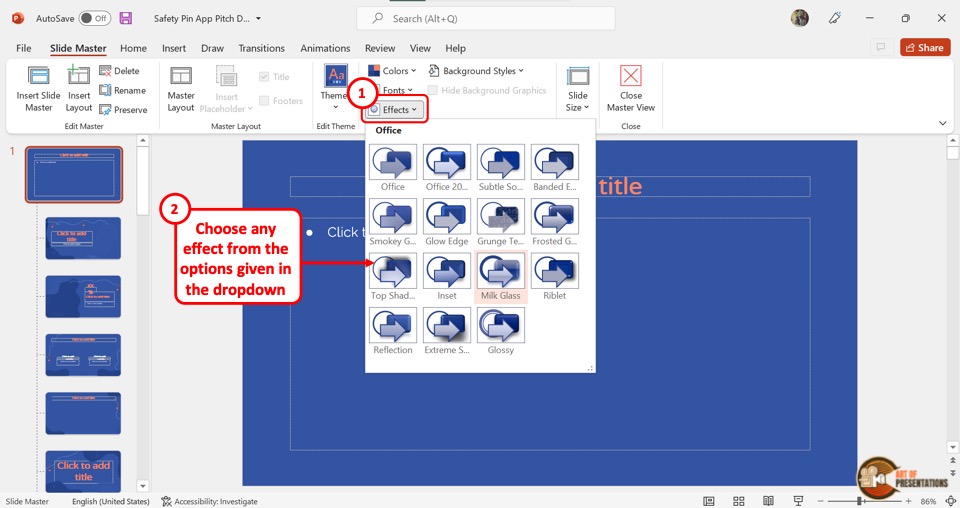
To apply effects in the “Slide Master” view of PowerPoint, click on the “Effects” option in the “Background” section. This will open a dropdown menu containing fifteen effect options to choose from. All you have to do is click on your preferred effect from the dropdown menu.
4f. How to Edit Footer in PowerPoint?
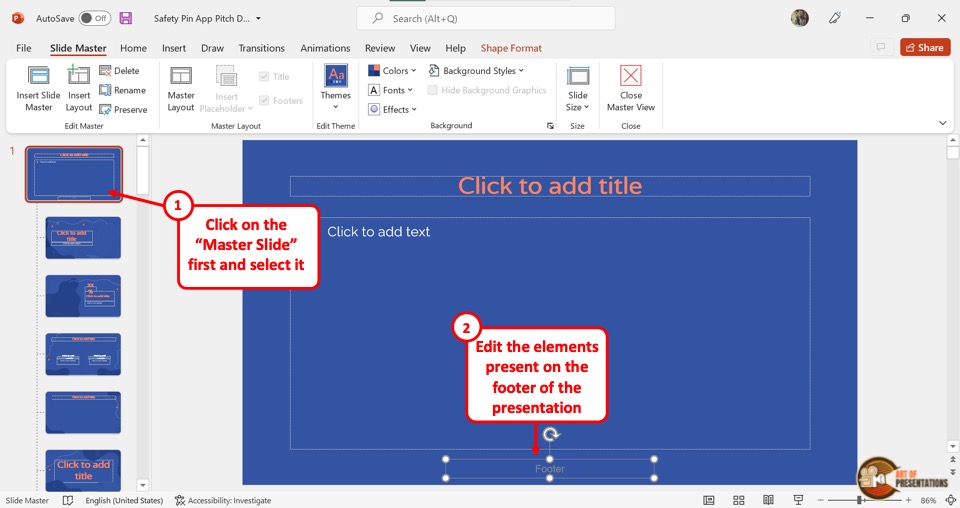
The footer in a PowerPoint presentation is a text that appears at the bottom of all slides. To edit the footer in the “Slide Master” view, all you have to do is click on the “Footer” box at the bottom of the master slide. Then type in the text you want in the footer.
Check out my other article on “How to Add a Footer in PowerPoint?” to learn more about editing, adding, and removing footers in PowerPoint.
4g. How to Add Logo to All Slides Using Slide Master in PowerPoint
Adding a logo to your Microsoft PowerPoint presentation can be a smart way of branding. It is quite easy if you know the correct steps.
In fact, I’ve written a detailed article on how to add a logo in PowerPoint. Do make sure to check out that article as well to get all the advanced tips and tricks and to know the correct way to do it!
Meanwhile, here are the key steps to add a logo to all slides using the “Slide Master” in PowerPoint –
Step-1: Click on the “Insert” tab
The first step is to click on the master slide from the slide layout panel on the left side of the screen in the “Slide Master” view. Then click on the “Insert” tab from the menu ribbon.
Step-2: Click on the “Pictures” button
The next step is to click on the “Pictures” button in the “Images” section of the “Insert” menu. Then click on the “This Device” option from the dropdown menu. This will open a dialog box.
Step-3: Click on the “Insert” option
In the “Insert Picture” dialog box, click on the logo you want to add to the presentation. Then click on the “Insert” button at the bottom of the dialog box to add the logo to the master slide. This will automatically add the logo to all the slides of the presentation.
4h. Use Slide Master to Add a Watermark in PowerPoint
A watermark is an identifying text or image that usually appears across a document and is semi-transparent. You can learn about how to add or remove watermarks in PowerPoint in my other article.
Meanwhile, I’ll share the key steps in a brief manner below –
Step-1: Click on the “Insert” tab
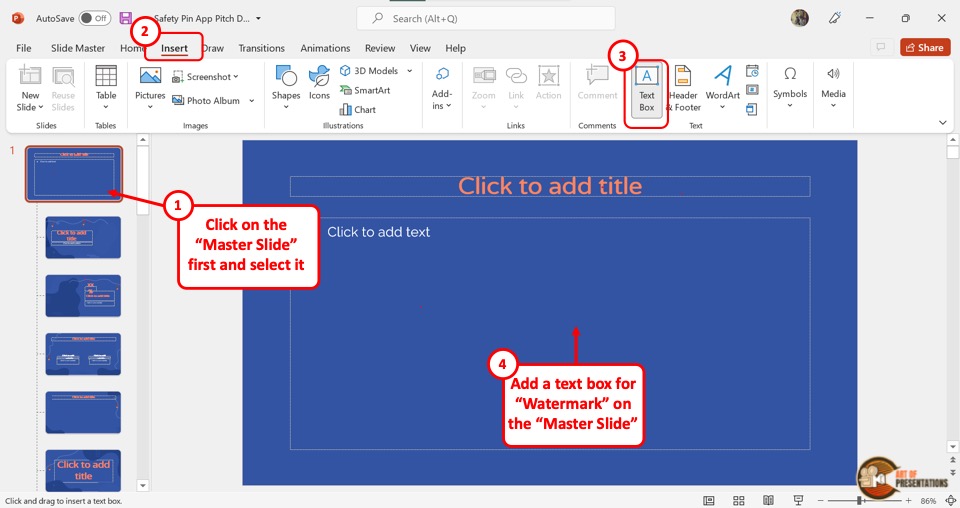
In the “Slide Master” view, click on the master slide which is the top slide in the slide layout panel. Then click on the “Insert” tab from the menu ribbon located at the top of the screen.
Step-2: Click on the “Text Box” option
In the “Insert” menu, click on the “Text Box” option from the “Text” section. Then draw the text box on the master slide. You can now type in the text you want as a watermark on all the slides.
Step-3: Click on the “Format Text Effects” option
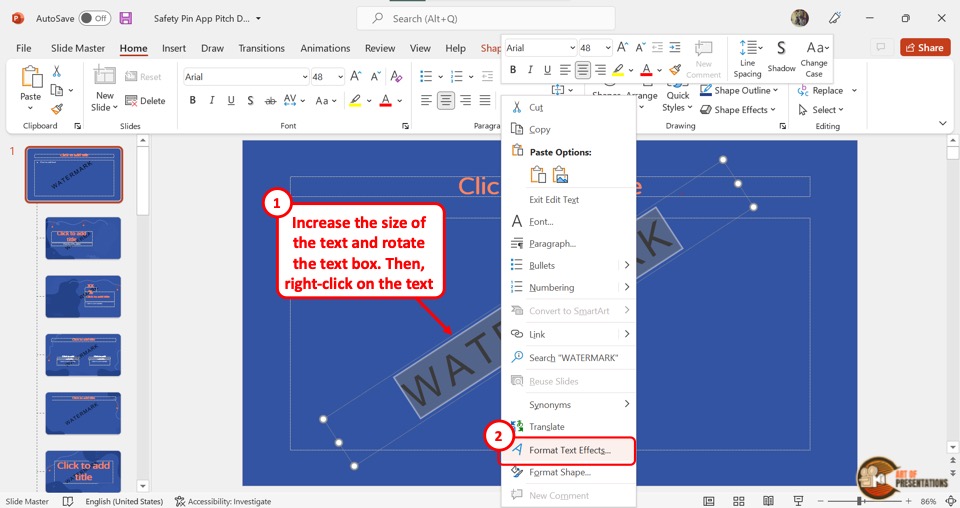
The next step is to select the text in the watermark text box. Then “Right Click” on the selected text and click on the “Format Text Effects” option. This will open the “Format Shape” sidebar on the right side of the screen.
Step-4: Increase the text transparency
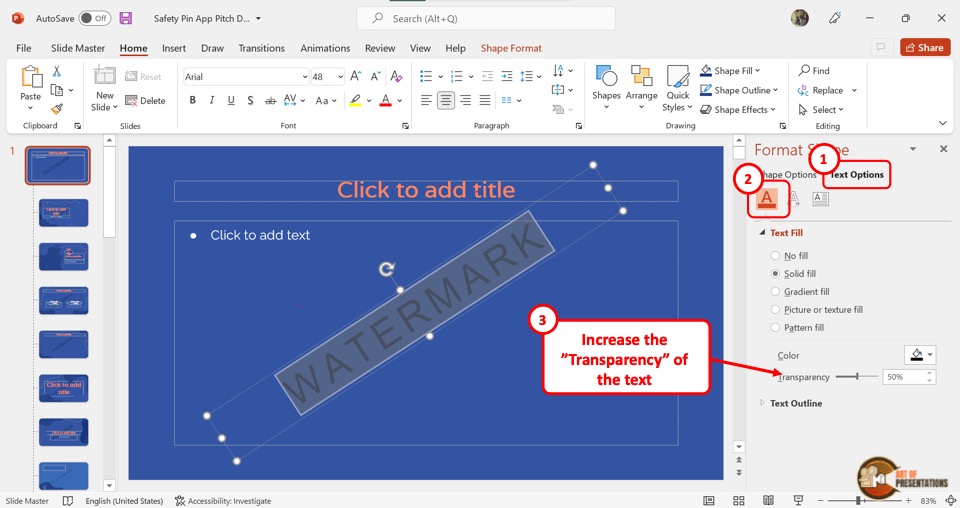
In the “Format Shape” sidebar, click on the “Text Fill and Outline” option which is the first icon. In the “Text Fill” section, click on the “Solid Fill” option. Then drag the slider next to the “Transparency” option to the right until the text reaches your preferred transparency.
5. Understanding Slide Layouts in PowerPoint Slide Master
Slide Layouts in Microsoft PowerPoint are slide designs that have pre-arranged placeholders that you can use to add your content quickly and easily. To understand the functions of slide layouts in PowerPoint and how to use them, you can read my article on slide layouts in PowerPoint.
5a. How to Know Which Slides Use What Slide Layouts
Using the “Normal” view in PowerPoint, you can see which slides are using what slide layouts. All you have to do is follow the 2 simple steps.
Step-1: Click on the “Normal View” option
In the menu ribbon located at the top of the screen, click on the “View” tab. In the “View” menu, click on the “Normal” option which is the first option in the “Presentation Views” section. This will return the screen to “Normal View”.
Step-2: Click on the “Layout” option
In the slide thumbnail panel at the left side of the screen, “Right Click” on a slide. Then click on the “Layout” option from the context menu. This will open a list of all the slide layouts available in the presentation. You will see the slide layout being used by the selected slide is highlighted in the list.
5b. How to Insert and Rename Slide Layouts
To insert or rename slide layouts, you have to first access the “Slide Master” menu from the “View” tab in the menu ribbon.
Inserting Slide Layouts
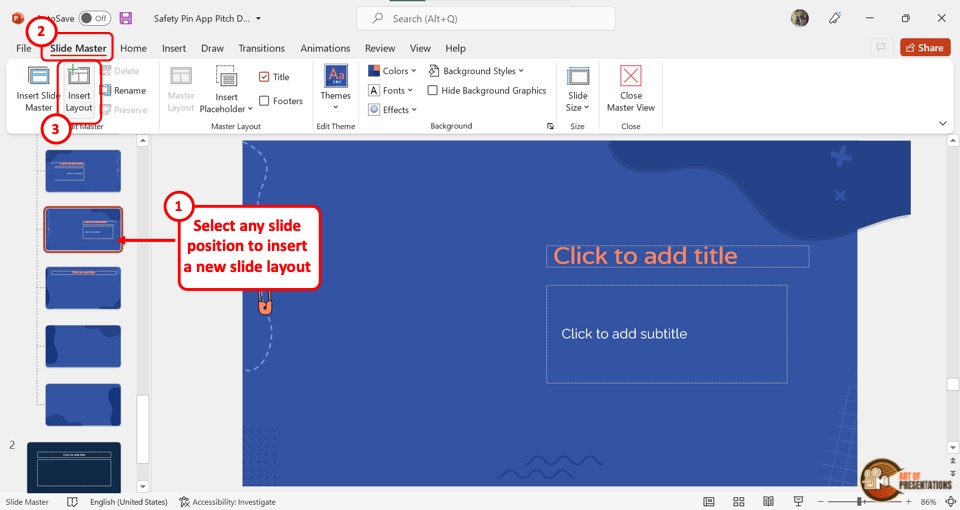
In the slide layout panel on the left side of the screen, you have to first click on the place where you want to insert a new slide layout. Then click on the “Insert Layout” button in the “Edit Master” section of the “Slide Master” menu.
Renaming Slide Layouts
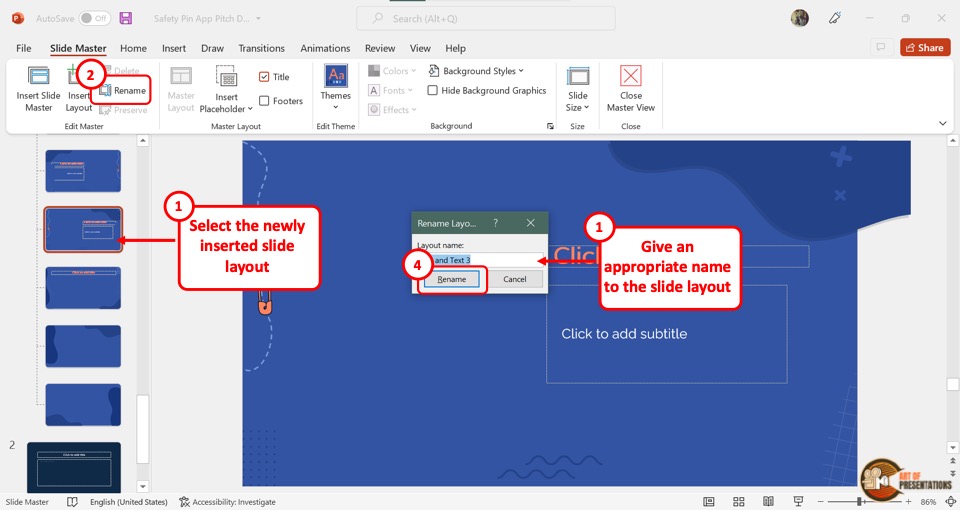
To rename a slide layout, you have to first click on the layout from the slide layout panel. Then click on the “Rename” option next to the “Insert Layout” button in the “Slide Master” menu. This will open the “Rename Layout” dialog box where you have to type in the new name for the slide layout.
Finally, you have to click on the “Rename” button in the dialog box to rename the slide layout.
6. Understanding Placeholders in Slide Master in PowerPoint
In Microsoft PowerPoint, a placeholder is a pre-formatted box on the slide where you can easily add content with a single click. You can learn more about placeholders in PowerPoint in my other article.
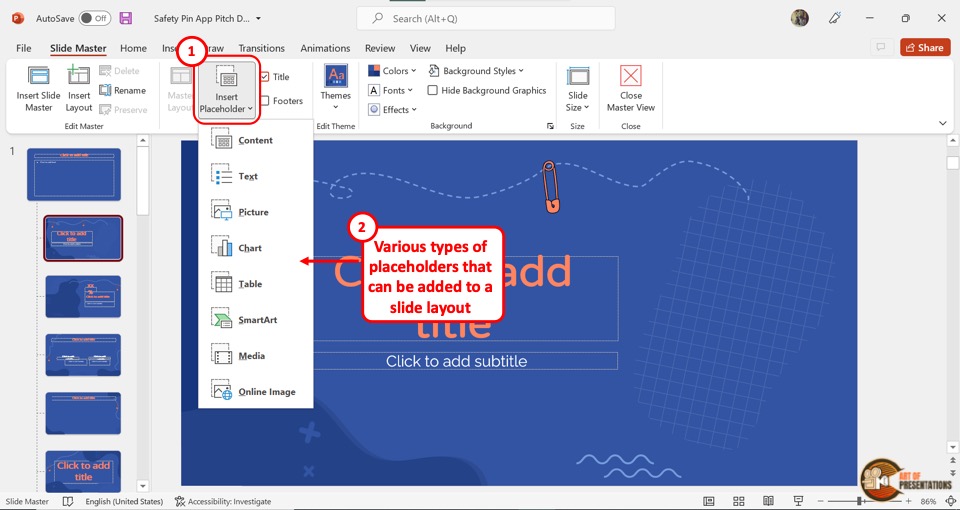
Using the “Slide Master” view, you can add, remove and edit the type and position of the placeholders in each slide layout. There are seven types of placeholders: “Text”, “Pictures”, “Chart”, “Table”, “SmartArt”, “Media”, and “Online Image”.
Besides, you can also use a “Content” placeholder which allows you to add any type of mentioned content.
7. How to Insert a Slide Master in PowerPoint?
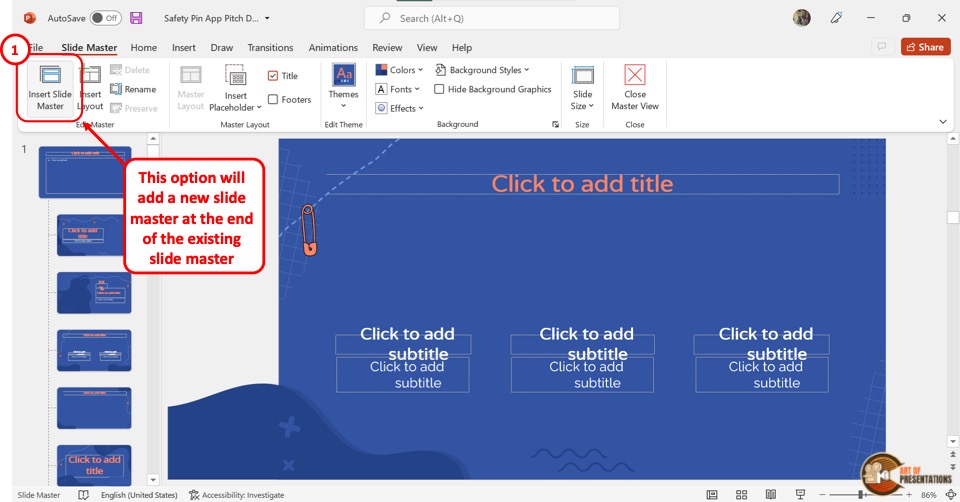
To insert a slide master in Microsoft PowerPoint, the first step is to open the “Slide Master” view from the “View” tab. In the “Slide Master” view, click on the “Insert Slide Master” button. It is the first button in the “Edit Master” section of the “Slide Master” menu.
Alternatively, you can press the “Ctrl+M” keys on your keyboard to insert a new slide master.
8. How to Delete a Slide Master in PowerPoint?
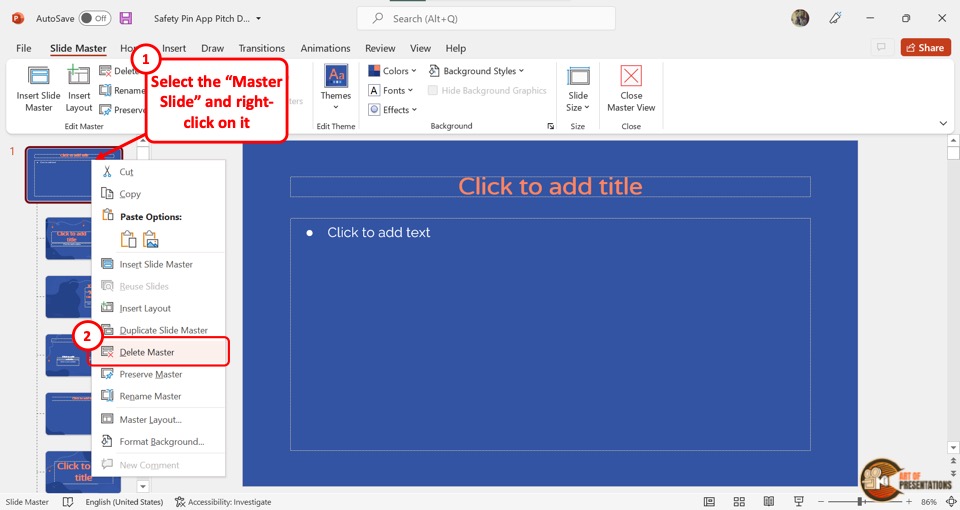
To delete an unused master slide in PowerPoint, you have to first “Right Click” on the master slide from the slide layout panel on the left side of the screen. Then click on the “Delete Master” option in the right-click menu. Alternatively, you can press the “delete” key on your keyboard.
9. How to Exit the Slide Master View in PowerPoint?
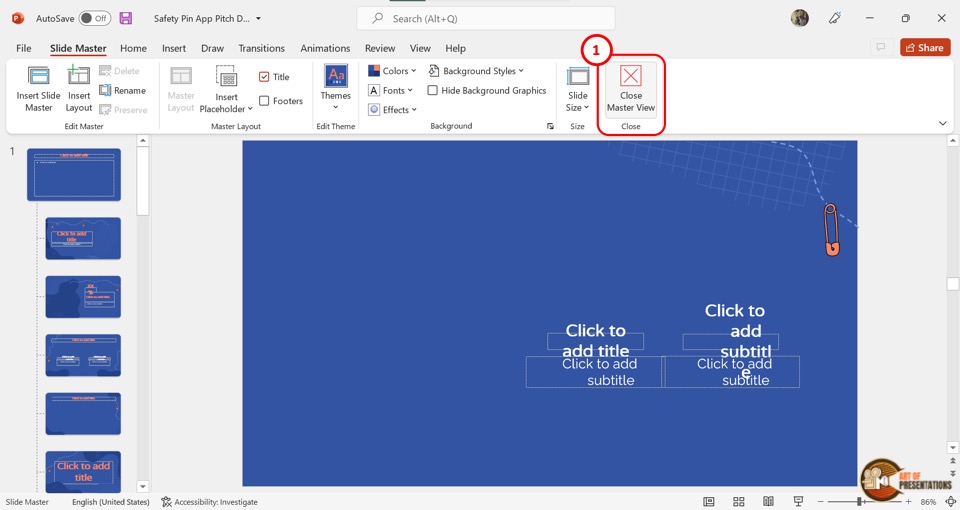
In Microsoft PowerPoint, you can exit the “Slide Master” view with one click. All you have to do is click on the “Close Master View” button. It is the last button under the “Slide Master” tab and is located in the “Close” section.