
Slide Master in presentation applications like Google Slides always feels like the thing that we should be scared about (like Lord Voldemort!) as the changes can affect and mess with your complete presentation!
But the truth is, a Slide Master in Google Slides just contains a bunch of slide layouts that actually make your task of creating a presentation much easier! If you know how to work with Slide Master, you can actually control your presentation in ways you couldn’t before!
So, in this article, we are going to do a deep dive into the subject of Slide Masters in Google Slides. We’ll learn what is a slide master, how you can access it, and how you can use it to add text placeholders, change backgrounds, and much more!
So, without further adieu, let’s get started!
1. What is Slide Master in Google Slides?
Let’s start with the basics – what exactly is a Slide Master in Google Slides?
In a nutshell, a Slide Master is a design blueprint of your presentation. It stores information about the theme, the slide layouts, the background, colors, fonts, placeholders, and even the position of the placeholders on a slide layout!
Using a Slide Master in Google Slides allows you to adjust and make presentation-wide changes in one go.
For instance, if you want to change the color of text on one slide, you can simply do that as you would normally, by clicking on the text box and changing the color from the Toolbar in Google Slides.
However, if you want to change the color of the text used in the title of all slides to a particular color, you should use the slide master.
The same holds true for the type of fonts for the presentation, color scheme, changing the layout, adding backgrounds, placeholders etc.
2. How to Access Slide Master in Google Slides?
Now that we have understood about the slide master in Google Slides, let’s learn how to access it.
Google Slides allows you access to the slide master view using the menu options. Here’s what you need to do to access the slide master in Google Slides.
Step-1: Click on “View”

The first step is to click on the “View” menu which is the third option in the menu bar located at the top of your screen.
Step-2: Click on the “Theme Builder” option
Now, all you have to do is click on the “Theme Builder” option from the dropdown menu under the “View” button.
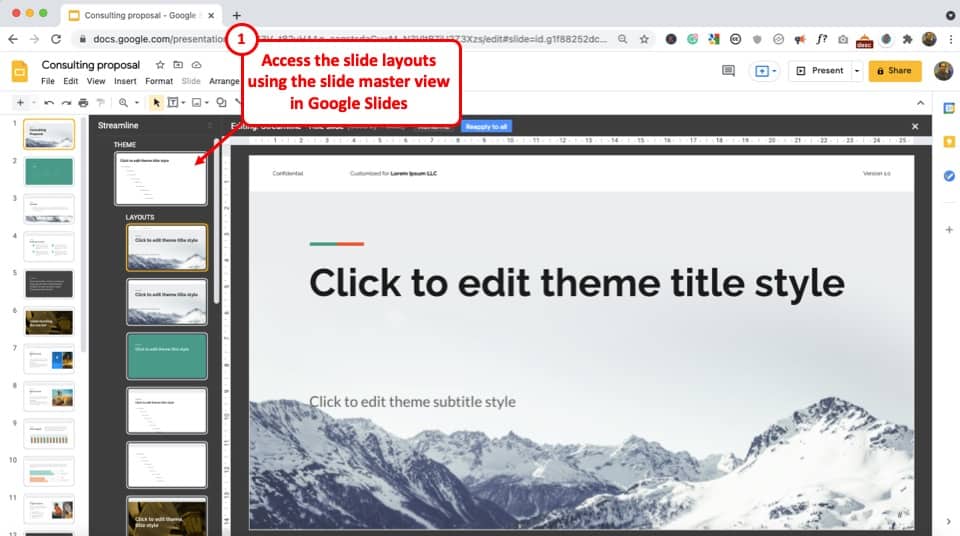
As soon as you click on the “Theme Builder”, you will be able to access the slide layouts in the slide master in Google Slides.
3. How to Edit the Slide Master in Google Slides?
In the slide master view, you can edit the theme, the contents, and the layouts for all the slides in the particular Google Slides presentation.
To edit the master slide, the first step is to click on the “Theme” slide. After that, you can edit the following elements.
Text Placeholder
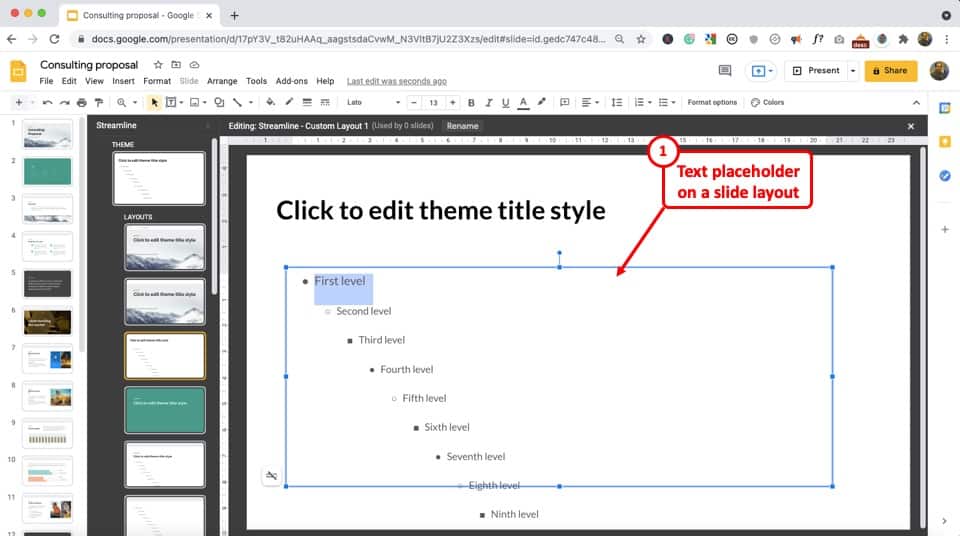
You can add different types of text placeholders depending upon the purpose of your slide. We’ll learn more about that in the next section.
To edit the existing placeholder, click on the text level you want to edit. Then you can change the “Font”, “Font size”, “Text color”, “Alignment”, etc. from the toolbar.
Backgrounds
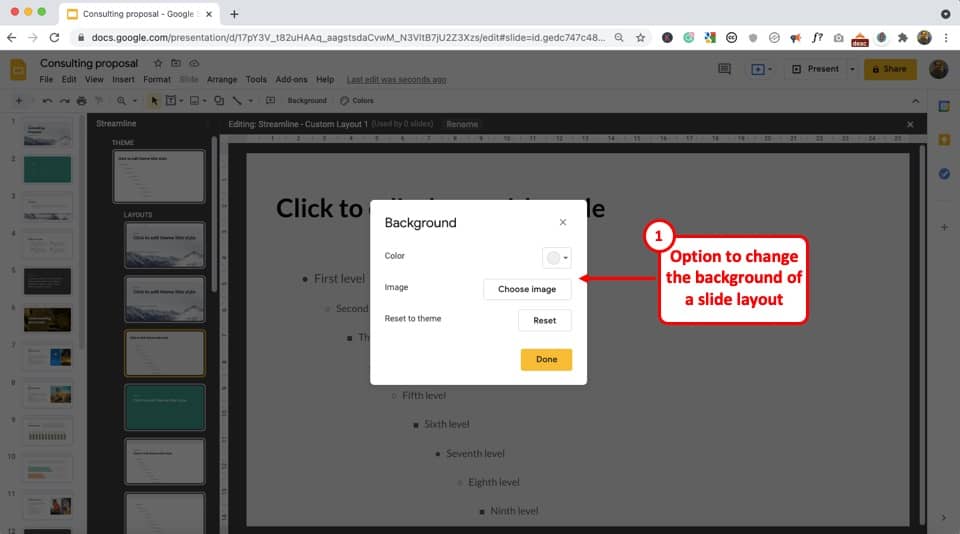
To edit the background of the master slide, all you have to do is click on the “Background” button on the toolbar.
Then you can select the “Background color” or the “Background image” for the master slide.
Colors
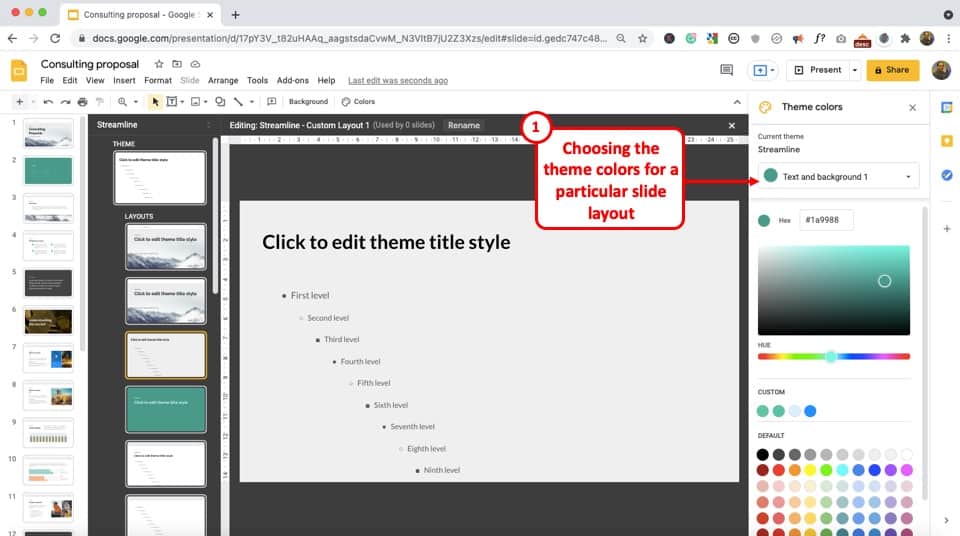
Click on the “Colors” option from the toolbar located at the top of the screen, right under the menu bar to edit the theme color. It will open a sidebar on the right side of your screen.
From the sidebar, click on the “Choose on the theme color” button and pick your preferred theme color from the dropdown menu.
Shapes and Lines
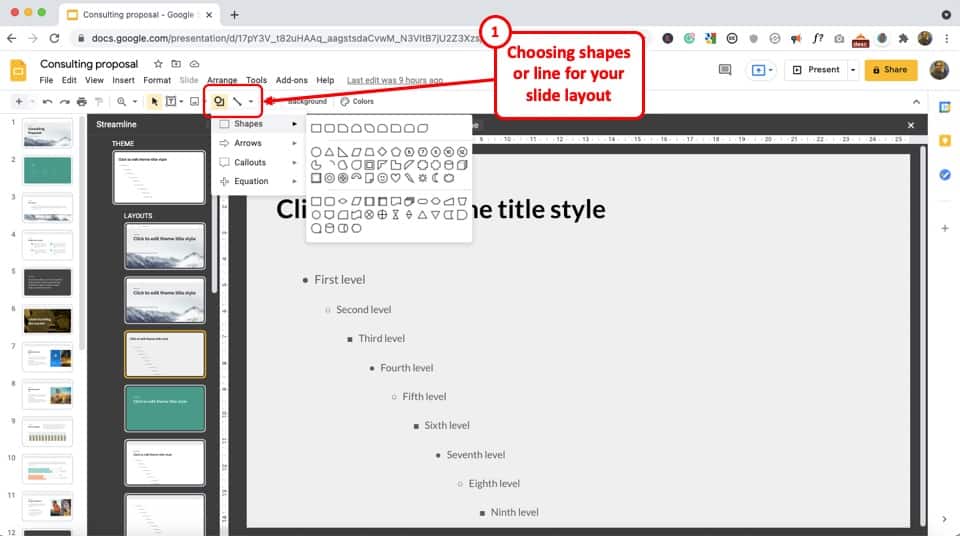
You can add different shapes and lines to the slide master from the toolbar.
To add a shape, click on the “Shape” button in the toolbar and choose your preferred shape from the “Shapes”, “Arrows”, “Callouts” and “Equations” options.
To add a line, all you have to do is click on the “Line” option in the toolbar and pick your preferred line from the dropdown menu. Then you can draw the line in the master slide.
In the following few sections, we shall create a slide layout in the slide master in Google Slides to understand exactly how the “Slide Master” works!
4. How to Add or Remove a Text Placeholder in Google Slides?
As you already know by now, you can add, remove, or even format a text placeholder in Google Slides.
Adding a text placeholder allows the user to know exactly where to enter the text on the slide in the normal view. However, you can control the position, the font, font size, and even the color of the text that shall be added using the text placeholder in the slide master.
Let’s say we want to create a slide layout for the “Team Members” of an organization. We will need to add text placeholders and image placeholders in the slide master in Google Slides.
Here’s how we shall go about creating such a slide layout using the slide master.
Step-1: Click on the “Theme Builder” option
The first step is to click on the “View” menu to access the dropdown menu. In the dropdown menu, click on the “Theme Builder” option to open the slide master view.
Step-2: Add a new slide layout
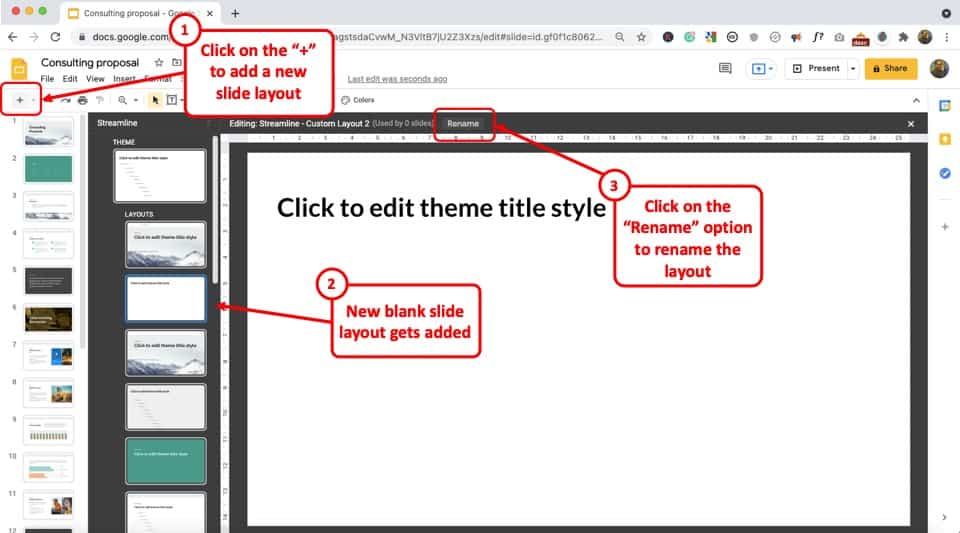
Next, simply click on any one slide, and click on the “New Slide Layout” option. You can recognize it from the “+” sign added to the top left corner of your screen just under the menu bar (as indicated in the image above).
Once you click on the “+” sign, a new layout will be added to your slide master.
Now, select the newly added blank slide layout and click on the “Rename” option.
Remember – we are creating a unique layout so we should also rename this slide layout so that we can easily recognize this layout in the normal view in Google Slides.
Click on the rename button.
Step-3: Rename the slide layout
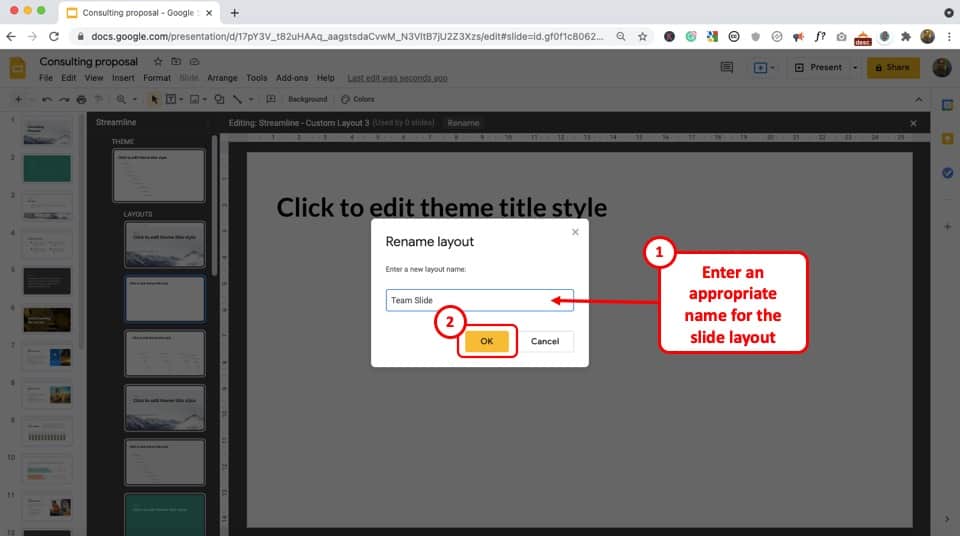
When you click on the “Rename” button, a new window will pop up. Simply type in a recognizable name for the slide layout. Then, click “OK“.
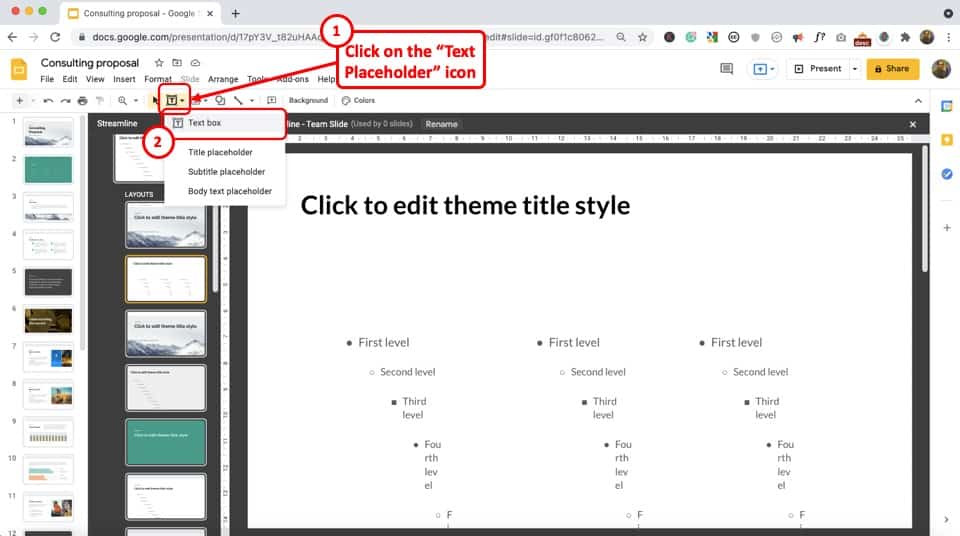
Step-4: Click on the “Insert text placeholder” button
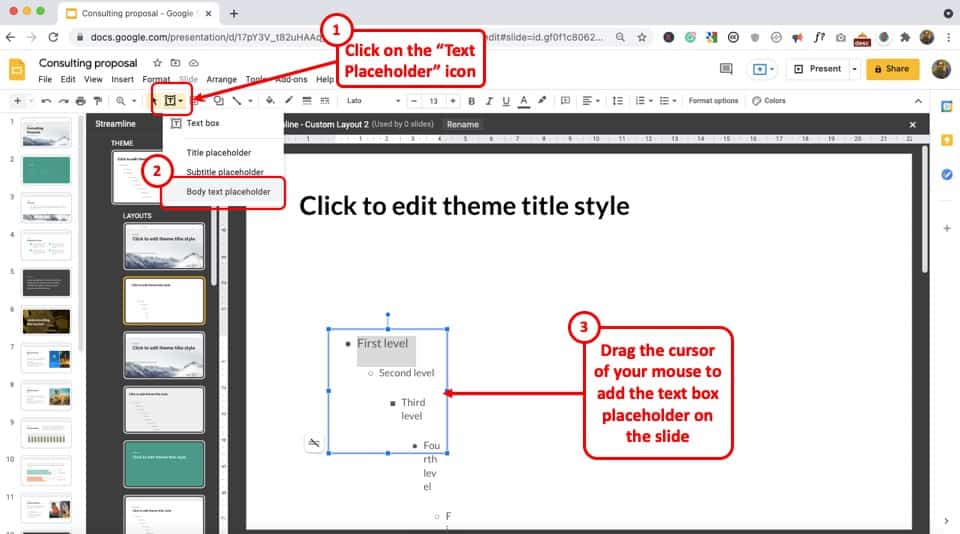
Now you can insert a text placeholder in the slide layout.
To do so, click on the “Insert text placeholder” button in the toolbar. From the dropdown menu, click on your preferred type of placeholder from the “Title placeholder”, “Subtitle placeholder” and the “Body text placeholder” options to add a text placeholder.
The title or the subtitle text placeholders are most useful for title or section break slides.
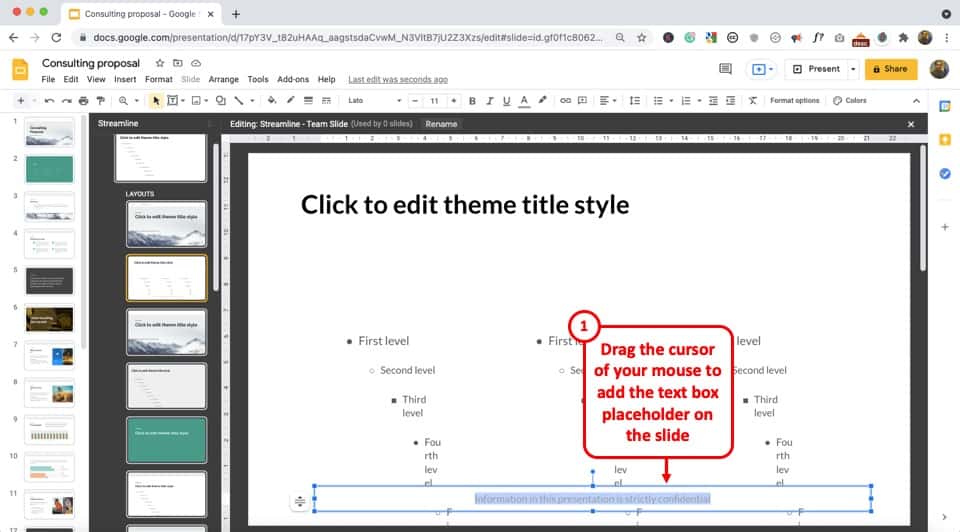
For the purpose of our team member slide layout design, we can either go with “body text placeholder” or just the “text box” option.
Choose your preferred option. Then, drag the cursor on your slide in order to add the placeholder to the slide layout.
Step-5: Add more text placeholders
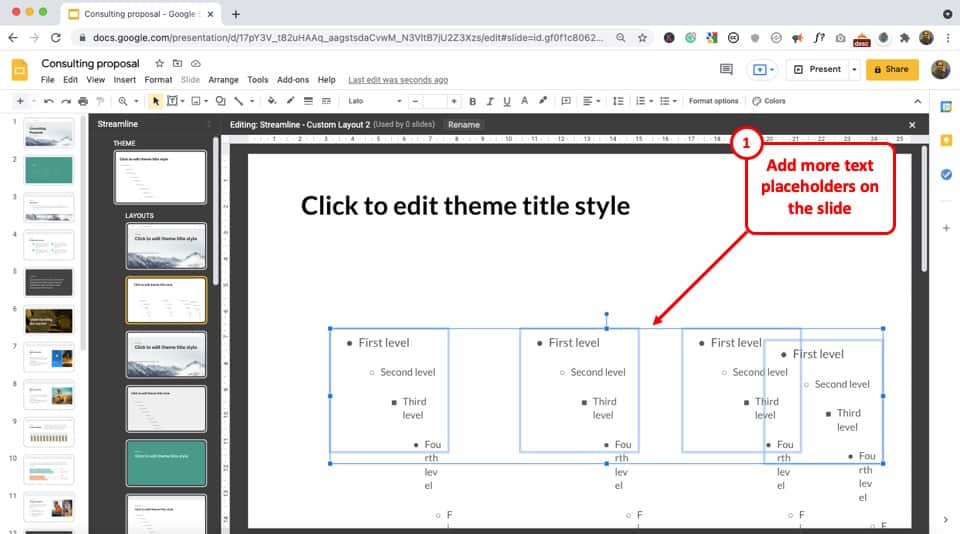
Now, in order to create a “Team Member” slide layout, repeat the process to add more text placeholders. Add as many text boxes on the slide layout as the number of team members that you want to represent on the slide.
You can also use the copy (Ctrl+C) and paste (Ctrl+V) functions, or the duplicate function (Ctrl+D) to quickly add the text placeholders on the slide layout.
Your slide layout might not be looking all the great at this point in time, but don’t worry, it will take shape once we add the image placeholders in the subsequent sections.
So, continue reading!
Removing a Text Placeholder
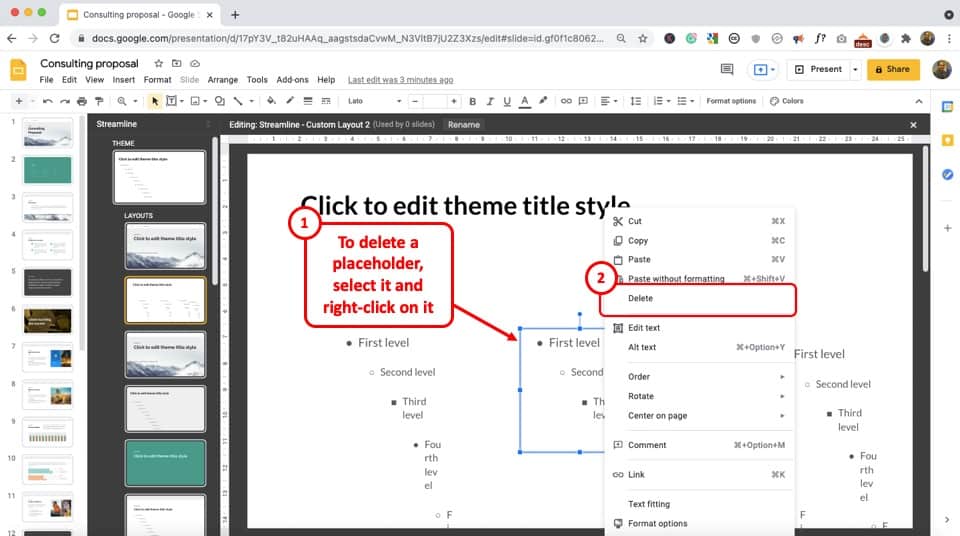
Now, before we move on to the next section, it is important to touch upon how to delete a text placeholder in Google Slides.
In case you have added an extra placeholder on the slide, and you want to get rid of it, simply select it and right-click on it. Then, from the options, click on “Delete” to remove the placeholder.
You can also press the “backspace” key or the “delete” key on your keyboard after you have selected the placeholder that you want to delete.
5. How to Make Text Editable in Slide Master in Google Slides?
In case you have tried adding text in the “Body text placeholder” already, you may wondering why you aren’t able to add the text!
Google Slides only allows you to edit a “Text Box Placeholder” in the slide master. You cannot edit a “Body text placeholder” or even a “Title or Subtitle Text placeholder” in the “Theme Builder” view.
Furthermore, you should remember that if you type out text in the text placeholder, that text will not be editable in the normal view. Thus, it is best to totally avoid adding text in the slide master.
Instead, simply insert the text placeholder and add the text in the normal view.
Nevertheless, if you really need to add permanent text in the slide master (for instance, a footer that doesn’t require to be edited on the front end), here’s how you can do it –
Step-1: Click on the “Text box” option
To add an editable text box, click on the “Insert text placeholder” button in the toolbar. Click on the “Text Box” option to insert a new text box in the slide master.
Step-2: Edit the new text box
Now you can add text in the text box and also edit it with the options available in the toolbar.
Remember! – This text is editable only in the slide master view but not in the normal view. It will appear in every slide of the presentation in the “Normal” view and the “Present” view.
6. Add an Image Placeholder in Slide Master in Google Slides?
Now, let’s learn how to add an image placeholder in the slide master in Google Slides. Let us go back to the slide layout that we were creating for the “Team Member” slide.
Here’s what you need to do –
Step-1: Add an Image Placeholder
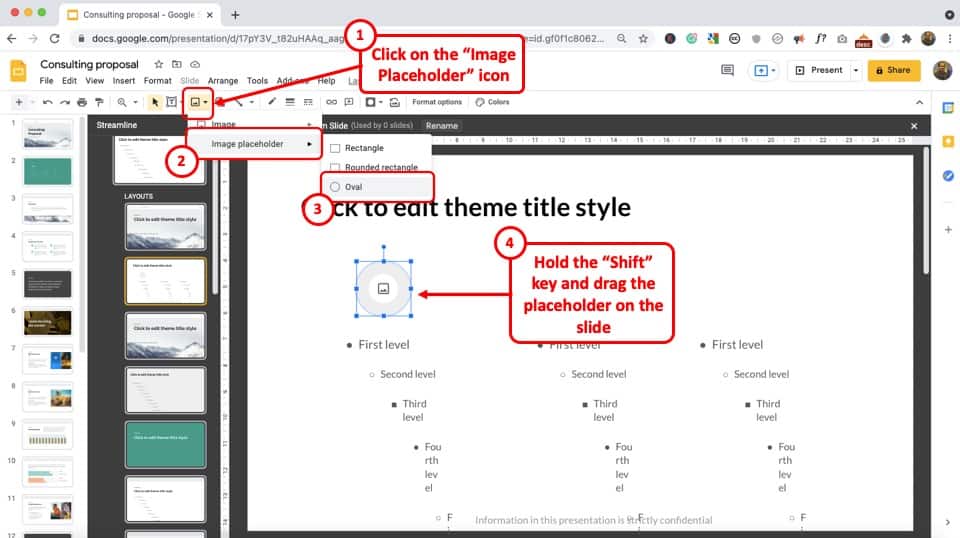
In Google Slides, you can add image placeholders of different shapes in the slide master layouts. This will allow you to add images in the predesigned placeholder easily when editing a slide.
To add an image placeholder, click on the “Insert image placeholder” button from the toolbar. Then, click on the “Image Placeholder” option. Make sure that you don’t click on the image option as this will add an image and not a placeholder.
You can select your preferred placeholder shape from the “Rectangle”, “Rounded rectangle” and “Oval” options.
For this example, we will create a perfect circle. To do that, select the “Oval” option. Then, press the “Shift” key on your keyboard, and drag the cursor on the slide layout. This will add an image placeholder in the shape of a perfect circle.
Step-2: Exit the “Theme Builder”
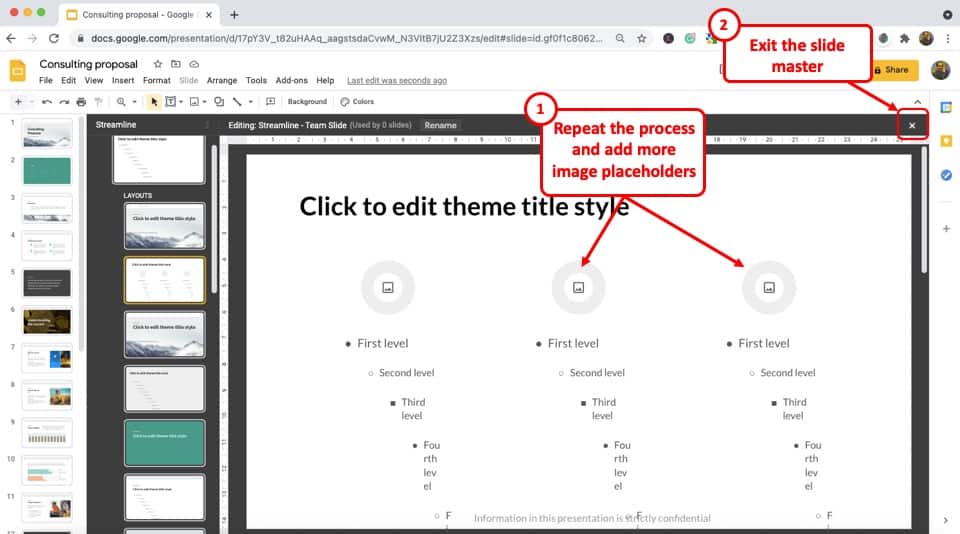
Now, repeat the process described in step 1 and add two more image placeholders since we want to add 3 team members for this slide.
You can also use the copy and paste shortcuts to quickly add the image placeholders. This will also allow you to add placeholders of the same size!
Once you’re done adding, simply click on the “X” (as shown in the image) to close the slide master view and exit the theme builder screen.
Step-3: Add a New Slide
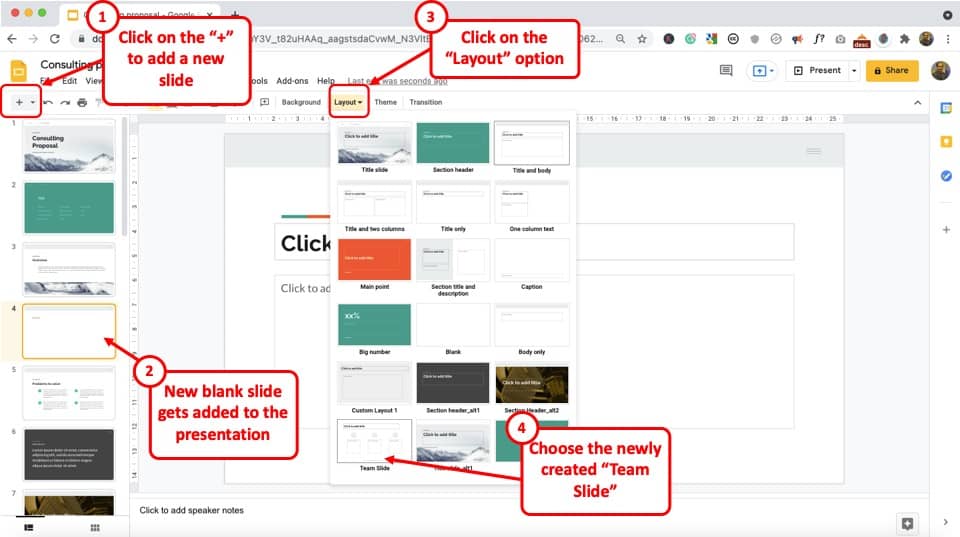
When you close the slide master or the theme builder view in Google Slides, you will be back in the normal view.
From here, simply click on the “+” button on the top left corner of your options under the menu bar to add a new slide. Make sure a blank slide has been added to the presentation.
Then, select the newly added slide, and click on the “Layout” button on the toolbar. You will be presented with all the existing slide layout options.
Now, remember that we had named our layout as “Team Slide“. This is where naming a slide layout comes in handy.
Locate the slide layout with this name, and click on it.
Step-4: Add the details to the slide
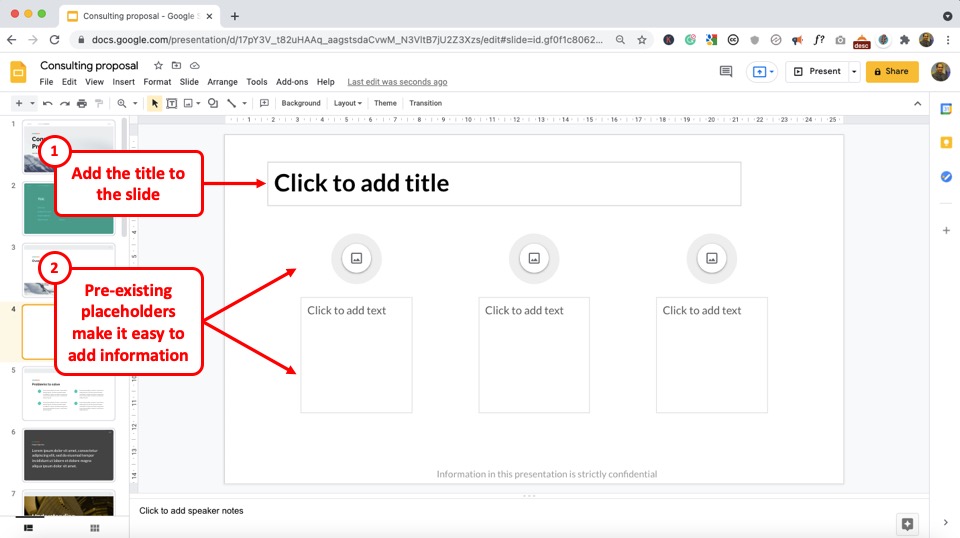
As you can see, you will already have all the placeholders positioned for you to simply add the information on the slide.
Thus, using placeholders, you can control the design and layout of the slide. You can also make adding information faster and easier.
To add the information, simply click on the placeholder and start typing.
Step-5: Fill in all the placeholders
As you can see in the above image, the slide is already taking a good shape in just a few clicks!
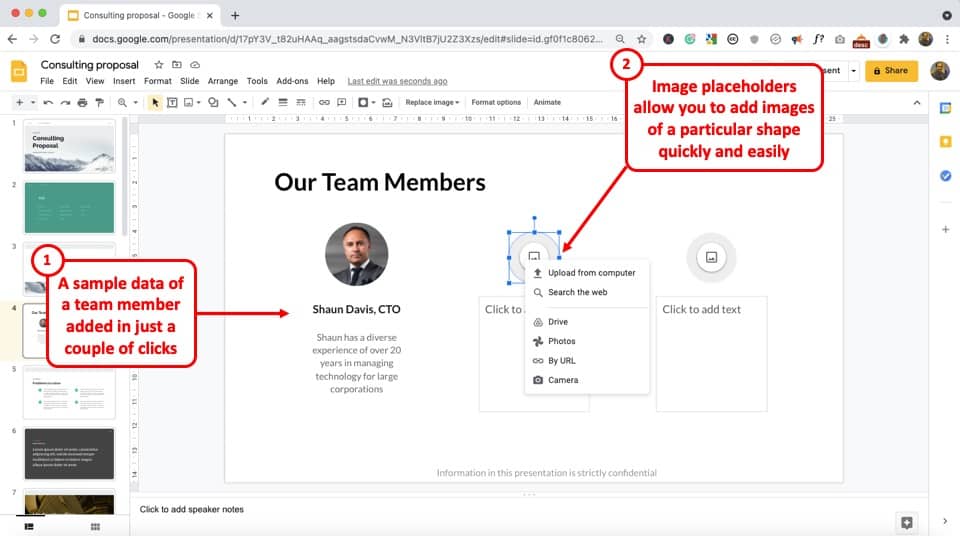
One thing to note is that using image placeholders in Google Slides allows you to add an image in a particular shape with a click on a button!
Simply click on the image placeholder and upload the image!
7. Can you Add Multiple Masters in Google Slides?
Google Slides allows you to add multiple master slides in a presentation.
A master slide is a slide layout that contains the theme of the entire presentation. All slides under a master slide follow the same theme, colors, and design as the master slide.
To add more than one master slide, all you have to do is follow the 3 easy steps.
Step-1: Click on the “Duplicate theme” option
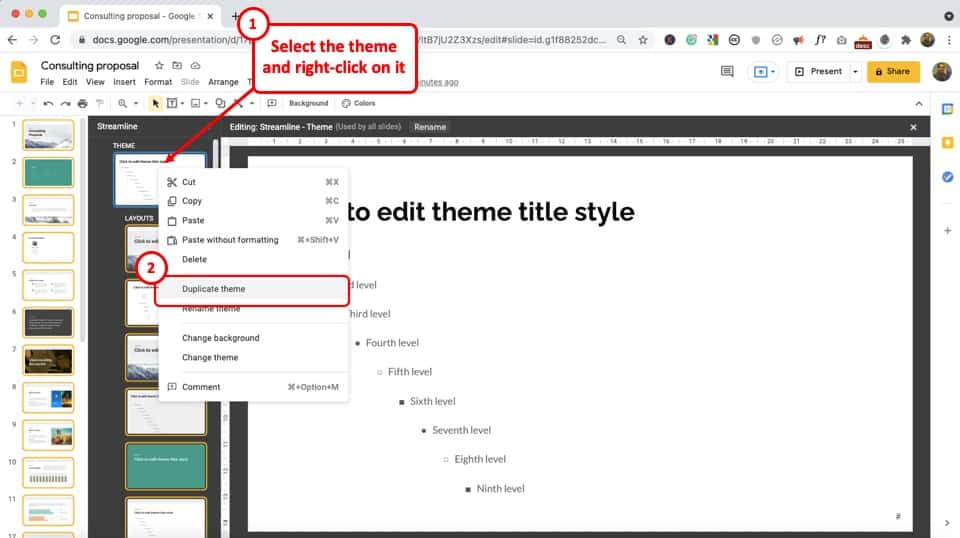
In the slide layout panel, the master slide is the slide under the “THEME” and over the “LAYOUTS” options.
The first step is to “Right-click” on the master slide in the “Theme Builder” view. In the dropdown menu, click on the “Duplicate theme” option.
Step-2: Click on the “Rename” button
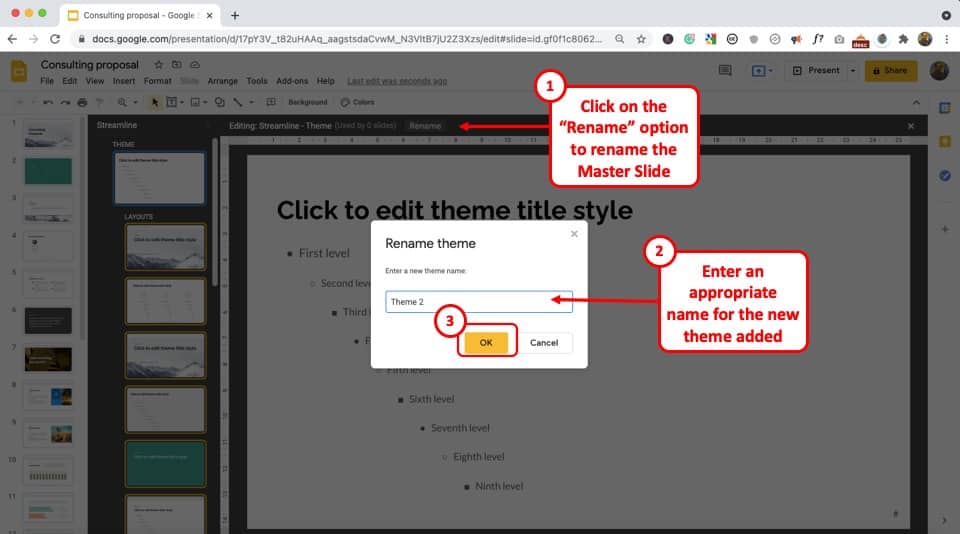
Next, you have to “Right Click” on the master slide again and select the “Rename theme” option from the dropdown menu.
Type in a title for the new master slide in the dialogue box and click on the “OK” button.
Step-3: Edit the slide master
Now all you have to do is edit the master slide and the slide layouts under the new master slide.
You can rearrange placeholders, change backgrounds and colors, and add other elements. You can also rename each individual slide layout.
7b. How to Know Which Slide Master to Use?
Google Slides does not allow you to use all the master slides when you add multiple masters. You can only use one master slide in a particular presentation.
To know which slide master to use out of the multiple masters available for the presentation, follow the 3 simple steps.
Step-1: Click on “Change theme”
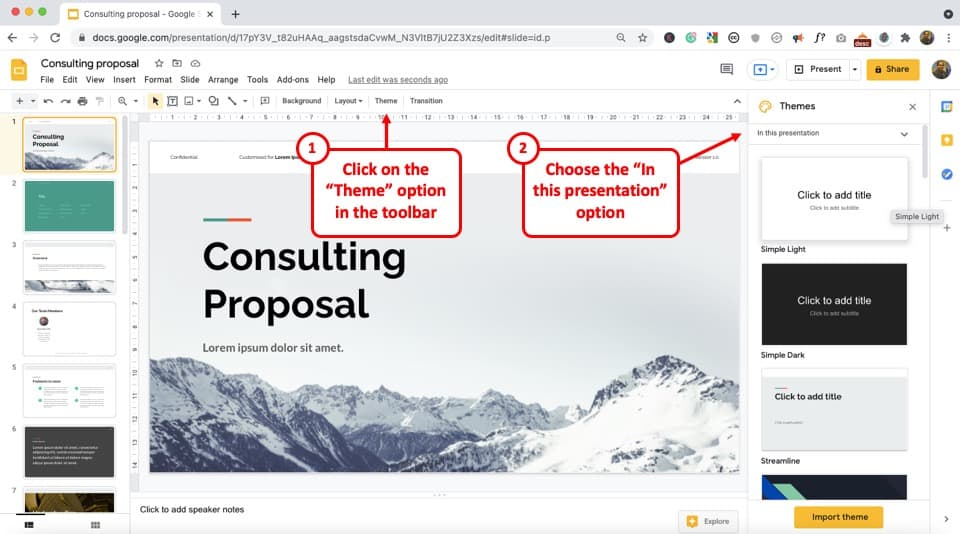
The first step is to open the “Slide” menu from the menu bar. In the dropdown menu, click on the “Change theme” option to open the “Themes” menu in the right sidebar.
Step-2: Click on the “In this presentation” box
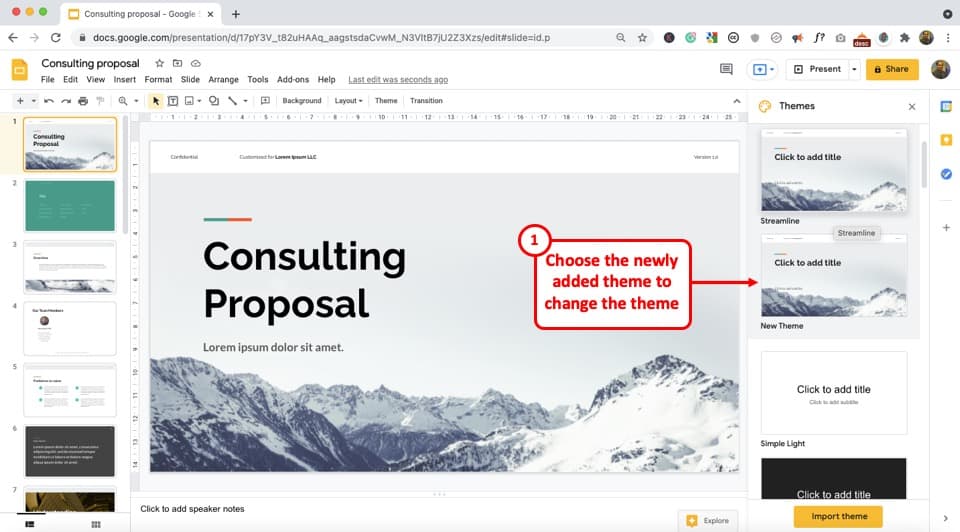
In the “Themes” menu, click on the “In this presentation” box located at the top of the sidebar. This will open a dropdown menu containing all the master slides available in the presentation.
Step-3: Select your preferred master slide theme
Now all you have to do is select the master slide you want to use in the presentation from the dropdown menu.
If you are unsure which one to choose, Google Slides allows you to select each master theme at a time and see how your existing slides change according to the layouts.
8. Google Slides Placeholder Greyed Out! How to Fix?
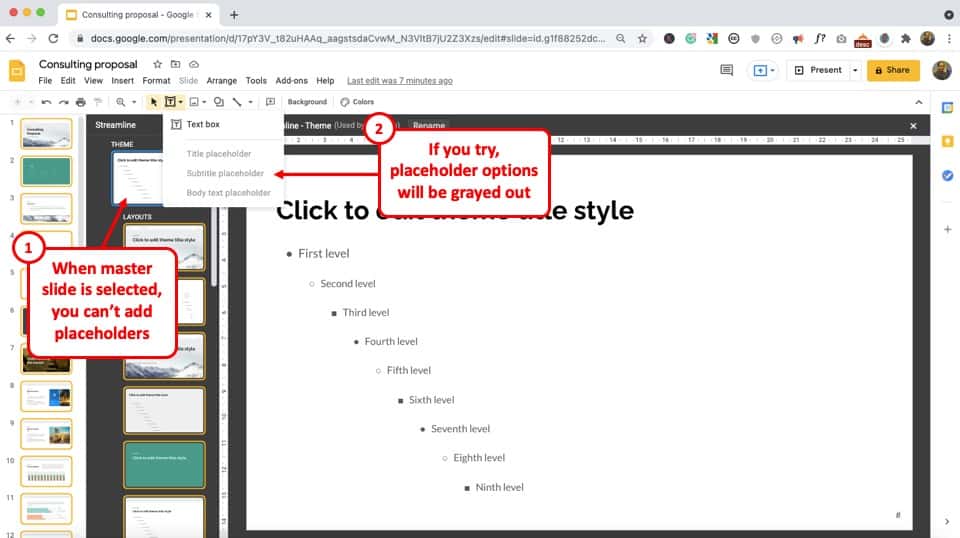
In the “Theme Builder” menu in Google Slides, you cannot add a new placeholder in the “Master Slide” i.e. the main slide or the first slide of a theme. This is because it controls all the remaining slides.
If you click on the “Insert text placeholder” or the “Insert image placeholder” button in the toolbar, you will see that all the placeholders are greyed out.
If you add a text box on this slide, it will be visible on all the slides in the same position.
To fix this, all you have to do is click on any slide layout under the “Layouts” option in the side pane.
Then you can click on the “Insert text placeholder” or the “Insert image placeholder” buttons and see that the placeholder options are black again.
9. Unsupported Placeholder Google Slides Error
Google Slides can show an “unsupported placeholder error” when importing a slide or multiple slides from another presentation software like Microsoft PowerPoint.
Besides, you can also run into this error when importing a theme in Google Slides. The unsupported placeholder error means that Google Slides cannot support some specific placeholders.
You can fix this problem in two ways.
Method 1 – Create the Placeholder from Scratch
In case of an unsupported placeholder, you can recreate the placeholder in Google Slides. To do so, open the “Theme Builder” menu from the “View” option.
Then click on “Insert text placeholder” or the “Insert image placeholder” button to add the placeholder again.
Method 2 – Insert the Placeholder as an Image
If the design or the theme of the unsupported placeholder cannot be recreated with the editing tools available in Google Slides, you can insert the placeholder as an image.
All you have to do is save the edited placeholder as an image in Microsoft PowerPoint. Then open Google Slides and click on the “Image” option from the “Insert” menu to add the placeholder as an image. However, you can only do this for an edited placeholder.
This fix will not work when you are importing a theme or inserting an empty placeholder.
10. Other Related Questions –
10a. How is Slide Master Different from a Template?
A slide master contains the theme of all the slide layouts. On the other hand, a template is how each slide layout looks.
A template contains the arrangement of the placeholder, the color, and the design of the layouts, etc. So the template is how the slide layouts look while the slide master contains information on the template of each slide layout.
10b. Can You Make a Master Slide Template?
Google Slides allows you to edit the master slide. Although you cannot create a new master slide, you can edit the existing master slide to create a new template.
You can follow the process described in point 7 of this article. A quick summary of the steps is mentioned below –
Step-1: Click on “Edit theme”
Click on the “Slide” option from the menu bar located at the top of the screen to open a dropdown menu. In the dropdown menu, click on “Edit theme” to open the slide master view.
Step-2: Rearrange the placeholders
In the slide master view, open the master slide from the slide layout pane. Now you click on the placeholders to rearrange and resize them.
Step-3: Add new elements
To add new elements to the master slide, all you have to do is click on the options available in the toolbar. You can also click on “Background” and “Colors” to change the look of the existing theme to a new one.
Step-4: Click on the “Rename” button
The next step is to give the new theme a name. Click on the “Rename” button at the top of the slide master view to open a dialogue box. In the dialogue box, type in the preferred title for the new master slide and click on the “OK” button.
10c. Can you Create a Slide Master from an Existing Slide?
In Google Slides, you can edit an existing master slide. You can also “Copy” and “Paste” an existing slide on the master slide to create a new template.
All you have to do is follow the 4 quick steps mentioned below –
Step-1: “Copy” the existing slide
In the normal view, open the slide you want to use for creating a new slide master and select all the contents of the slide.
Alternatively, you can press the “Ctrl+A” keys on your keyboard. Then “Right Click” on the slide and click on the “Copy” option. Alternatively, press the “Ctrl+C” keys on your keyboard.
Step-2: Click on “Edit theme”
Now you have to click on the “Slide” option in the menu bar and select the “Edit theme” option from the dropdown menu. This will open the “Theme Builder” view.
Step-3: “Paste” the slide’s elements
In the “Theme Builder” view, click on the master slide to open it. Select all the elements in the master slide and press the “delete” key on your keyboard.
Then “Right Click” on the empty master slide and select the “Paste” option. Alternatively, press the “Ctrl+V” keys on your keyboard.
Step-4: Replace the elements with placeholders
Google Slides will not allow you to edit the new elements pasted on the master slide in the normal view. To make each element editable, replace them with placeholders from the toolbar.
10d. What Elements Can you Change on a Slide Master?
On a master slide in Google Slides, you cannot insert a new image placeholder or a text placeholder.
However, you can edit the existing placeholders by reshaping and rearranging them. Besides, you can click on the “Change background” and “Theme colors” to change the background and the colors of all the slide layouts respectively.
10e. How to Copy a Slide Master in Google Slides?
In Google Slides, you can copy a slide master to duplicate it or reuse it in another presentation software. Copying a slide master is very easy.
All you have to do is “Right Click” on the master slide and click on the “Copy” option. Alternatively, you can press the “Ctrl+C” keys on your keyboard.
Credit to senivpetro (on Freepik) for the featured image of this article (further edited)