There are times when you want to not run the presentation in a systematic order. Instead, you may want to shuffle the slides at random. For instance, if you want to generate a random number on the slide during a game, you can set it up using a PowerPoint file.
But, can you shuffle slides randomly in PowerPoint?
By default, PowerPoint doesn’t allow to shuffle slides randomly. However, you can use a macro to do the same. First, enable the “Developer” tab. Then, click on the “Visual Basic” option, create a new “Module”, paste the special code, and save it. Click on the “Macros” option and “Run” the macros.
This will shuffle the slides in a random order. Make sure to save your file as a “macro-enabled” file to retain the macros in the presentation.
In this article, I’ll share all the details in a step-by-step manner with pictures. I’ve also included the VBA code to implement the macro. That, and much more!
So, let’s get started!
1. Can You Shuffle Slides in PowerPoint?
Microsoft PowerPoint does not have any feature that allows you to shuffle the order of the slides in a presentation at random. However, you can shuffle the slides by dragging them to random positions manually.
Besides, the “Macros”option in PowerPoint allows you to run VBA codes to automatically shuffle the slides at random.
2. How to Manually Shuffle Slides in PowerPoint?
In Microsoft PowerPoint, you can shuffle the slides in a presentation using the “Slide Sorter” view. However, it may not be as randomized as doing so using the “Macros” feature. To manually shuffle the slides in a presentation, follow the 4 quick steps.
Step-1: Click on the “View” tab

The first step is to open the “Slide Sorter” screen. To do so, you have to first click on the “View” tab in the menu ribbon at the top of the screen to open the “View” menu.
Step-2: Click on the “Slide Sorter” option
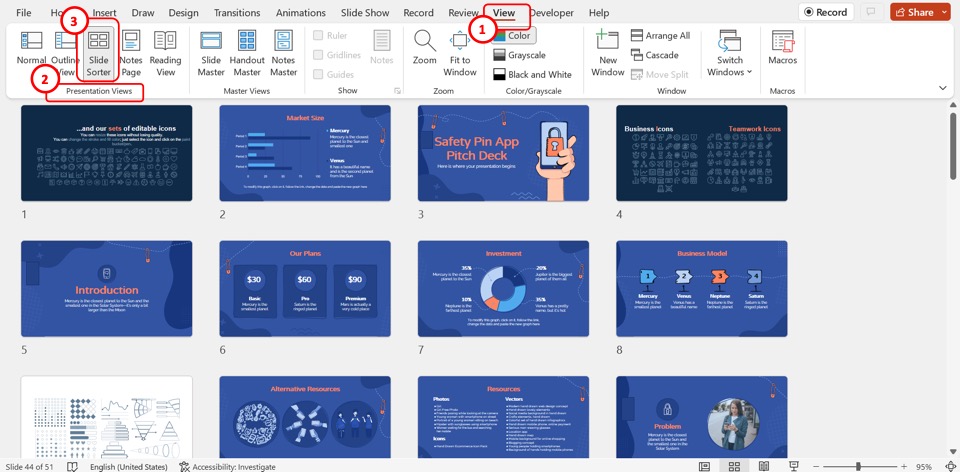
In the “Presentation Views” group of the “View” menu, click on the “Slide Sorter” option. You can now see the slide thumbnails on your screen.
Step-3: Click on the “Zoom Out” option
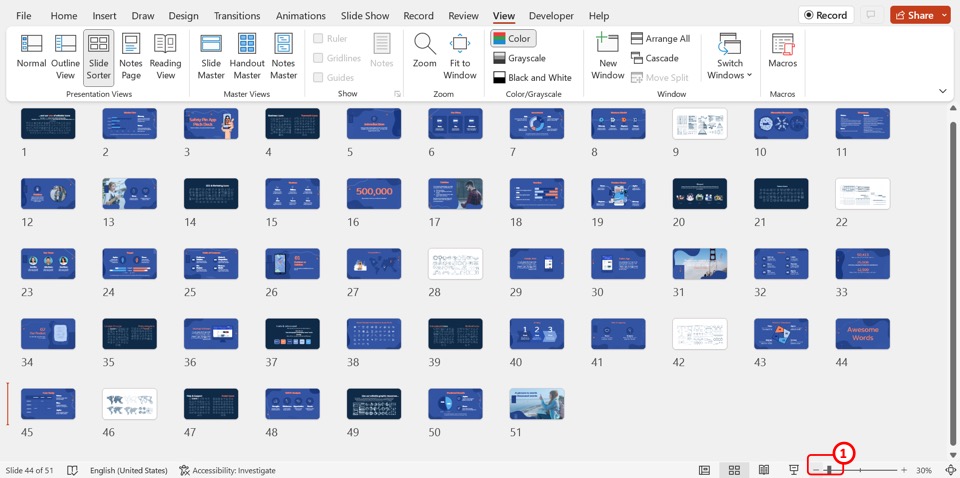
The next step is to click on the “Zoom Out” option which is the “-” icon at the bottom toolbar. Keep clicking on the “Zoom Out” option until you can see all the slides in the presentation on the screen at once.
Step-4: Rearrange the slides
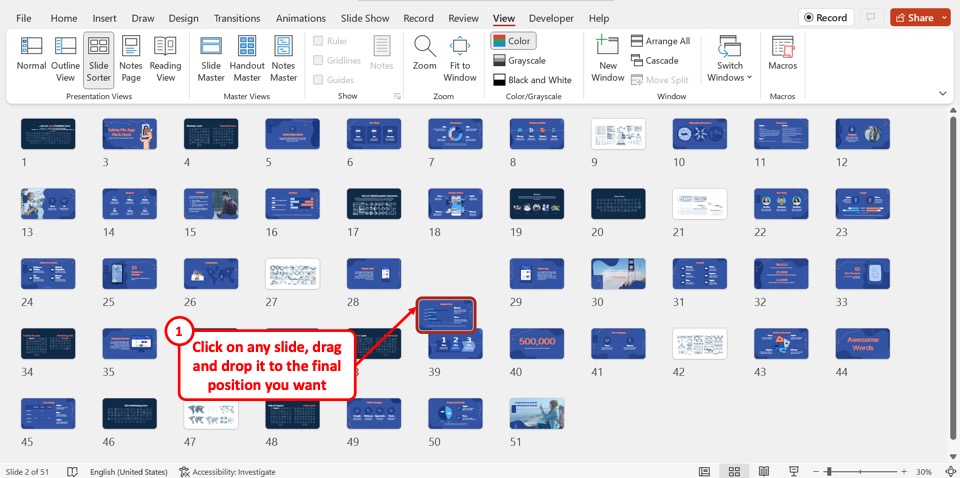
Now all you have to do is click on a slide and drag and drop it at a random position on the screen. Repeat this step with random slides until all the slides have been shuffled.
3. How to Shuffle Slides Randomly in PowerPoint?
In Microsoft PowerPoint, you can use a VBA code to create a random shuffling order of slides in the presentation. To do so, all you have to do is follow the 15 simple steps.
Step-1: Click on the “Customize the Ribbon” option

The first step is to “Right Click” on the menu ribbon located at the top of the screen. In the right-click menu, click on the “Customize the Ribbon” option. This will open a dialog box.
Step-2: Click on the “Developer” option
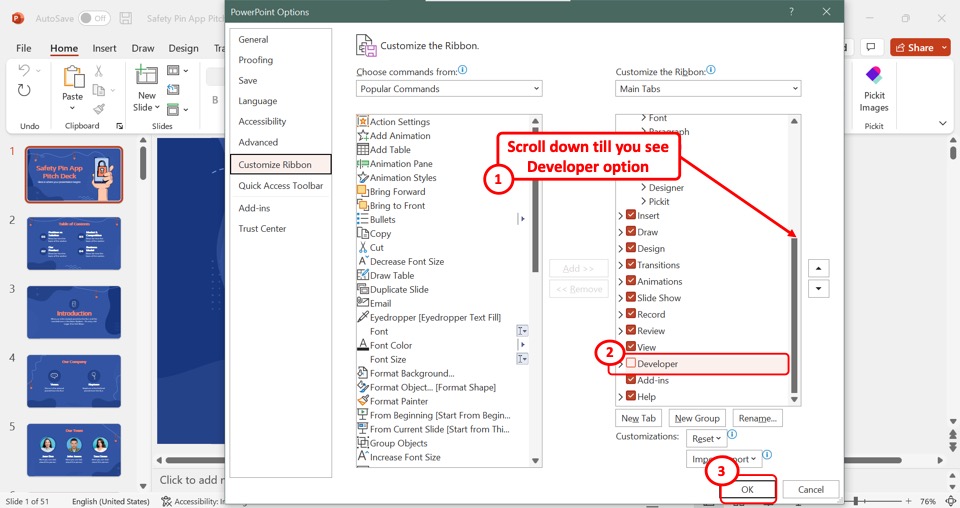
In the “PowerPoint Options” dialog box, scroll down under the “Main Tabs” box on the right column. Then click on the “Developer” option to select it. A red checkmark will appear by the “Developer” option.
Step-3: Click on the “OK” button
Now all you have to do is click on the “OK” button at the bottom of the “PowerPoint Options” dialog box to enable the “Developer” tab (as shown in the image above).
Step-4: Click on the “Developer” tab

The next step is to click on the “Developer” tab in the menu ribbon. In the “Code” group of the “Developer” tab, click on the “Visual Basic” option. This will open a pop-up window.
Step-5: Click on the “Module” option
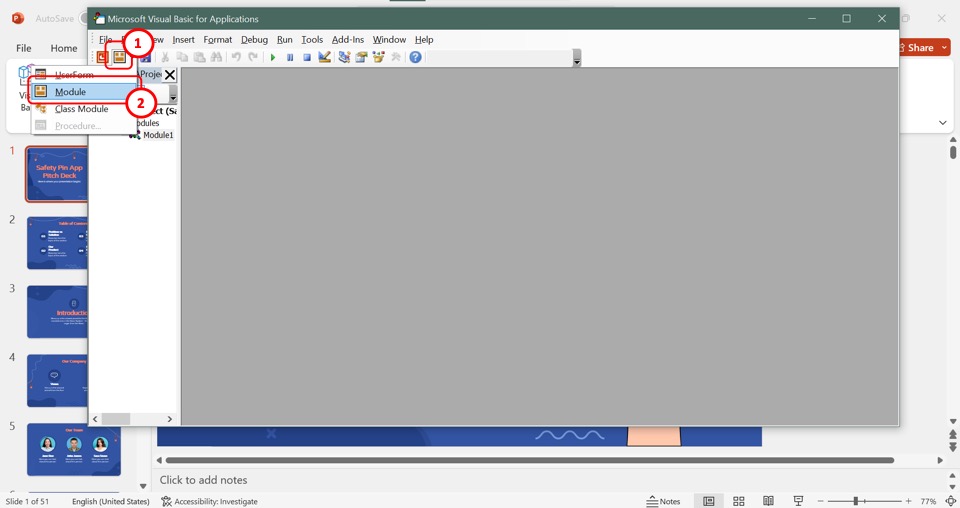
In the “Microsoft Visual Basic for Applications” window, click on the “Insert Module” icon. It is the orange icon that is located second to the left in the toolbar. Then click on the “Module” option in the dropdown menu under the “Insert Module” icon.
Step-6: Paste the VBA code
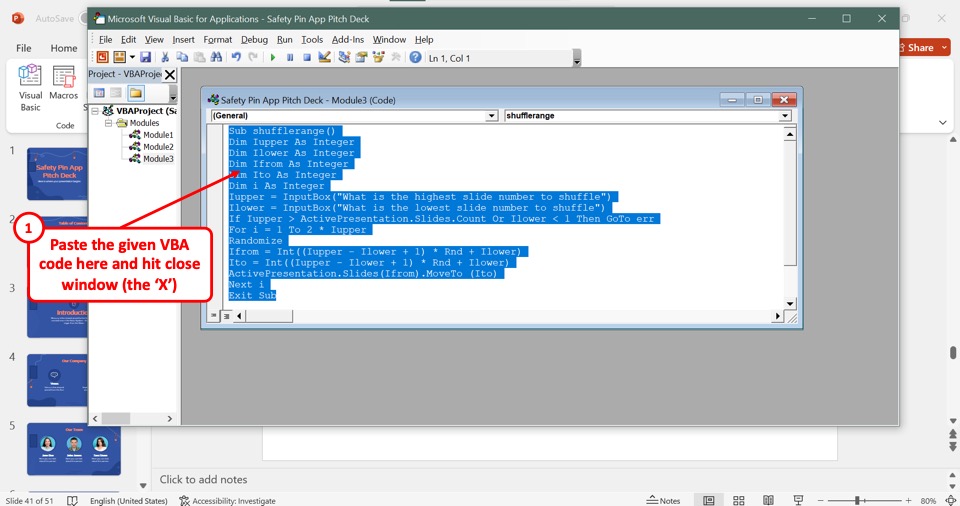
Now all you have to do is paste the following VBA code into the new module:
Sub shufflerange()
Dim Iupper As Integer
Dim Ilower As Integer
Dim Ifrom As Integer
Dim Ito As Integer
Dim i As Integer
Iupper = InputBox(“What is the highest slide number to shuffle”)
Ilower = InputBox(“What is the lowest slide number to shuffle”)
If Iupper > ActivePresentation.Slides.Count Or Ilower < 1 Then GoTo err
For i = 1 To 2*Iupper
Randomize
Ifrom = Int((Iupper – Ilower + 1) * Rnd + Ilower)
Ito = Int((Iupper – Ilower + 1) * Rnd + Ilower)
ActivePresentation.Slides(Ifrom).MoveTo (Ito)
Next i
Exit Sub
err:
MsgBox “Your choices are out of range”, vbCritical
End Sub
Step-7: Click on the “Close” option
Now you can close the “Microsoft Visual Basic for Applications” window. To do so, click on the “Close” option which is the “X” icon at the top right corner of the pop-up window (as shown above).
Step-8: Click on the “Macros” option
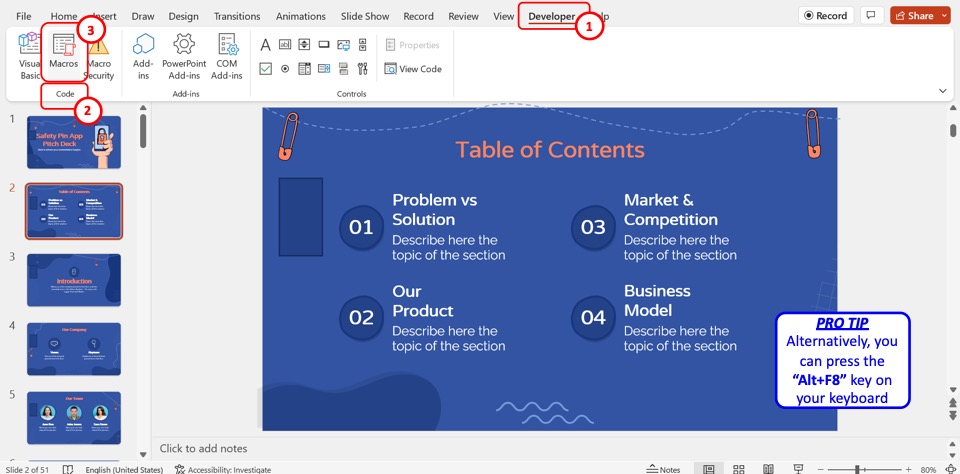
The next step is to run the VBA code. To do so, you have to first open the PowerPoint Macros. Click on the “Macros”option in the “Code” group of the “Developer” menu. Alternatively, you can click on the “Alt+F8” keys on your keyboard to open the Macros.
Step-9: Click on the “Run” button
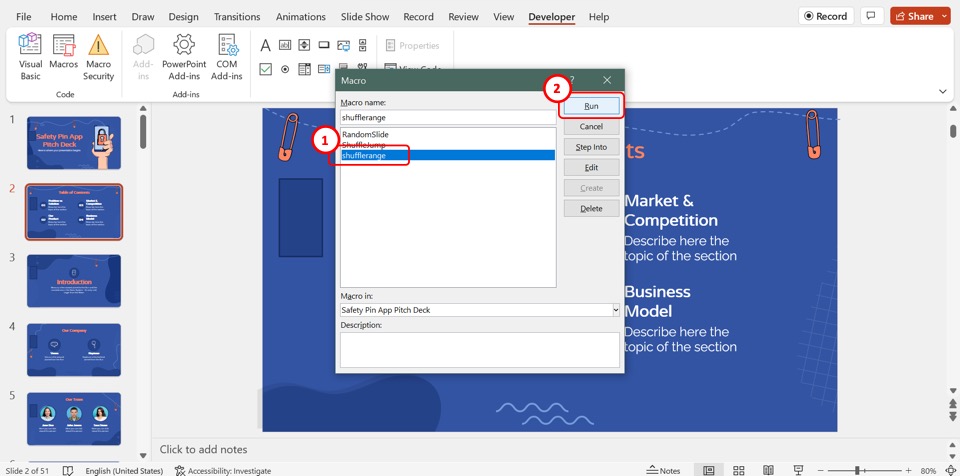
In the “Macro” dialog box, click on the “shufflerange” option to select it. Then click on the “Run” button in the right column of the dialog box to run the VBA code.
Step-10: Add the last slide number
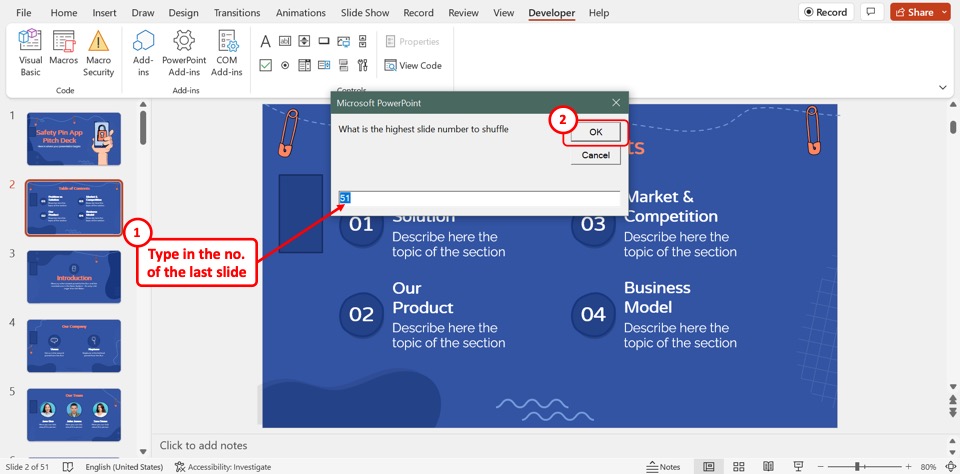
In the dialog box asking “What is the highest slide number to shuffle?”, type in the slide number of the last slide in the presentation. Then click on the “OK” button in the dialog box.
Step-11: Select the start of the random shuffling
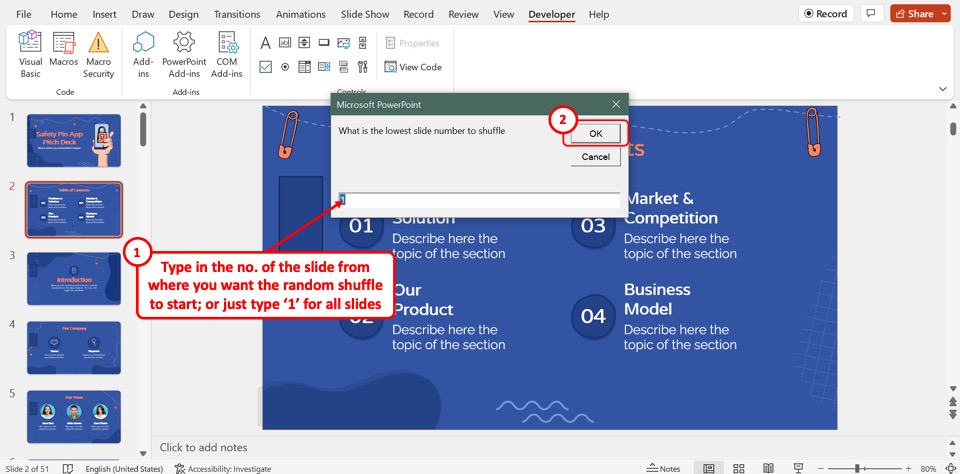
In the next dialog box asking “What is the lowest slide number to shuffle?”, type in the slide number where you want the shuffle to start. If you want to shuffle all the slides, just type in “1”. Then click on the “OK” button to shuffle the order of the slides randomly.
Step-12: Check the shuffled order
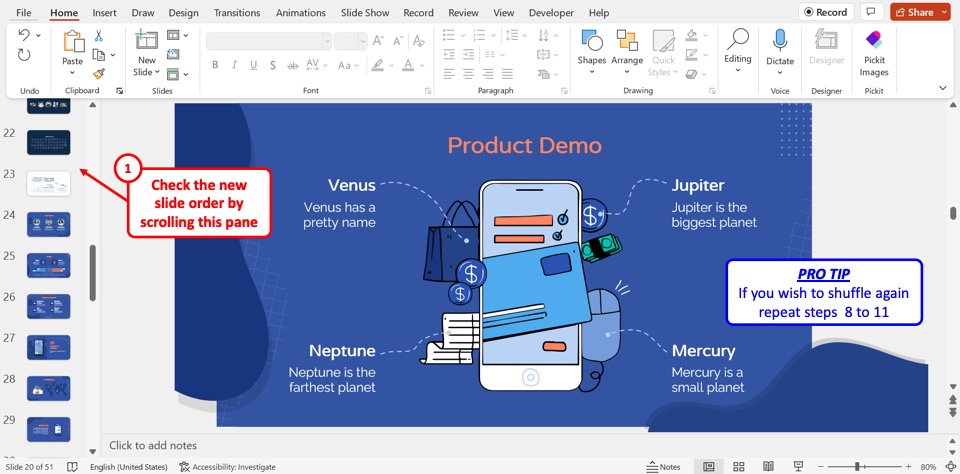
You can now simply scroll through the slide thumbnail pane on the left side of the screen to check the new random order of the shuffled slides. If you want to shuffle again, all you have to do is repeat the process from Step-8 to Step-11.
Step-13: Click on the “File” tab

The final step is to save the presentation as a macro-enabled file. To do so, you have to first click on the “File” tab in the menu ribbon located at the top of the screen.
Step-14: Click on the “Save As” option
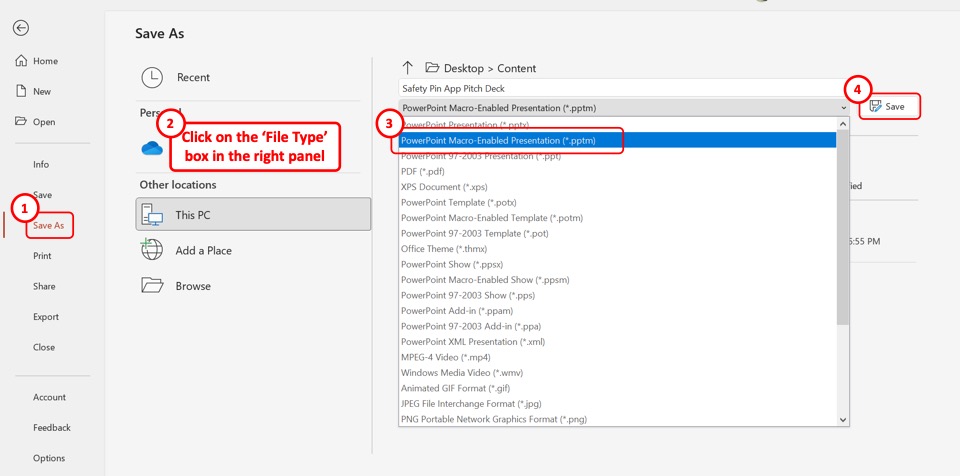
In the “File” menu, click on the “Save As” option from the sidebar on the left side of the screen. Then click on the file type box in the right column of the “Save As” screen. In the dropdown menu, click on the “PowerPoint Macro-Enabled Presentation (.pptm)” option.
Step-15: Click on the “Save” button
Finally, all you have to do is click on the “Save” button by the file type box to save the macro-enabled presentation with the slides shuffled in random order (as shown in the image above).
Credit to cookiestudio (on Freepik) for the featured image of this article (further edited).

![How to Shuffle Slides Randomly in PowerPoint? [Here’s How!]](https://artofpresentations.com/wp-content/uploads/2023/01/ezgif.com-gif-maker-1.webp)