![How to Save a Slide in PowerPoint Individually? [Quick Tip!]](https://artofpresentations.com/wp-content/uploads/2021/09/Featured-Image-Save-Just-One-Slide-in-PowerPoint.jpg)
There are times when we want to either just print or share just a single slide from our PowerPoint presentation. It might seem a bit difficult to do so initially, but the process is actually quite simple!
To save a slide in PowerPoint, select the slide from the slide preview panel on the left part of your screen. Press “Ctrl+C” to copy it. Now, click on the “File” tab, and open a “Blank PowerPoint Presentation”. Press “Ctrl+V” to paste the slide. Press “Ctrl+S” to save the single slide presentation.
In this article, I will share with you how you can save just one slide from an existing PowerPoint presentation.
Plus, I will also show you how to save a single slide as an image so that you can avoid the changes in the color and the look of the slide when you move it to a new presentation.
So, without further adieu, let’s get started!
1. How to Save a Single Slide in PowerPoint?
There are actually two different ways in which you can save a single slide in PowerPoint. The first method is where you copy the slide into a new presentation and save it separately. Another method is where you can save a single slide as an image!
Let’s take a look at both the methods below –
Method 1 – Save a Single Slide Using a New Presentation
If you want to extract and save a single slide from an existing PowerPoint presentation, the best thing for you to do is to copy the slide and paste it into a blank PowerPoint presentation.
Related Read – Check out my other article on How to Copy and Paste in PowerPoint that provides you with tips to help retain the design and formatting of your original slide.
Then, save the Powerpoint presentation that contains the single slide that you just pasted in it.
This method allows you retain editing capabilities to the single slide that you move into a new presentation.
Here are the steps that you need to follow –
Step 1 – Copy the Slide
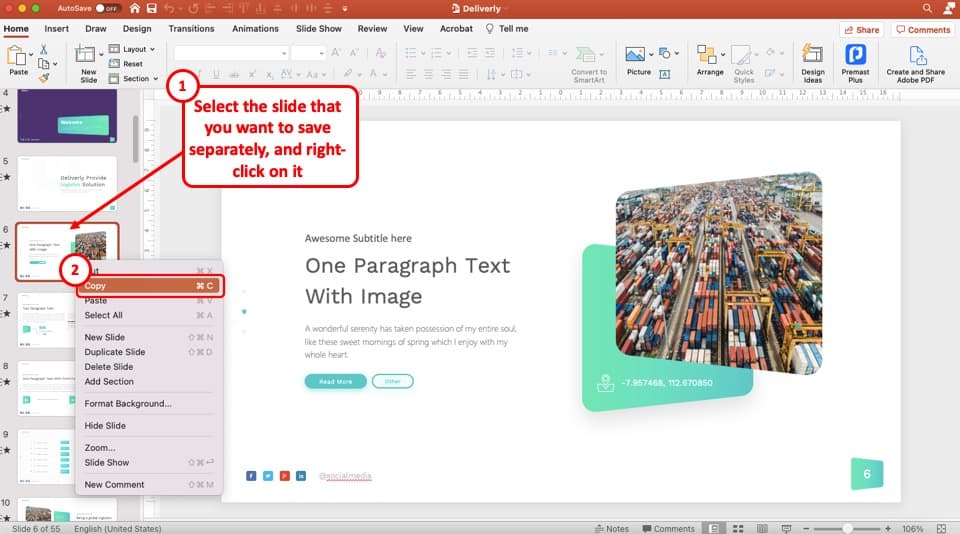
The first step is to copy the slide that you want to save as a presentation. To do that, first, select the slide from the “Slide Thumbnail View” on the left part of your PowerPoint window by clicking on it.
Then, “right-click” on the slide. From the options that are displayed in the menu, click on “Copy“.
You can also use the keyboard shortcut “Ctrl+C” to copy the slide once it has been selected.
Step 2 – Open a Blank Presentation
The next step is to move this slide into a new presentation. For that, first, we will need to open a blank presentation.
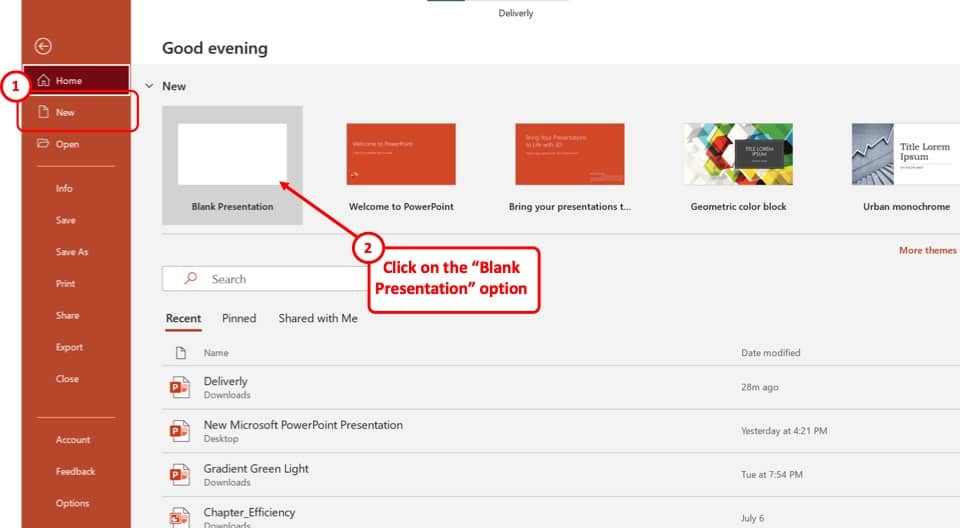
To open a blank presentation in PowerPoint, click on the “File” tab on the top. You will be taken to the backend view.
From the backend view, simply click on the “New” option on the left, and then select the “Blank Presentation” option.
This will open a new blank PowerPoint presentation.
You can also press “Ctrl+N” to open a new PowerPoint presentation and avoid all the above steps.
Step 3 – Paste the Copied Slide
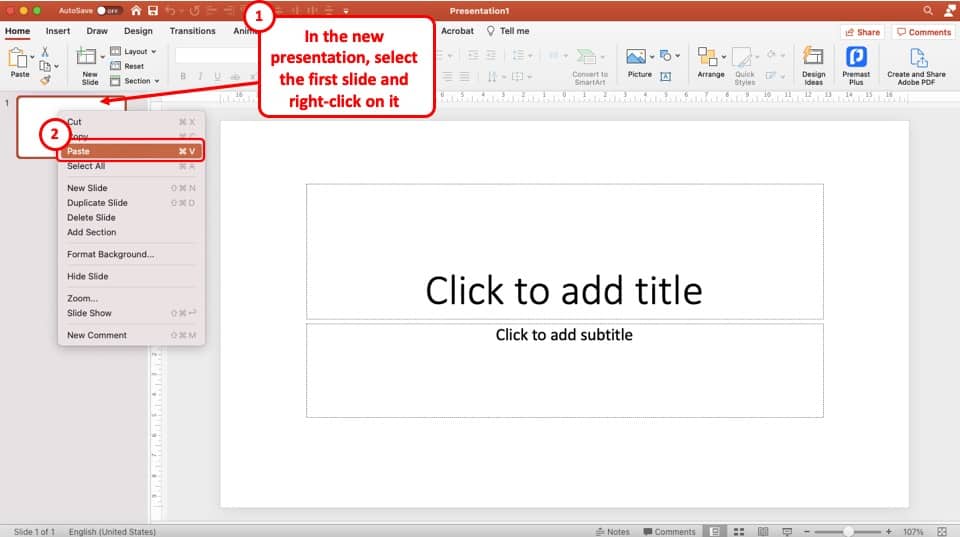
Once the new presentation is open, simply click on the first slide in the new presentation, and paste the slide that you have copied from the original presentation.
You can “right-click” on the first slide, and from the options that appear, click on “Paste“.
Alternatively, you can also simply click on the first blank slide in the new presentation and press “Ctrl+V” to paste the copied slide.
Step 4 – Choose the “Keep Source Formatting” option

Once you’ve pasted the slide from the original presentation into a new blank presentation, you will notice that sometimes the formatting of the slide (meaning the color and font) doesn’t get carried over.
This can be annoying as you really don’t want to spend time recreating the slide!
To solve this problem, click on the small “clipboard” icon underneath the slide that you just pasted in the new presentation. A dropdown menu will appear.
Simply, choose the “Keep Source Formatting” option from the dropdown.
This option will basically retain the way text, image and other elements were formatted in the original presentation.
Step 5 – Delete Additional Slides
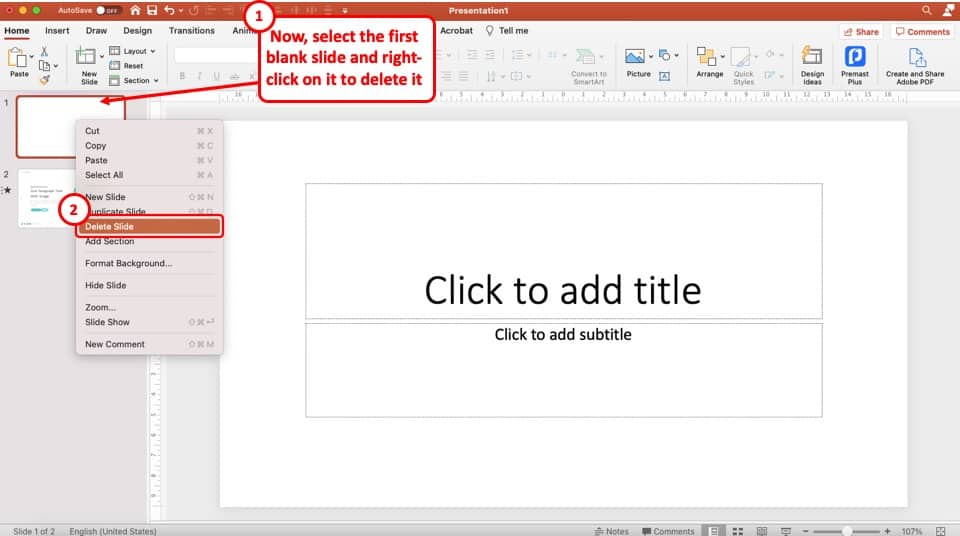
Now, all you are left to do is delete any additional slides that may be present in the new presentation.
To delete the slides from the presentation, select it by clicking on it. Then, right-click and choose the “Delete Slides” option.
You should be left with only a single slide that you copied from the original presentation.
Step 6 – Save the Presentation
The last step of the process is the make sure that you save the presentation.
To save a PowerPoint presentation, click on the “File” tab. Then, from the backend view, click on “Save“.
You can also use the keyboard shortcut “Ctrl+S” to save a PowerPoint presentation.
You will be prompted with a new window asking you to choose a destination to save the file. Navigate to the specific folder where you want to save the file. Then, click “Save“.
Method 2 – Save a Single Slide as an Image
If you are in a hurry and don’t really care about being able to edit the slide once it has been moved separately, then perhaps you should use this method.
Saving an individual slide as an image in Microsoft PowerPoint is quite an easy process.
It requires 4 easy steps as follows:
Step-1: “Right-click” on the slide

The first step is to go to the slide you want to save as an image and “Right Click” anywhere on the slide. This will open a drop-down menu.
Step-2: Select the “Save as Picture…” option
From the drop-down menu, click on the “Save as Picture…” option. This will open a new window.
In this window, you can select the folder you want to save the slide as a picture in. You can also rename the image by typing in the “File name” box.
Step-3: Select your preferred image format
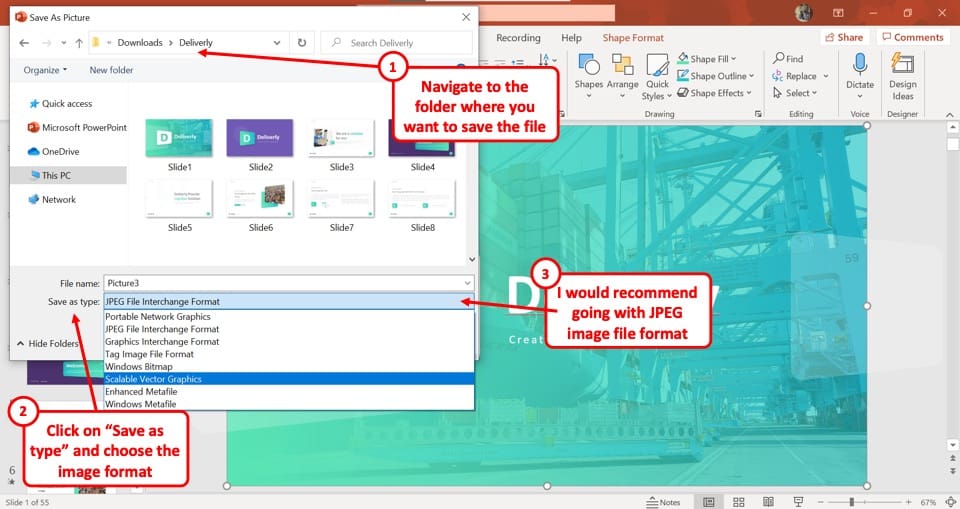
Below the “File name” box, click on the “Save as type” option. This will open a dropdown menu containing all the standard image format options. Click on your preferred format to select it.
I would recommend using the “JPEG” file format especially if you only plan to email this to a client or a team member.
If you plan to project it on a screen or print this slide on a huge paper, you would perhaps be better off going with the “PNG” file format.
Step-4: Click on the “Save” button
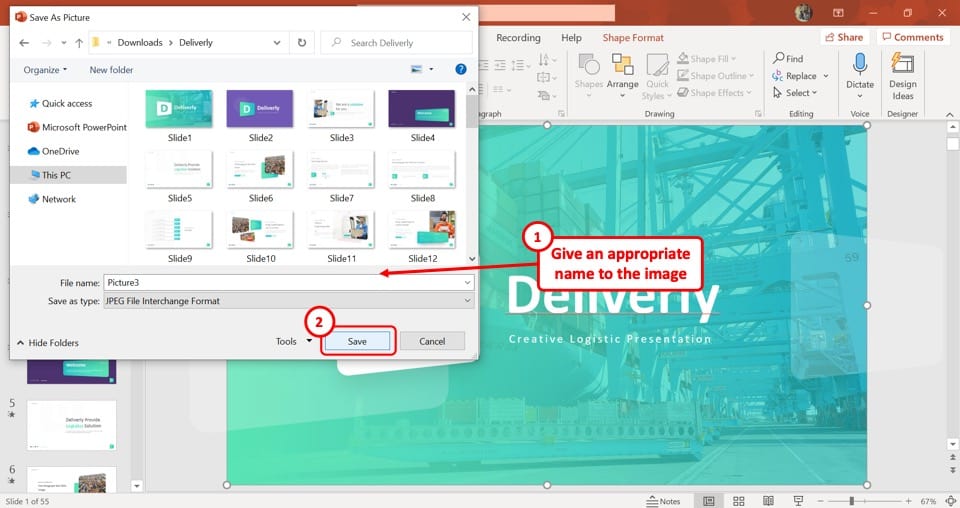
After naming your slide and selecting the image format, click on the “Save” button at the bottom of the new window. This will save the selected single slide as an image.
How to Save One Slide in PowerPoint as a Picture on Mac?
You can follow a similar process to the one mentioned in the previous section even on Mac. However, you can also use the export function and save just one slide as a picture in PowerPoint on Mac.
Here’s how to save just one slide as a Picture in PowerPoint on Mac –
Step-1: Select your preferred slide
First, click on the specific slide you want to save as a picture. Be sure to select the entire slide rather than a single element in the slide.
Step-2: Click on the “Export” option

In the “Primary Menu” bar at the top of your screen, click on the “File” option, which will open a dropdown menu. From the dropdown menu, select the “Export” option.
Step-3: Click on the “File Format” box
Clicking on the “Export” option will open a pop-up menu. At the bottom of the pop-up menu, click on the “File Format” box. This will open a dropdown menu containing various file formats.
Step-4: Select the preferred file format
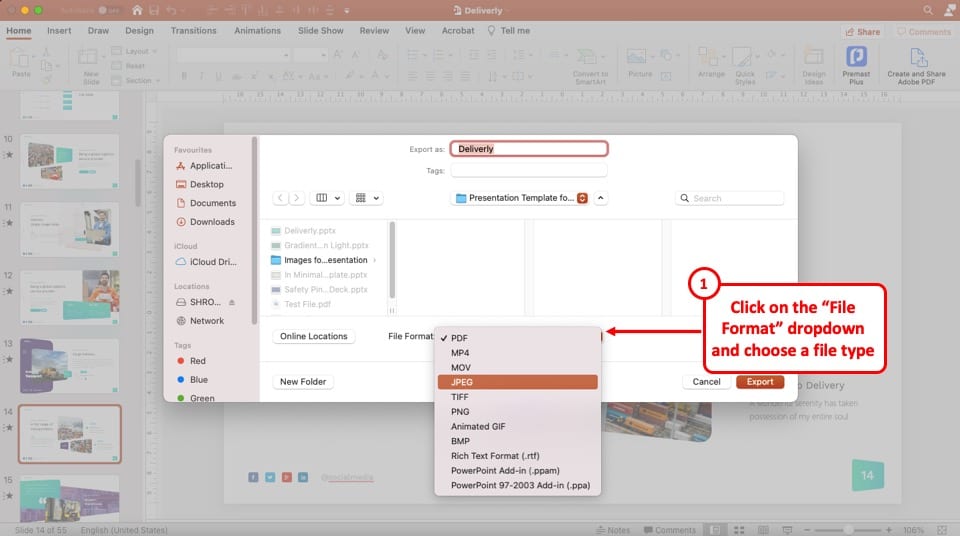
In the dropdown menu under the “File Format” box, there are three image formats which are “JPEG”, “TIFF” and “PNG.” Select your preferred image format.
My recommendation would be to choose the “JPEG” file format as that doesn’t significantly increase the size of the image and also maintains a decent quality for most purposes.
Step-5: Click on the “Save Current Slide Only” option
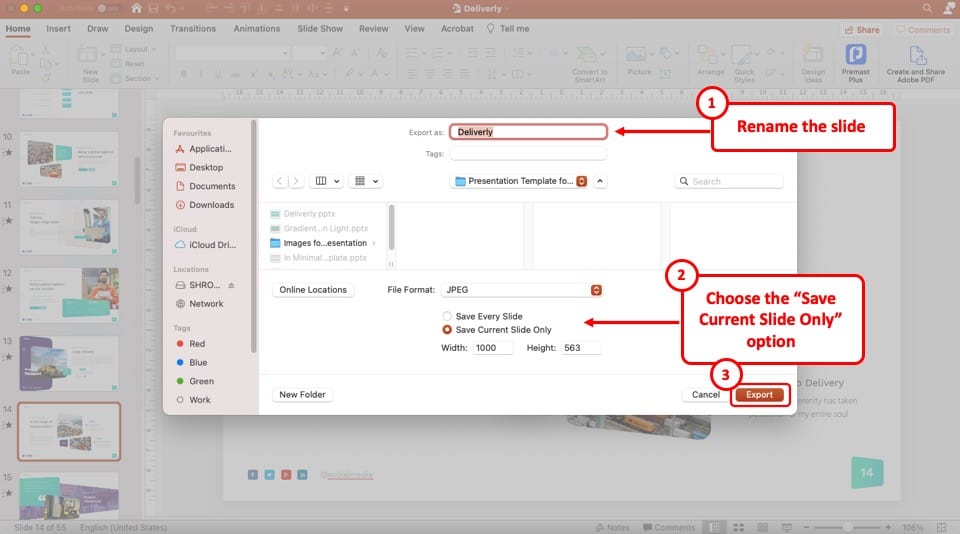
Once you select your desired file format, you will see two new options appear below the “File Format” box. Among the two options, click on “Save Current Slide Only.”
Step-6: Click on the “Export” button
To complete the process, click on the “Export” button which is located at the bottom of the pop-up window. Thus, the selected individual slide will be saved as a picture on your computer.
2. How to Save a Single Slide in PowerPoint as a PDF?
Another option is to save a single slide in PowerPoint as a PDF file. This is great especially when you want to send the slide to a client. Sending a file in a PDF format looks more professional.
Here’s what you need to do to save a single slide in PowerPoint as a PDF –
Step-1: Select the Slide

The first step is to select the slide that you want to save as a PDF file.
Step-2: Click on the “File” Tab and choose “Print”
At the top left corner of your screen, click on the “File” menu to open it. In the “File” menu, select the “Print” option from the sidebar at the right side of your screen.
Step-3: Select the “Microsoft Print to PDF” option
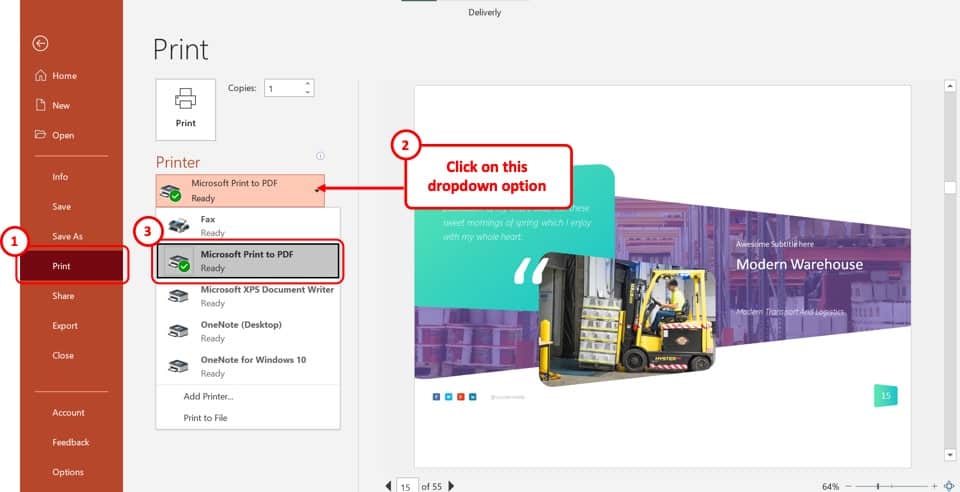
Once the “Print” option is open, click on “Printer” and select the “Microsoft Print to PDF” option from the dropdown menu.
Step-4: Click on the “Custom Range” button
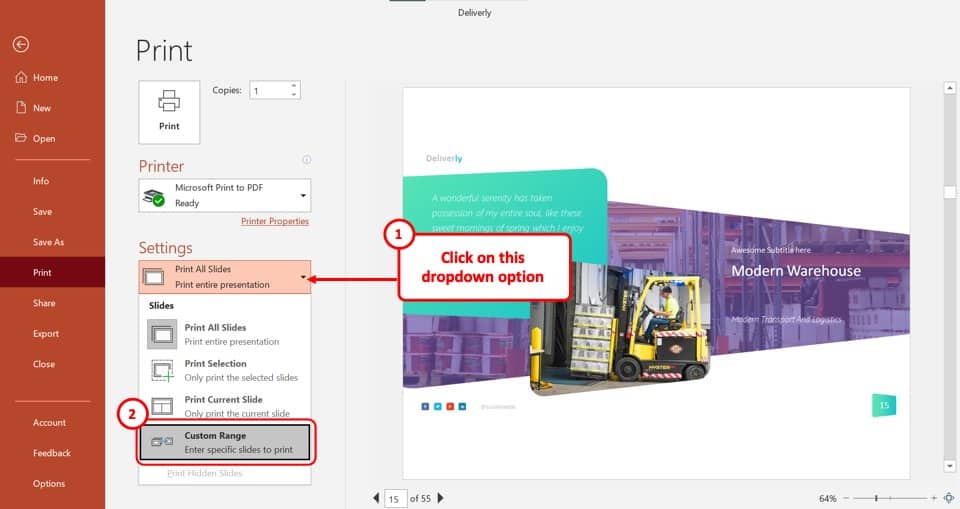
Now, under the “Settings” section, click on the top-most option which says “Print All Slides.” From the dropdown menu, click on the “Custom Range” button.
After that, click on the “Slides” box and type in the slide number of the slides that you want to save as PDF.
Step-5: Click on the “Print” button
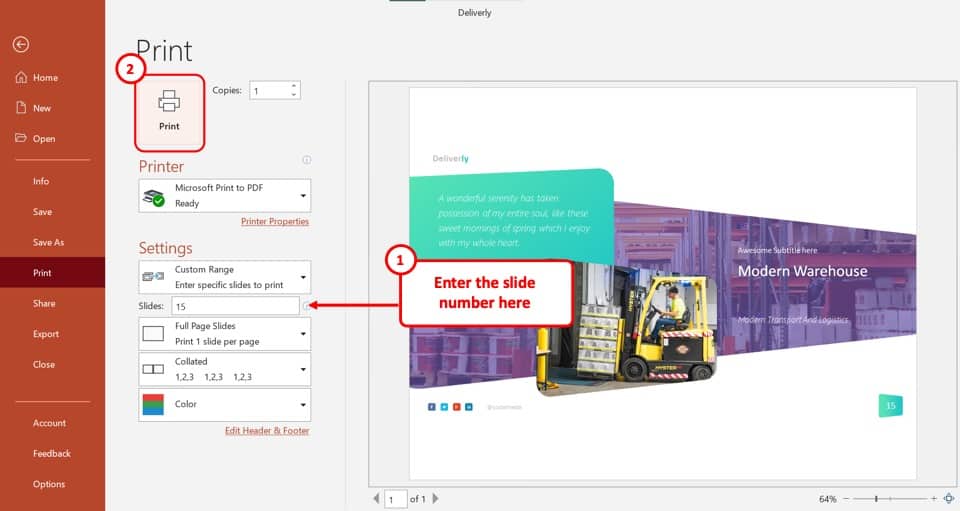
Now, click on the “Print” button to open a pop-up window. Type in the name of the PDF in the “File name” box and click on the “Save” button to save the selected slide as a PDF.
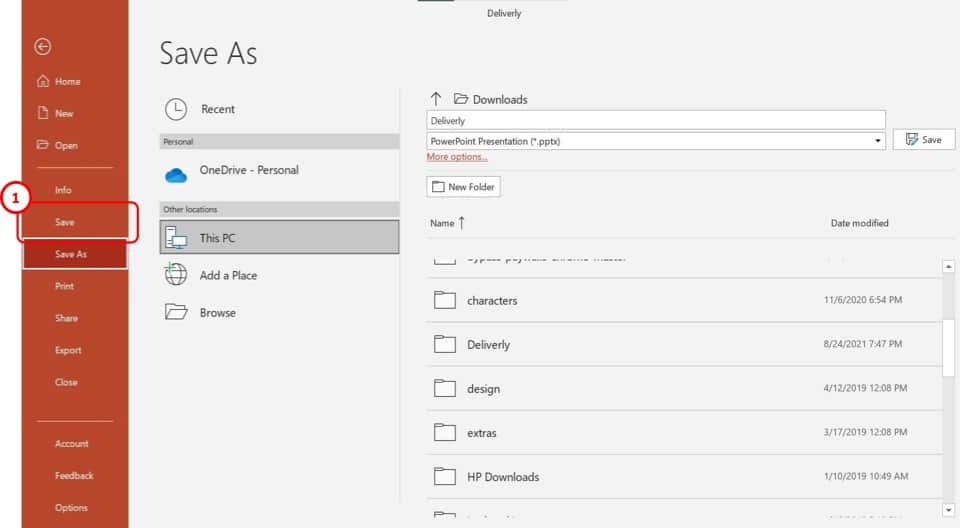
3. How to Save All Slides in PowerPoint as a Picture?
In Microsoft PowerPoint, you can save either an individual slide or an entire presentation as image files. Check out my other article where I’ve gone in-depth on how to save a PowerPoint as a picture. Make sure you check out the article for all the visual references and tips.
I’m also highlighting the process below but if you need to see the process with visual aids, check out the article linked above.
Step-1: Open the “File” menu
At the top-left corner of your PowerPoint window, you will find the “File” tab, which is the first option in the ribbon. Click on the “File” option to open a variety of options.
Step-2: Click on the “Save As” option
With the “File” menu opened, click on the “Save As” option from the sidebar located at the left side of your screen and select the folder where you want to save the pictures in.
To save the slides as pictures in a new folder, click on the “New Folder” button and type in the folder name.
Step-3: Click on “Save As Type”
The “Save As Type” drop-down menu is located in the text box that says “PowerPoint Presentation (*.pptx).”
Click on the text box to open a dropdown menu. Scroll down the menu and select your desired image format from “JPEG File Interchange Format (*.jpg)”, “PNG Portable Network Graphics Format (*.png)”, “TIFF Tag Image File Format (*.tif)” or “Scalable Vector Graphics Format (*.svg).”
Step-4: Click on the “Save” button
After selecting your preferred image file format, click on the “Save” button beside the “Save As Type” box. This will open a new dialogue box.
Step-5: Click on the “All Sides” button
Now, all you have to do is click on the “All Slides” button from the dialogue box to save all the slides of your presentation as image files.
Please Note – Each slide will be saved as a separate image arranged serially by slide number in your selected folder when you save a complete PowerPoint presentation as an image.
4. How to Print a Single Slide in PowerPoint?
In Microsoft PowerPoint, the process of printing an individual slide is similar to the process of saving the slide as a PDF file. Open the “Print” option from the “File” tab and then follow the 3 basic steps:
Step-1: Select the “Add Printer…” option
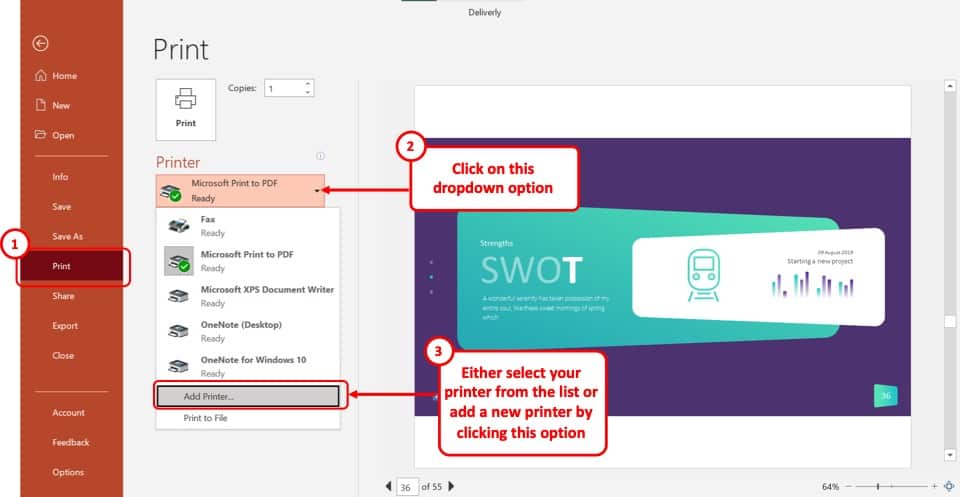
In the “Print” menu, click on the “Printer” box. From the dropdown menu, select the “Add Printer…” option.
This will prompt you to connect your printer to the computer. If your printer is already connected to your computer, click on it to select it.
Step-2: Select your preferred slide
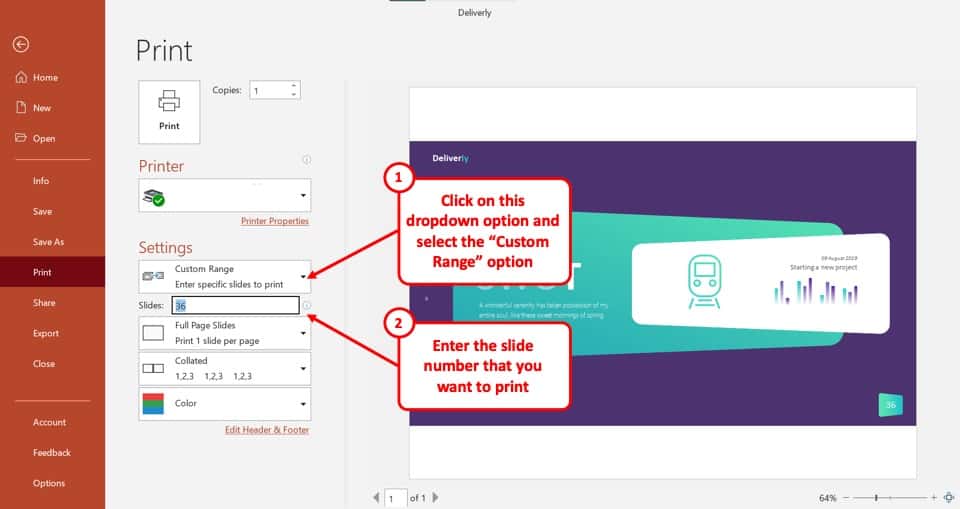
Next, click on the “Settings” button and select the “Custom Range” option from the drop-down menu. In the “Slides” box below, type in the slide number of your preferred slide.
Step-3: Click on the “Print” button

Now, all you have to do is click on the “Print” button for your printer to print the single PowerPoint slide you have selected.
Credit to cookie_studio (on Freepik) for the featured image of this article (further edited)