![How to Save a PowerPoint Presentation? [PPT & Other Formats!]](https://artofpresentations.com/wp-content/uploads/2022/03/Featured-Image-How-to-Save-a-PowerPoint-Presentation.webp)
Saving a PowerPoint presentation is one of the most important things that you need to do when you are creating a presentation using PowerPoint. Unlike some of the modern web-based presentation applications, you need to make sure that you save a PowerPoint presentation when you are using an offline version!
To save a PowerPoint presentation, click on the “File” tab. Then, from the backstage view, click on the “Save” option from the left panel. Choose the location or the folder where you want to save the presentation on your computer, and click on “Save”.
In this article, we shall not only understand how to save a standard PPT or PPTx file, but we shall also take a look at how to save a PowerPoint presentation in different file formats such as a PDF, video or an image!
So, let’s get started!
1. How to Save a PowerPoint Presentation?
Once you have saved a PowerPoint presentation, you can easily save it again with just one click. Furthermore, you can also save a PowerPoint presentation in other formats. However, the process of saving a PowerPoint presentation is slightly different on Windows and on Mac.
Let’s understand the process in further detail.
1a. Saving a PowerPoint Presentation on Windows
To save a PowerPoint Presentation on Windows PC, you can follow either of the 2 simple methods.
Method-1: Using the “Save” button on Quick Access Toolbar
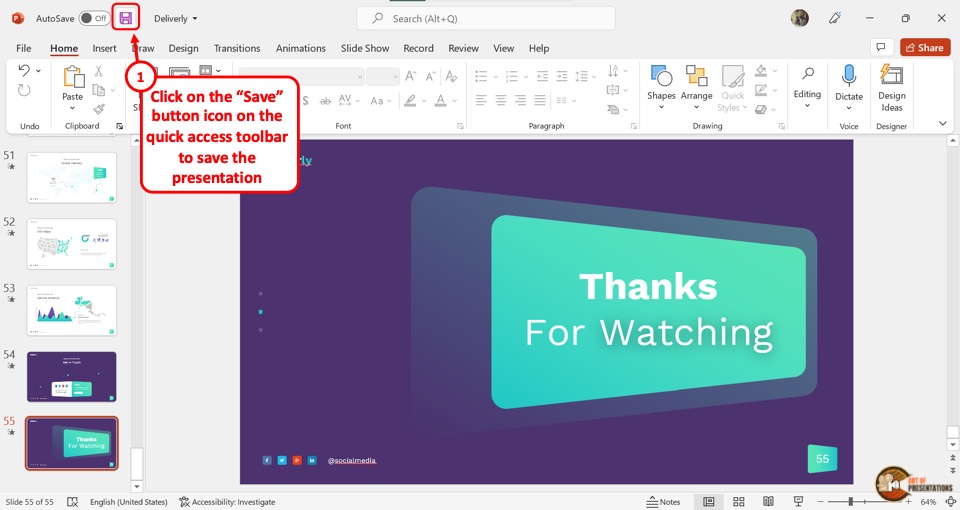
In the Quick Access Toolbar located at the very top of the screen, click on the “Save” icon.
The “Save” icon is located on the left side in the Quick Access Toolbar and looks like a floppy disk. Clicking on the “Save” button will immediately save the PowerPoint presentation in its current location as a “.pptx” file.
If you have opened a new presentation and you are saving it for the first time, clicking on the “Save” button will open a new explorer window. Simply navigate to the folder where you wish to save the new presentation on your computer, and click on “Save“.
Method-2: Using the “File” tab
Another, more common method is to use the “File” tab in PowerPoint to save your PowerPoint presentation.
Here’s what you need to do –
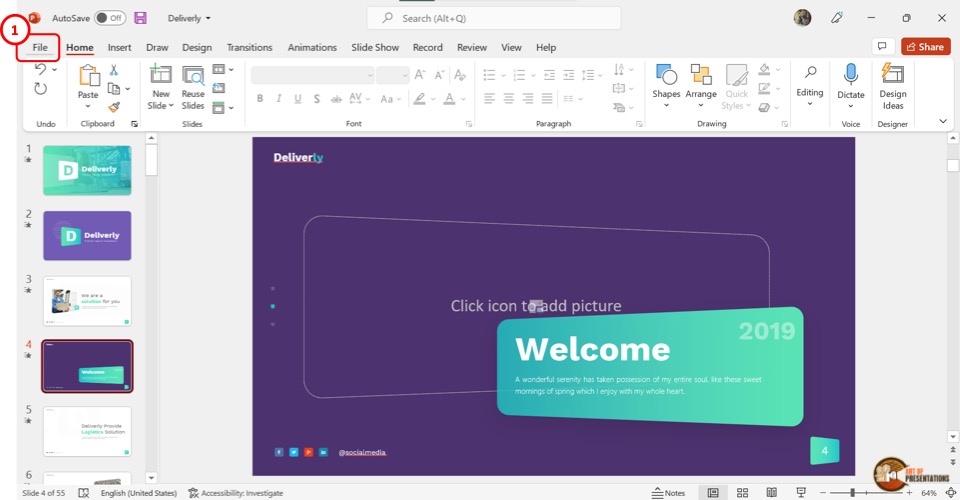
Step 1 – Click on the “File” Tab
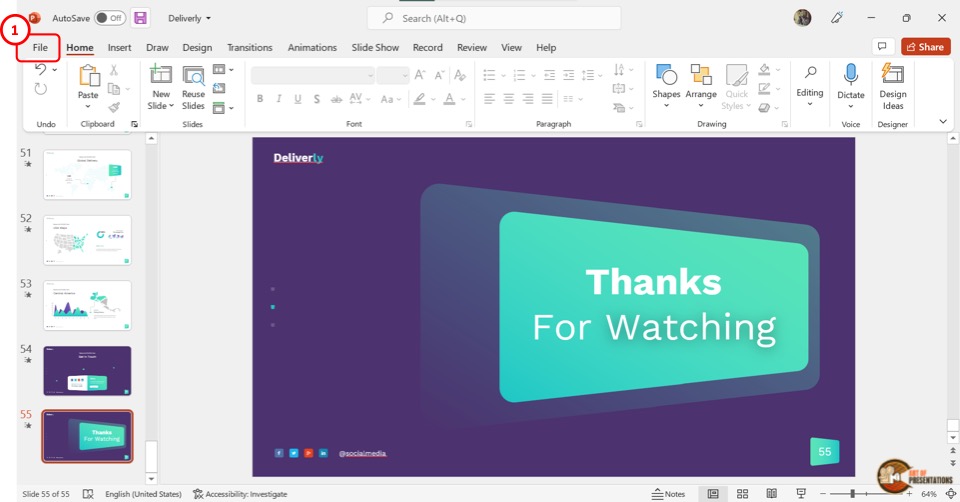
Another way to save a PowerPoint presentation is to use the “File” menu. You have to first click on the “File” tab located at the left corner of the menu ribbon at the top of the screen.
Step 2 – Click on the “Save” option
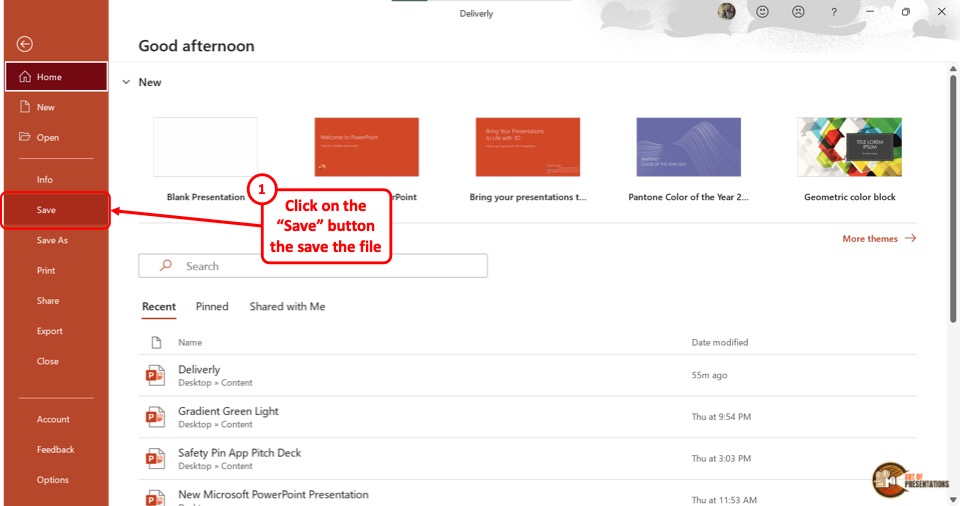
This will open the backstage view in PowerPoint. Now, click on the “Save” option from the sidebar on the left side of the screen. This will save the Microsoft PowerPoint as a “.pptx” file in the current location.
1b. Saving a PowerPoint Presentation on Mac
On a Mac computer, you can use the “File” menu as well to save the PowerPoint presentation.
The first step is to click on the “File” menu in the menu bar located at the top of the screen (above the PowerPoint window). This will open a dropdown menu. Click on the “Save” option from the dropdown menu to save the presentation as a “.pptx” file which is the standard format for presentations.
1c. Shortcut Keys to Save a PowerPoint Presentation
Microsoft PowerPoint also allows you to save a presentation with keyboard shortcuts. All you have to do is press the “Ctrl+S” keys on your keyboard in an open PowerPoint file. This will save the PowerPoint presentation.
1d. Best Format to Save a PowerPoint Presentation?
PowerPoint allows you to save a presentation in various different file formats! For instance, you can use the .ppt format if you wish to open the presentation file using PowerPoint 2007 or earlier. You can use .ppsx to open presentation directly as a PowerPoint Show file that opens it in the presentation mode.
In fact, there are several other formats you can save a presentation in. We shall explore how to save a PowerPoint presentation in several different formats later in the article.
However, the best format to save a PowerPoint Presentation is a “.pptx” file. This type can support all the latest as well as the older features of the PowerPoint presentation.
If you will be opening the presentation using a different software other than Microsoft PowerPoint, “.odp” is the best format. For printing, make sure to save the PowerPoint presentation as a PDF. That said, .pptx file format can help serve these purposes too.
2. How to Save a PowerPoint Presentation as PDF
Saving a PowerPoint presentation in PDF format is the suitable method for printing out your presentation. To save the PowerPoint presentation as a PDF file, follow the 4 easy steps.
Step-1: Click on the “File” Tab
First, click on the “File” tab in PowerPoint to open the back stage view of PowerPoint.
Step 2 – Click on the “Save As” option
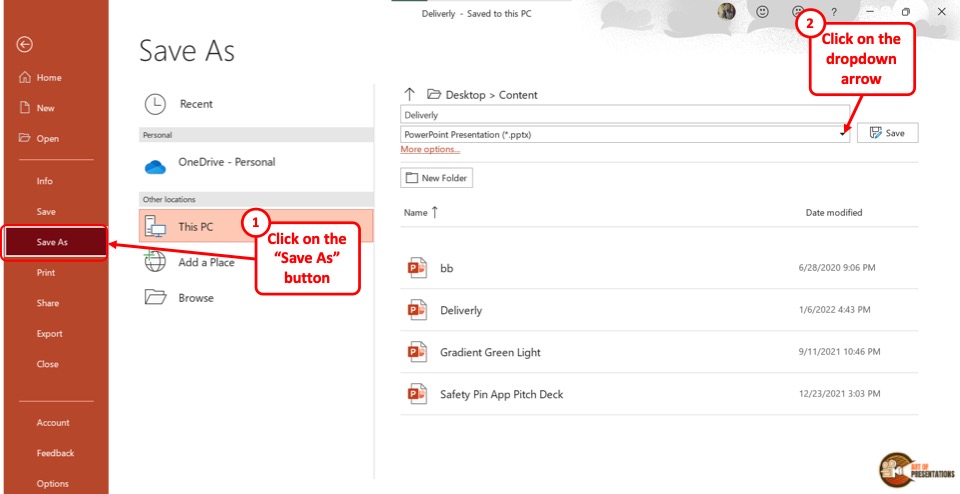
In the menu ribbon located at the top of the screen, click on the “File” tab. In the “File” menu, click on the “Save As” option from the sidebar on the left side of the screen.
Step-3: Click on the “PDF (*.pdf)” option
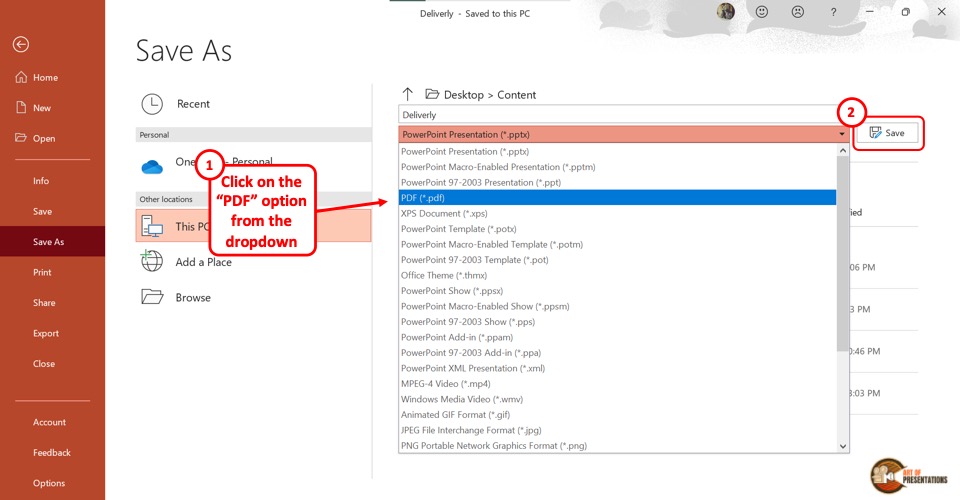
In the “Save As” screen, click on the box that shows “PowerPoint Presentation (*.pptx)”. This will open a dropdown menu. Click on the “PDF (*.pdf)” option from the dropdown menu.
Step-4: Click on the “Save” button
Now all you have to do is click on the “Save” button beside the box to save the PowerPoint presentation as a PDF file (as shown in the image in step 2).
3. How to Save a PowerPoint Presentation as a Video?
In Microsoft PowerPoint, you can also save a presentation as a video. This allows you to play the presentation slides as a video rather than a slide show.
3a. On Windows
To save a PowerPoint presentation as a video on a Windows PC, follow the 3 easy steps.
Step-1: Click on the “File” tab
The first step is to open the “Save As” screen. To do so, click on the “File” tab in the menu ribbon. In the “File” menu, click on the “Save As” option.
Step-2: Choose the “.mp4” file format from the “Save As” tab
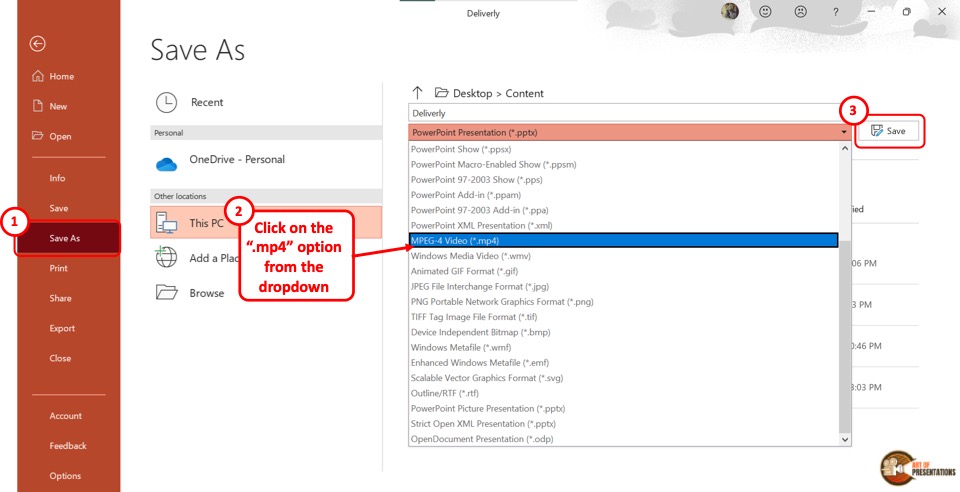
The next step is to click on the “Save As Options” box. It is the second box on the right side of the “Save As” screen. In the dropdown menu, click on either the “MPEG-4 Video (*.mp4)” option or the “Windows Media Video (*.wmv)” option.
Step-3: Click on the “Save” button
The final step is to click on the “Save” button (as indicated in step 2 above). It is located on the right side of the “Save As Options” box. This will save your PowerPoint presentation as a video.
3b. On Mac
To save a PowerPoint presentation as a video on a Mac device, follow the 3 simple steps.
Step-1: Click on the “Export” option

In the menu bar at the top of the screen, click on the “File” option. In the “File” dropdown menu, click on the “Export” option. This will open a dialog box.
Step-2: Click on the “File Format” box
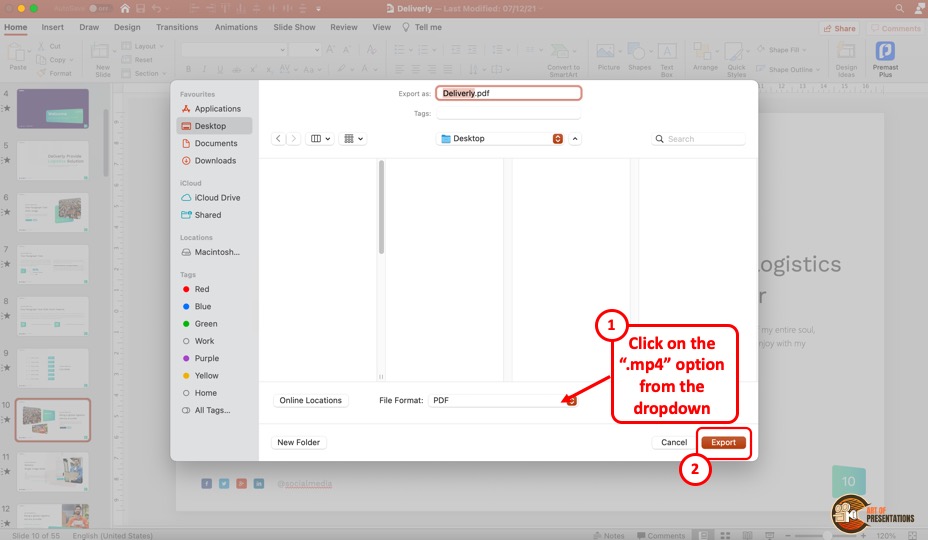
In the dialog box, click on the “File Format” box. This will open a dropdown menu. You can click on either the “MP4” option or the “MOV” option as you prefer.
Step-3: Click on the “Export” button
In the dialog box, you can also click on the “Quality” option to select the quality of the video. Once you are satisfied with the selections in the dialog box, click on the “Export” button at the bottom (as shown in the image in the previous step). This will save the presentation as a video.
4. How to Save a PowerPoint Presentation to Open in Slideshow Mode?
Microsoft PowerPoint allows you to save the PowerPoint presentation as a “PowerPoint Show” file. This opens directly as a slideshow. To save a PowerPoint presentation to open in slideshow mode, follow the 2 easy steps.
Step-1: Click on the “File” tab
In the open PowerPoint file, click on the “File” tab from the menu ribbon which is located at the top of the screen. In the “File” menu, click on the “Save As” option.
Step-2: Click on the “PowerPoint Show (*.ppsx)” option
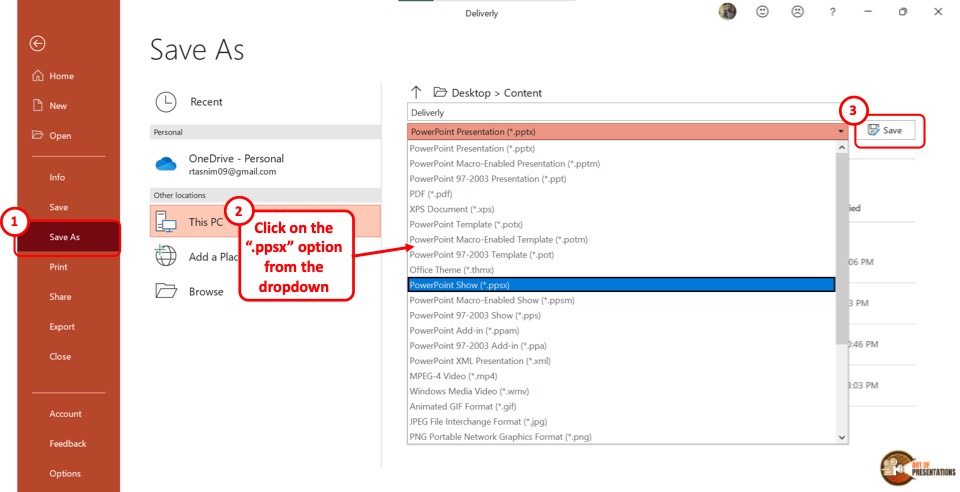
In the “Save As” screen, click on the “Save As Options” box which shows “PowerPoint Presentation (*.pptx)”. This will open a dropdown menu. Click on the “PowerPoint Show (*.ppsx)” option.
Now all you have to do is click on the “Save” button to save the PowerPoint presentation to open as a slideshow.
5. How to Save a PowerPoint Presentation as an Image?
In Microsoft PowerPoint, you can save the presentation as an image in five different formats: “Animated GIF Format (*.gif)”, “JPEG File Interchange Format (*.jpeg)”, “PNG Portable Network Graphics Format (*.png)”, “TIFF Tag Image File Format (*.tif)”, and “Scalable Vector Graphics Format (*.svg)”.
To save your presentation as an image, follow the 3 simple steps.
Step-1: Click on the “Save As” option from the “File” tab
The first step is to click on the “File” tab in the menu ribbon. Then click on the “Save As” option from the “File” menu.
Step-2: Select your preferred image format
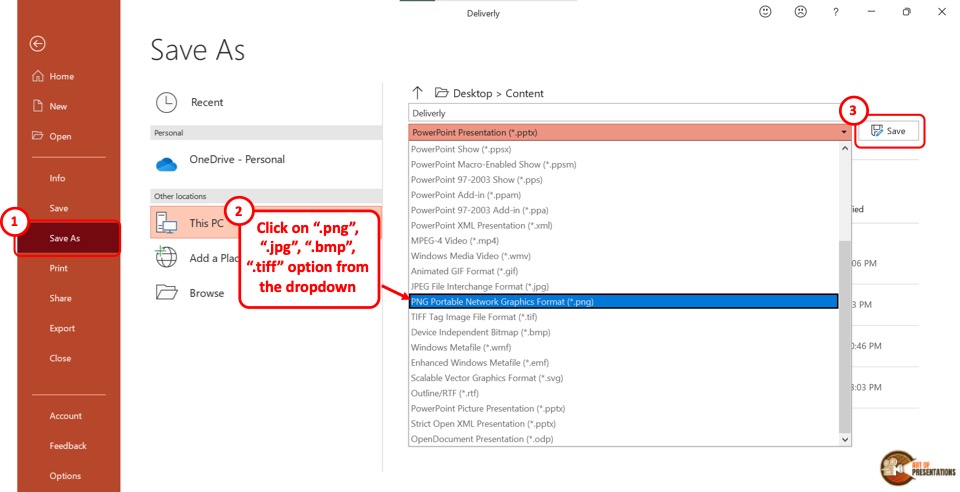
In the “Save As” screen, click on the “Save As Type” box which is the second box in the right column. From the dropdown menu, click on your preferred image format from the five available formats.
Step-3: Click on the “Save” button
Now all you have to do is click on the “Save” button (as shown in the image in step 2) beside the “Save As Type” box. This will save your presentation in a folder containing each slide as a separate image file.
6. How to Save a PowerPoint Presentation as a Template?
A PowerPoint template is a predesigned presentation that you can edit to add your own content. To save a presentation as a template, follow the 3 easy steps.
Step-1: Click on the “Export” option
The first step is to click on the “File” tab in the menu ribbon. Then click on the “Export” option from the sidebar in the “File” menu.
Step-2: Click on “Change File Type”
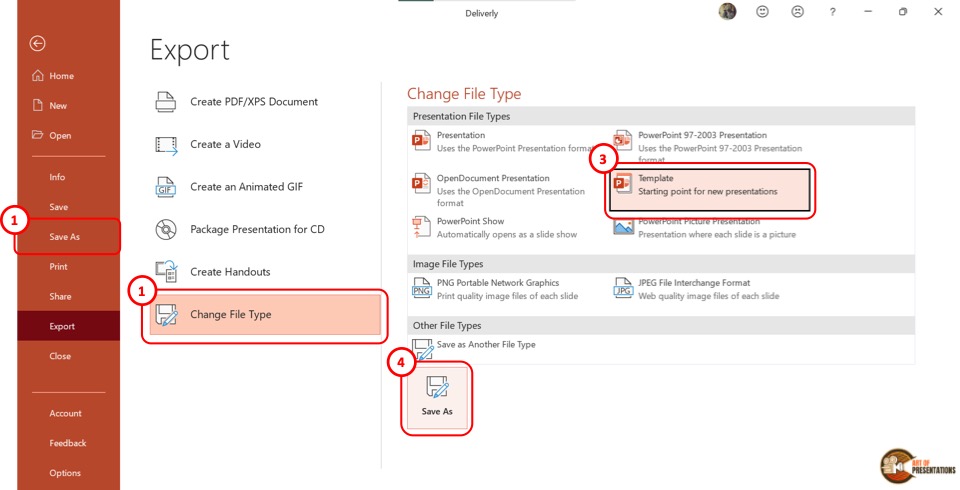
Now you have to click on the “Change File Type” option. Under the “Presentation File Types” group in the right column, click on the “Templates” option. Then click on the “Save As” button at the bottom of the screen.
Step-3: Click on the “Save” button
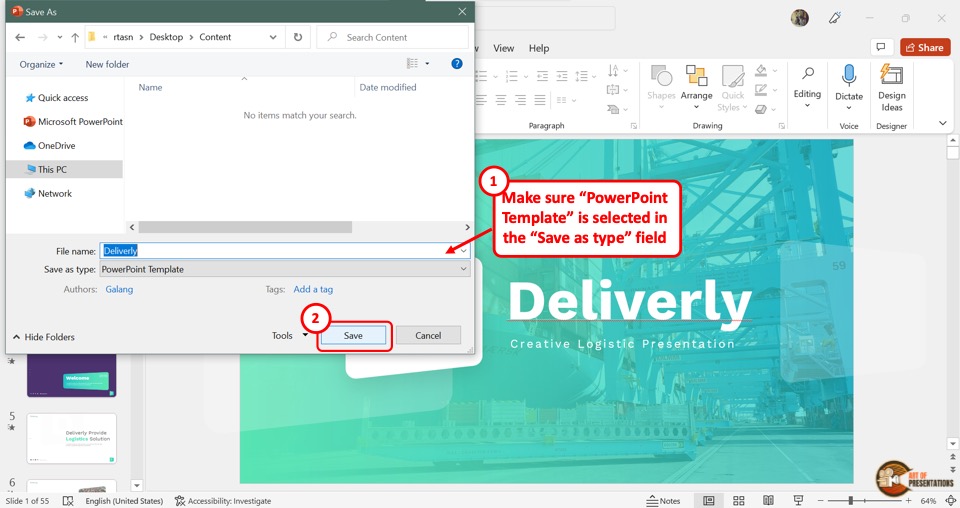
In the “Save As” dialog box, you will see that the “Save as type” box shows the “PowerPoint Template” format. Now all you have to do is click on the “Save” button.
7. How to Save PowerPoint Presentation as Google Slides?
Microsoft PowerPoint does not offer any feature to upload a presentation to Google Slides directly. However, Google Slides does offer you an option to upload your PowerPoint presentation and save it in Google Slides!
Here’s what you need to do –
Step-1: Save Your PowerPoint Presentation
The first step is to save your PowerPoint presentation using any method described in the section 1 of this article.
Make sure that you note down the location of the folder in which you have save the PowerPoint file.
Step-2: Click on the “Open file picker” option in Google Slides
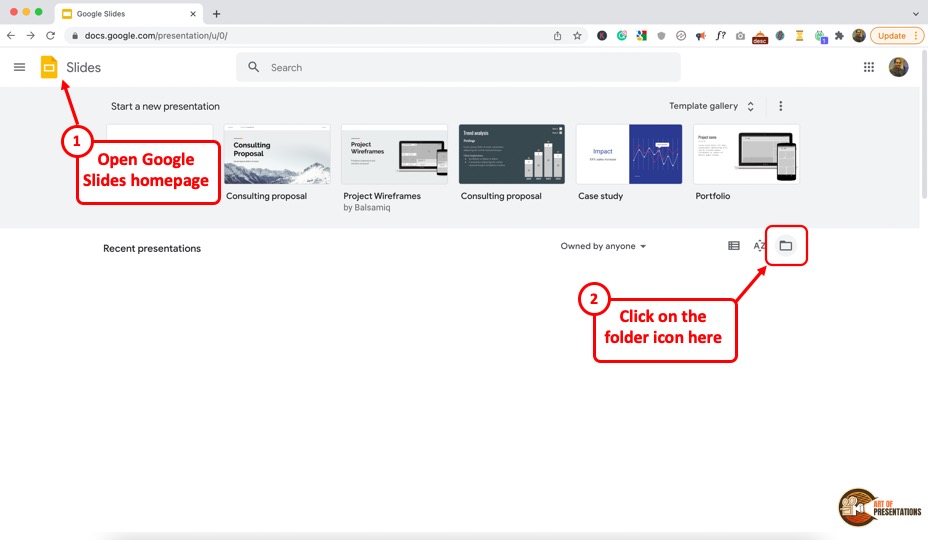
Now, the next thing you need to do is open your Google Slides account by visiting slides.google.com. If you aren’t logged in, make sure you sign in with your account credentials.
Next, you will be presented with Google Slides home screen (as shown in the image above). In Google Slides, click on the “Open file picker” icon which looks like a folder. This will open the “Open a file” dialog box.
Step-2: Click on “Upload”

In the “Open a file” dialog box, click on the “Upload” tab.
From your “File Explorer” window, drag and drop the PowerPoint presentation in the dialog box. Now the presentation will automatically open in Google Slides.
Also Read – How to “Make a Copy of a Google Slides Presentation” and how to “Share a Google Slides Presentation Correctly” with others!
You can also click on the “Select a file from your device” button (blue button in the center of the screen). This will open the file explorer window. Navigate to the folder in which you have saved your PowerPoint presentation, and click on “OK”. This will open and save the presentation file in Google Slides.
8. How to Save a PowerPoint Presentation to a Flash Drive?
To save a PowerPoint presentation on a flash drive or any external device, follow the 3 simple steps.
Step-1: Click on the “File” tab
In the menu ribbon located at the top of the screen, click on the “File” tab. In the “File” menu, click on the “Save As” option.
Step-2: Click on “Browse”
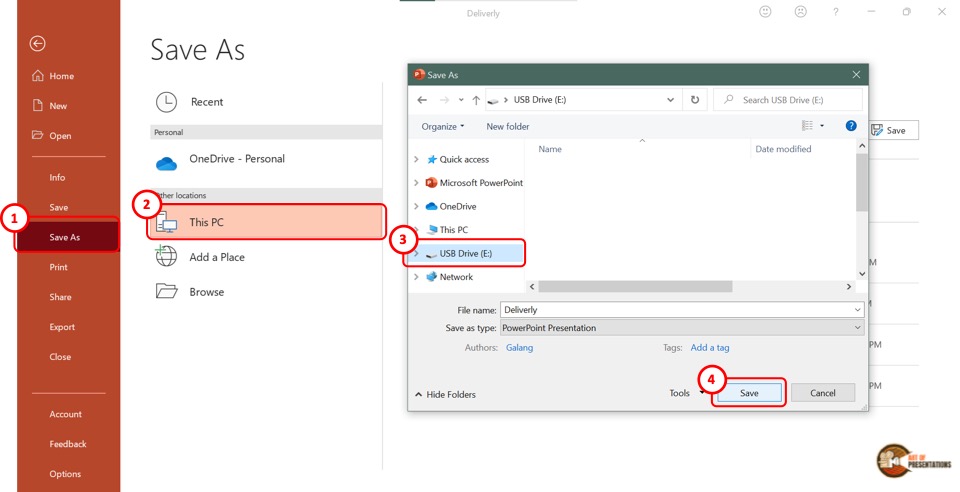
In the “Save As” screen, click on the “Browse” option which is the last option in the left column. This will open the “Save As” dialog box. In the sidebar on the left of the dialog box, click on the external disc.
Step-3: Click on the “Save” button
Now all you have to do is click on the “Save” button at the bottom of the dialog box to save the PowerPoint presentation on the flash drive (as shown in the image in step 2).
9. How to Save a Copy of a PowerPoint Presentation?
The “Save A Copy” feature of Microsoft PowerPoint allows you to save changes in your presentation in a copied file without changing the original file.
Check out my article to learn detailed steps on how to save a copy of a PowerPoint presentation.
10. How to Save a Read-Only PowerPoint Presentation?
The “Read-Only” feature of Microsoft PowerPoint allows you to protect your PowerPoint presentation.
Using this feature, you can share your presentation with others without giving them the access to change your presentation. To save a read-only PowerPoint presentation, follow the steps mentioned below –
Step-1: Click on the “File” tab
The first step is to click on the “File” tab in the menu ribbon. From the sidebar in the “File” menu, click on the “Info” option.
Step-2: Click on the “Protect Presentation” button

The next step is to click on the “Protect Presentation” option in the “Info” screen. This will open a dropdown menu. Click on the “Always Open Read-Only” option from the dropdown menu.
Step-3: Click on the “Save” option
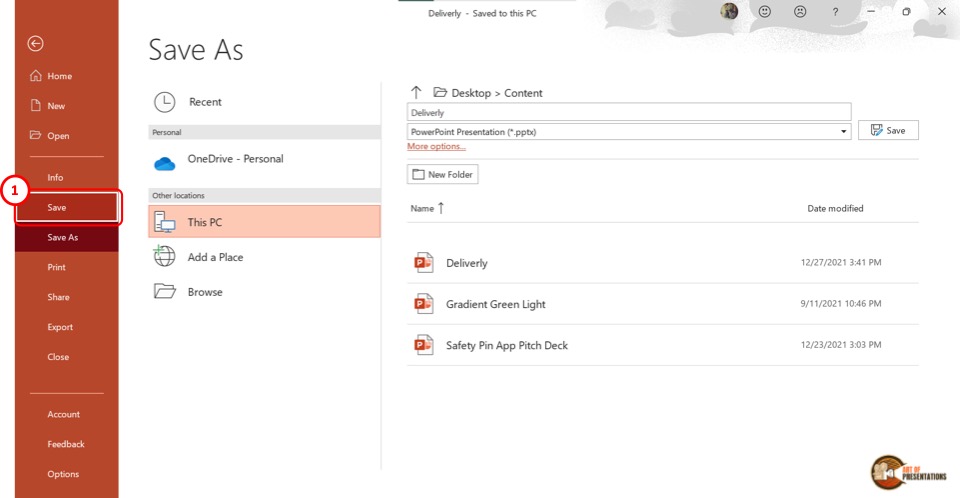
Now all you have to do is save the presentation. To do so, click on the “Save” option in the sidebar right under the “Info” option. Alternatively, you can press the “Ctrl+S” keys on your keyboard.
If you have received a presentation that opens only in the read-only mode, but you don’t know how to work with it, check out my other article on “How to Edit a Presentation in Read-Only Mode“.
11. How to Save a PowerPoint Presentation Without Notes?
When saving a PowerPoint presentation, you might want to remove the speaker notes. To do so, all you have to do is follow the 5 quick steps.
Step-1: Click on the “File” tab
In the menu ribbon, click on the “File” tab. Then click on the “Info” option from the “File” menu.
Step-2: Click on “Check for Issues” on the “Info” tab
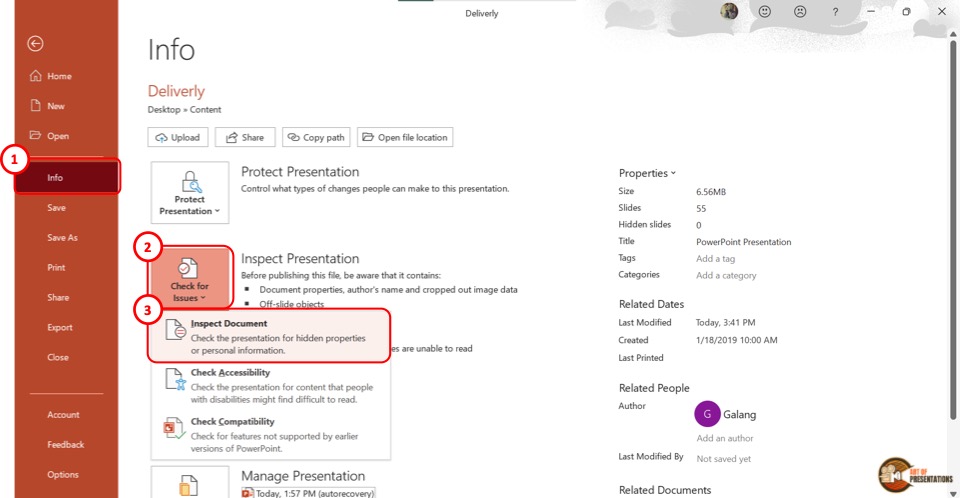
In the “Info” option, click on the “Check for Issues” button. Then click on the “Inspect Document” option from the dropdown menu. This will prompt a dialog box.
Step-3: Click on the “Inspect” option
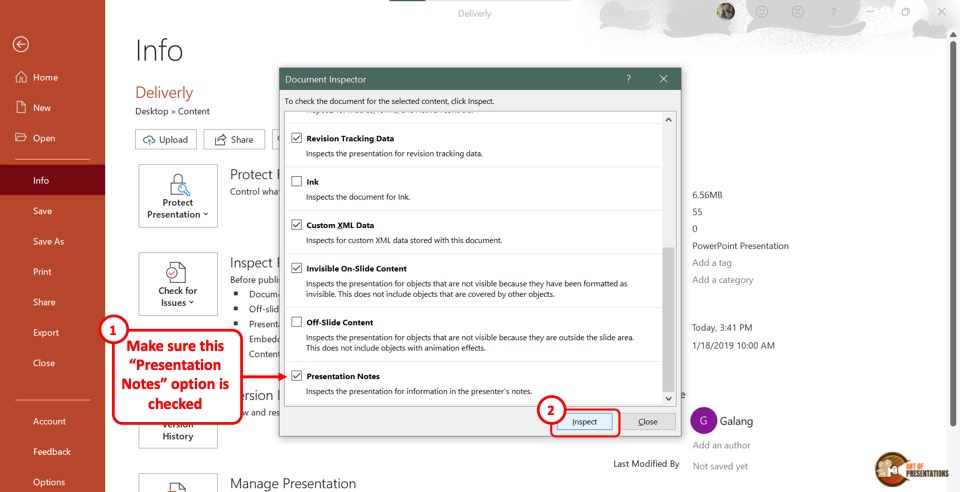
In the “Document Inspector” dialog box, scroll all the way to the bottom and make sure the “Presentation Notes” option is selected. Then click on the “Inspect” button at the bottom of the dialog box.
Step-4: Click on the “Remove All” option
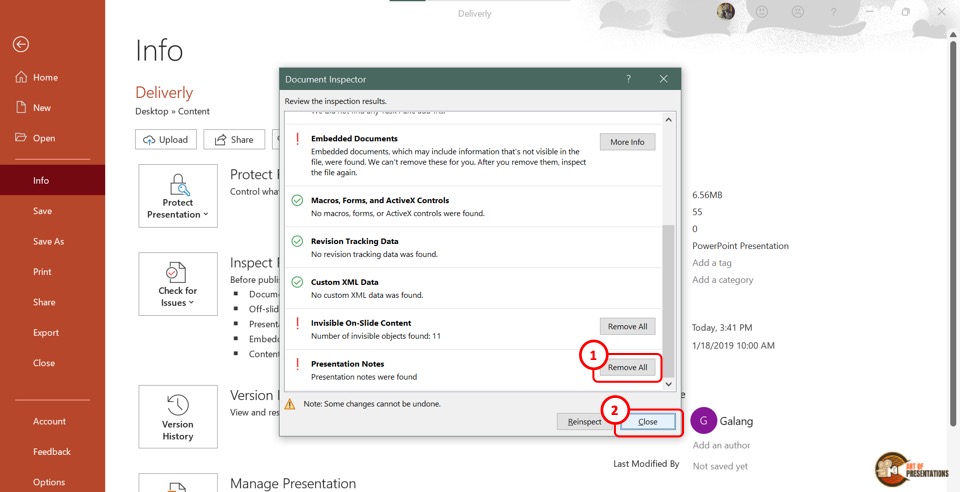
Once the inspection results are shown in the “Document Inspector” dialog, scroll to the bottom again to find the “Presentation Notes” option. Then click on the “Remove All” button at the right side of the “Presentation Notes” option.
Now all you have to do is click on the “Close” button at the bottom of the dialog box to finish the process.
Step-5: Click on the “Save” option
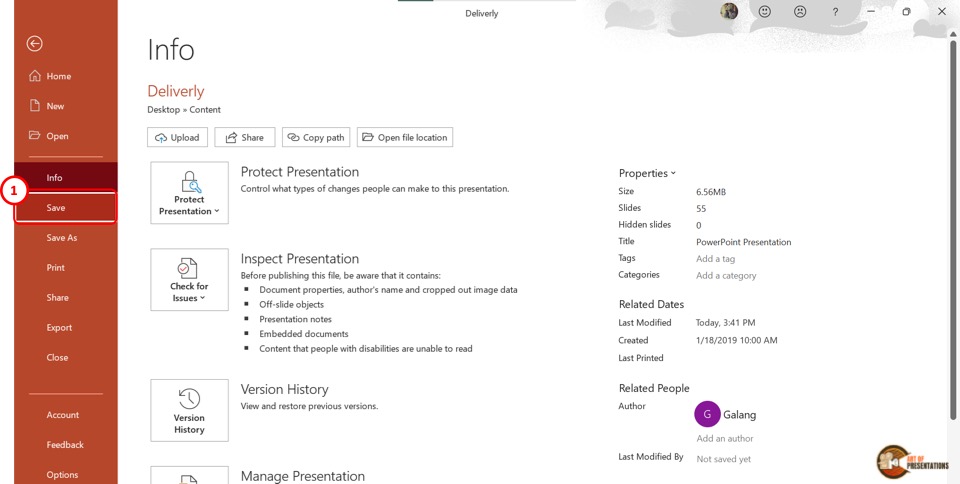
The final step is to click on the “Save” option in the sidebar of the “File” menu to save the presentation without notes. You can alternatively press the “Ctrl+S” keys on your keyboard.
12. How to Save PowerPoint Presentation Directly in Microsoft Teams?
If you are delivering a PowerPoint presentation to an audience using Microsoft teams, you can easily share a PowerPoint deck with your audience in the following steps –
- First, open the Microsoft Teams application and login to the meeting.
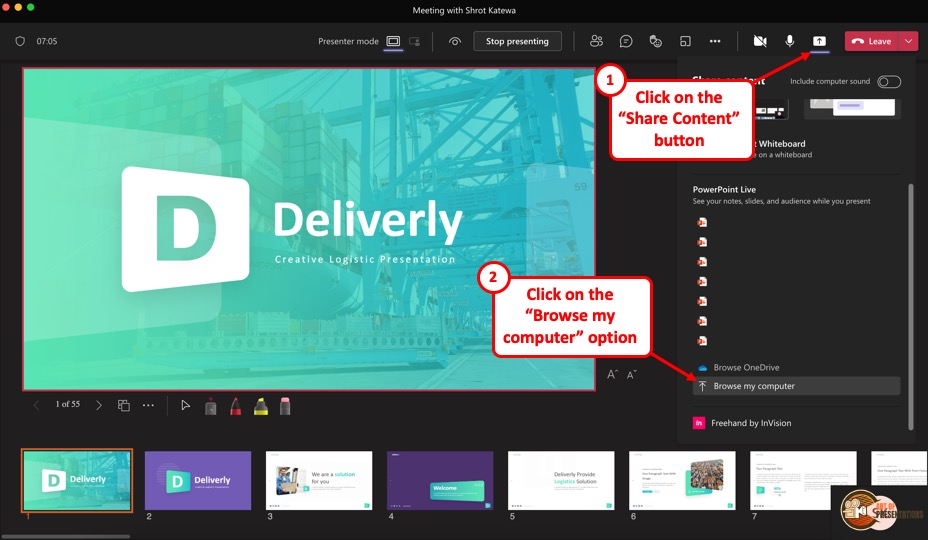
- On the “Meeting Controls” menu available in the top part of your meeting screen, locate the “Share Content” option.
- Click on the share content button. This will show the most recent PowerPoint files that you opened. You can either choose to click on one of the files visible. Alternatively, scroll down on the right panel and click on the “Browse my computer” option.
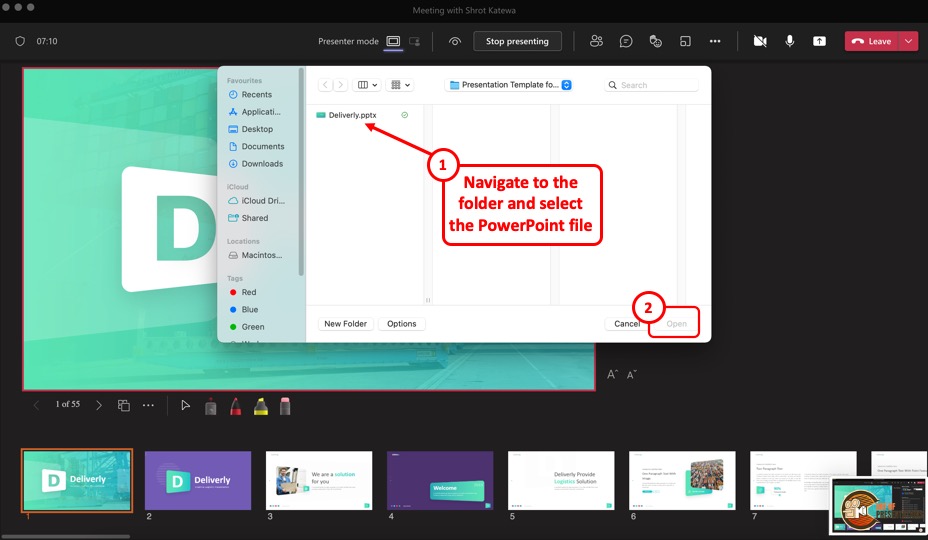
- This will open a new file browser window. Navigate to the respective location where your PowerPoint presentation is saved, click on it to select it. Then, click on “Open” to open the presentation in Microsoft Teams.
- The presentation will open by default in the presenter mode and shared with the audience of the meeting.
13. How to Enable Autosave in PowerPoint Presentation?
The autosave option is only available if you are using the Microsoft Office 365 version of PowerPoint. Other than that, you will have to manually save the PowerPoint file in all other versions.
You can autosave the PowerPoint presentation to the OneDrive cloud, and also autosave recovery files. To enable autosave in PowerPoint presentation, follow the 4 simple steps.
Step-1: Click on the “AutoSave” button
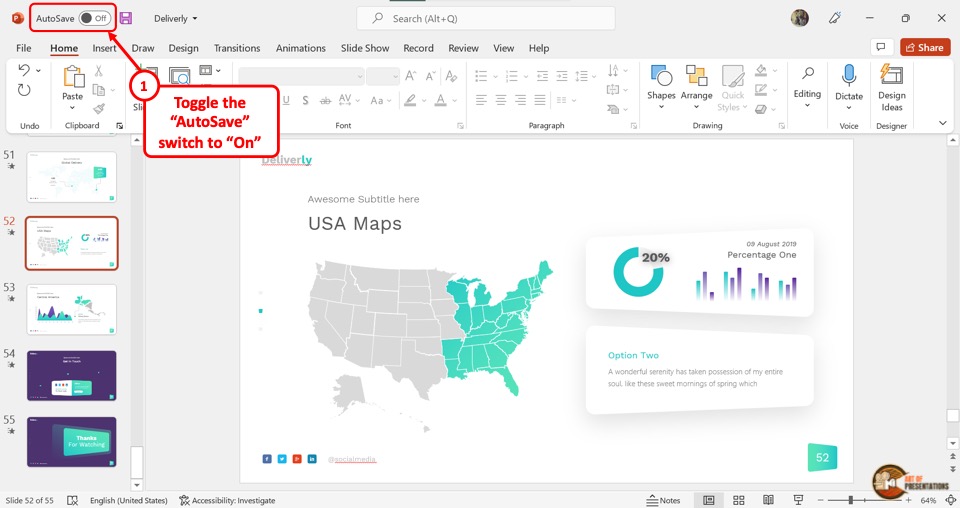
To simply turn on autosave in the OneDrive cloud for the PowerPoint presentation, all you have to do is click on the slider beside the “Autosave” option.
It is located in the left corner of the Quick Access Toolbar at the top of the screen.
Step-2: Click on “Options”
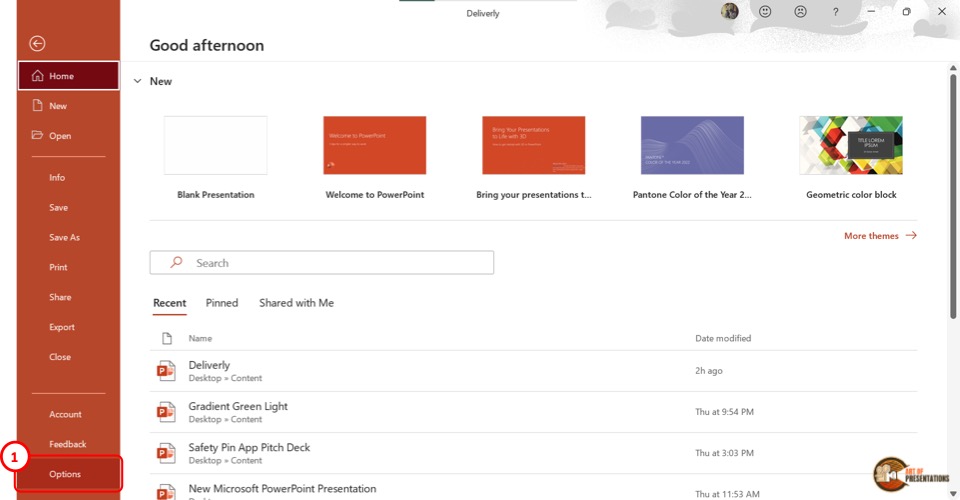
To access more autosave options, click on the “File” tab in the menu ribbon. Then click on the “Options” option which is the last option in the sidebar in the “File” menu. It will open a dialog box.
Step-3: Click on the “Save” option
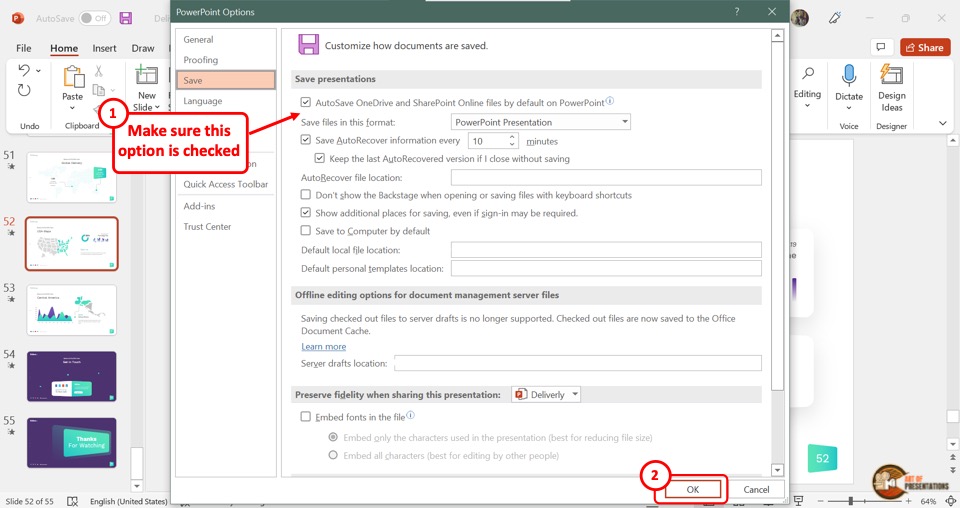
In the “PowerPoint Options” dialog, click on the “Save” option from the sidebar located on the left side. Now you can enable your preferred autosave options in the “Save presentations” section.
Click on the “Autosave OneDrive and SharePoint Online files by default on PowerPoint” for auto-saving on the cloud. You can also select how often the auto-recovery copy is saved by clicking on the box at the right side of the “Save Autorecover information” option.
Step-4: Click on the “OK” button
Now all you have to do is click on the “OK” button at the bottom of the “PowerPoint Options” dialog box to enable your autosave preference (as shown in the image in step 2).
Credit to Cookie_studio (on Freepik) for the featured image of this article (further edited).