If you use PowerPoint regularly to create presentations, at some point in time, you will need to rotate text in PowerPoint. What’s really interesting is that the option to rotate text doesn’t seem to be common knowledge. However, it is actually quite easy to rotate text in PowerPoint!
To rotate text in PowerPoint, first, select the text box. Then, from the “Home’ tab, click on the “Arrange” option. Next, click on “Rotate”. Finally, choose the type of rotation from the options provided as per your requirement. You can also use the “Rotate Handle” to rotate the text.
In this article, we shall understand the nuances of how to rotate text in PowerPoint. I will also share with you the steps that you need to follow if you want to curve the text or rotate it at a 45-degree slant position!
So, let’s get started!
A Quick Note Before We Begin – If you want to make your presentations stand out, I highly recommend using presentation templates from Envato. With Envato, you get access to thousands of presentation designs so you never run out of options again. Not only is Envato Elements very affordable, but also the best in the business when it comes to templates!
1. How to Rotate Text in PowerPoint?
There are 3 methods to rotate text in PowerPoint. You can either use the “Rotate” button, use the rotate handle, or use the format options to precisely rotate the text box. You can also use the “Flip” option which I will describe in the subsequent sections below.
In the following section, I will be describing the three methods step-by-step.
Method 1 – Using the “Rotate” Option
To use the “Rotate” option you have to select the textbox of the text that you want to rotate and follow the steps given below.
Step-1: Select the “Arrange” option
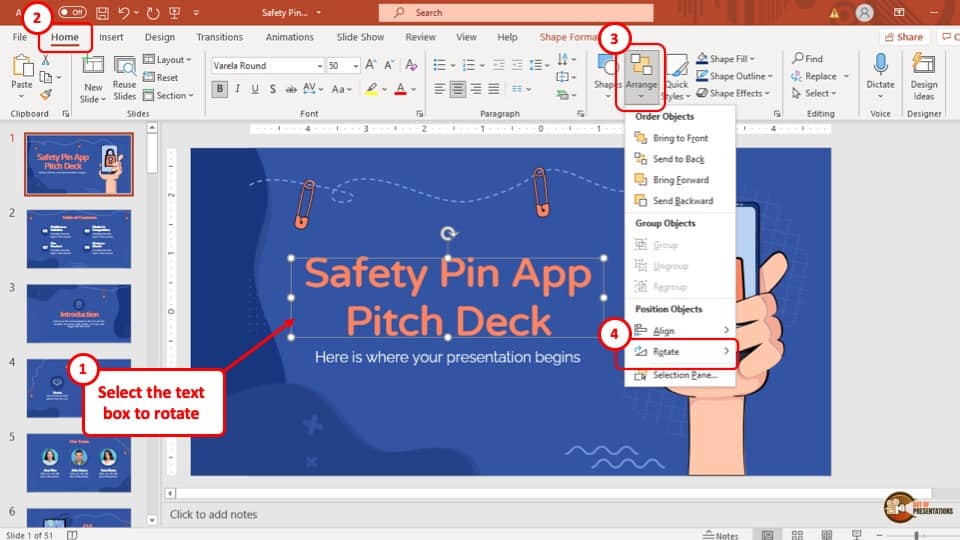
The first step is to select the “Arrange” option, which is located in the “Drawing” section of the “Home” tab. A drop-down menu will appear on the screen.
Step-2: Select your preferred rotation
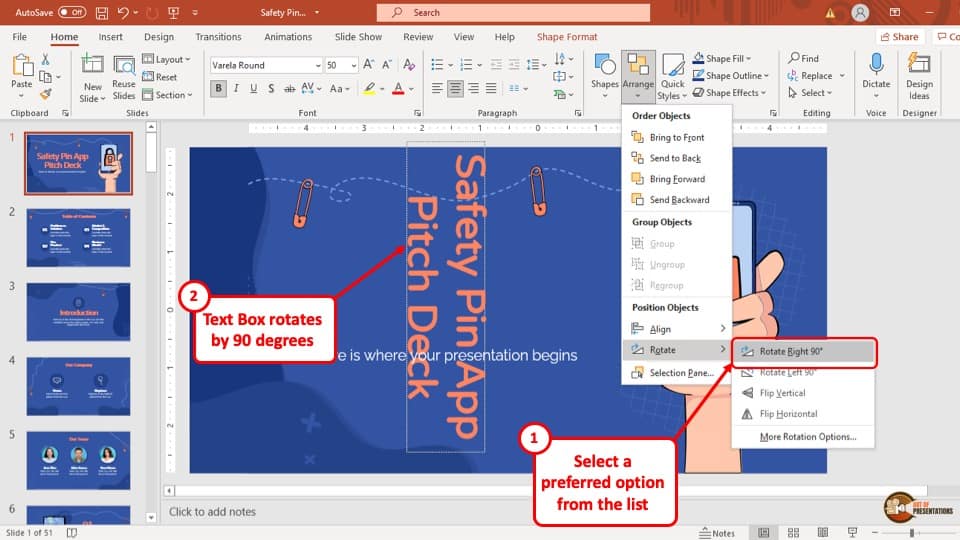
In this step, all you have to do is to select your preferred style of rotation from the 4 provided styles in the “Rotate” option in the drop-down menu.
Upon selecting one of the four styles, the text will rotate accordingly.
Method 2 – Using the Rotate Handle
You can also use the Rotate handle to rotate text in your PowerPoint presentation.
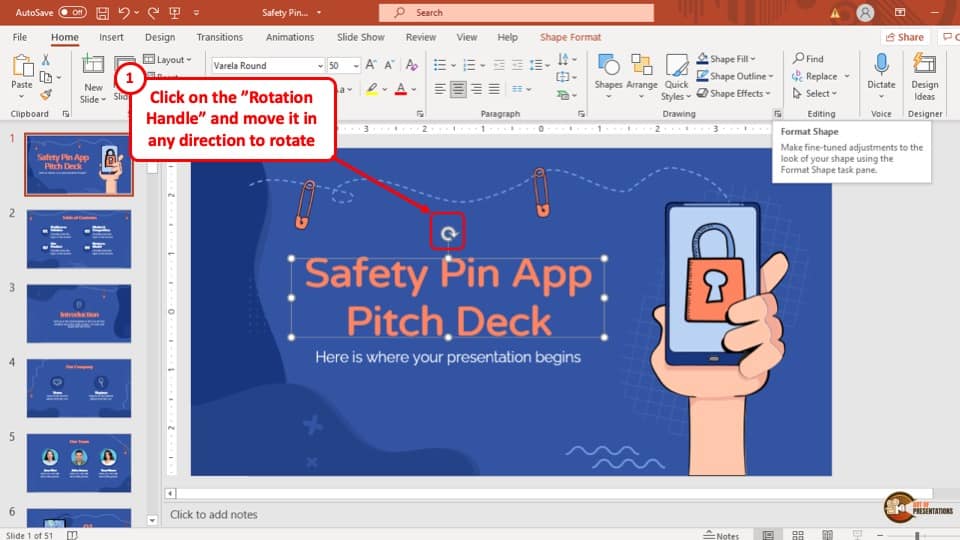
To do this, select the textbox and you will see a circular arrow pointing towards the right, which you can find above the middle part of the text box. Simply click and hold the rotate handle, rotate the text to your preferred angle, and let go of the cursor and the text will be rotated accordingly.
Method 3 – Using the “Format Shape” Option
To use the “Format Shape” option to rotate your text, select the text box and follow the simple steps described below.
Step-1: Select the “Format Shape” option
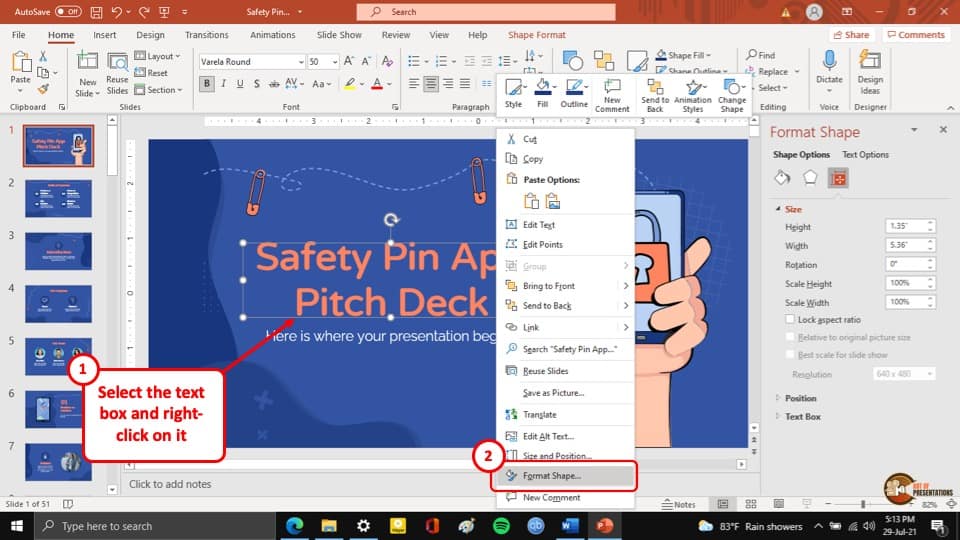
At first, you have to “Right-click” on the textbox to open a dropdown menu. From that drop-down menu, select the “Format Shape” option. A sidebar will appear on the right of your screen.
Step-2: Insert the angle in the “Rotation input” box.
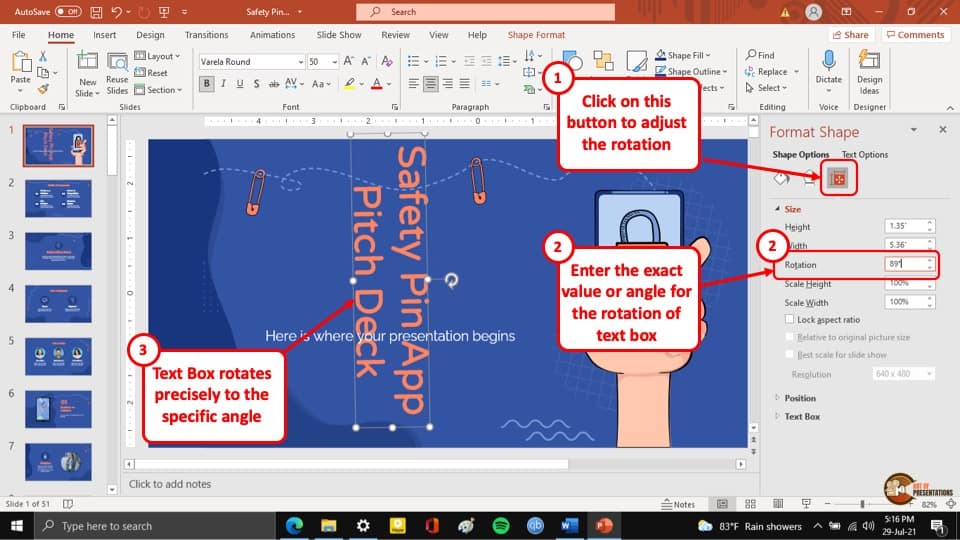
After you have opened the “Format Shape” sidebar, go to the “Size and Properties” tab. Here you will find the “Rotation input” box which is the 3rd box in the tab.
After you have entered your preferred angle of rotation, the text will rotate accordingly.
2. How to Slant Text in PowerPoint?
You can slant the text in your PowerPoint presentation from the “Format Shape” sidebar by changing the value in the “Rotation input” box or using the “Rotate Handle” to manually slant the texts. In the following section, I will be explaining how to rotate the text in your PowerPoint presentation to 45 degrees and 180 degrees.
2a. How to Rotate Text 45 degrees in PowerPoint?
To rotate the text in your PowerPoint presentation to 45 degrees, select the textbox and follow the two simple steps explained below.
Step-1: Click on the “More” button
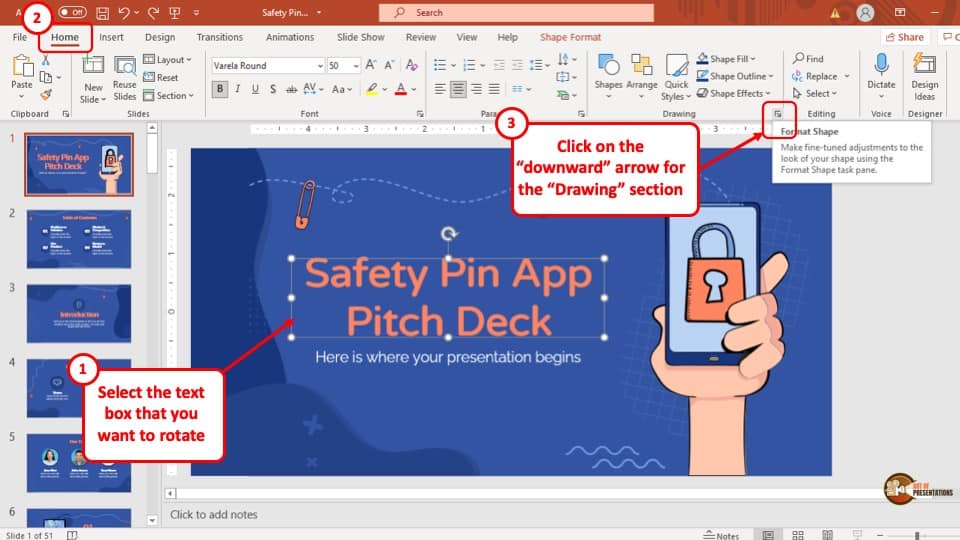
After you have selected the textbox, click on the “More” button of the “Drawing” section in the “Home” tab. The button is located in the bottom right corner of the “Drawing” section and looks like a box with an arrow on its right side pointing downwards.
Step-2: Go to the “Size and Properties” tab
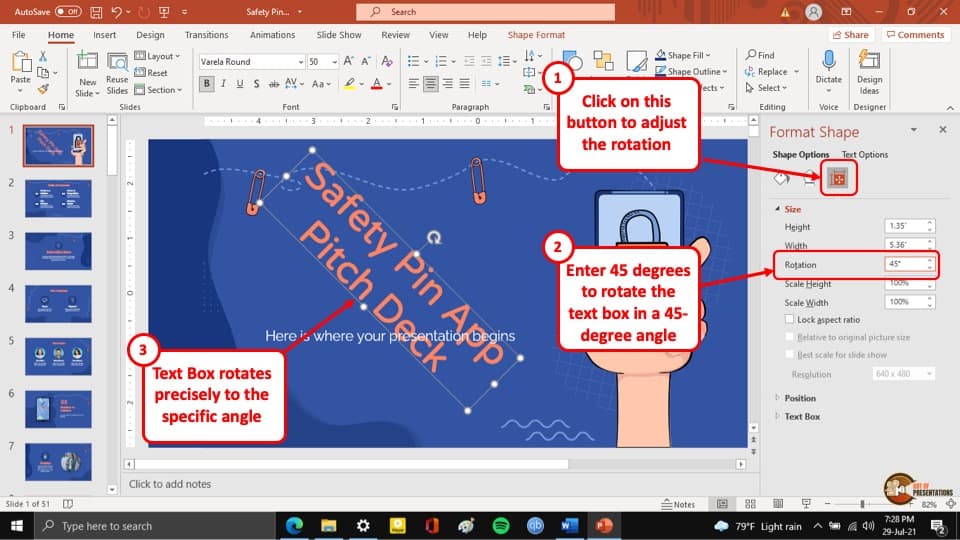
After clicking on the “More” button, the “Format Shape” sidebar will appear on the right side of the screen. In the “Format Shape” sidebar, go to the “Size and Properties” tab which is the third tab in the sidebar.
Step-3: Change the value of the “Rotation input” box
In the final step, all you have to do is change the value in the “Rotation input” box from 0 degrees to 45 degrees (as shown in the image in the previous step). The text will be rotated to 45 degrees immediately.
2b. How to Rotate Text 180 degrees in PowerPoint?
To rotate the text by 180 degrees in your PowerPoint presentation, all you have to do is follow the steps mentioned above and write “180” degrees in the “Rotation input” box instead of “45” degrees and the text will be rotated accordingly.
You can also use the “Flip” button to quickly flip the text box. This will end up rotating the text along with the text box. This option will save you a few clicks and a few seconds. I usually prefer using the “Flip” option especially when I want to rotate the text box by 180 degrees.
Here’s how to use the “Flip” option to rotate the text by 180 degrees –
Step-1: Select the Text Box
The first step is really to select the text box that you want to rotate by 180 degrees. Once selected, you will see the “Shape Format” tab appear on the top.
Step-2: Choose the “Flip Vertical” Option
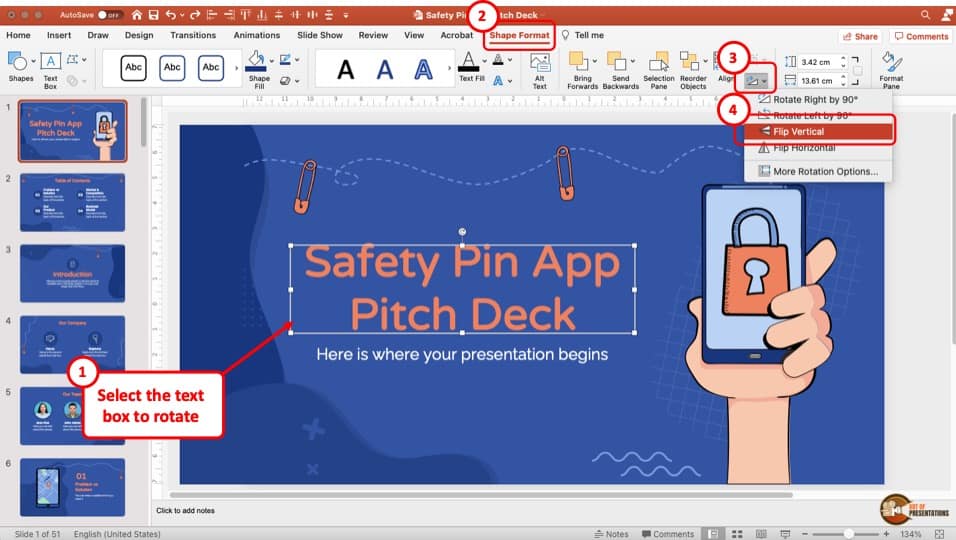
On the “Shape Format” tab, click on the “Rotate” icon. From the dropdown, select the “Flip Vertical” option. This will immediately rotate the text box by 180 degrees.
Remember, the text box can only be flipped vertically whereas other objects such as images can be flipped horizontally as well.
3. How to Rotate Text in a Table in PowerPoint?
Unfortunately, Microsoft PowerPoint does not allow users to rotate text in a table or even rotate a table. However, there is a workaround to this.
You can rotate the text in your PowerPoint presentation by writing the text in your PowerPoint presentation, take a screenshot of the writing, crop it to the size of the table cell, insert the image in the cell, and then rotate the image.
4. How to Mirror Text in PowerPoint?
To mirror text in your PowerPoint presentation, you have to use the “Format Shape” sidebar. Select the textbox of the text that you want to mirror. Then, go to the “Format Shape” sidebar, and follow the simple steps given below.
Step-1: Open the “Format Shape” Options and Go to the “Effects” Tab
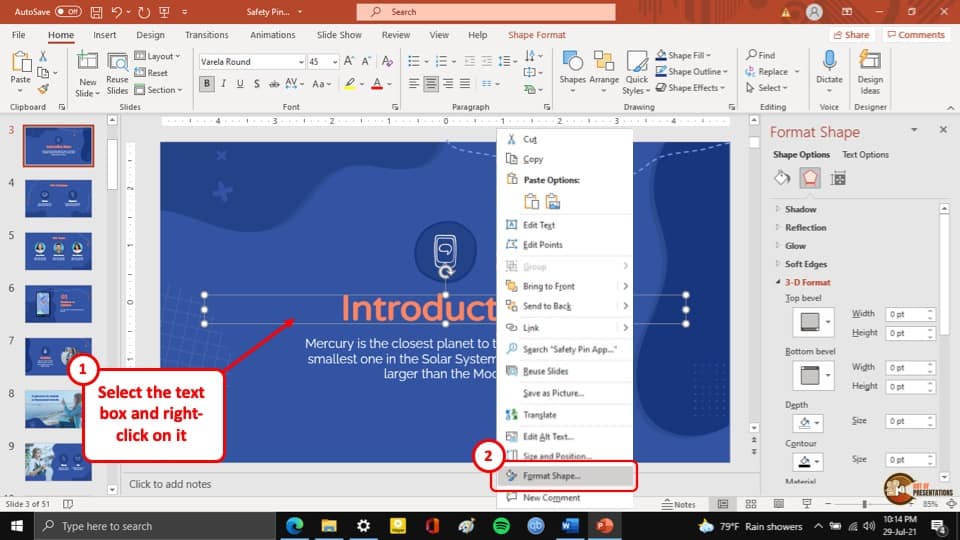
Select the text box first and right-click on it. From the options, click on the “Format Shape” option.
After you have selected the textbox and opened the “Format Shape” sidebar, go to the “Effects” tab, which is the second tab of the “Format Shape” sidebar.
Step-2: Expand the “3D Rotation” menu
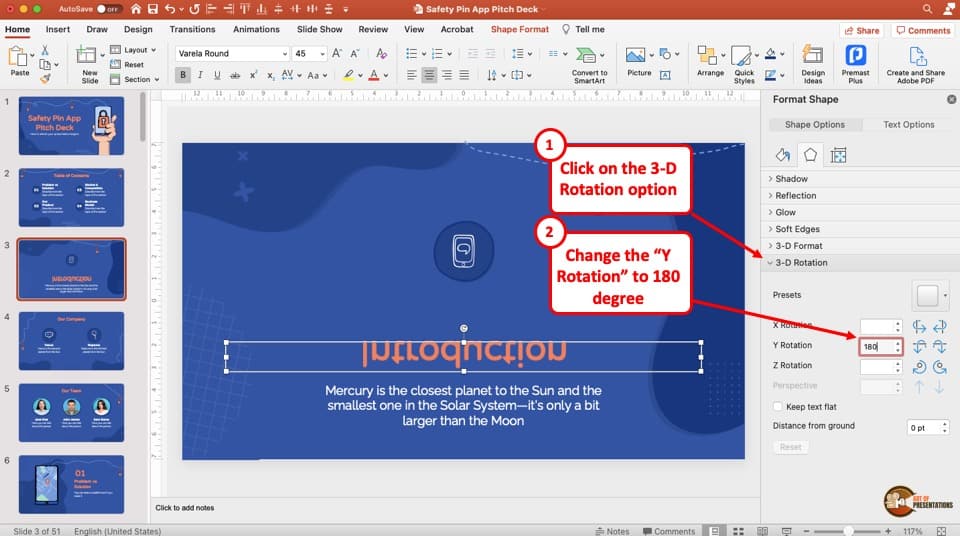
Now, click on the “3-D Rotation” menu, which will expand a list of options.
Step-3: Change the value in the “Y Rotation” box
To change the direction of the text in your PowerPoint presentation, change the value of the “Y Rotation” box from 0 degrees to 180 degrees (as shown in the image in the previous step).
This will mirror the text and point it towards the opposite direction from its previous form.
Step-4: Create the Mirror Effect
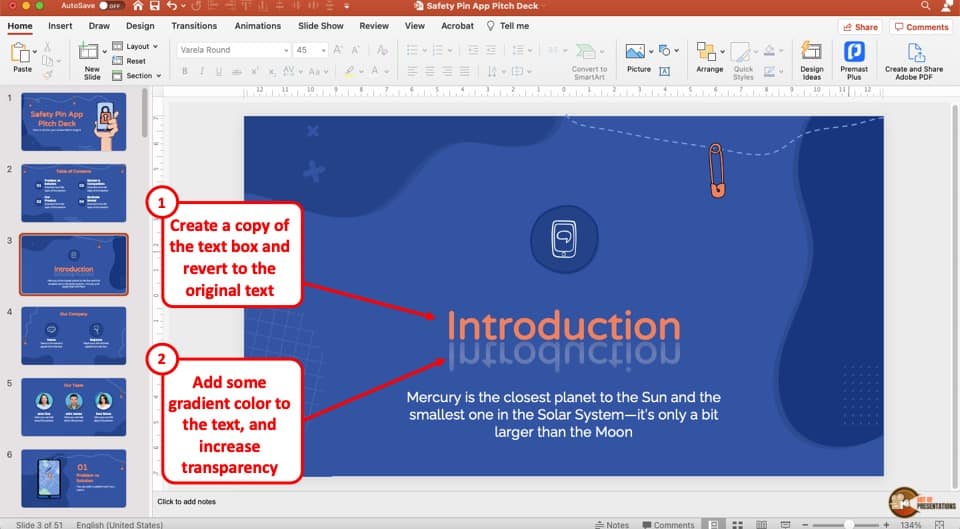
You can then add a normal text box on top of the inverted text to create the mirror effect in PowerPoint. To do that, simply create a copy of the text box using copy and paste in PowerPoint. Then, align the text boxes in the middle using the align options in PowerPoint.
For a more realistic effect, you may also want to change the font color, add a gradient with a grey color, and increase the transparency of the gradient to create the mirror text effect (as shown in the image above).
5. How to Change Text Direction in PowerPoint?
You can also change the direction of text in a text box in PowerPoint using the “Format Shape” options. Let me show you how to make vertical text in PowerPoint in a step-by-step manner below –
Step-1: Rotate the Text by 90 degree
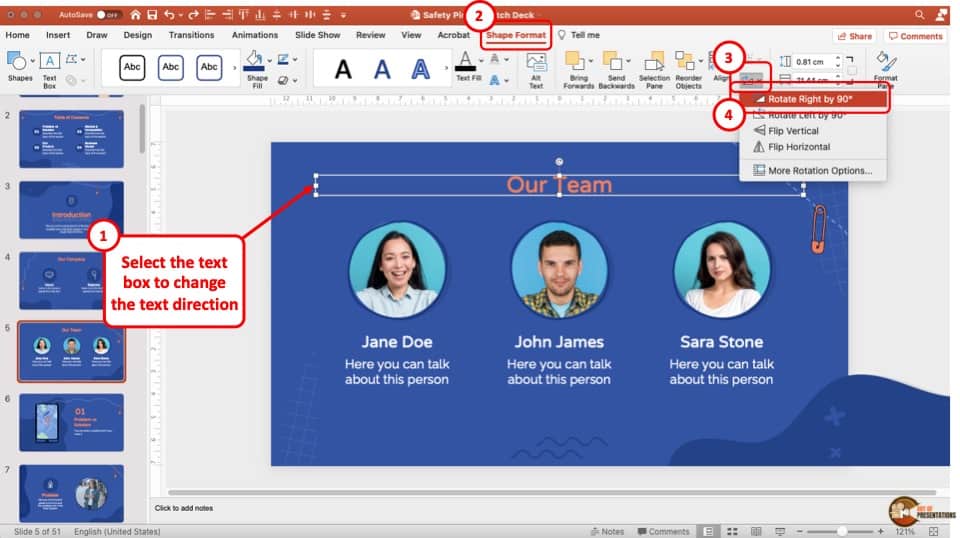
First, select the text box. Then, click on the “Shape Format” tab. Next, click on the “Rotate” option icon, and from the dropdown, select the “Rotate Right by 90 degrees” option.
You will notice that the text box will rotate by 90 degrees. However, the text will also rotate with it.
Step-2: Open Format Shape options
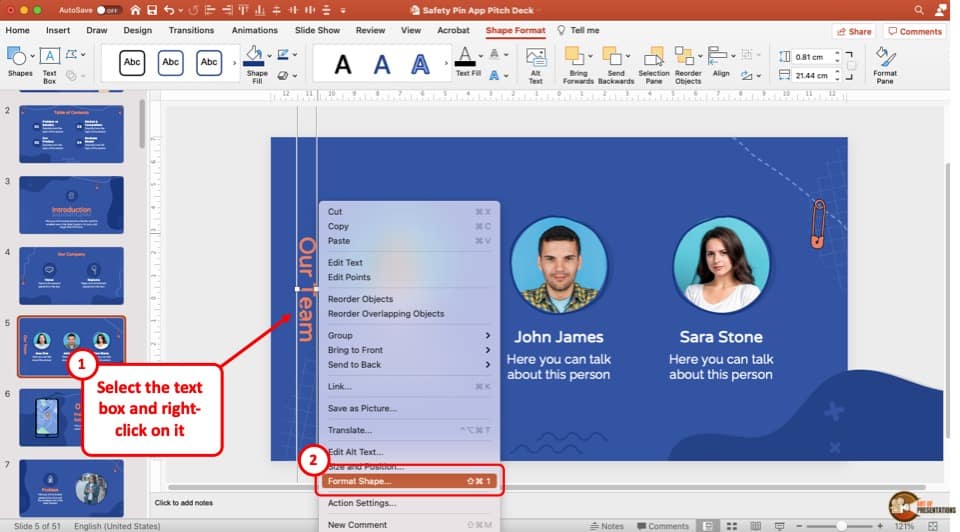
In the next step, right-click on it and open the “Format Shape” side panel.
Step-3: Open the “Text Direction” Settings
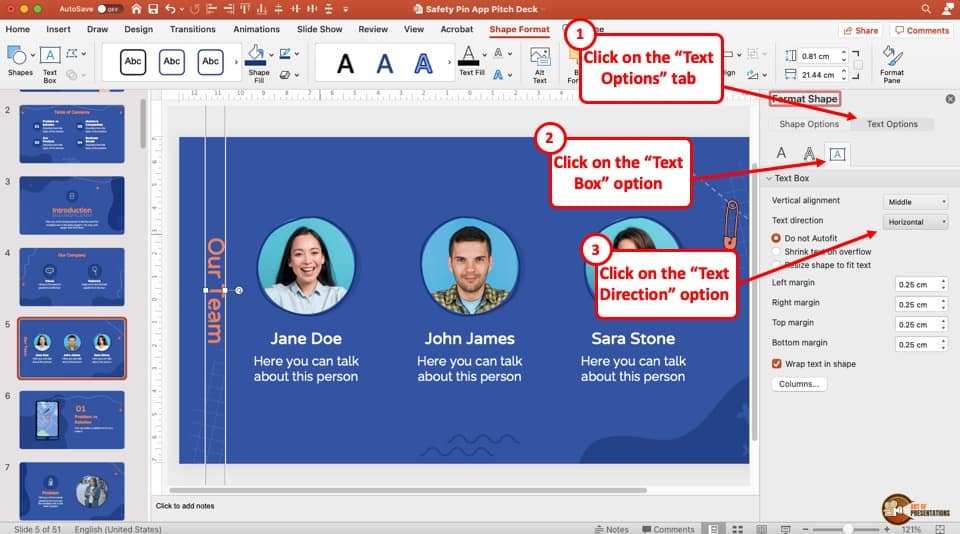
Now, from the “Format Shape” side panel, click on the “Text Options” button. Then, select the “Text Box” option (as indicated in the image above).
Finally, locate the “Text Direction” setting and click on it.
Step-4: Change the Text Direction
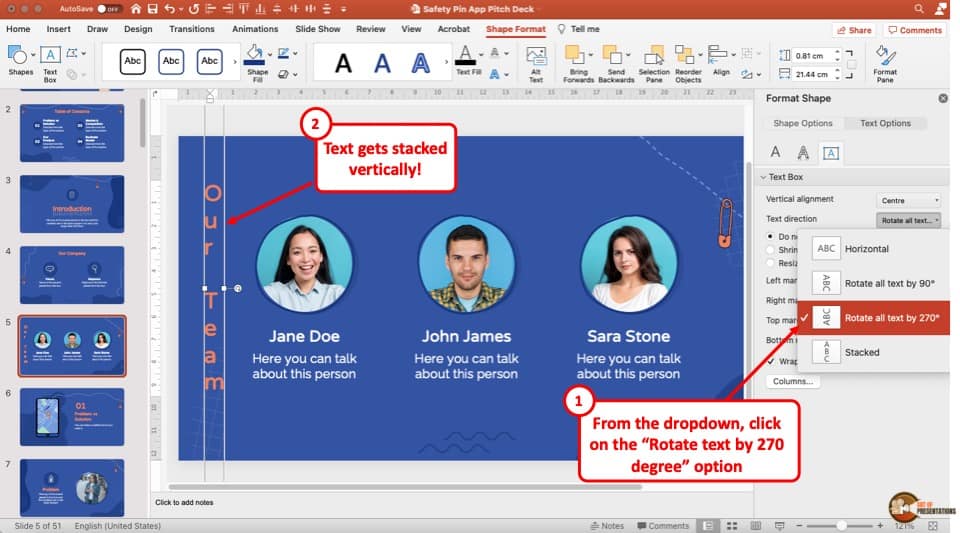
The last step is to change the direction of your text in the text box.
Click on the “Text Direction” option, and from the dropdown, choose the “Rotate all text by 270 degrees” option.
If this doesn’t work, click on the “Rotate all text by 90 degrees” option. Depending on how you rotated the text box initially, one of the two options will rotate the text properly in order to stack it vertically.
6. How to Curve Text in PowerPoint?
To curve text in PowerPoint, you have to use the “Text Effects” tool located in the “Shape Format” tab. The whole process is described in easy steps below.
To learn more about the different ways you can curve texts in your PowerPoint presentation, you can also read our article dedicated to the subject by clicking here.
Step-1: Go to the “Shape Format” tab
At first, select the text that you want to curve and then go to the “Shape Format” tab which is the last tab in the ribbon of your PowerPoint window.
Step-2: Click on the “Transform” option
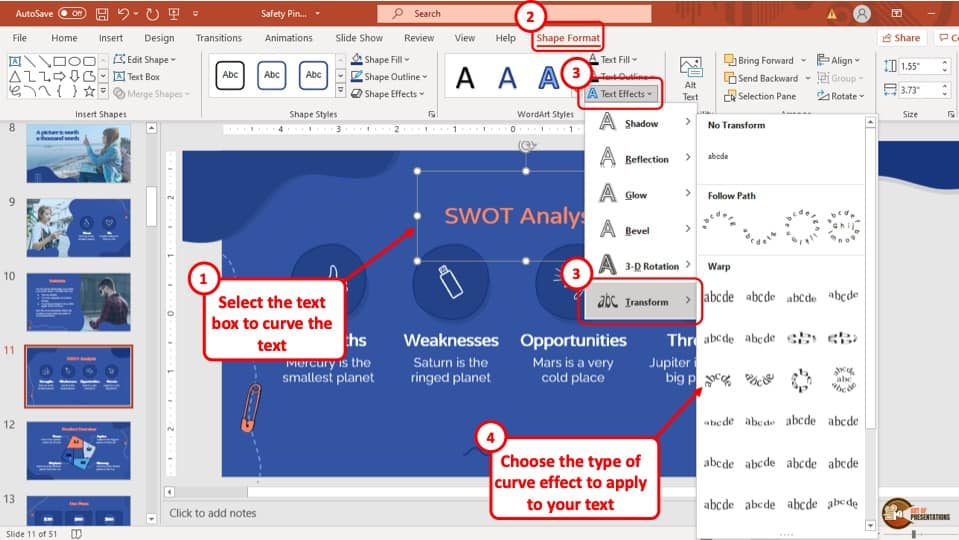
In the “Shape Format” tab, select the “Transform” option which is located in the “Text Effects” drop-down menu in the “WordArt Styles” section. Yet another drop-down menu will appear on your screen.
Step-3: Select your preferred curve
From the new drop-down menu, select your preferred curve style and the curve will be added to your text automatically.
More Related Articles
- How to Format Text in PowerPoint? [A Complete Guide!]
- How to Indent Text in PowerPoint? [A Step-by-Step Tutorial!]
- Clear Formatting Tool in PowerPoint [A Little Known Secret!]
- How to Use Format Painter in PowerPoint? [And Save Time!]
- How to Create a Perfect Semi-circle in PowerPoint!
Credit to wayhomestudio (on Freepik) for the featured image of this article

![How to Rotate Text in PowerPoint? [A Step-by-Step Guide!]](https://artofpresentations.com/wp-content/uploads/2021/08/Featured-Image-How-to-Rotate-Text-in-PowerPoint_Optimized.jpg)