![How to Name Slides in PowerPoint [A Step-by-Step Guide!]](https://artofpresentations.com/wp-content/uploads/2021/09/Featured-Image-How-to-Name-Slides-in-PowerPoint-optimize.jpg)
Giving a name to a slide in PowerPoint is one of those things that will not make or break your presentation. However, naming slides in PowerPoint can be really helpful in streamlining your process of presentation design and it will optimize things for you!
To name slides in PowerPoint, click on the “View” tab in PowerPoint. Then, click on the “Outline View” option from the ribbon. Now, in the slide preview section, click on the slide to add the name and start typing. This will add a title name to the slide.
In this article, we shall do a deep-dive in naming slides in PowerPoint. I’ll also share with you a trick wherein you can name all slides together. Plus, we shall also take a look at how naming a slide is different from naming a slide layout!
So, let’s get started!
1. Why Do You Need to Name Slides in PowerPoint?
Let’s begin with the basics. You may wonder, why do you even need to name slides in PowerPoint?
Naming slides in PowerPoint can help you structure your presentation better. It can help you re-organize your slides when using the slide sorter view. Moreover, the slide name helps you know the type of information present on the slide even without opening it.
So yes, naming slides won’t make your presentation look pretty. But, it will surely make it look more organized and help you save quite some time while designing it!
Plus, when creating a hyperlink within the presentation, it is easier to link to the specific slide when the slides have a name assigned to them.
1. How to Name a Slide in PowerPoint?
Now that we have established that naming slides in PowerPoint can be helpful, let us take a look at the process of how to name a slide in PowerPoint.
To name a slide in PowerPoint, you have to go to the “Outline view” option and add the name of the slides in the slide navigation sidebar. The whole process is described in easy steps below.
Step-1: Click on the “View” tab

The first step of the process is to click on the “View” tab which is located in the ribbon of your PowerPoint presentation. It is the second to last tab.
Step-2: Select a Slide to Name from the “Outline view”
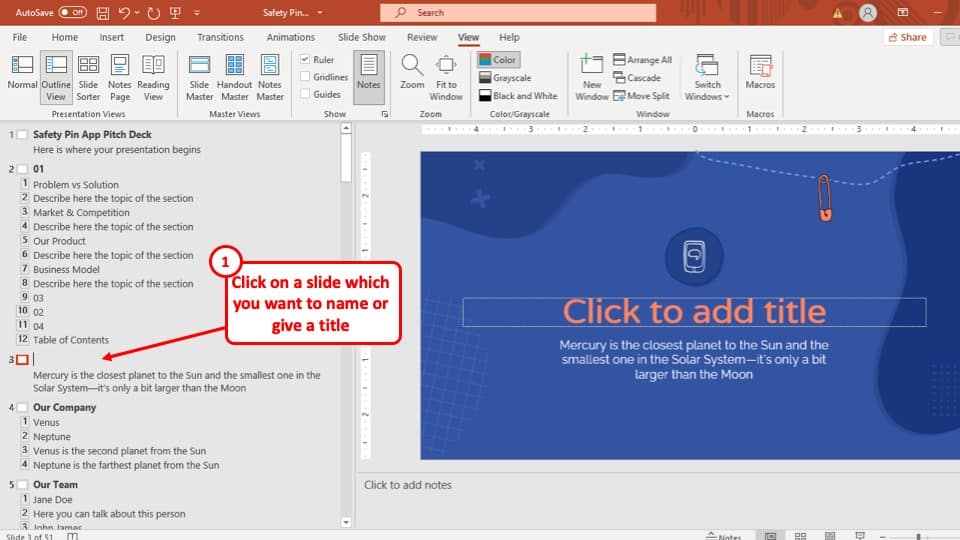
After you have clicked on the “View” tab, click on the “Outline View” option which is located in the “Presentation Views” section of the “View” tab.
Then, choose a slide to which you want to add a name.
Step-3: Add a name to the slide
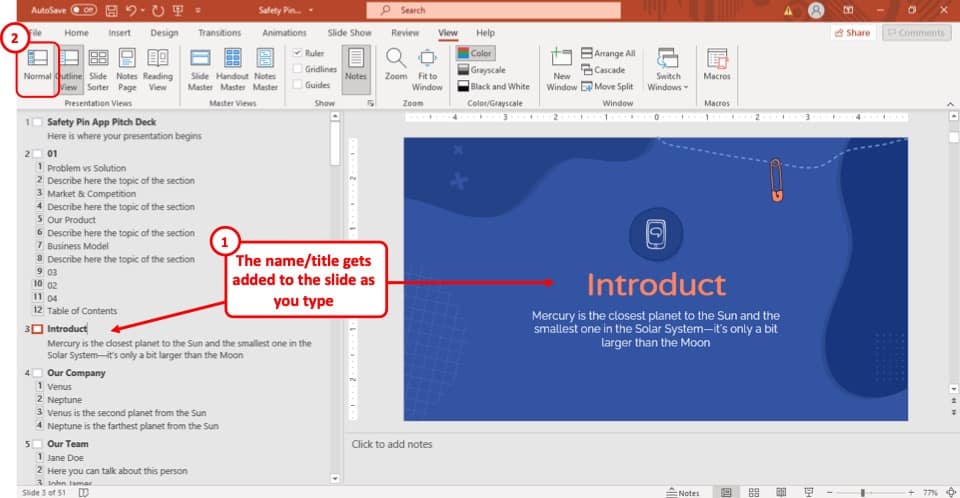
After you select the “Outline View” option in the “View” tab, the slide navigation sidebar to the left of your screen will change and the outline of the PowerPoint presentation will appear instead.
Simply type in the name of the slide in the “Outline view”, and the slide will be named accordingly.
To go back to the default view of your presentation, click on the “Normal View” option under the “View” tab.
2. How to Rename a Slide in PowerPoint?
If you want to rename a slide in PowerPoint, all you have to do is go back to the “Outline view” and change the name of the slide in the slide navigation bar as described in the previous section.
Follow the steps described in the above section and rewrite the name of your preferred slide.
One thing to remember is that when you name a slide, by default a slide title will be added to the slide. You can also edit the text in the “Slide Title” of the slide, and it will automatically rename the name of the slide.
3. How to Name All Slides in PowerPoint?
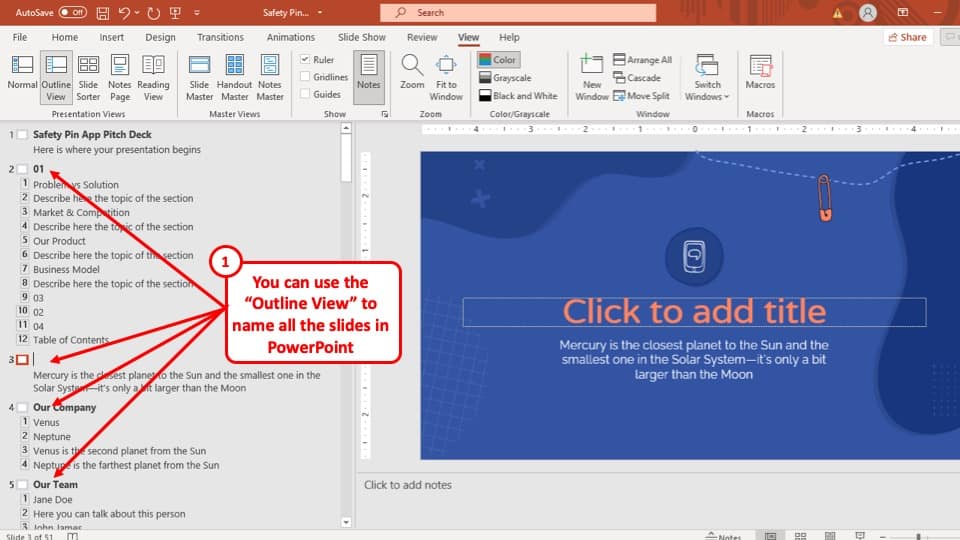
With the help of the “Outline view” option in PowerPoint, you can name all the slides in PowerPoint.
In fact, you can make an entire presentation (content only) using only the slide navigation sidebar of the “Outline view” option!
4. How to Name a Slide Layout in PowerPoint?
A slide layout is different from a simple slide. Slide layouts in PowerPoint are basically preformatted layouts or containers that determine the design of the slide.
Slides layouts are used to create a design template and make it easier for the user to maintain design consistency when adding content.
That said, you can always create your own slide layouts or even rename a layout at your convenience.
This section is going to focus on how to name a slide layout. If you are interested in learning more about slide layouts, check out this article that I wrote earlier.
To name a slide layout in your PowerPoint presentation, you have to go to the “Slide Master” view option from the “View” tab and change the name of the slide.
The entire process is described step-by-step below.
Step-1: Go to the “Slide Master” view

The first step of this process is to select the “Slide Master” view, which is located in the “Master Views” section of the “View” tab.
The “Slide Master” view is the first option in the “Master Views” section of the “View” tab.
Step-2: Click on the “Rename” option

In this step, select the layout that you want to rename and then click on the “Rename” button in the “Edit master” section of the “Slide Master” tab.
The “Edit Master” section is the first section of the “Slide Master” view.
Step-3: Give a name to the layout
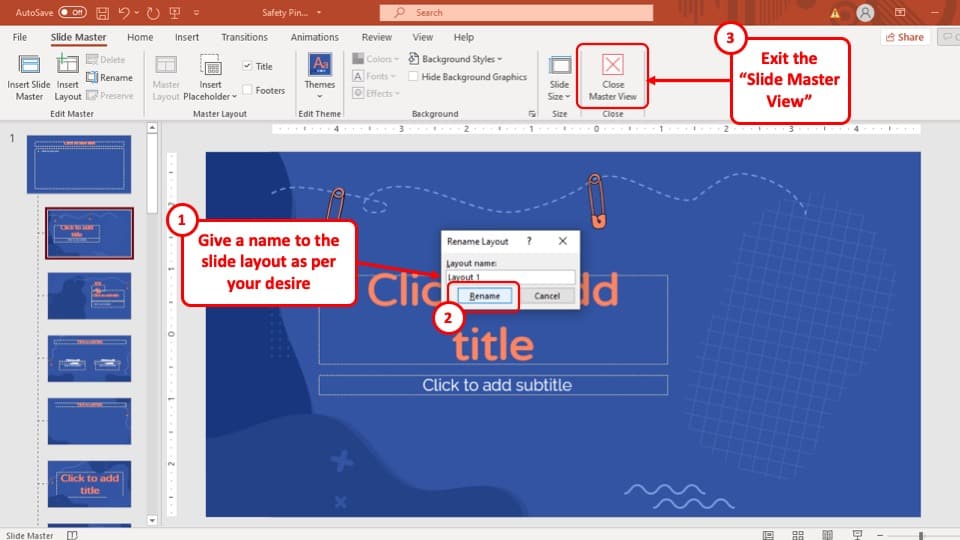
After you click on the “Rename” button, a pop-up window called “Rename Layout” will appear at the center of your screen.
Simply type in the preferred name for the layout and then hit the “Rename” button and the layout will be named accordingly.
5. How to Display the Slide Name during Slideshow?
Unfortunately, there is no direct way to display the slide name of the slide while in the presentation mode.
However, you can use a simple VBA code to make sure all the slides are displayed with their respective slide name. The whole process is described in simple steps below.
Step-1: Place the footers in the slides
The VBA code that you will be using during this method will cycle through the entire slide and insert the name of the slide in any shape that starts with the word ‘footer’.
So, the first step of this process is to add a footer to the slides that you want the slide name to be displayed in.
If you are not familiar with adding footers in PowerPoint, check out this article where I go in-depth into this topic. You will be able to learn everything about adding and editing a footer.
Once you’re done, you can come back to reading this article.
Step-2: Enable the Developer Mode
As a next step, you want to make sure that you have the developer tab enabled as we will need to use the visual basic editor in the remaining steps and then run the macros.
If you don’t know what it is or whether it is enabled, check out my complete guide on how to enable developer tab in PowerPoint.
Follow the process in that article, enable the developer tab, and come back to this article to continue with the next steps.
Step-3: Open the Visual Basic Editor in PowerPoint

Once you have enabled the developer tab, click on the “Developer” tab, and then click on the “Visual Basic” button.
You can also press the “Alt+F11” keys simultaneously. This will open the visual basic editor window directly.
Step-4: Click on the “Module” option

From the Visual Basics Editor window, click on the “Module” option which is located in the “Insert” tab.
Step-5: Paste the Macro code
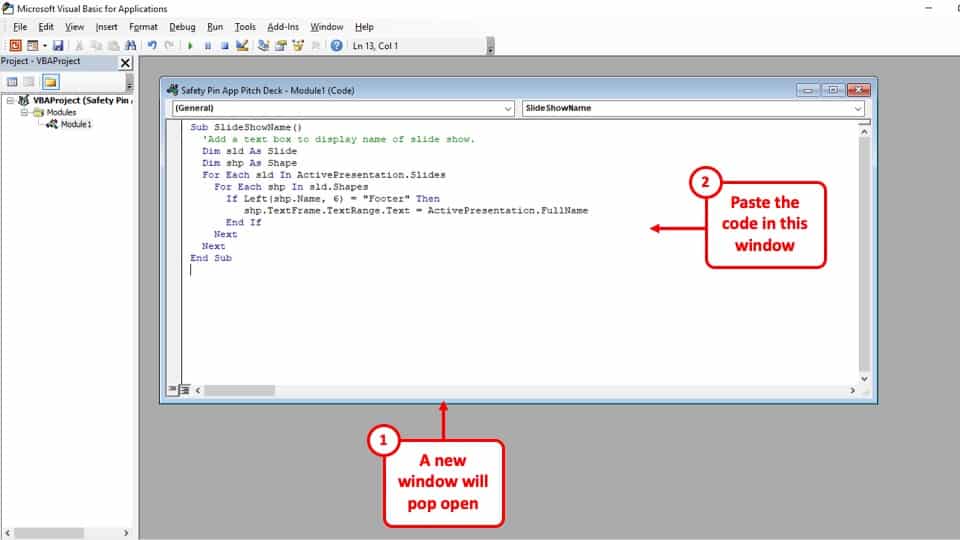
Once you’ve opened the pop-up window that appears when you click on the “Module” option, simply paste the code given below in that window.
Code:
Sub SlideShowName()
‘Add a text box to display name of slide show.
Dim sld As Slide
Dim shp As Shape
For Each sld In ActivePresentation.Slides
For Each shp In sld.Shapes
If Left(shp.Name, 6) = “Footer” Then
shp.TextFrame.TextRange.Text = ActivePresentation.FullName
End If
Next
Next
End Sub
Step-6: Save the presentation
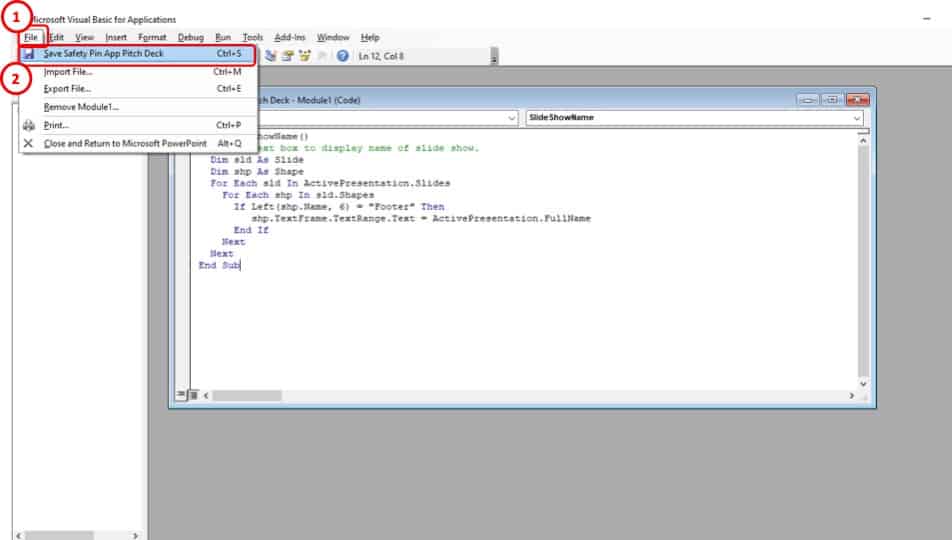
After you have inserted the code for the slide name, simply save the presentation from the “File” tab.
Step-7: Click on the “Macros” option

After you have saved the presentation as a ‘.pptm’ file, go to the “Developer” tab and select the “Macros” option in the “Code” section.
Step-8: Click on the “SlideShowName” option
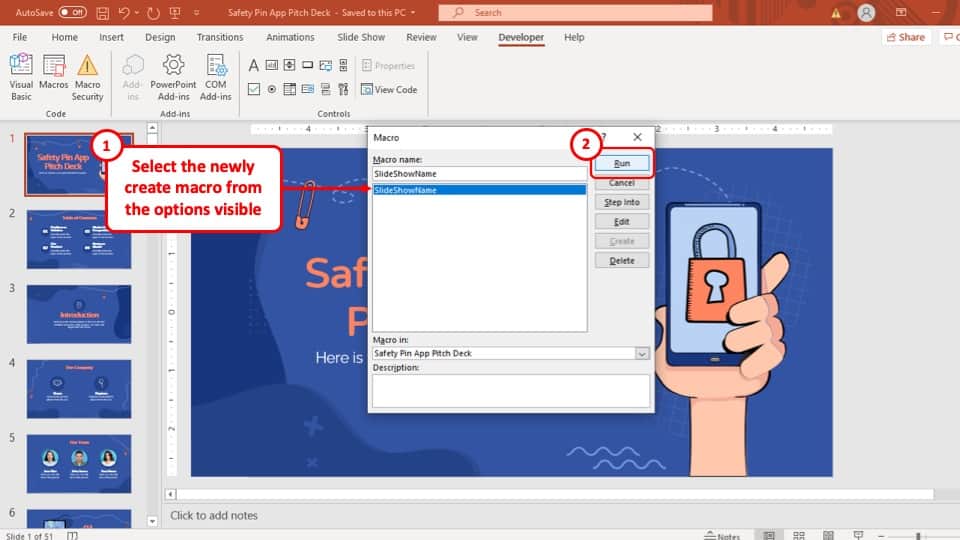
In the last step, all you have to do is to select the “SlideShowName” option in the pop-up window and then hit the “Run” button. After that, the slide name will be displayed during the presentation mode.
6. How to Name a PowerPoint Presentation?
To name a PowerPoint presentation, you have to go to the “Save as” option in the “File” tab. The whole process is described in 2 easy steps below.
Step-1: Go to the “File” tab

The first step of the process is to select the “File” tab, which is the first tab in the ribbon of your PowerPoint presentation.
Step-2: Type in the name of the presentation
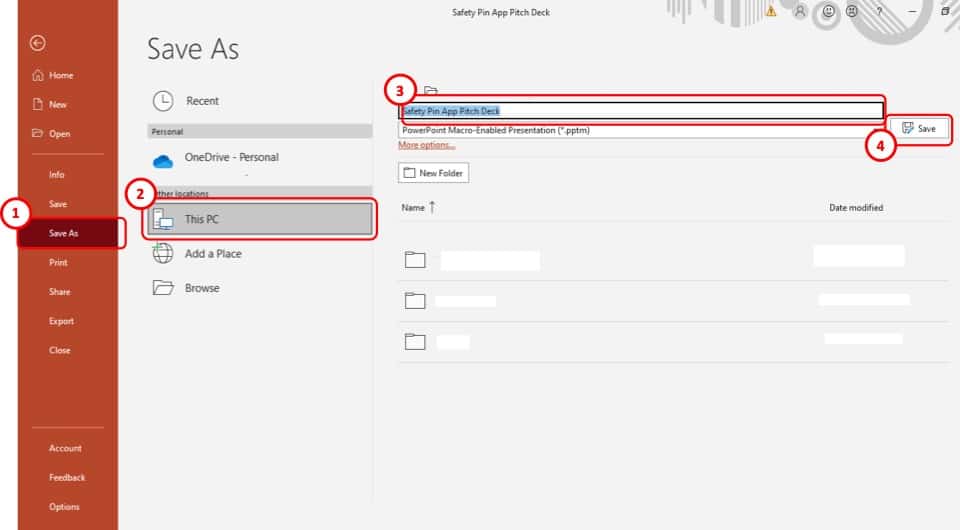
After you have clicked on the “File” tab, you will be taken to a new window. Click on the “Save As” option and type in the name of the presentation in the top dialogue box.
After that just hit the “Save” button to the right of the dialogue box and the name of the presentation will be saved accordingly.
7. How to Add Your Name as an Author to a PowerPoint Presentation?
The process of adding your name as an author to a PowerPoint presentation is explained in easy steps below.
Step-1: Click on the “File” Tab
The first step of the process is to go to the “File” tab as explained in the previous section
Step-2: Type your name in the “Author” box in the “Info” section
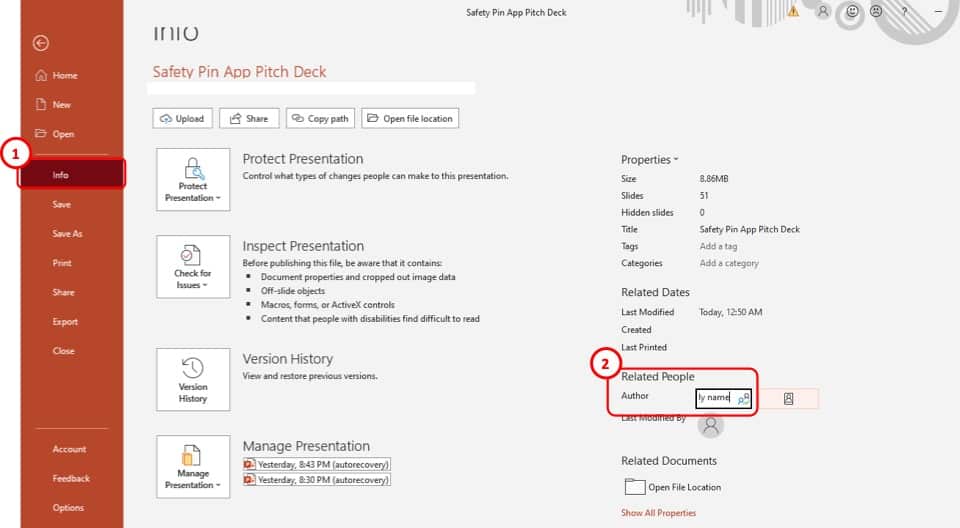
In the “Info” tab, you will find an option to the right of the screen that says “Author” with a box written, “Add an author” on it.
Simply type in your name in the “Author” box and hit “Enter” on your keyboard. After that, your name will be added as an author in that PowerPoint presentation.
More Related Articles
- Working with Slides in PowerPoint! [A Complete Guide!]
- How to Save a Slide as an Image in PowerPoint? [A Quick Tip!]
- Design Ideas Feature in PowerPoint [You Need to Know This Feature!]
- Notes Master in PowerPoint [Know How to Use It Properly!]
- PowerPoint vs Google Slides: Which is Better? [The Ultimate Guide!]
Credit to benzoix (on Freepik) for the featured image of the article (further edited).